lights INFINITI Q60 COUPE 2015 Quick Reference Guide
[x] Cancel search | Manufacturer: INFINITI, Model Year: 2015, Model line: Q60 COUPE, Model: INFINITI Q60 COUPE 2015Pages: 28, PDF Size: 1.43 MB
Page 8 of 28

6
INFINITI Intelligent Key System
The INFINITI Intelligent Key system allows you to lock or
unlock the vehicle, open the trunk and start the engine.
It is important to make sure the Intelligent Key is
with you (that is, in your pocket or purse).
The operating range of the Intelligent Key is within
31.5 in (80 cm) from each request switch.
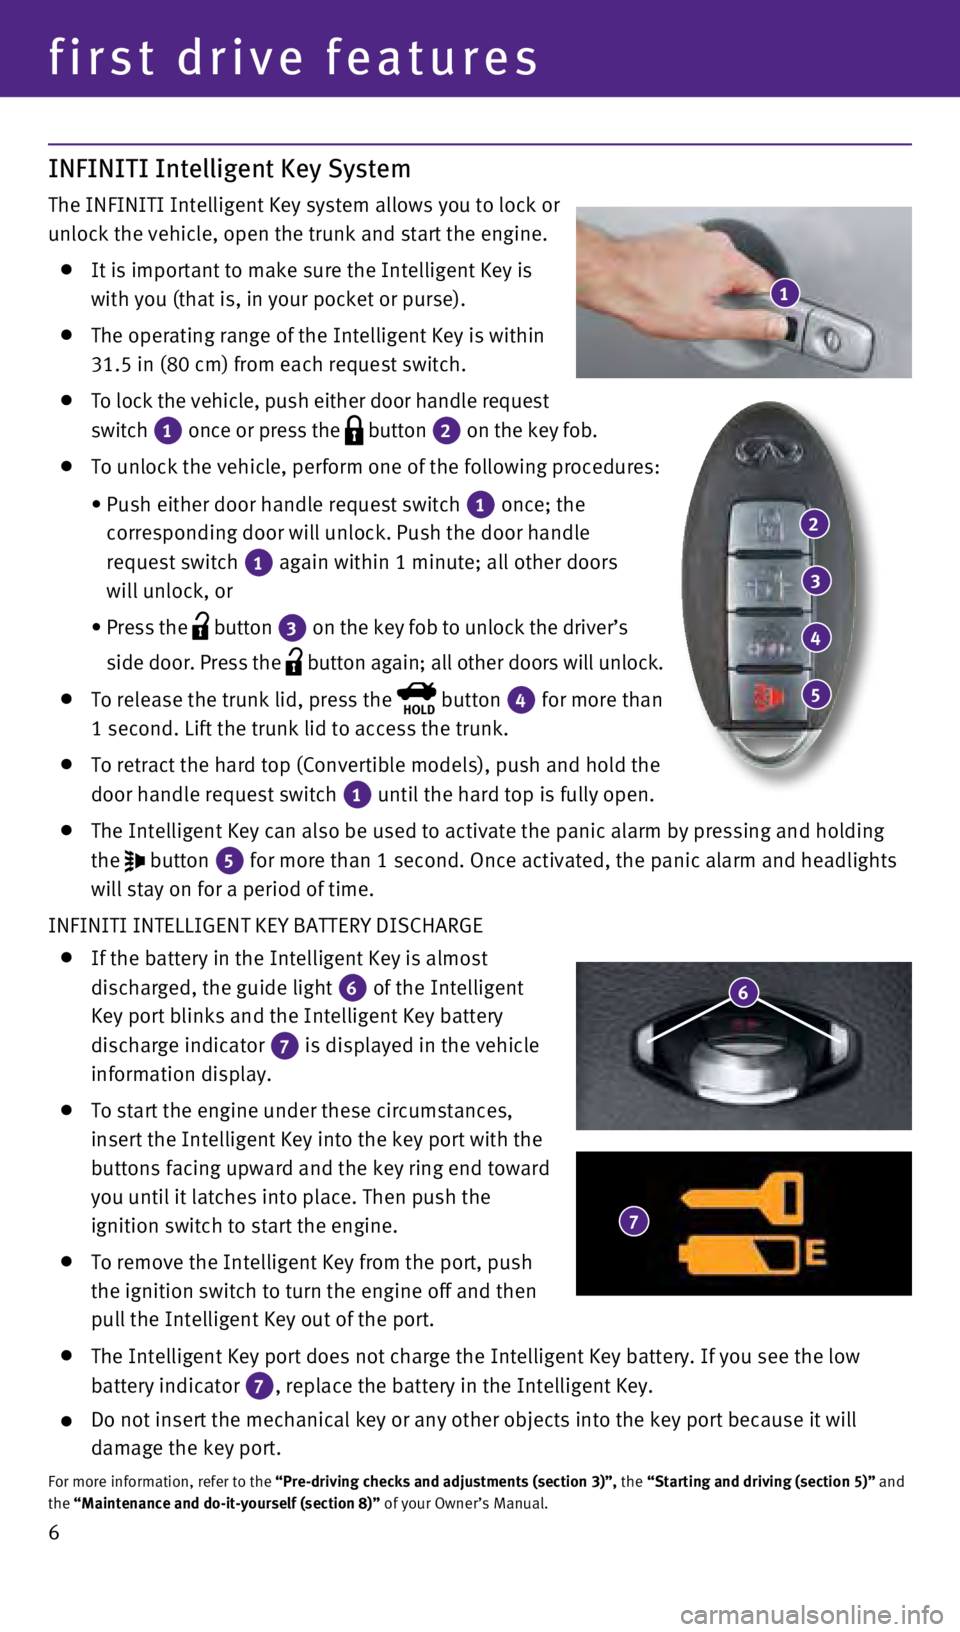
To lock the vehicle, push either door handle request
switch
1 once or press the button 2 on the key fob.
To unlock the vehicle, perform one of the following procedures:
•
Push either door handle request switch
1 once; the
corresponding door will unlock. Push the door handle
request switch
1 again within 1 minute; all other doors
will unlock, or
•
Press the button 3 on the key fob to unlock the driver’s
side door. Press the
button again; all other doors will unlock.
To release the trunk lid, press the HOLD button 4 for more than
1 second. Lift the trunk lid to access the trunk.
To retract the hard top (Convertible models), push and hold the
door handle request switch
1 until the hard top is fully open.
The Intelligent Key can also be used to activate the panic alarm by pres\
sing and holding
the
button 5 for more than 1 second. Once activated, the panic alarm and headlights
will stay on for a period of time.
INFINITI INTELLIGENT KEY BATTERY DISCHARGE
If the battery in the Intelligent Key is almost
discharged, the guide light
6 of the Intelligent
Key port blinks and the Intelligent Key battery
discharge indicator
7 is displayed in the vehicle
information display.
To start the engine under these circumstances,
insert the Intelligent Key into the key port with the
buttons facing upward and the key ring end toward
you until it latches into place. Then push the
ignition switch to start the engine.
To remove the Intelligent Key from the port, push
the ignition switch to turn the engine off and then
pull the Intelligent Key out of the port.
The Intelligent Key port does not charge the Intelligent Key battery. If\
you see the low
battery indicator
7, replace the battery in the Intelligent Key.
Do not insert the mechanical key or any other objects into the key port \
because it will
damage the key port.
For more information, refer to the “Pre-driving checks and adjustments (section 3)”, the “Starting and driving (section 5)” and
the “Maintenance and do-it-yourself (section 8)” of your Owner’s Manual.
1
first drive features
2
3
4
5
6
7
1811810_15b_Q60_G_Coupe_Convert_QRG_091514.indd 69/15/14 1:26 PM
Page 12 of 28

10
first drive features
Headlight Control Switch
HEADLIGHT CONTROL
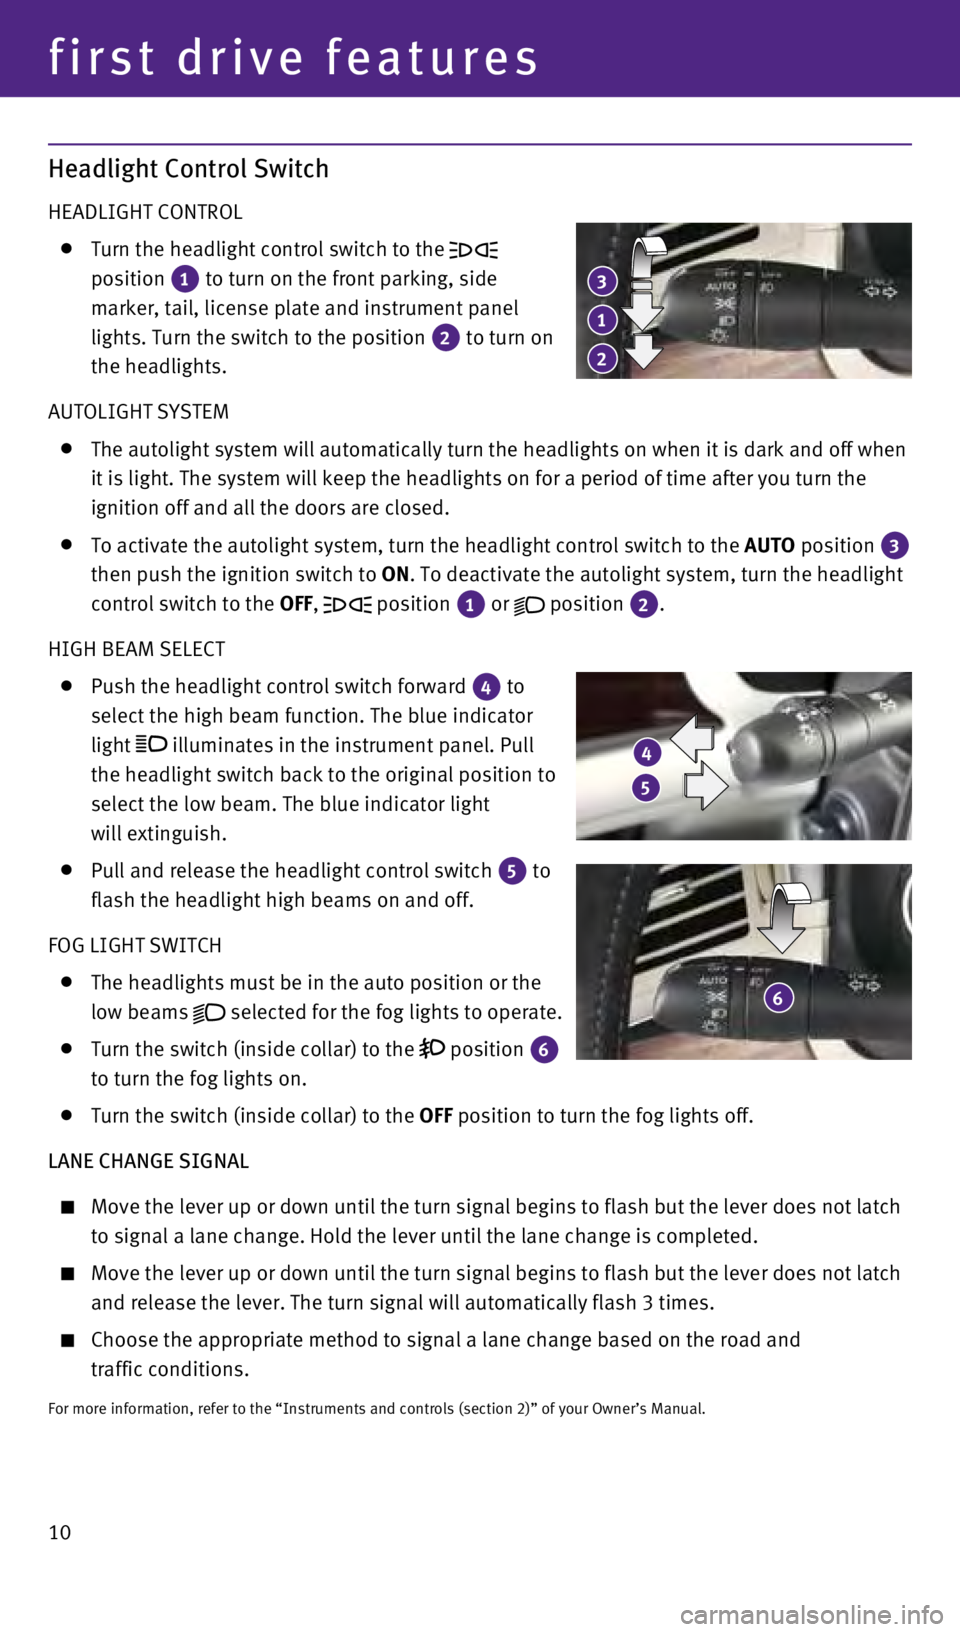
Turn the headlight control switch to the
position
1 to turn on the front parking, side
marker, tail, license plate and instrument panel
lights. Turn the switch to the position
2 to turn on
the headlights.
AUTOLIGHT SYSTEM
The autolight system will automatically turn the headlights on when it i\
s dark and off when
it is light. The system will keep the headlights on for a period of time\
after you turn the
ignition off and all the doors are closed.
To activate the autolight system, turn the headlight control switch to t\
he AUTO
position 3
then push the ignition switch to ON. To deactivate the autolight system, turn the headlight
control switch to the OFF,
position 1 or
position 2.
HIGH BEAM SELECT
Push the headlight control switch forward 4 to
select the high beam function. The blue indicator
light
illuminates in the instrument panel. Pull
the headlight switch back to the original position to
select the low beam. The blue indicator light
will extinguish.
Pull and release the headlight control switch 5 to
flash the headlight high beams on and off.
FOG LIGHT SWITCH
The headlights must be in the auto position or the
low beams
selected for the fog lights to operate.
Turn the switch (inside collar) to the
position 6
to turn the fog lights on.
Turn the switch (inside collar) to the
OFF position to turn the fog lights off.
LANE CHANGE SIGNAL
Move the lever up or down until the turn signal begins to flash but the \
lever does not latch
to signal a lane change. Hold the lever until the lane change is complet\
ed.
Move the lever up or down until the turn signal begins to flash but the \
leve r does not latch
and release the lever. The turn signal will automatically flash 3 times.\
Choose the appropriate method to signal a lane change based on the road and
traffic conditions.
For more information, refer to the “Instruments and controls (sectio\
n 2)” of your Owner’s Manual.
3
1
2
6
5
4
1811810_15b_Q60_G_Coupe_Convert_QRG_091514.indd 109/15/14 1:26 PM
Page 17 of 28

15
Intelligent Cruise Control (ICC) System (if so equipped)
VEHICLE-TO-VEHICLE DISTANCE CONTROL MODE
To set Vehicle-To-Vehicle Distance Control mode, press
the ON/OFF button
1 for less than 1.5 seconds.
The CRUISE indicator light
2 will illuminate.
Accelerate to the desired speed.
Push down on the
COAST/SET switch 3 and release
it. Cruise control will be set to the desired speed.
Press the distance button 4 repeatedly to change
the set distance between long, middle and short.
When a vehicle is not detected ahead of you in the
lane, the set distance and set vehicle speed indicator
lights will illuminate
5 in set mode.
When a vehicle is detected ahead of you in the lane,
the vehicle ahead detection, set distance and set
vehicle speed indicator lights will illuminate
6 in
set mode.
To reset at a faster cruising speed, push up and hold the ACCEL/RES
switch
7. When the vehicle attains the desired speed, release the switch.
To reset at a slower cruising speed, push down and hold the COAST/SET
switch
3. Release the switch when the vehicle slows to the desired speed.
To cancel the preset speed, push the CANCEL switch 8 or tap the brake pedal. The set
vehicle speed indicator
5 will extinguish.
To turn off cruise control, press the ON/OFF button 1. The CRUISE indicator light 2 in the
instrument panel will extinguish.
To set conventional (fixed speed) cruise control mode:
While cruise control is off, press the ON/OFF
button 1 and hold it down for more than 1.5
seconds. The CRUISE indicator light will illuminate.
Accelerate to the desired speed.
Push down on the
COAST/SET switch and release it. The SET indicator light will illuminate.
Cruise control should be set to the desired speed.
To switch between the two cruise control modes:
When one of the two cruise modes is in use, you must turn the system off\
, and then turn it
on again to select the other cruise control mode.
For more information, refer to the “Starting and driving (section 5)” of your Owner’s Manual.
1
2
3
4
5
6
78
1811810_15b_Q60_G_Coupe_Convert_QRG_091514.indd 159/15/14 1:26 PM
Page 25 of 28

23
HomeLink® Universal Transceiver
The HomeLink® Universal Transceiver can learn and consolidate the functions of up to \
three different hand-held transmitters, operating items such as garage d\
oors, property
gates, outdoor and indoor lights or alarm systems.
To program the HomeLink® Universal Transceiver:
•
Position the handheld transceiver 1-3 in (26-76 mm) away from the Home\
Link surface,
keeping the HomeLink indicator light in view.
•
Press and hold the desired HomeLink button and the handheld transmitter button
simultaneously until the HomeLink indicator light flashes slowly and the\
n rapidly.
•
Both buttons may be released when the indicator light flashes rapidly.
To verify the programing is complete, press and hold the HomeLink button\
and observe the
indicator light:
•
A solid, continuous light indicates the programing is complete and the H\
omeLink button
will activate your device.
•
A blinking light that turns to a solid, continuous light after 2 seconds\
indicates additional
steps are required to complete the programing.
An additional person may make the remaining steps easier. To complete th\
e
programing process:
•
At the receiver of the device that you are programing to the HomeLink bu\
tton, press
and release the “learn” or “smart” button (the name may var\
y by manufacturer but it is
usually located near where the hanging antenna wire is attached to the u\
nit). You have
approximately 30 seconds to initiate the following step.
•
Press and hold the programed HomeLink button for 2 seconds and release.
You may have to repeat the previous two steps up to three times to compl\
ete the
programing process. HomeLink should now activate your device.
For more information, refer to the “Instruments and controls (section 2)” of your Owner’s Manual, the HomeLink website at
www.homelink.com or call 1-800-355-3515.
HOMELINK
1811810_15b_Q60_G_Coupe_Convert_QRG_091514.indd 239/15/14 1:28 PM