display INFINITI Q60 COUPE 2018 Quick Reference Guide
[x] Cancel search | Manufacturer: INFINITI, Model Year: 2018, Model line: Q60 COUPE, Model: INFINITI Q60 COUPE 2018Pages: 22, PDF Size: 2.08 MB
Page 17 of 22

14
Navigation System (if so equipped)
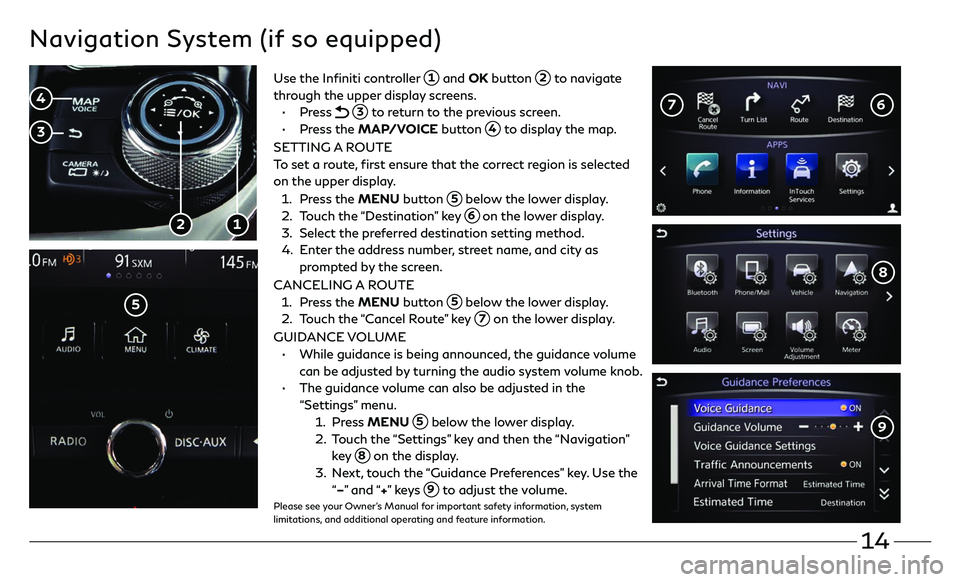
Use the Infiniti controller 1 and OK button 2 to navigate
through the upper display screens.
• Press 3 to return to the previous screen.
• Press the MAP/VOICE button 4 to display the map.
SETTING A ROUTE
To set a route, first ensure that the correct region is selected
on the upper display.
1. Press the MENU button 5 below the lower display.
2. Touch the “Destination” key 6 on the lower display.
3. Select the pr eferred destination setting method.
4. Enter the address number, street name, and city as
prompted by the screen.
CANCELING A ROUTE
1. Press the MENU button 5 below the lower display.
2. Touch the “Cancel Route” key 7 on the lower display.
GUIDANCE VOLUME
• While guidanc e is being announced, the guidance volume
can be adjusted by turning the audio system volume knob.
• The guidanc e volume can also be adjusted in the
“Settings” menu.
1. Press MENU 5 below the lower display.
2. T ouch the “Settings” key and then the “Navigation”
key 8 on the display.
3. N ext, touch the “Guidance Preferences” key. Use the
“–” and “+” ke y s 9 to adjust the volume.Please see your Owner’s Manual for important safety information, system
limitations, and additional operating and feature information.
1 2
5
6 7
3
4
8
9
Page 18 of 22

15
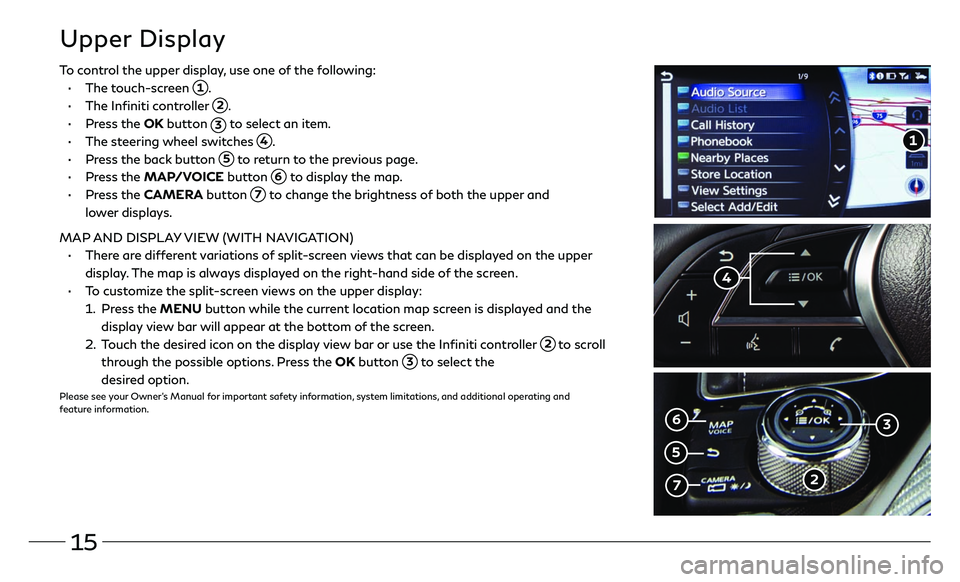
To control the upper display, use one of the following:
• The touch-screen 1.
• The Infiniti controller 2.
• Press the OK button 3 to select an item.
• The steering wheel switches 4.
• Press the back button 5 to return to the previous page.
• Press the MAP/VOICE button 6 to display the map.
• Press the CAMERA button 7 to change the brightness of both the upper and
lower displays.
MAP AND DISPLAY VIEW (WITH NAVIGATION)
• There are different variations of split-screen views that can be displayed on the upper
display. The map is always displayed on the right-hand side of the screen.
• To customize the split-screen views on the upper display:
1. Press the MENU button while the current location map screen is displayed and the
display view bar will appear at the bottom of the screen.
2. Touch the desired icon on the display view bar or use the Infiniti controller 2 to scroll
through the possible options. Press the OK button
3 to select the
desired option.
Please see your Owner’s Manual for important safety information, system limitations, and additional operating and
feature information.
Upper Display
2
1
4
5
3 6
7
Page 19 of 22

16
HomeLink® Universal Transceiver
(if so equipped)
HomeLink
To program the HomeLink® Universal Transceiver:
1 . Position the handheld transceiver 1-3 in (26-76 mm) away from
the HomeLink surface, keeping the HomeLink indicator light
in view.
2 . Press and hold the desired HomeLink button and the handheld
transmitter button simultaneously until the HomeLink indicator
light flashes slowly and then rapidly.
3. Both buttons may now be released.
4 Press and hold the HomeLink button, and a blinking light that
turns to a solid, continuous light after 2 seconds will display.
5 . At the receiver of the device press and release the program
button (this button can typically be found near the hanging
antenna wire of the device you are programing into HomeLink).
6. Press and hold the programed HomeLink button for 2 seconds
and release.Please see your Owner’s Manual for important safety information, system limitations, and
additional operating and feature information.
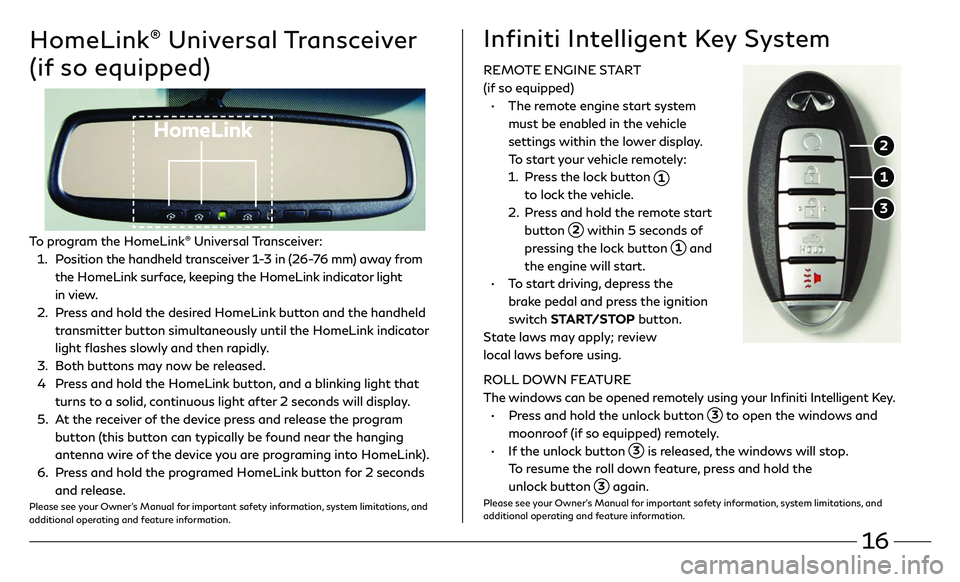
REMOTE ENGINE START
(if so equipped)
• The remote engine start system
must be enabled in the vehicle
settings within the lower display.
To start your vehicle remotely:
1. Press the lock button 1
to lock the vehicle.
2. Press and hold the remote start
button 2 within 5 seconds of
pressing the lock button 1 and
the engine will start.
• To start driving, depress the
brake pedal and press the ignition
switch START/STOP button.
State laws may apply; review
local laws before using.
ROLL DOWN FEATURE
The windows can be opened remotely using your Infiniti Intelligent Key.
• Press and hold the unlock button 3 to open the windows and
moonroof (if so equipped) remotely.
• If the unlock button 3 is released, the windows will stop.
To resume the roll down feature, press and hold the
unlock button
3 again.Please see your Owner’s Manual for important safety information, system limitations, and
additional operating and feature information.
Infiniti Intelligent Key System
1
2
3
Page 20 of 22

17
1
Infiniti InTouch™ Services (if so equipped)
Infiniti InTouch ™ Services combine
personalized convenience settings and
personal security features to compliment the
Total Ownership Experience
®. For more details
on Infiniti InTouch Services or to enroll your
vehicle, please visit usa.infinitiintouch.com or
call 1-855-444-7244.
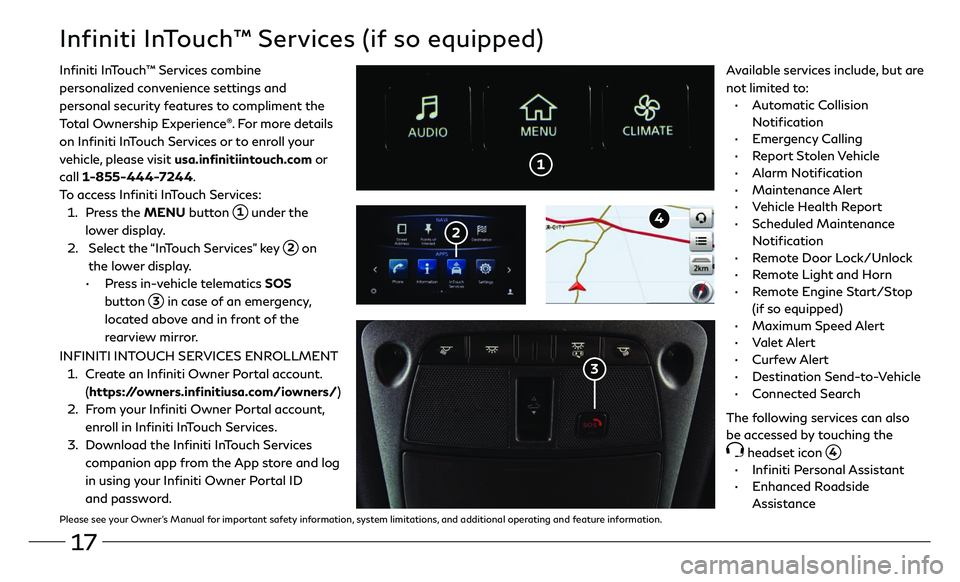
To access Infiniti InTouch Services:
1. Press the MENU button 1 under the
lower display.
2. Select the “InTouch Services” key 2 on
the lower display.
• Press in-vehicle telematics SOS
button
3 in case of an emergency,
located above and in front of the
rearview mirror.
2
3
Available services include, but are
not limited to:
• Automatic Collision
Notification
• Emergency Calling
• Report Stolen Vehicle
• Alarm Notification
• Maintenance Alert
• Vehicle Health Report
• Scheduled Maintenance
Notification
• Remote Door Lock/Unlock
• Remote Light and Horn
• Remote Engine Start/Stop
(if so equipped)
• Maximum Speed Alert
• Valet Alert
• Curfew Alert
• Destination Send-to-Vehicle
• Connected Search
The following services can also
be accessed by touching the
headset icon 4.
• Infiniti Personal Assistant
• Enhanced Roadside
Assistance
INFINITI INTOUCH SERVICES ENROLLMENT
1.
Create an Infiniti Owner Portal account.
(https://owners.infinitiusa.com/iowners/)
2. From your Infiniti Owner Portal account,
enroll in Infiniti InTouch Services.
3. Download the Infiniti InTouch Services
companion app from the App store and log
in using your Infiniti Owner Portal ID
and password.
4
Please see your Owner’s Manual for important safety information, system limitations, and additional operating and feature information.