key INFINITI Q60 COUPE 2020 Service Manual
[x] Cancel search | Manufacturer: INFINITI, Model Year: 2020, Model line: Q60 COUPE, Model: INFINITI Q60 COUPE 2020Pages: 476, PDF Size: 1.95 MB
Page 175 of 476
The automatic drive positioner system has
the following features:
.Entry/exit function
. Memory storage
ENTRY/EXIT FUNCTION
This system is designed so that the steering
column will automatically move when the
shift lever is in the P (Park) position. This
allows the driver to get into and out of the
driver’s seat more easily.
The steering wheel will move up when the
driver’s door is opened with the ignition
switch in the LOCK position.
The steering wheel will return to the pre-
vious position when the ignition switch is
placed in the ACC position.
Cancel or activate entry/exit func-
tion
All the following conditions must be met
before cancelling or activating the entry/exit
function.
.The ignition switch is placed in the LOCK
position.
. The entry/exit function is not in opera-
tion.
. The following switches are not operated.
— Seat memory switches — Power seat switches
— Electric tilting/telescopic steering
wheel switch
The entry/exit function can be activated or
canceled by pushing and holding the SET
switch for more than 10 seconds.
The entry/exit function can also be acti-
vated or canceled if the [Lift Steering Wheel
on Exit] key is turned to ON or OFF in the
[Settings] menu on the lower display. (See
the INFINITI InTouch
TMOwner’s Manual.
The displayed keys on the lower display may
vary depending on models, specifications
and software versions.)
Initialize entry/exit function
If the battery cable is disconnected, or if the
fuse opens, the entry/exit function will not
work though this function was set on before.
In such a case, after connecting the battery
or replacing with a new fuse, open and close
the driver’s door more than two times after
the ignition switch is switched from the ON
position to the LOCK position. The entry/
exit function will be activated.
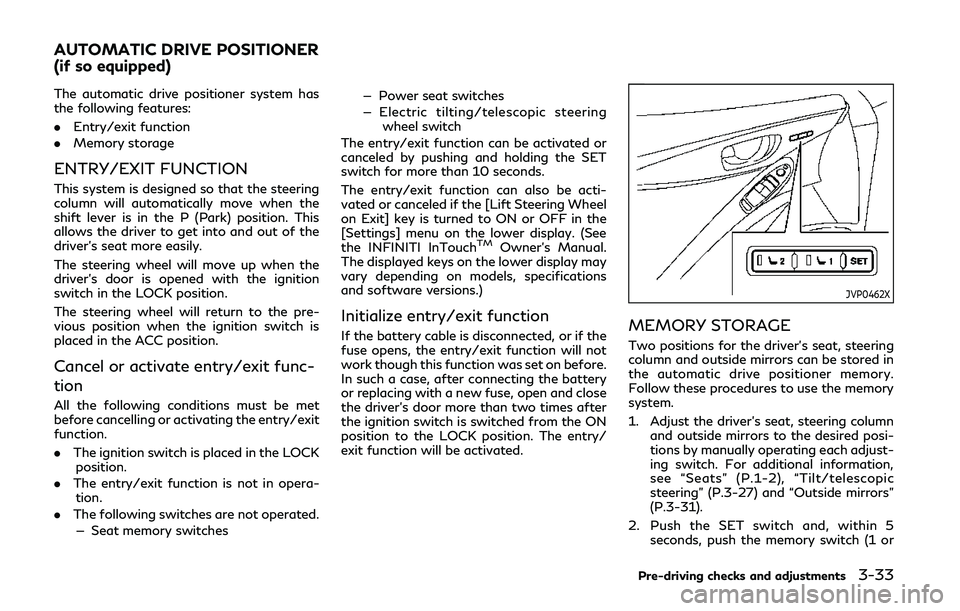
JVP0462X
MEMORY STORAGE
Two positions for the driver’s seat, steering
column and outside mirrors can be stored in
the automatic drive positioner memory.
Follow these procedures to use the memory
system.
1. Adjust the driver’s seat, steering column and outside mirrors to the desired posi-
tions by manually operating each adjust-
ing switch. For additional information,
see “Seats” (P.1-2), “Tilt/telescopic
steering” (P.3-27) and “Outside mirrors”
(P.3-31).
2. Push the SET switch and, within 5 seconds, push the memory switch (1 or
Pre-driving checks and adjustments3-33
AUTOMATIC DRIVE POSITIONER
(if so equipped)
Page 176 of 476
3-34Pre-driving checks and adjustments
2) fully for at least 1 second.
The indicator light for the pushed mem-
ory switch will stay on for approximately
5 seconds after pushing the switch.
When the memory is stored in the
memory switch (1 or 2), a buzzer will
sound.
If memory is stored in the same memory
switch, the previous memory will be
deleted.
Confirming memory storage
Push the SET switch. If the main memory
has not been stored, the indicator light will
come on for approximately 0.5 seconds.
When the memory has stored in position,
the indicator light will stay on for approxi-
mately 5 seconds.
Selecting the memorized position
1. Move the shift lever to the P (Park)position.
2. Push the memory switch (1 or 2) fully for at least 1 second.
The driver’s seat, steering column and
outside mirrors will move to the memor-
ized position with the indicator light
flashing, and then the light will stay on
for approximately 5 seconds.
Linking log-in function to a stored
memory position
The log-in function can be linked to a stored
memory position with the following proce-
dure.
1. Place the ignition switch in the ONposition while carrying an Intelligent
Key that was registered to the vehicle
with the log-in function. For more de-
tails, see “Log-in function” (P.3-15).
2. Adjust the position of the driver’s seat, steering column and outside mirrors
manually. See “Seats” (P.1-2), “Tilt/tele-
scopic steering” (P.3-27) and “Outside
mirrors” (P.3-31).
3. Place the ignition switch in the OFF position.
The next time you log in (selecting the user
on the display) after placing the ignition
switch in the ON position while carrying the
Intelligent Key, the system will automatically
adjust to the memorized driving position.
SYSTEM OPERATION
The automatic drive positioner system will
not work or will stop operating under the
following conditions:
. When the vehicle is moving.
. When any of the memory switches are
pushed while the automatic drive posi- tioner is operating.
. When the adjusting switch for the dri-
ver’s seat and steering column is turned
on while the automatic drive positioner is
operating.
. When the memory switch 1 or 2 is pushed
for less than 1 second.
. When the seat has already been moved
to the memorized position.
. When no seat position is stored in the
memory switch.
. While the walk-in function operates.
Page 183 of 476
SAA1897
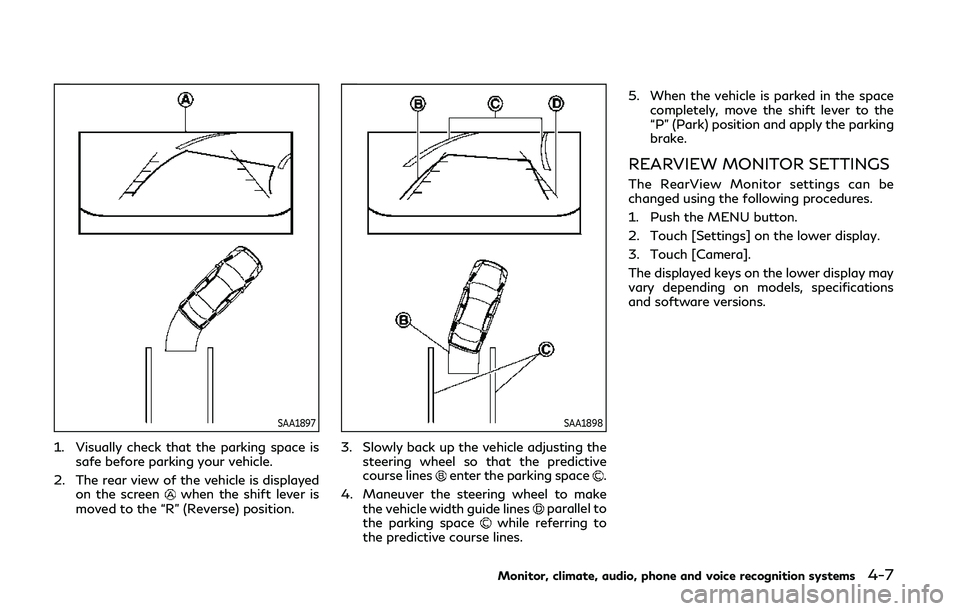
1. Visually check that the parking space issafe before parking your vehicle.
2. The rear view of the vehicle is displayed on the screen
when the shift lever is
moved to the “R” (Reverse) position.
SAA1898
3. Slowly back up the vehicle adjusting the steering wheel so that the predictive
course lines
enter the parking space.
4. Maneuver the steering wheel to make the vehicle width guide lines
parallel to
the parking spacewhile referring to
the predictive course lines. 5. When the vehicle is parked in the space
completely, move the shift lever to the
“P” (Park) position and apply the parking
brake.
REARVIEW MONITOR SETTINGS
The RearView Monitor settings can be
changed using the following procedures.
1. Push the MENU button.
2. Touch [Settings] on the lower display.
3. Touch [Camera].
The displayed keys on the lower display may
vary depending on models, specifications
and software versions.
Monitor, climate, audio, phone and voice recognition systems4-7
Page 184 of 476
4-8Monitor, climate, audio, phone and voice recognition systems
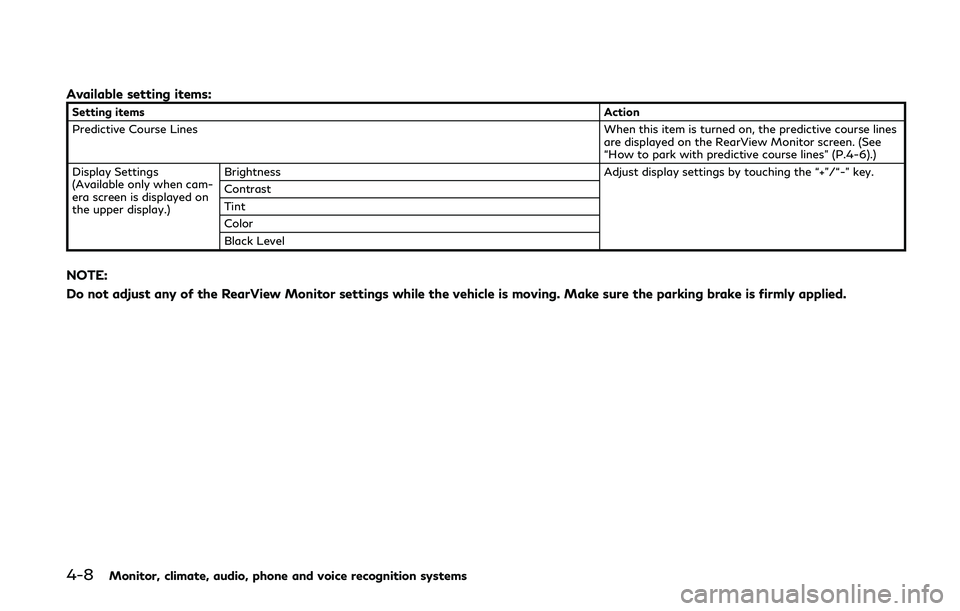
Available setting items:
Setting itemsAction
Predictive Course Lines When this item is turned on, the predictive course lines
are displayed on the RearView Monitor screen. (See
“How to park with predictive course lines” (P.4-6).)
Display Settings
(Available only when cam-
era screen is displayed on
the upper display.) Brightness
Adjust display settings by touching the “+”/“-” key.
Contrast
Tint
Color
Black Level
NOTE:
Do not adjust any of the RearView Monitor settings while the vehicle is moving. Make sure the parking brake is firmly applied.
Page 195 of 476
5. When the vehicle is parked in the spacecompletely, move the shift lever to the
“P” (Park) position and apply the parking
brake.
WAE0218X
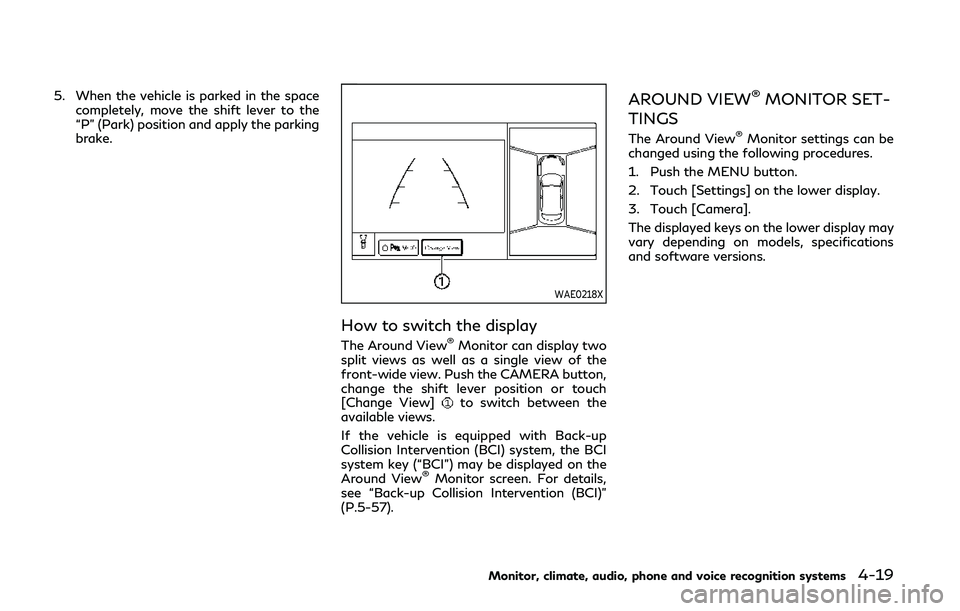
How to switch the display
The Around View®Monitor can display two
split views as well as a single view of the
front-wide view. Push the CAMERA button,
change the shift lever position or touch
[Change View]
to switch between the
available views.
If the vehicle is equipped with Back-up
Collision Intervention (BCI) system, the BCI
system key (“BCI”) may be displayed on the
Around View
®Monitor screen. For details,
see “Back-up Collision Intervention (BCI)”
(P.5-57).
AROUND VIEW®MONITOR SET-
TINGS
The Around View®Monitor settings can be
changed using the following procedures.
1. Push the MENU button.
2. Touch [Settings] on the lower display.
3. Touch [Camera].
The displayed keys on the lower display may
vary depending on models, specifications
and software versions.
Monitor, climate, audio, phone and voice recognition systems4-19
Page 196 of 476
4-20Monitor, climate, audio, phone and voice recognition systems
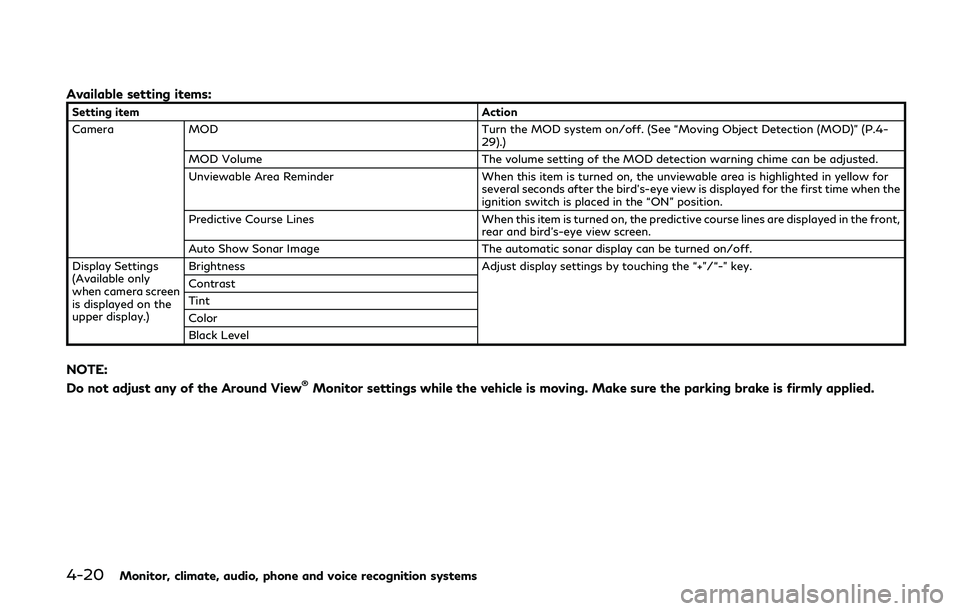
Available setting items:
Setting itemAction
Camera MOD Turn the MOD system on/off. (See “Moving Object Detection (MOD)” (P.4- 29).)
MOD Volume The volume setting of the MOD detection warning chime can be adjusted.
Unviewable Area Reminder When this item is turned on, the unviewable area is highlighted in yellow for several seconds after the bird’s-eye view is displayed for the first time when the
ignition switch is placed in the “ON” position.
Predictive Course Lines When this item is turned on, the predictive course lines are displayed in the front, rear and bird’s-eye view screen.
Auto Show Sonar Image The automatic sonar display can be turned on/off.
Display Settings
(Available only
when camera screen
is displayed on the
upper display.) Brightness Adjust display settings by touching the “+”/“-” key.
Contrast
Tint
Color
Black Level
NOTE:
Do not adjust any of the Around View®Monitor settings while the vehicle is moving. Make sure the parking brake is firmly applied.
Page 201 of 476
SONAR SYSTEM OPERATION
When the camera is first activated with the
bird’s-eye view on the upper display, red
markers will flash. This indicates that the
sonar system is activated.
The system gives the tone for front objects
when the shift lever is in the “D” (Drive)
position and both front and rear objects
when the shift lever is in the “R” (Reverse)
position.
When the camera image is shown on the
upper display, the system shows the sonar
indicator regardless of the shift lever posi-
tion.
The system is deactivated at speeds above 6
MPH (10 km/h). It is reactivated at lower
speeds.
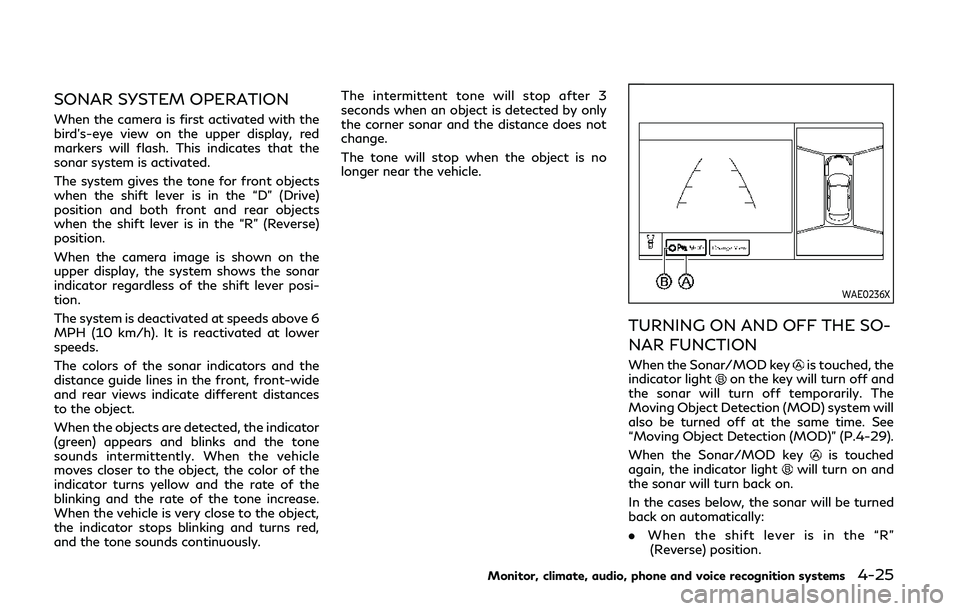
The colors of the sonar indicators and the
distance guide lines in the front, front-wide
and rear views indicate different distances
to the object.
When the objects are detected, the indicator
(green) appears and blinks and the tone
sounds intermittently. When the vehicle
moves closer to the object, the color of the
indicator turns yellow and the rate of the
blinking and the rate of the tone increase.
When the vehicle is very close to the object,
the indicator stops blinking and turns red,
and the tone sounds continuously.The intermittent tone will stop after 3
seconds when an object is detected by only
the corner sonar and the distance does not
change.
The tone will stop when the object is no
longer near the vehicle.
WAE0236X
TURNING ON AND OFF THE SO-
NAR FUNCTION
When the Sonar/MOD keyis touched, the
indicator lighton the key will turn off and
the sonar will turn off temporarily. The
Moving Object Detection (MOD) system will
also be turned off at the same time. See
“Moving Object Detection (MOD)” (P.4-29).
When the Sonar/MOD key
is touched
again, the indicator lightwill turn on and
the sonar will turn back on.
In the cases below, the sonar will be turned
back on automatically:
. When the shift lever is in the “R”
(Reverse) position.
Monitor, climate, audio, phone and voice recognition systems4-25
Page 202 of 476
4-26Monitor, climate, audio, phone and voice recognition systems
.When the CAMERA button is pushed
and a screen other than the camera view
is shown on the display.
. When vehicle speed decreases below
approximately 5 MPH (8 km/h).
. When the ignition switch is placed in the
“OFF” position and turned back to the
“ON” position again.
To prevent the sonar system from activating
altogether, use the sonar system settings
menu.
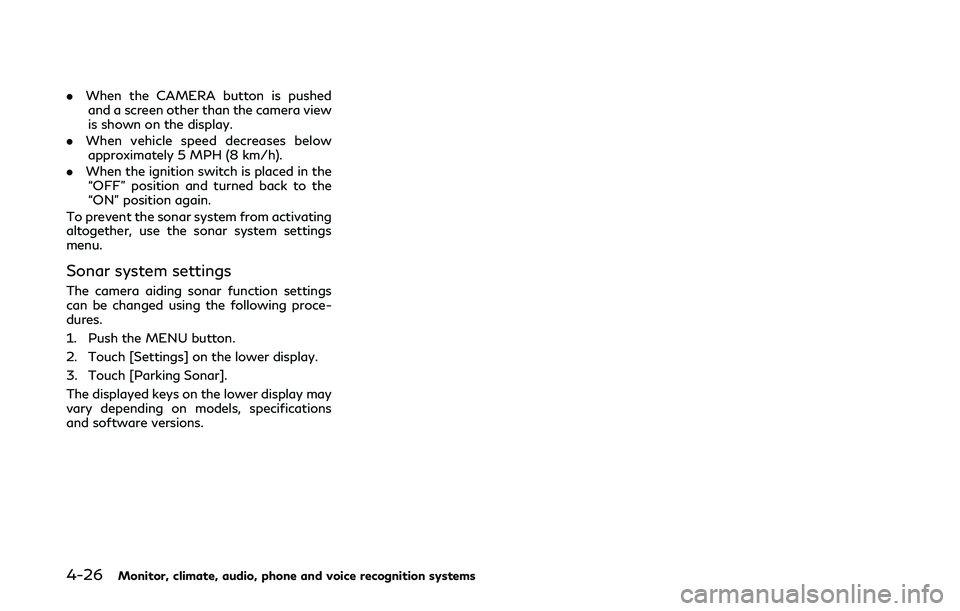
Sonar system settings
The camera aiding sonar function settings
can be changed using the following proce-
dures.
1. Push the MENU button.
2. Touch [Settings] on the lower display.
3. Touch [Parking Sonar].
The displayed keys on the lower display may
vary depending on models, specifications
and software versions.
Page 207 of 476
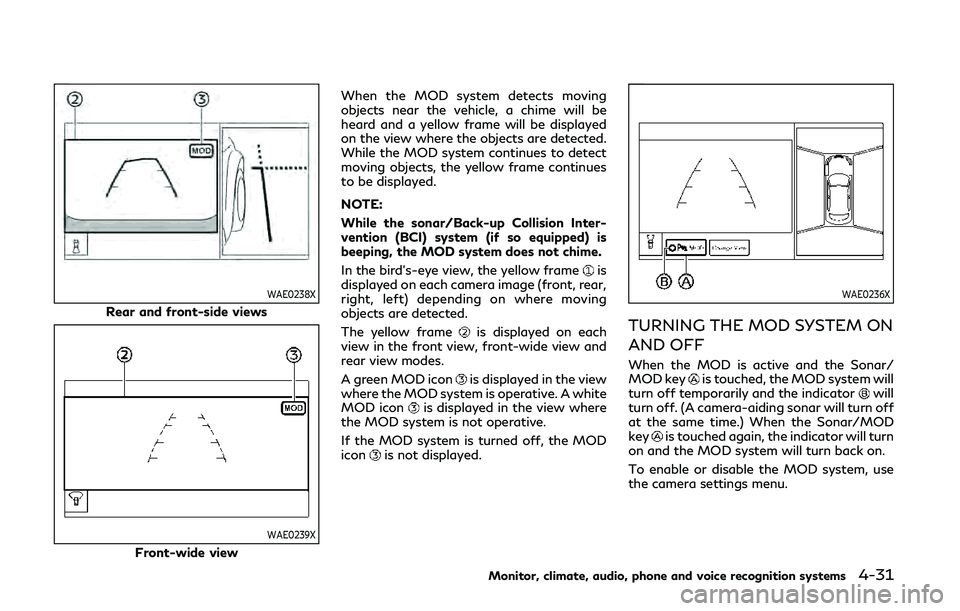
WAE0238X
Rear and front-side views
WAE0239X
Front-wide viewWhen the MOD system detects moving
objects near the vehicle, a chime will be
heard and a yellow frame will be displayed
on the view where the objects are detected.
While the MOD system continues to detect
moving objects, the yellow frame continues
to be displayed.
NOTE:
While the sonar/Back-up Collision Inter-
vention (BCI) system (if so equipped) is
beeping, the MOD system does not chime.
In the bird’s-eye view, the yellow frame
is
displayed on each camera image (front, rear,
right, left) depending on where moving
objects are detected.
The yellow frame
is displayed on each
view in the front view, front-wide view and
rear view modes.
A green MOD icon
is displayed in the view
where the MOD system is operative. A white
MOD icon
is displayed in the view where
the MOD system is not operative.
If the MOD system is turned off, the MOD
icon
is not displayed.
WAE0236X
TURNING THE MOD SYSTEM ON
AND OFF
When the MOD is active and the Sonar/
MOD keyis touched, the MOD system will
turn off temporarily and the indicatorwill
turn off. (A camera-aiding sonar will turn off
at the same time.) When the Sonar/MOD
key
is touched again, the indicator will turn
on and the MOD system will turn back on.
To enable or disable the MOD system, use
the camera settings menu.
Monitor, climate, audio, phone and voice recognition systems4-31
Page 208 of 476
4-32Monitor, climate, audio, phone and voice recognition systems
MOD function setting
The MOD function settings can be changed
using the following procedures.
1. Push the MENU button.
2. Touch [Settings] on the lower display.
3. Touch [Camera].
4. Touch [Camera].
Available setting items:
MOD:
When this item is turned on, the MOD
system is activated. When this item is turned
off (indicator turns off), the MOD system is
deactivated.
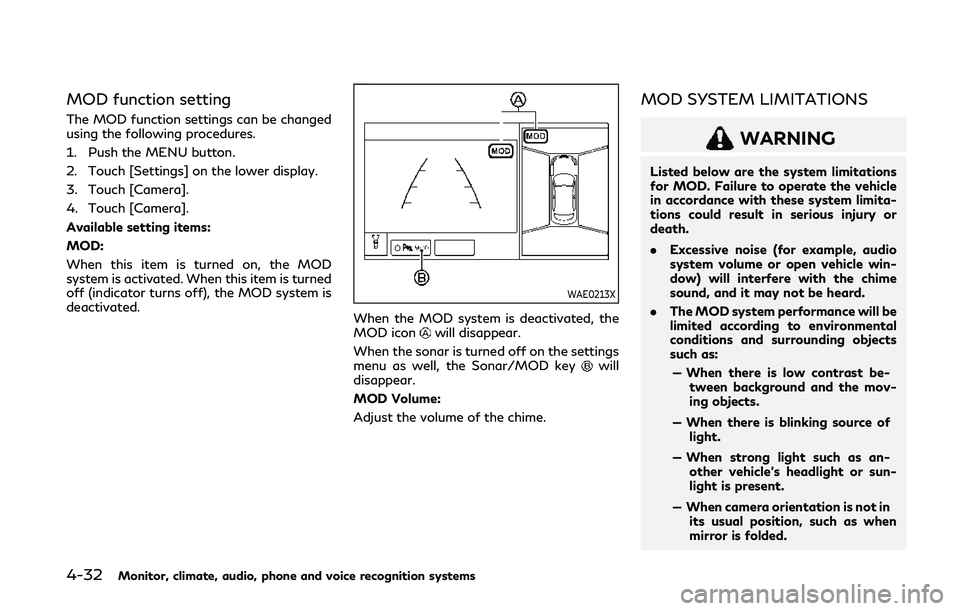
WAE0213X
When the MOD system is deactivated, the
MOD iconwill disappear.
When the sonar is turned off on the settings
menu as well, the Sonar/MOD key
will
disappear.
MOD Volume:
Adjust the volume of the chime.
MOD SYSTEM LIMITATIONS
WARNING
Listed below are the system limitations
for MOD. Failure to operate the vehicle
in accordance with these system limita-
tions could result in serious injury or
death.
. Excessive noise (for example, audio
system volume or open vehicle win-
dow) will interfere with the chime
sound, and it may not be heard.
. The MOD system performance will be
limited according to environmental
conditions and surrounding objects
such as:
— When there is low contrast be- tween background and the mov-
ing objects.
— When there is blinking source of light.
— When strong light such as an- other vehicle’s headlight or sun-
light is present.
— When camera orientation is not in its usual position, such as when
mirror is folded.