automatic transmission INFINITI Q70 2018 Owners Manual
[x] Cancel search | Manufacturer: INFINITI, Model Year: 2018, Model line: Q70, Model: INFINITI Q70 2018Pages: 458, PDF Size: 2.21 MB
Page 20 of 458

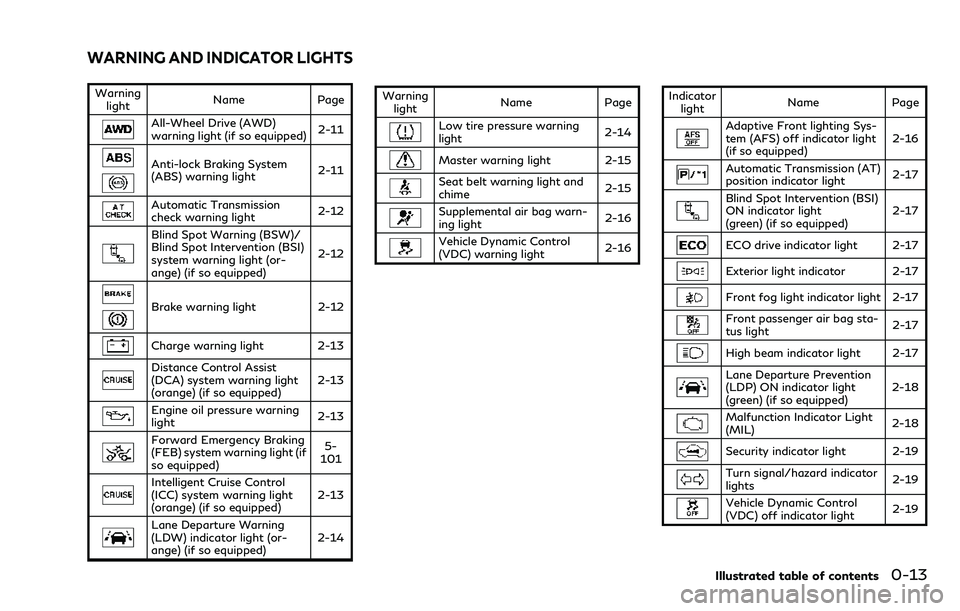
Warninglight Name
Page
All-Wheel Drive (AWD)
warning light (if so equipped) 2-11
Anti-lock Braking System
(ABS) warning light2-11
Automatic Transmission
check warning light
2-12
Blind Spot Warning (BSW)/
Blind Spot Intervention (BSI)
system warning light (or-
ange) (if so equipped)2-12
Brake warning light
2-12
Charge warning light 2-13
Distance Control Assist
(DCA) system warning light
(orange) (if so equipped)2-13
Engine oil pressure warning
light
2-13
Forward Emergency Braking
(FEB) system warning light (if
so equipped) 5-
101
Intelligent Cruise Control
(ICC) system warning light
(orange) (if so equipped) 2-13
Lane Departure Warning
(LDW) indicator light (or-
ange) (if so equipped)2-14Warning
light Name Page
Low tire pressure warning
light 2-14
Master warning light 2-15
Seat belt warning light and
chime 2-15
Supplemental air bag warn-
ing light
2-16
Vehicle Dynamic Control
(VDC) warning light2-16Indicator
light Name
Page
Adaptive Front lighting Sys-
tem (AFS) off indicator light
(if so equipped) 2-16
Automatic Transmission (AT)
position indicator light
2-17
Blind Spot Intervention (BSI)
ON indicator light
(green) (if so equipped)2-17
ECO drive indicator light 2-17
Exterior light indicator 2-17
Front fog light indicator light 2-17
Front passenger air bag sta-
tus light
2-17
High beam indicator light 2-17
Lane Departure Prevention
(LDP) ON indicator light
(green) (if so equipped)2-18
Malfunction Indicator Light
(MIL)
2-18
Security indicator light 2-19
Turn signal/hazard indicator
lights 2-19
Vehicle Dynamic Control
(VDC) off indicator light2-19
Illustrated table of contents0-13
WARNING AND INDICATOR LIGHTS
Page 87 of 458

2-10Instruments and controls
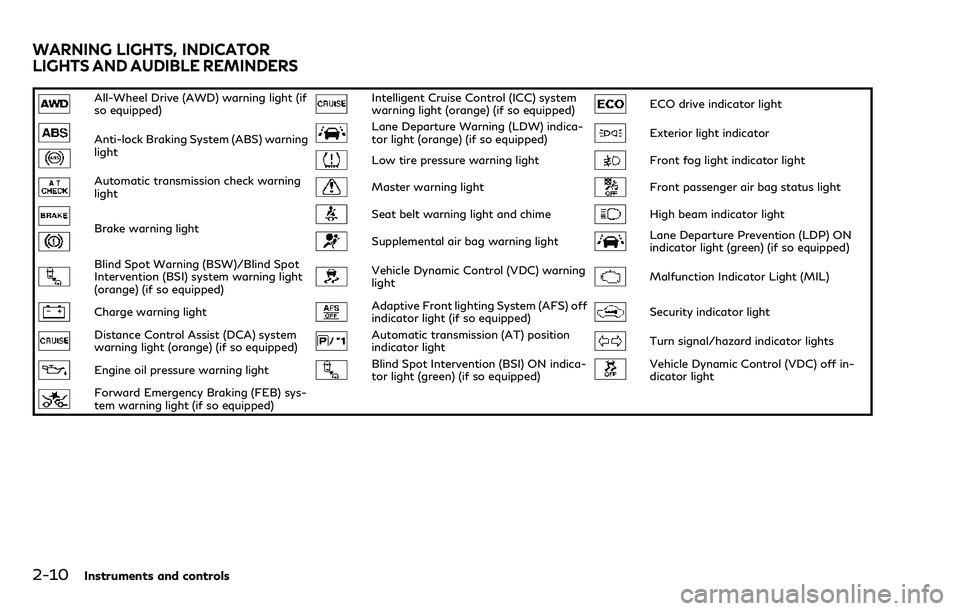
All-Wheel Drive (AWD) warning light (if
so equipped)Intelligent Cruise Control (ICC) system
warning light (orange) (if so equipped)ECO drive indicator light
Anti-lock Braking System (ABS) warning
lightLane Departure Warning (LDW) indica-
tor light (orange) (if so equipped)Exterior light indicator
Low tire pressure warning lightFront fog light indicator light
Automatic transmission check warning
lightMaster warning lightFront passenger air bag status light
Brake warning lightSeat belt warning light and chimeHigh beam indicator light
Supplemental air bag warning lightLane Departure Prevention (LDP) ON
indicator light (green) (if so equipped)
Blind Spot Warning (BSW)/Blind Spot
Intervention (BSI) system warning light
(orange) (if so equipped)Vehicle Dynamic Control (VDC) warning
lightMalfunction Indicator Light (MIL)
Charge warning lightAdaptive Front lighting System (AFS) off
indicator light (if so equipped)Security indicator light
Distance Control Assist (DCA) system
warning light (orange) (if so equipped)Automatic transmission (AT) position
indicator lightTurn signal/hazard indicator lights
Engine oil pressure warning lightBlind Spot Intervention (BSI) ON indica-
tor light (green) (if so equipped)Vehicle Dynamic Control (VDC) off in-
dicator light
Forward Emergency Braking (FEB) sys-
tem warning light (if so equipped)
WARNING LIGHTS, INDICATOR
LIGHTS AND AUDIBLE REMINDERS
Page 89 of 458

2-12Instruments and controls
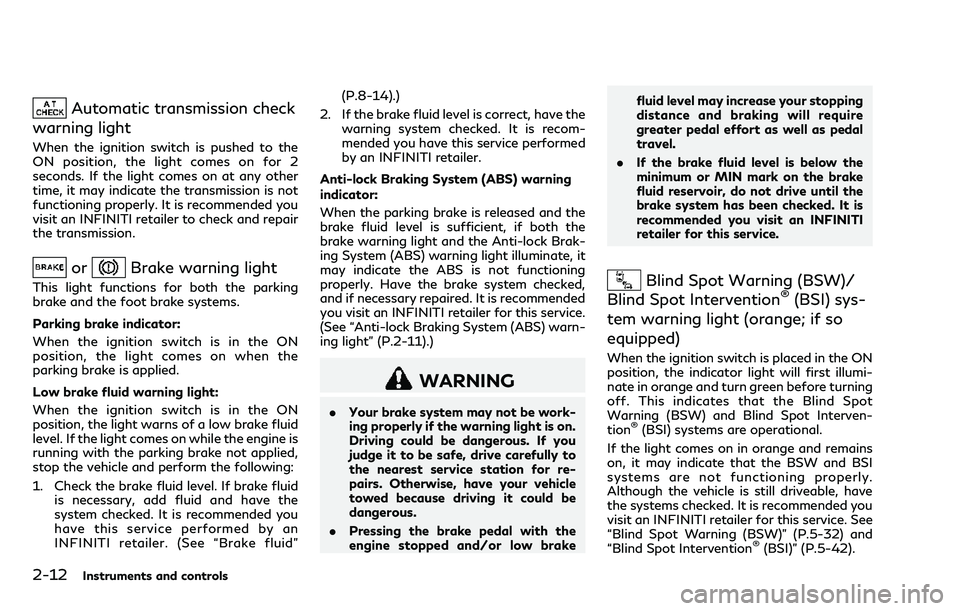
Automatic transmission check
warning light
When the ignition switch is pushed to the
ON position, the light comes on for 2
seconds. If the light comes on at any other
time, it may indicate the transmission is not
functioning properly. It is recommended you
visit an INFINITI retailer to check and repair
the transmission.
orBrake warning light
This light functions for both the parking
brake and the foot brake systems.
Parking brake indicator:
When the ignition switch is in the ON
position, the light comes on when the
parking brake is applied.
Low brake fluid warning light:
When the ignition switch is in the ON
position, the light warns of a low brake fluid
level. If the light comes on while the engine is
running with the parking brake not applied,
stop the vehicle and perform the following:
1. Check the brake fluid level. If brake fluid is necessary, add fluid and have the
system checked. It is recommended you
have this service performed by an
INFINITI retailer. (See “Brake fluid” (P.8-14).)
2. If the brake fluid level is correct, have the warning system checked. It is recom-
mended you have this service performed
by an INFINITI retailer.
Anti-lock Braking System (ABS) warning
indicator:
When the parking brake is released and the
brake fluid level is sufficient, if both the
brake warning light and the Anti-lock Brak-
ing System (ABS) warning light illuminate, it
may indicate the ABS is not functioning
properly. Have the brake system checked,
and if necessary repaired. It is recommended
you visit an INFINITI retailer for this service.
(See “Anti-lock Braking System (ABS) warn-
ing light” (P.2-11).)
WARNING
. Your brake system may not be work-
ing properly if the warning light is on.
Driving could be dangerous. If you
judge it to be safe, drive carefully to
the nearest service station for re-
pairs. Otherwise, have your vehicle
towed because driving it could be
dangerous.
. Pressing the brake pedal with the
engine stopped and/or low brake fluid level may increase your stopping
distance and braking will require
greater pedal effort as well as pedal
travel.
. If the brake fluid level is below the
minimum or MIN mark on the brake
fluid reservoir, do not drive until the
brake system has been checked. It is
recommended you visit an INFINITI
retailer for this service.
Blind Spot Warning (BSW)/
Blind Spot Intervention®(BSI) sys-
tem warning light (orange; if so
equipped)
When the ignition switch is placed in the ON
position, the indicator light will first illumi-
nate in orange and turn green before turning
off. This indicates that the Blind Spot
Warning (BSW) and Blind Spot Interven-
tion
®(BSI) systems are operational.
If the light comes on in orange and remains
on, it may indicate that the BSW and BSI
systems are not functioning properly.
Although the vehicle is still driveable, have
the systems checked. It is recommended you
visit an INFINITI retailer for this service. See
“Blind Spot Warning (BSW)” (P.5-32) and
“Blind Spot Intervention
®(BSI)” (P.5-42).
Page 94 of 458

if the AFS is operational.
This light also illuminates when the AFS is
turned off using the AFS switch.
If the AFS off indicator light blinks, it may
indicate the AFS is not functioning properly.
Have the system checked. It is recommended
you visit an INFINITI retailer for this service.
See “Adaptive Front lighting System (AFS)”
(P.2-36).
Automatic Transmission (AT)
position indicator light
When the ignition switch is pushed to the
ON position, the indicator shows the auto-
matic shift position.
In the manual shift mode, when the trans-
mission does not shift to the selected gear
due to a transmission protection mode, the
AT position indicator light will blink and a
chime will sound.
See “Automatic transmission” (P.5-15) for
further details.
Blind Spot Intervention®(BSI)
ON indicator light (green; if so
equipped)
The light comes on in green when the Blind
Spot Intervention®(BSI) system is turned on. The light turns off when the system is turned
off.
NOTE:
This light is common with the Blind Spot
Warning (BSW)/Blind Spot Intervention
(BSI) system warning light (orange). (See
“Blind Spot Warning (BSW)/Blind Spot
Intervention
®(BSI) system warning light”
(P.2-12).)
For more details, see “Blind Spot Interven-
tion
®(BSI)” (P.5-42).
ECO drive indicator light
When the ignition switch is pushed to the
ON position, the light will come on in orange,
turn green, and then turn off.
When the INFINITI Drive Mode Selector is
turned to the ECO mode, the ECO drive
indicator light will illuminate or change its
color depending on the accelerator pedal
operation to help assist the driver to drive
economically. For more details, see “Eco
mode” (P.5-21).
Exterior light indicator
This indicator illuminates when the headlight
switch is turned to the AUTO,orposition and the front parking lights, instru-
ment panel lights, rear combination lights, license plate lights or headlights are on. The
indicator turns off when these lights are
turned off.
Front fog light indicator light
The front fog light indicator light illuminates
when the front fog lights are on. (See “Fog
light switch” (P.2-39).)
Front passenger air bag status
light
The front passenger air bag status light
() will be lit and the passenger front air
bag will be OFF depending on how the front
passenger seat is being used.
For front passenger air bag status light
operation, see “INFINITI Advanced Air Bag
System (front seats)” (P.1-44).
High beam indicator light
This light comes on when the headlight high
beam is on and goes out when the low beam
is selected.
Instruments and controls2-17
Page 97 of 458

2-20Instruments and controls
SIC4323
The vehicle information displayis located
between the tachometer and the speed-
ometer, and it displays the indicators for the
driving systems, Intelligent Key operation
and various warnings and information:
For details about each system information,
see the following sections:
. Automatic Transmission (AT)
— “Driving the vehicle” (P.5-15)
. Intelligent Key system
— “Intelligent Key system” (P.3-7)
. INFINITI Drive Mode Selector
— “INFINITI Drive Mode Selector” (P.5- 20) .
Back-up Collision Intervention (BCI) (if so
equipped)
— “Back-up Collision Intervention (BCI)” (P.5-54)
. Cruise control (if so equipped)
— “Cruise control” (P.5-65)
. Intelligent Cruise Control (ICC) (if so
equipped)
— “Intelligent Cruise Control (ICC)” (P.5- 67)
. Distance Control Assist (DCA) (if so
equipped)
— “Distance Control Assist (DCA)” (P.5- 88)
. Forward Emergency Braking (FEB) (if so
equipped)
— “Forward Emergency Braking (FEB)” (P.5-101)
. Predictive Forward Collision Warning
(PFCW) (if so equipped)
— “Predictive Forward Collision Warning
(PFCW)” (P.5-108)
VEHICLE INFORMATION DISPLAY
Page 139 of 458

2-62Instruments and controls
PROGRAMMING HomeLink®FOR
CANADIAN CUSTOMERS AND
GATE OPENERS
Canadian radio-frequency laws require
transmitter signals to “time-out” (or quit)
after several seconds of transmission –
which may not be long enough for
HomeLink
®to pick up the signal during
programming. Similar to this Canadian law,
some U.S. gate operators are designed to
“time-out” in the same manner.
If you live in Canada or you are having
difficulties programming a gate operator or
garage door opener by using the “Program-
ming HomeLink
®” procedures, replace “Pro-
gramming HomeLink®” Step 2 with the
following:
NOTE:
When programming a garage door opener,
etc., unplug the device during the “cycling”
process to prevent possible damage to the
garage door opener components.
Step 2: Using both hands, simultaneously
press and hold the desired HomeLink
®
button and the hand-held transmitter but-
ton. During programming, your hand-held
transmitter may automatically stop trans-
mitting. Continue to press and hold the
desired HomeLink
®button while you press
and re-press (“cycle”) your hand-held trans- mitter every two seconds until the frequency
signal has been learned. The HomeLink
®
indicator light will flash slowly and then
rapidly after several seconds upon success-
ful programming.
DO NOTrelease until the
HomeLink
®indicator light flashes slowly and
then rapidly. When the indicator light flashes
rapidly, both buttons may be released. The
rapid flashing indicates successful program-
ming.
Proceed with “Programming HomeLink
®”
step 3 to complete.
Remember to plug the device back in when
programming is completed.
OPERATING THE HomeLink®
UNIVERSAL TRANSCEIVER
The HomeLink®Universal Transceiver, after
it is programmed, can be used to activate the
programmed device. To operate, simply
press and release the appropriate pro-
grammed HomeLink
®Universal Transceiver
button. The amber indicator light will illumi-
nate while the signal is being transmitted.
For convenience, the hand-held transmitter
of the device may also be used at any time.
PROGRAMMING TROUBLE-
SHOOTING
If the HomeLink®does not quickly learn the
hand-held transmitter information:
. replace the hand-held transmitter bat-
teries with new batteries.
. position the hand-held transmitter with
its battery area facing away from the
HomeLink
®surface.
. press and hold both the HomeLink®and
hand-held transmitter buttons without
interruption.
. position the hand-held transmitter 1-3 in
(26-76 mm) away from the HomeLink
®
surface. Hold the transmitter in that
position for up to 15 seconds. If
HomeLink
®is not programmed within
that time, try holding the transmitter in
another position - keeping the indicator
light in view at all times.
If you have any questions or are having
difficulty programming your HomeLink
®
buttons, refer to the HomeLink®web site
at: www.homelink.com or 1-800-355-
3515.
Page 210 of 458

5 Starting and driving
Precautions when starting and driving........................ 5-4Exhaust gas (carbon monoxide)............................... 5-4
Three-way catalyst...................................................... 5-5
Tire Pressure Monitoring System (TPMS) ............ 5-5
Avoiding collision and rollover................................... 5-7
Off-road recovery ........................................................ 5-8
Rapid air pressure loss................................................ 5-8
Drinking alcohol/drugs and driving......................... 5-9
Intelligent All-Wheel Drive (AWD) driving safety
precautions (AWD models)........................................ 5-9
Push-button ignition switch ......................................... 5-10 Operating range for engine start function.......... 5-10
Push-button ignition switch operation................ 5-11
Steering lock (if so equipped).................................. 5-11
Push-button ignition switch positions ................. 5-12
Emergency engine shut off...................................... 5-12
Intelligent Key battery discharge........................... 5-13
Before starting the engine ............................................ 5-13
Starting the engine.......................................................... 5-14
Driving the vehicle ........................................................... 5-15
Automatic transmission............................................ 5-15
Parking brake.................................................................... 5-19
INFINITI Drive Mode Selector .................................... 5-20
Standard mode........................................................... 5-20
Sport mode.................................................................. 5-20 Snow mode ............................................................... 5-20
Eco mode.................................................................... 5-21
Lane Departure Warning (LDW)/Lane Departure
Prevention (LDP) (if so equipped) .............................. 5-22 LDW system operation........................................... 5-24
Turning the LDW system ON/OFF.................... 5-25
How to enable/disable the LDW system.......... 5-26
LDP system operation ............................................ 5-26
Turning the LDP system ON/OFF ..................... 5-27
How to enable/disable the LDP system ........... 5-28
LDW/LDP system limitations .............................. 5-28
System temporarily unavailable .......................... 5-30
System malfunction................................................. 5-31
System maintenance ............................................... 5-31
Blind Spot Warning (BSW) (if so equipped) ............ 5-32 BSW system operation........................................... 5-33
Turning the BSW system ON/OFF.................... 5-34
How to enable/disable the BSW system.......... 5-35
BSW system limitations.......................................... 5-35
BSW driving situations ........................................... 5-36
System temporarily unavailable .......................... 5-40
System malfunction................................................. 5-41
System maintenance ............................................... 5-41
Blind Spot Intervention
®(BSI) (if so equipped) ...... 5-42
BSI system operation .............................................. 5-43
Page 224 of 458

AUTOMATIC TRANSMISSION
The automatic transmission in your vehicle is
electronically controlled by a transmission
control module to produce maximum effi-
ciency and smooth operation.
Shown on the following pages are the
recommended operating procedures for this
transmission. Follow these procedures for
maximum vehicle performance and driving
enjoyment.
Starting the vehicle
After starting the engine, fully depress the
foot brake pedal and push the shift lever
button before shifting the shift lever to the R
(Reverse), N (Neutral), D (Drive) or Manual
shift mode position. Be sure the vehicle is
fully stopped before attempting to shift the
shift lever.
This automatic transmission model is de-
signed so that the foot brake pedal must be
depressed before shifting from P (Park) to
any drive position while the ignition switch
position is ON.
The shift lever cannot be moved out of the P
(Park) position and into any of the other
gear positions if the ignition switch is
pushed to the LOCK, OFF or ACC position.
1. Keep the foot brake pedal depressed andpush the shift lever button to shift into a driving gear.
2. Release the parking brake and foot brake, then gradually start the vehicle in
motion.
WARNING
.Do not depress the accelerator pedal
while shifting from P (Park) or N
(Neutral) to R (Reverse), D (Drive) or
manual shift mode. Always depress
the brake pedal until shifting is
completed. Failure to do so could
cause you to lose control and have
an accident.
. Cold engine idle speed is high, so use
caution when shifting into a forward
or reverse gear before the engine has
warmed up.
. Never shift to either P (Park) or R
(Reverse) position while the vehicle is
moving forward and P (Park) or D
(Drive) position while the vehicle is
reversing. This could cause an acci-
dent or damage the transmission.
. Do not downshift abruptly on slip-
pery roads. This may cause a loss of
control.
CAUTION
.Except in an emergency, do not shift
to the N (Neutral) position while
driving. Coasting with the transmis-
sion in the N (Neutral) position may
cause serious damage to the trans-
mission.
. To avoid possible damage to your
vehicle; when stopping the vehicle on
an uphill grade, do not hold the
vehicle by depressing the accelerator
pedal. The foot brake should be used
for this purpose.
Starting and driving5-15
DRIVING THE VEHICLE
Page 226 of 458

SSD1099
Paddle shifters (if so equipped)
Manual shift mode
When the shift lever is in the manual shift
gate, the transmission is ready for the
manual shift mode. Shift ranges can be
selected manually by moving the shift lever
up or down, or pulling the right-side or left-
side paddle shifter (if so equipped).
When shifting up, move the shift lever to the
+ (up) side or pull the right-side paddle
shifter (+)
(if so equipped). The transmis-
sion shifts to the higher range.
When shifting down, move the shift lever to
the − (down) side or pull the left-side paddle
shifter (−)
(if so equipped). The transmis- sion shifts to the lower range.
When canceling the manual shift mode,
return the shift lever to the D (Drive)
position. The transmission returns to the
normal driving mode.
When you pull the paddle shifter while in the
D (Drive) position, the transmission will shift
to the upper or lower range temporarily. The
transmission will automatically return to the
D (Drive) position after a short period of
time. If you want to return to the D (Drive)
position manually, pull and hold the paddle
shifter for about 1.5 seconds.
In the manual shift mode, the shift range is
displayed on the position indicator in the
meter.
Shift ranges up or down one by one as
follows:
M1
?
/M2 ?
/M3?
/M4 ?
/M5?
/M6?
/M7
M7 (7th):
Use this position for all normal forward
driving at highway speeds.
M6 (6th) andM5 (5th):
Use these positions when driving up long
slopes, or for engine braking when driving
down long slopes.
M4 (4th),M3 (3rd) andM2 (2nd):
Use these positions for hill climbing or engine
braking on downhill grades.
M1 (1st):
Use this position when climbing steep hills
slowly or driving slowly through deep snow,
or for maximum engine braking on steep
downhill grades.
. Remember not to drive at high speeds for
extended periods of time in lower than
7th gear. This reduces fuel economy.
. Moving the shift lever rapidly to the same
side twice will shift the ranges in succes-
sion.
. In the manual shift mode, the transmis-
sion may not shift to the selected gear
or may automatically shift to the other
gear. This helps maintain driving per-
formance and reduces the chance of
vehicle damage or loss of control.
. When the transmission does not shift to
the selected gear, the Automatic Trans-
mission (AT) position indicator light (on
the vehicle information display) will
blink and the buzzer will sound.
. In the manual shift mode, the transmis-
sion automatically shifts down to 1st
gear before the vehicle comes to a stop.
When accelerating again, it is necessary
to shift up to the desired range.
Starting and driving5-17
Page 227 of 458

5-18Starting and driving
Accelerator downshift — In D (Drive)
position —
For passing or hill climbing, fully depress the
accelerator pedal to the floor. This shifts the
transmission down into the lower gear,
depending on the vehicle speed.
Fail-safe
When the fail-safe operation occurs, note
that the transmission will be locked in any of
the forward gears according to the condi-
tion.
If the vehicle is driven under extreme
conditions, such as excessive wheel spinning
and subsequent hard braking, the fail-safe
system may be activated. This will occur
even if all electrical circuits are functioning
properly. In this case, push the ignition
switch to the OFF position and wait for 3
seconds. Then push the ignition switch back
to the ON position. The vehicle should
return to its normal operating condition. If
it does not return to its normal operating
condition, have the transmission checked
and repaired, if necessary. It is recom-
mended you visit a an INFINITI retailer for
this service.
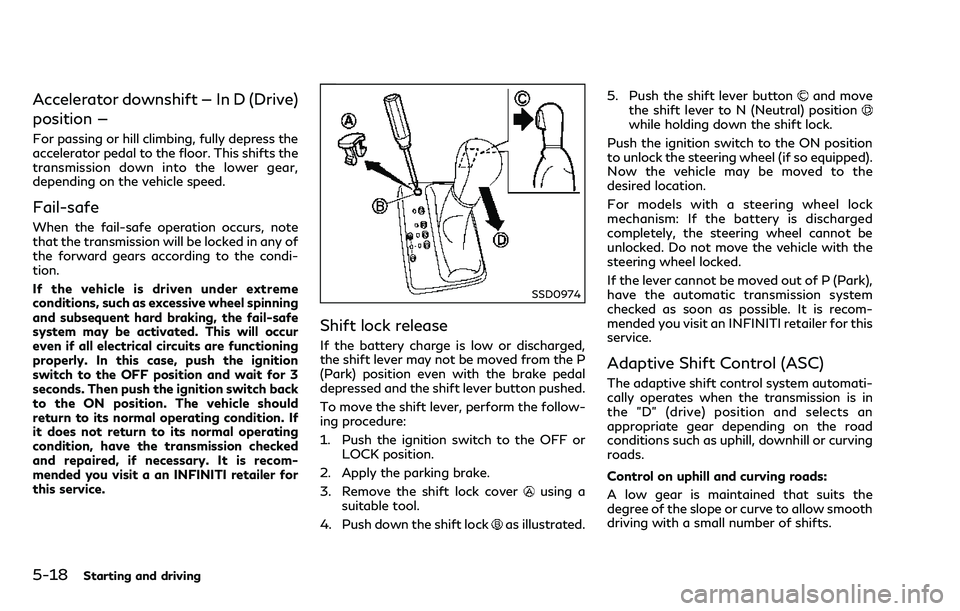
SSD0974
Shift lock release
If the battery charge is low or discharged,
the shift lever may not be moved from the P
(Park) position even with the brake pedal
depressed and the shift lever button pushed.
To move the shift lever, perform the follow-
ing procedure:
1. Push the ignition switch to the OFF orLOCK position.
2. Apply the parking brake.
3. Remove the shift lock cover
using a
suitable tool.
4. Push down the shift lock
as illustrated. 5. Push the shift lever button
and move
the shift lever to N (Neutral) position
while holding down the shift lock.
Push the ignition switch to the ON position
to unlock the steering wheel (if so equipped).
Now the vehicle may be moved to the
desired location.
For models with a steering wheel lock
mechanism: If the battery is discharged
completely, the steering wheel cannot be
unlocked. Do not move the vehicle with the
steering wheel locked.
If the lever cannot be moved out of P (Park),
have the automatic transmission system
checked as soon as possible. It is recom-
mended you visit an INFINITI retailer for this
service.
Adaptive Shift Control (ASC)
The adaptive shift control system automati-
cally operates when the transmission is in
the "D" (drive) position and selects an
appropriate gear depending on the road
conditions such as uphill, downhill or curving
roads.
Control on uphill and curving roads:
A low gear is maintained that suits the
degree of the slope or curve to allow smooth
driving with a small number of shifts.