oil temperature INFINITI Q70 HYBRID 2014 Owner's Manual
[x] Cancel search | Manufacturer: INFINITI, Model Year: 2014, Model line: Q70 HYBRID, Model: INFINITI Q70 HYBRID 2014Pages: 522, PDF Size: 4.02 MB
Page 32 of 522
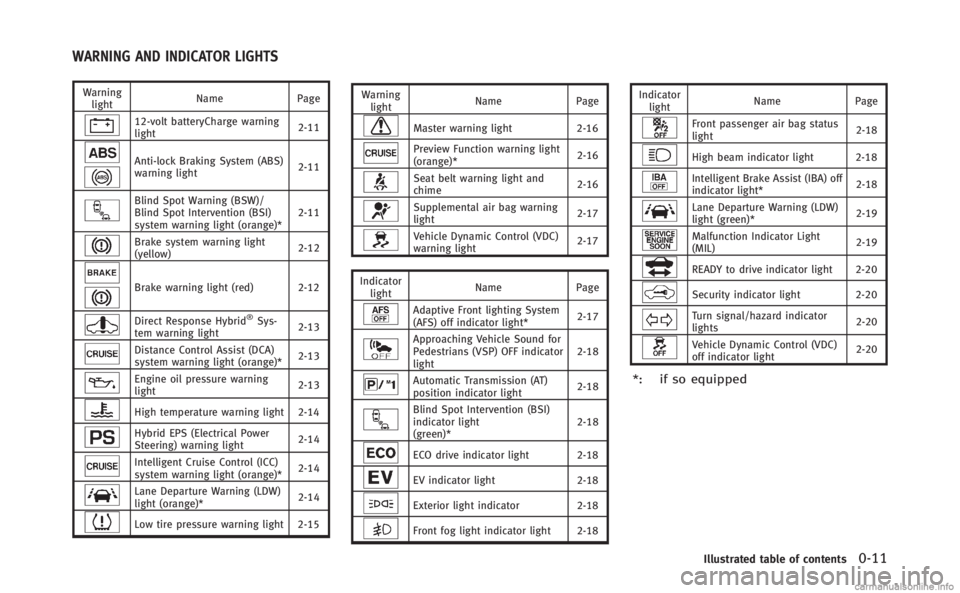
Warninglight Name
Page
12-volt batteryCharge warning
light 2-11
Anti-lock Braking System (ABS)
warning light2-11
Blind Spot Warning (BSW)/
Blind Spot Intervention (BSI)
system warning light (orange)*2-11
Brake system warning light
(yellow)
2-12
Brake warning light (red) 2-12
Direct Response Hybrid®Sys-
tem warning light 2-13
Distance Control Assist (DCA)
system warning light (orange)*
2-13
Engine oil pressure warning
light2-13
High temperature warning light 2-14
Hybrid EPS (Electrical Power
Steering) warning light2-14
Intelligent Cruise Control (ICC)
system warning light (orange)*2-14
Lane Departure Warning (LDW)
light (orange)*
2-14
Low tire pressure warning light 2-15 Warning
light Name
Page
Master warning light 2-16
Preview Function warning light
(orange)* 2-16
Seat belt warning light and
chime2-16
Supplemental air bag warning
light
2-17
Vehicle Dynamic Control (VDC)
warning light2-17
Indicator light Name
Page
Adaptive Front lighting System
(AFS) off indicator light* 2-17
Approaching Vehicle Sound for
Pedestrians (VSP) OFF indicator
light2-18
Automatic Transmission (AT)
position indicator light
2-18
Blind Spot Intervention (BSI)
indicator light
(green)*2-18
ECO drive indicator light 2-18
EV indicator light
2-18
Exterior light indicator2-18
Front fog light indicator light 2-18 Indicator
light Name
Page
Front passenger air bag status
light 2-18
High beam indicator light 2-18
Intelligent Brake Assist (IBA) off
indicator light*2-18
Lane Departure Warning (LDW)
light (green)*
2-19
Malfunction Indicator Light
(MIL)2-19
READY to drive indicator light 2-20
Security indicator light 2-20
Turn signal/hazard indicator
lights2-20
Vehicle Dynamic Control (VDC)
off indicator light2-20
*: if so equipped
Illustrated table of contents0-11
WARNING AND INDICATOR LIGHTS
Page 95 of 522
2-10Instruments and controls
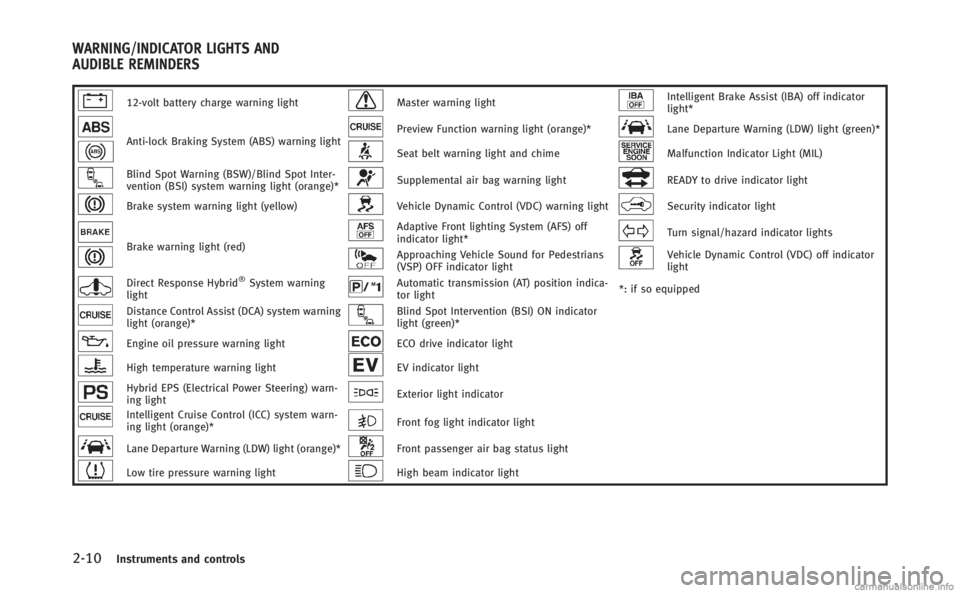
12-volt battery charge warning lightMaster warning lightIntelligent Brake Assist (IBA) off indicator
light*
Anti-lock Braking System (ABS) warning lightPreview Function warning light (orange)*Lane Departure Warning (LDW) light (green)*
Seat belt warning light and chimeMalfunction Indicator Light (MIL)
Blind Spot Warning (BSW)/Blind Spot Inter-
vention (BSI) system warning light (orange)*Supplemental air bag warning lightREADY to drive indicator light
Brake system warning light (yellow)Vehicle Dynamic Control (VDC) warning lightSecurity indicator light
Brake warning light (red)
Adaptive Front lighting System (AFS) off
indicator light*Turn signal/hazard indicator lights
Approaching Vehicle Sound for Pedestrians
(VSP) OFF indicator lightVehicle Dynamic Control (VDC) off indicator
light
Direct Response Hybrid®System warning
lightAutomatic transmission (AT) position indica-
tor light *: if so equipped
Distance Control Assist (DCA) system warning
light (orange)*Blind Spot Intervention (BSI) ON indicator
light (green)*
Engine oil pressure warning lightECO drive indicator light
High temperature warning lightEV indicator light
Hybrid EPS (Electrical Power Steering) warn-
ing lightExterior light indicator
Intelligent Cruise Control (ICC) system warn-
ing light (orange)*Front fog light indicator light
Lane Departure Warning (LDW) light (orange)*Front passenger air bag status light
Low tire pressure warning lightHigh beam indicator light
WARNING/INDICATOR LIGHTS AND
AUDIBLE REMINDERS
Page 116 of 522
The outside air temperature mode includes
a low temperature warning feature. If the
outside air temperature is below 378F
(38C), the warning is displayed on the
screen.
The outside temperature sensor is located
in front of the radiator. The sensor may be
affected by road or engine heat, wind
directions and other driving conditions.
The display may differ from the actual
outside temperature or the temperature
displayed on various signs or billboards.
10. Setting
Setting cannot be made while driving. A
message “Setting can only be operated
when stopped” is also displayed on the
dot matrix liquid crystal display.
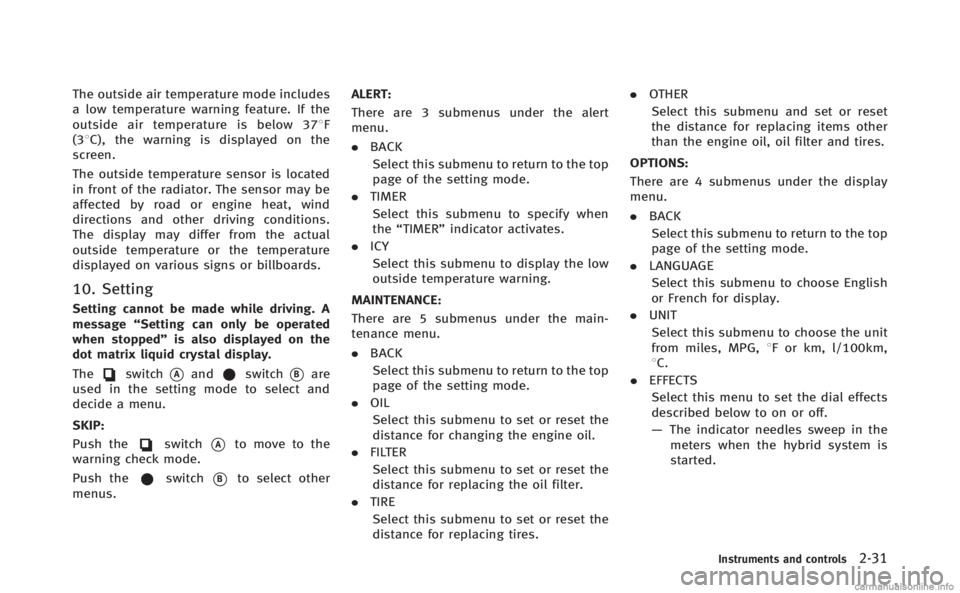
The
switch*Aandswitch*Bare
used in the setting mode to select and
decide a menu.
SKIP:
Push the
switch*Ato move to the
warning check mode.
Push the
switch*Bto select other
menus. ALERT:
There are 3 submenus under the alert
menu.
.
BACK
Select this submenu to return to the top
page of the setting mode.
. TIMER
Select this submenu to specify when
the “TIMER” indicator activates.
. ICY
Select this submenu to display the low
outside temperature warning.
MAINTENANCE:
There are 5 submenus under the main-
tenance menu.
. BACK
Select this submenu to return to the top
page of the setting mode.
. OIL
Select this submenu to set or reset the
distance for changing the engine oil.
. FILTER
Select this submenu to set or reset the
distance for replacing the oil filter.
. TIRE
Select this submenu to set or reset the
distance for replacing tires. .
OTHER
Select this submenu and set or reset
the distance for replacing items other
than the engine oil, oil filter and tires.
OPTIONS: There are 4 submenus under the display
menu.
. BACK
Select this submenu to return to the top
page of the setting mode.
. LANGUAGE
Select this submenu to choose English
or French for display.
. UNIT
Select this submenu to choose the unit
from miles, MPG, 8F or km, l/100km,
8C.
. EFFECTS
Select this menu to set the dial effects
described below to on or off.
— The indicator needles sweep in the
meters when the hybrid system is
started.
Instruments and controls2-31
Page 329 of 522
5-12Starting and driving
4. Push the ignition switch while depres-sing the brake pedal within 10 seconds
after the chime sounds. The hybrid
system will start.
After step 3 is performed, when the
ignition switch is pushed without depres-
sing the brake pedal, the ignition switch
position will change to ACC.
NOTE:
. When the ignition switch is pushed to
the ACC or ON position or the hybrid
system is started by the above proce-
dures, the Intelligent Key battery dis-
charge indicator appears on the dot
matrix liquid crystal display even if the
Intelligent Key is inside the vehicle.
This is not a malfunction. To turn off
the Intelligent Key battery discharge
indicator, touch the ignition switch
with the Intelligent Key again.
. If the Intelligent Key battery discharge
indicator appears, replace the battery
as soon as possible. (See “Intelligent
Key battery replacement” (P.8-26).).
Make sure the area around the vehicle
is clear.
. Check fluid levels such as engine oil,
coolant, brake fluid and window
washer fluid as frequently as possible,
or at least whenever you refuel.
. Check that all windows and lights are
clean.
. Visually inspect tires for their appear-
ance and condition. Also check tires for
proper inflation.
. Lock all doors.
. Position seat and adjust head re-
straints.
. Adjust inside and outside mirrors.
. Fasten seat belts and ask all passen-
gers to do likewise.
. Check the operation of warning lights
when the ignition switch is pushed to
the ON position. (See “Warning/indica-
tor lights and audible reminders” (P.2-
10).) 1. Apply the parking brake.
2. Move the shift lever to P (Park) posi-
tion.
The INFINITI Direct Response Hybrid
®
System is designed not to operate if
the shift lever is not in the P (Park)
position.
3. Depress the brake pedal and push the ignition switch to start the hybrid
system. The READY to drive indicator
light will illuminate on the meter.
When starting the hybrid system at
very low outside temperatures, the
READY to drive indicator light will flash
and it may take longer for the READY to
drive indicator light to illuminate.
. The hybrid system may not start even
with the READY to drive indicator light
illuminated. Once the READY to drive
indicator light is illuminated you may
begin driving the vehicle.
. You may hear a sound in the engine
compartment when the brake pedal is
depressed with the hybrid system off.
This does not indicate a problem.
NOTE:
Care should be taken to avoid situations
that can lead to potential 12-volt battery
BEFORE STARTING THE INFINITI DIRECT
RESPONSE HYBRID®SYSTEM STARTING THE INFINITI DIRECT RESPONSE
HYBRID®SYSTEM
Page 334 of 522

4. Push down the shift lock*Bas
illustrated.
5. Push the shift lever button
*Cand
move the shift lever to N (Neutral)
position
*Dwhile holding down the
shift lock.
Push the ignition switch to the ON position
to unlock the steering wheel (if so
equipped). Now the vehicle may be moved
to the desired location.
For models with a steering wheel lock
mechanism:
If the 12-volt battery is discharged com-
pletely, the steering wheel cannot be
unlocked. Do not move the vehicle with
the steering wheel locked.
If the lever cannot be moved out of P
(Park), have an INFINITI retailer check the
automatic transmission system as soon as
possible.
Adaptive shift control (ASC)
The adaptive shift control system automa-
tically operates when the transmission is
in the "D" (drive) position and selects an
appropriate gear depending on the road
conditions such as uphill, downhill or
curving roads. Control on uphill and curving roads:
A low gear is maintained that suits the
degree of the slope or curve to allow
smooth driving with a small number of
shifts.
Control on downhill roads:
The adaptive shift control system shifts to
a low gear that suits the degree of the
slope to reduce the number of times that
the brake must be used.
Control on winding roads:
A low gear is maintained on continuous
curves that involve repeated acceleration
and deceleration, so that smooth accelera-
tion is available instantly when the accel-
erator pedal is depressed.
NOTE:
. Adaptive shift control may not operate
when the transmission oil temperature
is low immediately after the start of
driving or when it is very hot.
. During some driving situations, hard
braking for example, the adaptive shift
control may automatically operate. The
transmission may automatically shift
to a lower gear for engine braking. This
increases engine speed but not vehicle
speed. Vehicle speed is controlled by the accelerator pedal when the vehicle
is in the Adaptive shift control mode.
. When the adaptive shift control oper-
ates, the transmission sometimes
maintains a lower gear for a longer
period of time than when adaptive shift
control is not operating. Engine speed
will be higher for a specific vehicle
speed while ASC system is operating
than when ASC is not operating.
Starting and driving5-17
Page 408 of 522

6. Plan for the shortest route..Utilize a map or navigation system todetermine the best route to save
time.
7. Avoid idling.
.Shutting off your engine when safe for stops exceeding 30-60 seconds
saves fuel and reduces emissions.
8. Buy an automated pass for toll roads.
.Automated passes permit drivers to use special lanes to maintain cruis-
ing speed through the toll and avoid
stopping and starting.
9. Winter warm up.
.Limit idling time to minimize impact to fuel economy.
.Vehicles typically need no more than30 seconds of idling at start-up to
effectively circulate the engine oil
before driving.
.Your vehicle will reach its ideal
operating temperature more quickly
while driving versus idling.
10. Keeping your vehicle cool.
.Park your vehicle in a covered
parking area or in the shade when-
ever possible.
.When entering a hot vehicle, open- ing the windows will help to reduce
the inside temperature faster, result-
ing in reduced demand on your A/C
system. .
Keep your engine tuned up.
. Follow the recommended scheduled
maintenance.
. Keep the tires inflated to the correct
pressure. Low tire pressure increases
tire wear and lowers fuel economy.
. Keep the wheels in correct alignment.
Improper alignment increases tire wear
and lowers fuel economy.
. Use the recommended viscosity engine
oil. (See “Engine oil and oil filter
recommendation” (P.9-6).)
Starting and driving5-91
INCREASING FUEL ECONOMY
Page 442 of 522

.Wax your vehicle only after a thorough
washing. Follow the instructions sup-
plied with the wax.
. Do not use a wax containing any
abrasives, cutting compounds or clea-
ners that may damage the vehicle
finish.
Machine compounding or aggressive pol-
ishing on a base coat/clear coat paint
finish may dull the finish or leave swirl
marks.
REMOVING SPOTS
Remove tar and oil spots, industrial dust,
insects, and tree sap as quickly as possible
from the paint surface to avoid lasting
damage or staining. Special cleaning
products are available at an INFINITI
retailer or any automotive accessory
stores.
UNDERBODY
In areas where road salt is used in winter,
the underbody must be cleaned regularly.
This will prevent dirt and salt from building
up and causing the acceleration of corro-
sion on the underbody and suspension.
Before the winter period and again in the
spring, the underseal must be checked
and, if necessary, re-treated.
GLASS
Use glass cleaner to remove smoke and
dust film from the glass surfaces. It is
normal for glass to become coated with a
film after the vehicle is parked in the hot
sun. Glass cleaner and a soft cloth will
easily remove this film.
CAUTION
When cleaning the inside of the windows,
do not use sharp-edged tools, abrasive
cleaners or chlorine-based disinfectant clea-
ners. They could damage the electrical
conductors, radio antenna elements or rear
window defroster elements.
WHEELS
Wash the wheels when washing the vehicle
to maintain their appearance.
. Clean the inner side of the wheels when
the wheel is changed or the underside
of the vehicle is washed.
. Inspect wheel rims regularly for dents
or corrosion. Such damage may cause
loss of pressure or poor seal at the tire
bead. .
INFINITI recommends that the road
wheels be waxed to protect against
road salt in areas where it is used
during winter.
CAUTION
Do not use abrasive cleaners when washing
the wheels.
Aluminum alloy wheels
Wash regularly with a sponge dampened in
a mild soap solution, especially during
winter months in areas where road salt is
used. Salt could discolor the wheels if not
removed.
CAUTION
Follow the directions below to avoid stain-
ing or discoloring the wheels:
. Do not use a cleaner that uses strong
acid or alkali contents to clean the
wheels.
. Do not apply wheel cleaners to the
wheels when they are hot. The wheel
temperature should be the same as
Appearance and care7-3
Page 443 of 522

7-4Appearance and care
ambient temperature.
. Rinse the wheel to completely remove
the cleaner within 15 minutes after the
cleaner is applied.
CHROME PARTS
Clean chrome parts regularly with a non-
abrasive chrome polish to maintain the
finish.
TIRE DRESSING
INFINITI does not recommend the use of
tire dressings. Tire manufacturers apply a
coating to the tires to help reduce dis-
coloration of the rubber. If a tire dressing is
applied to the tires, it may react with the
coating and form a compound. This com-
pound may come off the tire while driving
and stain the vehicle paint.
If you choose to use a tire dressing, take
the following precautions:
.Use a water-based tire dressing. The
coating on the tire dissolves more
easily with an oil-based tire dressing.
. Apply a light coat of tire dressing to
help prevent it from entering the tire
tread/grooves (where it would be diffi-
cult to remove). .
Wipe off excess tire dressing using a
dry towel. Make sure the tire dressing
is completely removed from the tire
tread/grooves.
. Allow the tire dressing to dry as
recommended by tire dressing manu-
facturer. Occasionally remove loose dust from the
interior trim, plastic parts and seats using
a vacuum cleaner or soft bristled brush.
Wipe the vinyl and leather surfaces with a
clean, soft cloth dampened in mild soap
solution, then wipe clean with a dry soft
cloth.
Regular care and cleaning is required in
order to maintain the appearance of the
leather.
Before using any fabric protector, read the
manufacturer’
s recommendations. Some
fabric protectors contain chemicals that
may stain or bleach the seat material.
Use a cloth dampened only with water, to
clean the meter and gauge lens.
WARNING
Do not use water or acidic cleaners (hot
steam cleaners) on the seat. This can
damage the seat or occupant classification
sensors. This can also affect the operation
of the air bag system and result in serious
personal injury.
CLEANING INTERIOR
Page 451 of 522

8-4Maintenance and do-it-yourself
securely. Check the belt webbing for cuts,
fraying, wear or damage.
Seats:Check seat position controls such as
seat adjusters, seatback recliner, etc. to
ensure they operate smoothly and that all
latches lock securely in every position.
Check that the head restraints move up
and down smoothly and that the locks (if
so equipped) hold securely in all latched
positions.
Steering wheel: Check for changes in the
steering conditions, such as excessive free
play, hard steering or strange noises.
Warning lights and chimes: Make sure that
all warning lights and chimes are operating
properly.
Windshield defroster: Check that the air
comes out of the defroster outlets properly
and in sufficient quantity when operating
the heater or air conditioner.
Windshield wiper and washer*: Check that
the wipers and washer operate properly
and that the wipers do not streak.
Under the hood and vehicle
The maintenance items listed here should
be checked periodically (for example, each
time you check the engine oil or refuel). 12-volt battery*:
Check the fluid level in
each cell. It should be between the MAX
and MIN lines. Vehicles operated in high
temperatures or under severe condition
require frequent checks of the battery fluid
level.
NOTE:
Care should be taken to avoid situations
that can lead to potential 12-volt battery
discharge and potential no-start condi-
tions such as:
1. Installation or extended use of electro-
nic accessories that consume 12-volt
battery power when the engine is not
running (Phone chargers, GPS, DVD
players, etc.)
2. Vehicle is not driven regularly and/or
only driven short distances.
In these cases, the 12-volt battery may
need to be charged to maintain 12-volt
battery health.
Brake fluid level*: Make sure that the
brake fluid level is between the MAX and
MIN lines on the reservoir.
Engine coolant level*: Check the coolant
level when the engine is cold.
Engine drive belts*: Make sure that no belt is frayed, worn, cracked or oily.
Engine oil level*:
Check the level after
parking the vehicle on a level spot and
turning off the hybrid system. Wait more
than 15 minutes for the oil to drain back
into the oil pan.
Exhaust system: Make sure there are no
loose supports, cracks or holes. If the
sound of the exhaust seems unusual or
there is a smell of exhaust fumes, im-
mediately have the exhaust system in-
spected by an INFINITI retailer. (See
“Precautions when starting and driving”
(P.5-3) for exhaust gas (Carbon monoxide).)
Fluid leaks: Check under the vehicle for
fuel, oil, water or other fluid leaks after the
vehicle has been parked for a while. Water
dripping from the air conditioner after use
is normal. If you should notice any leaks or
if gasoline fumes are evident, check for the
cause and have it corrected immediately.
Inverter coolant lebel: Check the coolant
level when the inverter is cold.
Power steering fluid level* and lines:
Check the level when the fluid is cold,
with the hybrid system off. Check the lines
for proper attachment, leaks, cracks, etc.
Radiator and hoses: Check the front of the
Page 459 of 522
8-12Maintenance and do-it-yourself
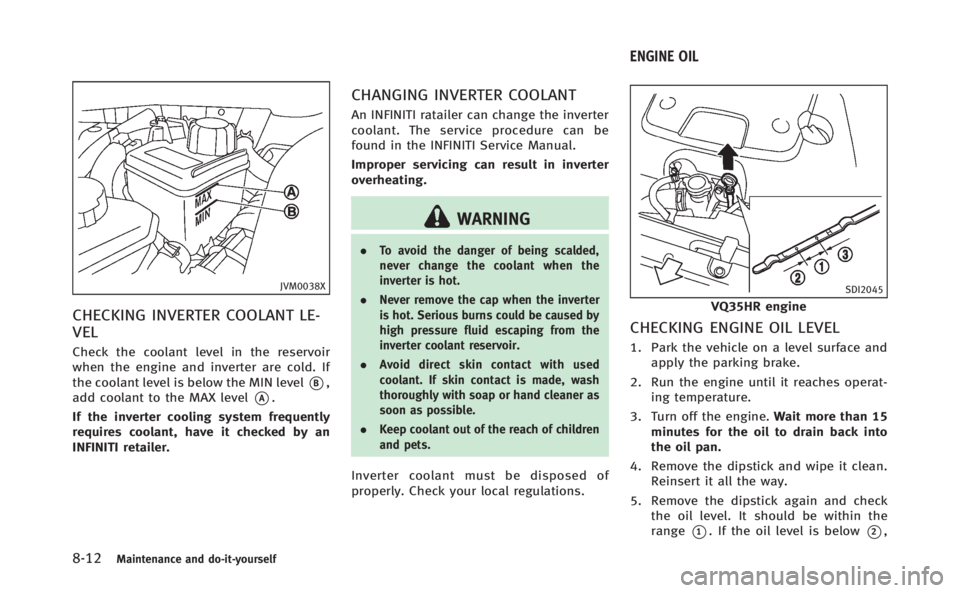
JVM0038X
CHECKING INVERTER COOLANT LE-
VEL
Check the coolant level in the reservoir
when the engine and inverter are cold. If
the coolant level is below the MIN level
*B,
add coolant to the MAX level
*A.
If the inverter cooling system frequently
requires coolant, have it checked by an
INFINITI retailer.
CHANGING INVERTER COOLANT
An INFINITI ratailer can change the inverter
coolant. The service procedure can be
found in the INFINITI Service Manual.
Improper servicing can result in inverter
overheating.
WARNING
. To avoid the danger of being scalded,
never change the coolant when the
inverter is hot.
. Never remove the cap when the inverter
is hot. Serious burns could be caused by
high pressure fluid escaping from the
inverter coolant reservoir.
. Avoid direct skin contact with used
coolant. If skin contact is made, wash
thoroughly with soap or hand cleaner as
soon as possible.
. Keep coolant out of the reach of children
and pets.
Inverter coolant must be disposed of
properly. Check your local regulations.
SDI2045
VQ35HR engine
CHECKING ENGINE OIL LEVEL
1. Park the vehicle on a level surface and
apply the parking brake.
2. Run the engine until it reaches operat- ing temperature.
3. Turn off the engine. Wait more than 15
minutes for the oil to drain back into
the oil pan.
4. Remove the dipstick and wipe it clean. Reinsert it all the way.
5. Remove the dipstick again and check the oil level. It should be within the
range
*1. If the oil level is below*2,
ENGINE OIL