INFINITI Q70 HYBRID 2017 Quick Reference Guide
Manufacturer: INFINITI, Model Year: 2017, Model line: Q70 HYBRID, Model: INFINITI Q70 HYBRID 2017Pages: 20, PDF Size: 1.43 MB
Page 11 of 20
8
5
6
Cruise Control (if so equipped)
3
2
1
4
3
2 1
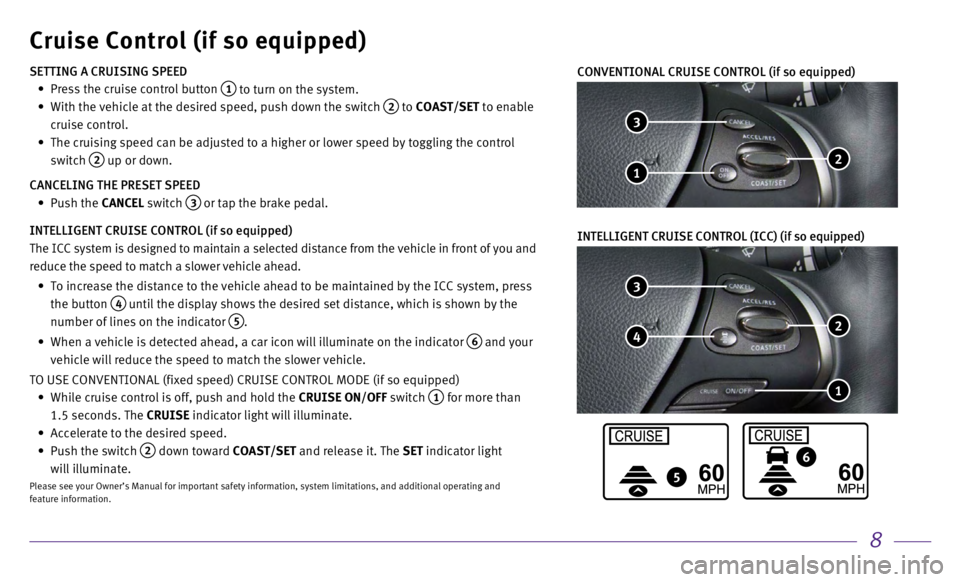
CONVENTIONAL CRUISE CONTROL (if so equipped)
SETTING A CRUISING SPEED
•
Press the cruise control button 1 to turn on the system.
•
With the vehicle at the desired speed, push down the switch 2 to COAST/SET to enable
cruise control.
•
The cruising speed can be adjusted to a higher or lower speed by togglin\
g the control
switch
2 up or down.
CANCELING THE PRESET SPEED
•
Push the CANCEL switch
3 or tap the brake pedal.
INTELLIGENT CRUISE CONTROL (if so equipped)
The ICC system is designed to maintain a selected distance from the vehi\
cle in front of you and
reduce the speed to match a slower vehicle ahead.
•
To increase the distance to the vehicle ahead to be maintained by the IC\
C system, press
the button
4 until the display shows the desired set distance, which is shown by the
number of lines on the indicator
5.
•
When a vehicle is detected ahead, a car icon will illuminate on the indi\
cator 6 and your
vehicle will reduce the speed to match the slower vehicle.
TO USE CONVENTIONAL (fixed speed) CRUISE CONTROL MODE (if so equipped\
)
•
While cruise control is off, push and hold the
CRUISE ON/OFF switch
1 for more than
1.5 seconds. The CRUISE indicator light will illuminate.
•
Accelerate to the desired speed.
•
Push the switch 2 down toward COAST/SET and release it. The SET indicator light
will illuminate.
Please see your Owner’s Manual for important safety information, syst\
em limitations, and additional operating and
feature information.
INTELLIGENT CRUISE CONTROL (ICC) (if so equipped)
Page 12 of 20
9
Navigation System (if so equipped)
2 1 5
4 7 312
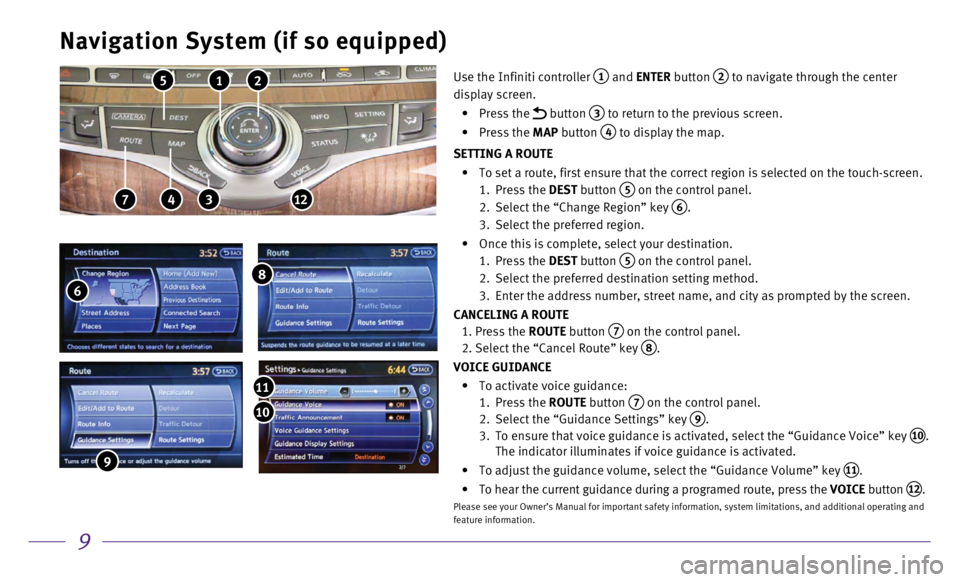
Use the Infiniti controller 1 and ENTER button 2 to navigate through the center
display screen.
•
Press the
button 3 to return to the previous screen.
•
Press the MAP button
4 to display the map.
SETTING A ROUTE
•
To set a route, first ensure that the correct region is selected on the \
touch-screen.
1.
Press the
DEST button
5 on the control panel.
2.
Select the “Change Region” key 6.
3.
Select the preferred region.
•
Once this is complete, select your destination.
1.
Press the
DEST button
5 on the control panel.
2.
Select the preferred destination setting method.
3.
Enter the address number, street name, and city as prompted by the scree\
n.
CANCELING A ROUTE
1.
Press the
ROUTE button
7 on the control panel. 2. Select the “Cancel Route” key
8.
VOICE GUIDANCE
•
To activate voice guidance:
1.
Press the
ROUTE button
7 on the control panel.
2.
Select the “Guidance Settings” key 9.
3.
To ensure that voice guidance is activated, select the “Guidance Voic\
e” key 10.
The indicator illuminates if voice guidance is activated.
•
To adjust the guidance volume, select the “Guidance Volume” key 11.
•
To hear the current guidance during a programed route, press the
VOICE button
12.
Please see your Owner’s Manual for important safety information, syst\
em limitations, and additional operating and
feature information.
6
8
9
10
11
Page 13 of 20
10
Infiniti Intelligent Key System
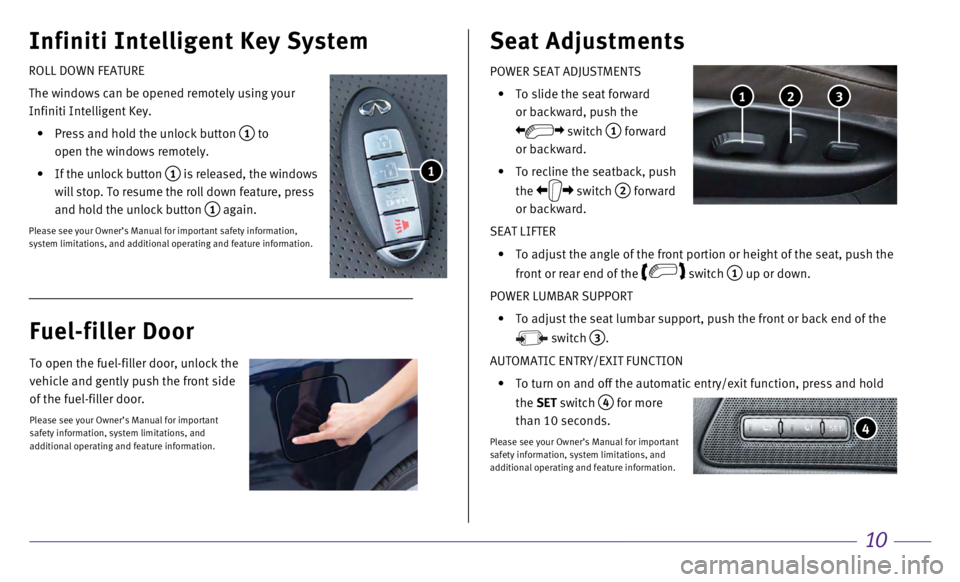
POWER SEAT ADJUSTMENTS
•
To slide the seat forward
or backward, push the
switch 1 forward
or backward.
•
To recline the seatback, push
the
switch
2 forward
or backward.
SEAT LIFTER
•
To adjust the angle of the front portion or height of the seat, push the\
front or rear end of the
switch
1 up or down.
POWER LUMBAR SUPPORT
•
To adjust the seat lumbar support, push the front or back end of the
switch
3.
AUTOMATIC ENTRY/EXIT FUNCTION
•
To turn on and off the automatic entry/exit function, press and hold
the
SET switch
4 for more
than 10 seconds.
Please see your Owner’s Manual for important
safety information, system limitations, and
additional operating and feature information.
Seat Adjustments
4
3 2 1
ROLL DOWN FEATURE
The windows can be opened remotely using your
Infiniti Intelligent Key.
•
Press and hold the unlock button 1 to
open the windows remotely.
•
If the unlock button 1 is released, the windows
will stop. To resume the roll down feature, press
and hold the unlock button
1 again.
Please see your Owner’s Manual for important safety information,
system limitations, and additional operating and feature information.
1
Fuel-filler Door
To open the fuel-filler door, unlock the
vehicle and gently push the front side
of the fuel-filler door.
Please see your Owner’s Manual for important
safety information, system limitations, and
additional operating and feature information.
Page 14 of 20
11
USB Connection Port
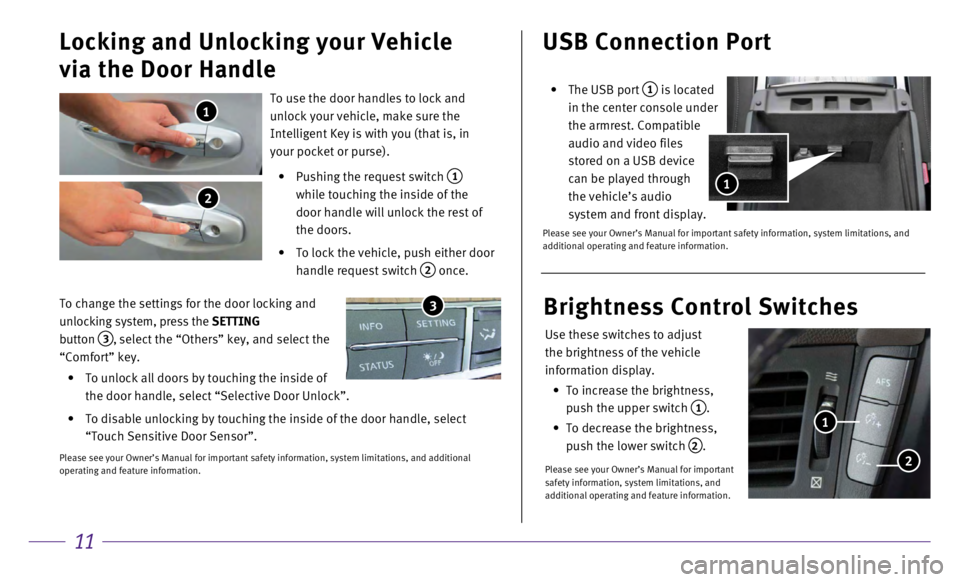
• The USB port 1 is located
in the center console under
the armrest. Compatible
audio and video files
stored on a USB device
can be played through
the vehicle’s audio
system and front display.
Please see your Owner’s Manual for important safety information, syst\
em limitations, and
additional operating and feature information.
1
To use the door handles to lock and
unlock your vehicle, make sure the
Intelligent Key is with you (that is, in
your pocket or purse).
•
Pushing the request switch 1
while touching the inside of the
door handle will unlock the rest of
the doors.
•
To lock the vehicle, push either door
handle request switch
2 once.
Locking and Unlocking your Vehicle
via the Door Handle
1
2
To change the settings for the door locking and
unlocking system, press the SETTING
button
3, select the “Others” key, and select the
“Comfort” key.
•
To unlock all doors by touching the inside of
the door handle, select “Selective Door Unlock”.
•
To disable unlocking by touching the inside of the door handle, select
“Touch Sensitive Door Sensor”.
Please see your Owner’s Manual for important safety information, syst\
em limitations, and additional
operating and feature information.
3
Use these switches to adjust
the brightness of the vehicle
information display.
•
To increase the brightness,
push the upper switch
1.
•
To decrease the brightness,
push the lower switch
2.
Please see your Owner’s Manual for important
safety information, system limitations, and
additional operating and feature information.
Brightness Control Switches
1
2
Page 15 of 20
12
Windows
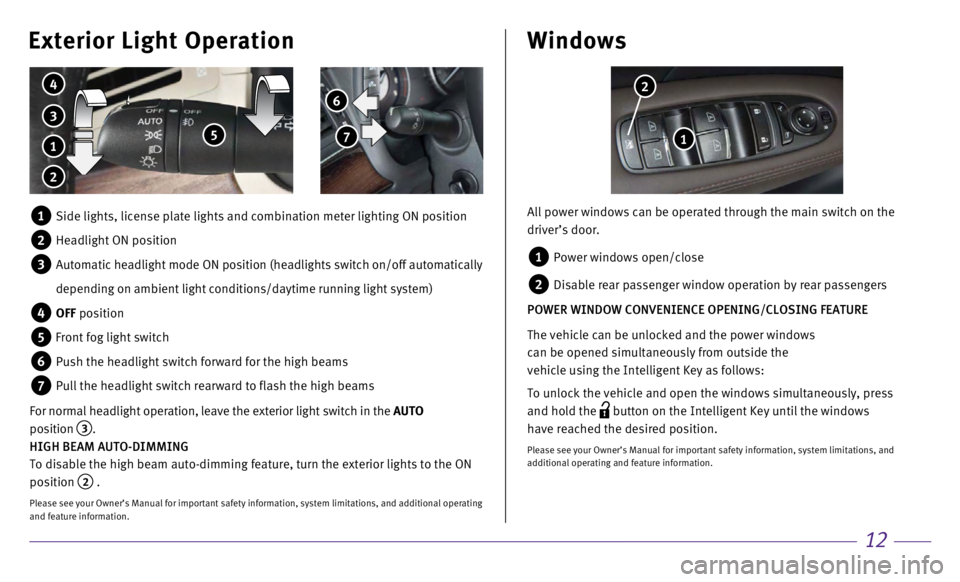
All power windows can be operated through the main switch on the
driver’s door.
1 Power windows open/close
2 Disable rear passenger window operation by rear passengers
POWER WINDOW CONVENIENCE OPENING/CLOSING FEATURE
The vehicle can be unlocked and the power windows
can be opened simultaneously from outside the
vehicle using the Intelligent Key as follows:
To unlock the vehicle and open the windows simultaneously, press
and hold the
button on the Intelligent Key until the windows
have reached the desired position.
Please see your Owner’s Manual for important safety information, syst\
em limitations, and
additional operating and feature information.
1
2 6
7
Exterior Light Operation
3
4
5 1
2
1 Side lights, license plate lights and combination meter lighting ON posi\
tion
2 Headlight ON position
3 Automatic headlight mode ON position (headlights switch on/off automati\
cally
depending on ambient light conditions/daytime running light system)
4 OFF position
5 Front fog light switch
6 Push the headlight switch forward for the high beams
7 Pull the headlight switch rearward to flash the high beams
For normal headlight operation, leave the exterior light switch in the AUTO
position
3.
HIGH BEAM AUTO-DIMMING
To disable the high beam auto-dimming feature, turn the exterior lights \
to the ON
position
2 .
Please see your Owner’s Manual for important safety information, syst\
em limitations, and additional operating
and feature information.
Page 16 of 20
13
Clock Set/AdjustmentTrip Computer
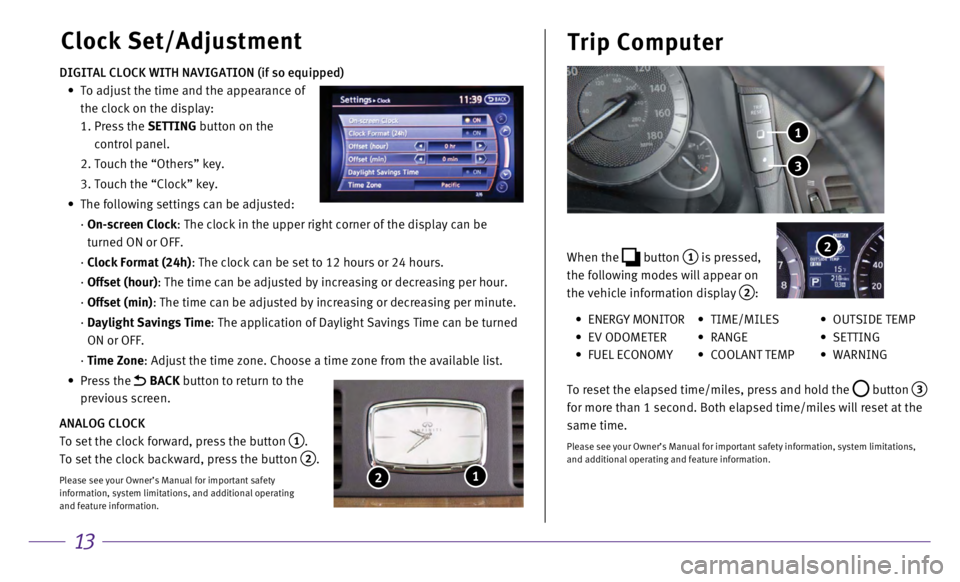
DIGITAL CLOCK WITH NAVIGATION (if so equipped)
•
To adjust the time and the appearance of
the clock on the display:
1.
Press the
SETTING button on the
control panel.
2. Touch the “Others” key.
3. Touch the “Clock” key.
•
The following settings can be adjusted:
·
On-screen Clock
: The clock in the upper right corner of the display can be
turned ON or OFF.
·
Clock Format (24h)
: The clock can be set to 12 hours or 24 hours.
·
Offset (hour)
: The time can be adjusted by increasing or decreasing per hour.
·
Offset (min)
: The time can be adjusted by increasing or decreasing per minute.
·
Daylight Savings Time
: The application of Daylight Savings Time can be turned
ON or OFF.
·
Time Zone
: Adjust the time zone. Choose a time zone from the available list.
•
Press the
BACK button to return to the
previous screen.
ANALOG CLOCK
To set the clock forward, press the button
1.
To set the clock backward, press the button
2.
Please see your Owner’s Manual for important safety
information, system limitations, and additional operating
and feature information.
1 2
When the button 1 is pressed,
the following modes will appear on
the vehicle information display
2:
3
1
2
• ENERGY MONITOR
•
EV ODOMETER
• FUEL ECONOMY
• TIME/MILES
•
RANGE
• COOLANT TEMP
• OUTSIDE TEMP
•
SETTING
•
WARNING
To reset the elapsed time/miles, press and hold the
button 3
for more than 1 second. Both elapsed time/miles will reset at the
same time.
Please see your Owner’s Manual for important safety information, syst\
em limitations,
and additional operating and feature information.
Page 17 of 20
14
Wiper and Washer Switch
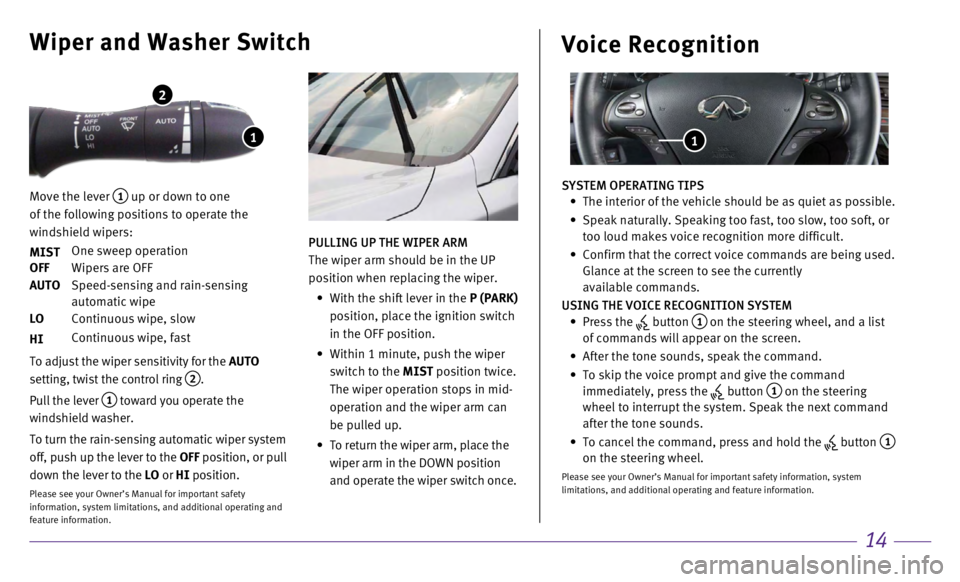
Move the lever 1 up or down to one
of the following positions to operate the
windshield wipers:
MIST
One sweep operation
OFF
Wipers are OFF
AUTO
Speed-sensing and rain-sensing
automatic wipe
LO
Continuous wipe, slow
HI
Continuous wipe, fast
To adjust the wiper sensitivity for the
AUTO
setting, twist the control ring
2.
Pull the lever
1 toward you operate the
windshield washer.
To turn the rain-sensing automatic wiper system
off, push up the lever to the OFF position, or pull
down the lever to the LO or HI position.
Please see your Owner’s Manual for important safety
information, system limitations, and additional operating and
feature information.
1
2
PULLING UP THE WIPER ARM
The wiper arm should be in the UP
position when replacing the wiper.
•
With the shift lever in the
P (PARK)
position, place the ignition switch
in the OFF position.
•
Within 1 minute, push the wiper
switch to the
MIST position twice.
The wiper operation stops in mid-
operation and the wiper arm can
be pulled up.
•
To return the wiper arm, place the
wiper arm in the DOWN position
and operate the wiper switch once.
Voice Recognition
SYSTEM OPERATING TIPS • The interior of the vehicle should be as quiet as possible.
•
Speak naturally. Speaking too fast, too slow, too soft, or
too loud makes voice recognition more difficult.
•
Confirm that the correct voice commands are being used.
Glance at the screen to see the currently
available commands.
USING THE VOICE RECOGNITION SYSTEM
•
Press the
button 1 on the steering wheel, and a list
of commands will appear on the screen.
•
After the tone sounds, speak the command.
•
To skip the voice prompt and give the command
immediately, press the button 1 on the steering
wheel to interrupt the system. Speak the next command
after the tone sounds.
•
To cancel the command, press and hold the button 1 on the steering wheel.
Please see your Owner’s Manual for important safety information, syst\
em
limitations, and additional operating and feature information.
1
Page 18 of 20
15
Infiniti Connection™ (if so equipped)
Infiniti Connection™ combines personalized convenience, concierge
settings and personal security features to compliment the Total
Ownership Experience
®. For more details on Infiniti Connection or to
enroll your vehicle, please visit www.InfinitiConnection.com or
call 855-444-7244.
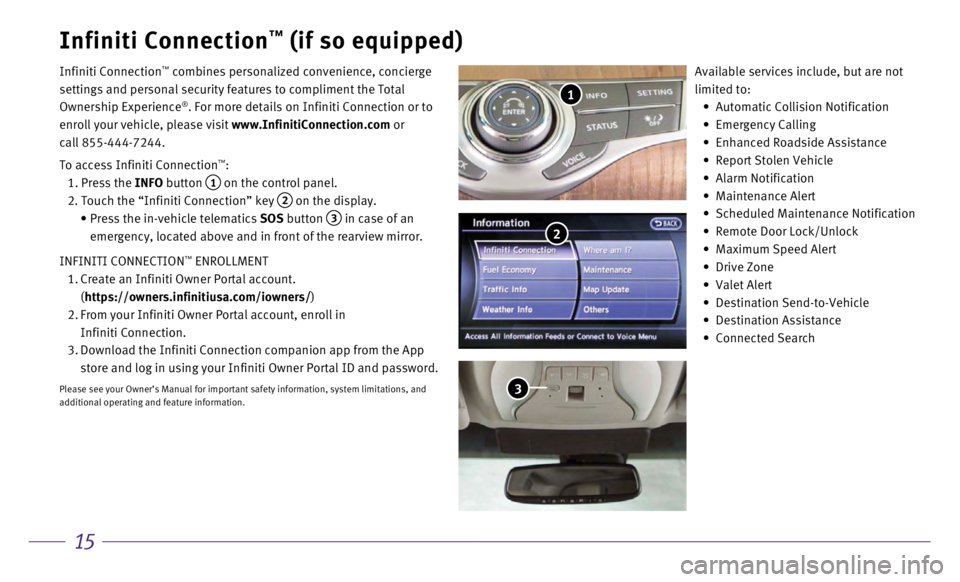
To access Infiniti Connection
™:
1. Press the
INFO button
1 on the control panel.
2. Touch the “Infiniti Connection” key 2 on the display.
•
Press the in-vehicle telematics
SOS button
3 in case of an
emergency, located above and in front of the rearview mirror.
INFINITI CONNECTION
™ ENROLLMENT
1.
Create an Infiniti Owner Portal account.
(https://owners.infinitiusa.com/iowners/)
2.
From your Infiniti Owner Portal account, enroll in
Infiniti Connection.
3.
Download the Infiniti Connection companion app from the App
store and log in using your Infiniti Owner Portal ID and password.
Please see your Owner’s Manual for important safety information, syst\
em limitations, and
additional operating and feature information.
Available services include, but are not
limited to:
•
Automatic Collision Notification
•
Emergency Calling
•
Enhanced Roadside Assistance
•
Report Stolen Vehicle
•
Alarm Notification
•
Maintenance Alert
•
Scheduled Maintenance Notification
•
Remote Door Lock/Unlock
•
Maximum Speed Alert
•
Drive Zone
•
Valet Alert
•
Destination Send-to-Vehicle
•
Destination Assistance
•
Connected Search
1
2
3
Page 19 of 20

Memo
Page 20 of 20
Printing: October 2016 (05)
QR17EA HY51U0
•
Printed in USA
To view detailed instructional videos, go to
www.infinitiownersinfo.mobi/2017/q70 or snap
this barcode with an appropriate barcode reader.
I N SPIRED PER F O R MAN C E
This Quick Reference Guide is intended to provide an overview of some of
the unique features of your new vehicle. Please see your Owner’s Manu\
al for
important safety information and system operation limitations. Features \
and
equipment in your vehicle may vary depending on model, trim level, optio\
ns
selected, order, date of production, region or availability. Therefore, \
you
may find information about features or equipment that are not included o\
r
installed on your vehicle.
All information, specifications and illustrations in this Quick Referenc\
e Guide
are those in effect at the time of printing. INFINITI reserves the right to change
specifications, performance, design or component suppliers without notice
and without obligation. From time to time, INFINITI may update or revise\
this
Quick Reference Guide to provide owners with the most accurate informati\
on
currently available. Please carefully read and retain, with this Quick
Reference Guide, all revision updates sent to you by INFINITI to ensure \
you
have access to accurate and up-to-date information regarding your vehicl\
e.
Current versions of vehicle Quick Reference Guides, Owner’s Manuals a\
nd
any updates can also be found in the Owner section of the INFINITI website
at https://owners.infinitiusa.com/iowners/navigation/manualsAndGuides.
If you have questions concerning any information in your Owner’s Manual,
contact INFINITI Client Support (see contact information listed above)\
.