light INFINITI QX50 2019 Navigation Manual
[x] Cancel search | Manufacturer: INFINITI, Model Year: 2019, Model line: QX50, Model: INFINITI QX50 2019Pages: 288, PDF Size: 1.42 MB
Page 71 of 288
INFO:
. Make sure that the iPod® firmware is
updated.
. The Lightning
TMconnector works with
iPhone® 5s, iPhone® 5, iPod touch®
(5th generation), and iPod nano® (7th
generation).
The 30-pin connector works with
iPhone® 4S, iPhone® 4, iPhone® 3GS,
iPhone® 3G, iPhone®, iPod touch® (1st
through 4th generation), iPod classic®
and iPod nano® (1st through 6th gen-
eration).
USB works with iPhone® 5s, iPhone® 5,
iPhone® 4S, iPhone® 4, iPhone® 3GS,
iPhone® 3G, iPhone®, iPod touch® (1st
through 5th generation) iPod classic®
and iPod nano® (1st through 7th gen-
eration).
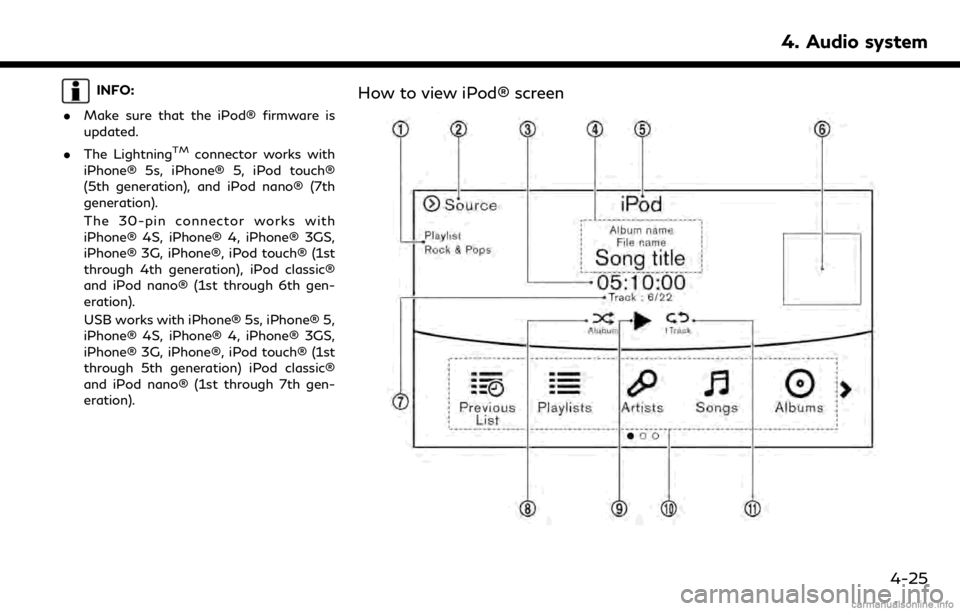
How to view iPod® screen
4. Audio system
4-25
Page 80 of 288

4. Audio system
CD/USB MEMORY DEVICE
CARE AND CLEANING
CD
. Handle a CD/DVD by its edges. Never
touch the surface of the disc. Do not
bend the disc.
. Always place the discs in the storage
case when they are not being used.
. To clean a disc, wipe the surface from
the center to the outer edge using a
clean, soft cloth. Do not wipe the disc
using a circular motion.
Do not use a conventional record cleaner or alcohol intended for industrial use.
. A new disc may be rough on the inner
and outer edges. Remove the rough
edges by rubbing the inner and outer
edges with the side of a pen or pencil as
illustrated.
USB MEMORY DEVICE
.Never touch the terminal portion of the
USB memory device.
. Do not place heavy objects on the USB
memory device.
. Do not store the USB memory device in
highly humid locations.
. Do not expose the USB memory device
to direct sunlight.
. Do not spill any liquids on the USB
memory device.
Refer to the USB memory device Owner’s
Manual for the details.
GRACENOTE® END USER LI-
CENSE AGREEMENT
This application or device contains software
from Gracenote, Inc. of Emeryville, Califor-
nia (“Gracenote”). The software from Grace-
note (the “Gracenote Software”) enables this
application to perform disc and/or file
identification and obtain music-related in-
formation, including name, artist, track, and
title information (“Gracenote Data”) from
online servers or embedded databases (col-
lectively, “Gracenote Servers”) and to per-
form other functions. You may use
Gracenote Data only by means of the
intended End-User functions of this applica-
tion or device.
You agree that you will use Gracenote Data,
the Gracenote Software, and Gracenote
Servers for your own personal non-commer-
cial use only. You agree not to assign, copy,
transfer or transmit the Gracenote Software
or any Gracenote Data to any third party.
YOU AGREE NOT TO USE OR EXPLOIT
GRACENOTE DATA, THE GRACENOTE
SOFTWARE, OR GRACENOTE SERVERS,
EXCEPT AS EXPRESSLY PERMITTED
HEREIN.
You agree that your non-exclusive license to
4-34
Page 85 of 288

voice during a call.
. This Bluetooth® system supports Wide-
band Speech, which enhances the sound
quality of phone calls placed over Blue-
tooth®. To take advantage of this fea-
ture, the mobile device should be used on
a carrier supporting Adaptive Multi-Rate
Wideband (AMR-WB) or HD Voice
technology. The performance of AMR-
WB may vary by carrier and calling area.
Consult your mobile carrier if you experi-
ence issues with call quality or connec-
tion.
. Immediately after the ignition switch is
pushed to the “ON” position, it may be
impossible to receive a call for a short
period of time.
. Do not place the cellular phone in an area
surrounded by metal or far away from
the in-vehicle phone module to prevent
tone quality degradation and wireless
connection disruption.
. While a cellular phone is connected
through the Bluetooth® wireless con-
nection, the battery power of the cellular
phone may discharge quicker than usual. .
If the Bluetooth® Hands-Free Phone
System seems to be malfunctioning,
please visit www.infinitiusa.com/blue-
tooth for troubleshooting help.
. Some cellular phones or other devices
may cause interference or a buzzing
noise to come from the audio system
speakers. Storing the device in a differ-
ent location may reduce or eliminate the
noise.
. Refer to the cellular phone Owner’s
Manual regarding the telephone pairing
procedure specific to your phone, bat-
tery charging, cellular phone antenna,
etc.
. The antenna display on the monitor may
not coincide with the antenna display of
some cellular phones.
. The battery display on the monitor may
not coincide with the battery display of
some cellular phones.
. Keep the interior of the vehicle as quiet
as possible to hear the caller’s voice
clearly as well as to minimize its echoes.
. If reception between callers is unclear,
adjusting the incoming or outgoing call
volume may improve the clarity. .
The microphone is located near the map
light.
PHONE
Connecting Bluetooth® Hands-
Free Phone
A cellular phone device must be connected
to the Bluetooth® Hands-Free Phone Sys-
tem before operation. Up to 5 cellular
phones can be connected to the system.
“Connecting Bluetooth® device”
(page 2-22)
Phone selection
Select one of the connected devices for
operation.
1. Push
Page 105 of 288
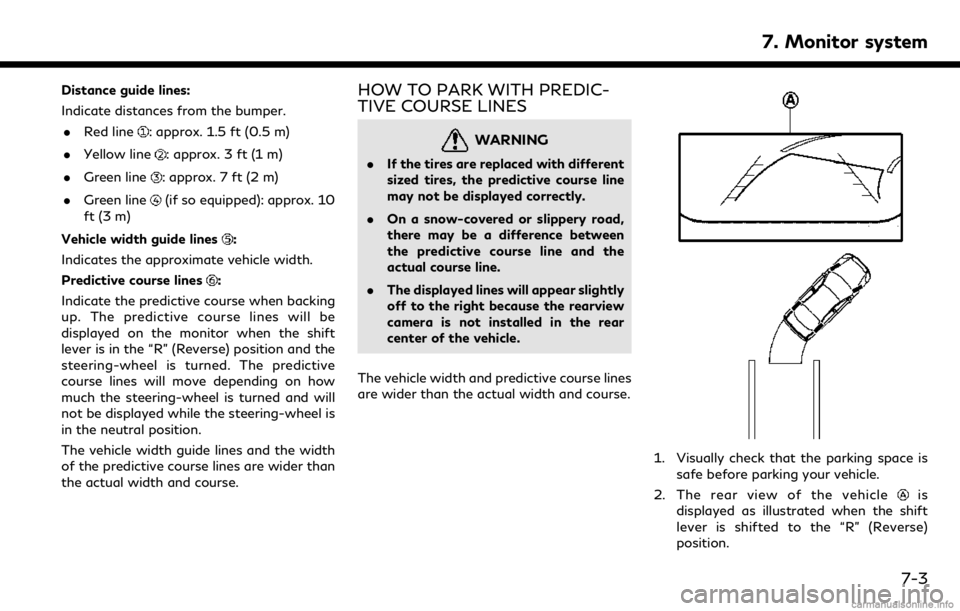
Distance guide lines:
Indicate distances from the bumper.. Red line
: approx. 1.5 ft (0.5 m)
. Yellow line
: approx. 3 ft (1 m)
. Green line
: approx. 7 ft (2 m)
. Green line
(if so equipped): approx. 10
ft (3 m)
Vehicle width guide lines
:
Indicates the approximate vehicle width.
Predictive course lines
:
Indicate the predictive course when backing
up. The predictive course lines will be
displayed on the monitor when the shift
lever is in the “R” (Reverse) position and the
steering-wheel is turned. The predictive
course lines will move depending on how
much the steering-wheel is turned and will
not be displayed while the steering-wheel is
in the neutral position.
The vehicle width guide lines and the width
of the predictive course lines are wider than
the actual width and course.
HOW TO PARK WITH PREDIC-
TIVE COURSE LINES
WARNING
. If the tires are replaced with different
sized tires, the predictive course line
may not be displayed correctly.
. On a snow-covered or slippery road,
there may be a difference between
the predictive course line and the
actual course line.
. The displayed lines will appear slightly
off to the right because the rearview
camera is not installed in the rear
center of the vehicle.
The vehicle width and predictive course lines
are wider than the actual width and course.
1. Visually check that the parking space is safe before parking your vehicle.
2. The rear view of the vehicle
is
displayed as illustrated when the shift
lever is shifted to the “R” (Reverse)
position.
7. Monitor system
7-3
Page 108 of 288
7. Monitor system
the object projects over the actual backing
up course.
ADJUSTING THE SCREEN
The RearView Monitor settings can be
changed with the following procedure.
1. Push
Page 109 of 288
resulting in a fire or an electric shock.
The following are operating limitations and
do not represent a system malfunction: . When the temperature is extremely high
or low, the screen may not clearly display
objects.
. When strong light is directly coming on
the camera, objects may not be displayed
clearly.
. Vertical lines may be seen in objects on
the screen. This is due to strong reflected
light from the bumper.
. The screen may flicker under fluorescent
light.
. The colors of objects on the RearView
Monitor may differ somewhat from the
actual color of objects.
. Objects on the monitor may not be clear
in a dark environment.
. There may be a delay when switching to
the RearView Monitor.
. When activating the RearView Monitor,
the guide lines, the icons and the mes-
sages may not be displayed for a while. .
If dirt, rain or snow accumulates on the
camera, the RearView Monitor may not
display object clearly. Clean the camera.
. Do not use wax on the camera window.
Wipe off any wax with a clean cloth
dampened with mild detergent diluted
with water.
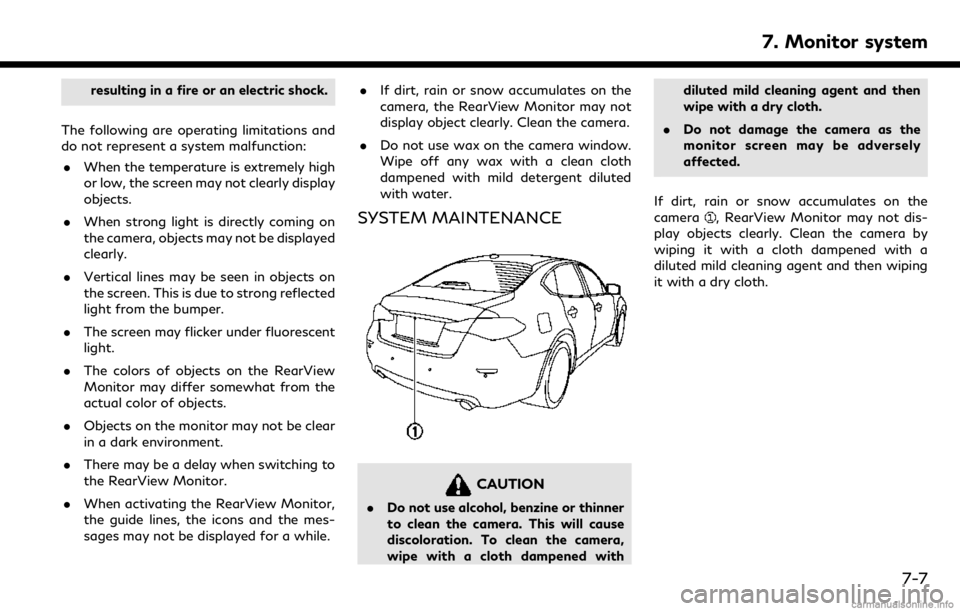
SYSTEM MAINTENANCE
CAUTION
.Do not use alcohol, benzine or thinner
to clean the camera. This will cause
discoloration. To clean the camera,
wipe with a cloth dampened with diluted mild cleaning agent and then
wipe with a dry cloth.
. Do not damage the camera as the
monitor screen may be adversely
affected.
If dirt, rain or snow accumulates on the
camera
, RearView Monitor may not dis-
play objects clearly. Clean the camera by
wiping it with a cloth dampened with a
diluted mild cleaning agent and then wiping
it with a dry cloth.
7. Monitor system
7-7
Page 112 of 288
7. Monitor system
.Use the displayed lines and the bird’s-
eye view as a reference. The lines and
the bird’s-eye view are greatly af-
fected by the number of occupants,
fuel level, vehicle position, road con-
dition and road grade.
. If the tires are replaced with different
sized tires, the predictive course line
and the bird’s-eye view may be dis-
played incorrectly.
. When driving the vehicle up a hill,
objects viewed in the monitor are
further than they appear. When driv-
ing the vehicle down a hill, objects
viewed in the monitor are closer than
they appear.
. Objects in the field of view of the rear
view or rear wide view (if so equipped)
will appear visually opposite com-
pared to when viewed in the rear view
or rear wide view (if so equipped) and
outside mirrors.
. Use the mirrors or actually look to
properly judge distances to other
objects.
. The distance between objects viewed
in the rear view differs from actual
distance because a wide-angle lens is used.
. On a snow-covered or slippery road,
there may be a difference between
the predictive course line and the
actual course line.
. The vehicle width and predictive
course lines are wider than the actual
width and course.
. The displayed lines on the rear view
will appear slightly off to the right
because the rear view camera is not
installed in the rear center of the
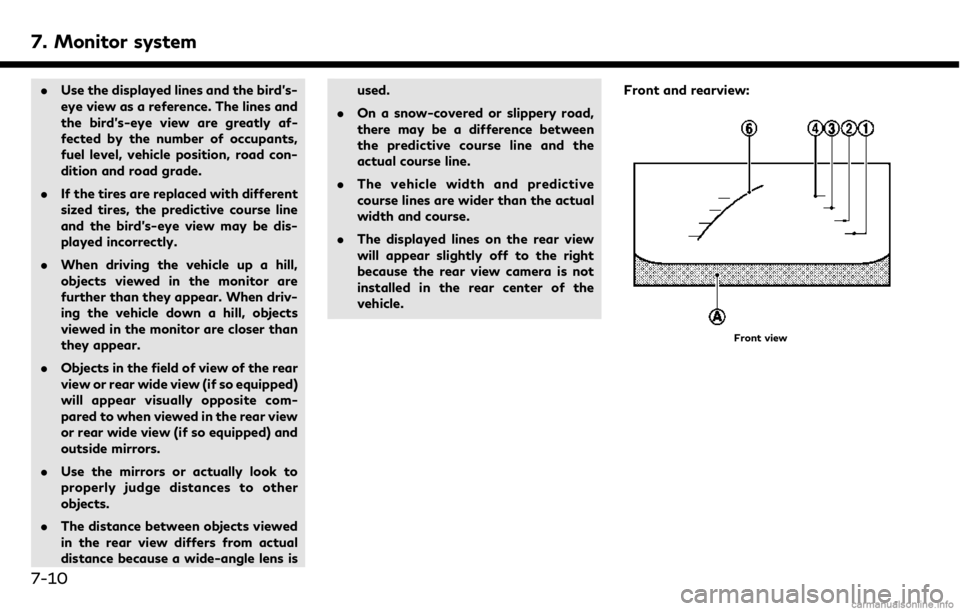
vehicle. Front and rearview:
Front view
7-10
Page 113 of 288

Rear view
Guiding lines that indicate the approximate
vehicle width and distances to objects with
reference to the vehicle body line
, are
displayed on the monitor.
Distance guide lines:
Indicate distances from the vehicle body.
. Red line
: approx. 1.5 ft (0.5 m)
. Yellow line
: approx. 3 ft (1 m)
. Green line
: approx. 7 ft (2 m)
. Green line
(if so equipped): approx. 10
ft (3 m)
Vehicle width guide lines
: Indicates the approximate vehicle width.
Predictive course lines
:
Indicate the predictive course when operat-
ing the vehicle. The predictive course lines
will be displayed on the monitor when the
steering wheel is turned. The predictive
course lines will move depending on how
much the steering wheel is turned and will
not be displayed while the steering wheel is
in the straight ahead position.
The front view will not be displayed when
the vehicle speed is above 6 MPH (10 km/h).
NOTE:
When the monitor displays the front view
and the steering wheel turns about 90
degrees or less from the straight ahead
position, both the right and left predictive
course lines
are displayed. When the
steering wheel turns about 90 degrees or
more, a line is displayed only on the
opposite side of the turn. Bird’s-eye view:
The bird’s-eye view shows the overhead
view of the vehicle, which helps confirm the
vehicle position and the predictive course to
a parking space.
The vehicle icon
shows the position of the
vehicle. Note that the size of the vehicle icon
on the bird’s-eye view may differ somewhat
from the actual distance to the vehicle.
The areas that the cameras cannot cover
are indicated in black.
The non-viewable area
is highlighted in
yellow for several seconds after the bird’s-
eye view is displayed. It will be shown only
7. Monitor system
7-11
Page 117 of 288
the object projects over the actual backing
up course.
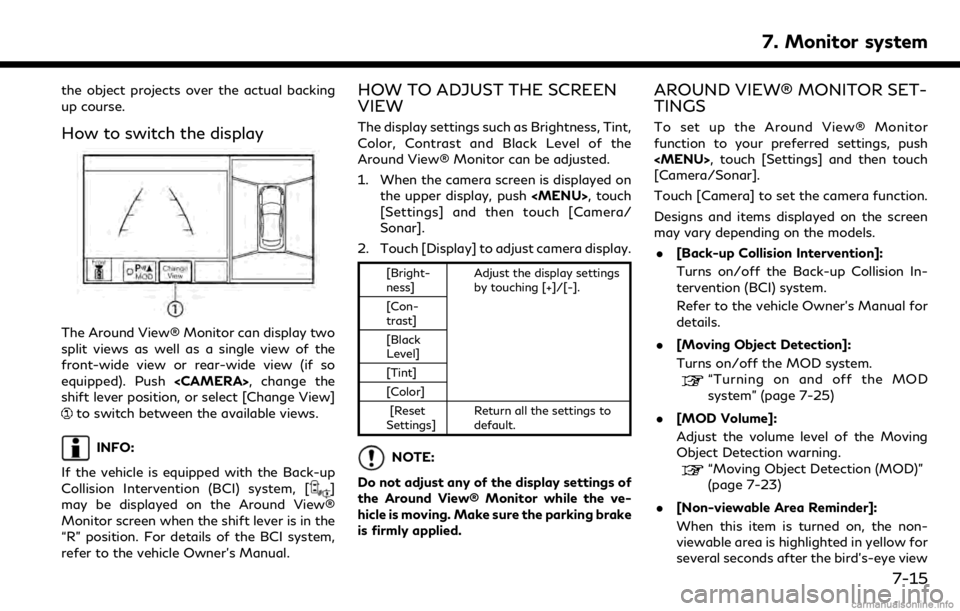
How to switch the display
The Around View® Monitor can display two
split views as well as a single view of the
front-wide view or rear-wide view (if so
equipped). Push
shift lever position, or select [Change View]
to switch between the available views.
INFO:
If the vehicle is equipped with the Back-up
Collision Intervention (BCI) system, [
]
may be displayed on the Around View®
Monitor screen when the shift lever is in the
“R” position. For details of the BCI system,
refer to the vehicle Owner’s Manual.
HOW TO ADJUST THE SCREEN
VIEW
The display settings such as Brightness, Tint,
Color, Contrast and Black Level of the
Around View® Monitor can be adjusted.
1. When the camera screen is displayed on the upper display, push
[Settings] and then touch [Camera/
Sonar].
2. Touch [Display] to adjust camera display.
[Bright-
ness] Adjust the display settings
by touching [+]/[-].
[Con-
trast]
[Black
Level]
[Tint]
[Color]
[Reset
Settings] Return all the settings to
default.
NOTE:
Do not adjust any of the display settings of
the Around View® Monitor while the ve-
hicle is moving. Make sure the parking brake
is firmly applied.
AROUND VIEW® MONITOR SET-
TINGS
To set up the Around View® Monitor
function to your preferred settings, push
[Camera/Sonar].
Touch [Camera] to set the camera function.
Designs and items displayed on the screen
may vary depending on the models. . [Back-up Collision Intervention]:
Turns on/off the Back-up Collision In-
tervention (BCI) system.
Refer to the vehicle Owner’s Manual for
details.
. [Moving Object Detection]:
Turns on/off the MOD system.
“Turning on and off the MOD
system” (page 7-25)
. [MOD Volume]:
Adjust the volume level of the Moving
Object Detection warning.
“Moving Object Detection (MOD)”
(page 7-23)
. [Non-viewable Area Reminder]:
When this item is turned on, the non-
viewable area is highlighted in yellow for
several seconds after the bird’s-eye view
7. Monitor system
7-15
Page 118 of 288
![INFINITI QX50 2019 Navigation Manual 7. Monitor system
is displayed for the first time after the
ignition switch is positioned in the “ON”
position.
. [Predictive Course Lines]:
When this item is turned on, the pre-
dictive course li INFINITI QX50 2019 Navigation Manual 7. Monitor system
is displayed for the first time after the
ignition switch is positioned in the “ON”
position.
. [Predictive Course Lines]:
When this item is turned on, the pre-
dictive course li](/img/42/34995/w960_34995-117.png)
7. Monitor system
is displayed for the first time after the
ignition switch is positioned in the “ON”
position.
. [Predictive Course Lines]:
When this item is turned on, the pre-
dictive course line is displayed in the
front, rear and bird’s-eye view screen.
. [Automatic Display with Sonar]:
The automatic sonar display can be
turned on/off.
“Camera aiding sonar function
(models with Around View® Moni-
tor)” (page 7-19)
AROUND VIEW® MONITOR SYS-
TEM LIMITATIONS
WARNING
Listed below are the system limitations
for Around View® Monitor. Failure to
operate the vehicle in accordance with
these system limitations could result in
serious injury or death.
. Do not use the Around View® Moni-
tor with the outside mirrors in the
stored position, and make sure that
the trunk is securely closed when
operating the vehicle using the Around View® Monitor.
. The apparent distance between ob-
jects viewed on the Around View®
Monitor differs from the actual dis-
tance.
. The cameras are installed on the front
grille, the outside mirrors and above
the rear license plate. Do not put
anything on the vehicle that covers
the cameras.
. When washing the vehicle with high
pressure water, be sure not to spray it
around the cameras. Otherwise,
water may enter the camera unit
causing water condensation on the
lens, a malfunction, fire or an electric
shock.
. Do not strike the cameras. They are
precision instruments. Doing so could
cause a malfunction or cause damage
resulting in a fire or an electric shock.
The following are operating limitations and
do not represent a system malfunction: . The screen displayed on the Around
View® Monitor will automatically return
to the previous screen 3 minutes after
has been pushed while the
shift lever is in a position other than the
“R” (Reverse) position.
. There may be a delay when switching
between views.
. When the temperature is extremely high
or low, the screen may not display
objects clearly.
. When strong light is directly shines on
the camera, objects may not be displayed
clearly.
. The screen may flicker under fluorescent
light.
. The colors of objects on the Around
View® Monitor may differ somewhat
from the actual color of objects.
. Objects on the monitor may not be clear
and the color of the object may differ in a
dark environment.
. There may be differences in sharpness
between each camera view of the bird’s-
eye view.
. When activating the Around View®
Monitor, the icons and the messages
may not be displayed for a while.
7-16