display INFINITI QX50 2019 Quick Reference Guide
[x] Cancel search | Manufacturer: INFINITI, Model Year: 2019, Model line: QX50, Model: INFINITI QX50 2019Pages: 24, PDF Size: 2.2 MB
Page 3 of 24
Additional information about your vehicle is also available in your Owner’s Manual, INFINITI InTouch™ Owner’s Manual at www.InfinitiUSA.com.
Table of Contents
• A cellular telephone should not be used for any purpose while
driving so full attention may be
given to vehicle operation.
•
Alw
ays wear your seat belt.
•
Supplemen
tal air bags do not
replace proper seat belt usage. • Childr
en 12 and under
should always ride in the
rear seat properly secured
in child restraints or seat
belts according to their age
and weight.
• Do not drink and drive. For more information, refer to the “Safety — Seats,
seat belts and supplemental restraint system (section
1)”
, the “Monitor, climate, audio, phone and voice
recognition systems (section 4)” and the “Starting
and driving (section 5)” of your Owner’s Manual.
PLEASE SEE YOUR OWNER’S MANUAL FOR IMPORTANT SAFETY INFORMATION AND SYSTEM OPERATION LIMITATIONS.
Cockpit Overview ........................................................................\
......... 1
Instrumen t Panel ........................................................................\
.......... 3
Meters and Gauges
........................................................................\
..... 5
Wiper and Washer Switch
................................................................. 7
Cruise Control
........................................................................\
............... 8
USB Connection Ports
........................................................................\
9
Electronic Shift Lever
........................................................................\
.. 9
Heater and Air Conditioner (automatic)
.........................................10
Opening the Liftgate
........................................................................\
... 11
Motion-Activated Liftgate (if so equipped)
..................................11Automatic Drive Positioner (if so equipped)
.................................
12
Head Up Display (if so equipped) .....................................................12
ProPILOT Assist (if so equipped)
.....................................................13
Connecting Your Cellular Phone or Device via Bluetooth
® ........ 14
V
oice Recognition........................................................................\
......... 14
Bluetooth
® Streaming Audio .............................................................. 15
H
omelink® Universal Transceiver (if so equipped) ........................ 15
INFINITI In Touch™ Services (if so equipped) ................................. 16
N
avigation System (if so equipped) ................................................. 17
Electronic Parking Brake
.................................................................... 18
Page 5 of 24

2
Cockpit Overview
Turn signal switch
Bluetooth®/Center display multi-function control switches
Wiper and washer switch
ProPILOT Assist/Intelligent Cruise Control (ICC) switches (if so equipped)
Vehicle information display switches
Page 7 of 24

4
Instrument Panel
Upper display/Navigation System (if so equipped)
Automatic heater and air conditioner controls
Lower display
Audio control panel
Shift lever
Push-button ignition switch
Hood latch release
Lower switch bank
•
Instrumen
t brightness control
•
F
ront and rear sonar switch (if so equipped)
•
S
teering assist switch (if so equipped)
•
P
ower liftgate switch
•
H
eadlight control switch
•
F
og light switch (if so equipped)
•
H
ead Up Display (HUD) switch (if so equipped)
•
Dynamic driv
er assistance switch (if so equipped)
Page 9 of 24

6
Meters and Gauges
Engine coolant temperature gauge
Odometer/Twin trip odometer
Vehicle information display
Shift lever indicator
Speedometer
Fuel gauge
Page 10 of 24
7
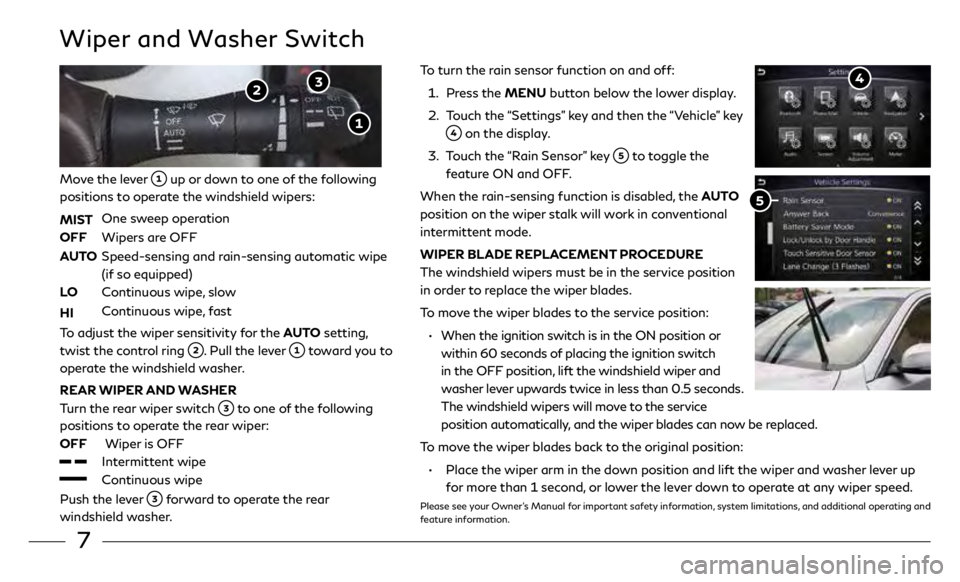
To turn the rain sensor function on and off:
1.
Pr
ess the MENU button below the lower display.
2.
T
ouch the “Settings” key and then the “Vehicle” key
on the display.
3
.
T
ouch the “Rain Sensor” key
to toggle the
feature ON and OFF.
When the rain-sensing function is disabled, the AUTO
position on the wiper stalk will work in conventional
intermittent mode.
WIPER BLADE REPLACEMENT PROCEDURE
The windshield wipers must be in the service position
in order to replace the wiper blades.
To move the wiper blades to the service position:
•
When the ignition swit
ch is in the ON position or
within 60 seconds of placing the ignition switch
in the OFF position, lift the windshield wiper and
washer lever upwards twice in less than 0.5 seconds.
The windshield wipers will move to the service
position automatically, and the wiper blades can now be replaced.
To move the wiper blades back to the original position:
•
Plac
e the wiper arm in the down position and lift the wiper and washer lever up
for more than 1 second, or lower the lever down to operate at any wiper speed.
Please see your Owner’s Manual for important safety information, system limitations, and additional operating and
feature information.
Wiper and Washer Switch
Move the lever up or down to one of the following
positions to operate the windshield wipers:
MIST
One sw
eep operation
OFF
Wipers ar
e OFF
AUTO
Speed-sensing and r
ain-sensing automatic wipe
(if so equipped)
LO
C
ontinuous wipe, slow
HI
C
ontinuous wipe, fast
To adjust the wiper sensitivity for the AUTO setting,
twist the control ring
. Pull the lever toward you to
operate the windshield washer.
REAR WIPER AND WASHER
Turn the rear wiper switch
to one of the following
positions to operate the rear wiper:
OFF
Wiper
is OFF
Intermittent wipe
Continuous wipe
Push the lever
forward to operate the rear
windshield washer.
Page 11 of 24
8
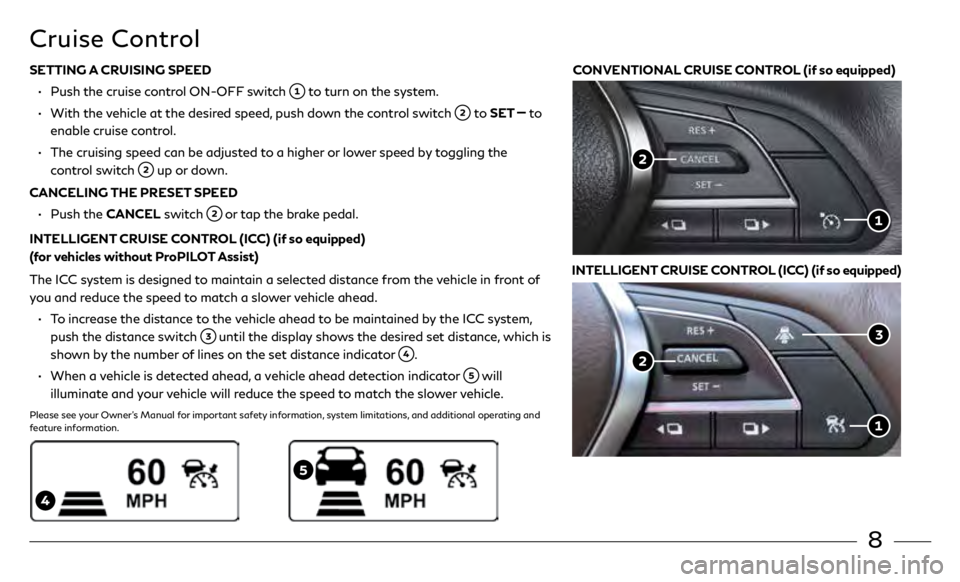
SETTING A CRUISING SPEED
•
Push the cruise c
ontrol ON-OFF switch
to turn on the system.
•
With the
vehicle at the desired speed, push down the control switch
to SET to
enable cruise control.
•
The cruising speed c
an be adjusted to a higher or lower speed by toggling the
control switch
up or down.
CANCELING THE PRESET SPEED
•
Push the CANCEL switch
or tap the brake pedal.
INTELLIGENT CRUISE CONTROL (ICC) (if so equipped)
(for vehicles without ProPILOT Assist)
The ICC system is designed to maintain a selected distance from the vehicle in front of
you and reduce the speed to match a slower vehicle ahead.
•
T
o increase the distance to the vehicle ahead to be maintained by the ICC system,
push the distance switch
until the display shows the desired set distance, which is
shown by the number of lines on the set distance indicator
.
•
When a
vehicle is detected ahead, a vehicle ahead detection indicator
will
illuminate and your vehicle will reduce the speed to match the slower vehicle.
Please see your Owner’s Manual for important safety information, system limitations, and additional operating and
feature information.
Cruise Control
CONVENTIONAL CRUISE CONTROL (if so equipped)
INTELLIGENT CRUISE CONTROL (ICC) (if so equipped)
Page 13 of 24
10
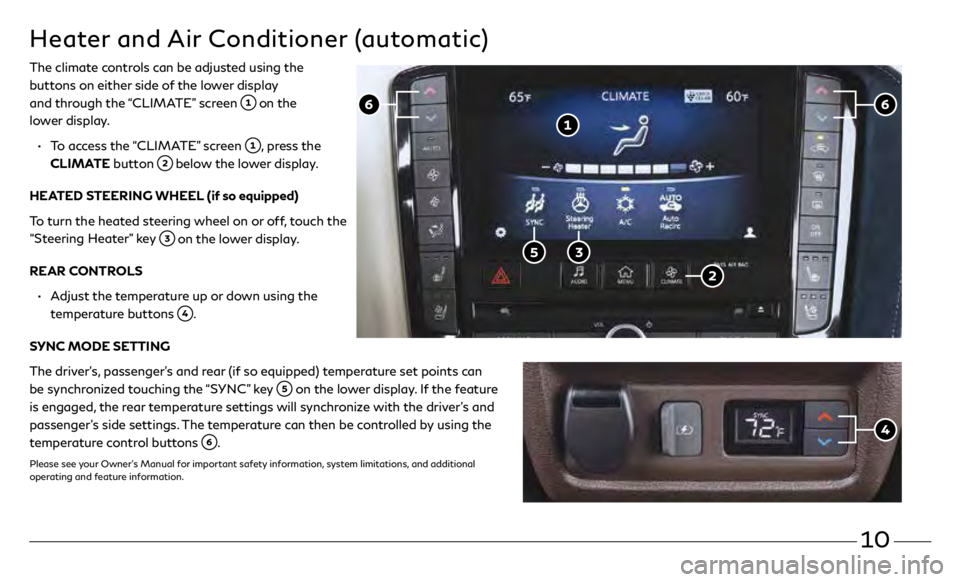
Heater and Air Conditioner (automatic)
The climate controls can be adjusted using the
buttons on either side of the lower display
and through the “CLIMATE” screen
on the
lower display.
•
To access the “CLIMATE” screen
, press the
CLIMATE button
below the lower display.
HEATED STEERING WHEEL (if so equipped)
To turn the heated steering wheel on or off, touch the
“Steering Heater” key
on the lower display.
REAR CONTROLS
•
A
djust the temperature up or down using the
temperature buttons
.
SYNC MODE SETTING
The driver’s, passenger’s and rear (if so equipped) temperature set points can
be synchronized touching the “SYNC” key
on the lower display. If the feature
is engaged, the rear temperature settings will synchronize with the driver’s and
passenger’s side settings. The temperature can then be controlled by using the
temperature control buttons
.
Please see your Owner’s Manual for important safety information, system limitations, and additional
operating and feature information.
Page 15 of 24
12
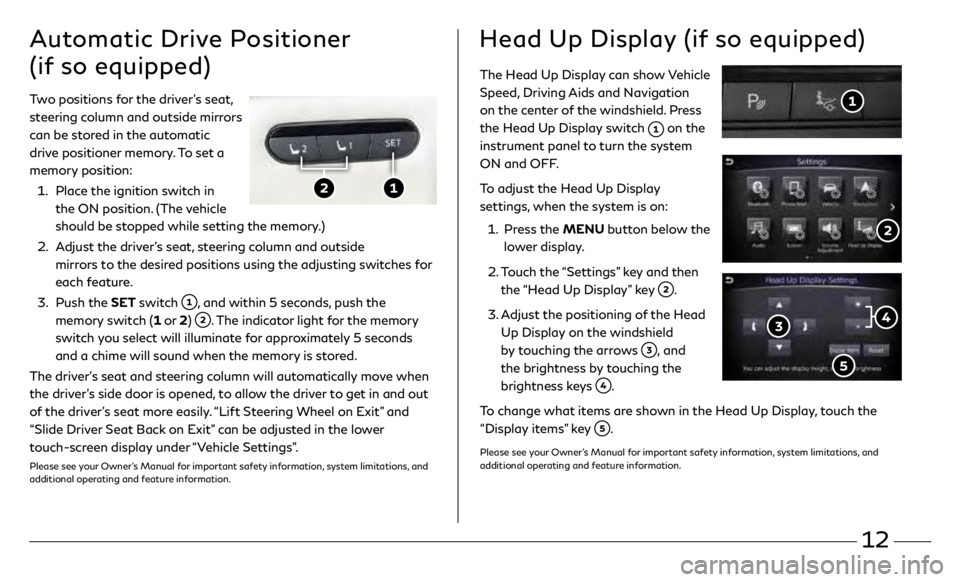
The Head Up Display can show Vehicle
Speed, Driving Aids and Navigation
on the center of the windshield. Press
the Head Up Display switch
on the
instrument panel to turn the system
ON and OFF.
To adjust the Head Up Display
settings, when the system is on:
1.
Pr
ess the MENU button below the
lower display.
2.
T
ouch the “Settings” key and then
the “Head Up Display” key
.
3
.
A
djust the positioning of the Head
Up Display on the windshield
by touching the arrows
, and
the brightness by touching the
brightness keys
.
To change what items are shown in the Head Up Display, touch the
“Display items” key
.
Please see your Owner’s Manual for important safety information, system limitations, and
additional operating and feature information.
Two positions for the driver’s seat,
steering column and outside mirrors
can be stored in the automatic
drive positioner memory. To set a
memory position:
1.
Plac
e the ignition switch in
the ON position. (The vehicle
should be stopped while setting the memory.)
2.
A
djust the driver’s seat, steering column and outside
mirrors to the desired positions using the adjusting switches for
each feature.
3
.
Push the
SET switch
, and within 5 seconds, push the
memory switch (1 or 2)
. The indicator light for the memory
switch you select will illuminate for approximately 5 seconds
and a chime will sound when the memory is stored.
The driver’s seat and steering column will automatically move when
the driver’s side door is opened, to allow the driver to get in and out
of the driver’s seat more easily. “Lift Steering Wheel on Exit” and
“Slide Driver Seat Back on Exit” can be adjusted in the lower
touch-screen display under “Vehicle Settings”.
Please see your Owner’s Manual for important safety information, system limitations, and
additional operating and feature information.
Automatic Drive Positioner
(if so equipped)Head Up Display (if so equipped)
Page 16 of 24
13
ProPILOT Assist (if so equipped)
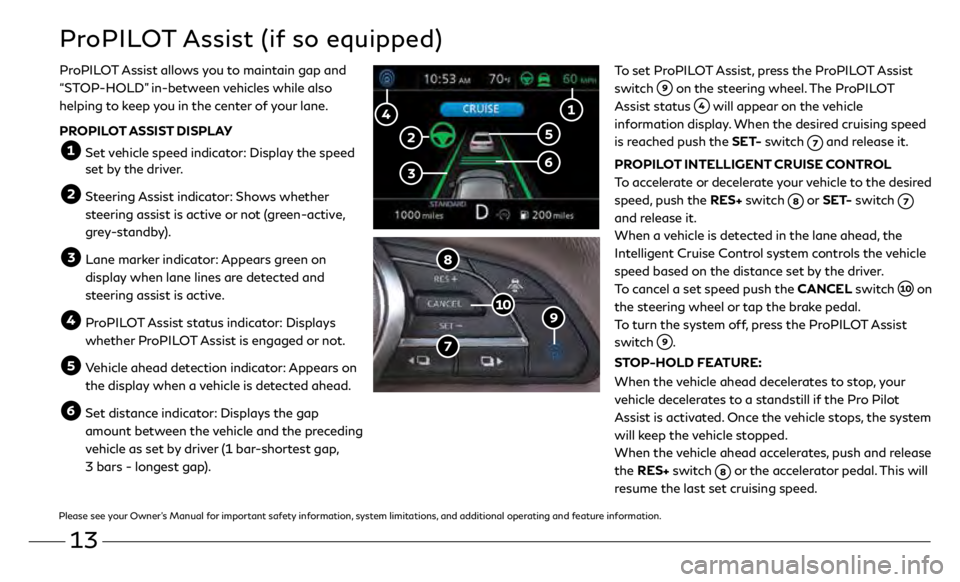
To set ProPILOT Assist, press the ProPILOT Assist
switch
on the steering wheel. The ProPILOT
Assist status
will appear on the vehicle
information display. When the desired cruising speed
is reached push the SET- switch
and release it.
PROPILOT INTELLIGENT CRUISE CONTROL
To accelerate or decelerate your vehicle to the desired
speed, push the RES+ switch
or SET- switch
and release it.
When a vehicle is detected in the lane ahead, the
Intelligent Cruise Control system controls the vehicle
speed based on the distance set by the driver.
To cancel a set speed push the CANCEL switch
on
the steering wheel or tap the brake pedal.
To turn the system off, press the ProPILOT Assist
switch
.
STOP-HOLD FEATURE:
When the vehicle ahead decelerates to stop, your
vehicle decelerates to a standstill if the Pro Pilot
Assist is activated. Once the vehicle stops, the system
will keep the vehicle stopped.
When the vehicle ahead accelerates, push and release
the RES+ switch
or the accelerator pedal. This will
resume the last set cruising speed.
ProPILOT Assist allows you to maintain gap and
“STOP-HOLD” in-between vehicles while also
helping to keep you in the center of your lane.
PROPILOT ASSIST DISPLAY
Set vehicle speed indicator: Display the speed
set by the driver.
Steering Assist indicator: Shows whether
steering assist is active or not (green-active,
grey-standby).
Lane mark er indicator: Appears green on
display when lane lines are detected and
steering assist is active.
ProPILOT Assist status indicator: Displays whether ProPILOT Assist is engaged or not.
Vehicle ahead detection indicator: Appears on the display when a vehicle is detected ahead.
Set distance indicator: Displays the gap amount between the vehicle and the preceding
vehicle as set by driver (1 bar-shortest gap,
3 bars - longest gap).
Please see your Owner’s Manual for important safety information, system limitations, and additional operating and feature information.
Page 17 of 24
14
Connecting Your Cellular Phone
or Device via Bluetooth
®*
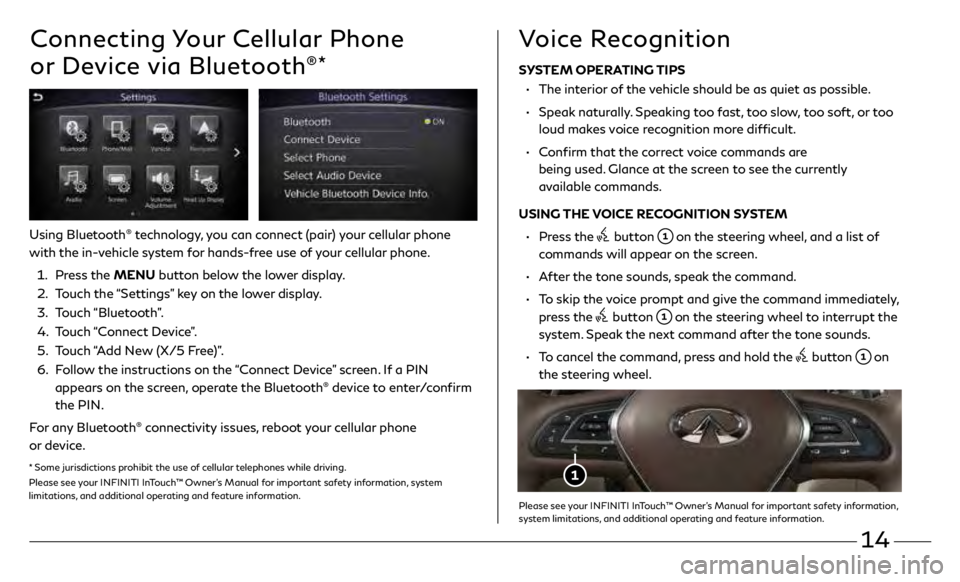
Using Bluetooth® technology, you can connect (pair) your cellular phone
with the in-vehicle system for hands-free use of your cellular phone.
1.
Pr
ess the MENU button below the lower display.
2.
T
ouch the “Settings” key on the lower display.
3
.
Touch “Bluetooth”.
4.
T
ouch “Connect Device”.
5.
T
ouch “Add New (X/5 Free)”.
6.
F
ollow the instructions on the “Connect Device” screen. If a PIN
appears on the screen, operate the Bluetooth
® device to enter/confirm
the PIN.
For any Bluetooth
® connectivity issues, reboot your cellular phone
or device.
* Some jurisdictions prohibit the use of cellular telephones while driving.
Please see your INFINITI InTouch™ Owner’s Manual for important safety information, system
limitations, and additional operating and feature information.
SYSTEM OPERATING TIPS
•
The in
terior of the vehicle should be as quiet as possible.
•
Speak
naturally. Speaking too fast, too slow, too soft, or too
loud makes voice recognition more difficult.
•
C
onfirm that the correct voice commands are
being used. Glance at the screen to see the currently
available commands.
USING THE VOICE RECOGNITION SYSTEM
•
Pr
ess the
button on the steering wheel, and a list of
commands will appear on the screen.
•
A
fter the tone sounds, speak the command.
•
T
o skip the voice prompt and give the command immediately,
press the
button on the steering wheel to interrupt the
system. Speak the next command after the tone sounds.
•
T
o cancel the command, press and hold the
button on
the steering wheel.
Voice Recognition
Please see your INFINITI InTouch™ Owner’s Manual for important safety information,
system limitations, and additional operating and feature information.