rear view INFINITI QX50 2021 Owner's Manual
[x] Cancel search | Manufacturer: INFINITI, Model Year: 2021, Model line: QX50, Model: INFINITI QX50 2021Pages: 542, PDF Size: 3.51 MB
Page 5 of 542
This manual was prepared to help you under-
stand the operation and maintenance of your
vehicle so that you may enjoy many miles
(kilometers) of driving pleasure. Please read
through this manual before operating your
vehicle.
A separate Warranty Information Booklet is
included in your Owner’s literature portfolio.
The “Maintenance and schedules” section of
this manual explains details about maintain-
ing and servicing your vehicle. Always carry
it with you when you take your vehicle to an
INFINITI retailer. The Warranty Information
Booklet contents provide complete informa-
tion about all warranties covering this ve-
hicle, the requirements to keep the warran-
ties in effect as well as the INFINITI
Roadside Assistance program.
Additionally, a separate Customer Care and
Lemon Law Information Booklet will explain
how to resolve any concerns you may have
with your vehicle, as well as clarify your
rights under your state’s lemon law.
In addition to factory-installed options, your
vehicle may also be equipped with additional
accessories installed prior to delivery. It is
recommended that you visit an INFINITI re-
tailer for details concerning the particular ac-
cessories with which your vehicle is equipped.It is important that you familiarize yourself
with all disclosures, warnings, cautions and
instructions concerning proper use of such
accessories prior to operating the vehicle
and/or accessory. It is recommended that
you visit an INFINITI retailer for details con-
cerning the particular accessories with which
your vehicle is equipped.
Before driving your vehicle, please read this
Owner's Manual carefully. This will ensure
familiarity with controls and maintenance re-
quirements, assisting you in the safe opera-
tion of your vehicle.
WARNING
IMPORTANT SAFETY INFORMATION
REMINDERS!
Follow these important driving rules to
help ensure a safe and comfortable trip for
you and your passengers!
• NEVER drive under the influence of alco-
hol or drugs.
• ALWAYS observe posted speed limits
and never drive too fast for conditions.
• ALWAYS give your full attention to
driving and avoid using vehicle features
or taking other actions that could dis-
tract you.
• ALWAYS use your seat belts and appro-
priate child restraint systems. Pre-teen
children should be seated in the rear seat.
• ALWAYS provide information about the
proper use of vehicle safety features to
all occupants of the vehicle.
• ALWAYS review this Owner’s Manual
for important safety information.
FOREWORD READ FIRST—THEN DRIVE SAFELY
Page 14 of 542
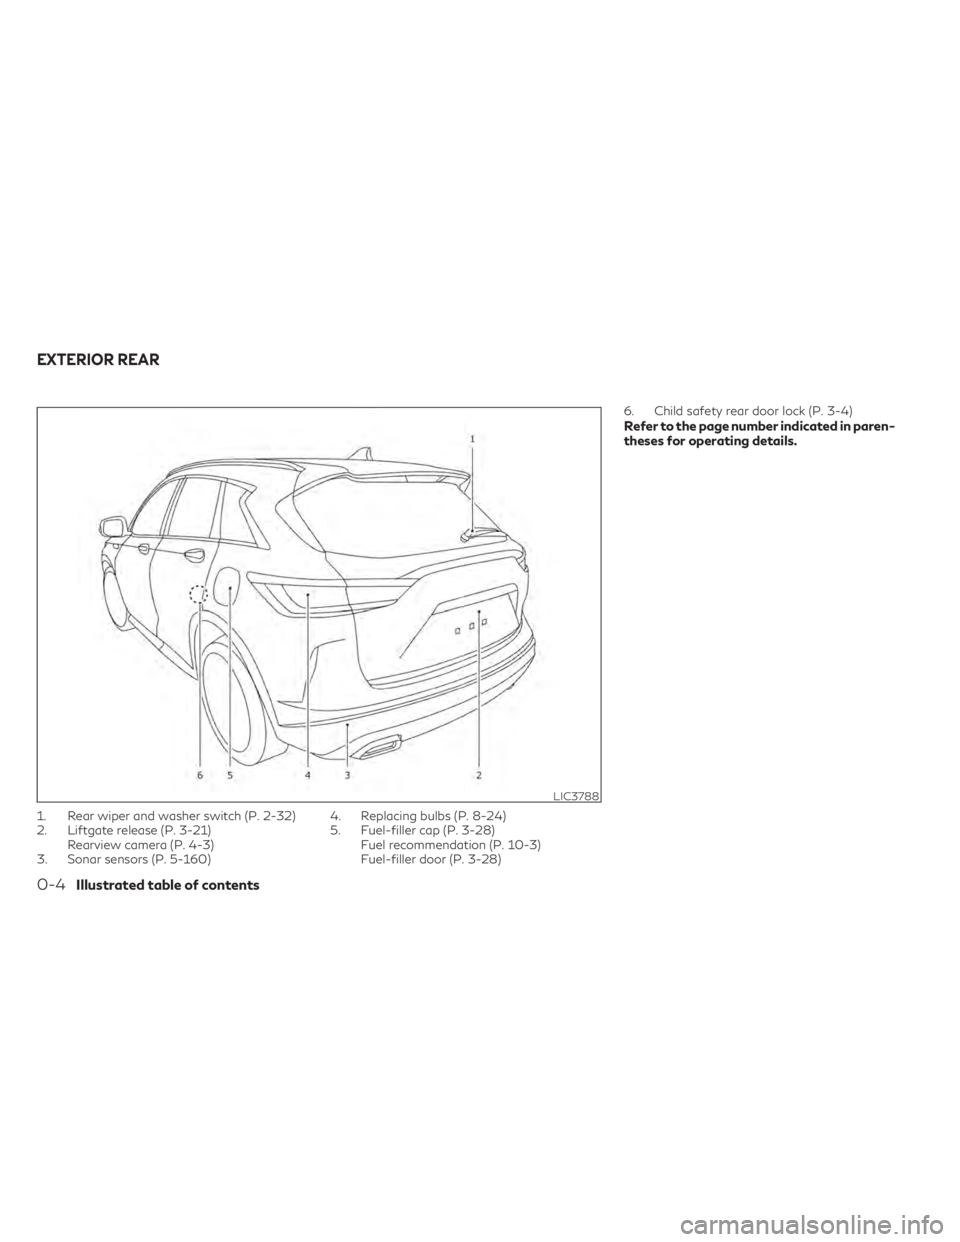
1. Rear wiper and washer switch (P. 2-32)
2. Liftgate release (P. 3-21)Rearview camera (P. 4-3)
3. Sonar sensors (P. 5-160) 4. Replacing bulbs (P. 8-24)
5. Fuel-filler cap (P. 3-28)
Fuel recommendation (P. 10-3)
Fuel-filler door (P. 3-28) 6. Child safety rear door lock (P. 3-4)
Refer to the page number indicated in paren-
theses for operating details.
LIC3788
EXTERIOR REAR
0-4Illustrated table of contents
Page 15 of 542
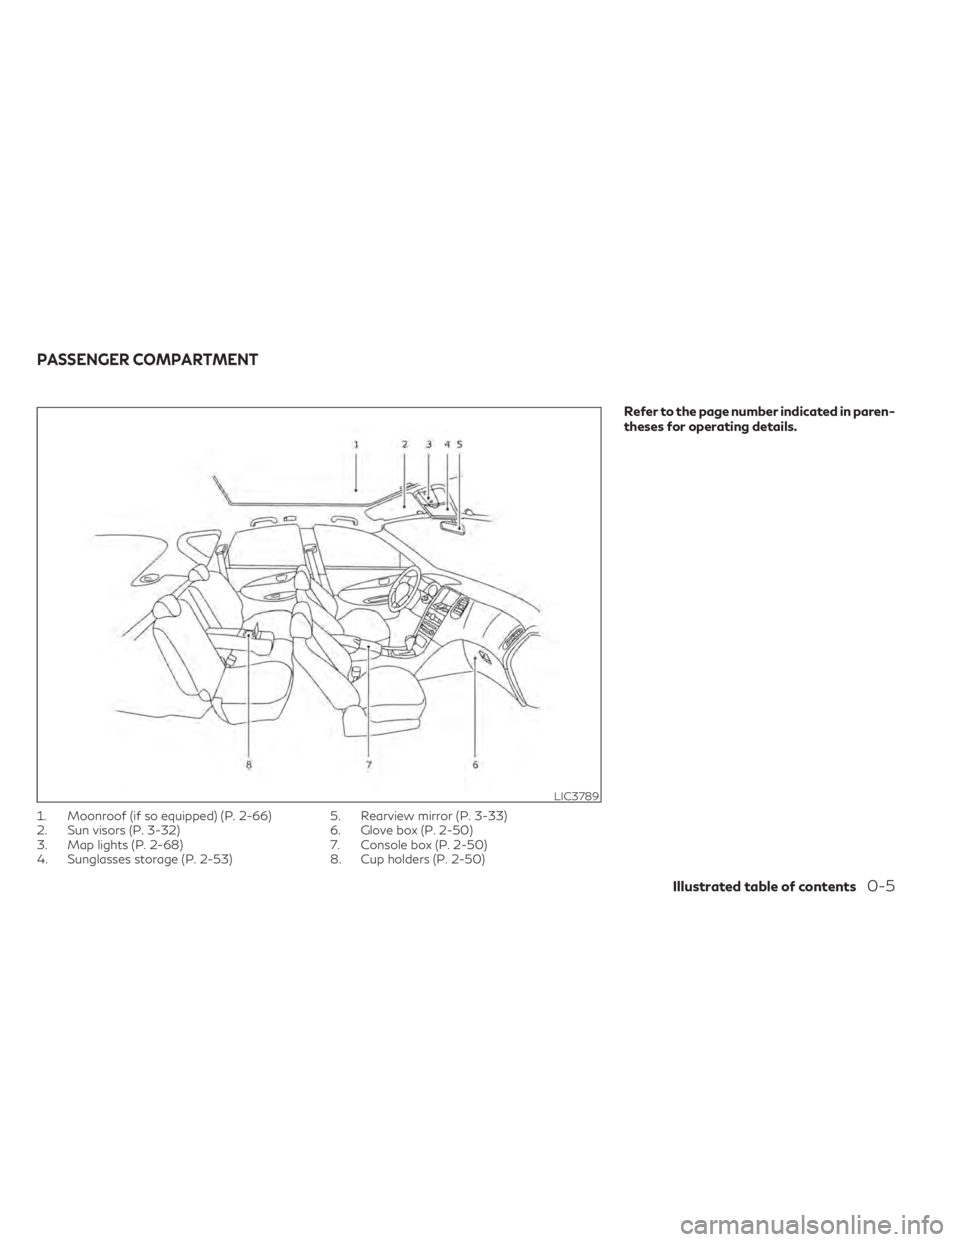
1. Moonroof (if so equipped) (P. 2-66)
2. Sun visors (P. 3-32)
3. Map lights (P. 2-68)
4. Sunglasses storage (P. 2-53)5. Rearview mirror (P. 3-33)
6. Glove box (P. 2-50)
7. Console box (P. 2-50)
8. Cup holders (P. 2-50)
Refer to the page number indicated in paren-
theses for operating details.
LIC3789
PASSENGER COMPARTMENT
Illustrated table of contents0-5
Page 160 of 542
3 Pre-driving checks and adjustments
Keys.............................................3-2
INFINITI Intelligent Key .......................3-2
INFINITI Vehicle Immobilizer System
keys ..........................................3-4
Doors ...........................................3-4
Locking with key ..............................3-4
Locking with inside lock knob Type A
(if so equipped) ...............................3-5
Locking with inside lock knob Type B
(if so equipped) ...............................3-5
Locking with power door lock switch ..........3-5
Automatic door locks .........................3-6
Child safety rear door lock .....................3-6
INFINITI Intelligent Key System ...................3-6
Operating range ..............................3-8
Door locks/unlocks precaution ................3-9
INFINITI Intelligent Key operation .............3-9
How to use the remote keyless entry
function .................................... 3-13
Warning signals ............................. 3-16
Troubleshooting guide ......................3-16
Log-in function ............................. 3-18
Remote Engine Start (if so equipped) ...........3-18
Remote Engine Start operating range ........3-19
Remote starting the vehicle ..................3-19
Extending engine run time ...................3-19
Canceling a Remote Engine Start ............3-20 Conditions the Remote Engine Start will
not work
................................... 3-20
Hood .......................................... 3-21
Liftgate ....................................... 3-21
Operating the power liftgate ................3-22
Motion-Activated Liftgate
(if so equipped) ............................. 3-24
Power liftgate main switch ..................3-26
Liftgate release ............................. 3-26
Liftgate position setting .....................3-27
Fuel-filler door ................................. 3-28
Opening the fuel-filler door ..................3-28
Fuel-filler cap ............................... 3-28
Steering wheel ................................. 3-31
Manual operation (if so equipped) ...........3-31
Automatic operation (if so equipped) .........3-31
Sun visors ..................................... 3-32
Vanity mirrors .............................. 3-33
C
ard holder ................................. 3-33
Mirrors ........................................ 3-33
Manual anti-glare rearview mirror
(if so equipped) ............................. 3-33
Automatic anti-glare rearview mirror
(if so equipped) ............................. 3-34
Outside mirrors ............................. 3-34
Memory Seat (if so equipped) ...................3-36
Page 193 of 542

VANITY MIRRORS
To access the vanity mirror, pull the sun visor
down and flip open the mirror cover. The
vanity mirror will illuminate when the mirror
cover is open.
CARD HOLDER
To use the card holder, slide card into the clip.
Do not view information while operating the
vehicle.
MANUAL ANTI-GLARE
REARVIEW MIRROR (if so
equipped)
Use the night positionO1to reduce glare
from the headlights of vehicles behind you at
night.
Use the day position
O2when driving in day-
light hours.
WARNING
Use the night position only when neces-
sary, because it reduces rear view clarity.
LPD2583
Driver’s and passenger’s side
LPD2340
Driver’s and passenger’s side
WPD0126
MIRRORS
Pre-driving checks and adjustments3-33
Page 194 of 542

AUTOMATIC ANTI-GLARE
REARVIEW MIRROR (if so
equipped)
The inside mirror is designed so that it auto-
matically dims during night time conditions
and according to the intensity of the head-
lights of the vehicle following you. The auto-
matic anti-glare feature is activated when
the ignition switch is in the ON position.
NOTE:
Do not hang any objects over the sensorsO1
or apply glass cleaner to the sensors. Doing
so will reduce the sensitivity of the sensors,
resulting in improper operation.
The indicator light
O2will illuminate when the
automatic anti-glare feature is operating.
To turn off the automatic anti-glare feature,
press the O button. The indicator light will
turn off.
To turn on the automatic anti-glare feature,
press the | button. The indicator light will
turn on.
For additional information on HomeLink®
Universal Transceiver operation, see
“HomeLink® Universal Transceiver”
(P. 2-70).
OUTSIDE MIRRORS
The outside mirror remote control will oper-
ate only when the ignition switch is in the ON
position.
Move the small switch
O1to select the left or
right mirror. Adjust each mirror to the desired
position using the large switch
O2. Move the
small switch
O1to the center (neutral) posi-
tion to prevent accidentally moving the
mirror.
LPD0469LPD3035
3-34Pre-driving checks and adjustments
Page 195 of 542
WARNING
• Objects viewed in the outside mirror on
the passenger side are closer than they
appear. Be careful when moving to the
right. Using only this mirror could cause
an accident. Use the inside mirror or
glance over your shoulder to properly
judge distances to other objects.
• Do not adjust the mirrors while driving.
You could lose control of your vehicle and
cause an accident.
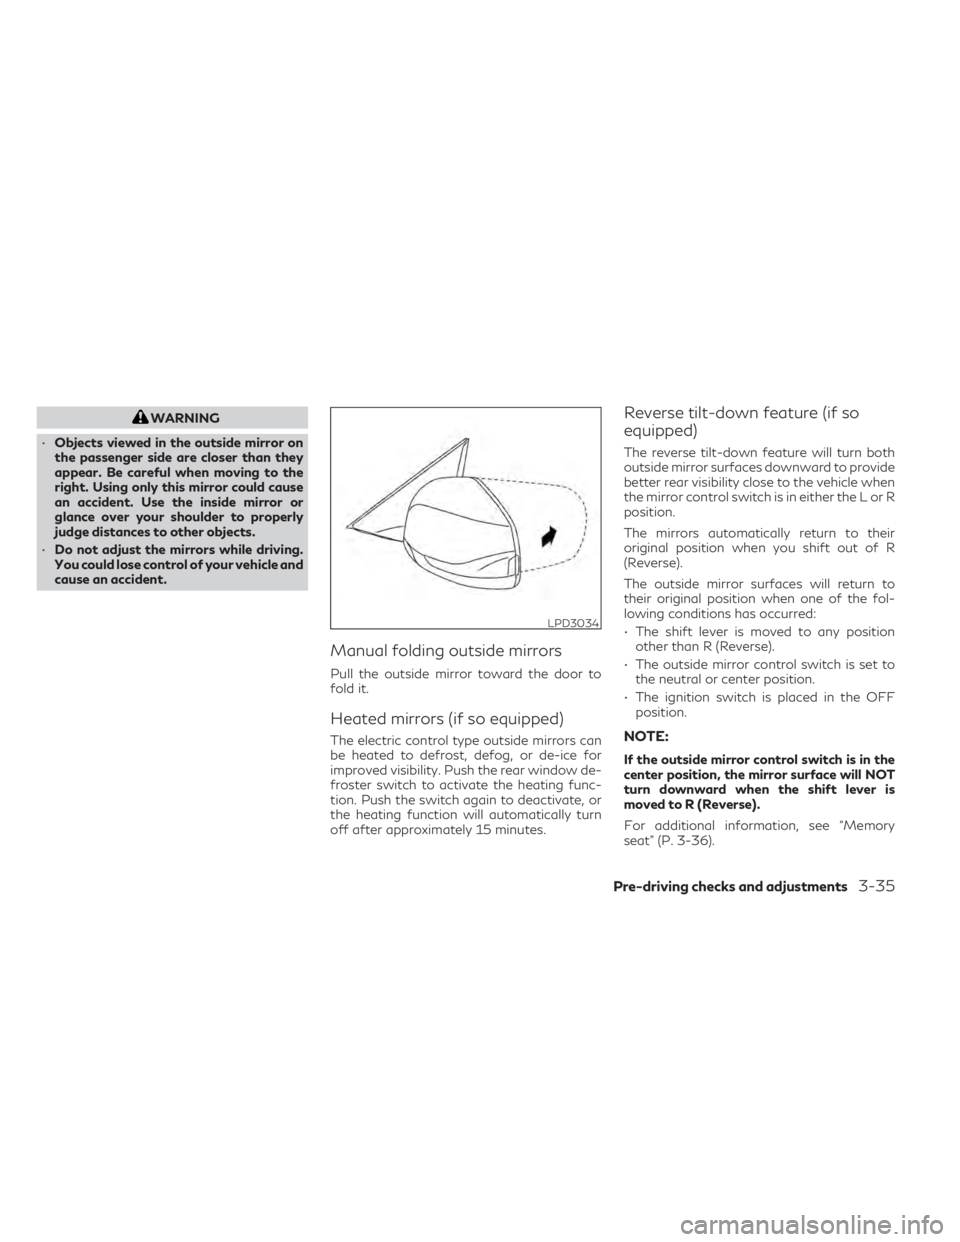
Manual folding outside mirrors
Pull the outside mirror toward the door to
fold it.
Heated mirrors (if so equipped)
The electric control type outside mirrors can
be heated to defrost, defog, or de-ice for
improved visibility. Push the rear window de-
froster switch to activate the heating func-
tion. Push the switch again to deactivate, or
the heating function will automatically turn
off after approximately 15 minutes.
Reverse tilt-down feature (if so
equipped)
The reverse tilt-down feature will turn both
outside mirror surfaces downward to provide
better rear visibility close to the vehicle when
the mirror control switch is in either the L or R
position.
The mirrors automatically return to their
original position when you shift out of R
(Reverse).
The outside mirror surfaces will return to
their original position when one of the fol-
lowing conditions has occurred:
• The shift lever is moved to any position other than R (Reverse).
• The outside mirror control switch is set to the neutral or center position.
• The ignition switch is placed in the OFF position.
NOTE:
If the outside mirror control switch is in the
center position, the mirror surface will NOT
turn downward when the shift lever is
moved to R (Reverse).
For additional information, see “Memory
seat” (P. 3-36).
LPD3034
Pre-driving checks and adjustments3-35
Page 199 of 542
4 Monitor, climate, audio, phone and voice
recognition systems
INFINITI InTouchTMOwner’s Manual.............4-2
RearView Monitor (if so equipped) ................4-3
RearView Monitor system operation ...........4-4
How to read the displayed lines ................4-4
Difference between predicted and actual
distances .....................................4-5
How to park with predicted course lines .......4-6
Adjusting the screen ......................... 4-8
How to turn on and off predicted course
lines ......................................... 4-8
RearView Monitor system limitations ......... 4-8
System maintenance ..........................4-9
Around View® Monitor (if so equipped) .........4-10
Around View® Monitor system operation .....4-11
Difference between predicted and actual
distances ................................... 4-16
How to park with predicted course lines ......4-17
How to switch the display ...................4-19
Around View® Monitor settings .............4-19
Adjusting the screen ........................ 4-20
Around View® Monitor system
limitations .................................. 4-21
System maintenance ........................ 4-23
Camera aiding sonar (parking sensor)
(if so equipped) ................................ 4-23Sonar system operation
.....................4-24
Turning on and off the sonar function ........4-25
Sonar system limitations ....................4-26
System maintenance ........................ 4-27
Moving Object Detection (MOD)
(if so equipped) ................................ 4-28
MOD system operation .....................4-29
Turning MOD on and off ....................4-31
MOD system limitations .....................4-31
System maintenance ........................ 4-32
Vents .......................................... 4-33
Heater and air conditioner (automatic) ..........4-34
Automatic operation ........................ 4-35
Manual operation ........................... 4-36
Operating tips .............................. 4-37
CLIMATE setting screen ....................4-37
Rear climate control (if so equipped) .........4-40
Heater and air conditioner settings
(if so equipped) ................................ 4-41
Servicing
air conditioner ........................ 4-42
USB/iPod® charging ports .....................4-42
Antenna ....................................... 4-43
Car phone or CB radio ......................... 4-43
Page 201 of 542
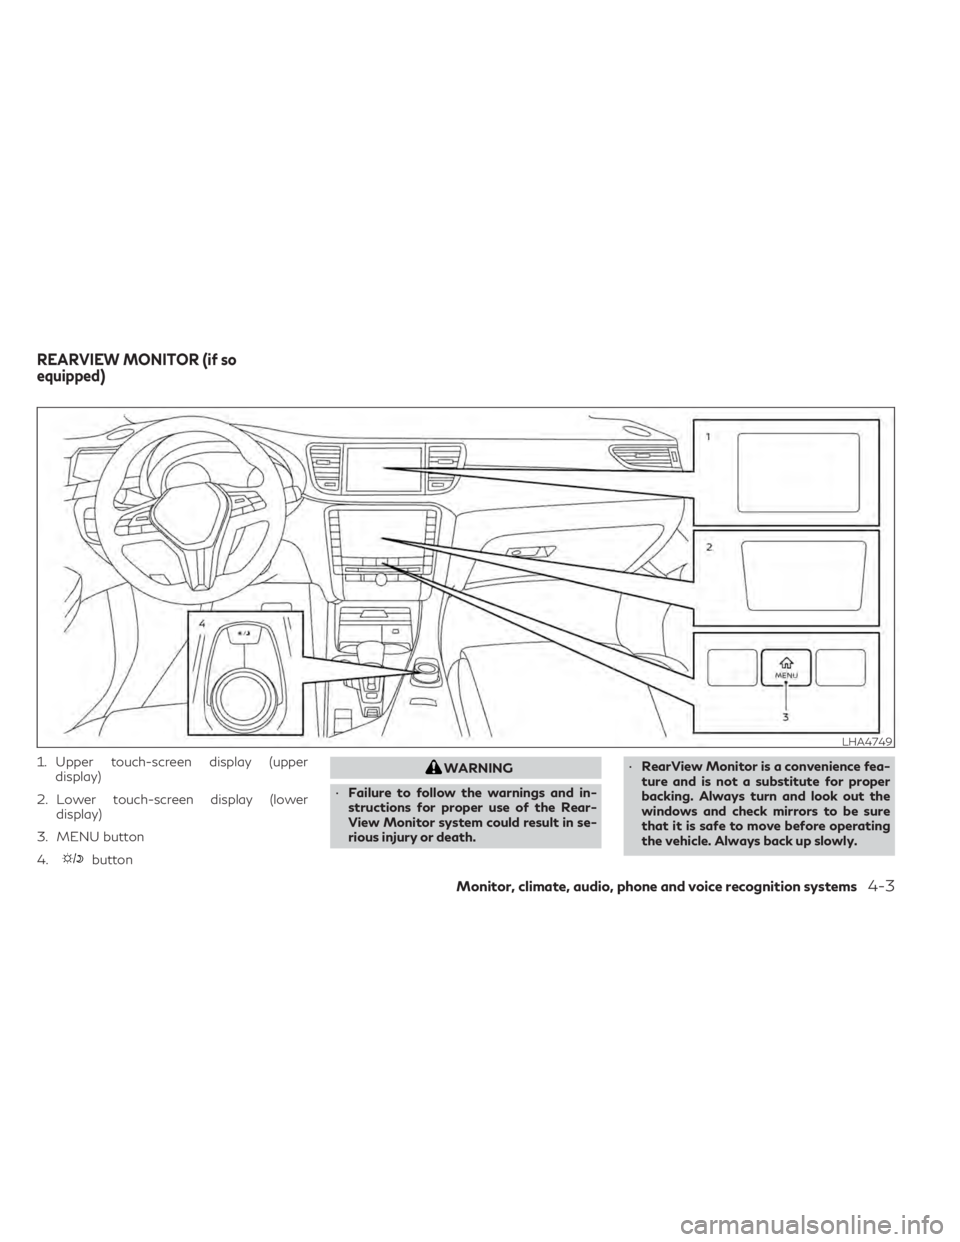
1. Upper touch-screen display (upperdisplay)
2. Lower touch-screen display (lower display)
3. MENU button
4.
button
WARNING
• Failure to follow the warnings and in-
structions for proper use of the Rear-
View Monitor system could result in se-
rious injury or death. •
RearView Monitor is a convenience fea-
ture and is not a substitute for proper
backing. Always turn and look out the
windows and check mirrors to be sure
that it is safe to move before operating
the vehicle. Always back up slowly.
LHA4749
REARVIEW MONITOR (if so
equipped)
Monitor, climate, audio, phone and voice recognition systems4-3
Page 202 of 542
•The system is designed as an aid to the
driver in showing large stationary ob-
jects directly behind the vehicle, to help
avoid damaging the vehicle.
• The distance guide line and the vehicle
width line should be used as a reference
only when the vehicle is on a level paved
surface. The distance viewed on the
monitor is for reference only and may be
different than the actual distance be-
tween the vehicle and displayed objects.
CAUTION
Do not scratch the camera lens when clean-
ing dirt or snow from the front of the
camera.
The RearView Monitor system automatically
shows a rear view of the vehicle in the upper
touch-screen display (upper display) when
the shift lever is shifted into the R (Reverse)
position. When activating the RearView
Monitor, the guide lines, the icons and the
messages may not be displayed immediately.
The radio can still be heard while the Rear-
View Monitor is active. To display the rear view, the RearView Moni-
tor system uses a camera located just above
the vehicle’s license plate
O1.
REARVIEW MONITOR SYSTEM
OPERATION
With the engine running, move the shift lever
to the R (Reverse) position to operate the
RearView Monitor. When activating the
RearView Monitor, the guide lines, the icons
and the messages may not be displayed
immediately.
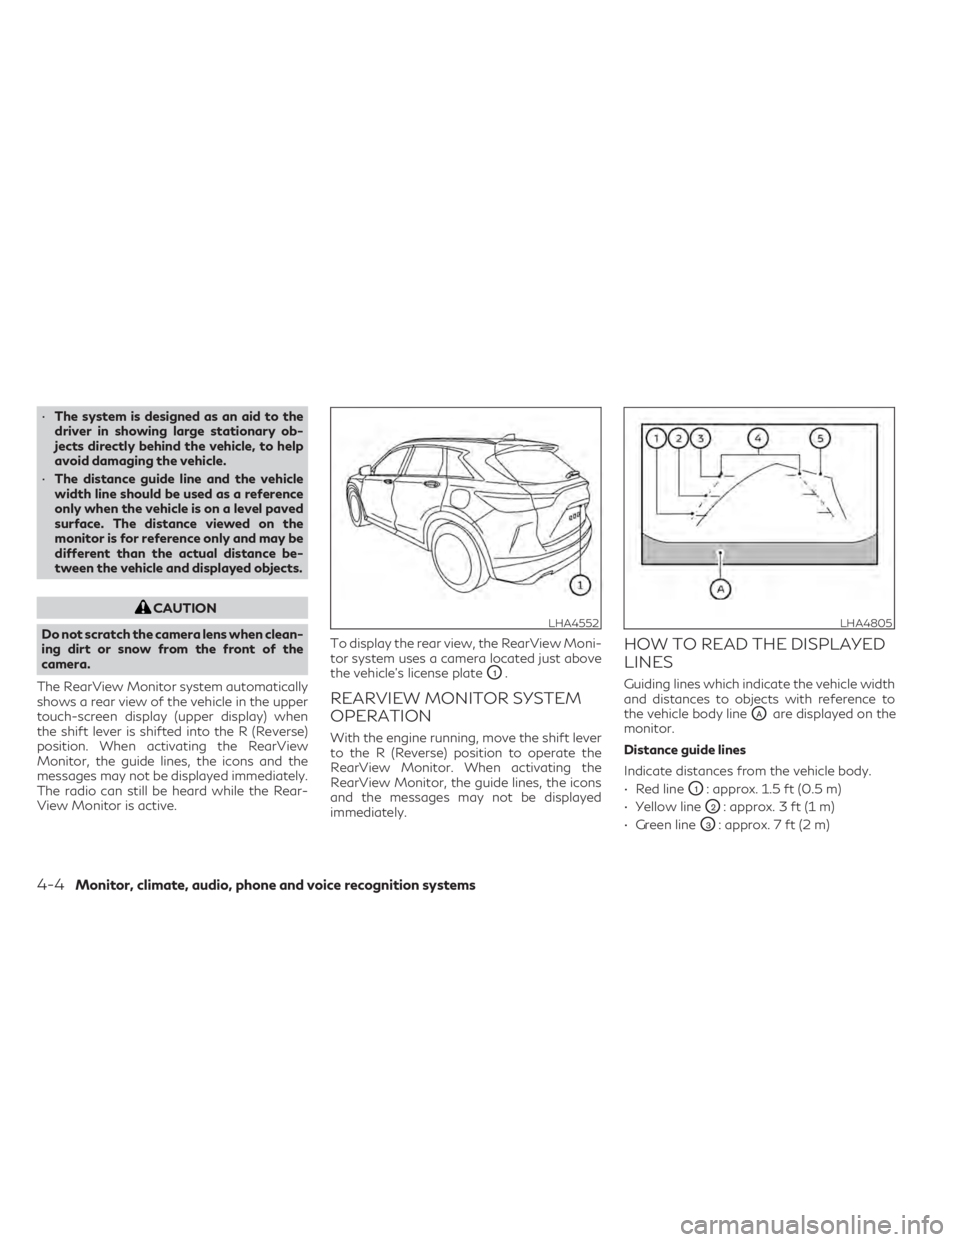
HOW TO READ THE DISPLAYED
LINES
Guiding lines which indicate the vehicle width
and distances to objects with reference to
the vehicle body line
OAare displayed on the
monitor.
Distance guide lines
Indicate distances from the vehicle body.
• Red line
O1: approx. 1.5 ft (0.5 m)
• Yellow line
O2: approx. 3 ft (1 m)
• Green line
O3: approx. 7 ft (2 m)
LHA4552LHA4805
4-4Monitor, climate, audio, phone and voice recognition systems