lock INFINITI QX50 2022 Workshop Manual
[x] Cancel search | Manufacturer: INFINITI, Model Year: 2022, Model line: QX50, Model: INFINITI QX50 2022Pages: 540, PDF Size: 6.58 MB
Page 181 of 540
Laws in some local communities may restrict
or prohibit the use of Remote Engine Start, or
the amount of time a parked vehicle engine
may idle. For example, some laws require a
person using Remote Engine Start to have
the vehicle in view or may restrict idling time
except in freezing temperatures. Check local
regulations for any requirements.
Other conditions may affect the function of
the Remote Engine Start feature. For addi-
tional information, see “Conditions the Re-
mote Engine Start will not work” (P. 3-20).
Other conditions can affect the performance
of the Intelligent Key transmitter. For addi-
tional information, see “INFINITI Intelligent
Key” (P. 3-2).REMOTE ENGINE START
OPERATING RANGE
WARNING
• To help avoid risk of injury or death
through unintended operation of the ve-
hicle and/or its systems, including en-
trapment in windows or inadvertent
door lock activation, do not leave chil-
dren, people who require the assistance
of others or pets unattended in your ve-
hicle. Additionally, the temperature in-
side a closed vehicle on a warm day can
quickly become high enough to cause a
significant risk of injury or death to
people and pets.
• Do not use Remote Engine Start in closed
spaces such as a garage. Do not breathe
exhaust gases; they contain colorless
and odorless carbon monoxide. Carbon
monoxide is dangerous. It can cause un-
consciousness or death.
CAUTION
When the Intelligent Key battery is dis-
charged or other strong radio wave
sources are present near the operating lo-
cation, the Intelligent Key operating range
becomes narrower, and the Intelligent Key
may not function properly.
The Remote Engine Start function can only
be used when the Intelligent Key is within the
specified operating range from the vehicle.
The Remote Engine Start operating range is
approximately 197 ft (60 m) from the vehicle.
REMOTE STARTING THE
VEHICLE
To use the Remote Engine Start feature per-
form the following:
1. Aim the Intelligent Key at the vehicle.
2. Press the
button to lock all doors.
3. Within 5 seconds press and hold the
button until the turn signal lights flash and
the tail lamps turn on. If the vehicle is not
within view press and hold the
but-
ton for at least 2 seconds.
Pre-driving checks and adjustments3-19
Page 182 of 540
The following events will occur when the en-
gine starts:
• The parking lights will turn on and remainon as long as the engine is running.
• The doors will be locked and the climate control system may come on.
• The engine will continue to run for 10 min- utes. Repeat the steps to extend the time
for an additional 10 minutes. For additional
information, see “Extending engine run
time” (P. 3-20).
Press and hold the brake pedal while switch-
ing the ignition to the ON position before
driving. For additional information, see “Driv-
ing the vehicle” (P. 5-18).
EXTENDING ENGINE RUN TIME
The Remote Engine Start feature can be ex-
tended one time by performing the steps
listed in “Remote starting the vehicle”
(P. 3-19). Run time will be calculated as
follows:
• The first 10 minute run time will start when the Remote Engine Start function is
performed. • The second 10 minutes will start immedi-
ately when the Remote Engine Start func-
tion is performed again. For example, if the
engine has been running for 5 minutes, and
10 minutes are added, the engine will run
for a total of 15 minutes.
• Extending engine run time will bring you to the two Remote Engine Start limit.
A maximum of two Remote Engine Starts, or
a single start with an extension, are allowed
between ignition cycles.
The ignition switch must be cycled to the ON
position and then back to the OFF position
before the Remote Engine Start procedure
can be used again.
CANCELING A REMOTE ENGINE
START
To cancel a Remote Engine Start, perform
one of the following:
• Aim the Intelligent Key at the vehicle and press
until the parking lights turn off.
• Turn on the hazard warning flashers.
• Cycle the ignition switch on and then off.
• The extended engine run time has expired.
• The first 10 minute timer has expired.
• Opening the engine hood.
• Shifting the vehicle out of P (Park). • The alarm sounds due to illegal entry into
the vehicle.
• Pushing the ignition switch without the In- telligent Key in the vehicle.
• Not pressing the brake pedal while pressing the ignition switch with the Intelligent Key
in the vehicle.
CONDITIONS THE REMOTE
ENGINE START WILL NOT WORK
The Remote Engine Start will not operate if
any of the following conditions are present:
• The ignition switch is placed in the ONposition.
• The hood is not securely closed.
• The hazard indicator lights are on.
• The engine is still running. The engine must be completely stopped. Wait at least 6 sec-
onds if the engine goes from running to off.
This is not applicable when extending en-
gine run time.
• The
button is not pressed and held for
at least 2 seconds.
• The
button is not pressed and held
within 5 seconds of pressing the lock
button.
• The brake is pressed.
• The doors are not closed and locked.
3-20Pre-driving checks and adjustments
Page 183 of 540
• The liftgate is open.
• The I–Key System Error warning messageappears in the vehicle information display.
• The alarm sounds due to illegal entry into the vehicle.
• Two Remote Engine Starts, or a single Re- mote Engine Start with an extension, have
already been used.
• The vehicle is not in P (Park).
• There is a detected registered key already inside of the vehicle.
The Remote Engine Start may display a
warning or indicator in the vehicle informa-
tion display. For additional information, see
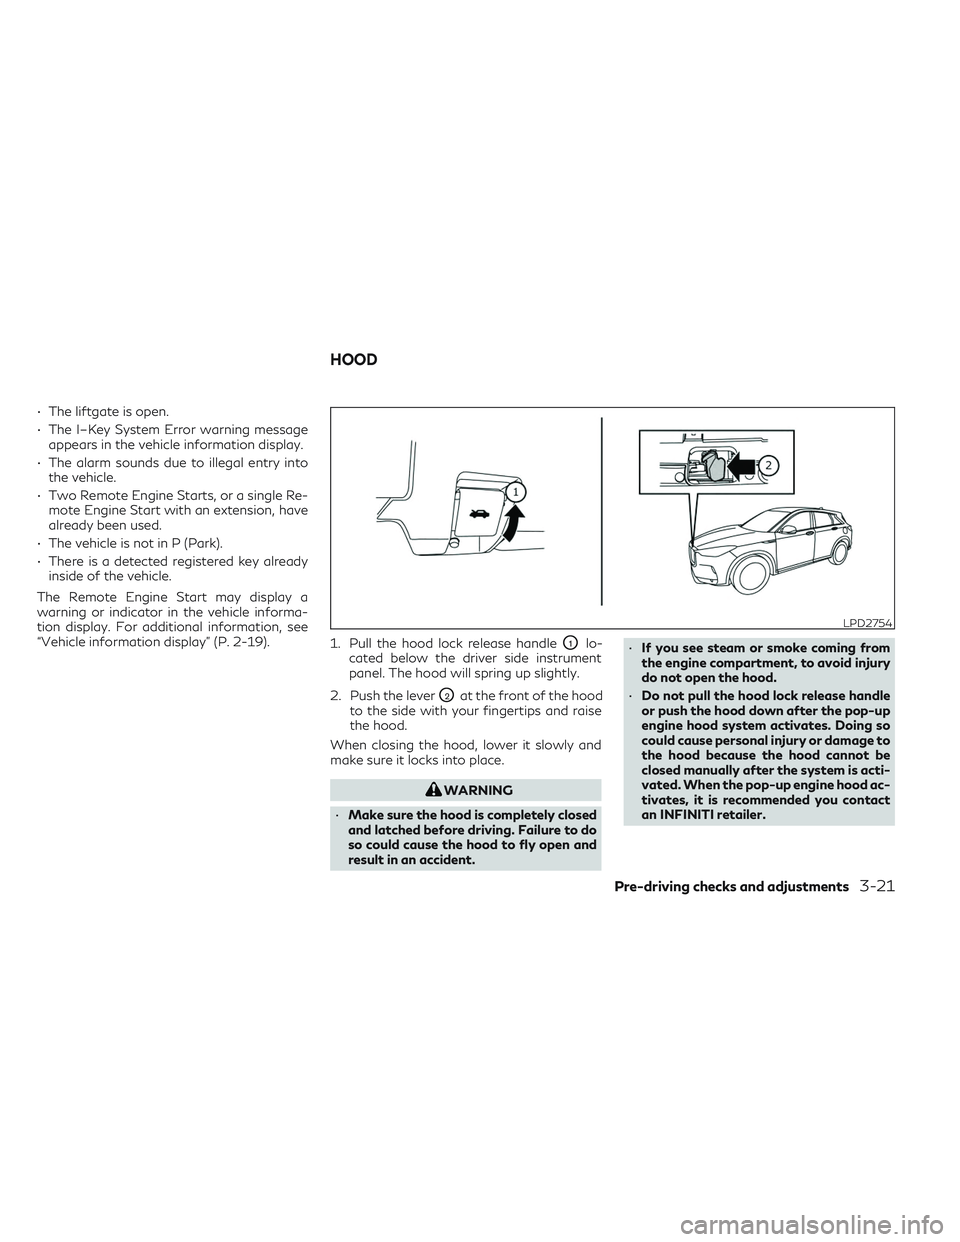
“Vehicle information display” (P. 2-19). 1. Pull the hood lock release handle
O1lo-
cated below the driver side instrument
panel. The hood will spring up slightly.
2. Push the lever
O2at the front of the hood
to the side with your fingertips and raise
the hood.
When closing the hood, lower it slowly and
make sure it locks into place.
WARNING
• Make sure the hood is completely closed
and latched before driving. Failure to do
so could cause the hood to fly open and
result in an accident. •
If you see steam or smoke coming from
the engine compartment, to avoid injury
do not open the hood.
• Do not pull the hood lock release handle
or push the hood down after the pop-up
engine hood system activates. Doing so
could cause personal injury or damage to
the hood because the hood cannot be
closed manually after the system is acti-
vated. When the pop-up engine hood ac-
tivates, it is recommended you contact
an INFINITI retailer.
LPD2754
HOOD
Pre-driving checks and adjustments3-21
Page 184 of 540

WARNING
• Always be sure the liftgate has been
closed securely to prevent it from open-
ing while driving.
• Do not drive with the liftgate open. This
could allow dangerous exhaust gases to
be drawn into the vehicle. For additional
information, see “Exhaust gas (carbon
monoxide)” (P. 5-4).
• To help avoid risk of injury or death
through unintended operation of the ve-
hicle and/or its systems, including en-
trapment in windows or inadvertent
door lock activation, do not leave chil-
dren, people who require the assistance
of others or pets unattended in your ve-
hicle. Additionally, the temperature in-
side a closed vehicle on a warm day can
quickly become high enough to cause a
significant risk of injury or death to
people and pets.
• Always be sure that hands and feet are
clear of the door frame to avoid injury
while closing the liftgate.
OPERATING THE POWER
LIFTGATE
WARNING
• Make sure that all passengers have their
hands, etc., inside the vehicle before
closing the liftgate. •
To help avoid risk of injury or death
through unintended operation of the ve-
hicle and/or its systems, including en-
trapment in windows or inadvertent
door lock activation, do not leave chil-
dren, people who require the assistance
of others or pets unattended in your ve-
hicle. Additionally, the temperature in-
side a closed vehicle on a warm day can
quickly become high enough to cause a
significant risk of injury or death to
people or pets.
LPD3058
Instrument panel switch
LIFTGATE
3-22Pre-driving checks and adjustments
Page 185 of 540
NOTE:
To open, close or reverse the power liftgate,
engage the P (Park) position. Also, the
power liftgate will not operate if the battery
voltage is low.
Power Open:
The power liftgate automatically moves from
the fully closed position to the fully open
position in approximately 5 to 8 seconds. The
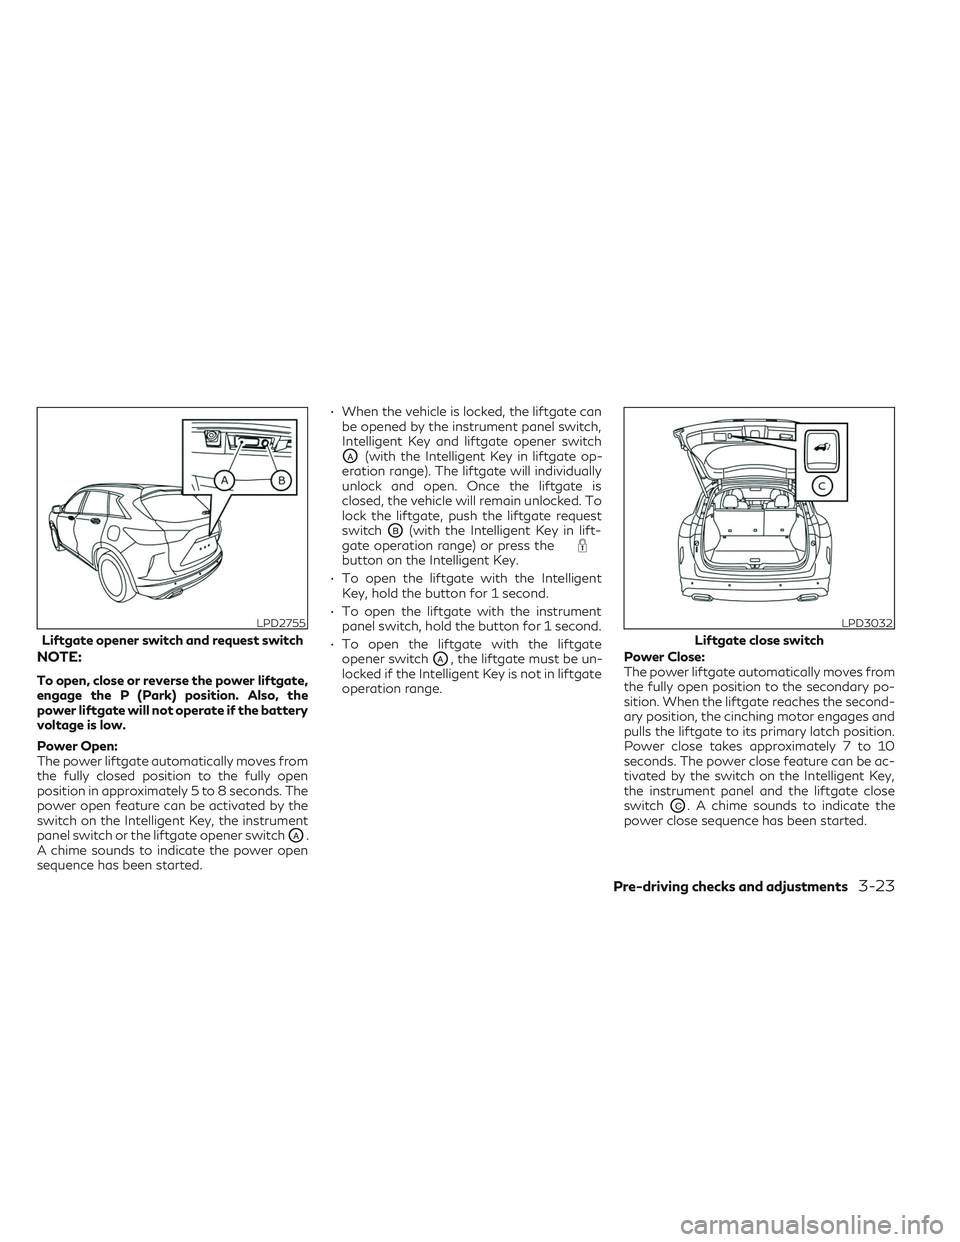
power open feature can be activated by the
switch on the Intelligent Key, the instrument
panel switch or the liftgate opener switch
OA.
A chime sounds to indicate the power open
sequence has been started. • When the vehicle is locked, the liftgate can
be opened by the instrument panel switch,
Intelligent Key and liftgate opener switch
OA(with the Intelligent Key in liftgate op-
eration range). The liftgate will individually
unlock and open. Once the liftgate is
closed, the vehicle will remain unlocked. To
lock the liftgate, push the liftgate request
switch
OB(with the Intelligent Key in lift-
gate operation range) or press the
button on the Intelligent Key.
• To open the liftgate with the Intelligent Key, hold the button for 1 second.
• To open the liftgate with the instrument panel switch, hold the button for 1 second.
• To open the liftgate with the liftgate opener switch
OA, the liftgate must be un-
locked if the Intelligent Key is not in liftgate
operation range. Power Close:
The power liftgate automatically moves from
the fully open position to the secondary po-
sition. When the liftgate reaches the second-
ary position, the cinching motor engages and
pulls the liftgate to its primary latch position.
Power close takes approximately 7 to 10
seconds. The power close feature can be ac-
tivated by the switch on the Intelligent Key,
the instrument panel and the liftgate close
switch
OC. A chime sounds to indicate the
power close sequence has been started.
LPD2755
Liftgate opener switch and request switch
LPD3032
Liftgate close switch
Pre-driving checks and adjustments3-23
Page 186 of 540
• If the liftgate opener switchOAis activated
while the cinching motor is engaged, the
cinching motor will disengage and release
the latch and the liftgate will open.
• The Intelligent Key button must be held for 1 second before the liftgate closes.
• The liftgate close switch
OCcan only be
used to close the liftgate if the power lift-
gate main switch is in the ON position.
Stop - Reverse:
During the open/close movement, the lift-
gate can be stopped if the Intelligent Key,
instrument panel or liftgate opener switch
OAor liftgate close switchOCis pushed. The
liftgate can be reversed if the Intelligent Key,
instrument panel or liftgate opener switch
OAor liftgate request switchOBis pushed again.
Auto Reverse:
If an obstacle is detected during power open
or power close, a warning chime will sound
and the liftgate will reverse direction and re-
turn to the full open or full close position. If a
second obstacle is detected, the liftgate mo-
tion will stop and the liftgate will enter
manual mode. A pinch strip is mounted on each side of the
liftgate. If an obstacle is detected by a pinch
strip during power close, the liftgate will re-
verse direction and return to the full open
position.
NOTE:
If the pinch strip is damaged or removed, the
power close function will not operate.
WARNING
There are some small distances immedi-
ately before the closed position which can-
not be detected. Make sure that all passen-
gers have their hands, etc., inside the
vehicle before closing the liftgate. Manual Mode:
If power operation is not available, the lift-
gate may be operated manually. Power op-
eration may not be available if multiple ob-
stacles have been detected in a single power
cycle or if the battery voltage is low.
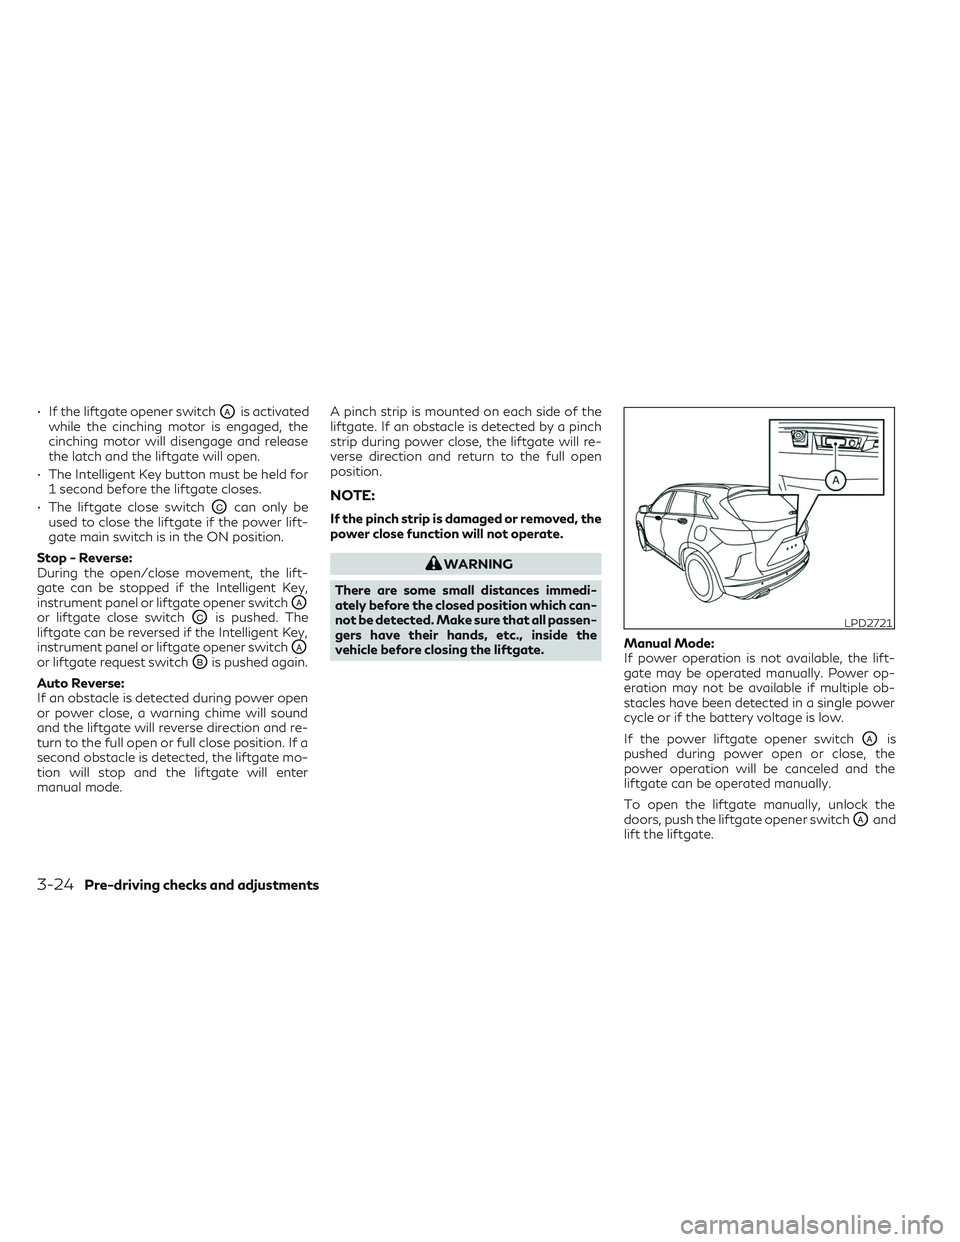
If the power liftgate opener switch
OAis
pushed during power open or close, the
power operation will be canceled and the
liftgate can be operated manually.
To open the liftgate manually, unlock the
doors, push the liftgate opener switch
OAand
lift the liftgate.
LPD2721
3-24Pre-driving checks and adjustments
Page 190 of 540

LIFTGATE POSITION SETTING
The liftgate can be set to open to a specific
height (garage mode) by performing the fol-
lowing:
1. Open the liftgate using the request switchor the Intelligent Key.
2. Pull the liftgate down and move to the desired height position (the liftgate will
have some resistance when being manu-
ally adjusted). 3. Push and hold the power liftgate close
switch
located on the liftgate for
more than 3 seconds or until two beeps
are heard.
The liftgate will open to the selected position
setting. To change the position of the liftgate,
repeat steps 1-3.
OPENING THE FUEL-FILLER
DOOR
The fuel-filler door automatically unlocks
when the driver's door is unlocked.
1. Unlock the fuel-filler door using one of the following operations:
• Unlock the driver’s door with the Intelli- gent Key.
• Push the power door lock switch to the unlock position.
•
Touch the one touch unlock sensor while
carrying the Intelligent Key with you. For
additional information, see “Locking all
doors and fuel-filler door” (P. 3-10).
LPD3031LPD2725
FUEL-FILLER DOOR
3-28Pre-driving checks and adjustments
Page 191 of 540
2. To open the fuel-filler door, push the rightside of the fuel-filler door to release.
To lock, close the fuel-filler door securely and
lock the doors.
FUEL-FILLER CAP
WARNING
• Gasoline is extremely flammable and
highly explosive under certain condi-
tions. You could be burned or seriously
injured if it is misused or mishandled. Al-
ways stop the engine and do not smoke
or allow open flames or sparks near the
vehicle when refueling.
• Do not attempt to top off the fuel tank
after the fuel pump nozzle shuts off au-
tomatically. Continued refueling may
cause fuel overflow, resulting in fuel
spray and possibly a fire.
• Use only an original equipment type fuel-
filler cap as a replacement. It has a
built-in safety valve needed for proper
operation of the fuel system and emis-
sion control system. An incorrect cap can
result in a serious malfunction and pos-
sible injury. It could also cause the
Malfunction Indicator Light (MIL) to
come on. •
Never pour fuel into the throttle body to
attempt to start your vehicle.
• Do not fill a portable fuel container in the
vehicle or trailer. Static electricity can
cause an explosion of flammable liquid,
vapor or gas in any vehicle or trailer. To
reduce the risk of serious injury or death
when filling portable fuel containers:
– Always place the container on the
ground when filling.
– Do not use electronic devices when
filling.
– Keep the pump nozzle in contact with
the container while you are filling it.
– Use only approved portable fuel con-
tainers for flammable liquid.
CAUTION
• Do not use a fuel containing more than
15% ethanol in your vehicle. For addi-
tional information, see “Fuel recommen-
dation” (P. 10-4). •
The Loose Fuel Cap warning message
will be displayed if the fuel-filler cap is
not properly tightened. It may take a few
driving trips for the message to be dis-
played. Failure to tighten the fuel-filler
cap properly after the Loose Fuel Cap
warning is displayed may cause the Mal-
function Indicator Light (MIL) to
illuminate.
• Failure to tighten the fuel-filler cap
properly may cause the
Malfunc-
tion Indicator Light (MIL) to illuminate.
If the
light illuminates because the
fuel-filler cap is loose or missing, tighten
or install the cap and continue to drive
the vehicle. The
light should turn off
after a few driving trips. If thelight
does not turn off after a few driving
trips, have the vehicle inspected. It is rec-
ommended that you visit an INFINITI re-
tailer for this service.
• For additional information, see “Mal-
function Indicator Light (MIL)”
(P. 2-15).
• If fuel is spilled on the vehicle body, flush
it away with water to avoid paint
damage.
Pre-driving checks and adjustments3-29
Page 192 of 540
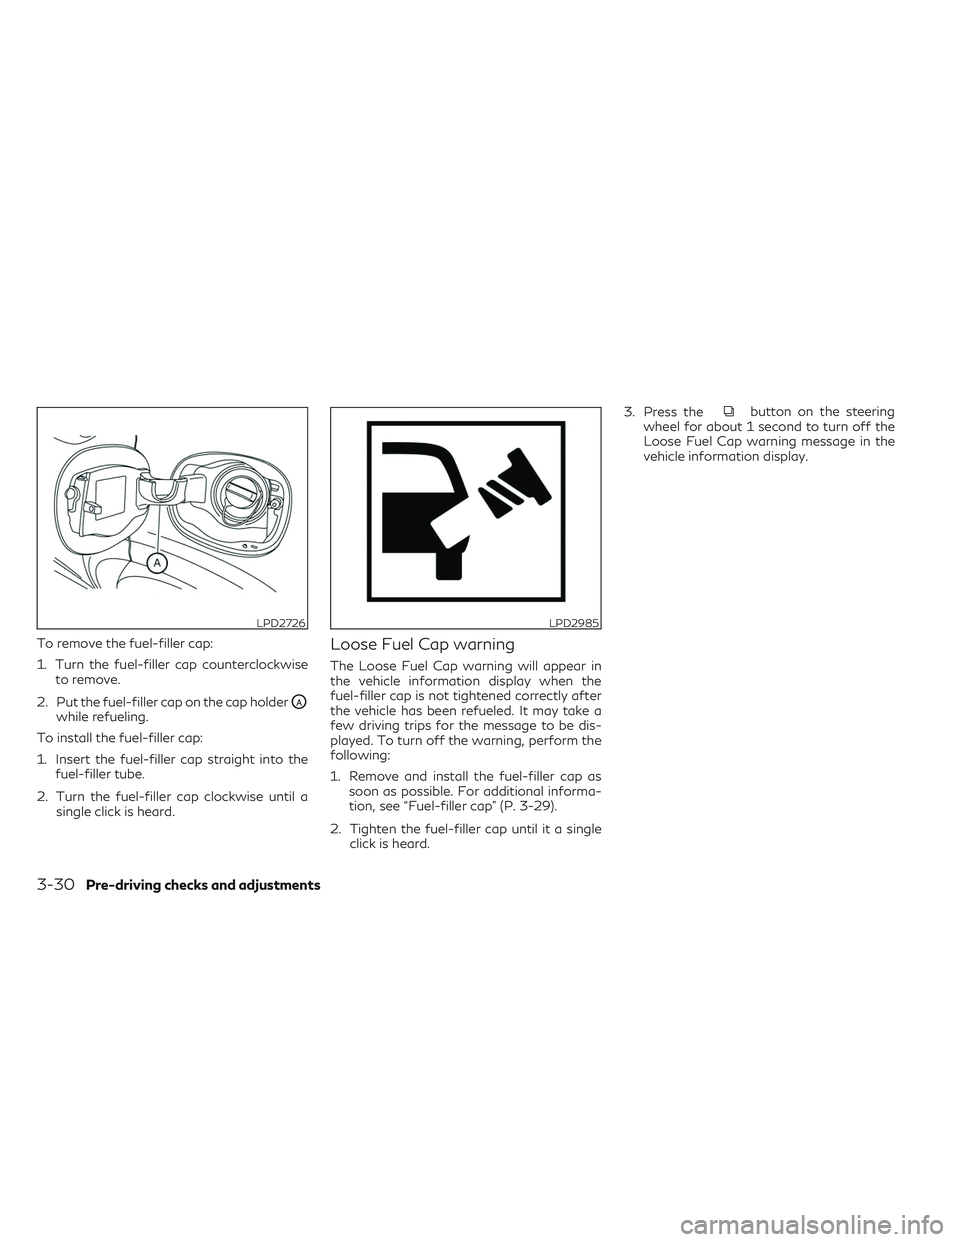
To remove the fuel-filler cap:
1. Turn the fuel-filler cap counterclockwiseto remove.
2. Put the fuel-filler cap on the cap holder
OAwhile refueling.
To install the fuel-filler cap:
1. Insert the fuel-filler cap straight into the fuel-filler tube.
2. Turn the fuel-filler cap clockwise until a single click is heard.
Loose Fuel Cap warning
The Loose Fuel Cap warning will appear in
the vehicle information display when the
fuel-filler cap is not tightened correctly after
the vehicle has been refueled. It may take a
few driving trips for the message to be dis-
played. To turn off the warning, perform the
following:
1. Remove and install the fuel-filler cap assoon as possible. For additional informa-
tion, see “Fuel-filler cap” (P. 3-29).
2. Tighten the fuel-filler cap until it a single click is heard. 3. Press the
button on the steering
wheel for about 1 second to turn off the
Loose Fuel Cap warning message in the
vehicle information display.
LPD2726LPD2985
3-30Pre-driving checks and adjustments
Page 193 of 540
WARNING
• Do not adjust the steering wheel while
driving. You could lose control of your
vehicle and cause an accident.
• Do not adjust the steering wheel any
closer to you than is necessary for proper
steering operation and comfort. The
driver's air bag inflates with great force.
If you are unrestrained, leaning forward,
sitting sideways or out of position in any
way, you are at greater risk of injury or
death in a crash. You may also receive
serious or fatal injuries from the air bag if
you are up against it when it inflates.
Always sit back against the seatback and
as far away as practical from the steer-
ing wheel. Always use the seat belts.
MANUAL OPERATION (if so
equipped)
Tilt and telescopic operation
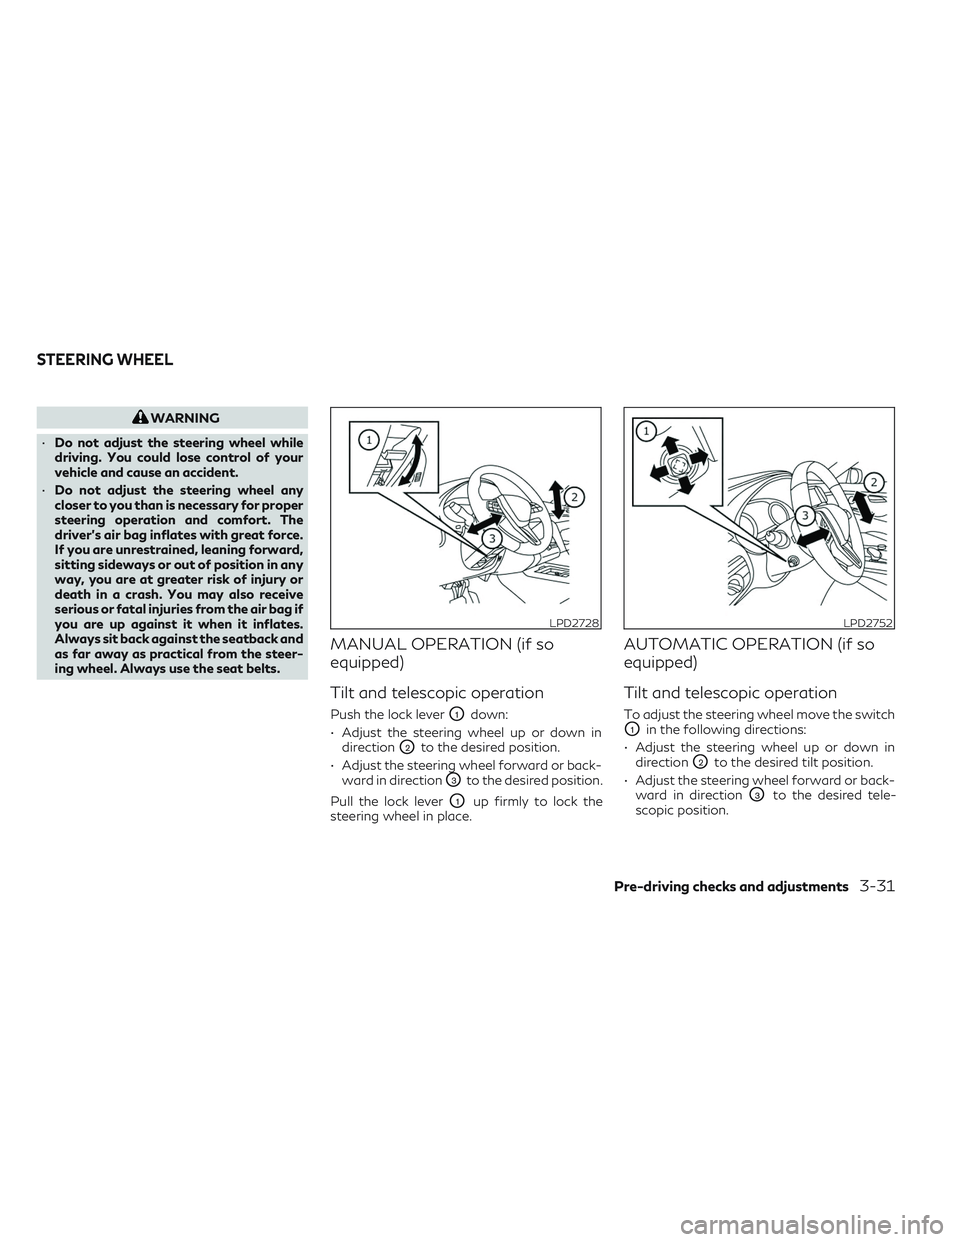
Push the lock leverO1down:
• Adjust the steering wheel up or down in direction
O2to the desired position.
• Adjust the steering wheel forward or back- ward in direction
O3to the desired position.
Pull the lock lever
O1up firmly to lock the
steering wheel in place.
AUTOMATIC OPERATION (if so
equipped)
Tilt and telescopic operation
To adjust the steering wheel move the switch
O1in the following directions:
• Adjust the steering wheel up or down in direction
O2to the desired tilt position.
• Adjust the steering wheel forward or back- ward in direction
O3to the desired tele-
scopic position.
LPD2728LPD2752
STEERING WHEEL
Pre-driving checks and adjustments3-31