INFINITI QX56 2004 Factory Service Manual
Manufacturer: INFINITI, Model Year: 2004, Model line: QX56, Model: INFINITI QX56 2004Pages: 3371, PDF Size: 78.5 MB
Page 531 of 3371

ATC-126
TROUBLE DIAGNOSIS
Revision: August 20072004 QX56
2. CHECK CIRCUIT CONTINUITY BETWEEN AMBIENT SENSOR AND FRONT AIR CONTROL
1. Turn ignition switch OFF.
2. Disconnect front air control connector M49.
3. Check continuity between ambient sensor harness connector
E1 terminal 2 (V/R) and front air control harness connector M49
terminal 21 (V/R).
OK or NG
OK >> GO TO 3.
NG >> Repair harness or connector.
3. CHECK AMBIENT SENSOR
Refer to ATC-127, "
Ambient Sensor" .
OK or NG
OK >> 1. Replace front air control. Refer to ATC-135, "FRONT AIR CONTROL" .
2. Go to self-diagnosis ATC-53, "
A/C System Self-diagnosis Function" and perform self-diagno-
sis.
NG >> 1. Replace ambient sensor. Refer to ATC-136, "
AMBIENT SENSOR" .
2. Go to self-diagnosis ATC-53, "
A/C System Self-diagnosis Function" and perform self-diagno-
sis.
4. CHECK CIRCUIT CONTINUITY BETWEEN AMBIENT SENSOR AND FRONT AIR CONTROL
1. Turn ignition switch OFF.
2. Disconnect front air control connector M49.
3. Check continuity between ambient sensor harness connector
E1 terminal 1 (P) and front air control harness connector M49
terminal 17 (P).
4. Check continuity between ambient sensor harness connector
E1 terminal 2 (V/R) and ground.
OK or NG
OK >> 1. Replace front air control. Refer to ATC-135, "FRONT AIR CONTROL" .
2. Go to self-diagnosis ATC-53, "
A/C System Self-diagnosis Function" and perform self-diagno-
sis.
NG >> Repair harness or connector.2 - 21 : Continuity should exist.
WJIA0820E
1 - 17 : Continuity should exist.
1 - Ground : Continuity should not exist.
WJIA0967E
Page 532 of 3371

TROUBLE DIAGNOSIS
ATC-127
C
D
E
F
G
H
I
K
L
MA
B
AT C
Revision: August 20072004 QX56
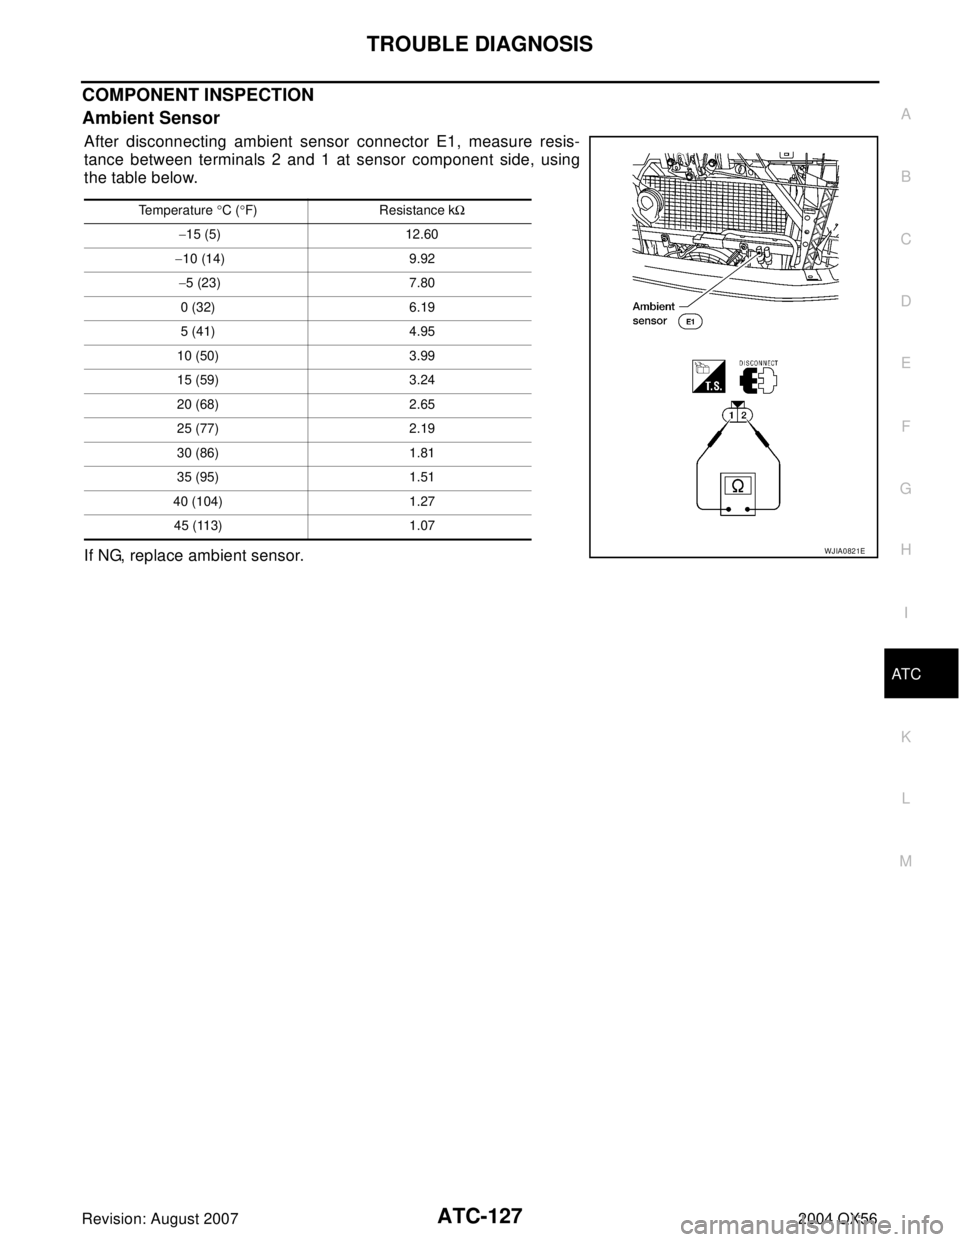
COMPONENT INSPECTION
Ambient Sensor
After disconnecting ambient sensor connector E1, measure resis-
tance between terminals 2 and 1 at sensor component side, using
the table below.
If NG, replace ambient sensor.
Temperature °C (°F) Resistance kΩ
−15 (5) 12.60
−10 (14) 9.92
−5 (23) 7.80
0 (32) 6.19
5 (41) 4.95
10 (50) 3.99
15 (59) 3.24
20 (68) 2.65
25 (77) 2.19
30 (86) 1.81
35 (95) 1.51
40 (104) 1.27
45 (113) 1.07
WJIA0821E
Page 533 of 3371

ATC-128
TROUBLE DIAGNOSIS
Revision: August 20072004 QX56
In-vehicle Sensor CircuitEJS002CT
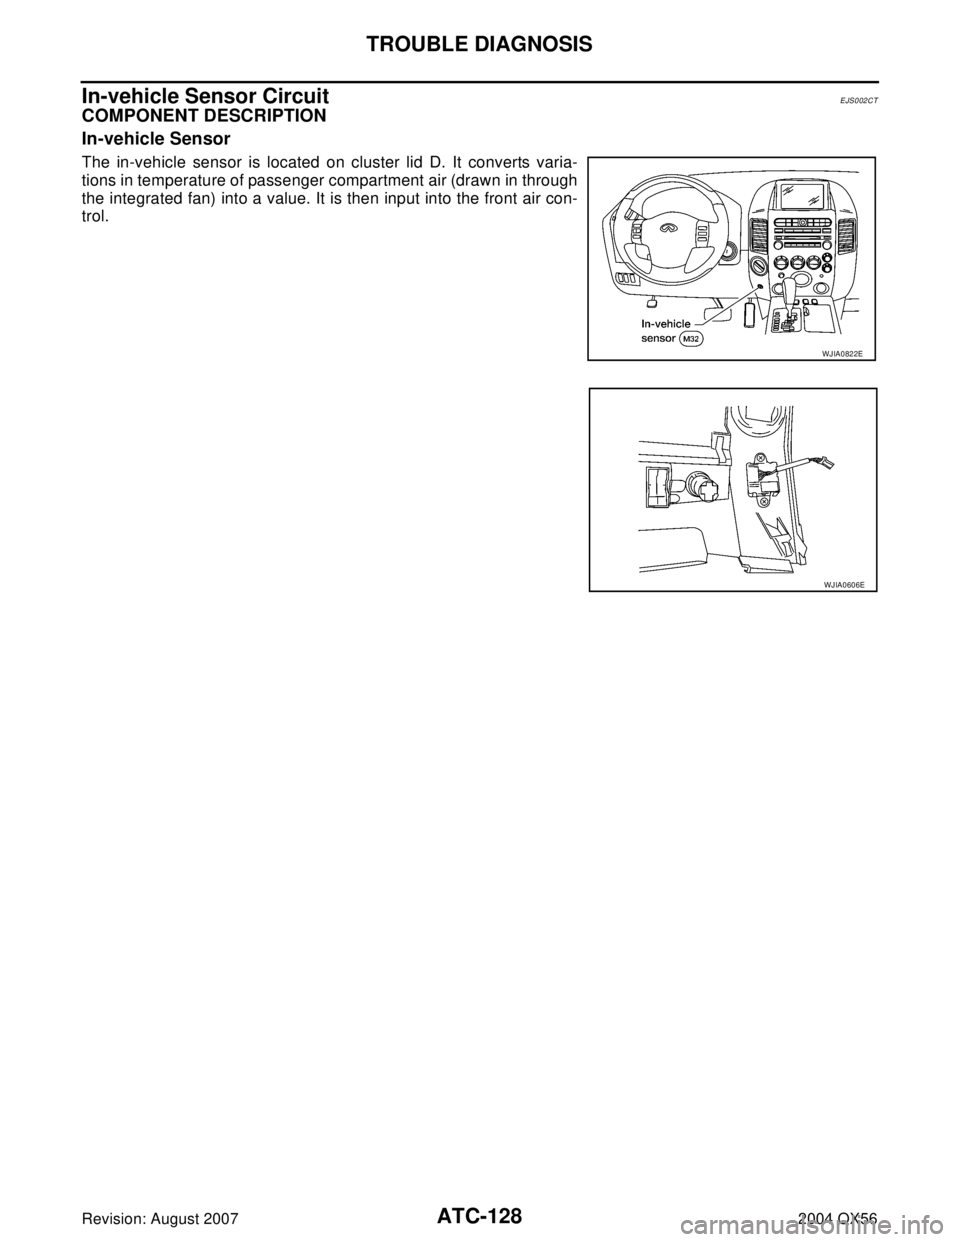
COMPONENT DESCRIPTION
In-vehicle Sensor
The in-vehicle sensor is located on cluster lid D. It converts varia-
tions in temperature of passenger compartment air (drawn in through
the integrated fan) into a value. It is then input into the front air con-
trol.
WJIA0822E
WJIA0606E
Page 534 of 3371

TROUBLE DIAGNOSIS
ATC-129
C
D
E
F
G
H
I
K
L
MA
B
AT C
Revision: August 20072004 QX56
DIAGNOSTIC PROCEDURE FOR IN-VEHICLE SENSOR
SYMPTOM: In-vehicle sensor circuit is open or shorted. (30 or 31 is
indicated as a result of conducting self-diagnosis.
1. CHECK IN-VEHICLE SENSOR CIRCUIT
Are diagnostic codes 44 or 46 present?
YES or NO
YES >> GO TO 6.
NO >> GO TO 2.
2. CHECK VOLTAGE BETWEEN IN-VEHICLE SENSOR AND GROUND
1. Disconnect in-vehicle sensor connector M32.
2. Turn ignition switch ON.
3. Check voltage between in-vehicle sensor harness connector
M32 terminal 4 (LG/R) and ground.
OK or NG
OK >> GO TO 3.
NG >> GO TO 5.
3. CHECK CIRCUIT CONTINUITY BETWEEN IN-VEHICLE SENSOR AND FRONT AIR CONTROL
1. Turn ignition switch OFF.
2. Disconnect front air control connector M49.
3. Check continuity between in-vehicle sensor harness connector
M32 terminal 1 (V/R) and front air control harness connector
M49 terminal 21 (V/R).
OK or NG
OK >> GO TO 4.
NG >> Repair harness or connector.
4. CHECK IN-VEHICLE SENSOR
Refer to ATC-131, "
In-vehicle Sensor" .
OK or NG
OK >> 1. Replace front air control. Refer to ATC-135, "FRONT AIR CONTROL" .
2. Go to AT C - 5 3 , "
A/C System Self-diagnosis Function" and perform self-diagnosis.
NG >> 1. Replace in-vehicle sensor. Refer to ATC-137, "
IN-VEHICLE SENSOR" .
2. Go to AT C - 5 3 , "
A/C System Self-diagnosis Function" and perform self-diagnosis.
WJIA0460E
4 - Ground : Approx. 5V
LJIA0089E
1 - 21 : Continuity should exist.
LJIA0090E
Page 535 of 3371

ATC-130
TROUBLE DIAGNOSIS
Revision: August 20072004 QX56
5. CHECK CIRCUIT CONTINUITY BETWEEN IN-VEHICLE SENSOR AND FRONT AIR CONTROL
1. Turn ignition switch OFF.
2. Disconnect front air control connector M50.
3. Check continuity between in-vehicle sensor harness connector
M32 terminal 4 (LG/R) and front air control harness connector
M50 terminal 32 (LG/R).
4. Check continuity between in-vehicle sensor harness connector
M32 terminal 4 (LG/R) and ground.
OK or NG
OK >> 1. Replace front air control. Refer to ATC-135, "FRONT AIR CONTROL" .
2. Go to self-diagnosis ATC-53, "
A/C System Self-diagnosis Function" and perform self-diagno-
sis.
NG >> Repair harness or connector.
6. CHECK CIRCUIT CONTINUITY BETWEEN IN-VEHICLE SENSOR MOTOR AND FRONT AIR CON-
TROL (SELF-DIAGNOSIS CODES 44 OR 46)
1. Turn ignition switch OFF.
2. Disconnect front air control connector M50 and in-vehicle sensor
connector M32.
3. Check continuity between in-vehicle sensor harness connector
M32 terminal 2 (O/B) and 3 (BR/Y) and front air control harness
connector M50 terminal 44 (O/B) and 43 (BR/Y).
4. Check continuity between in-vehicle sensor harness connector
M32 terminal 2 (O/B) and 3 (BR/Y) and ground.
OK or NG
OK >> 1. Replace front air control. Refer to ATC-135, "FRONT AIR CONTROL" .
2. Go to ATC-53, "
A/C System Self-diagnosis Function" and perform self-diagnosis.
NG >> Repair harness or connector.4 - 32 : Continuity should exist.
4 - Ground Continuity should not exist.
WJIA0823E
2 - 44 : Continuity should exist.
3 - 43 : Continuity should exist.
2, 3 - Ground :Continuity should not exist.
WJIA0824E
Page 536 of 3371

TROUBLE DIAGNOSIS
ATC-131
C
D
E
F
G
H
I
K
L
MA
B
AT C
Revision: August 20072004 QX56
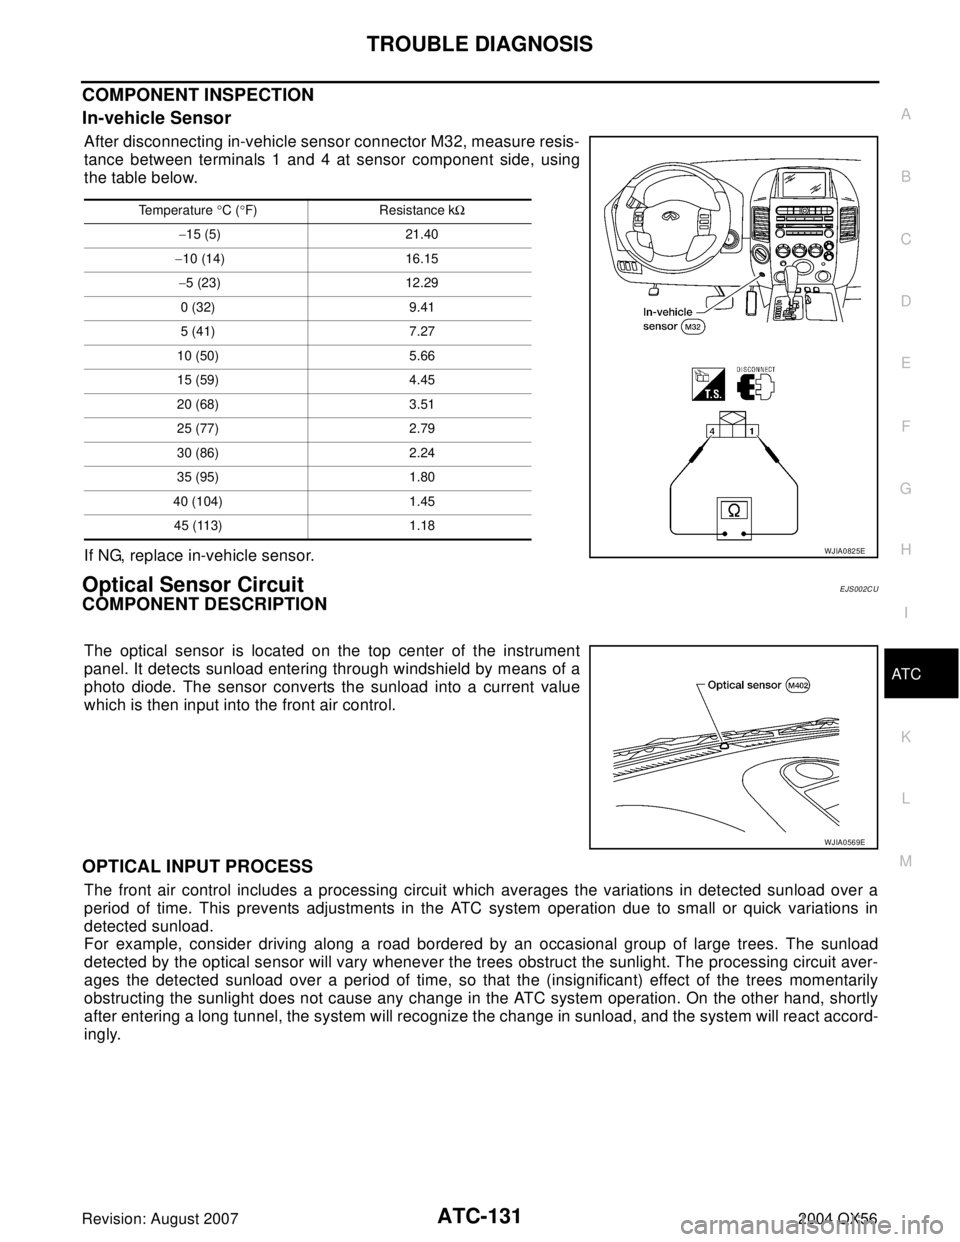
COMPONENT INSPECTION
In-vehicle Sensor
After disconnecting in-vehicle sensor connector M32, measure resis-
tance between terminals 1 and 4 at sensor component side, using
the table below.
If NG, replace in-vehicle sensor.
Optical Sensor CircuitEJS002CU
COMPONENT DESCRIPTION
The optical sensor is located on the top center of the instrument
panel. It detects sunload entering through windshield by means of a
photo diode. The sensor converts the sunload into a current value
which is then input into the front air control.
OPTICAL INPUT PROCESS
The front air control includes a processing circuit which averages the variations in detected sunload over a
period of time. This prevents adjustments in the ATC system operation due to small or quick variations in
detected sunload.
For example, consider driving along a road bordered by an occasional group of large trees. The sunload
detected by the optical sensor will vary whenever the trees obstruct the sunlight. The processing circuit aver-
ages the detected sunload over a period of time, so that the (insignificant) effect of the trees momentarily
obstructing the sunlight does not cause any change in the ATC system operation. On the other hand, shortly
after entering a long tunnel, the system will recognize the change in sunload, and the system will react accord-
ingly.
Temperature °C (°F) Resistance kΩ
−15 (5) 21.40
−10 (14) 16.15
−5 (23) 12.29
0 (32) 9.41
5 (41) 7.27
10 (50) 5.66
15 (59) 4.45
20 (68) 3.51
25 (77) 2.79
30 (86) 2.24
35 (95) 1.80
40 (104) 1.45
45 (113) 1.18
WJIA0825E
WJIA0569E
Page 537 of 3371

ATC-132
TROUBLE DIAGNOSIS
Revision: August 20072004 QX56
DIAGNOSTIC PROCEDURE FOR OPTICAL SENSOR
SYMPTOM: Optical sensor circuit is open or shorted. [50 (Driver) or
52 (Passenger) is indicated as a result of conducting self-diagnosis.]
1. CHECK CIRCUIT CONTINUITY BETWEEN OPTICAL SENSOR AND FRONT AIR CONTROL
1. Turn ignition switch OFF.
2. Disconnect front air control connector M50 and optical sensor
connector M402.
3. Check continuity between optical sensor harness connector
M402 terminal 1 (W/V) and 2 (G/O) and front air control harness
connector M50 terminal 31 (W/V) and 40 (G/O).
4. Check continuity between optical sensor harness connector
M402 terminal 1 (W/V) and 2 (G/O) and ground.
OK or NG
OK >> GO TO 2.
NG >> Repair harness or connector.
2. CHECK CIRCUIT CONTINUITY BETWEEN OPTICAL SENSOR AND BCM
1. Disconnect BCM connector M18.
2. Check continuity between optical sensor harness connector
M402 terminal 3 (P) and BCM harness connector M18 terminal
18 (P).
3. Check continuity between optical sensor harness connector
M402 terminal 3 (P) and ground.
OK or NG
OK >> Replace optical sensor. Refer to ATC-138, "OPTICAL SENSOR" .
NG >> Repair harness or connector.
WJIA0826E
1 - 31 : Continuity should exist.
2 - 40 : Continuity should exist.
1, 2 - Ground. : Continuity should not exist.
WJIA0827E
3 - 18 : Continuity should exist.
3 - Ground : Continuity should not exist.
WJIA0828E
Page 538 of 3371

TROUBLE DIAGNOSIS
ATC-133
C
D
E
F
G
H
I
K
L
MA
B
AT C
Revision: August 20072004 QX56
Intake Sensor CircuitEJS002CV
COMPONENT DESCRIPTION
Intake Sensor
The intake sensor is located on the front heater & cooling unit. It con-
verts temperature of air after it passes through the evaporator into a
resistance value which is then input to the front air control.
DIAGNOSTIC PROCEDURE FOR INTAKE SENSOR
SYMPTOM: Intake sensor circuit is open or shorted. (56 or 57 is indi-
cated as a result of conducting self-diagnosis).
1. CHECK VOLTAGE BETWEEN INTAKE SENSOR AND GROUND
1. Disconnect intake sensor connector M146.
2. Turn ignition switch ON.
3. Check voltage between intake sensor harness connector M146
terminal 2 (L/B) and ground.
OK or NG
OK >> GO TO 2.
NG >> GO TO 4.
2. CHECK CIRCUIT CONTINUITY BETWEEN INTAKE SENSOR AND FRONT AIR CONTROL
1. Turn ignition switch OFF.
2. Disconnect front air control connector M49.
3. Check continuity between intake sensor harness connector
M146 terminal 1 (V/R) and front air control harness connector
M49 terminal 21 (V/R).
OK or NG
OK >> GO TO 3.
NG >> Repair harness or connector.
WJIA0571E
WJIA0464E
2 - Ground : Approx. 5V
WJIA0829E
1 - 21 : Continuity should exist.
WJIA0830E
Page 539 of 3371

ATC-134
TROUBLE DIAGNOSIS
Revision: August 20072004 QX56
3. CHECK INTAKE SENSOR
Refer to ATC-134, "
Intake Sensor" .
OK or NG
OK >> 1. Replace front air control. Refer to ATC-135, "FRONT AIR CONTROL" .
2. Go to self-diagnosis ATC-53, "
A/C System Self-diagnosis Function" and perform self-diagno-
sis.
NG >> 1. Replace intake sensor. Refer to ATC-139, "
INTAKE SENSOR" .
2. Go to self-diagnosis ATC-53, "
A/C System Self-diagnosis Function" and perform self-diagno-
sis.
4. CHECK CIRCUIT CONTINUITY BETWEEN INTAKE SENSOR AND FRONT AIR CONTROL
1. Turn ignition switch OFF.
2. Disconnect front air control connector M49.
3. Check continuity between intake sensor harness connector
M146 terminal 2 (L/B) and front air control harness connector
M49 terminal 9 (L/B).
4. Check continuity between intake sensor harness connector
M146 terminal 2 (L/B) and ground.
OK or NG
OK >> 1. Replace front air control. Refer to ATC-135, "FRONT AIR CONTROL" .
2. Go to self-diagnosis ATC-53, "
A/C System Self-diagnosis Function" and perform self-diagno-
sis.
NG >> Repair harness or connector.
COMPONENT INSPECTION
Intake Sensor
After disconnecting intake sensor connector, measure resistance
between terminals 1 and 2 at sensor harness side, using the table
below.
If NG, replace intake sensor.2 - 9 : Continuity should exist.
2 - Ground : Continuity should not exist.
WJIA0831E
Temperature °C (°F) Resistance kΩ
−15 (5) 209.0
−10 (14) 160.0
−5 (23) 123.0
0 (32) 95.8
5 (41) 74.9
10 (50) 58.9
15 (59) 46.7
20 (68) 37.3
25 (77) 30.0
30 (86) 24.2
35 (95) 19.7
40 (104) 16.1
45 (113) 13.2
WJIA0832E
Page 540 of 3371

CONTROL UNIT
ATC-135
C
D
E
F
G
H
I
K
L
MA
B
AT C
Revision: August 20072004 QX56
CONTROL UNITPFP:27500
Removal and InstallationEJS002CW
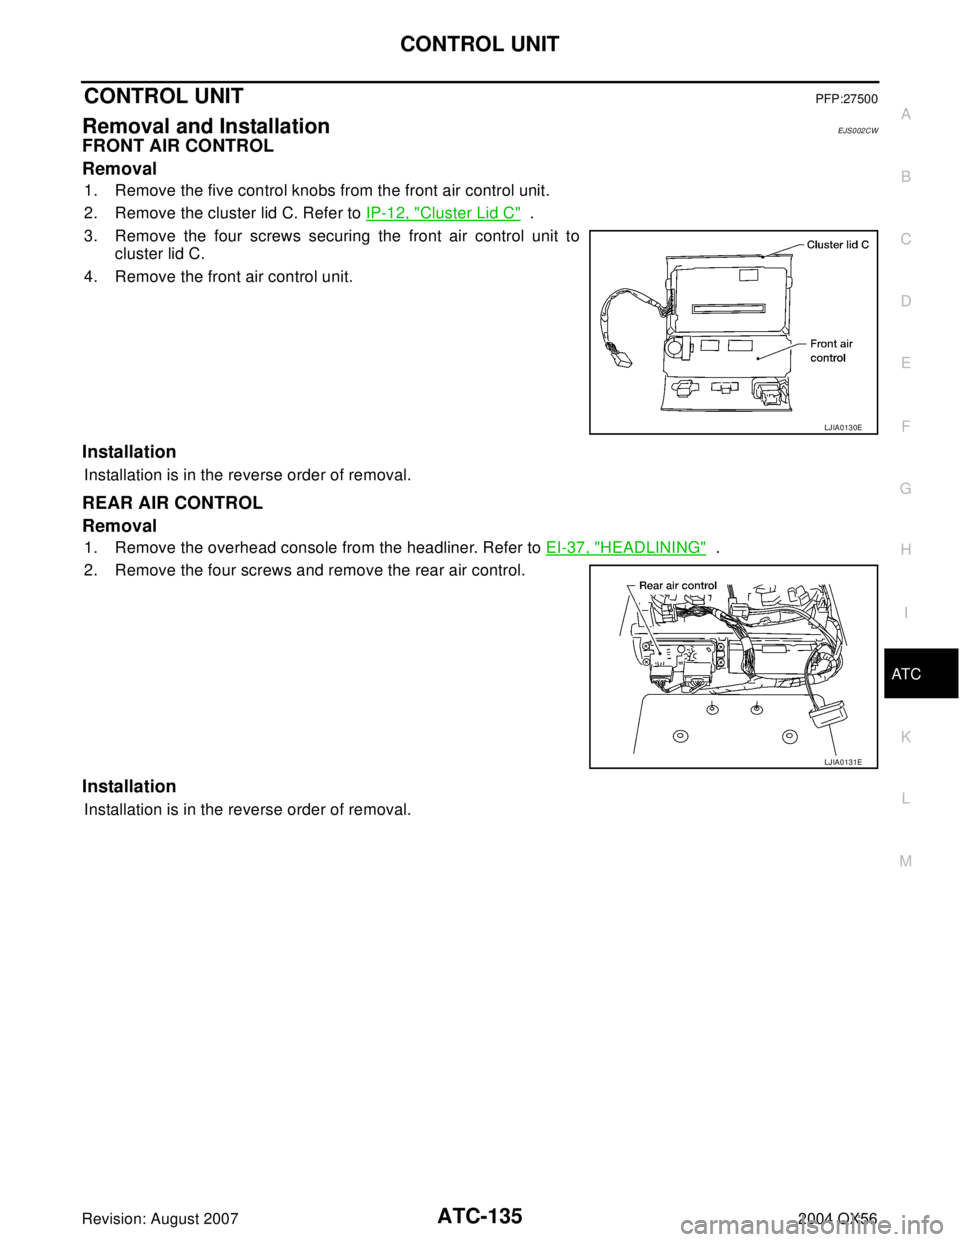
FRONT AIR CONTROL
Removal
1. Remove the five control knobs from the front air control unit.
2. Remove the cluster lid C. Refer to IP-12, "
Cluster Lid C" .
3. Remove the four screws securing the front air control unit to
cluster lid C.
4. Remove the front air control unit.
Installation
Installation is in the reverse order of removal.
REAR AIR CONTROL
Removal
1. Remove the overhead console from the headliner. Refer to EI-37, "HEADLINING" .
2. Remove the four screws and remove the rear air control.
Installation
Installation is in the reverse order of removal.
LJIA0130E
LJIA0131E