differential INFINITI QX56 2007 Factory Owner's Manual
[x] Cancel search | Manufacturer: INFINITI, Model Year: 2007, Model line: QX56, Model: INFINITI QX56 2007Pages: 3061, PDF Size: 64.56 MB
Page 1923 of 3061
FFD-24
< SERVICE INFORMATION >
FRONT FINAL DRIVE ASSEMBLY
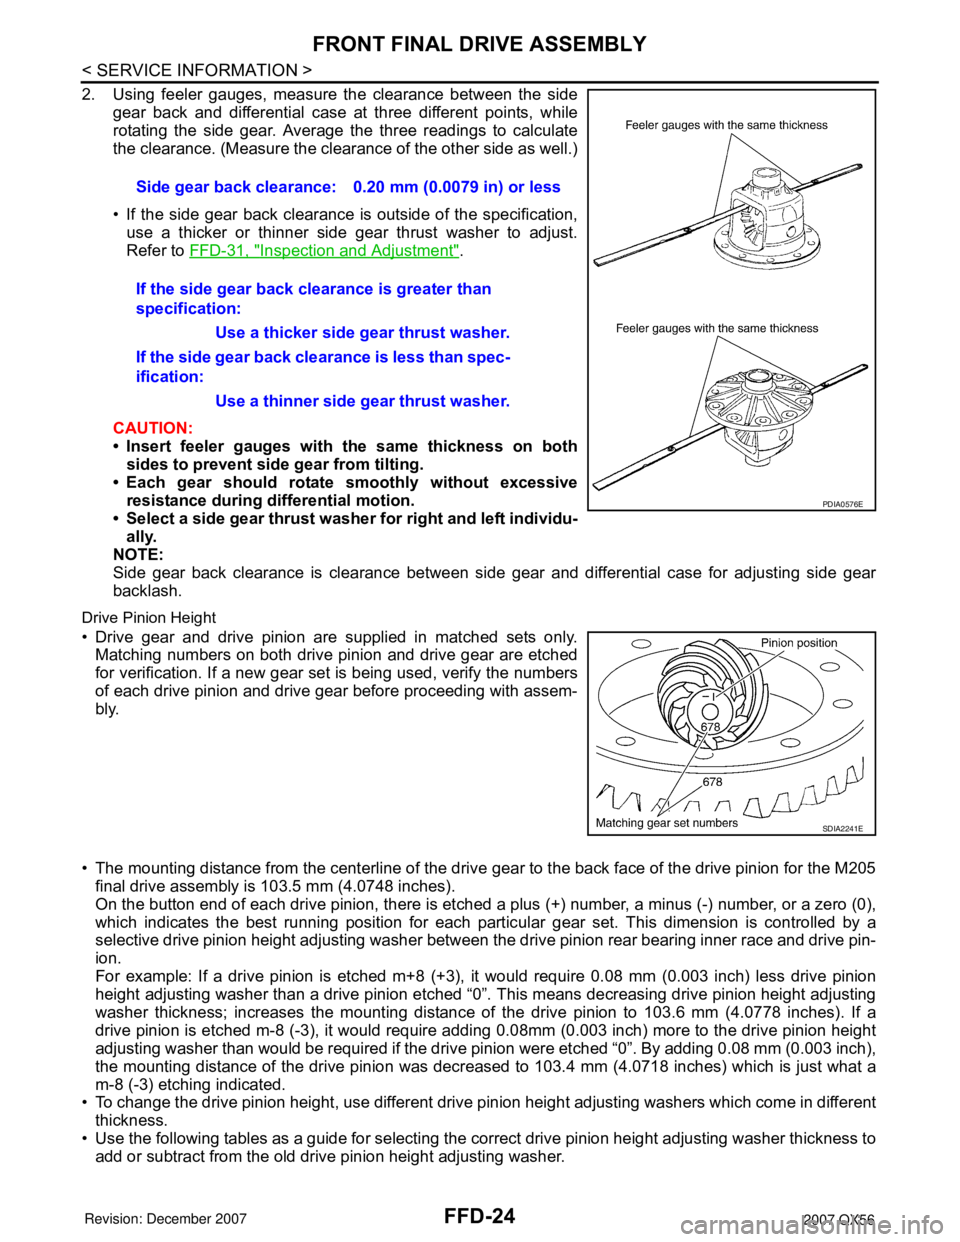
2. Using feeler gauges, measure the clearance between the side
gear back and differential case at three different points, while
rotating the side gear. Average the three readings to calculate
the clearance. (Measure the clearance of the other side as well.)
• If the side gear back clearance is outside of the specification,
use a thicker or thinner side gear thrust washer to adjust.
Refer to FFD-31, "
Inspection and Adjustment".
CAUTION:
• Insert feeler gauges with the same thickness on both
sides to prevent side gear from tilting.
• Each gear should rotate smoothly without excessive
resistance during differential motion.
• Select a side gear thrust washer for right and left individu-
ally.
NOTE:
Side gear back clearance is clearance between side gear and differential case for adjusting side gear
backlash.
Drive Pinion Height
• Drive gear and drive pinion are supplied in matched sets only.
Matching numbers on both drive pinion and drive gear are etched
for verification. If a new gear set is being used, verify the numbers
of each drive pinion and drive gear before proceeding with assem-
bly.
• The mounting distance from the centerline of the drive gear to the back face of the drive pinion for the M205
final drive assembly is 103.5 mm (4.0748 inches).
On the button end of each drive pinion, there is etched a plus (+) number, a minus (-) number, or a zero (0),
which indicates the best running position for each particular gear set. This dimension is controlled by a
selective drive pinion height adjusting washer between the drive pinion rear bearing inner race and drive pin-
ion.
For example: If a drive pinion is etched m+8 (+3), it would require 0.08 mm (0.003 inch) less drive pinion
height adjusting washer than a drive pinion etched “0”. This means decreasing drive pinion height adjusting
washer thickness; increases the mounting distance of the drive pinion to 103.6 mm (4.0778 inches). If a
drive pinion is etched m-8 (-3), it would require adding 0.08mm (0.003 inch) more to the drive pinion height
adjusting washer than would be required if the drive pinion were etched “0”. By adding 0.08 mm (0.003 inch),
the mounting distance of the drive pinion was decreased to 103.4 mm (4.0718 inches) which is just what a
m-8 (-3) etching indicated.
• To change the drive pinion height, use different drive pinion height adjusting washers which come in different
thickness.
• Use the following tables as a guide for selecting the correct drive pinion height adjusting washer thickness to
add or subtract from the old drive pinion height adjusting washer.Side gear back clearance: 0.20 mm (0.0079 in) or less
If the side gear back clearance is greater than
specification:
Use a thicker side gear thrust washer.
If the side gear back clearance is less than spec-
ification:
Use a thinner side gear thrust washer.
PDIA0576E
SDIA2241E
Page 1925 of 3061
FFD-26
< SERVICE INFORMATION >
FRONT FINAL DRIVE ASSEMBLY
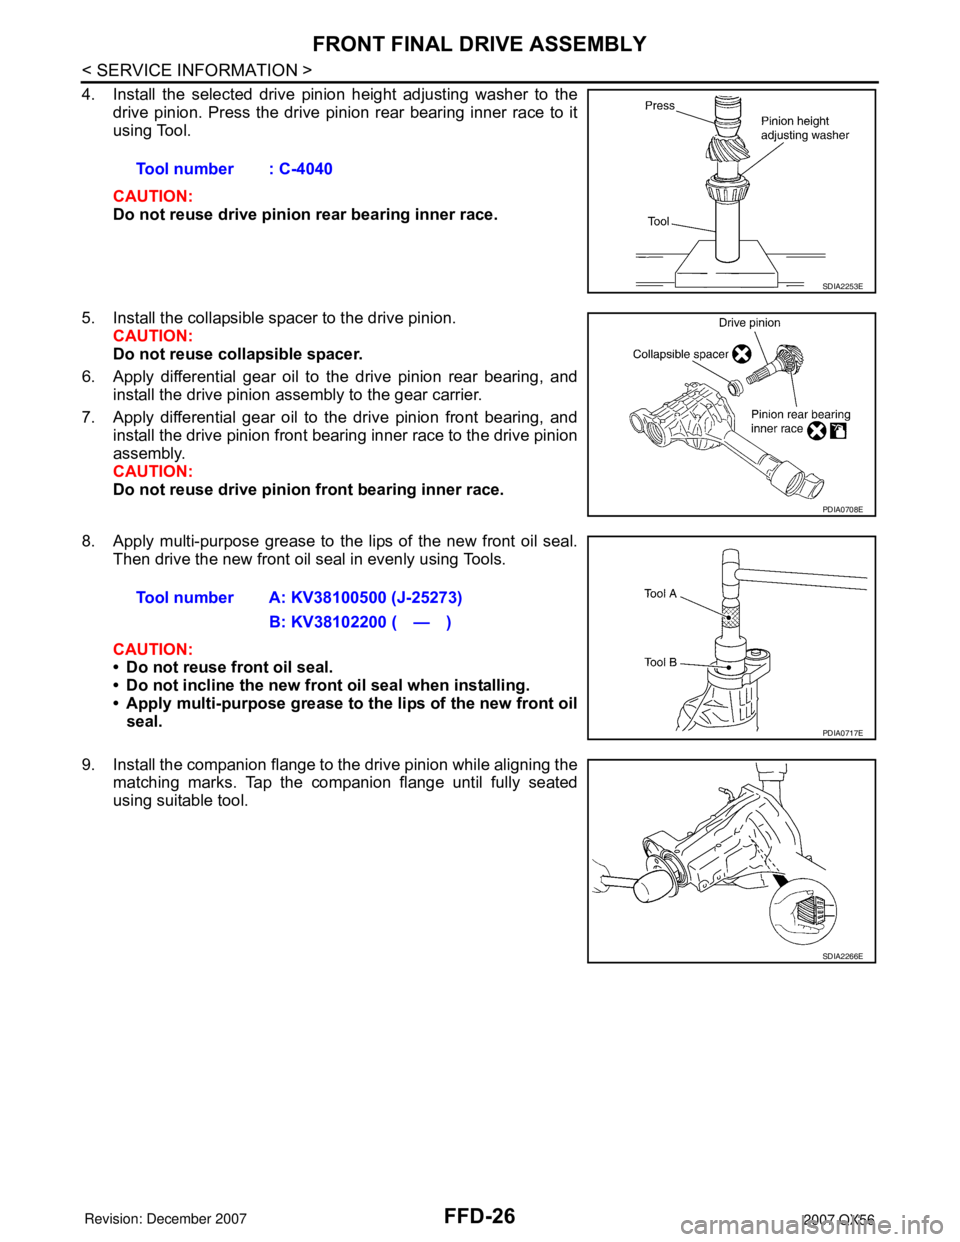
4. Install the selected drive pinion height adjusting washer to the
drive pinion. Press the drive pinion rear bearing inner race to it
using Tool.
CAUTION:
Do not reuse drive pinion rear bearing inner race.
5. Install the collapsible spacer to the drive pinion.
CAUTION:
Do not reuse collapsible spacer.
6. Apply differential gear oil to the drive pinion rear bearing, and
install the drive pinion assembly to the gear carrier.
7. Apply differential gear oil to the drive pinion front bearing, and
install the drive pinion front bearing inner race to the drive pinion
assembly.
CAUTION:
Do not reuse drive pinion front bearing inner race.
8. Apply multi-purpose grease to the lips of the new front oil seal.
Then drive the new front oil seal in evenly using Tools.
CAUTION:
• Do not reuse front oil seal.
• Do not incline the new front oil seal when installing.
• Apply multi-purpose grease to the lips of the new front oil
seal.
9. Install the companion flange to the drive pinion while aligning the
matching marks. Tap the companion flange until fully seated
using suitable tool.Tool number : C-4040
SDIA2253E
PDIA0708E
Tool number A: KV38100500 (J-25273)
B: KV38102200 ( — )
PDIA0717E
SDIA2266E
Page 1926 of 3061

FRONT FINAL DRIVE ASSEMBLY
FFD-27
< SERVICE INFORMATION >
C
E
F
G
H
I
J
K
L
MA
B
FFD
N
O
P
10. Apply anti-corrosive oil to the threads of the drive pinion and the
seating surface of the new drive pinion lock nut. Then adjust the
drive pinion lock nut tightening torque using Tool A, and check
the drive pinion bearing preload torque using Tool B.
CAUTION:
• Do not reuse drive pinion lock nut.
• Apply anti-corrosive oil to the threads of the drive pinion
and the seating surface of the new drive pinion lock nut.
• Adjust the drive pinion lock nut tightening torque to the
lower limit first. Do not exceed the drive pinion lock nut
specified torque.
• If the drive pinion bearing preload torque exceeds the
specified value, replace collapsible spacer and tighten it
again to adjust. Do not loosen drive pinion lock nut to
adjust the drive pinion bearing preload torque.
• After adjustment, rotate drive pinion back and forth 2 to 3
times to check for unusual noise, rotation malfunction,
and other malfunctions.
11. Check companion flange runout.
12. Install the differential case assembly.
Differential Assembly
1. Install side gear thrust washers with the same thickness as the
ones installed prior to disassembly, or reinstall the old ones on
the side gears.
2. Install the side gears and side gear thrust washers into the dif-
ferential case.
3. Install the pinion mate thrust washers to the two pinion mate
gears. Then install the pinion mate gears with the pinion mate
thrust washers by aligning them in diagonally opposite positions
and rotating them into the differential case.Tool number A: KV38108300 (J-44195)
B: ST3127S000 (J-25765-A)
Drive pinion bearing preload torque:
2.3 - 3.4 N·m (24 - 34 kg-cm, 21 - 30 in-lb)
WDIA0382E
SDIA0193J
SDIA2025E
Page 1927 of 3061

FFD-28
< SERVICE INFORMATION >
FRONT FINAL DRIVE ASSEMBLY
4. Install the pinion mate shaft and align the lock pin hole on the
pinion mate shaft with the lock pin hole on the differential case.
5. Measure the side gear end play. If necessary, select the appro-
priate side gear thrust washers.
6. Drive a new lock pin into the pinion mate shaft until it is flush
with the differential case using suitable tool.
CAUTION:
Do not reuse lock pin.
7. Align the matching mark of the differential case with the mark of
the drive gear, then place the drive gear onto the differential
case.
8. Install and tighten the new drive gear bolts to the specified
torque.
CAUTION:
• Make sure the drive gear back and threaded holes are
clean.
• Do not reuse drive gear bolts.
• Tighten new drive gear bolts in a crisscross pattern.
9. Press the new side bearing inner races to the differential case
using Tools.
CAUTION:
Do not reuse side bearing inner races.
SDIA0195J
SPD030
SDIA2593E
SDIA2239E
Tool number A: KV38100300 (J-25523)
B: ST33081000
SPD353
Page 1928 of 3061

FRONT FINAL DRIVE ASSEMBLY
FFD-29
< SERVICE INFORMATION >
C
E
F
G
H
I
J
K
L
MA
B
FFD
N
O
P
10. Install side bearing adjusters into gear carrier.
11. Apply differential gear oil to the side bearings, and install the dif-
ferential case assembly with the side bearing outer races into
the gear carrier.
CAUTION:
Do not reuse side bearing outer race when replacing side
bearing inner race (replace as a set).
12. Install the side bearing caps with the matching marks aligned.
NOTE:
Do not tighten at this step. This allows further tightening of side
bearing adjusters.
13. Tighten each side bearing adjuster alternately turning drive gear.
14. Check and adjust tooth contact, backlash, drive gear runout and total preload torque.
Recheck above items.
• After adjusting tooth contact and backlash secure side bearing
adjuster with screws and tighten side bearing cap bolt to the
specified torque.
15. Apply multi-purpose grease to the lips of the new side oil seal. Then drive the new side oil seal in evenly to
the gear carrier using suitable tool.
CAUTION:
• Do not reuse side oil seal.
• Do not incline the new side oil seal when installing.
• Apply multi-purpose grease to the lips of the new side oil seal.
SPD527
PDIA0700E
SDIA2265E
SDIA2263E
Page 1930 of 3061
SERVICE DATA AND SPECIFICATIONS (SDS)
FFD-31
< SERVICE INFORMATION >
C
E
F
G
H
I
J
K
L
MA
B
FFD
N
O
P
SERVICE DATA AND SPECIFICATIONS (SDS)
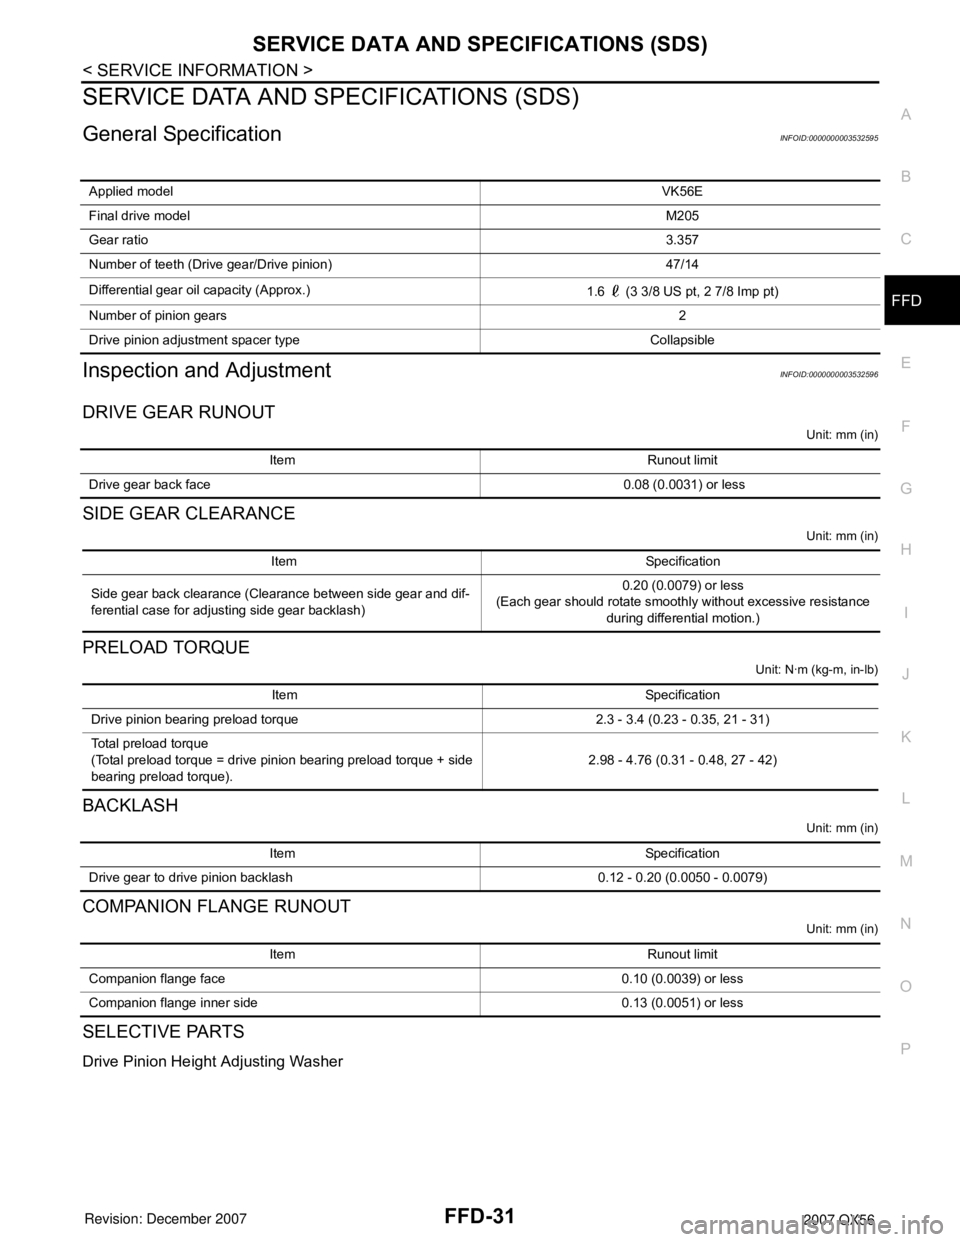
General SpecificationINFOID:0000000003532595
Inspection and AdjustmentINFOID:0000000003532596
DRIVE GEAR RUNOUT
Unit: mm (in)
SIDE GEAR CLEARANCE
Unit: mm (in)
PRELOAD TORQUE
Unit: N·m (kg-m, in-lb)
BACKLASH
Unit: mm (in)
COMPANION FLANGE RUNOUT
Unit: mm (in)
SELECTIVE PARTS
Drive Pinion Height Adjusting Washer
Applied modelVK56E
Final drive modelM205
Gear ratio3.357
Number of teeth (Drive gear/Drive pinion) 47/14
Differential gear oil capacity (Approx.)
1.6 (3 3/8 US pt, 2 7/8 Imp pt)
Number of pinion gears2
Drive pinion adjustment spacer type Collapsible
Item Runout limit
Drive gear back face 0.08 (0.0031) or less
Item Specification
Side gear back clearance (Clearance between side gear and dif-
ferential case for adjusting side gear backlash)0.20 (0.0079) or less
(Each gear should rotate smoothly without excessive resistance
during differential motion.)
Item Specification
Drive pinion bearing preload torque 2.3 - 3.4 (0.23 - 0.35, 21 - 31)
Total preload torque
(Total preload torque = drive pinion bearing preload torque + side
bearing preload torque).2.98 - 4.76 (0.31 - 0.48, 27 - 42)
Item Specification
Drive gear to drive pinion backlash 0.12 - 0.20 (0.0050 - 0.0079)
Item Runout limit
Companion flange face 0.10 (0.0039) or less
Companion flange inner side 0.13 (0.0051) or less
Page 2017 of 3061

TERMINOLOGY
GI-51
< SERVICE INFORMATION >
C
D
E
F
G
H
I
J
K
L
MB
GI
N
O
P
Exhaust gas recirculation control-BPT
valveEGRC-BPT valve BPT valve
Exhaust gas recirculation control-solenoid
valveEGRC-solenoid valve EGR control solenoid valve
Exhaust gas recirculation temperature sen-
sor
EGRT sensor Exhaust gas temperature sensor
EGR temperature sensor
Flash electrically erasable programmable
read only memoryFEEPROM ***
Flash erasable programmable read only
memoryFEPROM ***
Flexible fuel sensor FFS ***
Flexible fuel system FF system ***
Fuel pressure regulator *** Pressure regulator
Fuel pressure regulator control solenoid
valve*** PRVR control solenoid valve
Fuel trim FT ***
Heated Oxygen sensor HO2S Exhaust gas sensor
Idle air control system IAC system Idle speed control
Idle air control valve-air regulator IACV-air regulator Air regulator
Idle air control valve-auxiliary air control
valveIACV-AAC valve Auxiliary air control (AAC) valve
Idle air control valve-FICD solenoid valve IACV-FICD solenoid valve FICD solenoid valve
Idle air control valve-idle up control sole-
noid valveIACV-idle up control solenoid valve Idle up control solenoid valve
Idle speed control-FI pot ISC-FI pot FI pot
Idle speed control system ISC system ***
Ignition control IC ***
Ignition control module ICM ***
Indirect fuel injection system IFI system ***
Intake air IA Air
Intake air temperature sensor IAT sensor Air temperature sensor
Knock *** Detonation
Knock sensor KS Detonation sensor
Malfunction indicator lamp MIL Check engine light
Manifold absolute pressure MAP ***
Manifold absolute pressure sensor MAPS ***
Manifold differential pressure MDP ***
Manifold differential pressure sensor MDPS ***
Manifold surface temperature MST ***
Manifold surface temperature sensor MSTS ***
Manifold vacuum zone MVZ ***
Manifold vacuum zone sensor MVZS ***
Mass air flow sensor MAFS Air flow meter
Mixture control solenoid valve MC solenoid valve Air-fuel ratio control solenoid valve
Multiport fuel injection System MFI system Fuel injection controlNEW TERMNEW ACRONYM /
ABBREVIATIONOLD TERM
Page 2107 of 3061
IDX-3
A
C
D
E
F
G
H
I
J
K
L B
IDX
ALPHABETICAL INDEX
Brake fluid level ................................................. MA-28
Brake hydraulic line ........................................... BR-12
Brake inspection ................................................ MA-28
Brake lines and cables inspection ..................... MA-28
Brake master cylinder ....................................... BR-15
Brake switch ...................................... EC-572, EC-584
BRK/SW - Wiring diagram ............................... EC-585
Bulb specifications ........................................... LT-148
Bumper, front ...................................................... EI-13
Bumper, rear ....................................................... EI-15
C
Cabin air filter .................................................... MA-21
Camshaft ........................................................... EM-46
Camshaft inspection .......................................... EM-49
Camshaft position sensor (PHASE) ................ EC-369
CAN - Wiring diagram .............. EC-157, AT-93, AT-94
CAN communication EC-32, EC-156, EC-159, TF-112,
RSU-6
Canister-See EVAP canister ............................. EC-36
Center case (Transfer) ....................... TF-154, TF-167
CHARGE - Wiring diagram ............................... SC-19
Charging system ............................................... SC-17
Chassis and body maintenance ........................ MA-21
Chassis and body maintenanceSchedule 1 ........ MA-8
Chassis and body maintenanceSchedule 2 ...... MA-10
CHIME - Wiring diagram ..................................... DI-41
Circuit breaker ................................................... PG-17
Clock ................................................................... DI-61
CLOCK - Wiring diagram .................................... DI-61
Closed loop control ............................. EC-26, EC-501
Closed loop control (Bank 1) ........................... EC-501
Closed loop control (Bank 2) ........................... EC-501
Clutch drum (Transfer) ....................... TF-154, TF-167
Clutch pressure switch (Transfer) ...... TF-154, TF-167
Coil spring (front) ............................................. FSU-10
Collision diagnosis .......................................... SRS-53
Combination lamp, front, removal and installation . LT-
25
Combination lamp, rear, removal and installation .. LT-
101
Combination meter ................................................ DI-5
Combination switch ............................................ LT-79
COMBSW - Wiring diagram ............................... LT-79
COMM - Wiring diagram ................................... AV-94
COMPAS - Wiring diagram ................................. DI-24
Compass ............................................................. DI-23
Component Location (auto A/C) ...................... ATC-38
Compressor clutch removal and installation . ATC-180
Compressor mounting ................................... ATC-179
Compressor precaution ................................... ATC-11
Compressor special service tool ..................... ATC-14
Condenser ..................................................... ATC-184
Connecting rod .................................................. EM-96
Connecting rod bearing clearance .................... EM-96
Connecting rod bushing clearance .................... EM-96
Console box - See Instrument panel ................... IP-10
CONSULT for VDC ......................................... BRC-27
CONSULT general information ........................... GI-37
CONSULT-II for engine ................................... EC-118
Control units (terminal arrangement) ................. PG-71
Control valve (A/T) ............................................. AT-36
Control valve (Transfer) ...................... TF-154, TF-167
Converter housing installation ............ AT-240, AT-244
COOL/F - Wiring diagram ................................ EC-507
Coolant mixture ratio ......................................... MA-12
Coolant replacement ............................ CO-10, MA-13
Cooling circuit (engine) ........................................ CO-8
Cooling fan ........................................................ CO-17
Cooling fan control ........................................... EC-504
Cooling fan motor ............................................ EC-513
Cooling unit (A/C evaporator) ....... ATC-157, ATC-186
Corrosion protection ......................................... BL-157
Crankcase ventilation system - See Positive crankcase
ventilation .......................................................... EC-46
Crankshaft ......................................................... EM-79
Crankshaft position sensor (POS) ................... EC-362
Crash zone sensor .......................................... SRS-48
CUR/SE - Wiring diagram ... EC-522, EC-529, EC-536,
EC-543
Cylinder block .................................................... EM-78
Cylinder block boring ......................................... EM-99
D
D/LOCK - Wiring diagram ................................... BL-19
Data link connector for Consult ......... EC-120, EC-132
Daytime light system .......................................... LT-27
Daytime running light - See Daytime light system .. LT-
27
DEF - Wiring diagram ....................................... GW-74
Diagnosis sensor unit ...................................... SRS-51
Diagnostic trouble code (DTC) for OBD system . EC-9,
EC-54
Diagnostic trouble code (DTC) inspection priority chart
EC-91
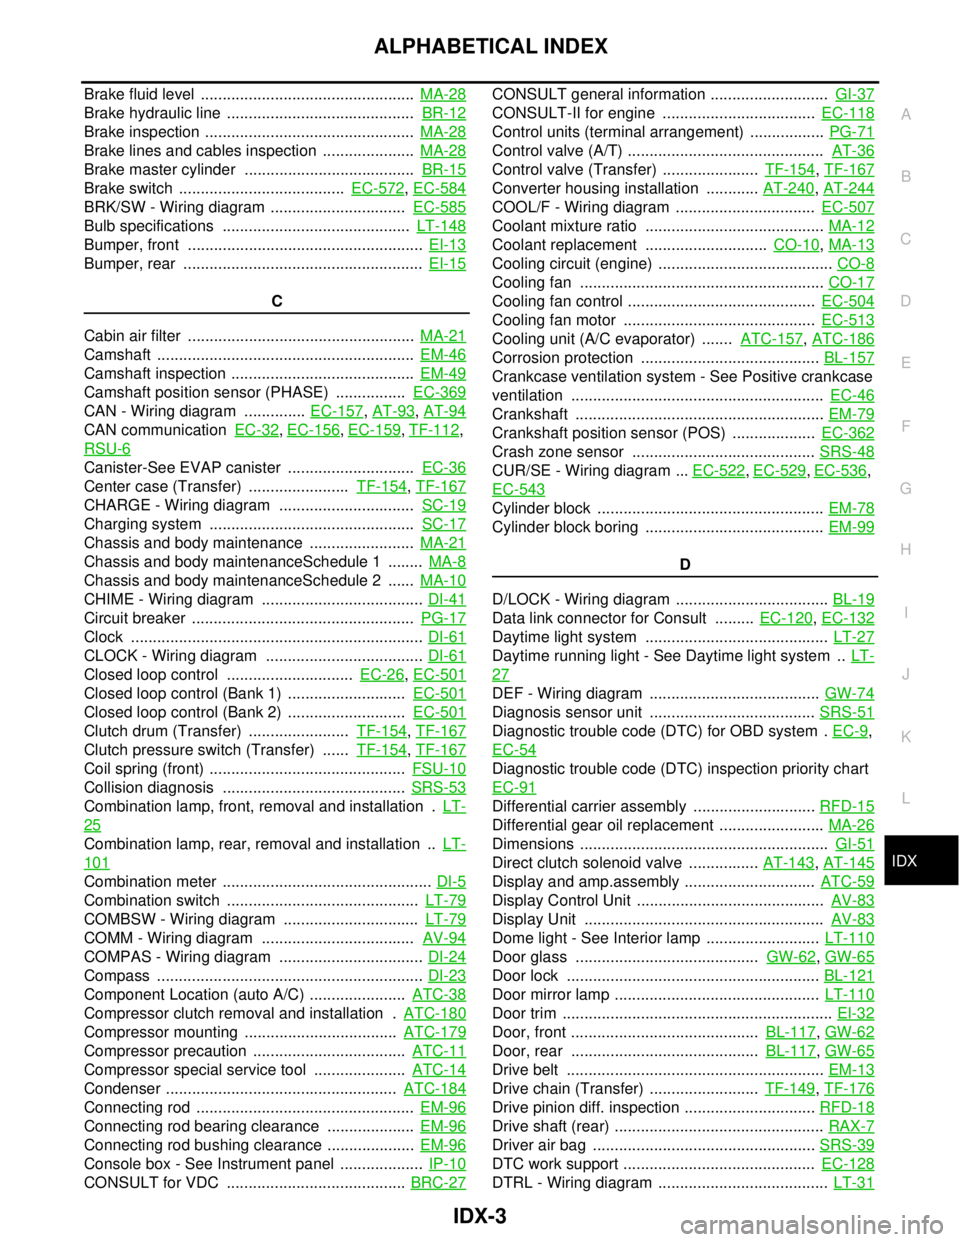
Differential carrier assembly ............................ RFD-15
Differential gear oil replacement ........................ MA-26
Dimensions ......................................................... GI-51
Direct clutch solenoid valve ................ AT-143, AT-145
Display and amp.assembly .............................. ATC-59
Display Control Unit ........................................... AV-83
Display Unit ....................................................... AV-83
Dome light - See Interior lamp .......................... LT-110
Door glass .......................................... GW-62, GW-65
Door lock .......................................................... BL-121
Door mirror lamp ............................................... LT-110
Door trim .............................................................. EI-32
Door, front ........................................... BL-117, GW-62
Door, rear ........................................... BL-117, GW-65
Drive belt ........................................................... EM-13
Drive chain (Transfer) ......................... TF-149, TF-176
Drive pinion diff. inspection .............................. RFD-18
Drive shaft (rear) ................................................ RAX-7
Driver air bag ................................................... SRS-39
DTC work support ............................................ EC-128
DTRL - Wiring diagram ....................................... LT-31
Page 2480 of 3061

NOISE, VIBRATION AND HARSHNESS (NVH) TROUBLESHOOTINGPR-3
< SERVICE INFORMATION >
CEF
G H
I
J
K L
M A
B
PR
N
O P
NOISE, VIBRATION AND HARSHN ESS (NVH) TROUBLESHOOTING
NVH Troubleshooting ChartINFOID:0000000003532575
Use the chart below to help you find t he cause of the symptom. If necessary, repair or replace these parts.
×: ApplicableReference page
PR-4
(front)
PR-8 (rear)
PR-4 (front)
PR-8 (rear)
PR-4 (front)
PR-8 (rear)
FFD-6, "
NVH Troubleshooting Chart
"
RFD-7, "
NVH Troubleshooting Chart
"
FAX-4, "
NVH Troubleshooting Chart
"
RAX-4, "
NVH Troubleshooting Chart
"
FSU-4, "
NVH Troubleshooting Chart
"
RSU-4, "
NVH Troubleshooting Chart
"
WT-4, "
NVH Troubleshooting Chart
"
WT-4, "
NVH Troubleshooting Chart
"
FAX-4, "
NVH Troubleshooting Chart
"
BR-4, "
NVH Troubleshooting Chart
"
PS-5, "
NVH Troubleshooting Chart
"
Possible cause and suspected parts
Uneven rotation torque
Rotation imbalance
Excessive run out
Differential
Axle
Suspension
Tires
Road wheel
Drive shaft
Brakes
Ste eri ng
Symptom Noise
×××××××××××
Shake ×××××××
Vibration ××××××××
Page 2522 of 3061
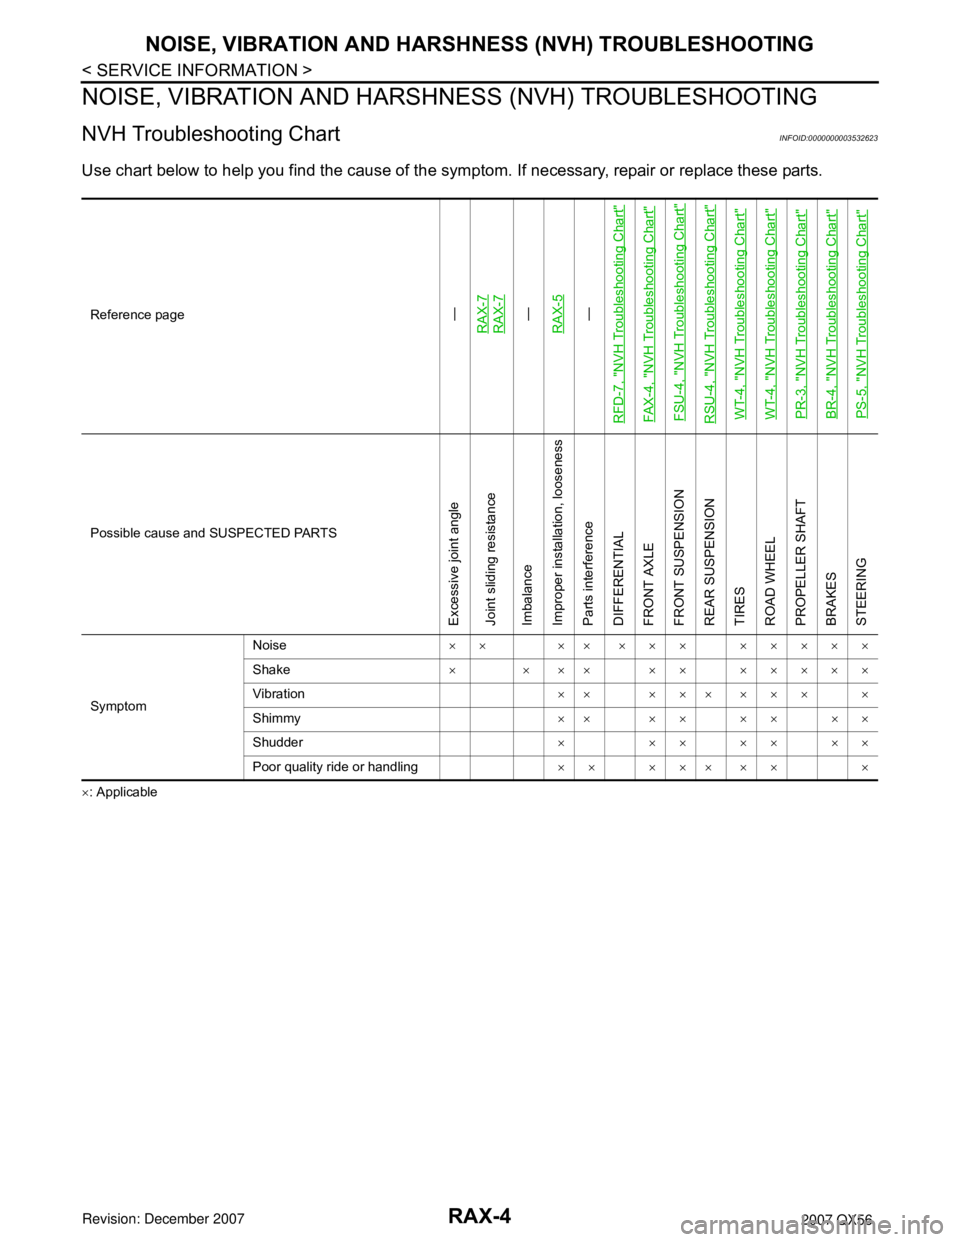
RAX-4
< SERVICE INFORMATION >
NOISE, VIBRATION AND HARSHNESS (NVH) TROUBLESHOOTING
NOISE, VIBRATION AND HARSHNESS (NVH) TROUBLESHOOTING
NVH Troubleshooting ChartINFOID:0000000003532623
Use chart below to help you find the cause of the symptom. If necessary, repair or replace these parts.
×: ApplicableReference page
—
RAX-7RAX-7—
RAX-5—
RFD-7, "
NVH Troubleshooting Chart
"
FAX-4, "
NVH Troubleshooting Chart
"
FSU-4, "
NVH Troubleshooting Chart
"
RSU-4, "
NVH Troubleshooting Chart
"
WT-4, "
NVH Troubleshooting Chart
"
WT-4, "
NVH Troubleshooting Chart
"
PR-3, "
NVH Troubleshooting Chart
"
BR-4, "
NVH Troubleshooting Chart
"
PS-5, "
NVH Troubleshooting Chart
"
Possible cause and SUSPECTED PARTS
Excessive joint angle
Joint sliding resistance
Imbalance
Improper installation, looseness
Parts interference
DIFFERENTIAL
FRONT AXLE
FRONT SUSPENSION
REAR SUSPENSION
TIRES
ROAD WHEEL
PROPELLER SHAFT
BRAKES
STEERING
SymptomNoise×× ×× ××× ×××××
Shake× × ×× ×× ×××××
Vibration×× ××× ××× ×
Shimmy×× ×× ×× ××
Shudder×××××××
Poor quality ride or handling×× ××× ×× ×