transmission oil INFINITI QX56 2009 Factory Repair Manual
[x] Cancel search | Manufacturer: INFINITI, Model Year: 2009, Model line: QX56, Model: INFINITI QX56 2009Pages: 4171, PDF Size: 84.65 MB
Page 3860 of 4171
TM-212
< ON-VEHICLE REPAIR >
REAR OIL SEAL
REAR OIL SEAL
Rear Oil SealINFOID:0000000004187482
REMOVAL AND INSTALLATION
Removal
1. Remove rear propeller shaft. Refer to DLN-196, "Removal and Installation".
2. Remove transfer from transmission (4WD models). Refer to DLN-141, "Removal and Installation"
.
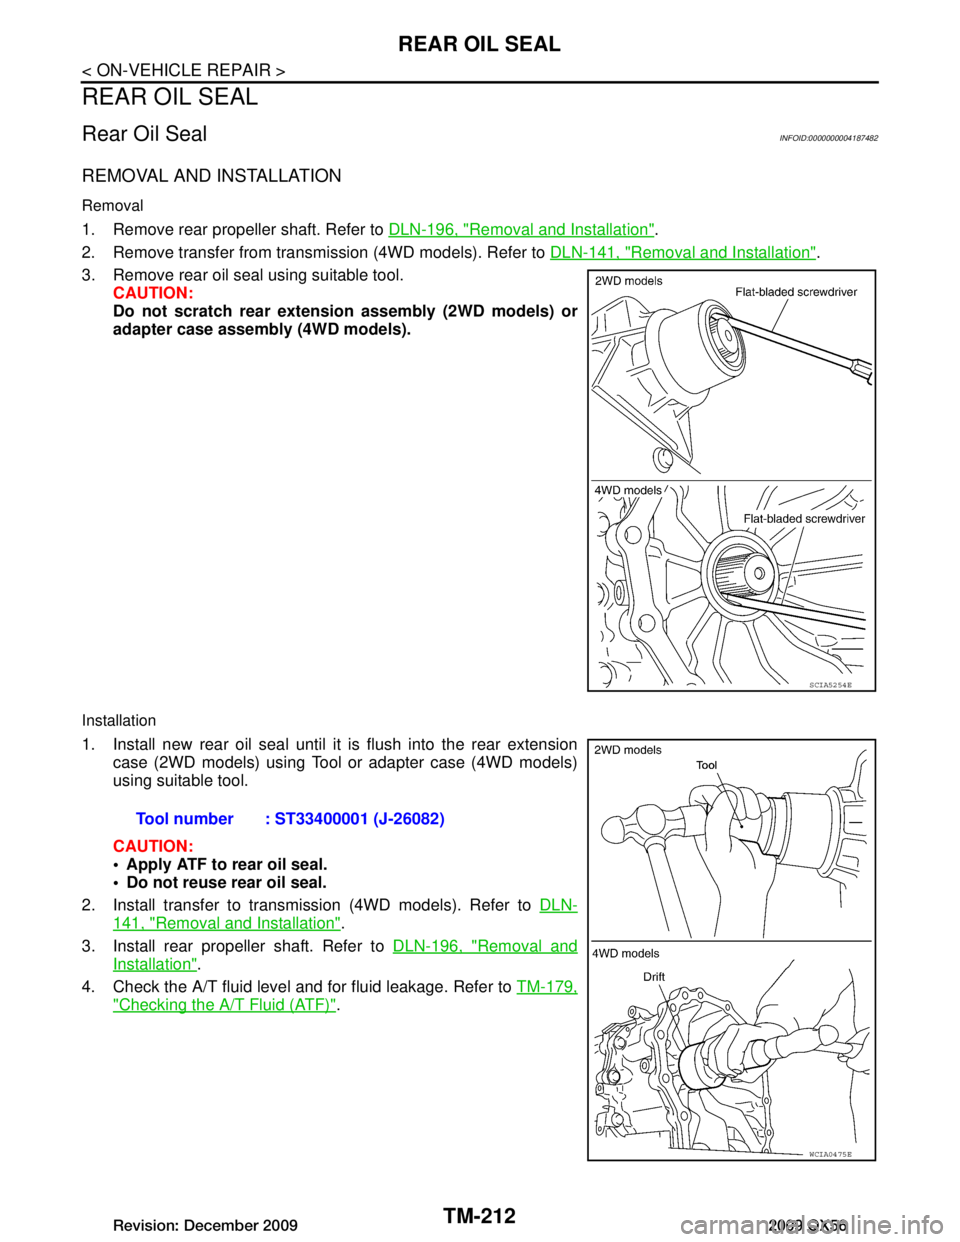
3. Remove rear oil seal using suitable tool. CAUTION:
Do not scratch rear extension assembly (2WD models) or
adapter case assembly (4WD models).
Installation
1. Install new rear oil seal until it is flush into the rear extension
case (2WD models) using Tool or adapter case (4WD models)
using suitable tool.
CAUTION:
Apply ATF to rear oil seal.
Do not reuse rear oil seal.
2. Install transfer to transmission (4WD models). Refer to DLN-
141, "Removal and Installation".
3. Install rear propeller shaft. Refer to DLN-196, "Removal and
Installation".
4. Check the A/T fluid level and for fluid leakage. Refer to TM-179,
"Checking the A/T Fluid (ATF)".
SCIA5254E
Tool number : ST33400001 (J-26082)
WCIA0475E
Revision: December 20092009 QX56
Page 3864 of 4171
TM-216
< REMOVAL AND INSTALLATION >
TRANSMISSION ASSEMBLY
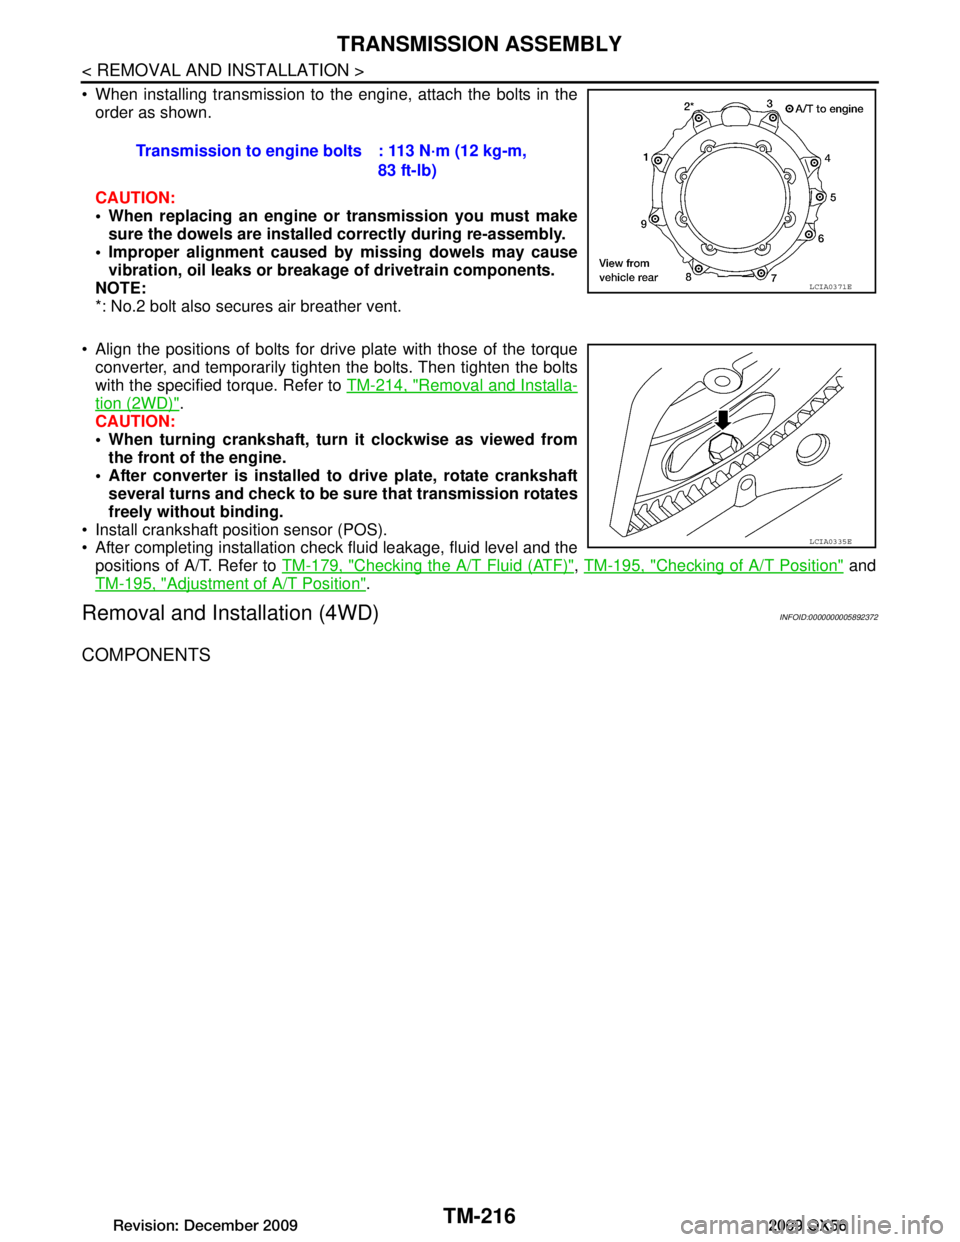
When installing transmission to the engine, attach the bolts in theorder as shown.
CAUTION:
When replacing an engine or transmission you must make
sure the dowels are installe d correctly during re-assembly.
Improper alignment caused by missing dowels may cause
vibration, oil leaks or breakage of drivetrain components.
NOTE:
*: No.2 bolt also secures air breather vent.
Align the positions of bolts for drive plate with those of the torque converter, and temporarily tight en the bolts. Then tighten the bolts
with the specified torque. Refer to TM-214, "Removal and Installa-
tion (2WD)".
CAUTION:
When turning crankshaft, turn it clockwise as viewed from
the front of the engine.
After converter is installed to drive plate, rotate crankshaft several turns and check to be su re that transmission rotates
freely without binding.
Install crankshaft position sensor (POS).
After completing installation check fluid leakage, fluid level and the positions of A/T. Refer to TM-179, "Checking the A/T Fluid (ATF)"
, TM-195, "Checking of A/T Position" and
TM-195, "Adjustment of A/T Position"
.
Removal and Installation (4WD)INFOID:0000000005892372
COMPONENTS
Transmission to engine bolts : 113 N·m (12 kg-m,
83 ft-lb)
LCIA0371E
LCIA0335E
Revision: December 20092009 QX56
Page 3867 of 4171
TRANSMISSION ASSEMBLYTM-219
< REMOVAL AND INSTALLATION >
CEF
G H
I
J
K L
M A
B
TM
N
O P
INSPECTION
Installation and Inspection of Torque Converter
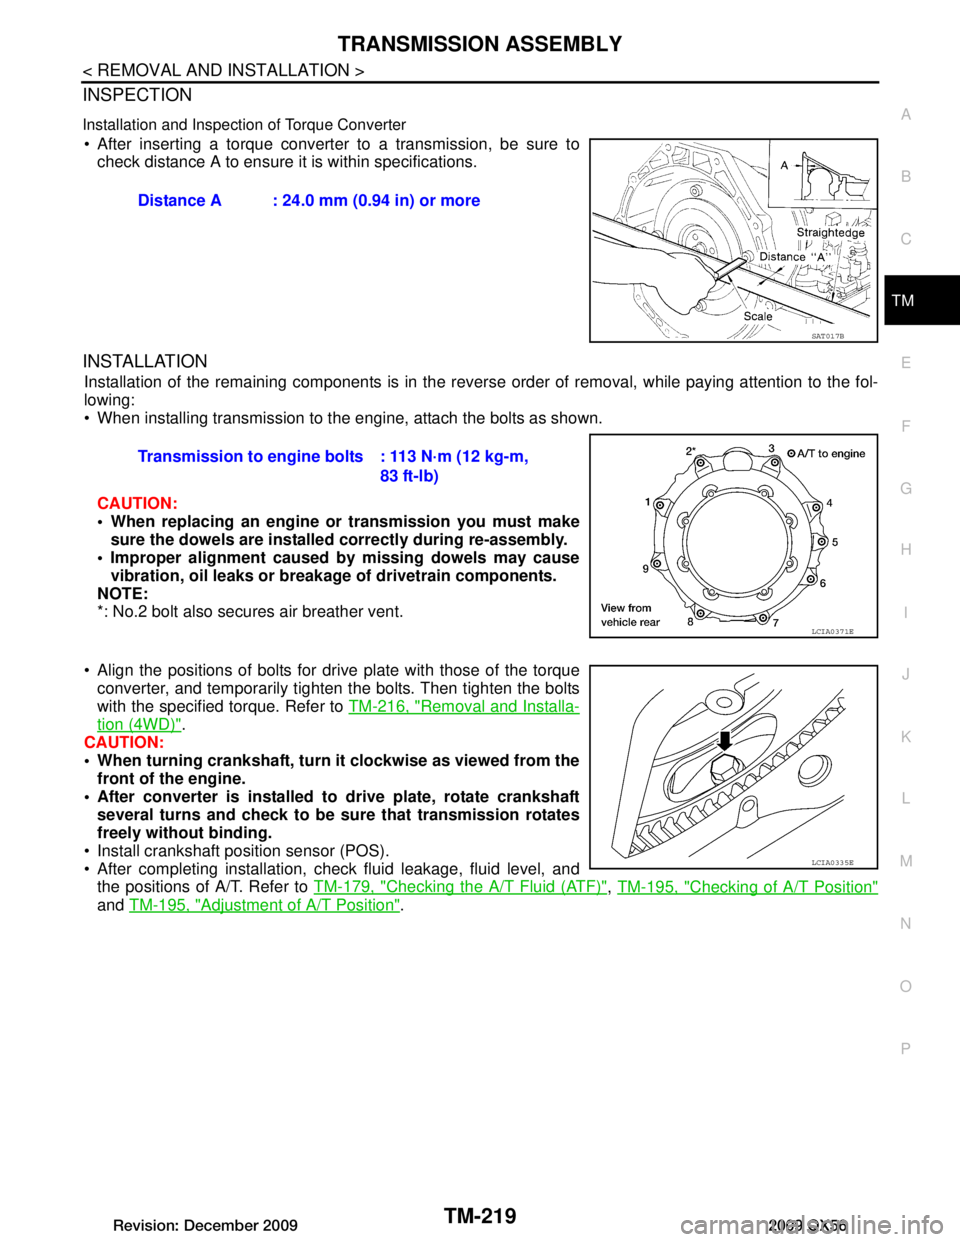
After inserting a torque converter to a transmission, be sure to check distance A to ensure it is within specifications.
INSTALLATION
Installation of the remaining components is in the revers e order of removal, while paying attention to the fol-
lowing:
When installing transmission to the engine, attach the bolts as shown.
CAUTION:
When replacing an engine or transmission you must make sure the dowels are installed correctly during re-assembly.
Improper alignment caused by missing dowels may cause vibration, oil leaks or breakage of drivetrain components.
NOTE:
*: No.2 bolt also secures air breather vent.
Align the positions of bolts for dr ive plate with those of the torque
converter, and temporarily tighten the bolts. Then tighten the bolts
with the specified torque. Refer to TM-216, "Removal and Installa-
tion (4WD)".
CAUTION:
When turning crankshaft, turn it clockwise as viewed from the
front of the engine.
After converter is installed to drive plate, rotate crankshaft
several turns and check to be sure that transmission rotates
freely without binding.
Install crankshaft position sensor (POS).
After completing installation, check fluid leakage, fluid level, and the positions of A/T. Refer to TM-179, "Checking the A/T Fluid (ATF)"
, TM-195, "Checking of A/T Position"
and TM-195, "Adjustment of A/T Position".
Distance A : 24.0 mm (0.94 in) or more
SAT017B
Transmission to engine bolts : 113 N·m (12 kg-m,
83 ft-lb)
LCIA0371E
LCIA0335E
Revision: December 20092009 QX56
Page 3872 of 4171

TM-224
< DISASSEMBLY AND ASSEMBLY >
OVERHAUL
4WD
16. Bearing race 17. Needle bearing 18. Manual plate
19. Parking rod 20. Manual shaft oil seal 21. Manual shaft
22. O-ring 23. Band servo anchor end pin 24. Detent spring
25. Spacer 26. Seal ring 27. Snap ring
28. Return spring 29. O-ring 30. Servo assembly
31. Snap ring 32. Sub-harness 33. Control valve with TCM
34. Bracket 35. A/T fluid temperature sensor 2 36. A/T assemblt harness connector
37. O-ring 38. Retaining pin 39. Transmission case
*: Apply Genuine Anaerobic Liquid Gasket or equivalent.
Revision: December 20092009 QX56
Page 3874 of 4171

TM-226
< DISASSEMBLY AND ASSEMBLY >
OVERHAUL
19. Parking rod 20. Manual shaft oil seal 21. Manual shaft
22. O-ring 23. Band servo anchor end pin 24. Detent spring
25. Spacer 26. Seal rings 27. Return spring
28. O-ring 29. Servo assembly 30. Snap ring
31. Snap ring 32. Sub-harness 33. Control valve with TCM
34. Bracket 35. A/T fluid temperature sensor 2 36. Oil pan
37. Magnets 38. Drain plug 39. Drain plug gasket
40. Oil pan bolt 41. Oil pan gasket 42. A/T assembly harness connector
43. O-ring 44. Retaining pin 45. Transmission case
Revision: December 20092009 QX56
Page 3881 of 4171
DISASSEMBLYTM-233
< DISASSEMBLY AND ASSEMBLY >
CEF
G H
I
J
K L
M A
B
TM
N
O P
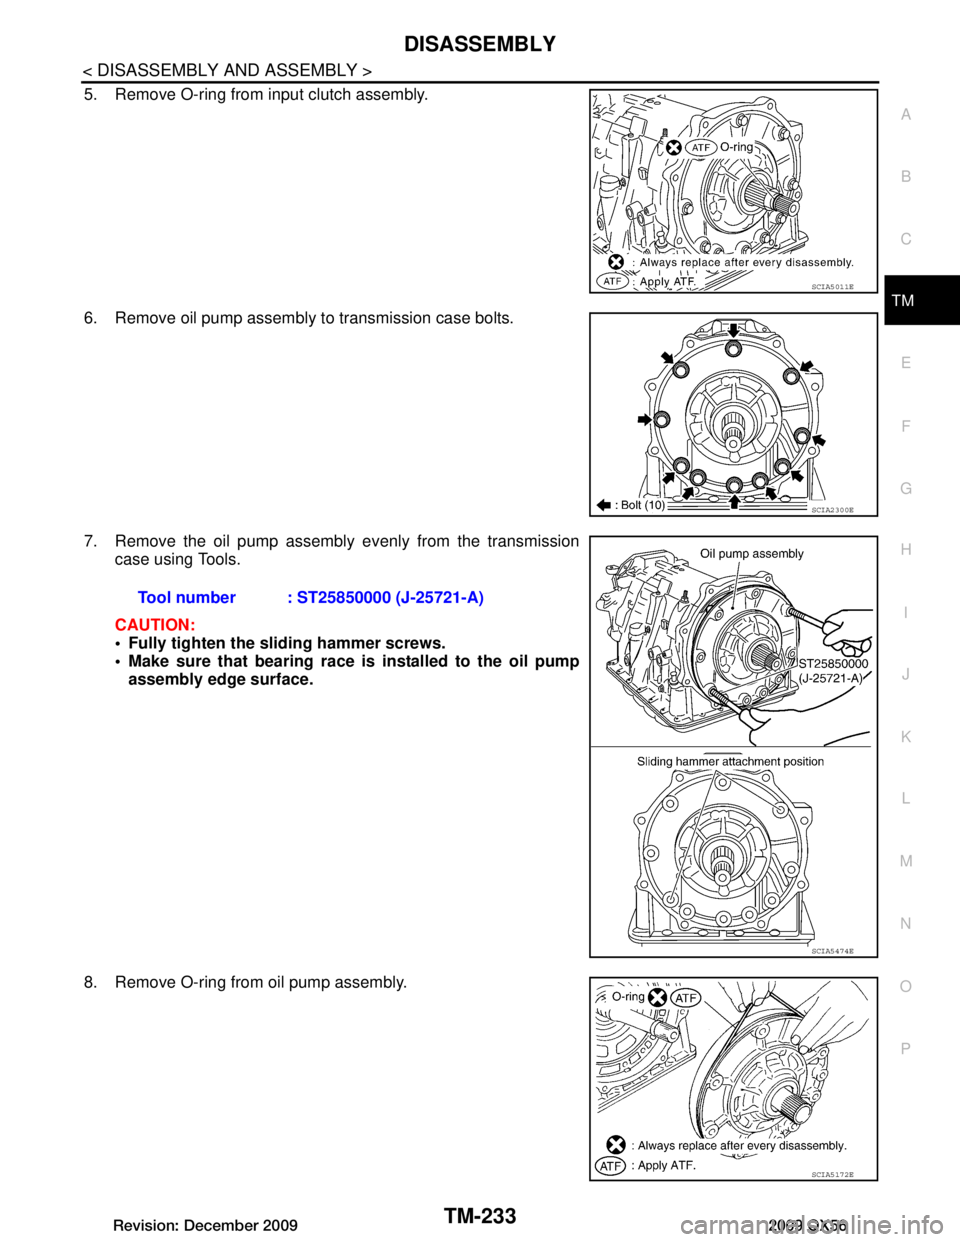
5. Remove O-ring from input clutch assembly.
6. Remove oil pump assembly to transmission case bolts.
7. Remove the oil pump assembly evenly from the transmission case using Tools.
CAUTION:
Fully tighten the sliding hammer screws.
Make sure that bearing race is installed to the oil pump
assembly edge surface.
8. Remove O-ring from oil pump assembly.
SCIA5011E
SCIA2300E
Tool number : ST25850000 (J-25721-A)
SCIA5474E
SCIA5172E
Revision: December 20092009 QX56
Page 3891 of 4171

DISASSEMBLYTM-243
< DISASSEMBLY AND ASSEMBLY >
CEF
G H
I
J
K L
M A
B
TM
N
O P
47. Remove seal rings from output shaft.
48. Remove needle bearing from transmission case.
49. Remove output speed sensor from transmission case. CAUTION:
Do not subject it to impact by dropping or hitting it.
Do not disassemble.
Do not allow metal filings or any foreign material to get on
the sensor's front edge magnetic area.
Do not place in an area affected by magnetism.
50. Remove reverse brake snap ring using two flat-bladed screw- drivers.
NOTE:
Press out snap ring from the transmission case oil pan side gap
using a flat-bladed screwdriver, and remove it using a another
screwdriver.
51. Remove reverse brake retaining plate from transmission case. Check facing for burns, cracks or damage. If necessary,replace the plate.
52. Remove N-spring from transmission case.
SCIA5209E
SCIA5031E
SCIA2320E
SCIA5032E
SCIA5214E
Revision: December 20092009 QX56
Page 3893 of 4171
DISASSEMBLYTM-245
< DISASSEMBLY AND ASSEMBLY >
CEF
G H
I
J
K L
M A
B
TM
N
O P
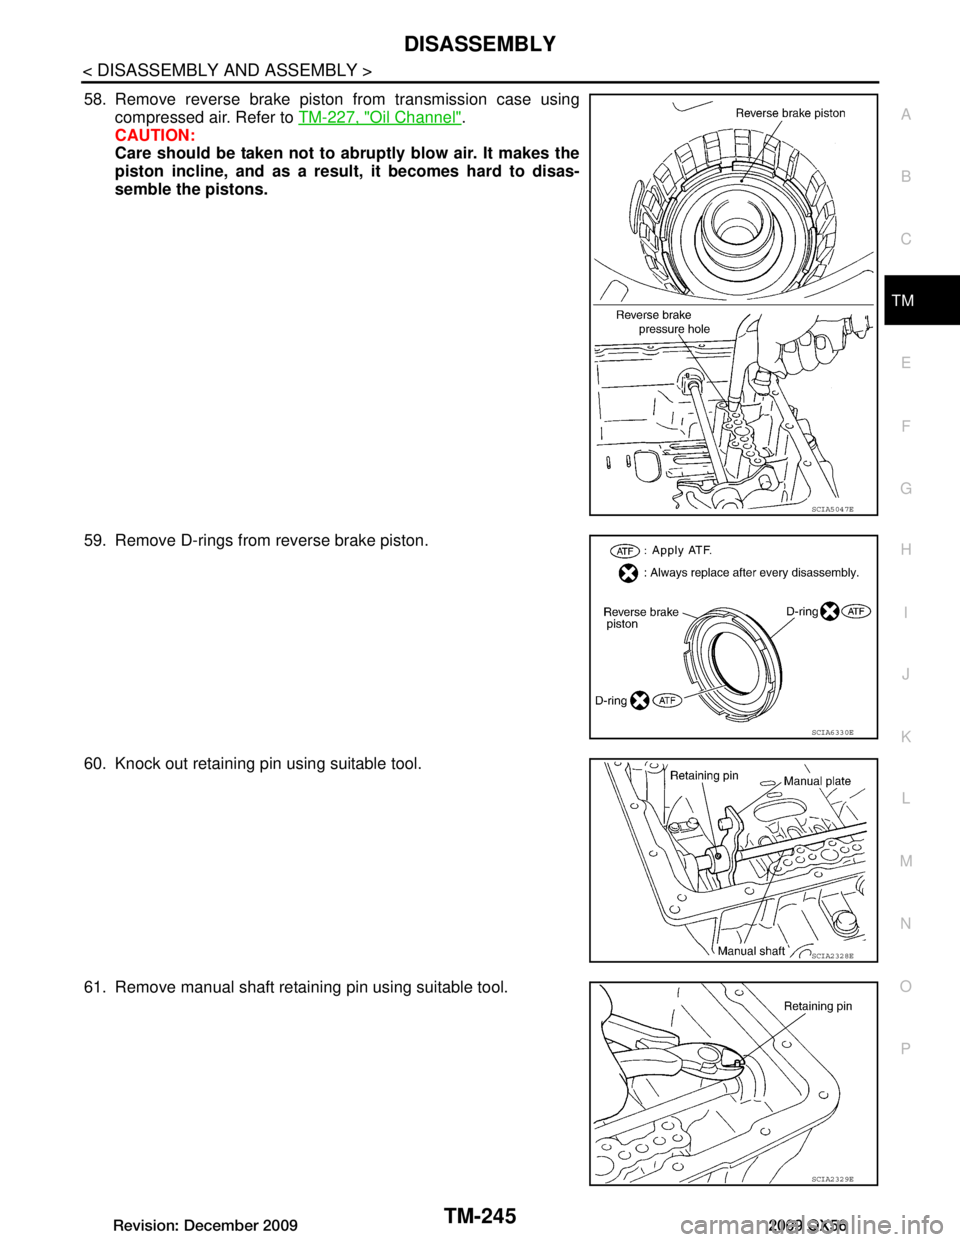
58. Remove reverse brake piston from transmission case using compressed air. Refer to TM-227, "Oil Channel"
.
CAUTION:
Care should be taken not to abruptly blow air. It makes the
piston incline, and as a result , it becomes hard to disas-
semble the pistons.
59. Remove D-rings from reverse brake piston.
60. Knock out retaining pin using suitable tool.
61. Remove manual shaft retaining pin using suitable tool.
SCIA5047E
SCIA6330E
SCIA2328E
SCIA2329E
Revision: December 20092009 QX56
Page 3894 of 4171
TM-246
< DISASSEMBLY AND ASSEMBLY >
DISASSEMBLY
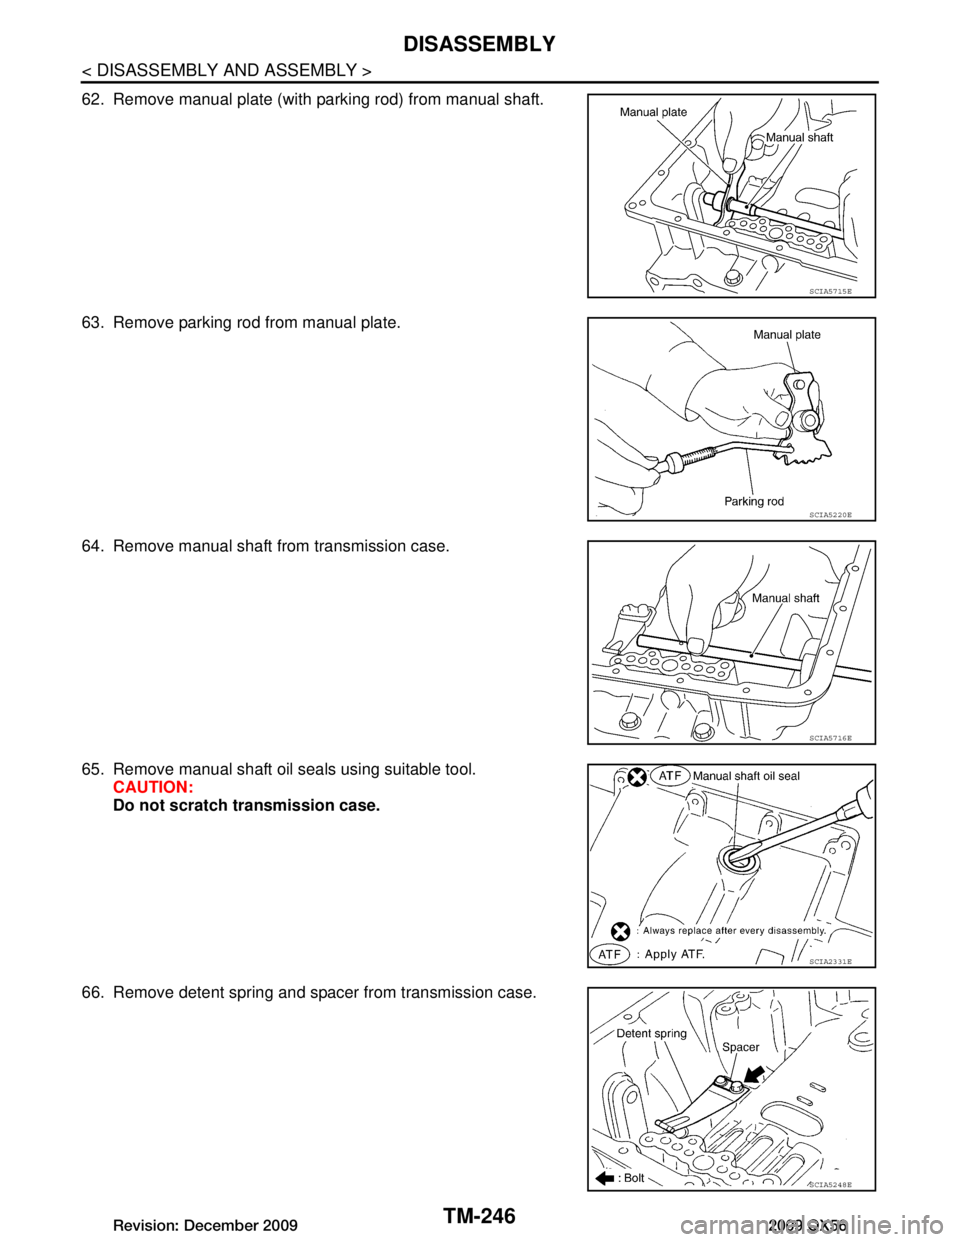
62. Remove manual plate (with parking rod) from manual shaft.
63. Remove parking rod from manual plate.
64. Remove manual shaft from transmission case.
65. Remove manual shaft oil seals using suitable tool.CAUTION:
Do not scratch transmission case.
66. Remove detent spring and spacer from transmission case.
SCIA5715E
SCIA5220E
SCIA5716E
SCIA2331E
SCIA5248E
Revision: December 20092009 QX56
Page 3916 of 4171
TM-268
< DISASSEMBLY AND ASSEMBLY >
ASSEMBLY
ASSEMBLY
Assembly (1)INFOID:0000000004187496
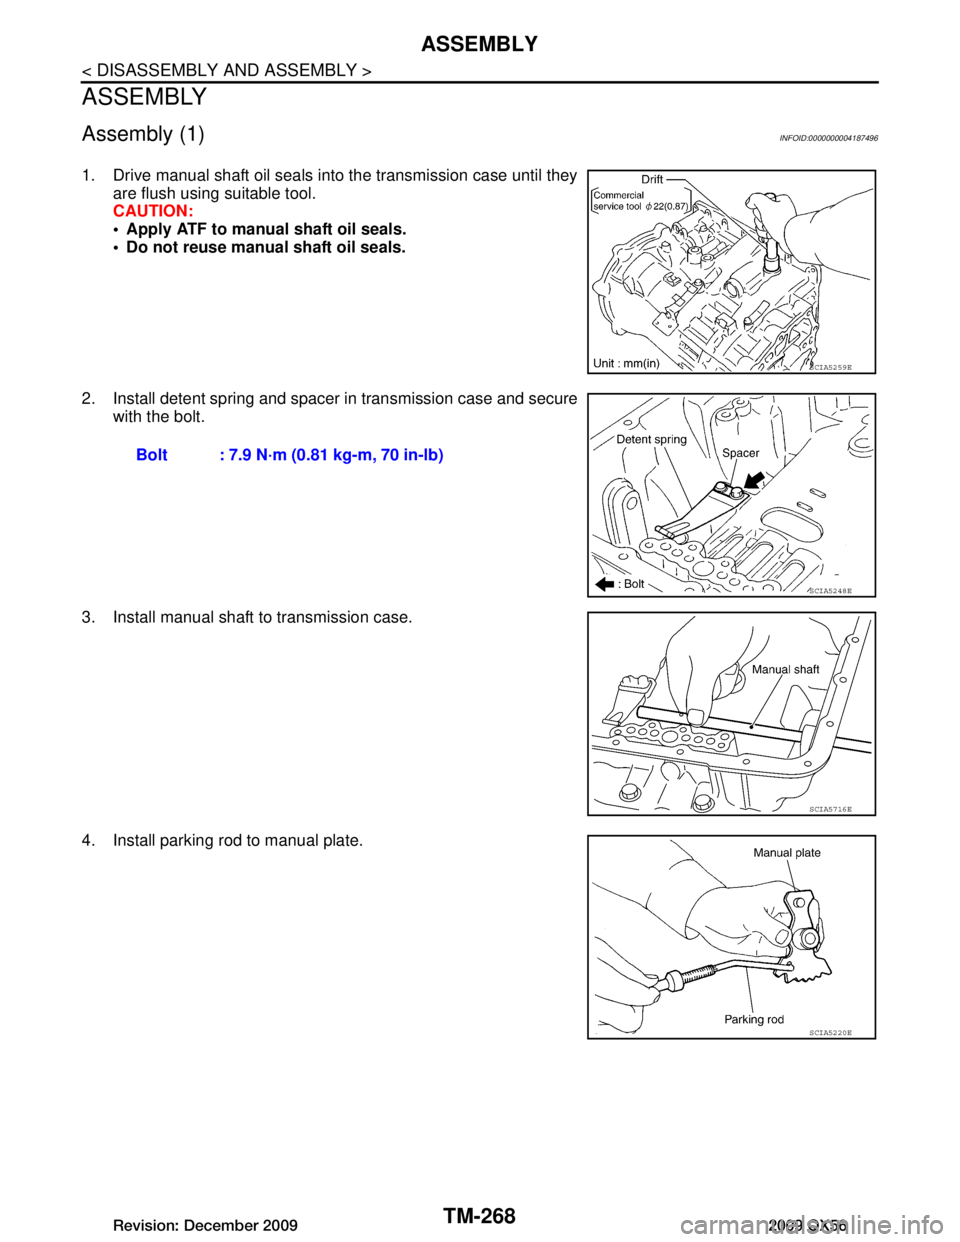
1. Drive manual shaft oil seals into the transmission case until theyare flush using suitable tool.
CAUTION:
Apply ATF to manual shaft oil seals.
Do not reuse manual shaft oil seals.
2. Install detent spring and spacer in transmission case and secure with the bolt.
3. Install manual shaft to transmission case.
4. Install parking rod to manual plate.
SCIA5259E
Bolt : 7.9 N·m (0.81 kg-m, 70 in-lb)
SCIA5248E
SCIA5716E
SCIA5220E
Revision: December 20092009 QX56