battery INFINITI QX56 2009 Factory Service Manual
[x] Cancel search | Manufacturer: INFINITI, Model Year: 2009, Model line: QX56, Model: INFINITI QX56 2009Pages: 4171, PDF Size: 84.65 MB
Page 3234 of 4171

SE-2
Precaution Necessary for Steering Wheel Rota-
tion After Battery Disconnect ..................................
44
Precaution for Work ................................................45
PREPARATION ...........................................46
PREPARATION .............................................. ...46
Special Service Tool ............................................ ...46
Commercial Service Tool .......................................46
ON-VEHICLE REPAIR ................................47
FRONT SEAT ................................................. ...47
Exploded View ..................................................... ...47
Removal and Installation ........................................50
SECOND SEAT .................................................51
Exploded View ..................................................... ...51
Removal and Installation ........................................55
THIRD SEAT ......................................................56
Exploded View ..................................................... ...56
LH Side Seat ...........................................................58
Power seat cross beam ..........................................59
RH Side Seat ..........................................................63
DISASSEMBLY AND ASSEMBLY ............65
FRONT SEAT ................................................. ...65
Exploded View ..................................................... ...65
Disassembly and Assembly ....................................68
SECOND SEAT .................................................71
Disassembly and Assembly ................................. ...71
THIRD SEAT ......................................................76
Exploded View ..................................................... ...76
Revision: December 20092009 QX56
Page 3251 of 4171

THIRD SEATSE-19
< COMPONENT DIAGNOSIS >
C
DE
F
G H
I
K L
M A
B
SE
N
O P
THIRD SEAT
Power Supply and Ground Circu it Check for Third Row Power Folding Seat Control
Unit
INFOID:0000000003775447
1.CHECK FUSES AND FUSIBLE LINK
Check for blown fuses or fusible link.
Are any fuses or fusible links blown?
YES >> Install new fuse. Eliminate cause of malfunction if fuse blows again.
NO >> GO TO 2
2.POWER SUPPLY CIRCUIT CHECK
1. Disconnect third row power folding seat control unit connectors B401 and B402.
2. Check voltage between third row power folding seat control unit harness connectors B401, B402 terminals 1, 8, 13, 14 and
ground.
Are the inspection results normal?
YES >> GO TO 3
NO >> Check harness for open between third row power folding seat control unit and fuse or fusible link.
3.GROUND CIRCUIT CHECK
1. Turn ignition switch OFF.
2. Check continuity between third row power folding seat control unit harness connector B402 terminals 16, 18, 21 and ground.
Do all terminals have ground?
YES >> Inspection End.
NO >> Check harness for ground.
Unit Power source Fuse or Fusible Link Location
Third row power folding seat control unit Battery
F
Fuse and fusible link box
19 Fuse block (J/B)
Ignition switch ON or START 14
TerminalsIgnition switch position
(+) (–) OFF ON START
Connector Terminal
A: B401 1
Ground Battery
voltage
80 VBattery
voltage
B: B402 13
Battery
voltage
14 Battery
voltage
ALJIA0274ZZ
Te r m i n a l s
Continuity
(+)
(–)
Connector Terminal
B402 16
Ground Yes
18
21
ALJIA0275ZZ
Revision: December 20092009 QX56
Page 3252 of 4171

SE-20
< COMPONENT DIAGNOSIS >
THIRD SEAT
Third Row Power Folding Seat Switch
INFOID:0000000003775448
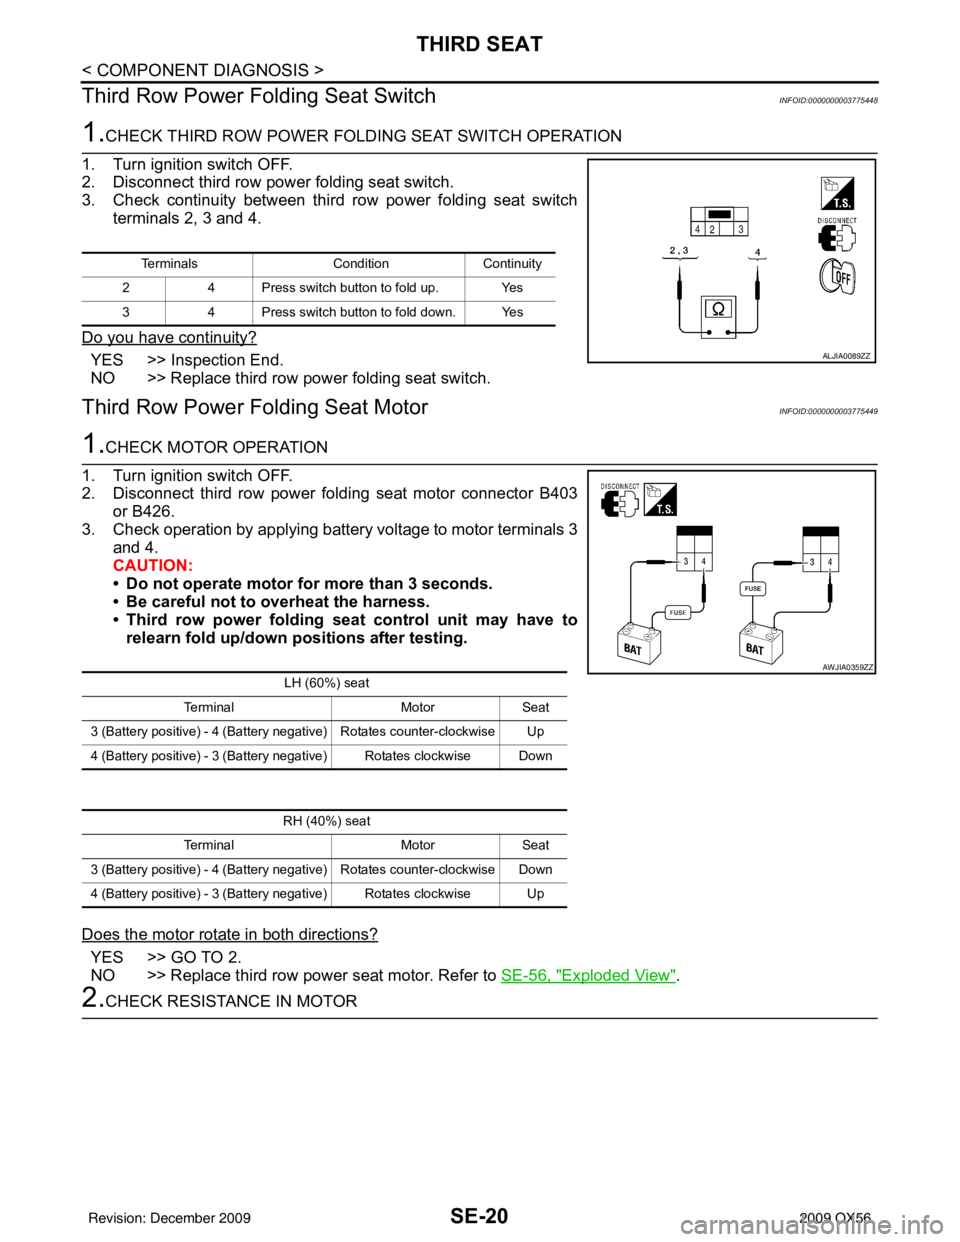
1.CHECK THIRD ROW POWER FOLDING SEAT SWITCH OPERATION
1. Turn ignition switch OFF.
2. Disconnect third row power folding seat switch.
3. Check continuity between third row power folding seat switch terminals 2, 3 and 4.
Do you have continuity?
YES >> Inspection End.
NO >> Replace third row power folding seat switch.
Third Row Power Folding Seat MotorINFOID:0000000003775449
1.CHECK MOTOR OPERATION
1. Turn ignition switch OFF.
2. Disconnect third row power folding seat motor connector B403 or B426.
3. Check operation by applying battery voltage to motor terminals 3 and 4.
CAUTION:
• Do not operate motor for more than 3 seconds.
• Be careful not to overheat the harness.
• Third row power folding seat control unit may have to
relearn fold up/down positions after testing.
Does the motor rotate in both directions?
YES >> GO TO 2.
NO >> Replace third row power seat motor. Refer to SE-56, "
Exploded View".
2.CHECK RESISTANCE IN MOTOR
Terminals Condition Continuity
2 4 Press switch button to fold up. Yes
3 4 Press switch button to fold down. Yes
ALJIA0089ZZ
LH (60%) seat
Terminal MotorSeat
3 (Battery positive) - 4 (Battery negative) Rotates counter-clockwise Up
4 (Battery positive) - 3 (Battery negative) Rotates clockwise Down
AWJIA0359ZZ
RH (40%) seat
Terminal MotorSeat
3 (Battery positive) - 4 (Battery negative) Rotates counter-clockwise Down
4 (Battery positive) - 3 (Battery negative) Rotates clockwise Up
Revision: December 20092009 QX56
Page 3254 of 4171

SE-22
< ECU DIAGNOSIS >
THIRD ROW POWER FOLDING SEAT CONTROL UNIT
ECU DIAGNOSIS
THIRD ROW POWER FOLDING SEAT CONTROL UNIT
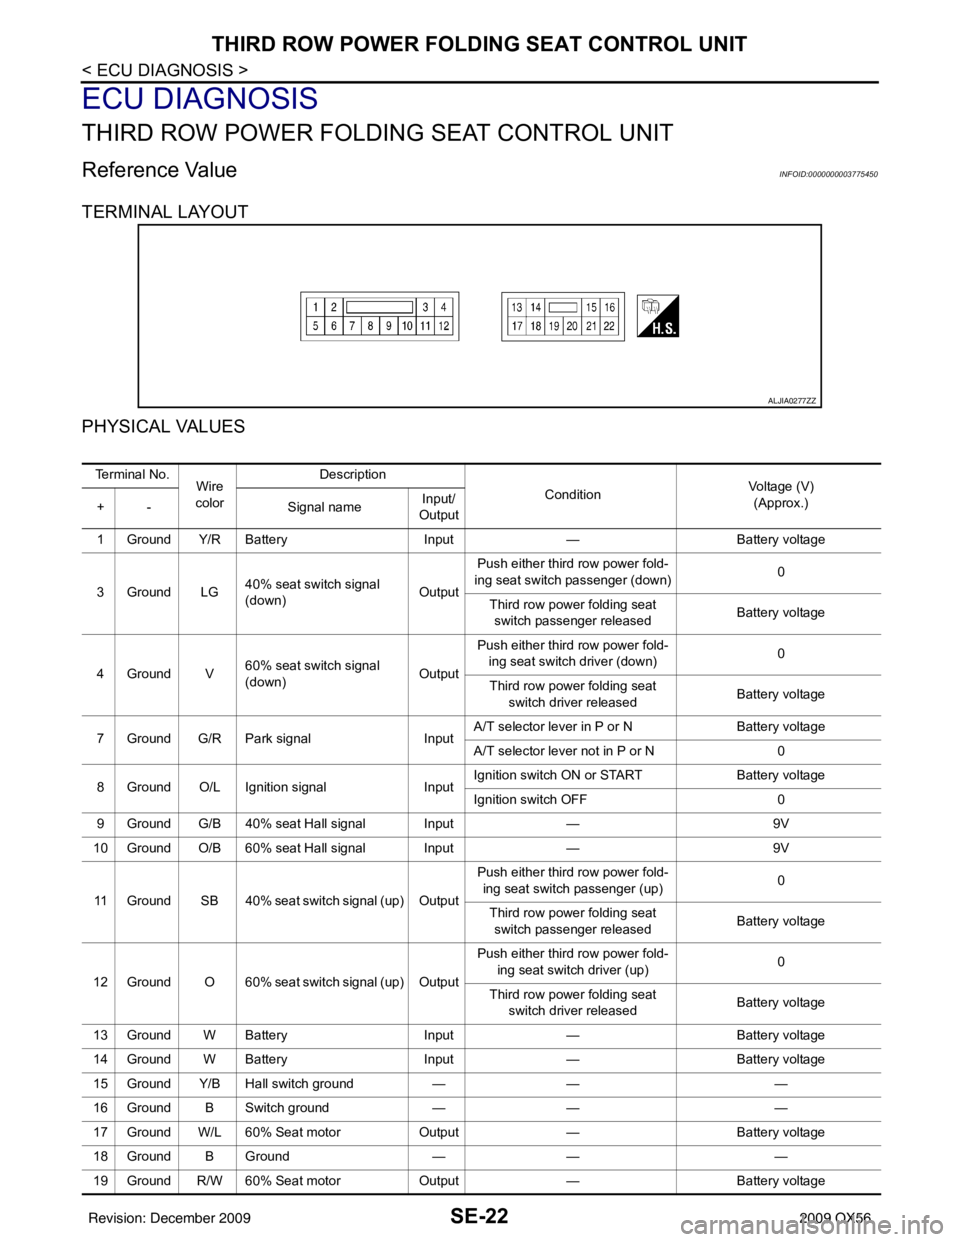
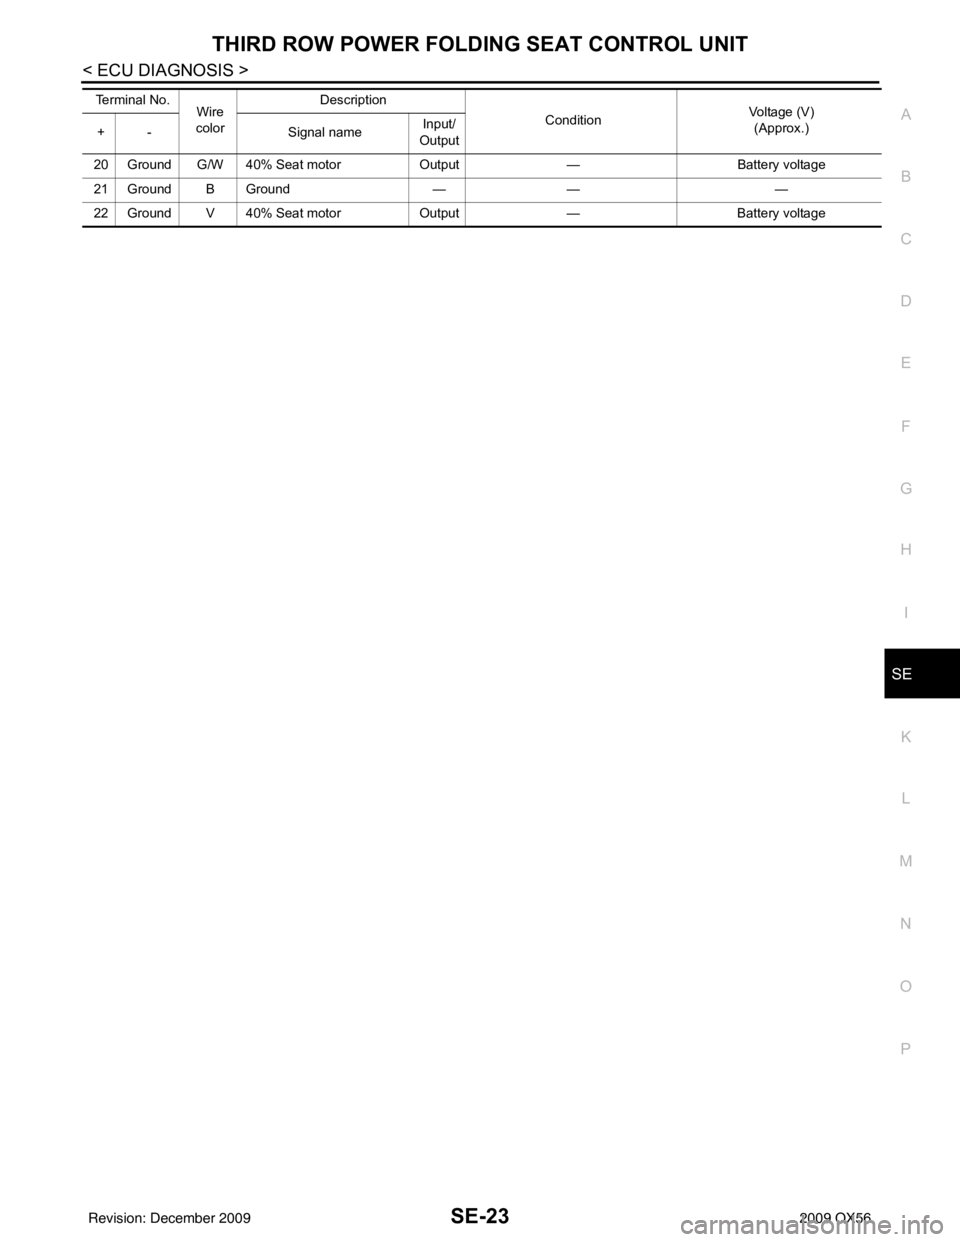
Reference ValueINFOID:0000000003775450
TERMINAL LAYOUT
PHYSICAL VALUES
ALJIA0277ZZ
Te r m i n a l N o .Wire
color Description
ConditionVoltage (V)
(Approx.)
+ - Signal nameInput/
Output
1 Ground Y/R Battery Input— Battery voltage
3Ground LG 40% seat switch signal
(down) OutputPush either third row power fold-
ing seat switch passenger (down) 0
Third row power folding seat switch passenger released Battery voltage
4Ground V 60% seat switch signal
(down) OutputPush either third row power fold-
ing seat switch driver (down) 0
Third row power folding seat switch driver released Battery voltage
7 Ground G/R Park signal InputA/T selector lever in P or N
Battery voltage
A/T selector lever not in P or N 0
8 Ground O/L Ignition signal InputIgnition switch ON or START
Battery voltage
Ignition switch OFF 0
9 Ground G/B 40% seat Hall signal Input —9V
10 Ground O/B 60% seat Hall signal Input —9V
11 Ground SB 40% seat switch signal (up) Output Push either third row power fold-
ing seat switch passenger (up) 0
Third row power folding seat switch passenger released Battery voltage
12 Ground O 60% seat switch signal (up) Output Push either third row power fold-
ing seat switch driver (up) 0
Third row power folding seat switch driver released Battery voltage
13 Ground W Battery Input— Battery voltage
14 Ground W Battery Input— Battery voltage
15 Ground Y/B Hall switch ground —— —
16 Ground B Switch ground —— —
17 Ground W/L 60% Seat motor Output— Battery voltage
18 Ground B Ground —— —
19 Ground R/W 60% Seat motor Output— Battery voltage
Revision: December 20092009 QX56
Page 3255 of 4171

THIRD ROW POWER FOLDING SEAT CONTROL UNITSE-23
< ECU DIAGNOSIS >
C
DE
F
G H
I
K L
M A
B
SE
N
O P
20 Ground G/W 40% Seat motor Output— Battery voltage
21 Ground B Ground —— —
22 Ground V 40% Seat motor Output— Battery voltage
Te r m i n a l N o .
Wire
color Description
ConditionVoltage (V)
(Approx.)
+ - Signal nameInput/
Output
Revision: December 20092009 QX56
Page 3264 of 4171

SE-32
< SYMPTOM DIAGNOSIS >
NONE OF THE THIRD ROW POWER FOLDING SEATS WILL OPERATE WITH
ANY SWITCH.
NONE OF THE THIRD ROW POWE R FOLDING SEATS WILL OPERATE
WITH ANY SWITCH.
None of the Third Row Power Folding Seat s Will Operate With Any Third Row Power
Folding Seat Switch
INFOID:0000000003775455
1.PRELIMINARY CHECK
Perform preliminary check. Refer to SE-5, "
Preliminary Check".
Are inspection results normal?
YES >> GO TO 2.
NO >> Perform repairs as necessary.
2.THIRD ROW POWER FOLDING SEAT SWITCH GROUND
1. Turn ignition switch OFF.
2. Disconnect any third row power folding seat switch connector.
3. Check continuity between third row power folding seat switch harness connector terminal 4 and ground.
Is there continuity?
YES >> GO TO 3.
NO >> Repair ground circuit.
3.PNP SWITCH SIGNAL
1. Confirm A/T selector lever is in PARK position.
2. Turn ignition switch ON.
3. Check voltage between third row power folding seat control unit harness connector B401 terminal 7 and ground.
Is there battery voltage?
YES >> Replace third row power folding seat control unit. Refer to SE-59, "Power seat cross beam".
NO >> Repair circuit as necessary.
ALJIA0116ZZ
Terminals Ignition switch
(+)
(-)ON
Third row power
folding seat
control unit Te r m i n a l N o .
B401 7Ground Battery voltage
ALJIA0278ZZ
Revision: December 20092009 QX56
Page 3276 of 4171

SE-44
< PRECAUTION >
PRECAUTIONS
PRECAUTION
PRECAUTIONS
Precaution for Supplemental Restraint System (SRS) "AIR BAG" and "SEAT BELT
PRE-TENSIONER"
INFOID:0000000005880168
The Supplemental Restraint System such as “A IR BAG” and “SEAT BELT PRE-TENSIONER”, used along
with a front seat belt, helps to reduce the risk or severity of injury to the driver and front passenger for certain
types of collision. This system includes seat belt switch inputs and dual stage front air bag modules. The SRS
system uses the seat belt switches to determine the front air bag deployment, and may only deploy one front
air bag, depending on the severity of a collision and w hether the front occupants are belted or unbelted.
Information necessary to service the system safely is included in the SR and SB section of this Service Man-
ual.
WARNING:
• To avoid rendering the SRS inopera tive, which could increase the risk of personal injury or death in
the event of a collision which would result in air bag inflation, all maintenance must be performed by
an authorized NISSAN/INFINITI dealer.
• Improper maintenance, including in correct removal and installation of the SRS, can lead to personal
injury caused by unintent ional activation of the system. For re moval of Spiral Cable and Air Bag
Module, see the SR section.
• Do not use electrical test equipmen t on any circuit related to the SRS unless instructed to in this
Service Manual. SRS wiring harn esses can be identified by yellow and/or orange harnesses or har-
ness connectors.
PRECAUTIONS WHEN USING POWER TOOLS (AIR OR ELECTRIC) AND HAMMERS
WARNING:
• When working near the Airbag Diagnosis Sensor Unit or other Airbag System sensors with the Igni-
tion ON or engine running, DO NOT use air or electri c power tools or strike near the sensor(s) with a
hammer. Heavy vibration could activate the sensor( s) and deploy the air bag(s), possibly causing
serious injury.
• When using air or electric power tools or hammers , always switch the Ignition OFF, disconnect the
battery, and wait at least 3 minu tes before performing any service.
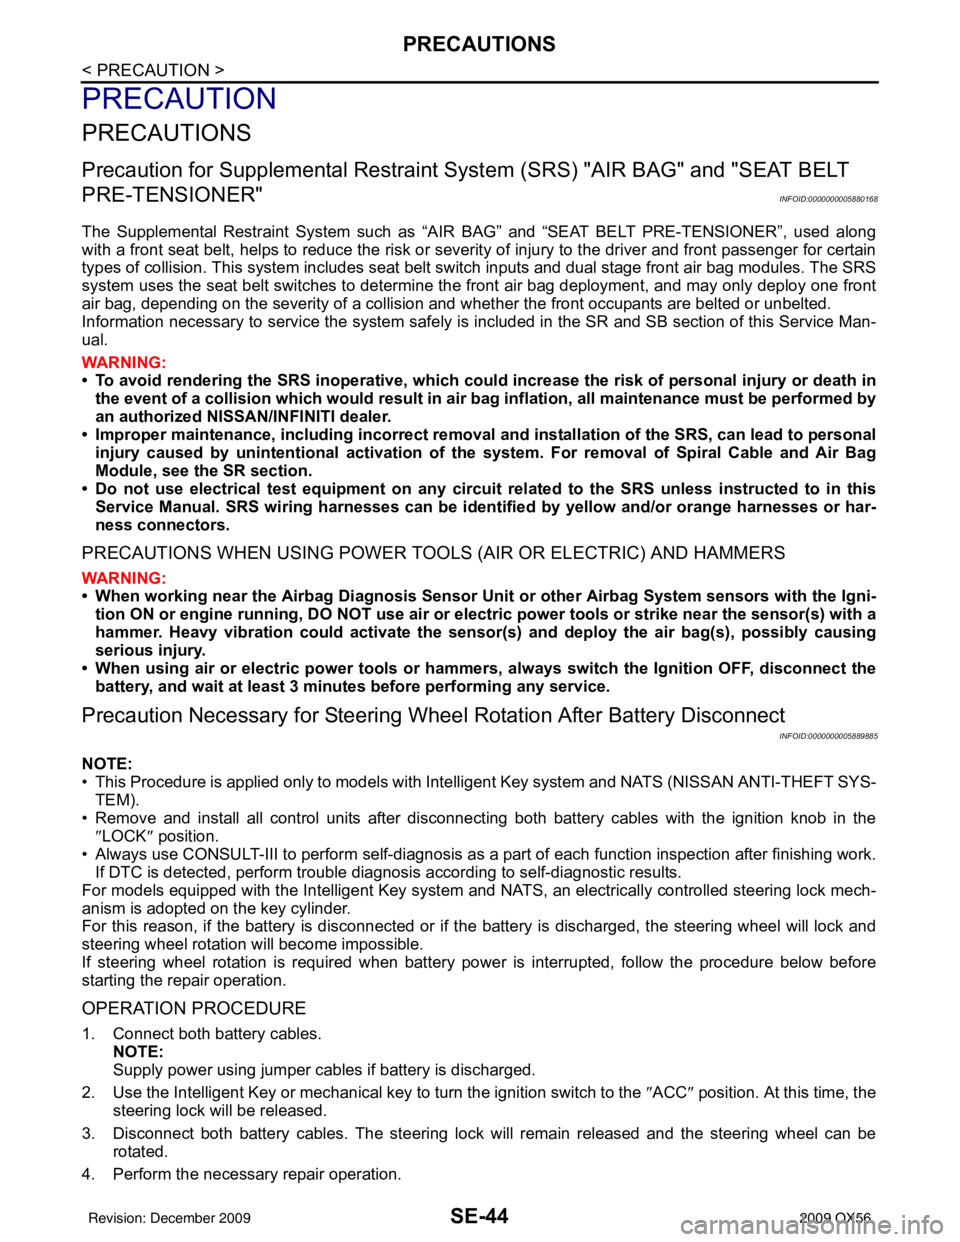
Precaution Necessary for Steering W heel Rotation After Battery Disconnect
INFOID:0000000005889885
NOTE:
• This Procedure is applied only to models with Intelligent Key system and NATS (NISSAN ANTI-THEFT SYS-
TEM).
• Remove and install all control units after disconnecting both battery cables with the ignition knob in the
″LOCK ″ position.
• Always use CONSULT-III to perform self-diagnosis as a part of each function inspection after finishing work.
If DTC is detected, perform trouble diagnosis according to self-diagnostic results.
For models equipped with the Intelligent Key system and NATS, an electrically controlled steering lock mech-
anism is adopted on the key cylinder.
For this reason, if the battery is disconnected or if the battery is discharged, the steering wheel will lock and
steering wheel rotation will become impossible.
If steering wheel rotation is required when battery pow er is interrupted, follow the procedure below before
starting the repair operation.
OPERATION PROCEDURE
1. Connect both battery cables. NOTE:
Supply power using jumper cables if battery is discharged.
2. Use the Intelligent Key or mechanical key to turn the ignition switch to the ″ACC ″ position. At this time, the
steering lock will be released.
3. Disconnect both battery cables. The steering lock will remain released and the steering wheel can be rotated.
4. Perform the necessary repair operation.
Revision: December 20092009 QX56
Page 3277 of 4171

PRECAUTIONSSE-45
< PRECAUTION >
C
DE
F
G H
I
K L
M A
B
SE
N
O P
5. When the repair work is completed, return the ignition switch to the ″LOCK ″ position before connecting
the battery cables. (At this time, the steering lock mechanism will engage.)
6. Perform a self-diagnosis check of al l control units using CONSULT-III.
Precaution for WorkINFOID:0000000003775464
• When removing or disassembling each component, be ca reful not to damage or deform it. If a component
may be subject to interference, be sure to protect it with a shop cloth.
• When removing (disengaging) components with a screwdriver or similar tool, be sure to wrap the component
with a shop cloth or vinyl tape to protect it.
• Protect the removed parts with a shop cloth and keep them.
• Replace a deformed or damaged clip.
• If a part is specified as a non-reusable part, always replace it with new one.
• Be sure to tighten bolts and nuts securely to the specified torque.
• After re-installation is completed, be sure to check that each part works normally.
• Follow the steps below to clean components.
- Water soluble foul: Dip a soft cloth into lukewarm water, and wring the water out of the cloth to wipe the fouled area.
Then rub with a soft and dry cloth.
- Oily foul: Dip a soft cloth into lukewarm water with mild detergent (concentration: within 2 to 3%), and wipe the fouled area.
Then dip a cloth into fresh water, and wring the water out of the cloth to wipe the detergent off. Then rub with
a soft and dry cloth.
• Do not use organic solvent such as thinner, benzene, alcohol, or gasoline.
• For genuine leather seats, use a genuine leather seat cleaner.
Revision: December 20092009 QX56
Page 3282 of 4171

SE-50
< ON-VEHICLE REPAIR >
FRONT SEAT
Removal and Installation
INFOID:0000000005880170
REMOVAL
CAUTION:
• When removing or installing the seat trim, handle it carefully to keep dirt out and avoid damage.
• Before removing the front seat, turn the ignition switch off, disconnect both battery cables and wait
at least 3 minutes.
• When checking the power seat circuit for continuity using a circuit tester, do not confuse its connec-
tor with the side air bag modul e connector. Such an error may cause the air bag to deploy.
• Do not drop, tilt, or bump the si de air bag module while installing the seat. Always handle it with
care.
• After front side air bag module inflates, front seatback assembly must be replaced.
• Front passenger seat is equipped with an Occupa nt Classification System sensor and control mod-
ule. Do not disassemble front passenger seat cushion assembly or remove the trim as this will affect
the Occupant Classification System calibration.
• Always replace passenger seat cushion as an assembly.
1. Slide the seat until the four body mounting bolts are visible and a tool can be inserted. NOTE:
• If disassembling the seat after removal, set the front/rear cushion lifters to the top position.
2. Disconnect both battery cables and wait at least 3 minutes.
3. Remove the outer pedestal finisher.
4. Disconnect the side air bag module harness connector.
5. Remove the four body mounting bolts.
6. Disconnect the power seat harness connectors and remove the seat from the vehicle.
CAUTION:
When removing and installing th e seat, use shop cloths to protect the vehicle from damage.
INSTALLATION
Installation is in the reverse order of removal.
19. Outer pedestal finisher 20. Seat cushion outer finisher21. Seat cushion assembly
22. Power seat switch escutcheon 23. Slide switch knob 24. Recliner switch knob
25. Seatback assembly 26. Headrest holder27. Seat slide/ recline switch
28. Power lumbar switch
Revision: December 20092009 QX56
Page 3312 of 4171

SEC-2
B2192, P1611 ID DISCORD, IMMU-ECM .........31
Description ........................................................... ...31
DTC Logic ...............................................................31
Diagnosis Procedure ..............................................31
B2193, P1612 CHAIN OF ECM-IMMU ..............33
Description ........................................................... ...33
DTC Logic ...............................................................33
Diagnosis Procedure ..............................................33
B2194 ID DISCORD IMMU-I-KEY .....................34
Description ........................................................... ...34
DTC Logic ...............................................................34
Diagnosis Procedure ..............................................34
B2552 INTELLIGENT KEY ................................35
Description ........................................................... ...35
DTC Logic ...............................................................35
Diagnosis Procedure ..............................................35
Special Repair Requirement ...................................35
B2590 ID DISCORD BCM-I-KEY .................... ...36
Description ........................................................... ...36
DTC Logic ...............................................................36
Diagnosis Procedure ..............................................36
P1610 LOCK MODE ..........................................37
Description ........................................................... ...37
DTC Logic ...............................................................37
Diagnosis Procedure ..............................................37
POWER SUPPLY AND GROUND CIRCUIT .....38
INTELLIGENT KEY UNIT ...................................... ...38
INTELLIGENT KEY UNIT : Diagnosis Procedure ...38
BCM ........................................................................ ...38
BCM : Diagnosis Procedure ...................................38
KEY CYLINDER SWITCH .................................40
Description ........................................................... ...40
Component Function Check ...................................40
Diagnosis Procedure ..............................................40
IGNITION KNOB SWITCH .................................42
Ignition Knob Switch Check ................................. ...42
HOOD SWITCH .................................................44
Diagnosis Procedure ..............................................44
HORN FUNCTION .............................................46
Symptom Table ................................................... ...46
VEHICLE SECURITY INDICATOR ....................47
Description ........................................................... ...47
Component Function Check .................................47
Diagnosis Procedure ..............................................47
ECU DIAGNOSIS ..................................... ...49
BCM (BODY CONTROL MODULE) ............... ...49
Reference Value .................................................. ...49
Terminal Layout ......................................................51
Physical Values .......................................................51
Wiring Diagram - VEHICLE SECURITY SYSTEM ...57
Wiring Diagram - IVIS .............................................68
Fail Safe .................................................................76
DTC Inspection Priority Chart ...............................77
DTC Index ..............................................................77
INTELLIGENT KEY UNIT ..................................79
Reference Value - Intelligent Key Unit ................. ...79
Reference Value - Steering Lock Solenoid .............82
Wiring Diagram - INTELLIGENT KEY SYSTEM/
ENGINE START FUNCTION - ................................
83
Fail Safe .................................................................95
DTC Inspection Priority Chart ...............................95
DTC Index ..............................................................95
IPDM E/R (INTELLIGENT POWER DISTRI-
BUTION MODULE ENGINE ROOM) .................
96
Reference Value .................................................. ...96
Terminal Layout ......................................................98
Physical Values .......................................................98
Fail Safe ...............................................................102
DTC Index ............................................................103
SYMPTOM DIAGNOSIS ...........................104
INTELLIGENT KEY SYSTEM/ENGINE
START FUNCTION SYMPTOMS ................... ..
104
Symptom Table .................................................... .104
VEHICLE SECURITY SYSTEM SYMPTOMS ..105
Symptom Table .....................................................105
INFINITI VEHICLE IMMOBILIZER SYSTEM-
NATS SYMPTOMS ...........................................
106
Symptom Table .................................................... .106
ON-VEHICLE MAINTENANCE .................107
PRE-INSPECTION FOR DIAGNOSTIC ......... ..107
Basic Inspection ................................................... .107
Vehicle Security Operation Check ........................107
PRECAUTION ...........................................109
PRECAUTIONS .............................................. ..109
Precaution for Supplemental Restraint System
(SRS) "AIR BAG" and "SEAT BELT PRE-TEN-
SIONER" .............................................................. .
109
Precaution Necessary for Steering Wheel Rota-
tion After Battery Disconnect ................................
109
ON-VEHICLE REPAIR ..............................111
VEHICLE SECURITY SYSTEM ...................... ..111
Removal and Installation .......................................111
Revision: December 20092009 QX56