power steering INFINITI QX56 2010 Factory Service Manual
[x] Cancel search | Manufacturer: INFINITI, Model Year: 2010, Model line: QX56, Model: INFINITI QX56 2010Pages: 4210, PDF Size: 81.91 MB
Page 3663 of 4210
POWER STEERING GEAR AND LINKAGEST-25
< REMOVAL AND INSTALLATION >
C
DE
F
H I
J
K L
M A
B
ST
N
O P
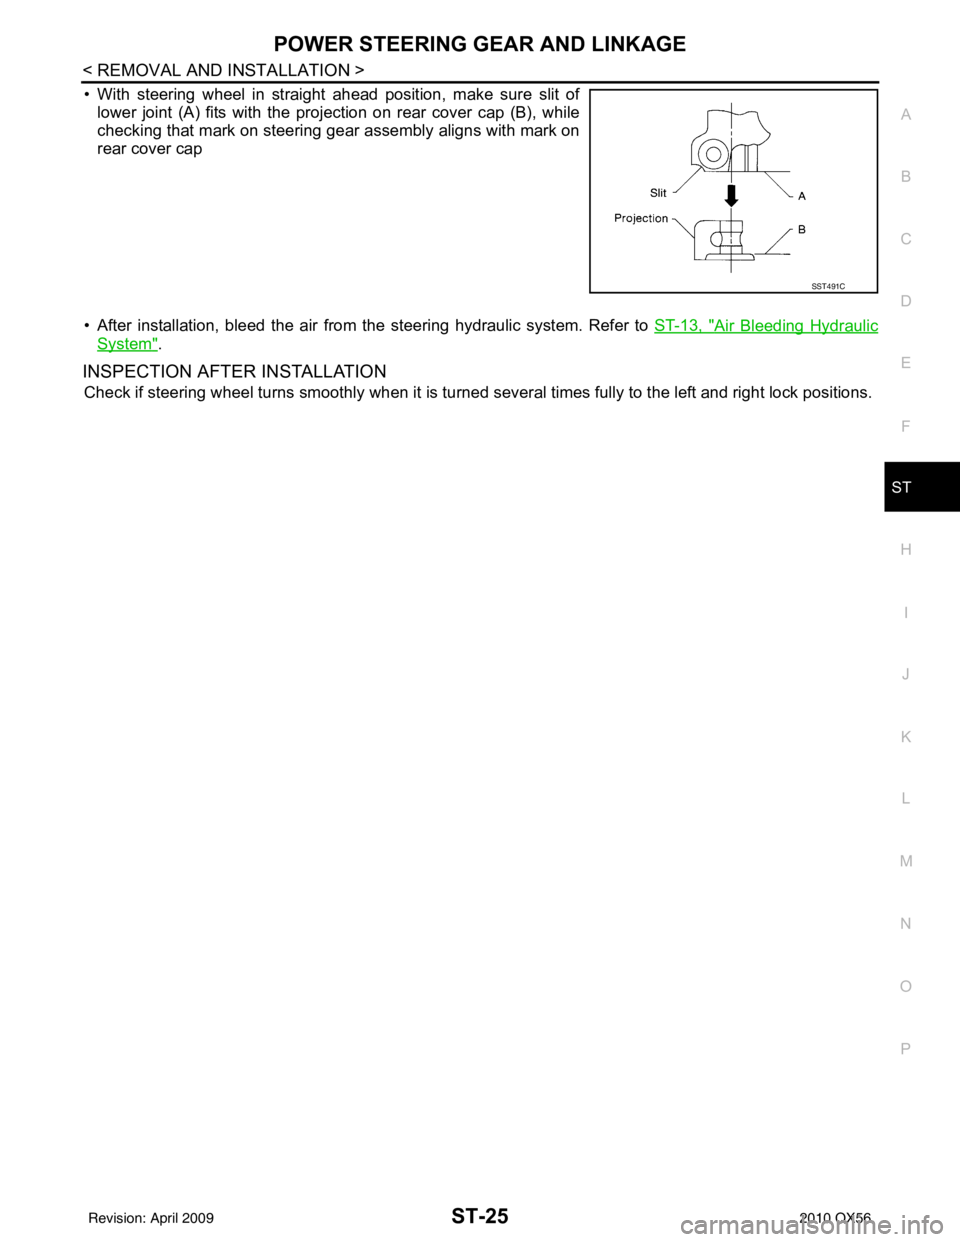
• With steering wheel in straight ahead position, make sure slit of lower joint (A) fits with the projection on rear cover cap (B), while
checking that mark on steering gear assembly aligns with mark on
rear cover cap
• After installation, bleed the air from the steering hydraulic system. Refer to ST-13, "
Air Bleeding Hydraulic
System".
INSPECTION AFTER INSTALLATION
Check if steering wheel turns smoothly when it is turned several times fully to the left and right lock positions.
SST491C
Revision: April 20092010 QX56
Page 3664 of 4210
ST-26
< REMOVAL AND INSTALLATION >
POWER STEERING OIL PUMP
POWER STEERING OIL PUMP
Removal and InstallationINFOID:0000000005147874
REMOVAL
1. Drain power steering fluid from reservoir tank.
2. Remove engine room cover. Refer to EM-24, "
Removal and Installation".
3. Remove air duct assembly. Refer to EM-25, "
Removal and Installation".
4. Remove power steering reservoir tank.
5. Remove serpentine drive belt belt from auto tensioner and power steering pump. Refer to EM-13,
"Removal and Installation".
6. Disconnect pressure sensor electrical connector.
7. Remove high pressure and low pressure piping from power steering oil pump. Refer to ST-27
.
8. Remove bolts, then remove power steering pump.
INSTALLATION
Installation is in the reverse order of removal. Refer to ST-27 for tightening torque.
• After installation, bleed air. Refer to ST-13, "
Air Bleeding Hydraulic System".
NOTE:
Belt tension is automatic and requires no adjustment.
Revision: April 20092010 QX56
Page 3666 of 4210
ST-28
< REMOVAL AND INSTALLATION >
HYDRAULIC LINE
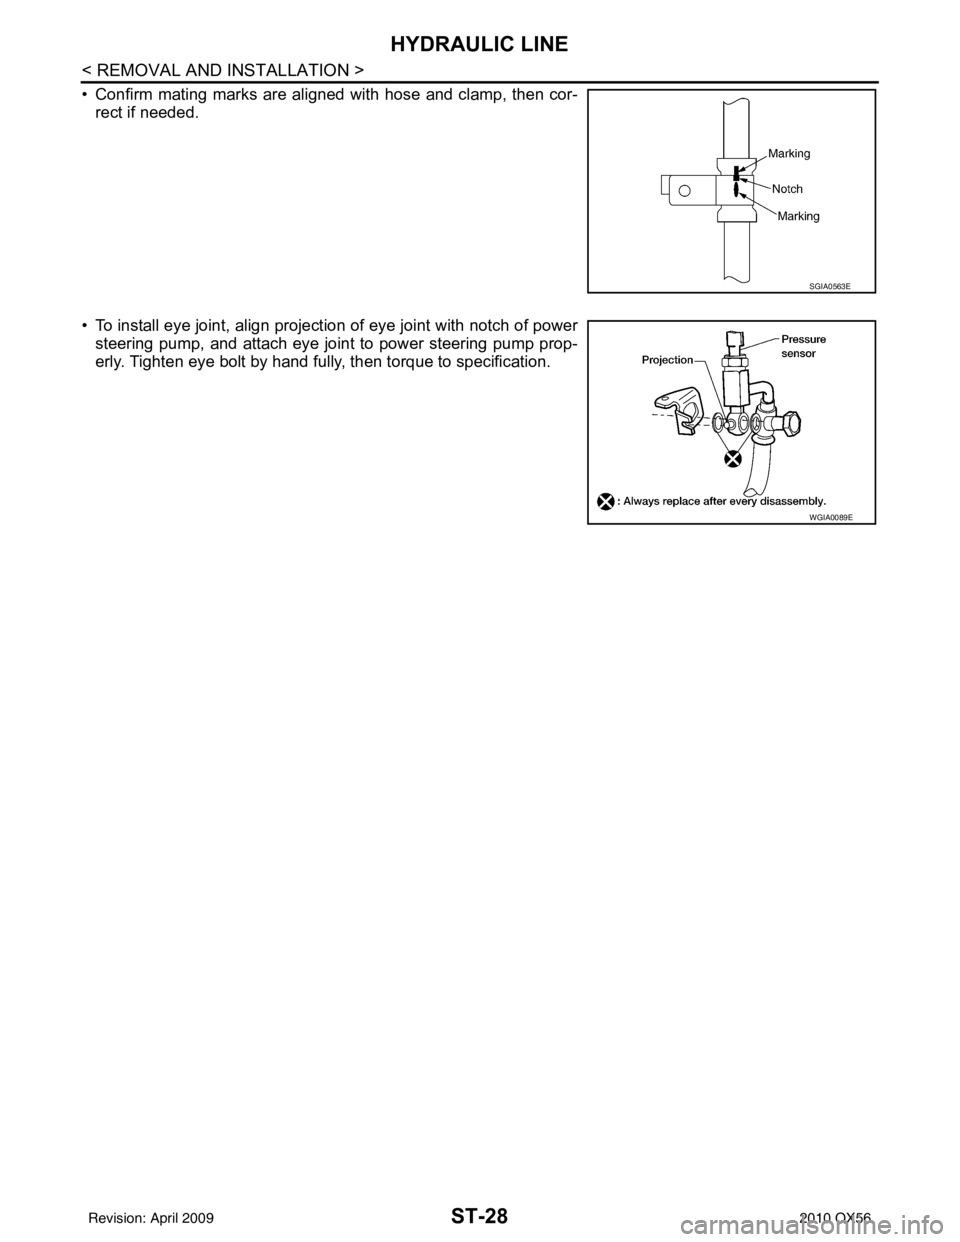
• Confirm mating marks are aligned with hose and clamp, then cor-rect if needed.
• To install eye joint, align projection of eye joint with notch of power steering pump, and attach eye joint to power steering pump prop-
erly. Tighten eye bolt by hand fully, then torque to specification.
SGIA0563E
WGIA0089E
Revision: April 20092010 QX56
Page 3669 of 4210
POWER STEERING GEAR AND LINKAGEST-31
< DISASSEMBLY AND ASSEMBLY >
C
DE
F
H I
J
K L
M A
B
ST
N
O P
POWER STEERING GEAR AND LINKAGE
Disassembly and AssemblyINFOID:0000000005147877
CAUTION:
• Secure steering gear assembly with a vise, using copper plates or something similar to prevent it
from being damaged. Do not grip cylinder with a vise.
• Before performing disassembly, clean steering gear assembly with kerosene. Be careful not to bring
any kerosene into contact with the di scharge and return port connectors.
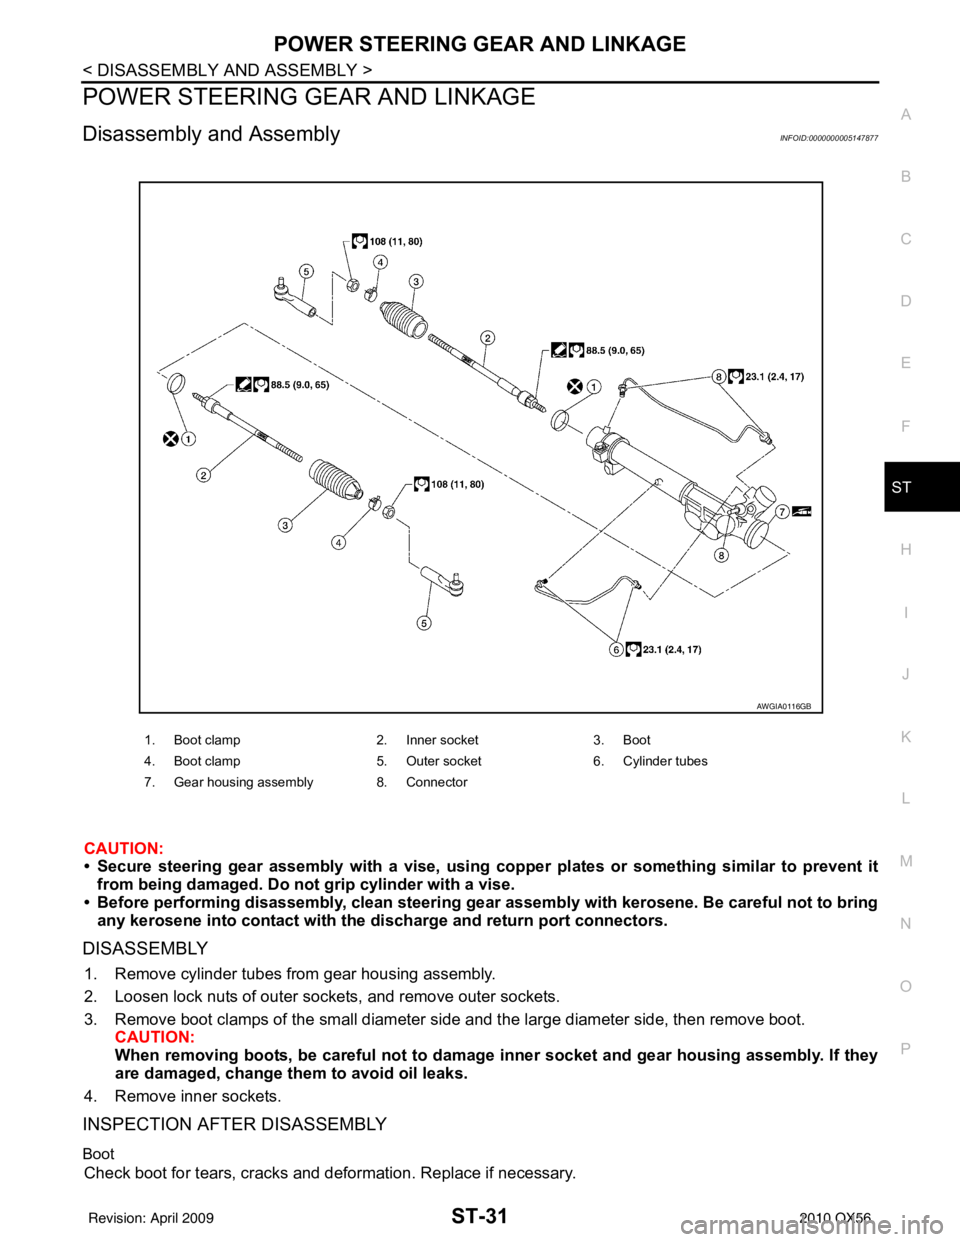
DISASSEMBLY
1. Remove cylinder tubes from gear housing assembly.
2. Loosen lock nuts of outer sockets, and remove outer sockets.
3. Remove boot clamps of the small diameter si de and the large diameter side, then remove boot.
CAUTION:
When removing boots, be careful not to damage inner socket and gear housing assembly. If they
are damaged, change th em to avoid oil leaks.
4. Remove inner sockets.
INSPECTION AFTER DISASSEMBLY
Boot
Check boot for tears, cracks and deformation. Replace if necessary.
1. Boot clamp 2. Inner socket3. Boot
4. Boot clamp 5. Outer socket6. Cylinder tubes
7. Gear housing assembly 8. Connector
AWGIA0116GB
Revision: April 20092010 QX56
Page 3670 of 4210
ST-32
< DISASSEMBLY AND ASSEMBLY >
POWER STEERING GEAR AND LINKAGE
Gear Housing Assembly
Check gear housing assembly for dents, cracks or damage. Replace as an assembly if necessary.
Outer Socket and Inner Socket
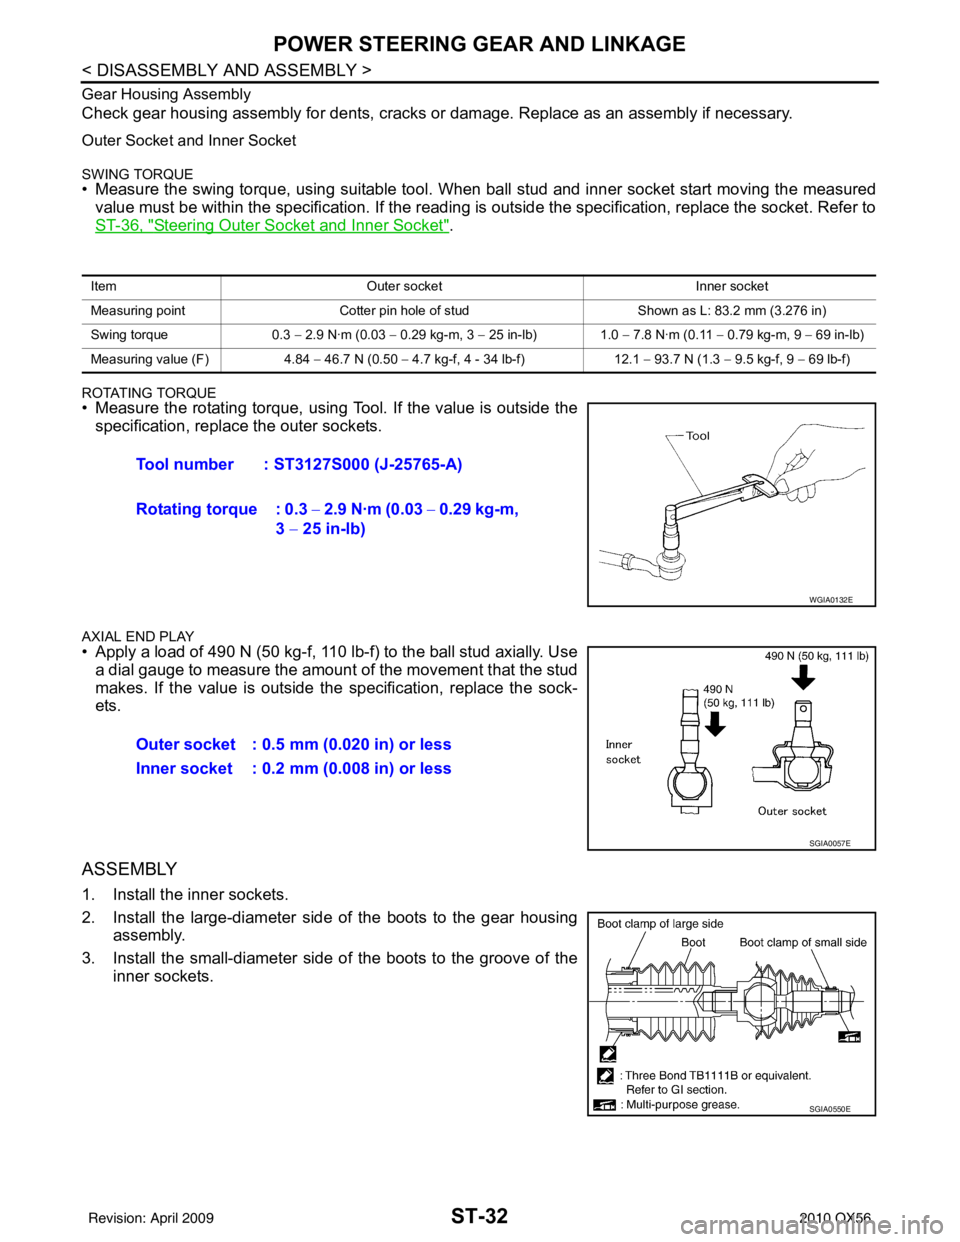
SWING TORQUE• Measure the swing torque, using suitable tool. When ball stud and inner socket start moving the measured
value must be within the specification. If the reading is outside the specification, replace the socket. Refer to
ST-36, "
Steering Outer Socket and Inner Socket".
ROTATING TORQUE• Measure the rotating torque, using Tool. If the value is outside the specification, replace the outer sockets.
AXIAL END PLAY• Apply a load of 490 N (50 kg-f, 110 lb-f) to the ball stud axially. Usea dial gauge to measure the amount of the movement that the stud
makes. If the value is outside the specification, replace the sock-
ets.
ASSEMBLY
1. Install the inner sockets.
2. Install the large-diameter side of the boots to the gear housing assembly.
3. Install the small-diameter side of the boots to the groove of the inner sockets.
Item Outer socket Inner socket
Measuring point Cotter pin hole of stud Shown as L: 83.2 mm (3.276 in)
Swing torque 0.3 − 2.9 N·m (0.03 − 0.29 kg-m, 3 − 25 in-lb) 1.0 − 7.8 N·m (0.11 − 0.79 kg-m, 9 − 69 in-lb)
Measuring value (F) 4.84 − 46.7 N (0.50 − 4.7 kg-f, 4 - 34 lb-f) 12.1 − 93.7 N (1.3 − 9.5 kg-f, 9 − 69 lb-f)
Tool number : ST3127S000 (J-25765-A)
Rotating torque : 0.3 − 2.9 N·m (0.03 − 0.29 kg-m,
3 − 25 in-lb)
WGIA0132E
Outer socket : 0.5 mm (0.020 in) or less
Inner socket : 0.2 mm (0.008 in) or less
SGIA0057E
SGIA0550E
Revision: April 20092010 QX56
Page 3671 of 4210
POWER STEERING GEAR AND LINKAGEST-33
< DISASSEMBLY AND ASSEMBLY >
C
DE
F
H I
J
K L
M A
B
ST
N
O P
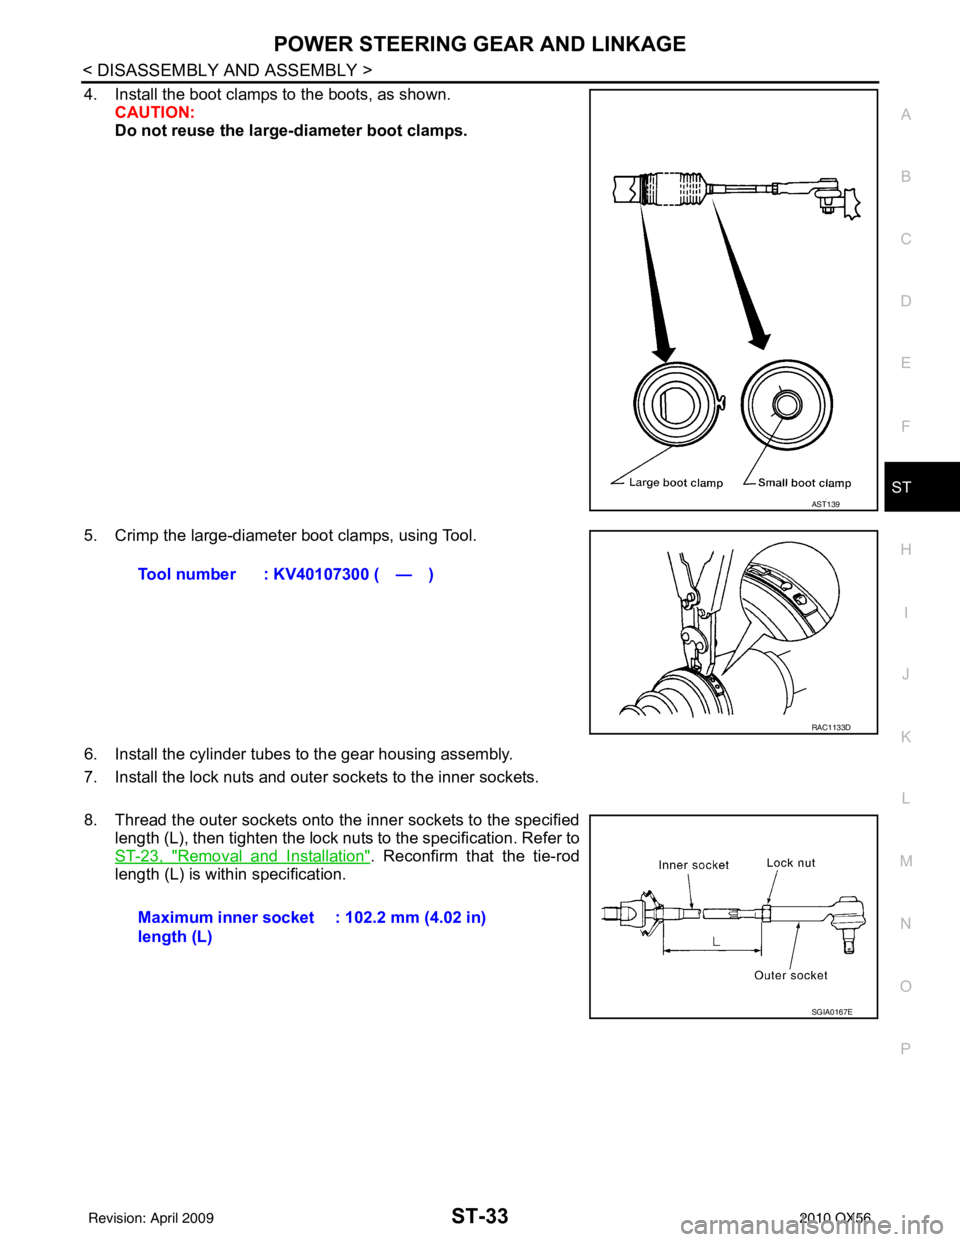
4. Install the boot clamps to the boots, as shown. CAUTION:
Do not reuse the large-diameter boot clamps.
5. Crimp the large-diameter boot clamps, using Tool.
6. Install the cylinder tubes to the gear housing assembly.
7. Install the lock nuts and outer sockets to the inner sockets.
8. Thread the outer sockets onto the inner sockets to the specified length (L), then tighten the lock nut s to the specification. Refer to
ST-23, "
Removal and Installation". Reconfirm that the tie-rod
length (L) is within specification.
AST139
Tool number : KV40107300 ( — )
RAC1133D
Maximum inner socket
length (L) : 102.2 mm (4.02 in)
SGIA0167E
Revision: April 20092010 QX56
Page 3672 of 4210
ST-34
< DISASSEMBLY AND ASSEMBLY >
POWER STEERING OIL PUMP
POWER STEERING OIL PUMP
Disassembly and AssemblyINFOID:0000000005147878
INSPECTION BEFORE DISASSEMBLY
Disassemble the power steering oil pump only if the following items are found.
• Deformed or damaged pulley, bracket, connector or suction pipe.
• Oil leakage from the suction pipe or connector.
DISASSEMBLY
NOTE:
Mount the power steering oil pump in a vise as needed.
1. Remove the connector bolt, connector and copper washers. CAUTION:
Do not reuse the copper washers.
2. Remove the suction pipe and O-ring. CAUTION:
Do not reuse the O-ring.
3. Remove the pulley nut and pulley.
4. Remove the bracket bolts and bracket.
INSPECTION AFTER DISASSEMBLY
Body Assembly Inspection
Check the power steering oil pump body assembly fo r damage. If any damage is found, replace with a new
power steering oil pump assembly.
ASSEMBLY
Assembly is in the reverse order of disassembly.
CAUTION:
• Do not reuse the copper gaskets
• Do not reuse the O-ring. Apply a coat of Ge nuine Nissan PSF or equivalent to the O-ring.
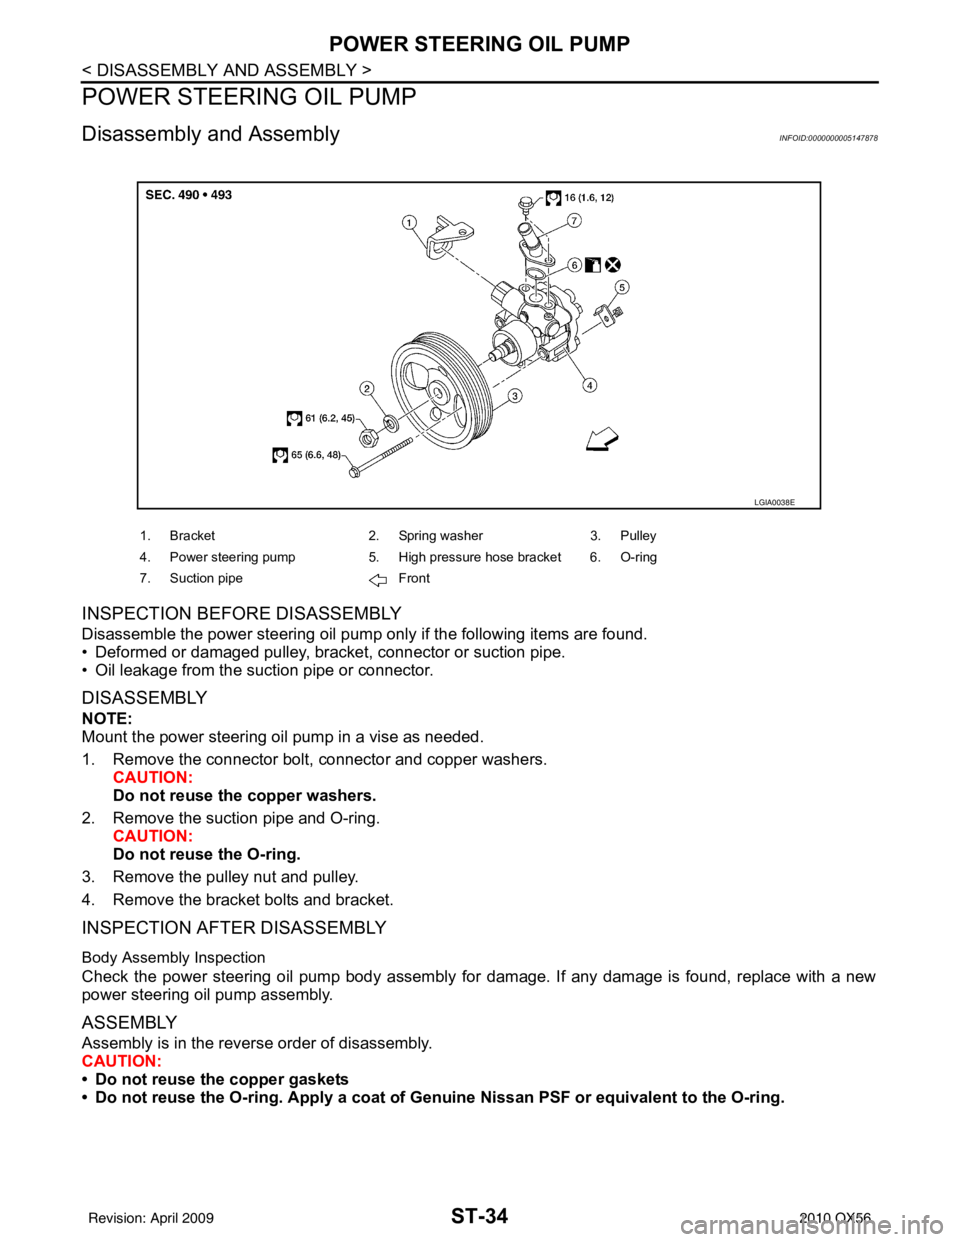
1. Bracket 2. Spring washer3. Pulley
4. Power steering pump 5. High pressure hose bracket 6. O-ring
7. Suction pipe Front
LGIA0038E
Revision: April 20092010 QX56
Page 3675 of 4210
SERVICE DATA AND SPECIFICATIONS (SDS)ST-37
< SERVICE DATA AND SPECIFICATIONS (SDS)
C
DE
F
H I
J
K L
M A
B
ST
N
O P
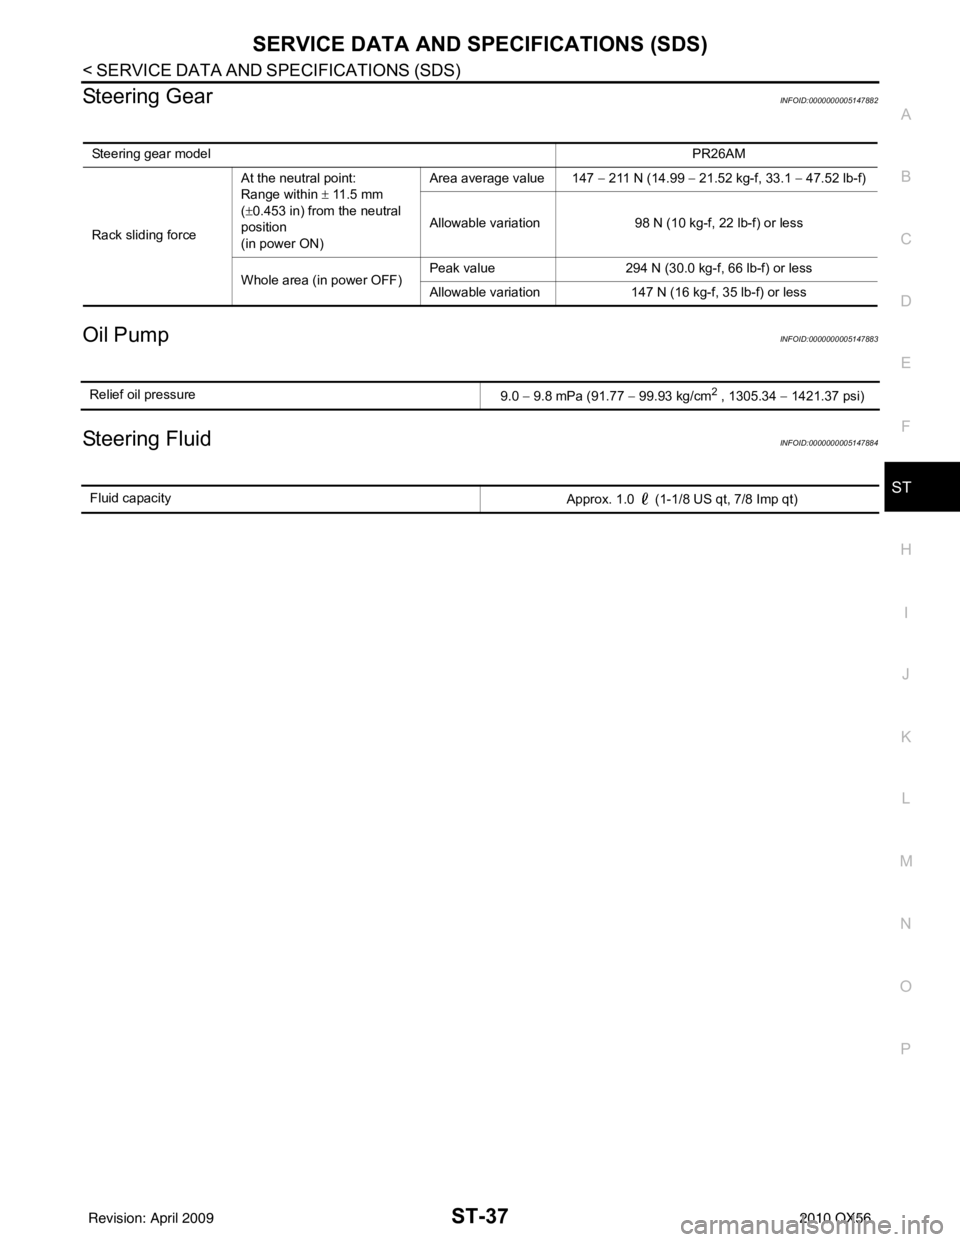
Steering GearINFOID:0000000005147882
Oil PumpINFOID:0000000005147883
Steering FluidINFOID:0000000005147884
Steering gear model PR26AM
Rack sliding force At the neutral point:
Range within ±
11.5 mm
(± 0.453 in) from the neutral
position
(in power ON) Area average value 147
− 211 N (14.99 − 21.52 kg-f, 33.1 − 47.52 lb-f)
Allowable variation 98 N (10 kg-f, 22 lb-f) or less
Whole area (in power OFF) Peak value
294 N (30.0 kg-f, 66 lb-f) or less
Allowable variation 147 N (16 kg-f, 35 lb-f) or less
Relief oil pressure
9.0 − 9.8 mPa (91.77 − 99.93 kg/cm2 , 1305.34 − 1421.37 psi)
Fluid capacity
Approx. 1.0 (1-1/8 US qt, 7/8 Imp qt)
Revision: April 20092010 QX56
Page 3676 of 4210
STR-1
ENGINE
C
DE
F
G H
I
J
K L
M
SECTION STR
A
STR
N
O P
CONTENTS
STARTING SYSTEM
PRECAUTION ....... ........................................2
PRECAUTIONS .............................................. .....2
Precaution for Supplemental Restraint System
(SRS) "AIR BAG" and "SEAT BELT PRE-TEN-
SIONER" ............................................................. ......
2
Precaution Necessary for Steering Wheel Rota-
tion After Battery Disconnect ............................... ......
2
Precaution for Power Generation Variable Voltage
Control System ..........................................................
3
PREPARATION ............................................4
PREPARATION .............................................. .....4
Special Service Tool ........................................... ......4
Commercial Service Tool ..........................................4
BASIC INSPECTION ....................................5
DIAGNOSIS AND REPAIR WORKFLOW ..... .....5
Work Flow ........................................................... ......5
FUNCTION DIAGNOSIS ...............................8
STARTING SYSTEM ...................................... .....8
System Diagram .................................................. ......8
System Description ...................................................8
Component Parts Location ........................................8
Component Description ............................................9
COMPONENT DIAGNOSIS .........................10
B TERMINAL CIRCUIT .....................................10
Description ........................................................... ....10
Diagnosis Procedure ...............................................10
S CONNECTOR CIRCUIT .................................12
Description ...............................................................12
Diagnosis Procedure ...............................................12
STARTING SYSTEM .........................................14
Wiring Diagram .................................................... ....14
SYMPTOM DIAGNOSIS ..............................18
STARTING SYSTEM .........................................18
Symptom Table ................................................... ....18
ON-VEHICLE REPAIR .................................19
STARTER MOTOR ...........................................19
Removal and Installation ..................................... ....19
SERVICE DATA AND SPECIFICATIONS
(SDS) ............... .......................................... ...
20
STARTER MOTOR ...........................................20
Starter .................................................................. ....20
Revision: April 20092010 QX56
Page 3677 of 4210
STR-2
< PRECAUTION >
PRECAUTIONS
PRECAUTION
PRECAUTIONS
Precaution for Supplemental Restraint System (SRS) "AIR BAG" and "SEAT BELT
PRE-TENSIONER"
INFOID:0000000005315461
The Supplemental Restraint System such as “A IR BAG” and “SEAT BELT PRE-TENSIONER”, used along
with a front seat belt, helps to reduce the risk or severity of injury to the driver and front passenger for certain
types of collision. This system includes seat belt switch inputs and dual stage front air bag modules. The SRS
system uses the seat belt switches to determine the front air bag deployment, and may only deploy one front
air bag, depending on the severity of a collision and w hether the front occupants are belted or unbelted.
Information necessary to service the system safely is included in the SR and SB section of this Service Man-
ual.
WARNING:
• To avoid rendering the SRS inopera tive, which could increase the risk of personal injury or death in
the event of a collision which would result in air bag inflation, all maintenance must be performed by
an authorized NISSAN/INFINITI dealer.
• Improper maintenance, including in correct removal and installation of the SRS, can lead to personal
injury caused by unintent ional activation of the system. For re moval of Spiral Cable and Air Bag
Module, see the SR section.
• Do not use electrical test equipmen t on any circuit related to the SRS unless instructed to in this
Service Manual. SRS wiring harn esses can be identified by yellow and/or orange harnesses or har-
ness connectors.
PRECAUTIONS WHEN USING POWER TOOLS (AIR OR ELECTRIC) AND HAMMERS
WARNING:
• When working near the Airbag Diagnosis Sensor Unit or other Airbag System sensors with the Igni-
tion ON or engine running, DO NOT use air or electri c power tools or strike near the sensor(s) with a
hammer. Heavy vibration could activate the sensor( s) and deploy the air bag(s), possibly causing
serious injury.
• When using air or electric power tools or hammers , always switch the Ignition OFF, disconnect the
battery, and wait at least 3 minu tes before performing any service.
Precaution Necessary for Steering W heel Rotation After Battery Disconnect
INFOID:0000000005315460
NOTE:
• This Procedure is applied only to models with Intelligent Key system and NATS (NISSAN ANTI-THEFT SYS-
TEM).
• Remove and install all control units after disconnecting both battery cables with the ignition knob in the
″LOCK ″ position.
• Always use CONSULT-III to perform self-diagnosis as a part of each function inspection after finishing work.
If DTC is detected, perform trouble diagnosis according to self-diagnostic results.
For models equipped with the Intelligent Key system and NATS, an electrically controlled steering lock mech-
anism is adopted on the key cylinder.
For this reason, if the battery is disconnected or if the battery is discharged, the steering wheel will lock and
steering wheel rotation will become impossible.
If steering wheel rotation is required when battery pow er is interrupted, follow the procedure below before
starting the repair operation.
OPERATION PROCEDURE
1. Connect both battery cables. NOTE:
Supply power using jumper cables if battery is discharged.
2. Use the Intelligent Key or mechanical key to turn the ignition switch to the ″ACC ″ position. At this time, the
steering lock will be released.
3. Disconnect both battery cables. The steering lock will remain released and the steering wheel can be rotated.
4. Perform the necessary repair operation.
Revision: April 20092010 QX56