navigation system INFINITI QX60 2014 Owner's Manual
[x] Cancel search | Manufacturer: INFINITI, Model Year: 2014, Model line: QX60, Model: INFINITI QX60 2014Pages: 547, PDF Size: 7.39 MB
Page 16 of 547
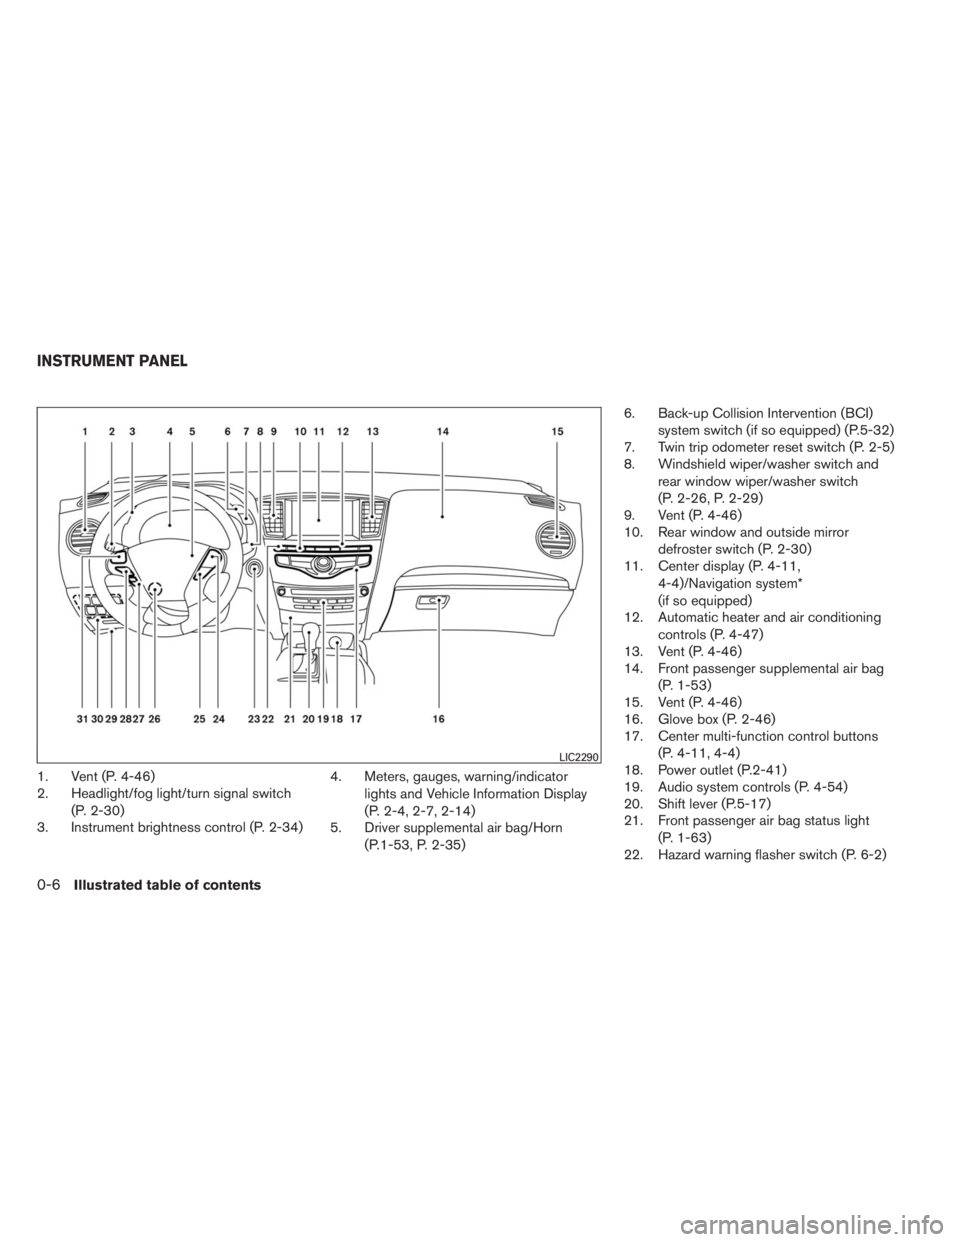
1. Vent (P. 4-46)
2. Headlight/fog light/turn signal switch
(P. 2-30)
3. Instrument brightness control (P. 2-34)4. Meters, gauges, warning/indicator
lights and Vehicle Information Display
(P. 2-4, 2-7, 2-14)
5. Driver supplemental air bag/Horn
(P.1-53, P. 2-35)6. Back-up Collision Intervention (BCI)
system switch (if so equipped) (P.5-32)
7. Twin trip odometer reset switch (P. 2-5)
8. Windshield wiper/washer switch and
rear window wiper/washer switch
(P. 2-26, P. 2-29)
9. Vent (P. 4-46)
10. Rear window and outside mirror
defroster switch (P. 2-30)
11. Center display (P. 4-11,
4-4)/Navigation system*
(if so equipped)
12. Automatic heater and air conditioning
controls (P. 4-47)
13. Vent (P. 4-46)
14. Front passenger supplemental air bag
(P. 1-53)
15. Vent (P. 4-46)
16. Glove box (P. 2-46)
17. Center multi-function control buttons
(P. 4-11, 4-4)
18. Power outlet (P.2-41)
19. Audio system controls (P. 4-54)
20. Shift lever (P.5-17)
21. Front passenger air bag status light
(P. 1-63)
22. Hazard warning flasher switch (P. 6-2)
LIC2290
INSTRUMENT PANEL
0-6Illustrated table of contents
Page 17 of 547
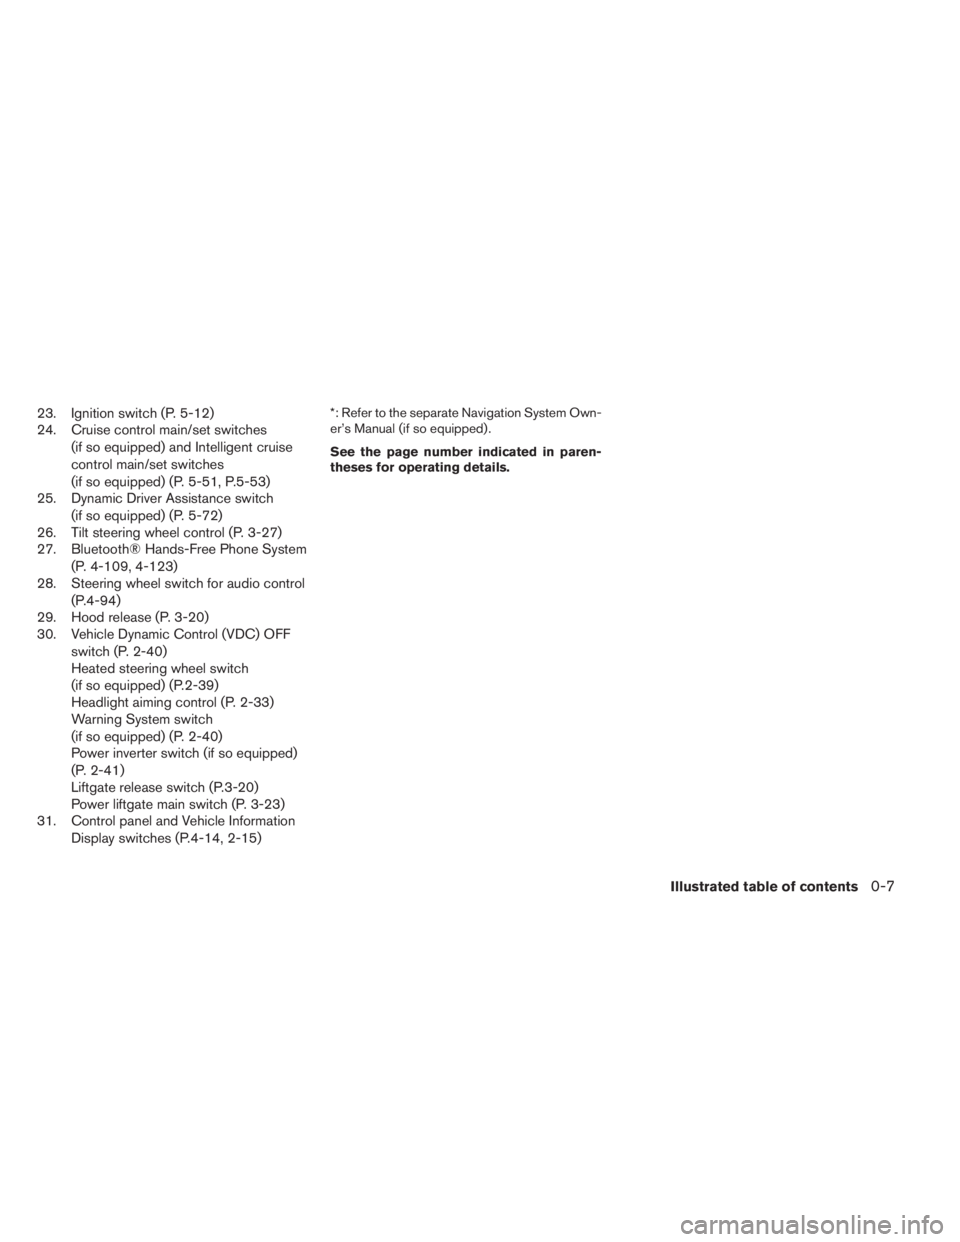
23. Ignition switch (P. 5-12)
24. Cruise control main/set switches
(if so equipped) and Intelligent cruise
control main/set switches
(if so equipped) (P. 5-51, P.5-53)
25. Dynamic Driver Assistance switch
(if so equipped) (P. 5-72)
26. Tilt steering wheel control (P. 3-27)
27. Bluetooth® Hands-Free Phone System
(P. 4-109, 4-123)
28. Steering wheel switch for audio control
(P.4-94)
29. Hood release (P. 3-20)
30. Vehicle Dynamic Control (VDC) OFF
switch (P. 2-40)
Heated steering wheel switch
(if so equipped) (P.2-39)
Headlight aiming control (P. 2-33)
Warning System switch
(if so equipped) (P. 2-40)
Power inverter switch (if so equipped)
(P. 2-41)
Liftgate release switch (P.3-20)
Power liftgate main switch (P. 3-23)
31. Control panel and Vehicle Information
Display switches (P.4-14, 2-15)*: Refer to the separate Navigation System Own-
er’s Manual (if so equipped) .
See the page number indicated in paren-
theses for operating details.
Illustrated table of contents0-7
Page 94 of 547
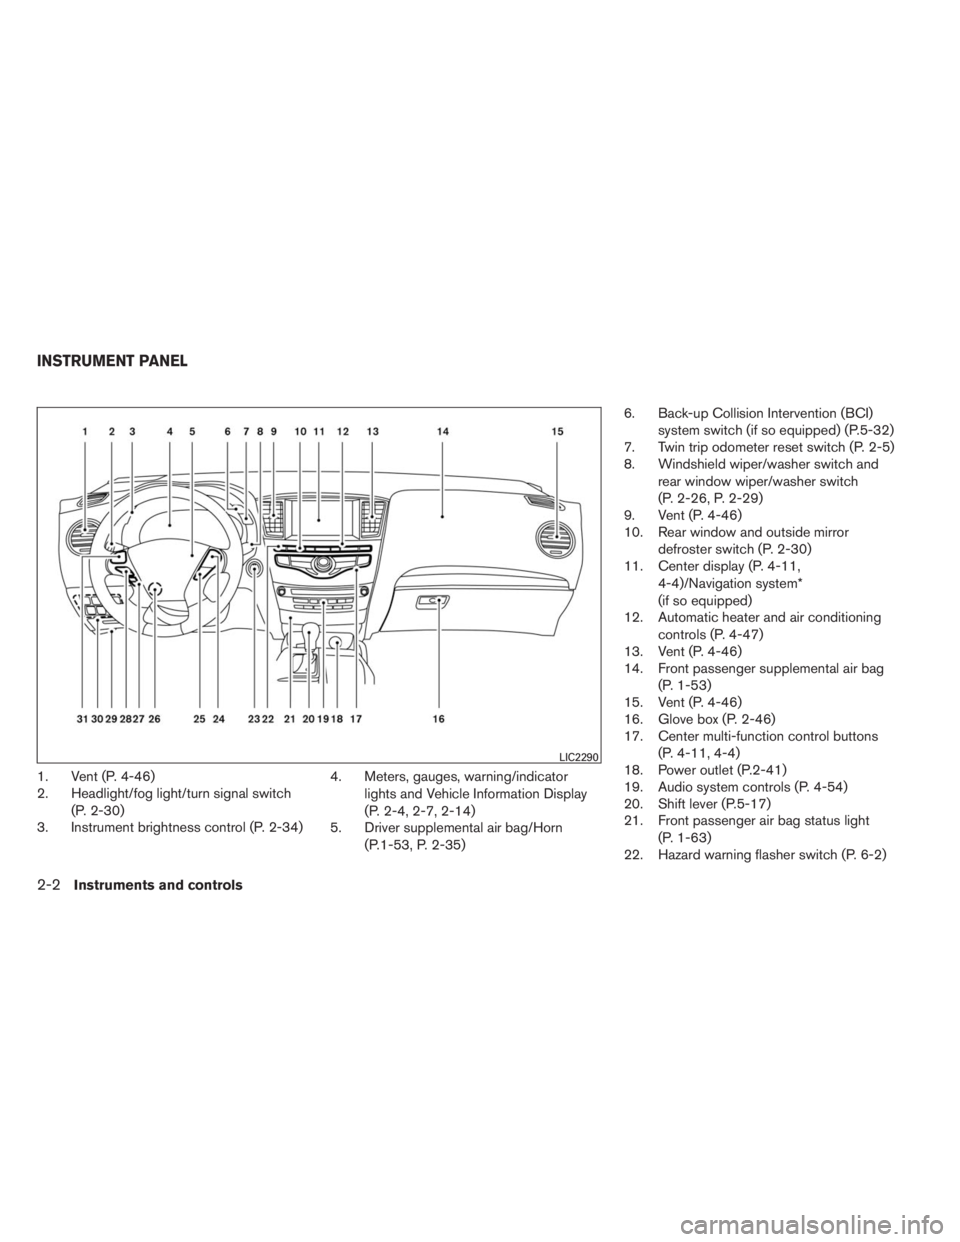
1. Vent (P. 4-46)
2. Headlight/fog light/turn signal switch
(P. 2-30)
3. Instrument brightness control (P. 2-34)4. Meters, gauges, warning/indicator
lights and Vehicle Information Display
(P. 2-4, 2-7, 2-14)
5. Driver supplemental air bag/Horn
(P.1-53, P. 2-35)6. Back-up Collision Intervention (BCI)
system switch (if so equipped) (P.5-32)
7. Twin trip odometer reset switch (P. 2-5)
8. Windshield wiper/washer switch and
rear window wiper/washer switch
(P. 2-26, P. 2-29)
9. Vent (P. 4-46)
10. Rear window and outside mirror
defroster switch (P. 2-30)
11. Center display (P. 4-11,
4-4)/Navigation system*
(if so equipped)
12. Automatic heater and air conditioning
controls (P. 4-47)
13. Vent (P. 4-46)
14. Front passenger supplemental air bag
(P. 1-53)
15. Vent (P. 4-46)
16. Glove box (P. 2-46)
17. Center multi-function control buttons
(P. 4-11, 4-4)
18. Power outlet (P.2-41)
19. Audio system controls (P. 4-54)
20. Shift lever (P.5-17)
21. Front passenger air bag status light
(P. 1-63)
22. Hazard warning flasher switch (P. 6-2)
LIC2290
INSTRUMENT PANEL
2-2Instruments and controls
Page 95 of 547
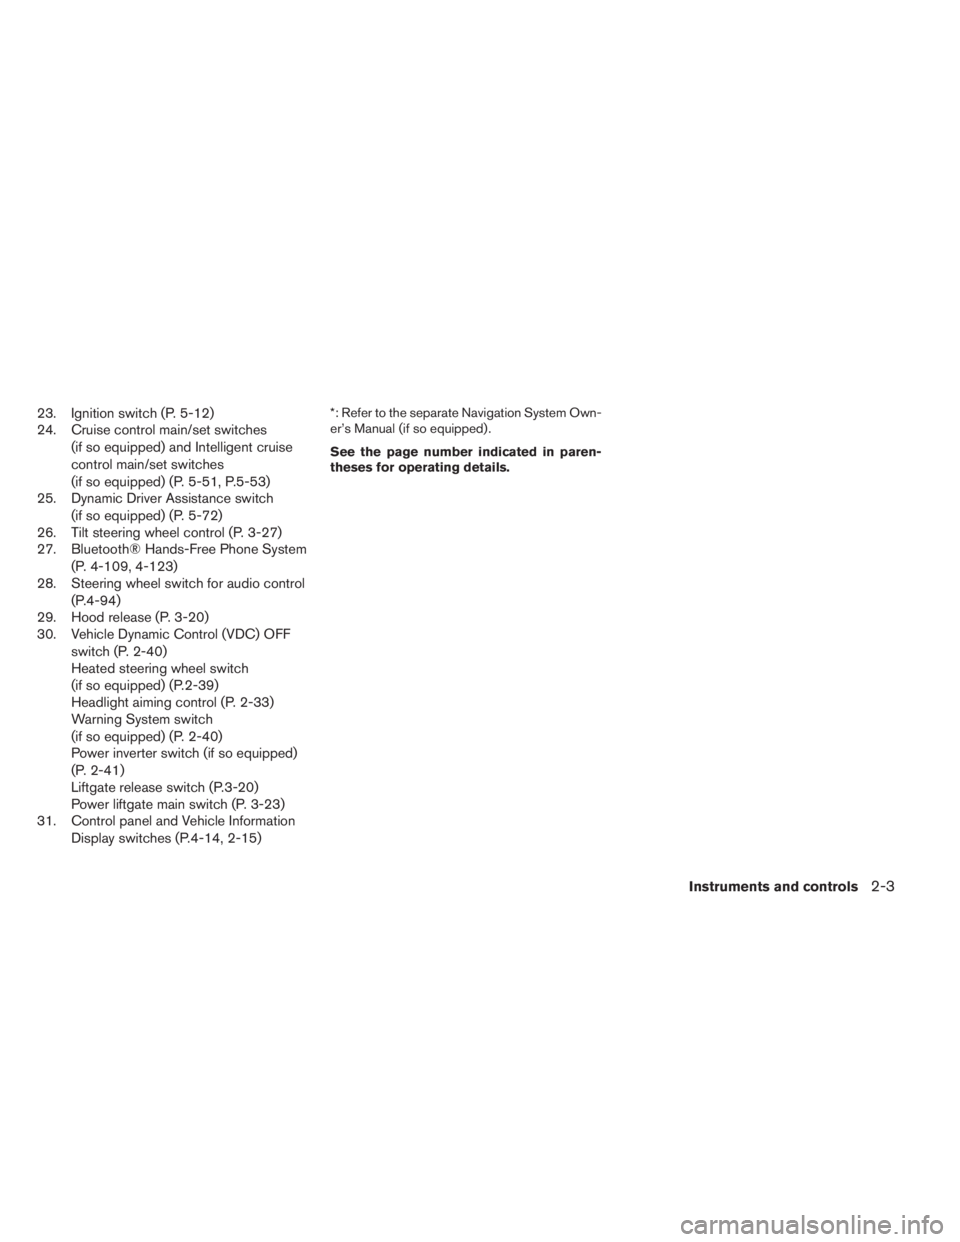
23. Ignition switch (P. 5-12)
24. Cruise control main/set switches
(if so equipped) and Intelligent cruise
control main/set switches
(if so equipped) (P. 5-51, P.5-53)
25. Dynamic Driver Assistance switch
(if so equipped) (P. 5-72)
26. Tilt steering wheel control (P. 3-27)
27. Bluetooth® Hands-Free Phone System
(P. 4-109, 4-123)
28. Steering wheel switch for audio control
(P.4-94)
29. Hood release (P. 3-20)
30. Vehicle Dynamic Control (VDC) OFF
switch (P. 2-40)
Heated steering wheel switch
(if so equipped) (P.2-39)
Headlight aiming control (P. 2-33)
Warning System switch
(if so equipped) (P. 2-40)
Power inverter switch (if so equipped)
(P. 2-41)
Liftgate release switch (P.3-20)
Power liftgate main switch (P. 3-23)
31. Control panel and Vehicle Information
Display switches (P.4-14, 2-15)*: Refer to the separate Navigation System Own-
er’s Manual (if so equipped) .
See the page number indicated in paren-
theses for operating details.
Instruments and controls2-3
Page 112 of 547
Use the,, and the ENTER buttons to
select and change the units of the vehicle infor-
mation display. The units of the center
display/navigation can be changed indepen-
dently of the vehicle information display. For ve-
hicles not equipped with Navigation see “Lan-
guage / Units” and vehicles equipped with
Navigation see, “Others settings” and for in the
“Monitor, climate, audio, phone and voice recog-
nition systems” section of this manual.
Mileage
The unit for the mileage that displays in the ve-
hicle information display can be changed to:
●miles, MPG, Inch
●km/h, l/100km, cm
●km/h, km/l, cm
Use the
and the ENTER buttons to select
and change the unit.
Tire Pressures
The unit for tire pressure that displays in the
vehicle information display can be changed to:
●psi
●kPa
●bar
●Kgf/cm
2
Use theand the ENTER buttons to select
and change the unit.
Temperature
The temperature that displays in the vehicle infor-
mation display can be changed from:
●°F (Fahrenheit)
●°C (Celsius)
Use the ENTER button to toggle choices.
Welcome Effects
The welcome screen display can be turned
ON/OFF to display when the ignition switch is
placed in the ACC or ON position. To
enable/disable the welcome screen:
1. Press the
button.
2. Use the
buttons to select “Settings”,
and press ENTER.
3. Select “Welcome Effects” using the
buttons and press ENTER to turn this func-
tion ON or OFF.
Factory Reset
The settings in the vehicle information display can
be reset back to the factory default. To reset the
vehicle information display:
1. Press the
button.
2. Use the
buttons to select “Settings”,
and press the ENTER button.
3. Select “Factory Reset” using the
but-
tons and press the ENTER button.
4. Select “YES” to return all settings back to
default by pressing the ENTER button.
2-20Instruments and controls
Page 161 of 547

CHILD SAFETY REAR DOOR LOCK
Child safety locks help prevent the rear doors
from being opened accidentally, especially when
small children are in the vehicle.
The child safety lock levers are located on the
edge of the rear doors.
When the lever is in the LOCK position, the
door can be opened only from the outside.
WARNING
●Radio waves could adversely affect
electric medical equipment. Those who
use a pacemaker should contact the
electric medical equipment manufac-
turer for the possible influences before
use.
●The Intelligent Key transmits radio
waves when the buttons are pressed.
The FAA advises the radio waves may
affect aircraft navigation and communi-
cation systems. Do not operate the In-
telligent Key while on an airplane. Make
sure the buttons are not operated unin-
tentionally when the unit is stored for a
flight.
The Intelligent Key system can operate all the
door locks using the remote controller function or
pushing the request switch on the vehicle without
taking the key out from a pocket or purse. The
operating environment and/or conditions may af-
fect the Intelligent Key system operation.
Be sure to read the following before using the
Intelligent Key system.
CAUTION
●Be sure to carry the Intelligent Key with
you when operating the vehicle.
●Never leave the Intelligent Key in the
vehicle when you leave the vehicle.
The Intelligent Key is always communicating with
the vehicle as it receives radio waves. The Intel-
ligent Key system transmits weak radio waves.
Environmental conditions may interfere with the
operation of the Intelligent Key system under the
following operating conditions:
●When operating near a location where
strong radio waves are transmitted, such as
a TV tower, power station and broadcasting
station.
●When in possession of wireless equipment,
such as a cellular telephone, transceiver,
and CB radio.
●When the Intelligent Key is in contact with or
covered by metallic materials.
●When any type of radio wave remote control
is used nearby.
●When the Intelligent Key is placed near an
electric appliance such as a personal com-
puter.
●When the vehicle is parked near a parking
meter.
LPD2049
INFINITI INTELLIGENT KEY SYSTEM
Pre-driving checks and adjustments3-7
Page 188 of 547

Selecting the memorized position
Set the shift lever to the P (Park) position, then:
●Within 45 seconds of opening the driver’s
door, push the memory switch (1 or 2) or
●Place the ignition switch in the ON position
and push the memory switch (1 or 2) .
The driver’s seat, steering column, and outside
mirrors will move to the memorized position with
the indicator light blinking, and then the light will
stay on for approximately 5 seconds.
ENTRY/EXIT FUNCTION
This system is designed so that the driver’s seat
and automatic operation steering column will au-
tomatically move when the shift lever is in the P
(Park) position. This allows the driver to get into
and out of the driver’s seat more easily.
The driver’s seat will slide backward and the
steering column will move up:
●When the driver’s door is opened with the
ignition switch placed in the LOCK position.
●When the ignition switch is turned from
ACC to LOCK with the driver’s door open.The driver’s seat and steering wheel will return to
the previous position:
●When the driver’s door is closed with the
ignition switch placed in the LOCK position.
●When the ignition switch is turned from
ACC to ON while the shift lever is in the P
(Park) position.
The entry/exit function can be adjusted or can-
celed through the Vehicle Settings in the vehicle
information display by performing the following:
●Switch the Exit Seat Slide from ON to OFF.
●Switch the Exit Steering UP from ON to
OFF.
Restarting the entry/exit function
If the battery cable is disconnected or if the fuse
opens, the entry/exit function will be disabled.
Drive the vehicle over 25 MPH (40 km/h) to
restart the entry/exit function. You can also restart
the entry/exit function using the following proce-
dure.
1. Connect the battery cable or replace the
fuse.
2. Open and close the driver’s door more than
2 times with the ignition switch in the LOCK
position.
The entry/exit function should now work properly.
SETTING MEMORY FUNCTION
The position of the following settings can be
linked to the Intelligent Key and the memorized
settings can be available for each Intelligent Key.
●Climate control system
●Navigation system (if so equipped)
●Audio system
To use the memory function, set the climate,
navigation and audio systems to the driver’s pre-
ferred settings. Lock the doors with the Intelligent
Key. Each Intelligent Key may be set with the
driver’s individual preferences. When a new In-
telligent Key is used, “Connection with the key
has been done” will be displayed on the screen
and the memorized settings are available.
To engage the memorized settings, perform the
following:
1. Carry the Intelligent Key that is linked to the
memorized settings.
2. Unlock the doors by pushing the driver’s
door handle request switch or the
UNLOCK
button on the Intelligent
Key.
3. Place the ignition switch in the “ON” posi-
tion. The settings linked to the Intelligent Key
will start.
3-34Pre-driving checks and adjustments
Page 189 of 547

For further instructions on using the Climate con-
trol system see “Heater and air conditioner (au-
tomatic)” in “Monitor, climate, audio, phone and
voice recognition systems”.
For further instructions on using the Navigation
System, see the separate Navigation System
Owner’s Manual.
For further instructions on using the Audio sys-
tem, see “Audio system” in “Monitor, climate,
audio, phone and voice recognition systems”.
SYSTEM OPERATION
The automatic drive positioner system will not
work or will stop operating under the following
conditions:
●When the vehicle speed is above 4 MPH
(7 km/h).
●When any of the memory switches are
pushed while the automatic drive positioner
is operating.
●When the adjusting switch for the driver’s
seat and steering column is turned on while
the automatic drive positioner is operating.
●When the seat has already been moved to
the memorized position.
●When no seat position is stored in the
memory switch.●When the shift lever is moved from P (Park)
to any other position.
●When the driver’s door remains open more
than 45 seconds and the ignition switch is
not in the ON position.
●The seat synchronization function is auto-
matically disabled if the outside mirrors or
steering wheel reaches its maximum adjust-
ment.
●The seat synchronization function will not
operate if the seat is adjusted over one of the
following maximum thresholds:
– Seat sliding: 3.0 in (76 mm)
– Seatback reclining: 9.1 degrees
– Seat lifter (rear side): 0.8 in (20 mm)
The entry/exit function can be adjusted or can-
celed through the Vehicle Settings in the vehicle
information display by performing the following:
●Switch the Exit Seat Slide from ON to OFF.
●Switch the Exit Steering UP from ON to
OFF.
Pre-driving checks and adjustments3-35
Page 191 of 547

4 Monitor, climate, audio, phone and voice
recognition systems
Control panel buttons — color screen without
Navigation System (if so equipped)..................4-4
How to use the INFINITI controller................4-5
How to select menus on the screen..............4-6
How to use the STATUS button..................4-6
How to use the INFO button.....................4-6
How to use the SETTING button.................4-8
OFF button.............................4-10
Control panel buttons — color screen with
Navigation System (if so equipped).................4-11
How to use the INFINITI controller...............4-12
How to use the touch screen...................4-12
Menu options.................................4-14
How to select menus on the screen.............4-15
How to use the STATUS button.................4-15
How to use the INFO button....................4-16
How to use the SETTING button................4-18
OFF button.............................4-21
Image viewer (if so equipped)......................4-22
Using the image viewer........................4-22
RearView Monitor (if so equipped)..................4-24
How to read the displayed lines.................4-24
How to park with predicted course lines..........4-25Difference between predictive and actual
distances.....................................4-26
How to adjust the screen.......................4-28
Operating tips.................................4-28
Around View® Monitor (if so equipped).............4-29
Available views................................4-30
Difference between predictive and actual
distances.....................................4-35
How to switch the display......................4-37
Parking Sensor (if so equipped) Rear Center
Sonar (if so equipped).........................4-38
Moving Object Detection (MOD)................4-40
How to adjust the screen view..................4-42
Around View Monitor settings...................4-43
View malfunction..............................4-44
Operating tips.................................4-45
Vents...........................................4-46
Heater and air conditioner (automatic)..............4-47
Automatic operation...........................4-48
Manual operation..............................4-48
Operating tips.................................4-49
CLIMATE setting screen........................4-50
Servicing air conditioner...........................4-53
Audio system....................................4-54
Page 192 of 547
Radio........................................4-54
FM radio reception . ...........................4-54
AM radio reception . ...........................4-54
Satellite radio reception (if so equipped).........4-55
Audio operation precautions....................4-55
FM/AM/SAT radio with compact disc (CD)
player (if so equipped).........................4-70
Digital Versatile Disc (DVD) Player
Operation (models with Navigation System)......4-79
USB interface.................................4-82
iPod®* player operation........................4-87
Bluetooth® streaming audio (if so equipped).....4-91
CD care and cleaning..........................4-94
Steering wheel switch for audio control..........4-94
Antenna......................................4-96
Dual head restraint/headrest DVD system
(if so equipped)..................................4-96
System components...........................4-97
Before operating dual head restraint/
headrest DVD system.........................4-102
Playing a digital versatile disc (DVD)............4-103
Operating tips................................4-107
Care and maintenance........................4-108
Car phone or CB radio . ..........................4-109Bluetooth® Hands-Free Phone System without
Navigation System (if so equipped)................4-109
Regulatory Information........................4-111
Using the system.............................4-111
Control buttons..............................4-113
Getting started...............................4-114
List of voice commands.......................4-115
Voice Adaptation (VA) mode...................4-120
Manual control...............................4-121
Troubleshooting guide........................4-122
Bluetooth® Hands-Free Phone System with
Navigation System (if so equipped)................4-123
Regulatory Information........................4-125
Voice commands.............................
4-125
Connecting procedure........................4-126
Vehicle Phonebook...........................4-127
Handset phonebook..........................4-128
Making a call.................................4-129
Receiving a call..............................4-130
During a call.................................4-130
Ending a call.................................4-131
Phone settings...............................4-131
Bluetooth settings............................4-132