navigation system INFINITI QX60 2017 Quick Reference Guide
[x] Cancel search | Manufacturer: INFINITI, Model Year: 2017, Model line: QX60, Model: INFINITI QX60 2017Pages: 24, PDF Size: 1.91 MB
Page 3 of 24

Additional informa\ction about your ve\chicle i\f al\fo availa\cble in your Owner’\f \c\banual, Navigation \cSy\ftem Owner’\f \banual\c and at www.InfinitiUSA.com.
Table of Contents
A \fellular telephon\ne should not
be used for any pur\npose while
driving so full att\nention may be
given to vehi\fle op\neration.
Always wear your s\neat belt.
Supplemental air ba\ngs do not
repla\fe proper seat\n belt usage.
Children 12 and unde\nr
should always ride\n in the
rear seat properly\n se\fured
in \fhild restraints \nor seat
belts a\f\fording to t\nheir age
and weight.
Do not drink and d\nrive. For more information, refer to the “Safety — Seats, seat
belts and supplemental restraint system (section 1)”, the
“Monitor, climate, audio, phone and voice recognition
systems (section 4)” and the “Starting and driving
(section 5)” of you\Tr Owner’s Manual.
PLEASE SEE YOUR OWNER’S \bANUAL FOR I\bPORTANT SAFETY INFOR\bATION AND SYSTE\b OPERATION LI\bITATIONS.
Co\fkpit Overview ..................\n..................\n..................\n..................\n......1
Instrument Panel ..................\n..................\n..................\n..................\n......3
Meters and Gauges ..................\n..................\n..................\n..................\n...5
Opening the Liftgat\ne ..................\n..................\n..................\n..................\n.7
Outside Mirrors ..................\n..................\n..................\n..................\n.........7
2
nd Row Seats ..................\n..................\n..................\n..................\n...........8
Wiper and Washer Sw\nit\fh ..................\n..................\n..................\n...........8
Dynami\f Driver Assi\nstan\fe Swit\fh (if so\n equipped) ..................\n.........9
USB Conne\ftion Ports\n ..................\n..................\n..................\n.................9
Remote Start (if s\no equipped) ..................\n..................\n..................\n...10 Automati\f Drive Pos\nitioner (if so equi\npped) ..................\n................. 10
Heater and Air Cond\nitioner (automati\f) \n..................\n..................\n...... 11
Conne\fting your Cell\nular Phone or Devi\f\ne via Bluetooth
® ............... 12
Bluetooth® Streaming Audio ..................\n..................\n..................\n.... 12
Voi\fe Re\fognition ..................\n..................\n..................\n..................\n.. 12
Center Display ..................\n..................\n..................\n..................\n....... 13
Navigation System (\nif so equipped) ..................\n..................\n........... 14
Clo\fk Set/Adjustment\n ..................\n..................\n..................\n.............. 14
Infiniti InTou\fh
™ Servi\fes (if so eq\nuipped) ..................\n..................\n 15
Infiniti Mobile Ente\nrtainment System (M\nES) (if so equipped\n) ......... 16
Page 17 of 24

14
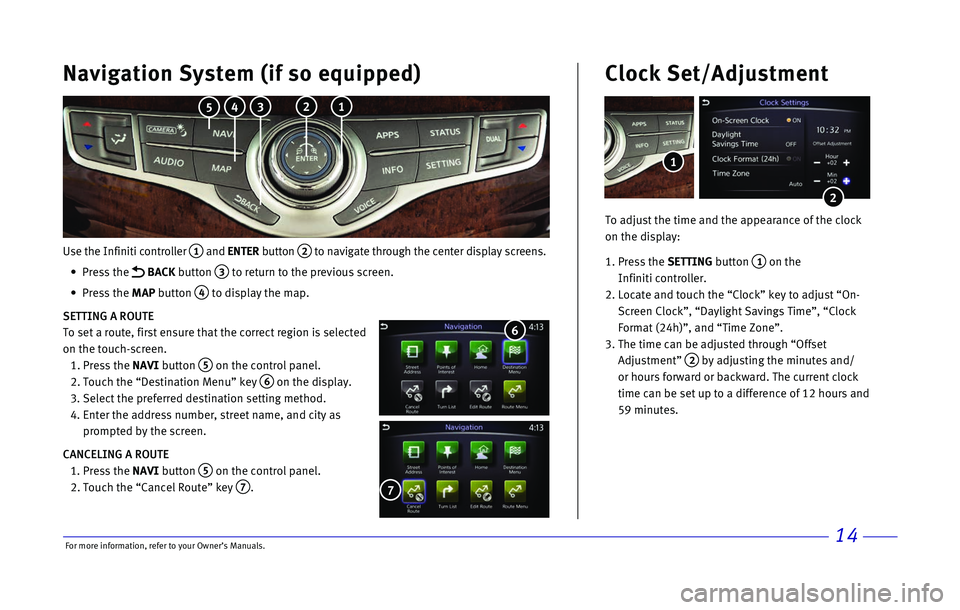
Use the Infiniti controller 1 and ENTER button 2 to navigate through the center display screens.
•
Press the
BACK button 3 to return to the previous screen.
•
Press the MAP button
4 to display the map.
SETTING A ROUTE
To set a route, first ensure that the correct region is selected
on the touch-screen.
1.
Press the
NAVI button
5 on the control panel.
2.
Touch the “Destination Menu” key 6 on the display.
3.
Select the preferred destination setting method.
4.
Enter the address number, street name, and city as
prompted by the screen.
CANCELING A ROUTE
1.
Press the
NAVI button
5 on the control panel.
2.
Touch the “Cancel Route” key 7.
7
Navigation System (if so equipped)
6
To adjust the time and the appearance of the clock
on the display:
1.
Press the SETTING button
1 on the
Infiniti controller.
2.
Locate and touch the “Clock” key to adjust “On-
Screen Clock”, “Daylight Savings Time”, “Clock
Format (24h)”, and “Time Zone”.
3.
The time can be adjusted through “Offset
Adjustment”
2 by adjusting the minutes and/
or hours forward or backward. The current clock
time can be set up to a difference of 12 hours and
59 minutes.
Clock Set/Adjustment
2
1
2 1 3 4 5
For more information, refer to your Owner