audio INFINITI QX60-HYBRID 2015 Owners Manual
[x] Cancel search | Manufacturer: INFINITI, Model Year: 2015, Model line: QX60-HYBRID, Model: INFINITI QX60-HYBRID 2015Pages: 577, PDF Size: 5.58 MB
Page 8 of 577
Table of
ContentsHEV Overview
Illustrated table of contents
Safety—Seats, seat belts and supplemental restraint system
Instruments and controls
Pre-driving checks and adjustments
Monitor, climate, audio, phone and voice recognition systems
Starting and driving
In case of emergency
Appearance and care
Maintenance and do-it-yourself
Technical and consumer information
Index
HEV0
1
2
3
4
5
6
7
8
9
10
Page 29 of 577

1. Vent (P. 4-41)
2. Headlight/fog light/turn signal switch(P. 2-35)
3. Instrument brightness control (P. 2-39) 4. Meters, gauges, warning/indicator
lights and Vehicle Information Display
(P. 2-4, 2-13, 2-17)
5. Driver supplemental air bag/Horn
(P.1-48, P. 2-40) 6. Back-up Collision Intervention (BCI)
system switch (if so equipped) (P.5-32)
7. Twin trip odometer reset switch (P. 2-5)
8. Windshield wiper/washer switch and
rear window wiper/washer switch
(P. 2-32, P. 2-32)
9. Vent (P. 4-41)
10. Rear window defroster switch (P. 4-42)
11. Display screen (P. 2-17)
12. Automatic heater and air conditioning
controls (P. 4-42)
13. Vent (P. 4-41)
14. Front passenger supplemental air bag
(P. 1-48)
15. Vent (P. 4-41)
16. Glove box (P. 2-53)
17. Control panel with Navigation System/
Control panel without Navigation
System (P. 4-10)
18. Power outlet (P.2-48)
19. Audio system controls (P. 4-49)
20. Shift lever (P.5-17)
21. Front passenger air bag status light
(P. 1-48)
22. Hazard warning flasher switch (P. 6-2)
23. Push start ignition switch (P. 5-12)
LIC2290
INSTRUMENT PANEL
0-6Illustrated table of contents
Page 30 of 577

24. Cruise control main/set switches (if soequipped) and Intelligent cruise control
main/set switches (if so equipped)
(P. 5-52, P.5-54)
25. Dynamic Driver Assistance switch
(if so equipped) (P. 5-74)
26. Tilt steering wheel control (P. 3-28)
27. Bluetooth® Hands-Free Phone System
(P. 4-107)
28. Steering wheel switch for audio control
(P.4-92)
29. Hood release (P. 3-21)
30. Vehicle Dynamic Control (VDC) OFF
switch (P. 2-46)
Warning System switch (if so
equipped) (P. 2-46)
Power inverter switch (if so equipped)
(P. 2-45)
Liftgate release switch (P.3-22)
Heated Steering Wheel (if so
equipped) (P. 2-45)
Power liftgate main switch (P. 3-22)
31. Control panel and Vehicle Information
Display switches (P.2-17)
* For additional information, refer to the separate
Navigation System Owner’s Manual (if so
equipped) . Refer to the page number indicated in pa-
rentheses for operating details.
Illustrated table of contents0-7
Page 103 of 577
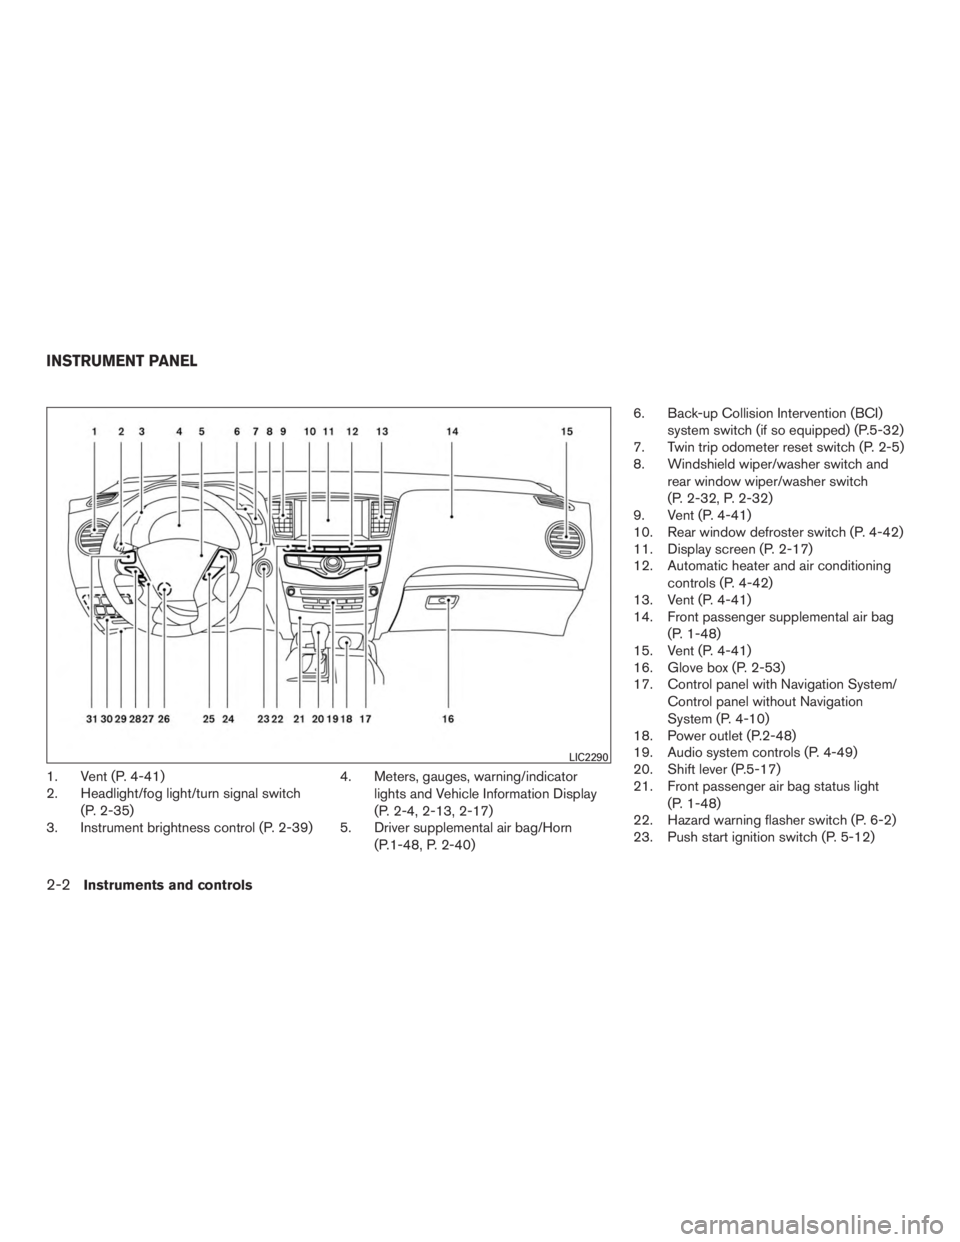
1. Vent (P. 4-41)
2. Headlight/fog light/turn signal switch(P. 2-35)
3. Instrument brightness control (P. 2-39) 4. Meters, gauges, warning/indicator
lights and Vehicle Information Display
(P. 2-4, 2-13, 2-17)
5. Driver supplemental air bag/Horn
(P.1-48, P. 2-40) 6. Back-up Collision Intervention (BCI)
system switch (if so equipped) (P.5-32)
7. Twin trip odometer reset switch (P. 2-5)
8. Windshield wiper/washer switch and
rear window wiper/washer switch
(P. 2-32, P. 2-32)
9. Vent (P. 4-41)
10. Rear window defroster switch (P. 4-42)
11. Display screen (P. 2-17)
12. Automatic heater and air conditioning
controls (P. 4-42)
13. Vent (P. 4-41)
14. Front passenger supplemental air bag
(P. 1-48)
15. Vent (P. 4-41)
16. Glove box (P. 2-53)
17. Control panel with Navigation System/
Control panel without Navigation
System (P. 4-10)
18. Power outlet (P.2-48)
19. Audio system controls (P. 4-49)
20. Shift lever (P.5-17)
21. Front passenger air bag status light
(P. 1-48)
22. Hazard warning flasher switch (P. 6-2)
23. Push start ignition switch (P. 5-12)
LIC2290
INSTRUMENT PANEL
2-2Instruments and controls
Page 104 of 577
24. Cruise control main/set switches (if soequipped) and Intelligent cruise control
main/set switches (if so equipped)
(P. 5-52, P.5-54)
25. Dynamic Driver Assistance switch
(if so equipped) (P. 5-74)
26. Tilt steering wheel control (P. 3-28)
27. Bluetooth® Hands-Free Phone System
(P. 4-107)
28. Steering wheel switch for audio control
(P.4-92)
29. Hood release (P. 3-21)
30. Vehicle Dynamic Control (VDC) OFF
switch (P. 2-46)
Warning System switch (if so
equipped) (P. 2-46)
Power inverter switch (if so equipped)
(P. 2-45)
Liftgate release switch (P.3-22)
Heated Steering Wheel
(if so equipped) (P. 2-45)
Power liftgate main switch (P. 3-22)
31. Control panel and Vehicle Information
Display switches (P.2-17)* For additional information, refer to the separate
Navigation System Owner’s Manual (if so
equipped) .
Refer to the page number indicated in pa-
rentheses for operating details.
Instruments and controls2-3
Page 118 of 577
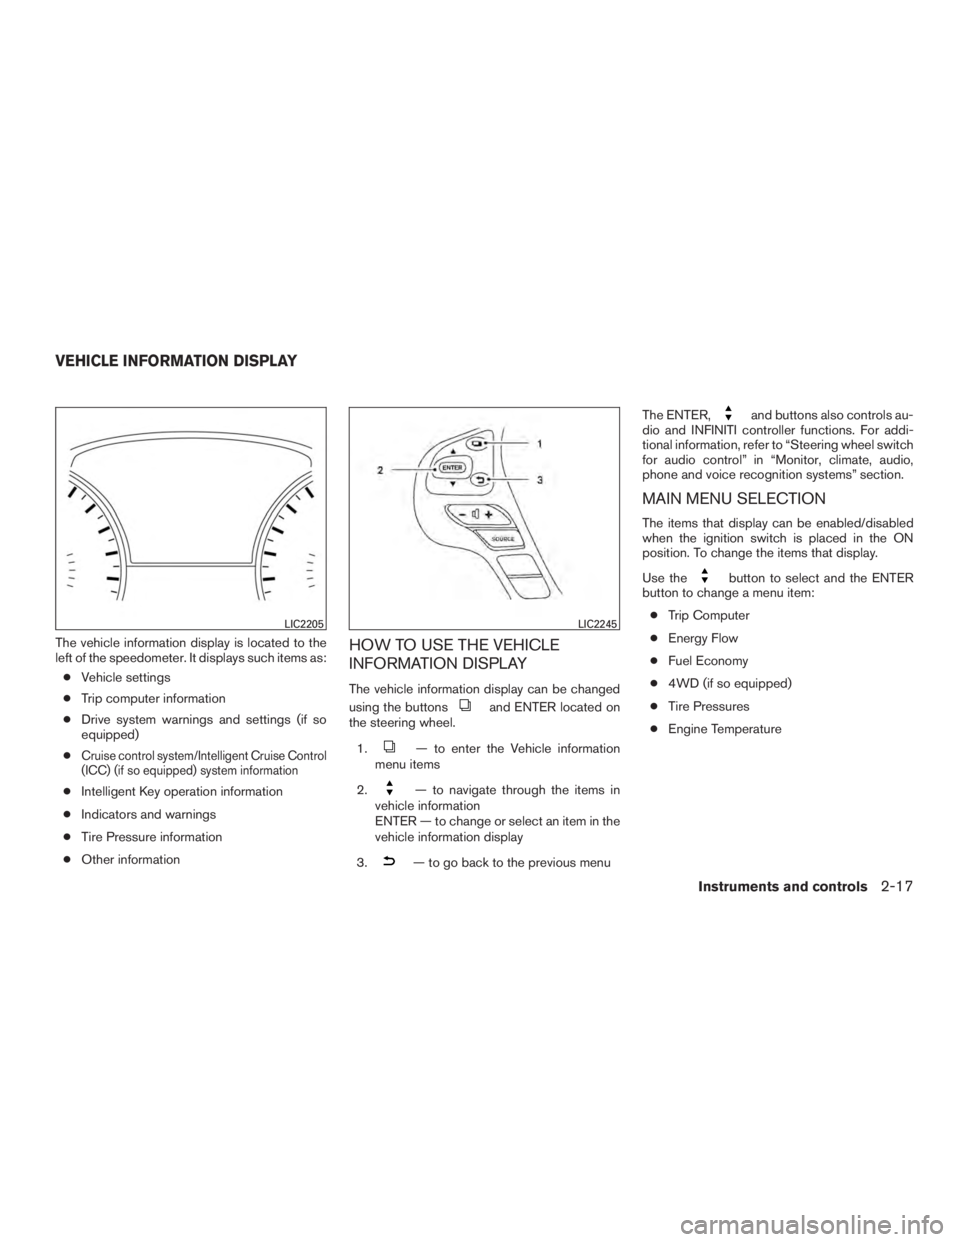
The vehicle information display is located to the
left of the speedometer. It displays such items as:● Vehicle settings
● Trip computer information
● Drive system warnings and settings (if so
equipped)
●
Cruise control system/Intelligent Cruise Control
(ICC) (if so equipped) system information
● Intelligent Key operation information
● Indicators and warnings
● Tire Pressure information
● Other information
HOW TO USE THE VEHICLE
INFORMATION DISPLAY
The vehicle information display can be changed
using the buttons
and ENTER located on
the steering wheel.
1.
— to enter the Vehicle information
menu items
2.
— to navigate through the items in
vehicle information
ENTER — to change or select an item in the
vehicle information display
3.
— to go back to the previous menu The ENTER,
and buttons also controls au-
dio and INFINITI controller functions. For addi-
tional information, refer to “Steering wheel switch
for audio control” in “Monitor, climate, audio,
phone and voice recognition systems” section.
MAIN MENU SELECTION
The items that display can be enabled/disabled
when the ignition switch is placed in the ON
position. To change the items that display.
Use the
button to select and the ENTER
button to change a menu item:
● Trip Computer
● Energy Flow
● Fuel Economy
● 4WD (if so equipped)
● Tire Pressures
● Engine Temperature
LIC2205LIC2245
VEHICLE INFORMATION DISPLAY
Instruments and controls2-17
Page 121 of 577
●Blind Spot
● Warning (BSW)
●Assistance (BSI)
●Brightness — Bright/STD/Dark
Parking Aids
To turn on or off the system displayed in the
“Parking Aids” menu use the
button to
select and the ENTER button to enable/disable
“Moving Object”.
For additional information, refer to “Moving Ob-
ject Detection (MOD)” in the “Monitor, climate,
audio, phone and voice recognition systems”
section.
Back-up Collision Interv.(ention) (if so
equipped)
The back-up collision intervention system can be
changed to be ON when the ignition switch is
placed in the ON position and to Auto Resume.
Use the
button to select and the ENTER
button to change a menu item:
● Ignition On Status – On/Off Intelligent Brake Assist (if so equipped)
The intelligent brake assist system can be
enabled/disabled in the vehicle information dis-
play.
Use the
button to select and the ENTER
button to change a menu item:
● System – On/Off
Vehicle Settings
Vehicle settings allow the customer to change
settings for rain sensor (if so equipped) , interior
lights, Intelligent Key settings, unlock settings
and other vehicle settings.
The vehicle settings can be changed using
the
,, and the ENTER buttons.
Welcome light
The welcome light can be set to be ON or OFF.
From the Vehicle Settings menu, select “Wel-
come Light”. Use the ENTER button to turn this
feature ON or OFF.
Auto Room Lamp
The interior lights can be set to be ON or OFF if
any door is unlocked. From the Vehicle Settings
menu, select “Auto Room Light”. Use the ENTER
button to turn this feature ON or OFF. Light Sensitivity
Light sensitivity can be set to illuminate earlier
based on the brightness outside the vehicle.
From the Vehicle Settings menu, select “Light
Sensitivity”. Use the ENTER button to change the
sensitivity.
Light Off Delay
The duration of the automatic headlights can be
changed from 0 to 180 seconds. From the Ve-
hicle Settings menu, select “Light Off Delay”. Use
the ENTER button to change the duration.
Rain Sensor (if so equipped)
The rain sensor can be set to be ON or OFF. From
the Vehicle Settings menu, select “Rain Sensor”.
Use the ENTER button to turn this feature ON or
OFF.
Wiper with Speed
The wiper with speed can be set to be ON or
OFF. From the Vehicle Settings menu, select
“Wiper with Speed”. Use the ENTER button to
turn this feature ON or OFF.
I-Key Door Lock
When this item is turned on, the request switch
on the door is activated. From the Vehicle Set-
tings menu, select “I-Key Door Unlock”. Use the
ENTER button to activate this function.
2-20Instruments and controls
Page 124 of 577
Other
This indicator appears when the customer set
distance is reached for checking or replacing
maintenance items other than the engine oil, oil
filter and tires. Other maintenance items can in-
clude such things as air filter or tire rotation. The
distance for checking or replacing the items can
be set or reset.
Alarms
This setting allows the customer to set alarms for
outside temperature and a timer alert.1. Press the
button.
2. Use the
button until “Settings” is se-
lected, and press ENTER.
3. Select “Alarms” using the
button and
press ENTER.
Outside Temperature
This setting allows the customer to
enable/disable the alert for low outside tempera-
ture in the vehicle information display.
1. Use the
button to select “Outside
Temperature”.
2. Press the ENTER button to turn ON/OFF the outside temperature in the vehicle infor-
mation display. Timer Alert
This setting allows the driver to set an alert to
notify a set time has been reached.
1. Use the
button to select “Timer Alert”.
2. Press the ENTER button.
3. To change the timer amount, use the
button and the ENTER button to save the
selected time amount.
Language
The language of the vehicle information display is
displayed in UK English only.
The language of the center display/navigation
can be changed independently of the vehicle
information display. For additional information re-
fer to “Language / Units” in the “Monitor, climate,
audio, phone and voice recognition systems”
section of this manual.
Units
The units that are shown in the vehicle informa-
tion display can be changed: ● Mileage
● Tire pressures
● Temperature Use the
,, and the ENTER buttons to
select and change the units of the vehicle infor-
mation display. The units of the center
display/navigation can be changed indepen-
dently of the vehicle information display. For ad-
ditional information, refer to “How to use the
Setting Button” in the “Monitor, climate, audio,
phone and voice recognition systems” section of
this manual.
Mileage
The unit for the mileage that displays in the ve-
hicle information display can be changed to:
● miles, MPG, Inch
● km/h, l/100km, cm
● km/h, km/l, cm
Use the
and the ENTER buttons to select
and change the unit.
Tire Pressures
The unit for tire pressure that displays in the
vehicle information display can be changed to:
● psi
● kPa
● bar
● Kgf/cm
2
Instruments and controls2-23
Page 172 of 577
●Do not drop the Intelligent Key.
● Do not strike the Intelligent Key sharply
against another object.
● Do not change or modify the Intelligent
Key.
● Wetting may damage the Intelligent
Key. If the Intelligent Key gets wet, im-
mediately wipe until it is completely dry.
● Do not place the Intelligent Key for an
extended period in an area where tem-
peratures exceed 140°F (60°C) .
● Do not attach the Intelligent Key with a
key holder that contains a magnet.
● Do not place the Intelligent Key near
equipment that produces a magnetic
field, such as a TV, audio equipment and
personal computers.
If an Intelligent Key is lost or stolen,
INFINITI recommends erasing the ID code
of that Intelligent Key from the vehicle.
This may prevent the unauthorized use of
the Intelligent Key to operate the vehicle.
For information regarding the erasing
procedure, contact an INFINITI retailer.
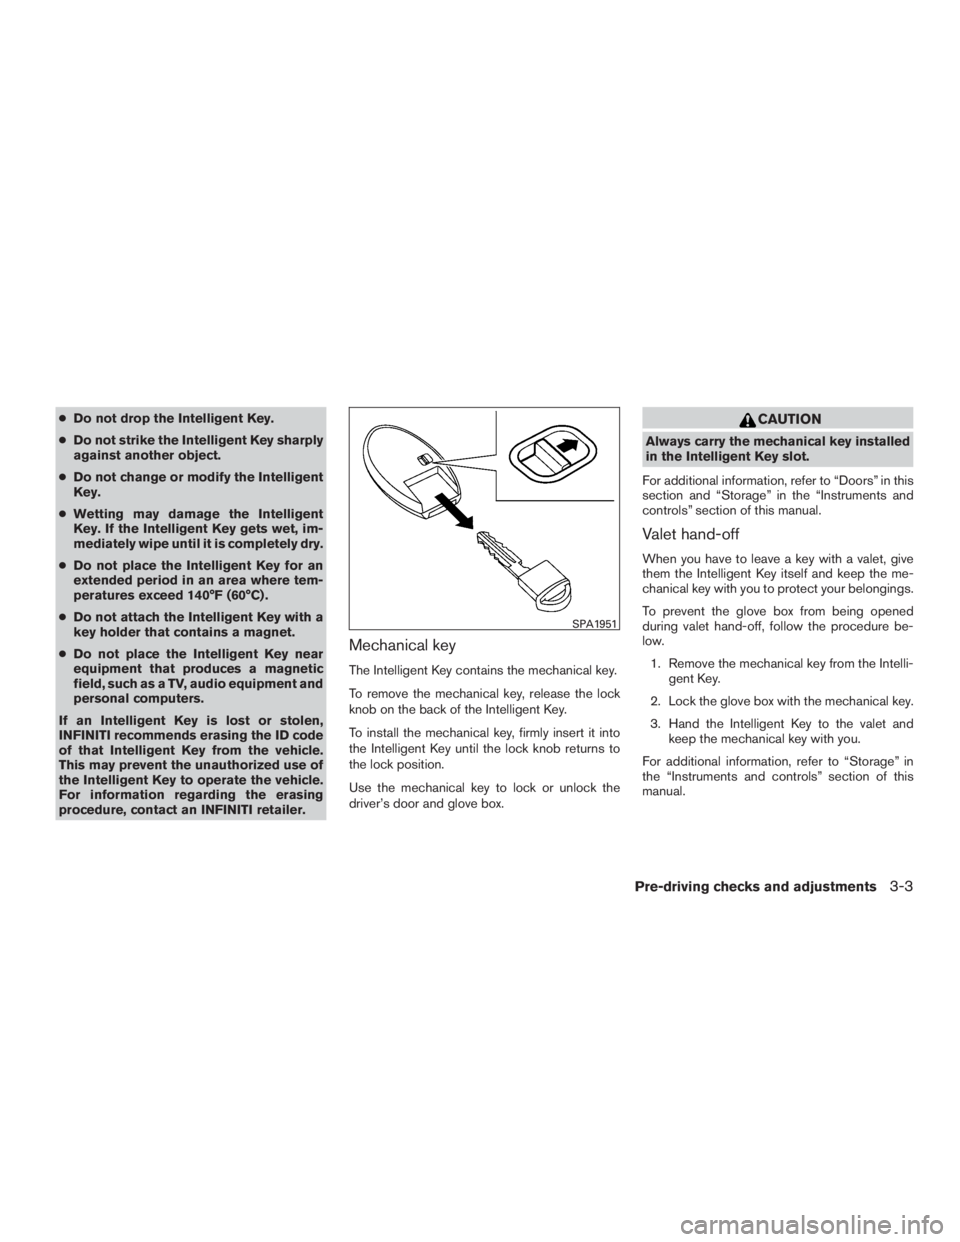
Mechanical key
The Intelligent Key contains the mechanical key.
To remove the mechanical key, release the lock
knob on the back of the Intelligent Key.
To install the mechanical key, firmly insert it into
the Intelligent Key until the lock knob returns to
the lock position.
Use the mechanical key to lock or unlock the
driver’s door and glove box.
CAUTION
Always carry the mechanical key installed
in the Intelligent Key slot.
For additional information, refer to “Doors” in this
section and “Storage” in the “Instruments and
controls” section of this manual.
Valet hand-off
When you have to leave a key with a valet, give
them the Intelligent Key itself and keep the me-
chanical key with you to protect your belongings.
To prevent the glove box from being opened
during valet hand-off, follow the procedure be-
low. 1. Remove the mechanical key from the Intelli- gent Key.
2. Lock the glove box with the mechanical key.
3. Hand the Intelligent Key to the valet and keep the mechanical key with you.
For additional information, refer to “Storage” in
the “Instruments and controls” section of this
manual.
SPA1951
Pre-driving checks and adjustments3-3
Page 177 of 577
In such cases, correct the operating conditions
before using the Intelligent Key function or use
the mechanical key.
Although the life of the battery varies depending
on the operating conditions, the battery’s life is
approximately 2 years. If the battery is dis-
charged, replace it with a new one.
When the Intelligent Key battery is low, an indi-
cator illuminates in the Vehicle Information Dis-
play. For additional information, refer to “Vehicle
Information Display” in the “Instruments and con-
trols” section of this manual.
Since the Intelligent Key is continuously receiving
radio waves, if the key is left near equipment
which transmits strong radio waves, such as sig-
nals from a TV and personal computer, the bat-
tery life may become shorter.
For information regarding replacement of a bat-
tery, refer to “Battery replacement” in the “Main-
tenance and do-it-yourself” section of this
manual.
As many as four Intelligent Keys can be regis-
tered and used with one vehicle. For information
about the purchase and use of additional Intelli-
gent Keys, contact an INFINITI retailer.CAUTION
Listed below are conditions or occur-
rences which will damage the Intelligent
Key:
●Do not allow the Intelligent Key, which
contains electrical components, to
come into contact with water or salt
water. This could affect the system
function.
● Do not drop the Intelligent Key.
● Do not strike the Intelligent Key sharply
against another object.
● Do not change or modify the Intelligent
Key.
● Wetting may damage the Intelligent
Key. If the Intelligent Key gets wet, im-
mediately wipe until it is completely dry.
● Do not place the Intelligent Key for an
extended period in an area where tem-
peratures exceed 140°F (60°C) .
● Do not attach the Intelligent Key with a
key holder that contains a magnet.
● Do not place the Intelligent Key near
equipment that produces a magnetic
field, such as a TV, audio equipment and
personal computers. If an Intelligent Key is lost or stolen, INFINITI
recommends erasing the ID code of that Intelli-
gent Key from the vehicle. This may prevent the
unauthorized use of the Intelligent Key to operate
the vehicle. For information regarding the erasing
procedure, contact an INFINITI retailer.
3-8Pre-driving checks and adjustments