climate settings INFINITI QX60 HYBRID 2015 Quick Reference Guide
[x] Cancel search | Manufacturer: INFINITI, Model Year: 2015, Model line: QX60 HYBRID, Model: INFINITI QX60 HYBRID 2015Pages: 36, PDF Size: 1.83 MB
Page 11 of 36
9
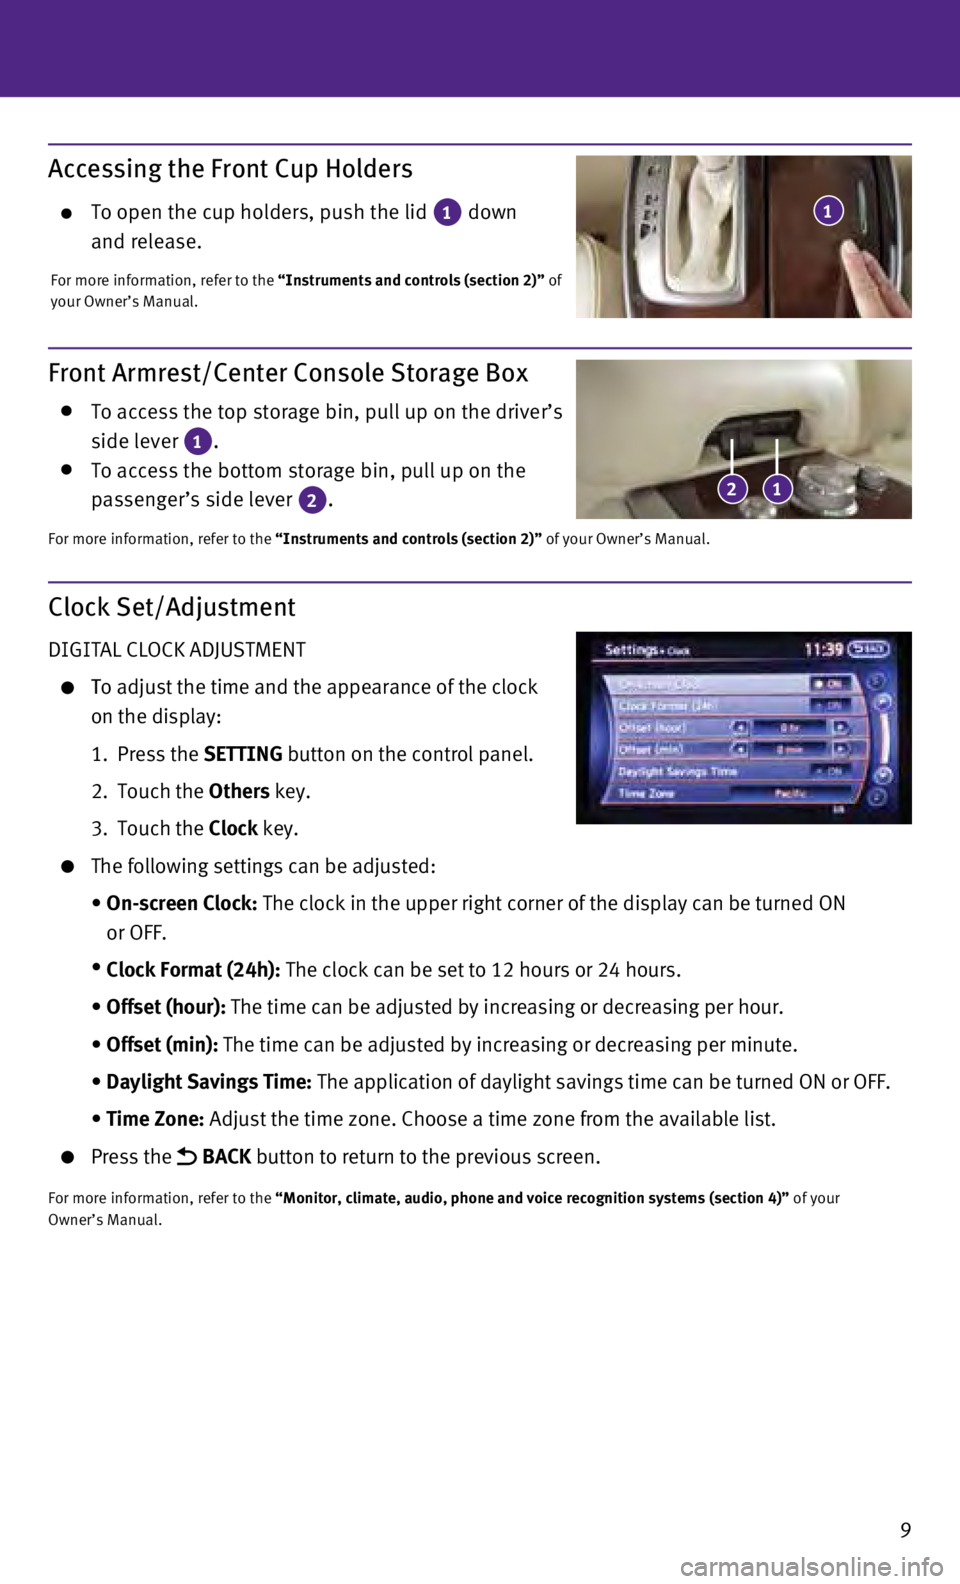
Accessing the Front Cup Holders
To open the cup holders, push the lid 1 down
and release.
For more information, refer to the “Instruments and controls (section 2)” of
your Owner’s Manual.
1
Front Armrest/Center Console Storage Box
To access the top storage bin, pull up on the driver’s
side lever 1. To access the bottom storage bin, pull up on the
passenger’s side lever 2.
For more information, refer to the “Instruments and controls (section 2)” of your Owner’s Manual.
12
Clock Set/Adjustment
DIGITAL CLOCK ADJUSTMENT
To adjust the time and the appearance of the clock
on the display:
1.
Press the
SETTING button on the control panel.
2.
Touch the
Others key.
3.
Touch the
Clock key.
The following settings can be adjusted:
•
On-screen Clock:
The clock in the upper right corner of the display can be turned ON
or OFF.
•
Clock Format (24h):
The clock can be set to 12 hours or 24 hours.
•
Offset (hour):
The time can be adjusted by increasing or decreasing per hour.
•
Offset (min):
The time can be adjusted by increasing or decreasing per minute.
•
Daylight Savings Time:
The application of daylight savings time can be turned ON or OFF.
•
Time Zone:
Adjust the time zone. Choose a time zone from the available list.
Press the BACK button to return to the previous screen.
For more information, refer to the “Monitor, climate, audio, phone and voice recognition systems (secti\
on 4)” of your
Owner’s Manual.
Page 12 of 36
10
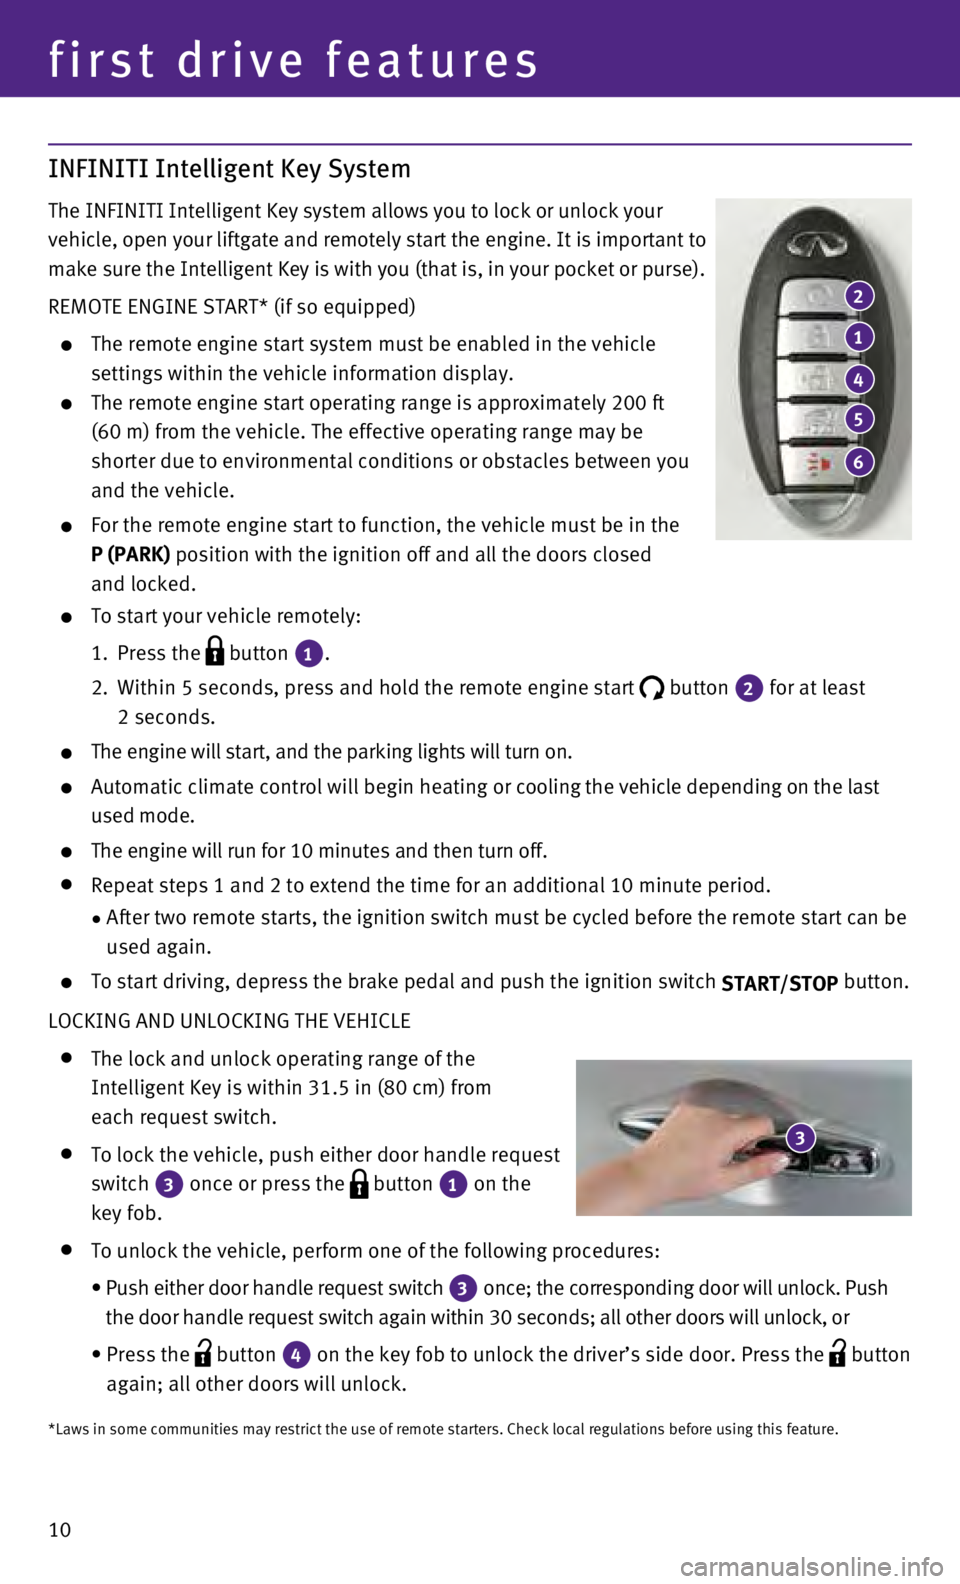
INFINITI Intelligent Key System
The INFINITI Intelligent Key system allows you to lock or unlock your
vehicle, open your liftgate and remotely start the engine. It is importa\
nt to
make sure the Intelligent Key is with you (that is, in your pocket or p\
urse).
REMOTE ENGINE START* (if so equipped)
The remote engine start system must be enabled in the vehicle
settings within the vehicle information display.
The remote engine start operating range is approximately 200 ft
(60 m) from the vehicle. The effective operating range may be
shorter due to environmental conditions or obstacles between you
and the vehicle.
For the remote engine start to function, the vehicle must be in the
P (PARK) position with the ignition off and all the doors closed
and locked.
To start your vehicle remotely:
1.
Press the button
1.
2.
Within 5 seconds, press and hold the remote engine start button
2 for at least
2 seconds.
The engine will start, and the parking lights will turn on.
Automatic climate control will begin heating or c ooling the vehicle depending on the last
used mode.
The engine will run for 10 minutes and then turn off.
Repeat steps 1 and 2 to extend the time for an additional 10 minute peri\
od.
•
After two remote starts, the ignition switch must be cycled before the r\
emote start can be
used again.
To start driving, depress the brake pedal and push the ignition switch START/STOP button.
LOCKING AND UNLOCKING THE VEHICLE
The lock and unlock operating range of the
Intelligent Key is within 31.5 in (80 cm) from
each request switch.
To lock the vehicle, push either door handle request
switch
3 once or press the
button
1 on the
key fob.
To unlock the vehicle, perform one of the following procedures:
•
Push either door handle request switch 3 once; the corresponding door will unlock. Push
the door handle request switch again within 30 seconds; all other doors will unlock, or
•
Press the button
4 on the key fob to unlock the driver’s side door. Press the
button
again; all other doors will unlock.
first drive features
2
1
4
5
6
3
*Laws in some communities may restrict the use of remote starters. Check\
local regulations before using this feature.
Page 19 of 36
17
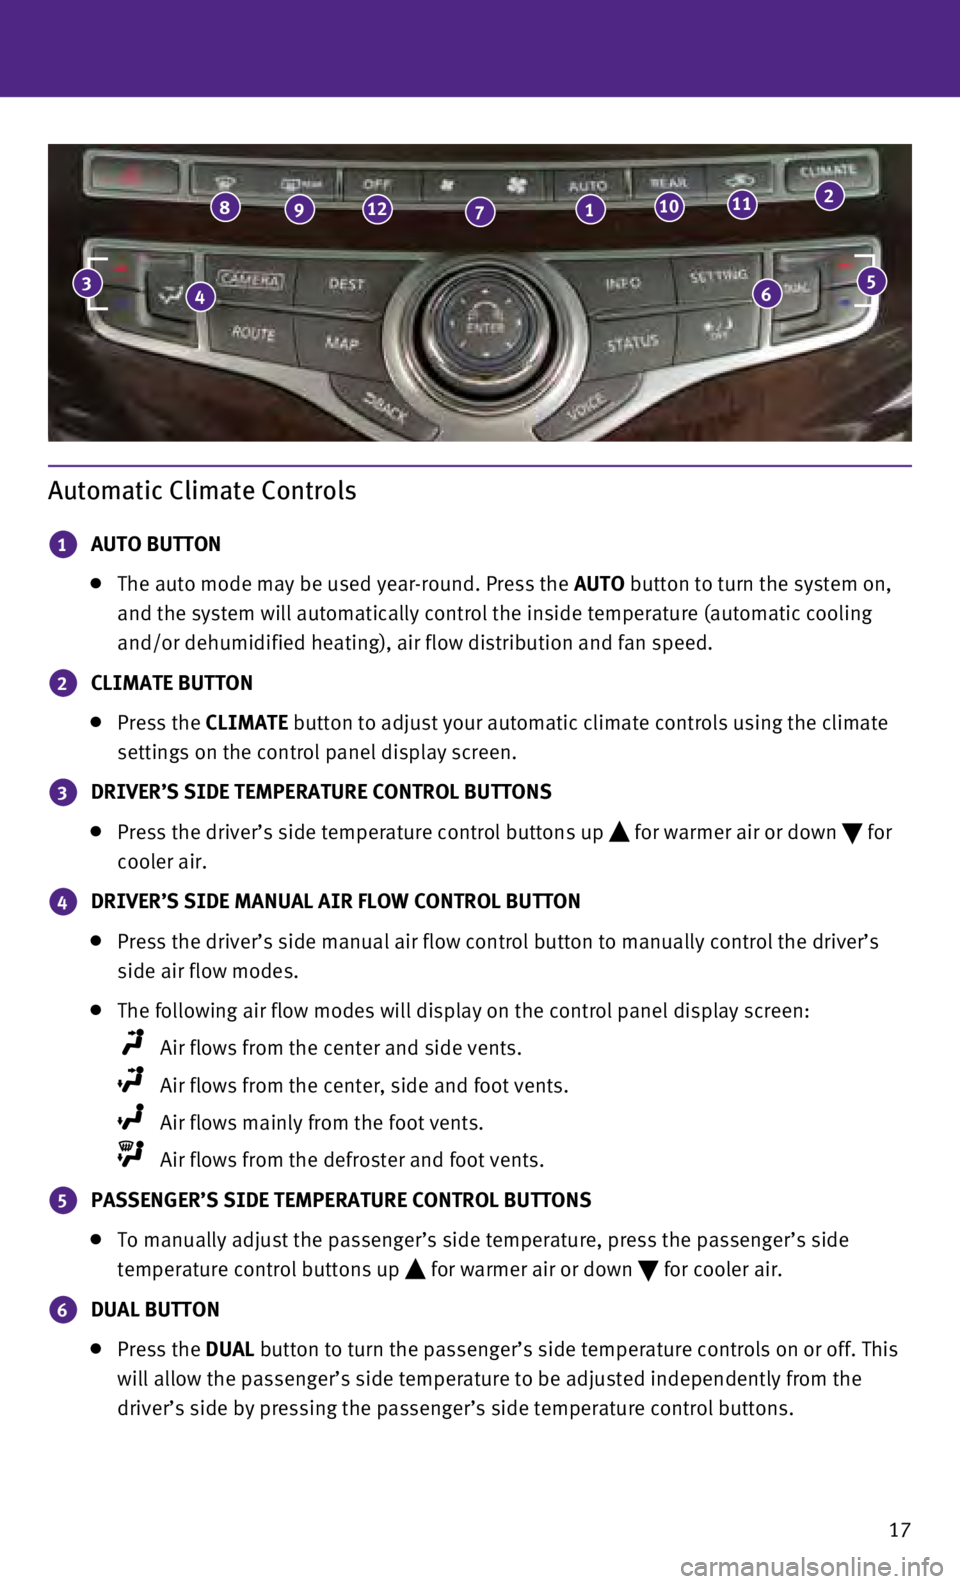
Automatic Climate Controls
1 AUTO BUTTON
The auto mode may be used year-round. Press the AUTO button to turn the system on,
and the system will automatically control the inside temperature (autom\
atic cooling
and/or dehumidified heating), air flow distribution and fan speed.
2 CLIMATE BUTTON
Press the CLIMATE button to adjust your automatic climate controls using the climate
settings on the control panel display screen.
3 DRIVER’S SIDE TEMPERATURE CONTROL BUTTONS
Press the driver’s side temperature control buttons up for warmer air or down
for
cooler air.
4 DRIVER’S SIDE MANUAL AIR FLOW CONTROL BUTTON
P ress the driver’s side manual air flow control button to manually con\
trol the driver’s
side air flow modes.
The following air flow modes will display on the control panel display s\
cree n:
Air flows from the center and side vents.
Air flows from the center, side and foot vents.
Air flows mainly from the foot vents.
Air flows from the defroster and foot vents.
5 PASSENGER’S SIDE TEMPERATURE CONTROL BUTTONS
To manually adjust the passenger’s side temperature, press the passen\
ger ’s side
temperature control buttons up
for warmer air or down
for cooler air.
6 DUAL BUTTON
Press the
DUAL button to turn the passenger’s side temperature controls on or off. This
will allow the passenger’s side temperature to be adjusted independen\
tly from the
driver’s side by pressing the passenger’s side temperature control\
buttons.
46
89127110112
35
Page 20 of 36
18
first drive features
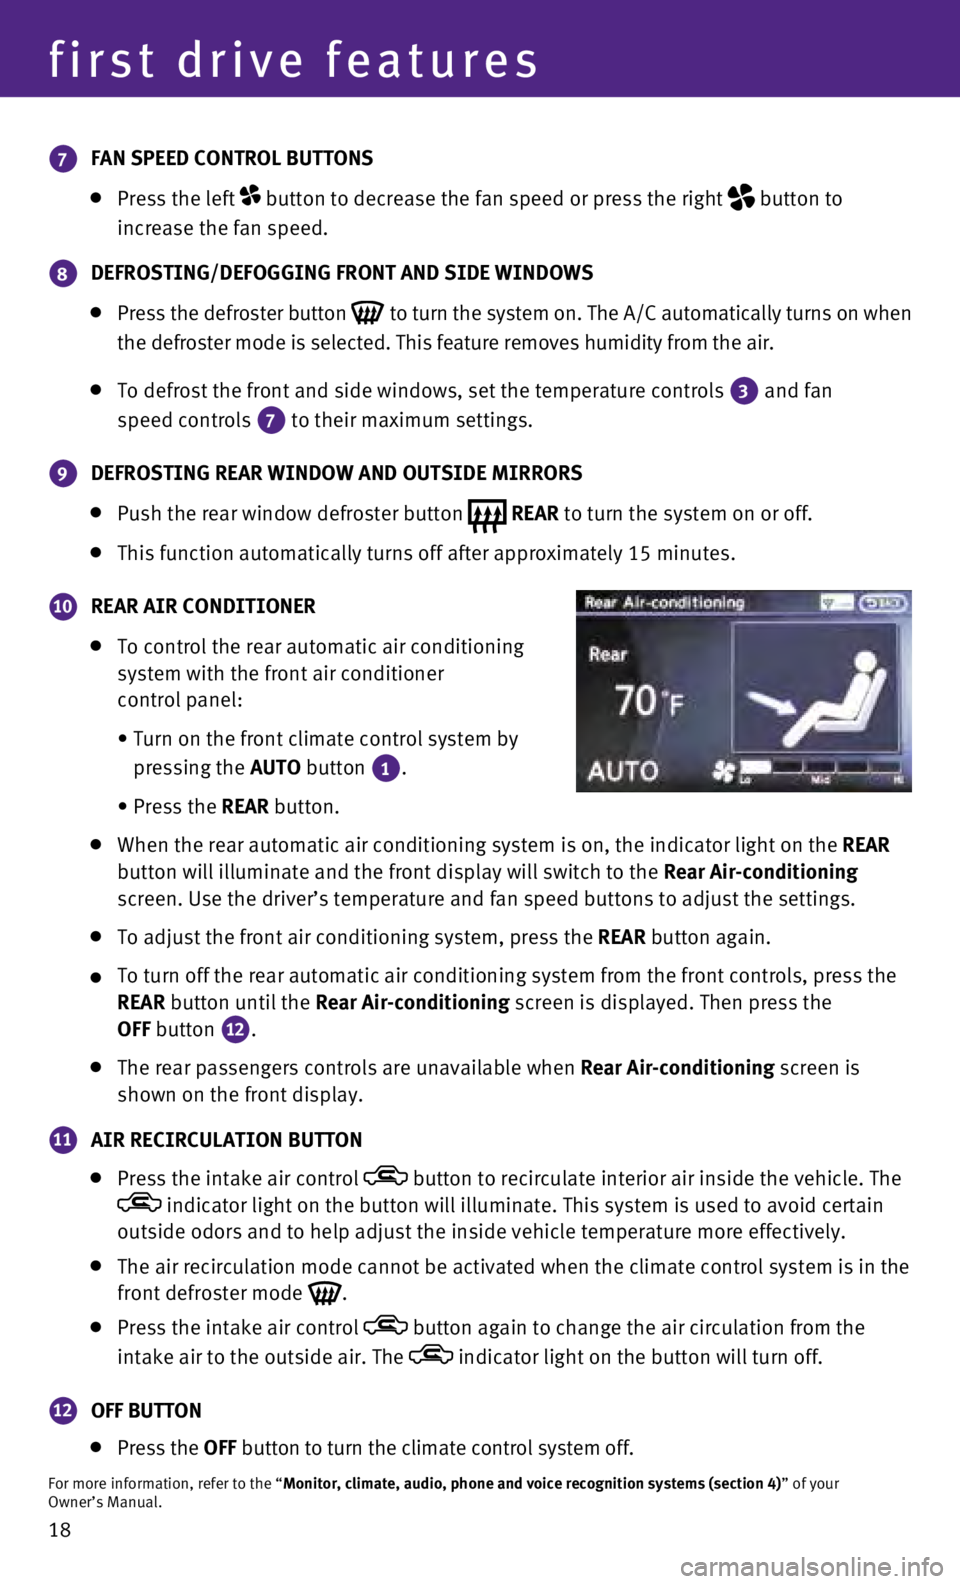
7 FAN SPEED CONTROL BUTTONS
Press the left button to decrease the fan speed or press the right
button to
increase the fan speed.
8 DEFROSTING/DEFOGGING FRONT AND SIDE WINDOWS
Press the defroster button
to turn the system on. The A/C automatically turns on when
the defroster mode is selected. This feature removes humidity from the a\
ir.
To defrost the front and side windows, set the temperature controls
3 and fan
speed controls 7 to their maximum settings.
9 DEFROSTING REAR WINDOW AND OUTSIDE MIRRORS
Push the rear window defroster button REAR to turn the system on or off. This function automatically turns off after approximately 15 minutes.
10 REAR AIR CONDITIONER
To control the rear au
tomatic air conditioning
system with the front air conditioner
control panel:
•
Turn on the front climate control system by
pressing the
AUTO button
1.
•
Press the
REAR button.
When the rear automatic air conditioning system is on, the indicator lig\
ht o n the REAR
button will illuminate and the front display will switch to the Rear Air-conditioning
screen. Use the driver’s temperature and fan speed buttons to adjust \
the settings.
To adjust the front air conditioning system, press the REAR button again.
To turn off the rear automatic air conditioning system from the front co\
ntrols, press the
REAR
button until the Rear Air-conditioning screen is displayed. Then press the
OFF button
12.
The rear passengers controls are unavailable when Rear Air-conditioning screen is
shown on the front display.
11 AIR RECIRCULATION BUTTON
Press the intake air control button to recirculate interior air inside the vehicle. The indicator light on the button will illuminate. This system is used to a\
void certain
outside odors and to help adjust the inside vehicle temperature more eff\
ectively.
The air recirculation mode cannot be activated when the climate control \
sys tem is in the
front defroster mode
.
Press the intake air control button again to change the air circulation from the
intake air to the outside air. The
indicator light on the button will turn off.
12 OFF BUTTON
Press the
OFF button to turn the climate control system off.
For more information, refer to the “Monitor, climate, audio, phone and voice recognition systems (section 4\
) ” of your
Owner’s Manual.
Page 21 of 36
19
21
356
4
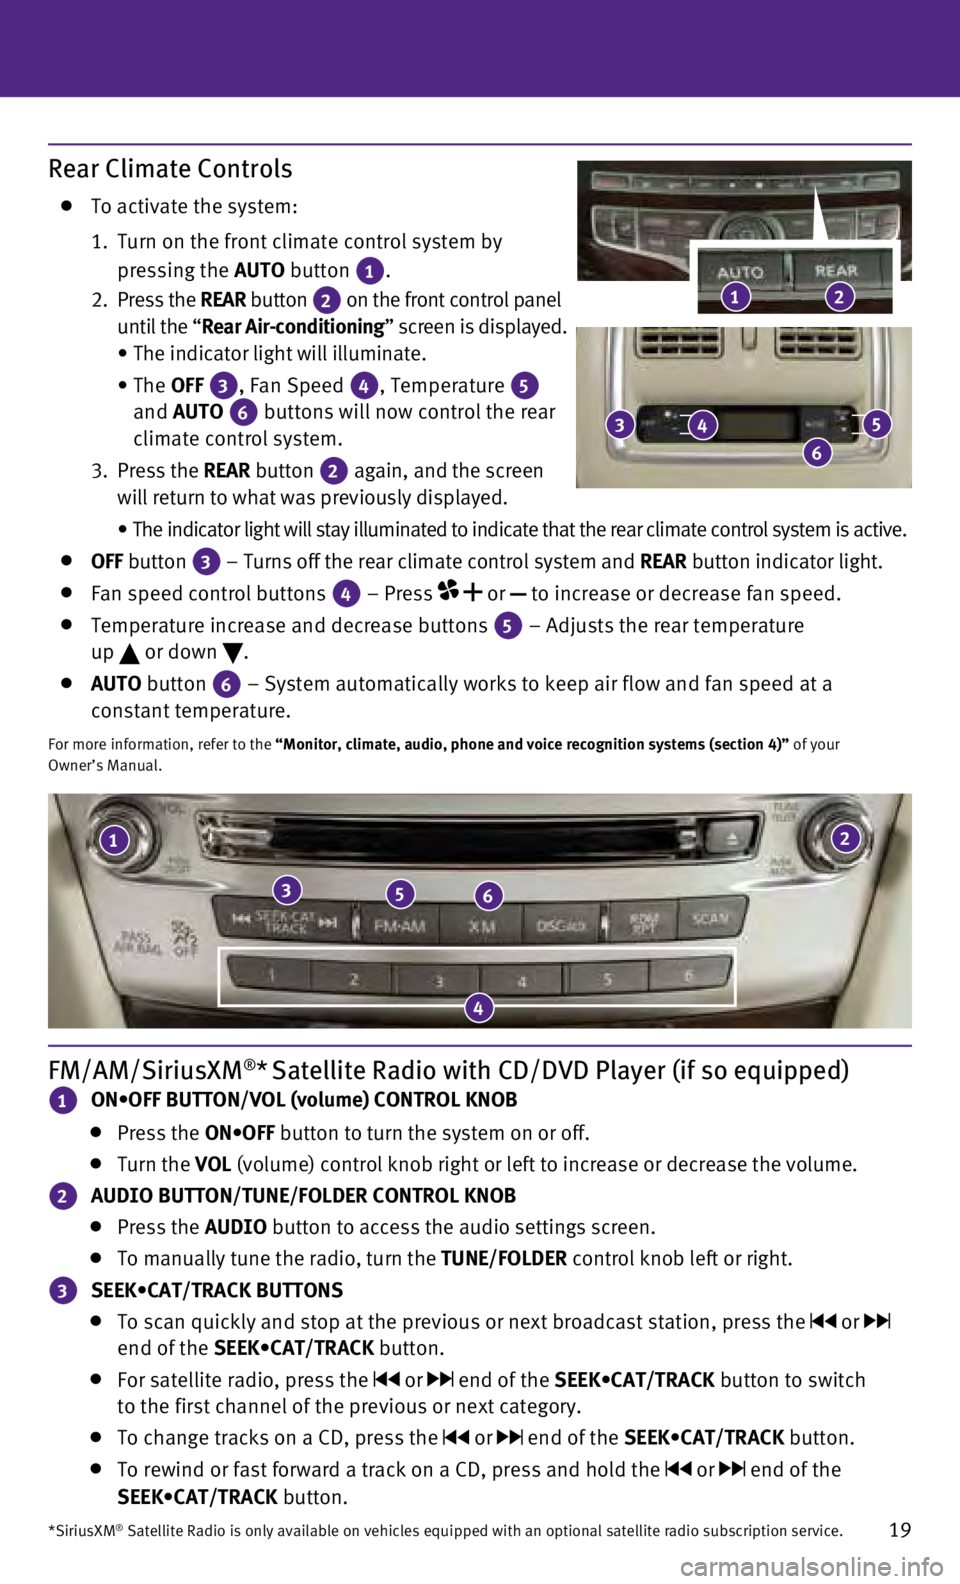
FM/AM/SiriusXM®* Satellite Radio with CD/DVD Player (if so equipped)
1 ON•OFF BUTTON/VOL (volume) CONTROL KNOB
Press the ON•OFF button to turn the system on or off.
Turn the VOL (volume) control knob right or left to increase or decrease the volume\
.
2 AUDIO BUTTON/TUNE/FOLDER CONTROL KNOB
Press the
AUDIO button to access the audio settings screen.
To manually tune the radio, turn the TUNE/FOLDER control knob left or right.
3 SEEK•CAT/TRACK BUTTONS
To scan quickly and stop at the previous or next broadcast station, pres\
s the or
end of the SEEK•CAT/TRACK button.
For satellite radio, press the or end of the SEEK•CAT/TRACK button to switch
to the first channel of the previous or next category.
To change tracks on a CD, press the or end of the SEEK•CAT/TRACK button.
To rewind or fast forward a track on a CD, press and hold the or end of the
SEEK•CAT/TRACK button.
*SiriusXM® Satellite Radio is only available on vehicles equipped with an optional\
satellite radio subscription service.
Rear Climate Controls
To activate the system:
1.
Turn on the front climate control system by
pressing the AUTO button
1.
2
.
Press the REAR button
2 on the front control panel
until the “Rear Air-conditioning” screen is displayed.
•
The indicator light will illuminate.
•
The OFF
3, Fan Speed 4, Temperature 5
and AUTO
6 buttons will now control the rear
climate control system.
3.
Press the REAR button
2 again, and the screen
will return to what was previously displayed.
•
The indicator light will stay illuminated to indicate that the rear clim\
ate control system is active.
OFF button
3 – Turns off the rear climate control system and REAR button indicator light. Fan speed control buttons
4 – Press
or
to increase or decrease fan speed.
Temperature increase and decrease buttons 5 – Adjusts the rear temperature
up or down
.
AUTO button
6 – System automatically works to keep air flow and fan speed at a
constant temperature.
For more information, refer to the “Monitor, climate, audio, phone and voice recognition systems (secti\
on 4)” of your
Owner’s Manual.
2
3
6
45
1
Page 32 of 36
30
system guide
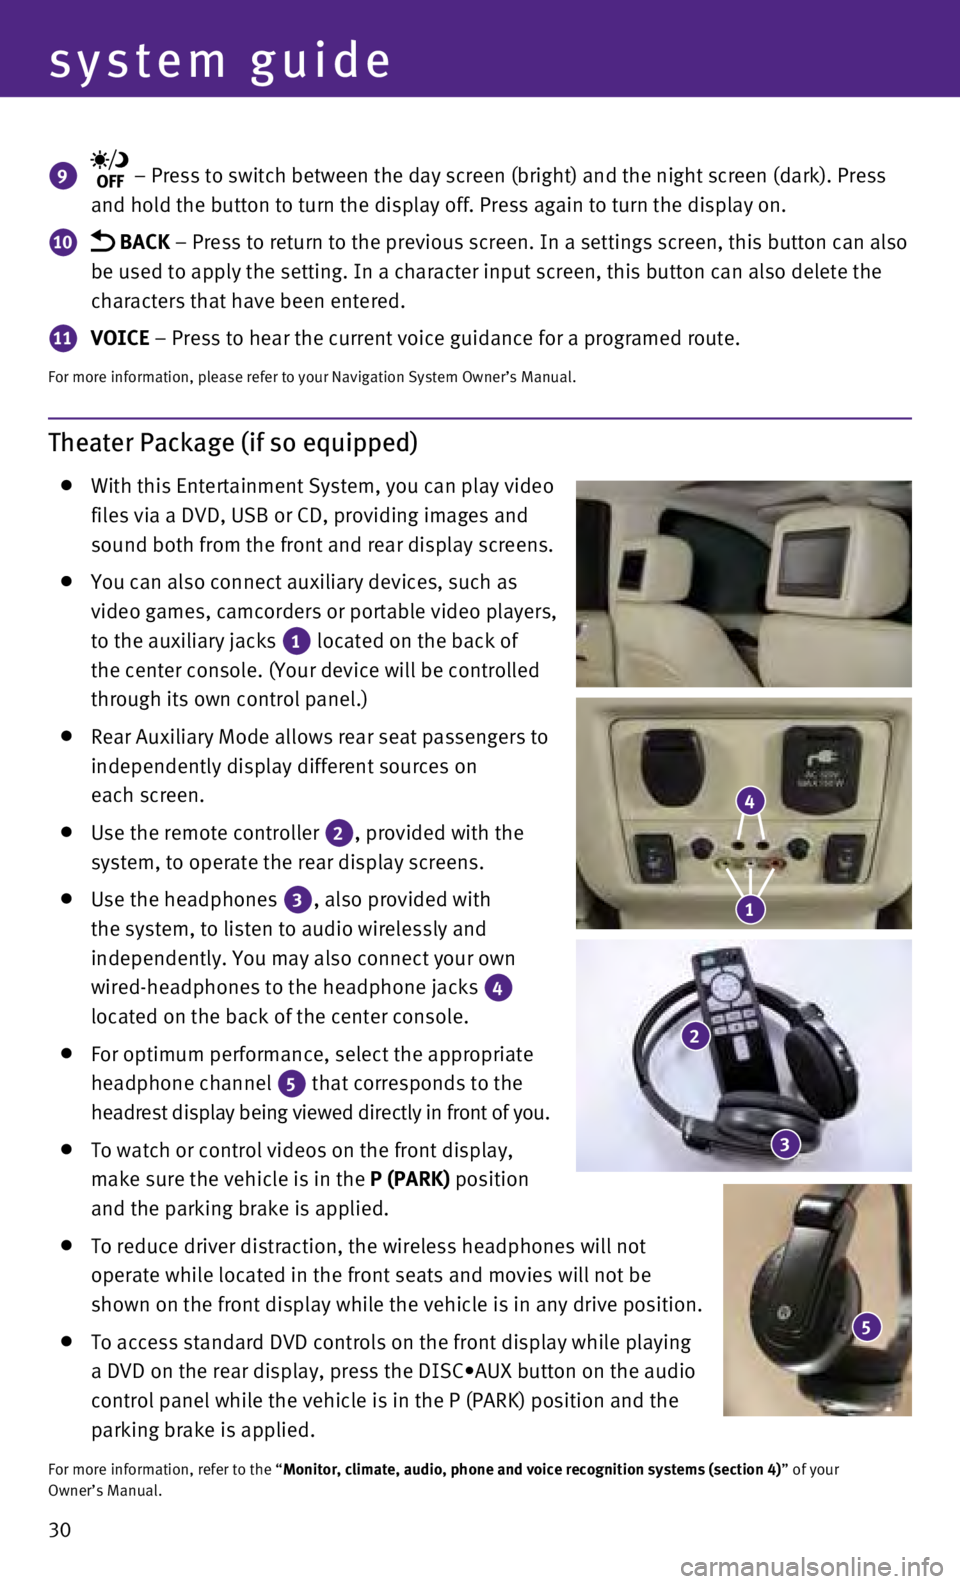
Theater Package (if so equipped)
With this Entertainment System, you can play video
files via a DVD, USB or CD, providing images and
sound both from the front and rear display screens.
You can also connect auxiliary devices, such as
video games, camcorders or portable video players,
to the auxiliary jacks
1 located on the back of
the center console. (Your device will be controlled
through its own control panel.)
Rear Auxiliary Mode allows rear seat passengers to
independently display different sources on
each screen.
Use the remote controller 2, provided with the
system, to operate the rear display screens.
Use the headphones 3, also provided with
the system, to listen to audio wirelessly and
independently. You may also connect your own
wired-headphones to the headphone jacks
4
located on the back of the center console.
For optimum performance, select the appropriate
headphone channel
5 that corresponds to the
headrest display being viewed directly in front of you.
To watch or control videos on the front display,
make sure the vehicle is in the
P (PARK) position
and the parking brake is applied.
To reduce driver distraction, the wireless headphones will not
operate while located in the front seats and movies will not be
shown on the front display while the vehicle is in any drive position.
To access standard DVD controls on the front display while playing
a DVD on the rear display, press the DISC•AUX button on the audio
control panel while the vehicle is in the P (PARK) position and the
parking brake is applied.
For more information, refer to the “Monitor, climate, audio, phone and voice recognition systems (section 4\
) ” of your
Owner’s Manual.
9 – Press to switch between the day screen (bright) and the night sc\
reen (dark). Press
and hold the button to turn the display off. Press again to turn the dis\
play on.
10 BACK – Press to return to the previous screen. In a settings screen, this\
button can also
be used to apply the setting. In a character input screen, this button c\
an also delete the
characters that have been entered.
11 VOICE – Press to hear the current voice guidance for a programed route.
For more information, please refer to your Navigation System Owner’s \
Manual.
5
4
1
2
3