instrument panel INFINITI QX60 HYBRID 2015 Quick Reference Guide
[x] Cancel search | Manufacturer: INFINITI, Model Year: 2015, Model line: QX60 HYBRID, Model: INFINITI QX60 HYBRID 2015Pages: 36, PDF Size: 1.83 MB
Page 2 of 36
23
24
26
25
292827
15
22
*See your Owner’s Manual for information.
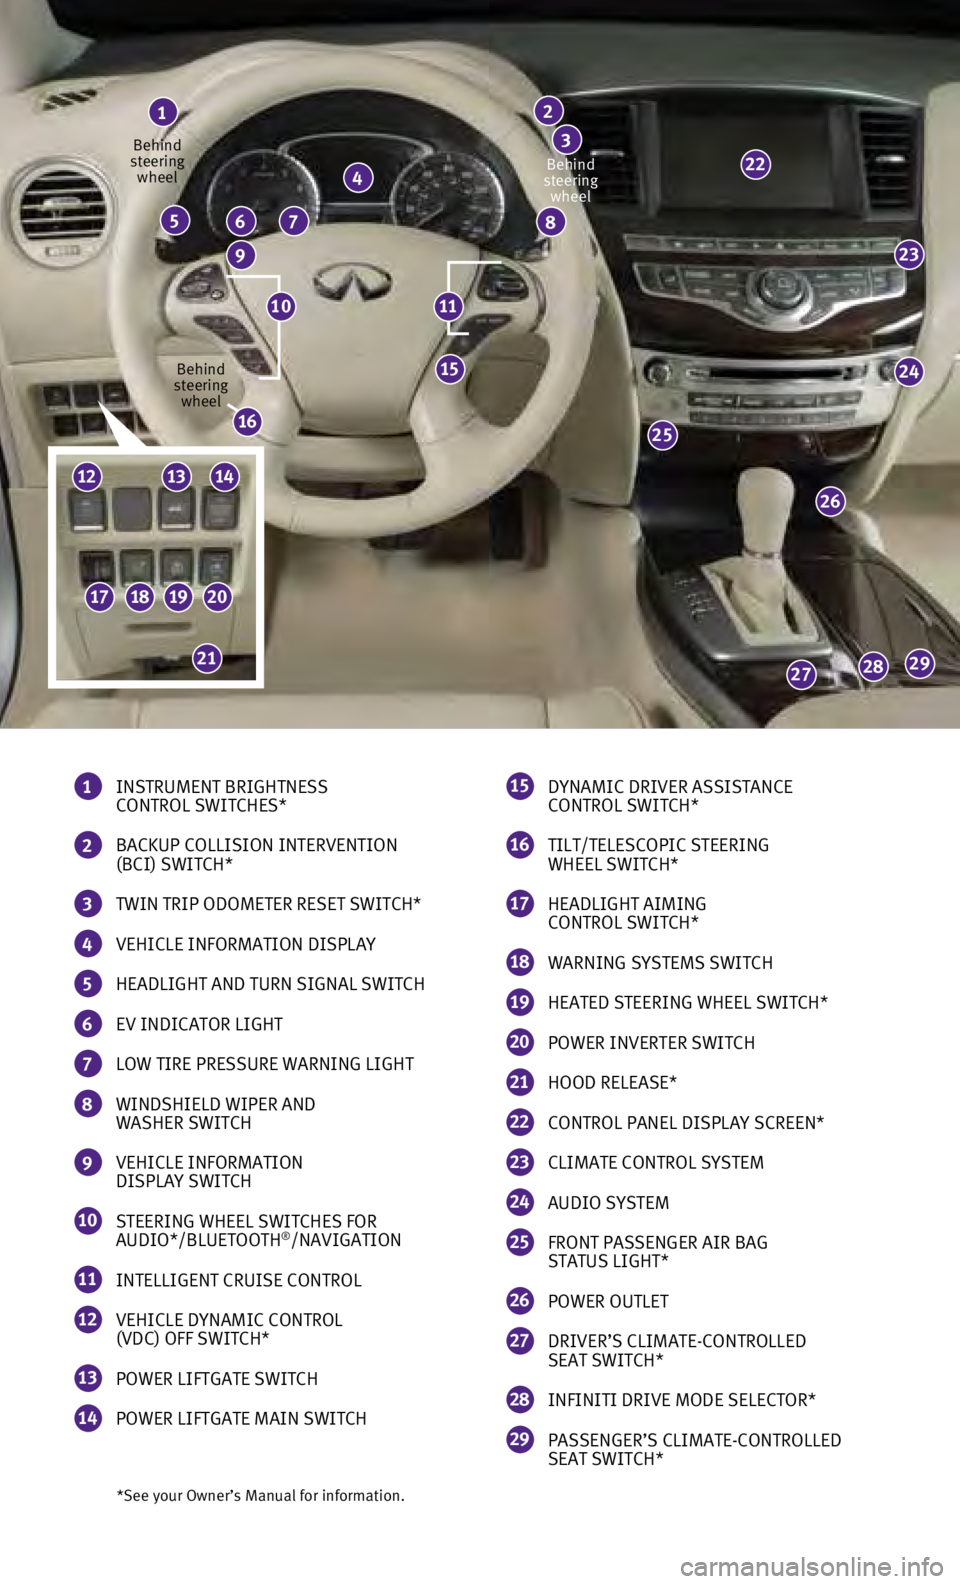
1 INSTRUMENT BRIGHTNESS
CONTROL SWITCHES*
2 BACKUP COLLISION INTERVENTION
(BCI) SWITCH*
3 TWIN TRIP ODOMETER RESET SWITCH*
4 VEHICLE INFORMATION DISPLAY
5 HEADLIGHT AND TURN SIGNAL SWITCH
6 EV INDICATOR LIGHT
7 LOW TIRE PRESSURE WARNING LIGHT
8 WINDSHIELD WIPER AND
WASHER SWITCH
9 VEHICLE INFORMATION
DISPLAY SWITCH
10 STEERING WHEEL SWITCHES FOR
AUDIO*/BLUETOOTH®/NAVIGATION
11 INTELLIGENT CRUISE CONTROL
12 VEHICLE DYNAMIC CONTROL
(VDC) OFF SWITCH*
13 POWER LIFTGATE SWITCH
14 POWER LIFTGATE MAIN SWITCH
1
4
765
9
8
2
3
15 DYNAMIC DRIVER ASSISTANCE
CONTROL SWITCH*
16 TILT/TELESCOPIC STEERING
WHEEL SWITCH*
17 HEADLIGHT AIMING
CONTROL SWITCH*
18 WARNING SYSTEMS SWITCH
19 HEATED STEERING WHEEL SWITCH*
20 POWER INVERTER SWITCH
21 HOOD RELEASE*
22 CONTROL PANEL DISPLAY SCREEN*
23 CLIMATE CONTROL SYSTEM
24 AUDIO SYSTEM
25 FRONT PASSENGER AIR BAG
STATUS LIGHT*
26 POWER OUTLET
27 DRIVER’S CLIMATE-CONTROLLED
SEAT SWITCH*
28 INFINITI DRIVE MODE SELECTOR*
29 PASSENGER’S CLIMATE-CONTROLLED
SEAT SWITCH*
1110
Behind
steering wheel
Behind
steering wheel Behind
steering wheel
16
17181920
21
121314
Page 5 of 36
3
Scheduled Maintenance Notification – Receive scheduled maintenance no\
tifications
based on mileage data provided by your vehicle.
Maintenance Alert – Receive notification of a vehicle system malfunct\
ion that triggers
instrument panel warning lights.
Destination Assistance – Receive point-of-interest assistance via a g\
uided IVR (Interactive
Voice Response) or Response Specialist by pressing the
key on the map screen or the
INFINITI Connection web portal.
Destination Send-to-Vehicle – Find and download point-of interest inf\
ormation from
Google Maps™.
•
To access, go to the INFINITI Connection menu and select “Sync All In\
formation Feeds”.
Then go to the feeds menu page and download the desired destination info\
rmation.
Connected Search – Select “Connected Search” from the Destinati\
on menu on the
vehicle’s Navigation System to conduct a point-of-interest search wit\
hin a certain distance
of the vehicle’s location.
Drive Zone – Monitor the movement of your vehicle within a specified \
region. Set up
boundaries in the Monitoring section of the INFINITI Connection web port\
al.
Max Speed Alert – Set up a maximum speed on the INFINITI Connection w\
eb portal. You
will receive notifications if your vehicle exceeds the maximum speed set\
ting.
Mobile Information Service – Receive the latest news headlines, stock\
quotes and
sports scores by setting up preferences on the Mobile Information Servic\
e page in the
INFINITI Connection web portal.
Valet Alert – Use Valet Alert to set up a 0.2-mile radius around your\
vehicle.
•
Activate alerts by pressing the “Connect to Voice Menu” button on \
the INFINITI
Connection screen or by pressing the
key on the map screen.
•
At the prompt, say “Valet Alert” and then “Activate” or “\
Deactivate”.
For more information, refer to the “Viewing technical information (section 7)” of your Navigation System Owner’s Manual.
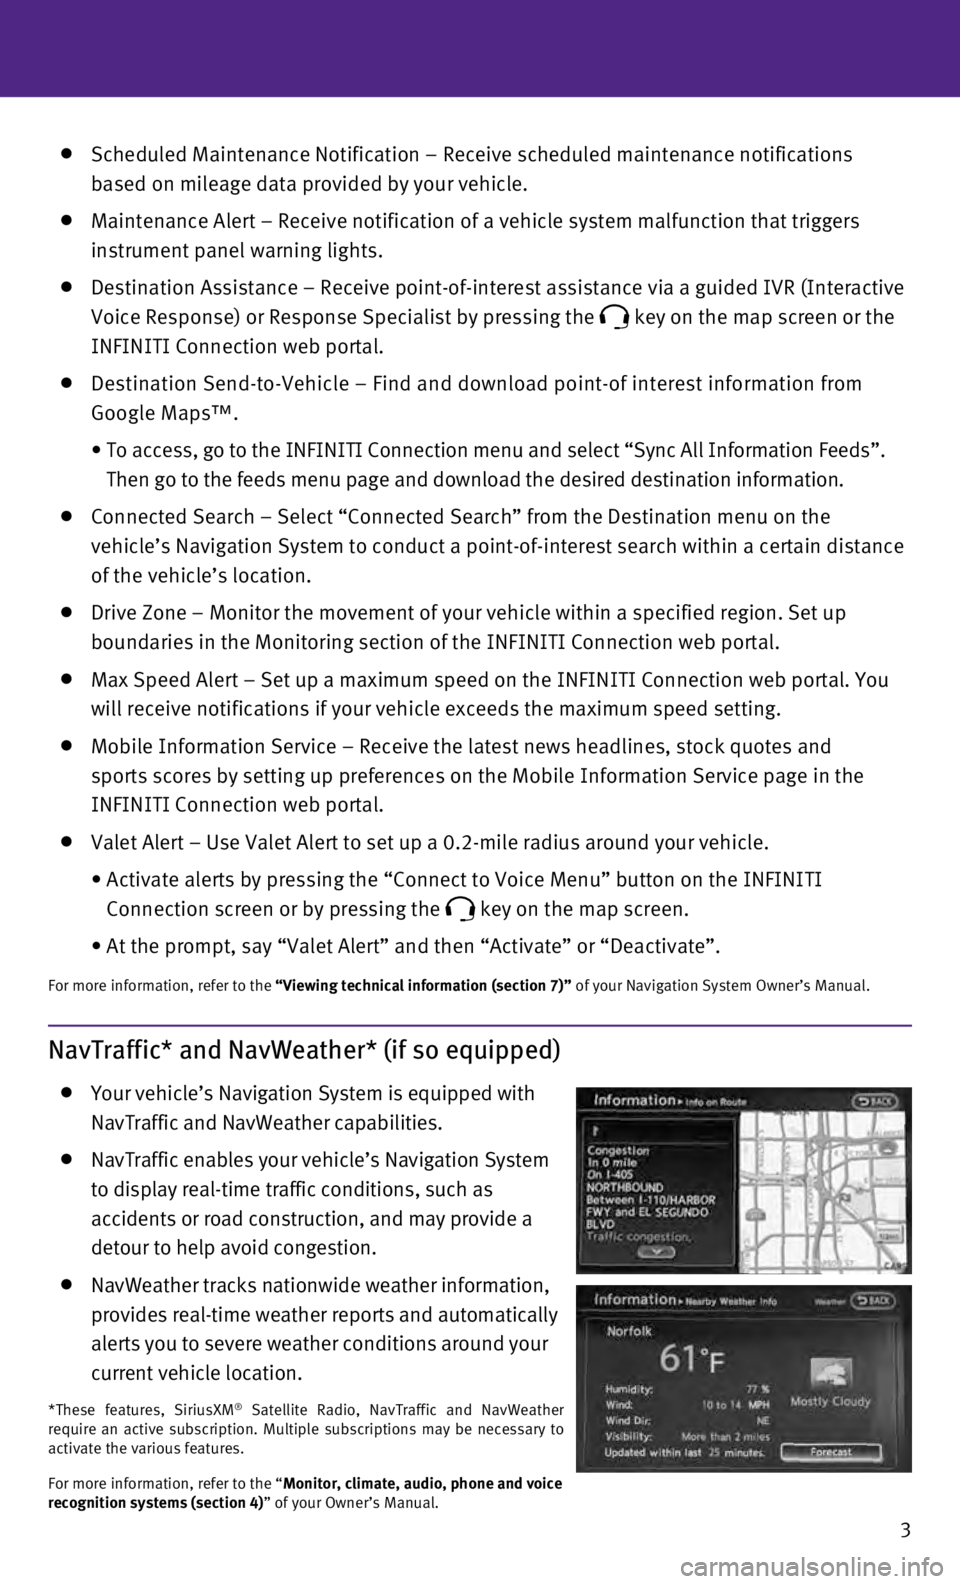
NavTraffic* and NavWeather* (if so equipped)
Your vehicle’s Navigation System is equipped with
NavTraffic and NavWeather capabilities.
NavTraffic enables your vehicle’s Navigation System
to display real-time traffic conditions, such as
accidents or road construction, and may provide a
detour to help avoid congestion.
NavWeather tracks nationwide weather information,
provides real-time weather reports and automatically
alerts you to severe weather conditions around your
current vehicle location.
*These features, SiriusXM® Satellite Radio, NavTraffic and NavWeather
require an active subscription. Multiple subscriptions may be necessary \
to
activate the various features.
For more information, refer to the “Monitor, climate, audio, phone and voice
recognition systems (section 4)” of your Owner’s Manual.
Page 11 of 36
9
Accessing the Front Cup Holders
To open the cup holders, push the lid 1 down
and release.
For more information, refer to the “Instruments and controls (section 2)” of
your Owner’s Manual.
1
Front Armrest/Center Console Storage Box
To access the top storage bin, pull up on the driver’s
side lever 1. To access the bottom storage bin, pull up on the
passenger’s side lever 2.
For more information, refer to the “Instruments and controls (section 2)” of your Owner’s Manual.
12
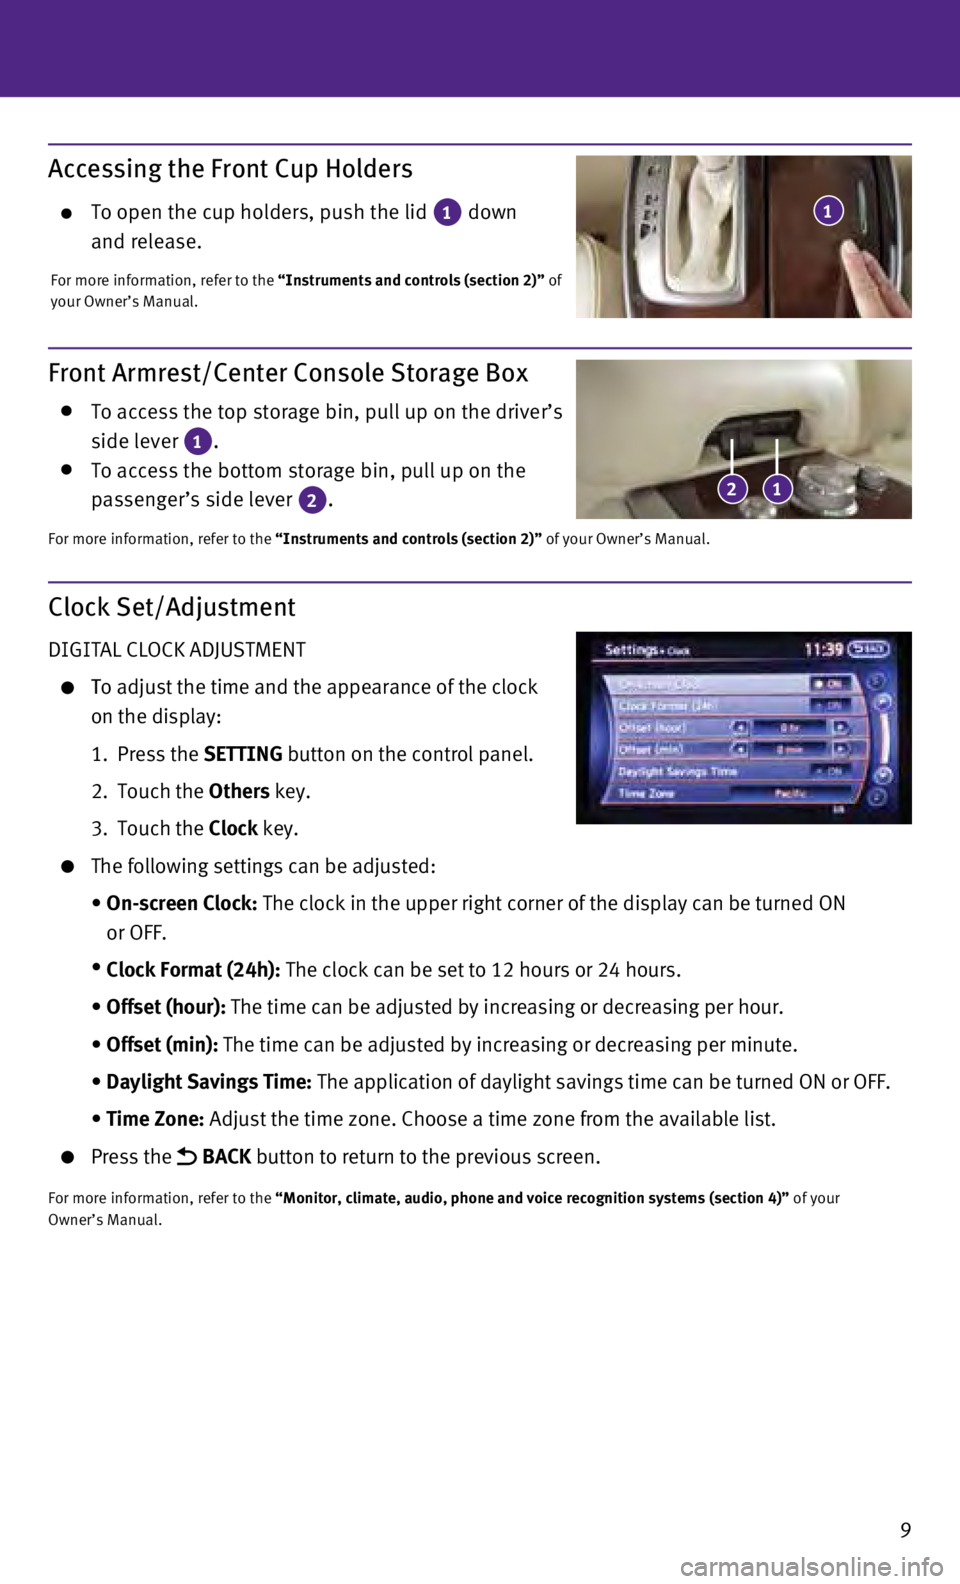
Clock Set/Adjustment
DIGITAL CLOCK ADJUSTMENT
To adjust the time and the appearance of the clock
on the display:
1.
Press the
SETTING button on the control panel.
2.
Touch the
Others key.
3.
Touch the
Clock key.
The following settings can be adjusted:
•
On-screen Clock:
The clock in the upper right corner of the display can be turned ON
or OFF.
•
Clock Format (24h):
The clock can be set to 12 hours or 24 hours.
•
Offset (hour):
The time can be adjusted by increasing or decreasing per hour.
•
Offset (min):
The time can be adjusted by increasing or decreasing per minute.
•
Daylight Savings Time:
The application of daylight savings time can be turned ON or OFF.
•
Time Zone:
Adjust the time zone. Choose a time zone from the available list.
Press the BACK button to return to the previous screen.
For more information, refer to the “Monitor, climate, audio, phone and voice recognition systems (secti\
on 4)” of your
Owner’s Manual.
Page 13 of 36
11
LIFTGATE RELEASE
To open the rear liftgate, press the
button
5 for longer than 1 second. To close the rear liftgate, press the
button
5 again for longer than 1 second.
PANIC ALARM
The Intelligent Key can also be used to activate the panic alarm by pres\
sing and holding
the
button
6 for more than 1 second. Once activated, the panic alarm and headlights
will stay on for a period of time.
INTELLIGENT KEY BATTERY DISCHARGE
If the battery of the Intelligent Key is discharged or
environmental conditions interfere with the
Intelligent Key operation, start the engine according
to the following procedure:
1.
Move the shift lever to the
P (PARK) position.
2.
Firmly apply the foot brake.
3.
Touch the ignition switch with the Intelligent Key
and a chime will sound.
4.
Within 10 seconds after the chime sounds, push the ignition switch while\
depressing
the brake pedal and the engine will start.
For more information, refer to the “Pre-driving checks and adjustments (section 3)”, the “Starting and driving (section 5)” and
the “Maintenance and do-it-yourself (section 8)” of your Owner’s Manual.
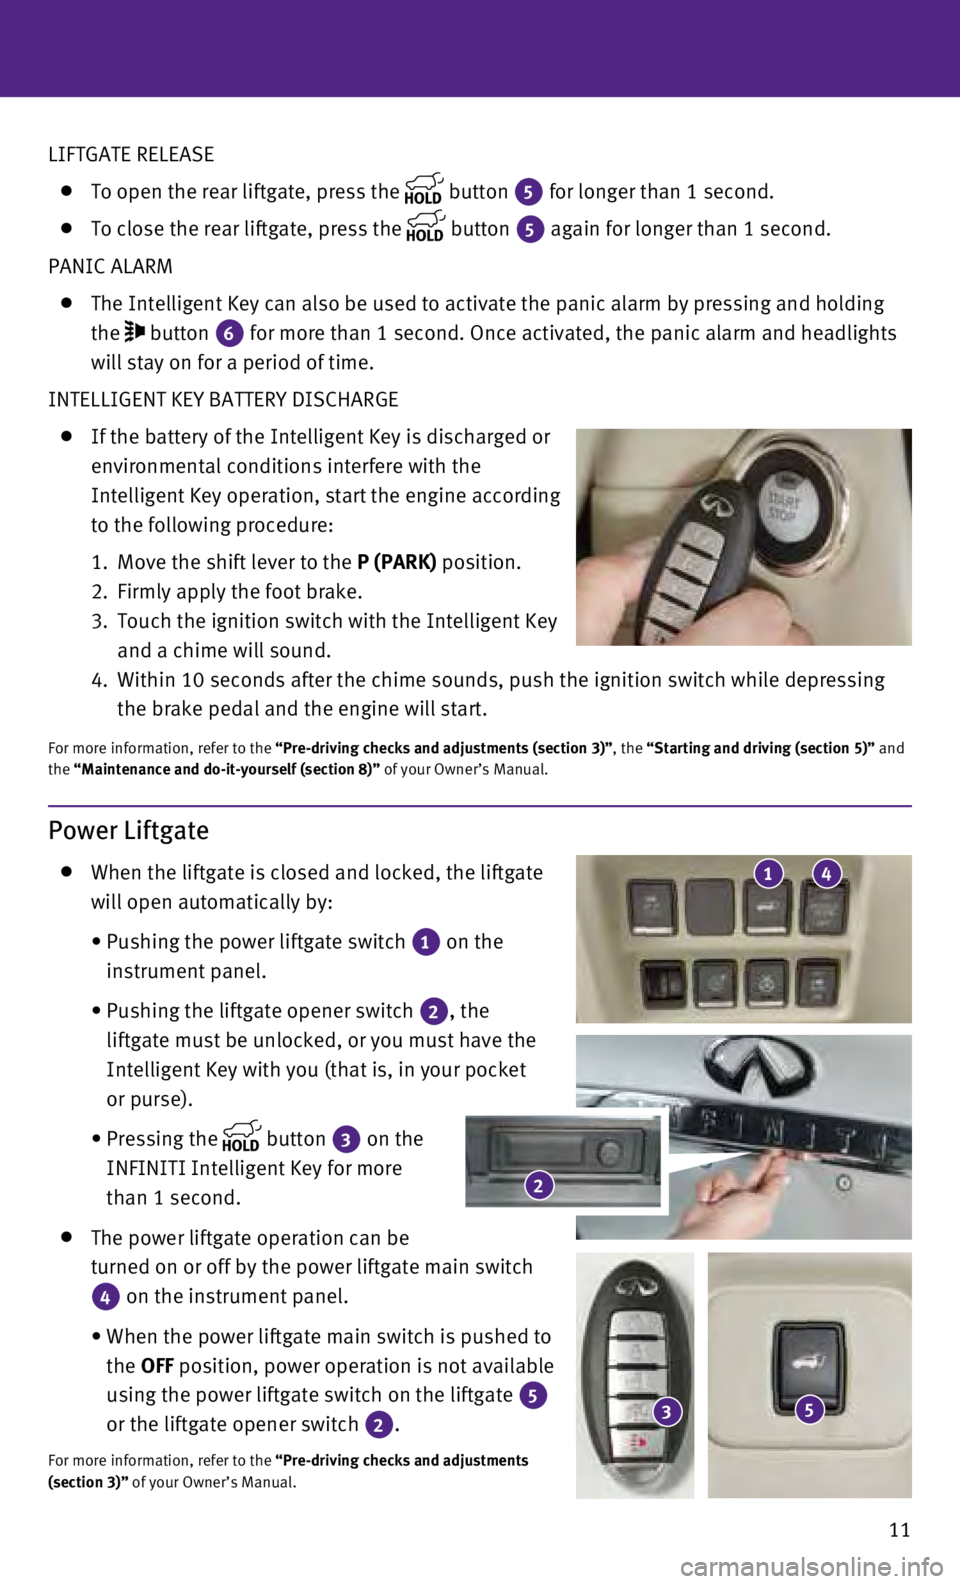
Power Liftgate
When the liftgate is closed and locked, the liftgate
will open automatically by:
•
Pushing the power liftgate switch 1 on the
instrument panel.
•
Pushing the liftgate opener switch 2, the
liftgate must be unlocked, or you must have the
Intelligent Key with you (that is, in your pocket
or purse).
•
Pressing the button
3 on the
INFINITI Intelligent Key for more
than 1 second.
The power liftgate operation can be
turned on or off by the power liftgate main switch
4 on the instrument panel.
•
When the power liftgate main switch is pushed to
the
OFF position, power operation is not available
using the power liftgate switch on the liftgate
5
or the liftgate opener switch 2.
For more information, refer to the “Pre-driving checks and adjustments
(section 3)” of your Owner’s Manual.
2
53
41
Page 17 of 36
15
Headlight Control Switch
HEADLIGHT CONTROL
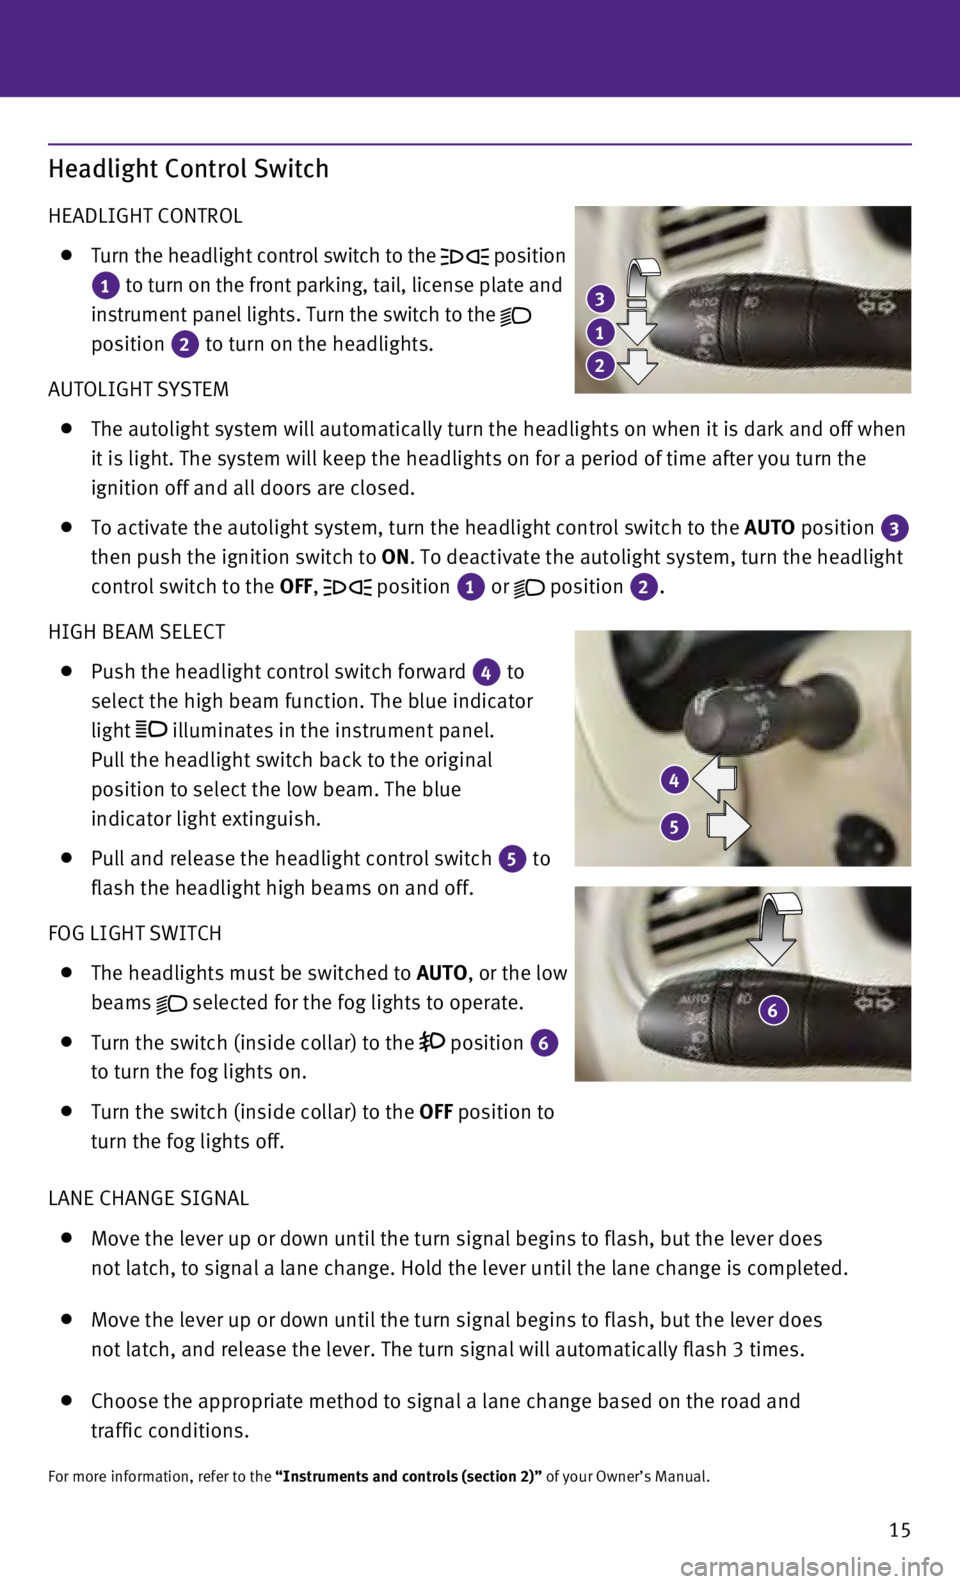
Turn the headlight control switch to the
position
1 to turn on the front parking, tail, license plate and
instrument panel lights. Turn the switch to the
position 2 to turn on the headlights.
AUTOLIGHT SYSTEM
The autolight system will automatically turn the headlights on when it i\
s da
rk and off when
it is light. The system will keep the headlights on for a period of time\
after you turn the
ignition off and all doors are closed.
To activate the autolight system, turn the headlight control switch to t\
he AUTO
position
3
then push the ignition switch to ON. To deactivate the autolight system, turn the headlight
control switch to the OFF,
position
1 or
position
2.
HIGH BEAM SELECT
Push the headlight control switch forward
4 to
select the high beam function. The blue indicator
light
illuminates in the instrument panel.
Pull the headlight switch back to the original
position to select the low beam. The blue
indicator light extinguish.
Pull and release the headlight control switch
5 to
flash the headlight high beams on and off.
FOG LIGHT SWITCH
T
he headlights must be switched to AUTO, or the low
beams
selected for the fog lights to operate.
Turn the switch (inside collar) to the
position
6
to turn the fog lights on.
Turn the switch (inside collar)
to the
OFF position to
turn the fog lights off.
LANE CHANGE SIGNAL
Move the lever up or down until the turn signal begins to flash, but the\
lever does
not latch, to signal a lane change. Hold the lever until the lane change\
is completed.
Move the lever up or down until the turn signal begins to flash, but the\
lever does
not latch, and release the lever. The turn signal will automatically fla\
sh 3 times.
Choose the appropriate method to signal a lane change based on the road \
and
traffic conditions.
For more information, refer to the “Instruments and controls (section 2)” of your Owner’s Manual.
3
4
6
1
5
2
Page 22 of 36
20
USB (Universal Serial Bus) Connection
Port/iPod® Interface
The USB port 1 is located in the center
console under the arm rest.
When a compatible USB memory device or
iPod® is plugged into the USB port, compatible audio
and video files stored on the device can be played
through the vehicle’s audio system and front display.
For more information, refer to the “Monitor, climate, audio, phone and voice recognition systems (secti\
on 4)” of your
Owner’s Manual.
first drive features
Conventional (Fixed Speed) Cruise Control
The cruise control system enables you to set a
constant cruising speed once the vehicle has
reached 25 mph (40 km/h).
The system will automatically maintain the set
speed until you tap the brake pedal, accelerate,
cancel or turn the system off.
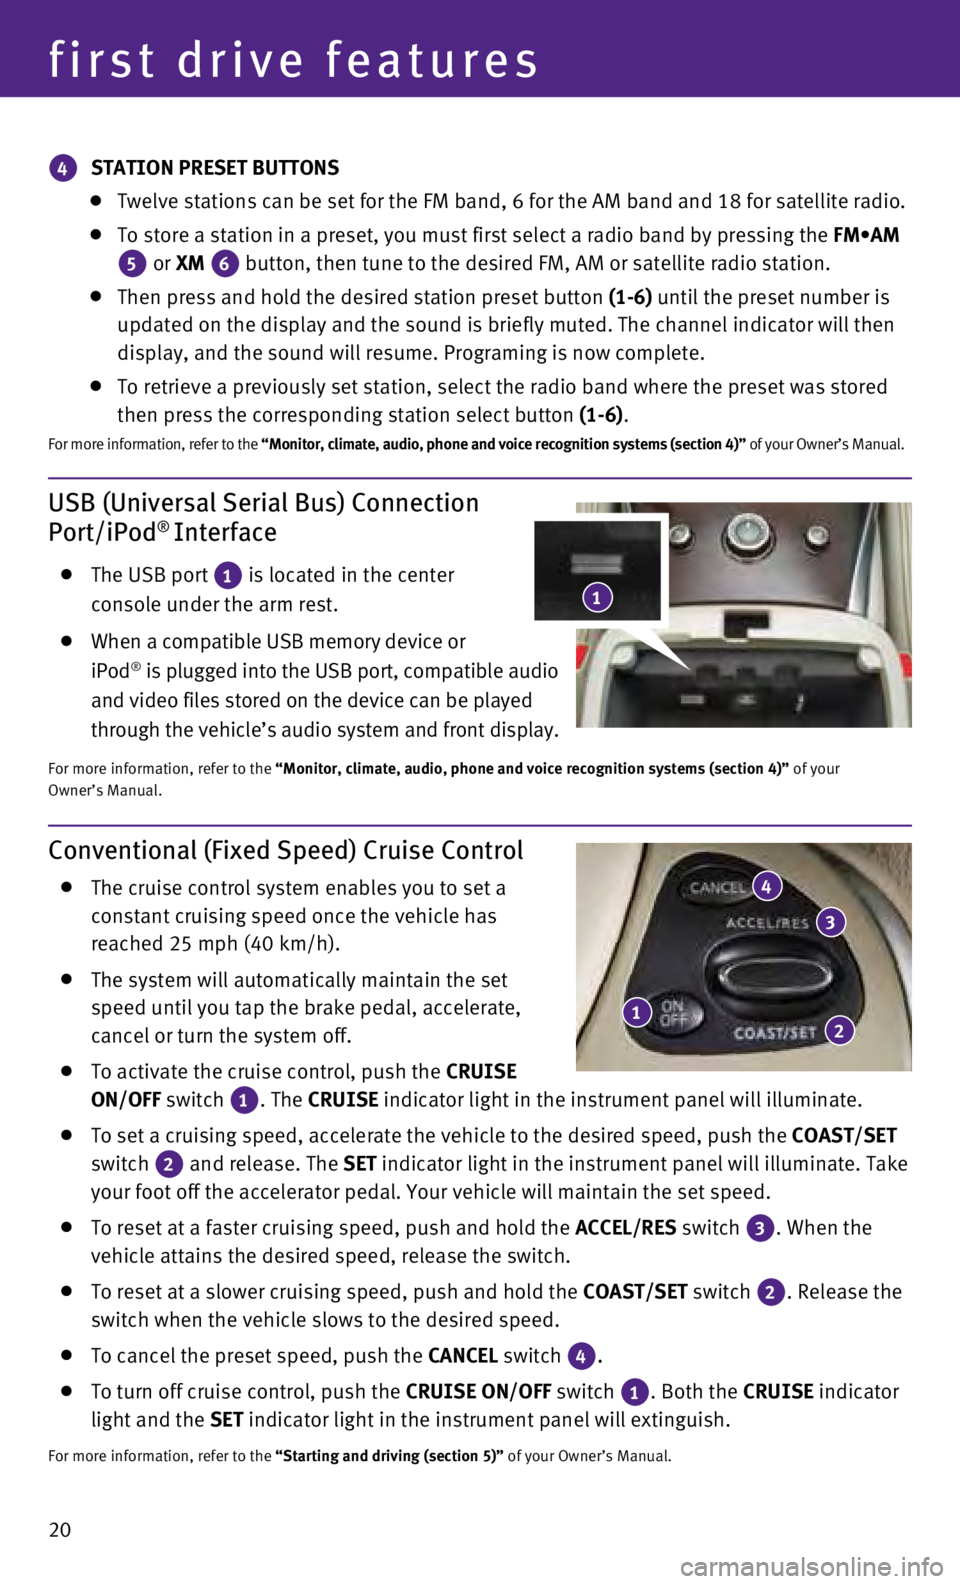
To activate the cruise control, push the CRUISE
ON/OFF switch
1. The
CRUISE
indicator light in the instrument panel will illuminate.
To set a cruising speed, accelerate the vehicle to the desired speed, pu\
sh the
COAST/SET
switch
2 and release. The
SET indicator light
in the instrument panel will illuminate. Take
your foot off the accelerator pedal. Your vehicle will maintain the set \
speed.
To reset at a faster cruising speed, push and hold the ACCEL/RES switch 3. When the
vehicle attains the desired speed, release the switch.
To reset at a slower cruising speed, push and hold the COAST/SET switch 2. Release the
switch when the vehicle slows to the desired speed.
To cancel the preset speed, push the CANCEL switch
4.
To turn off cruise control, push the CRUISE
ON/OFF switch
1. Both the
CRUISE indicator
light and the SET indicator light in the instrument panel will extinguish.
For more information, refer to the “Starting and driving (section 5)” of your Owner’s Manual.
12
3
4
4 STATION PRESET BUTTONS
Twelve stations can be set for the FM band, 6 for the AM band and 18 for\
sa
tellite radio.
To store a station in a preset, you must first select a radio band by pr\
essing the FM•AM
5 or XM
6 button, then tune to the desired FM, AM or satellite radio station. Then press and hold the desired station preset button
(1-6) until the preset number is
updated on the display and the sound is briefly muted. The channel indic\
ator will then
display, and the sound will resume. Programing is now complete.
To retrieve a previously set station, select the radio band where the pr\
eset w as stored
then press the corresponding station select button (1-6).
F or more information, refer to the “Monitor, climate, audio, phone and voice recognition systems (secti\
on 4)” of your Owner’s Manual.
1
Page 23 of 36
21
Intelligent Cruise Control (ICC) System (if so equipped)
VEHICLE-TO-VEHICLE DISTANCE CONTROL MODE
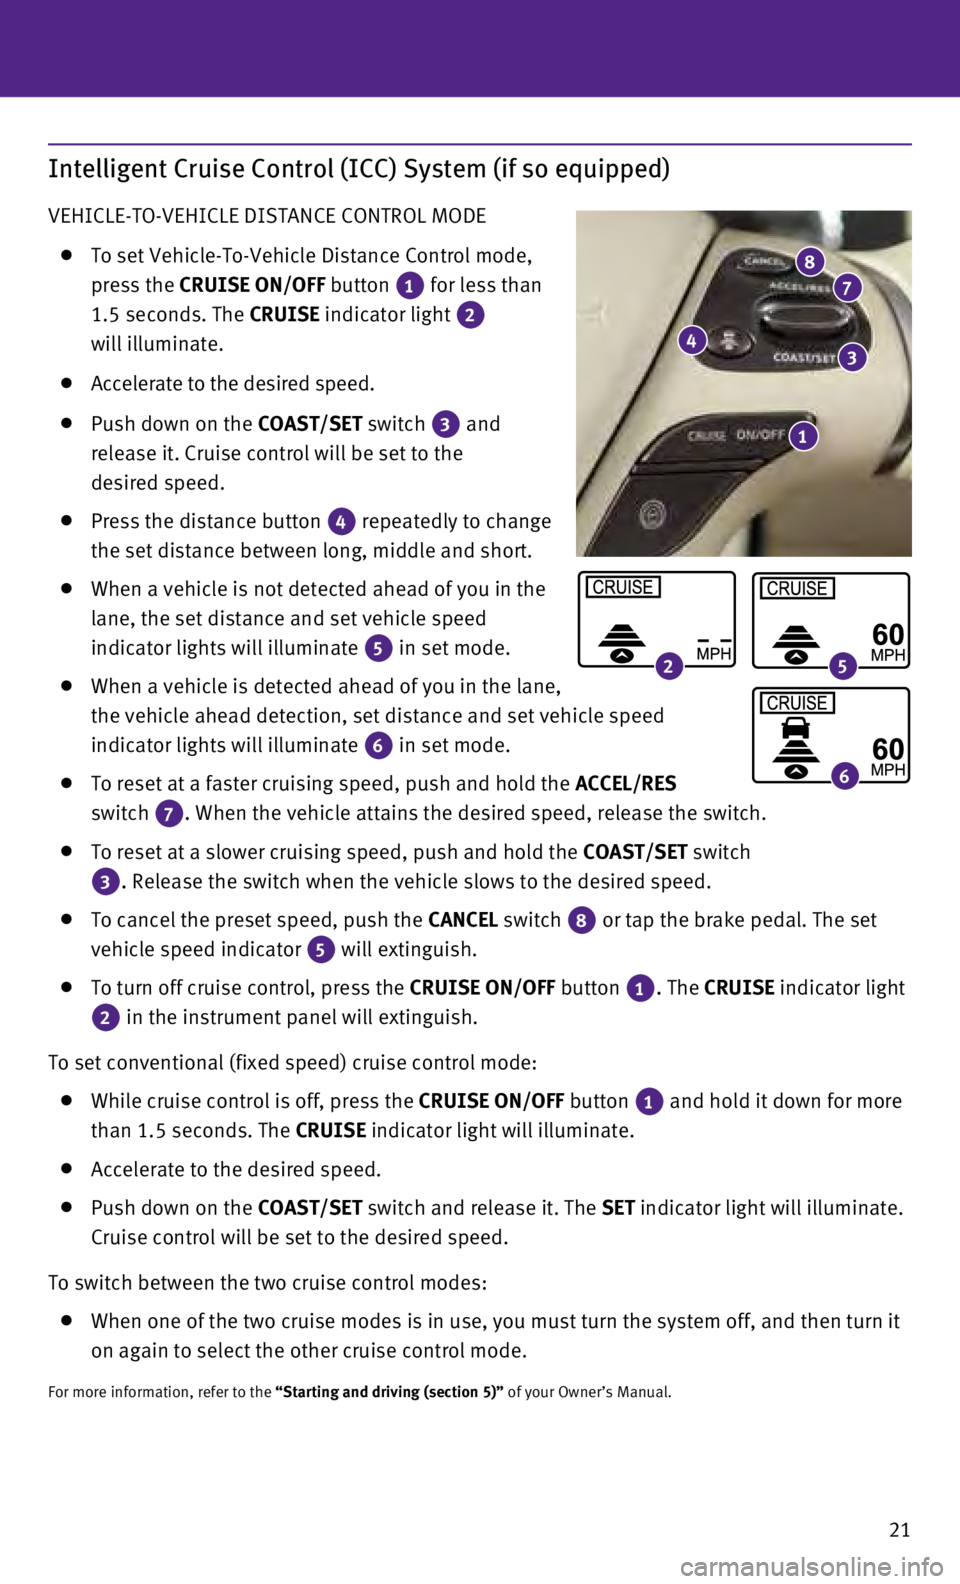
To set Vehicle-To-Vehicle Distance Control mode,
press the CRUISE ON/OFF button
1 for less than
1.5 seconds. The CRUISE indicator light 2
will illuminate.
Accelerate to the desired speed.
Push down on the COAST/SET switch
3 and
release it. Cruise control will be set to the
desired speed.
Press the distance button 4 repeatedly to change
the set distance between long, middle and short.
When a vehicle is not detected ahead of you in the
lane, the set distance and set vehicle speed
indicator lights will illuminate
5 in set mode.
When a vehicle is detected ahead of you in the lane,
the vehicle ahead detection, set distance and set vehicle speed
indicator lights will illuminate
6 in set mode.
To reset at a faster cruising speed, push and hold the
ACCEL/RES
switch
7. When the vehicle attains the desired speed, release the switch.
To reset at a slower cruising speed, push and hold the COAST/SET switch
3. Release the switch when the vehicle slows to the desired speed.
To cancel the preset speed, push the CANCEL switch
8 or tap the brake pedal. The set
vehicle speed indicator 5 will extinguish.
To turn off cruise control, press the
CRUISE ON/OFF button
1. The CRUISE indicator light
2 in the instrument panel will extinguish.
To set conventional (fixed speed) cruise control mode:
While cruise control is off, press the CRUISE ON/OFF
button 1
and hold it down for more
than 1.5 seconds. The
CRUISE indicator light will illuminate.
Accelerate to the desired speed.
Push down on the COAST/SET switch and release it. The SET indicator light will illuminate.
Cruise control will be set to the desired speed.
To switch between the two cruise control modes:
W hen one of the two cruise modes is in use, you must turn the system off,\
and then turn it
on again to select the other cruise control mode.
For more information, refer to the “Starting and driving (section 5)” of your Owner’s Manual.
1
43
78
25
6
Page 24 of 36
22
Power Outlets
12V OUTLETS
The power outlets are for powering electrical
accessories such as cellular telephones. They are
rated at 12 volt, 120W (10A) maximum.
To use a power outlet, open the cap.
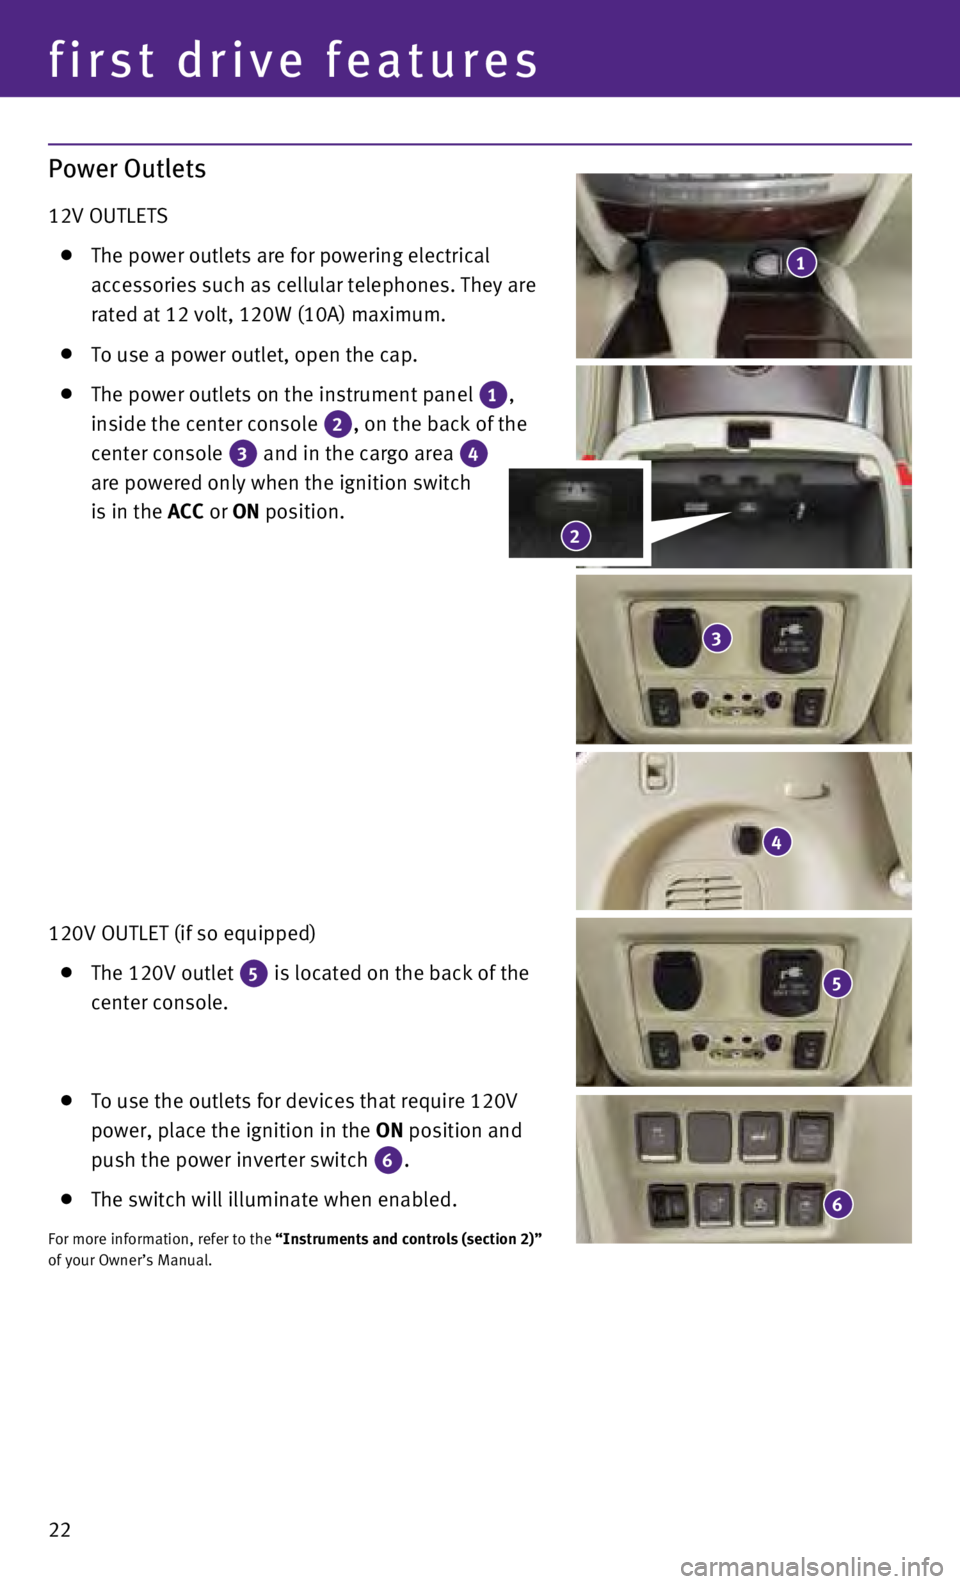
The power outlets on the instrument panel 1,
inside the center console 2, on the back of the
center console 3 and in the cargo area 4
are powered only when the ignition switch
is in the ACC or ON position.
120V OUTLET (if so equipped)
The 120V outlet 5 is located on the back of the
center console.
To use the outlets for devices that require 120V
power, place the ignition in the ON position and
push the power inverter switch
6.
The switch will illuminate when enabled.
For more information, refer to the “Instruments and controls (section 2)”
of your Owner’s Manual.
1
4
5
3
6
2
first drive features
Page 28 of 36
26
system guide
MAKING A CALL BY PHONE NUMBER
1.
Press the button.
2.
After waiting for the tone, say “Call”.
3.
After the next tone, say “Phone Number”.
4.
After the next tone, say “123-456-7890”.
You may also say the digits in groups of 3, 3 and 4, respectively. To us\
e this group
dialing method, say only the first 3 digits of the phone number instead \
of all 10 digits.
After the system recognizes the digits, it will request the next 3 digit\
s and finally the last
4 digits.
5.
After the system speaks the correct number and sounds the tone, say “\
Dial”.
RECEIVING/ENDING A CALL
To accept the call, press the button on the steering wheel.
To reject the call, press the
button.
To hang-up, press the
button.
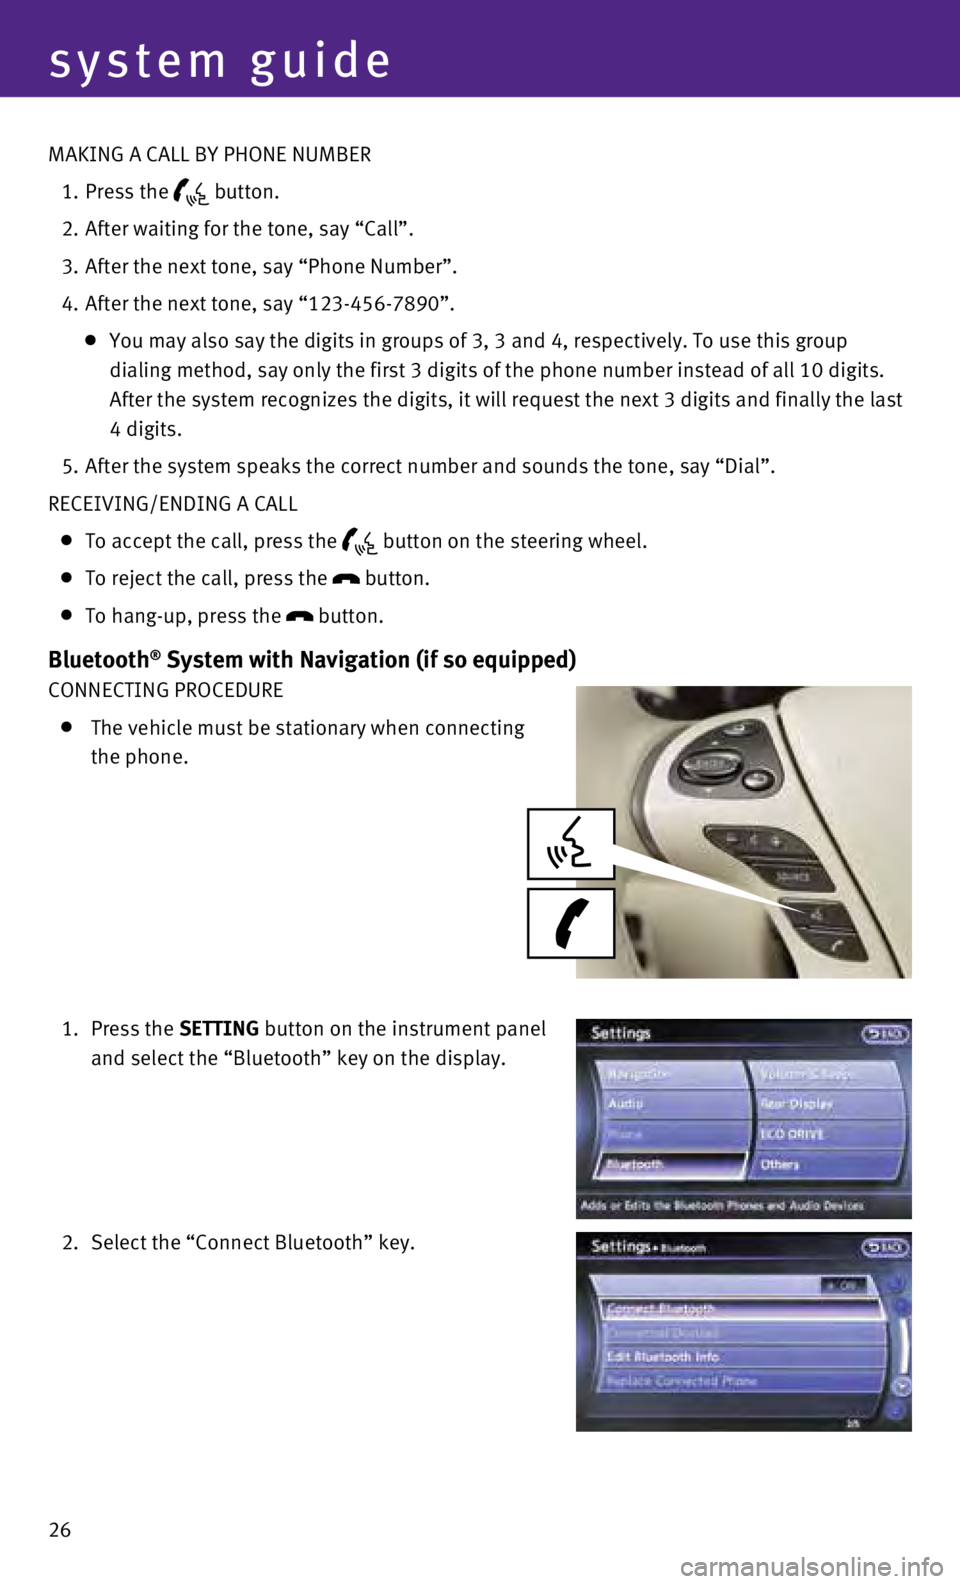
Bluetooth® System with Navigation (if so equipped)
CONNECTING PROCEDURE
The vehicle must be stationary when connecting
the phone.
1.
Press the SETTING button on the instrument panel
and select the “Bluetooth” key on the display.
2.
Select the “Connect Bluetooth” key.