reset INFINITI QX60 HYBRID 2015 Quick Reference Guide
[x] Cancel search | Manufacturer: INFINITI, Model Year: 2015, Model line: QX60 HYBRID, Model: INFINITI QX60 HYBRID 2015Pages: 36, PDF Size: 1.83 MB
Page 2 of 36
23
24
26
25
292827
15
22
*See your Owner’s Manual for information.
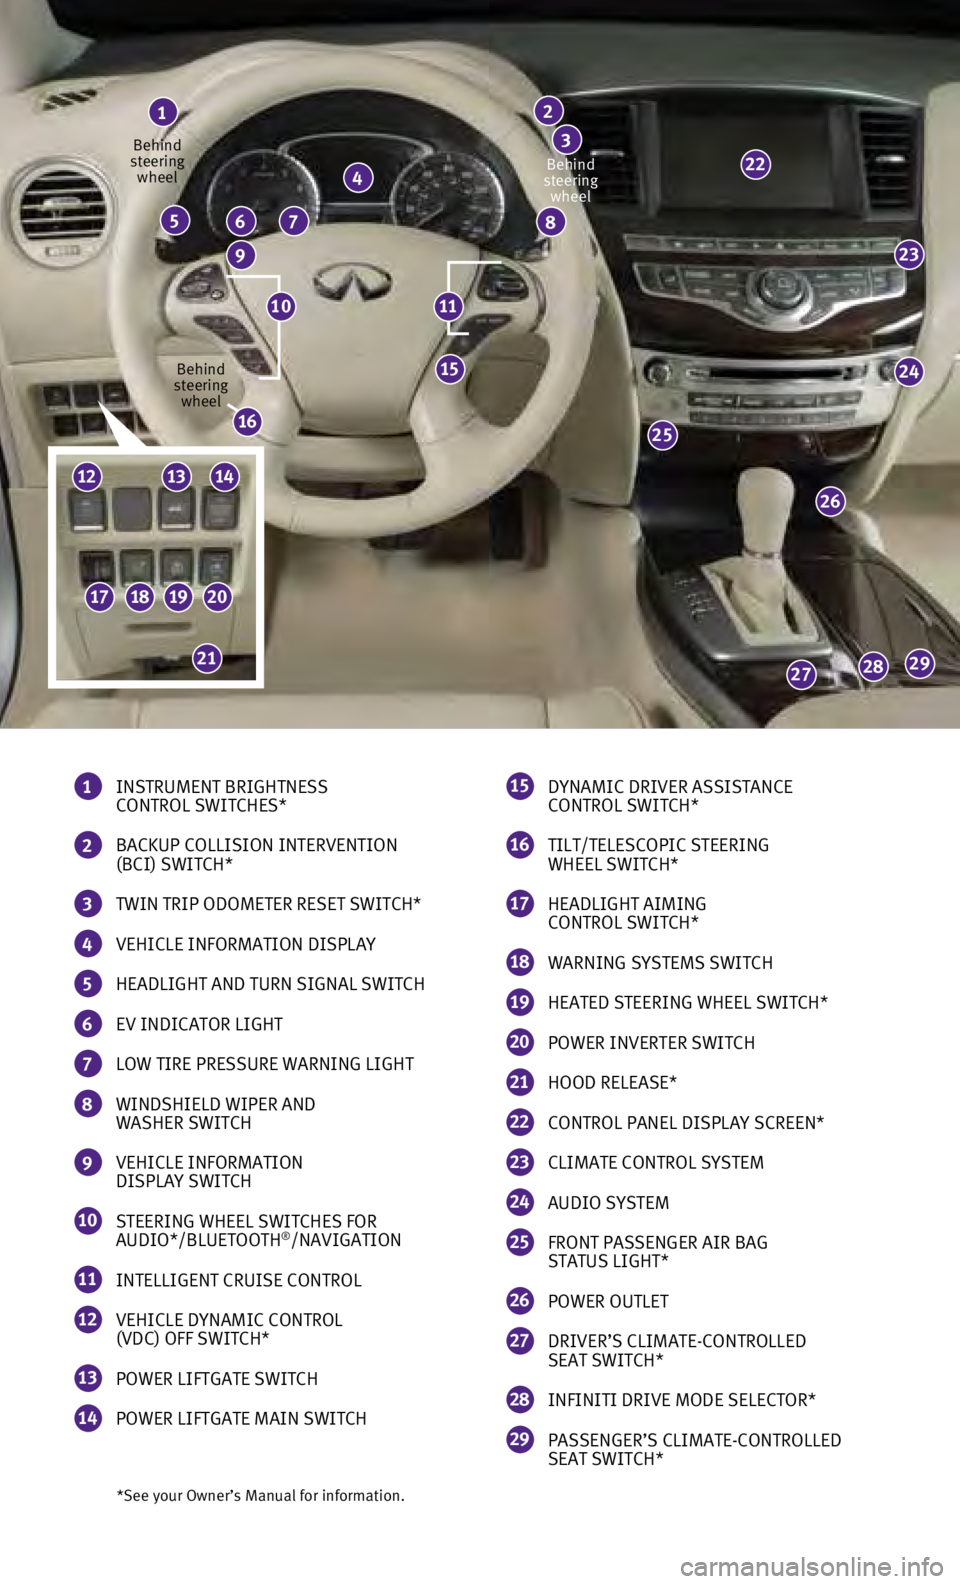
1 INSTRUMENT BRIGHTNESS
CONTROL SWITCHES*
2 BACKUP COLLISION INTERVENTION
(BCI) SWITCH*
3 TWIN TRIP ODOMETER RESET SWITCH*
4 VEHICLE INFORMATION DISPLAY
5 HEADLIGHT AND TURN SIGNAL SWITCH
6 EV INDICATOR LIGHT
7 LOW TIRE PRESSURE WARNING LIGHT
8 WINDSHIELD WIPER AND
WASHER SWITCH
9 VEHICLE INFORMATION
DISPLAY SWITCH
10 STEERING WHEEL SWITCHES FOR
AUDIO*/BLUETOOTH®/NAVIGATION
11 INTELLIGENT CRUISE CONTROL
12 VEHICLE DYNAMIC CONTROL
(VDC) OFF SWITCH*
13 POWER LIFTGATE SWITCH
14 POWER LIFTGATE MAIN SWITCH
1
4
765
9
8
2
3
15 DYNAMIC DRIVER ASSISTANCE
CONTROL SWITCH*
16 TILT/TELESCOPIC STEERING
WHEEL SWITCH*
17 HEADLIGHT AIMING
CONTROL SWITCH*
18 WARNING SYSTEMS SWITCH
19 HEATED STEERING WHEEL SWITCH*
20 POWER INVERTER SWITCH
21 HOOD RELEASE*
22 CONTROL PANEL DISPLAY SCREEN*
23 CLIMATE CONTROL SYSTEM
24 AUDIO SYSTEM
25 FRONT PASSENGER AIR BAG
STATUS LIGHT*
26 POWER OUTLET
27 DRIVER’S CLIMATE-CONTROLLED
SEAT SWITCH*
28 INFINITI DRIVE MODE SELECTOR*
29 PASSENGER’S CLIMATE-CONTROLLED
SEAT SWITCH*
1110
Behind
steering wheel
Behind
steering wheel Behind
steering wheel
16
17181920
21
121314
Page 10 of 36
8
essential information
Loose Fuel Cap
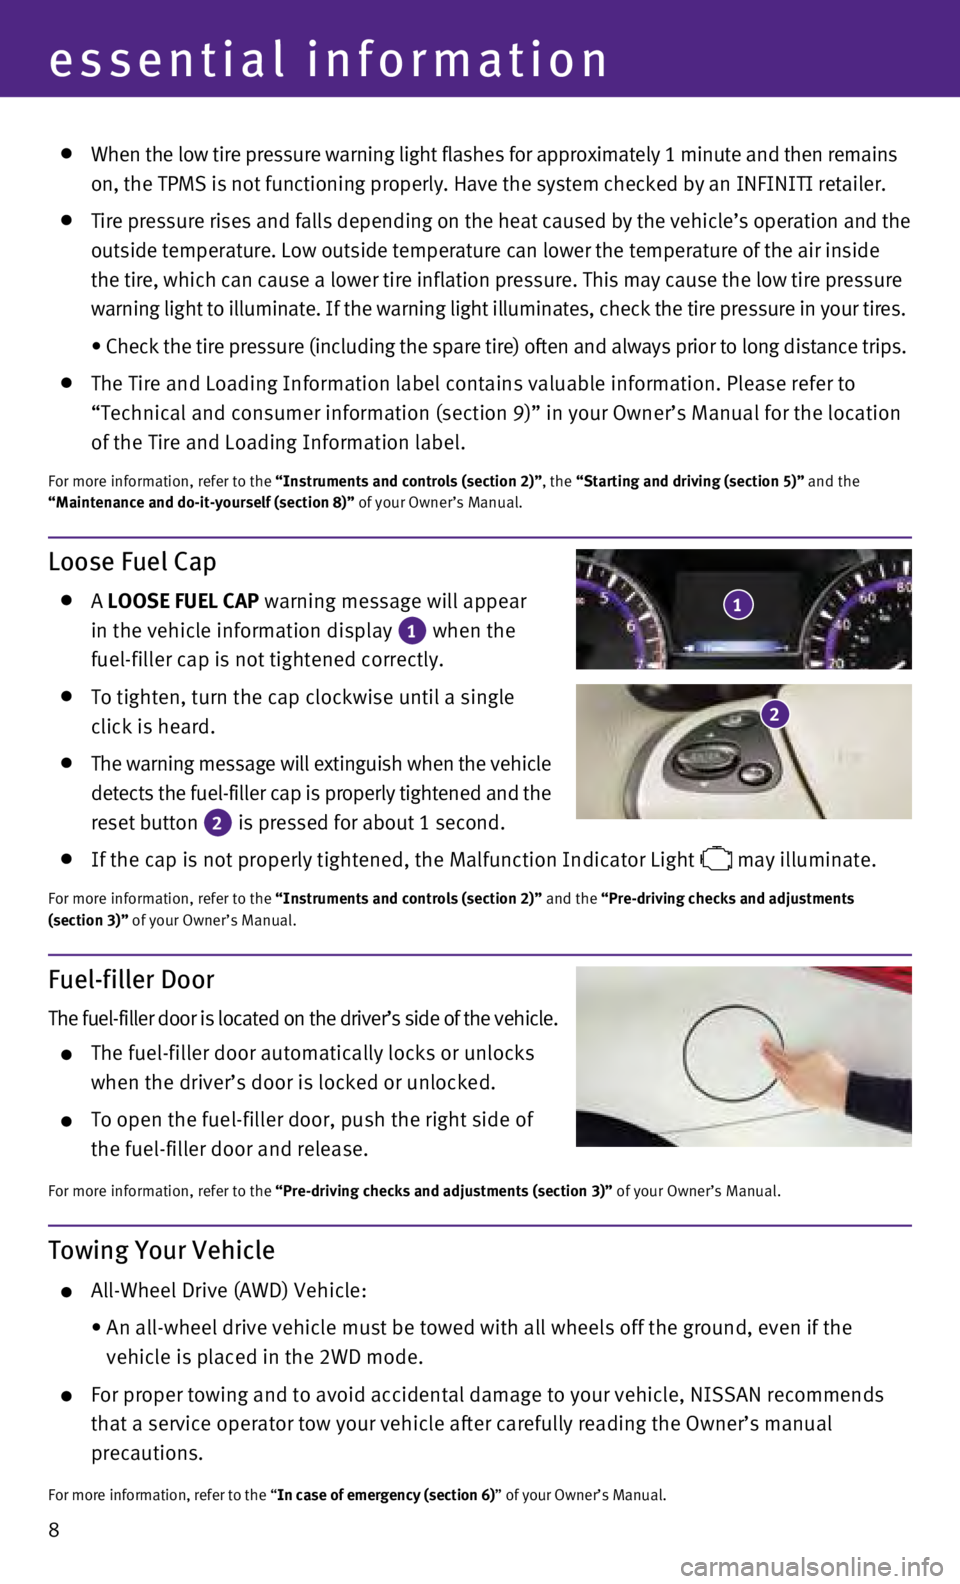
A LOOSE FUEL CAP warning message will appear
in the vehicle information display
1 when the
fuel-filler cap is not tightened correctly.
To tighten, turn the cap clockwise until a single
click is heard.
The warning message will extinguish when the vehicle
detects the fuel-filler cap is properly tightened and the
reset button
2 is pressed for about 1 second. If the cap is not properly tightened, the Malfunction Indicator Light
may illuminate.
For more information, refer to the “Instruments and controls (section 2)” and the “Pre-driving checks and adjustments
(section 3)” of your Owner’s Manual.
1
2
When the low tire pressure warning light flashes for approximately 1 min\
ute and then remains
on, the TPMS is not functioning properly. Have the system checked by an \
INFINITI retailer.
Tire pressure rises and falls depending on the heat caused by the vehicl\
e’s operation and the
outside temperature. Low outside temperature can lower the temperature o\
f the air inside
the tire, which can cause a lower tire inflation pressure. This may caus\
e the low tire pressure
warning light to illuminate. If the warning light illuminates, check the\
tire pressure in your tires.
•
Check the tire pressure (including the spare tire) often and always pr\
ior to long distance trips.
The Tire and Loading Information label contains valuable information. Pl\
ease refer to
“Technical and consumer information (section 9)” in your Owner’\
s Manual for the location
of the Tire and Loading Information label.
For more information, refer to the “Instruments and controls (section 2)”, the “Starting and driving (section 5)” and the
“Maintenance and do-it-yourself (section 8)” of your Owner’s Manual.
Fuel-filler Door
The fuel-filler door is located on the driver’s side of the vehicle.
The fuel-filler door automatically locks or unlocks
when the driver’s door is locked or unlocked.
To open the fuel-filler door, push the right side of
the fuel-filler door and release.
For more information, refer to the “Pre-driving checks and adjustments (section 3)” of your Owner’s Manual.
Towing Your Vehicle
All-Wheel Drive (AWD) Vehicle:
•
An all-wheel drive vehicle must be towed with all wheels off the ground,\
even if the
vehicle is placed in the 2WD mode.
For proper towing and to avoid accidental damage to your vehicle, NISSAN\
recommends
that a service operator tow your vehicle after carefully reading the Own\
er’s manual
precautions.
For more information, refer to the “In case of emergency (section 6)” of your Owner’s Manual.
Page 22 of 36
20
USB (Universal Serial Bus) Connection
Port/iPod® Interface
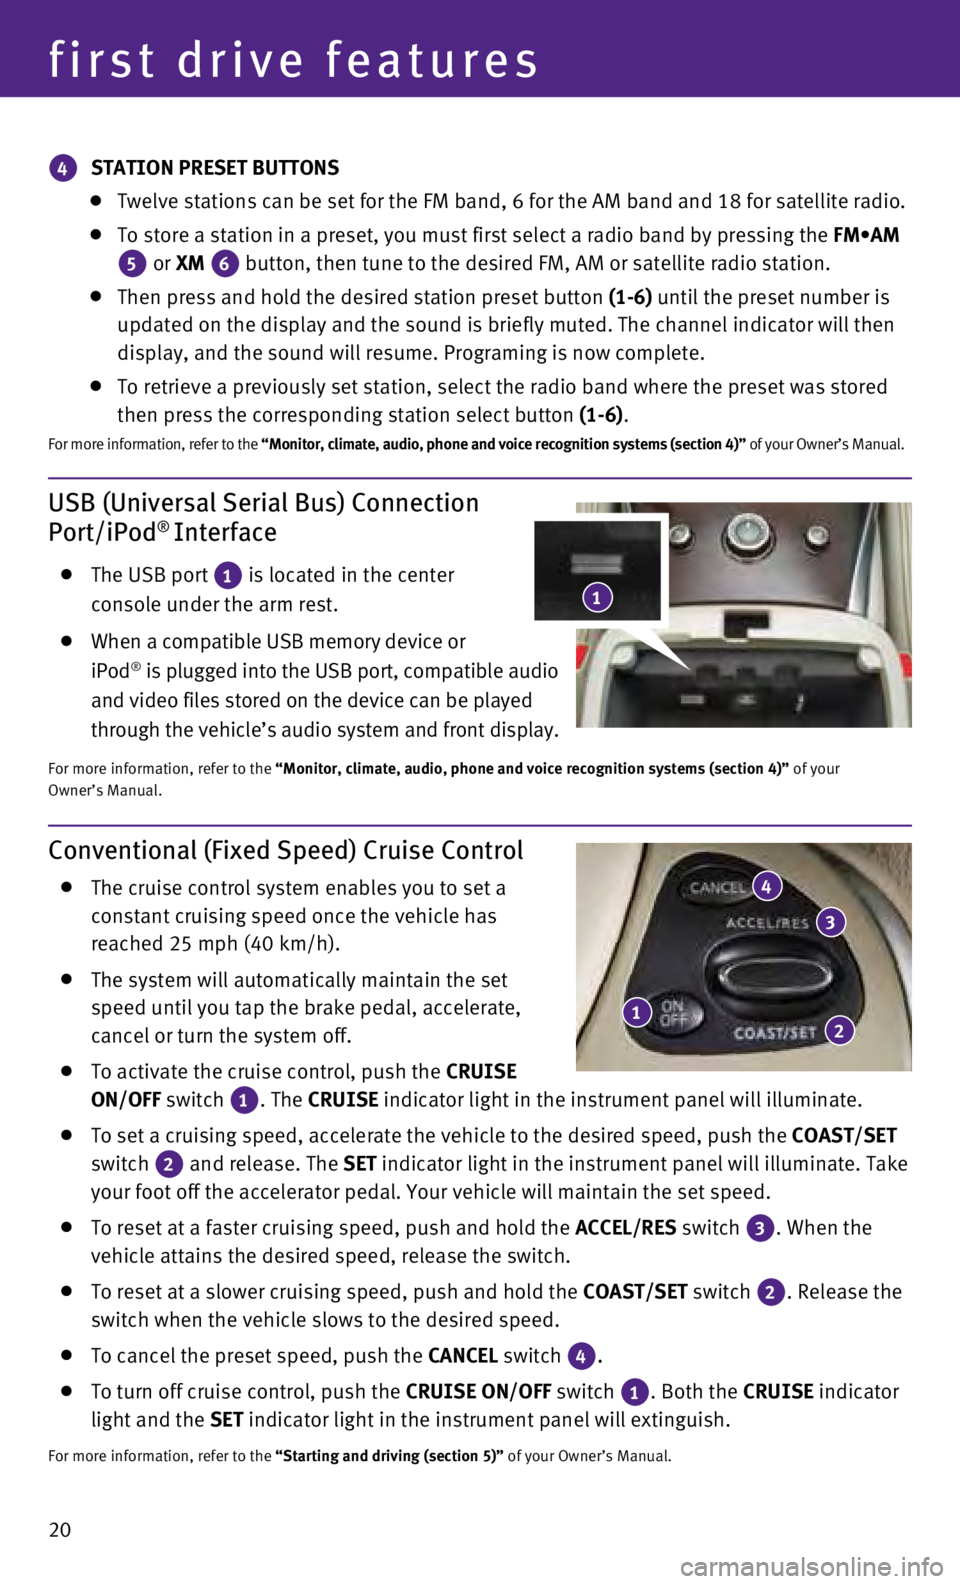
The USB port 1 is located in the center
console under the arm rest.
When a compatible USB memory device or
iPod® is plugged into the USB port, compatible audio
and video files stored on the device can be played
through the vehicle’s audio system and front display.
For more information, refer to the “Monitor, climate, audio, phone and voice recognition systems (secti\
on 4)” of your
Owner’s Manual.
first drive features
Conventional (Fixed Speed) Cruise Control
The cruise control system enables you to set a
constant cruising speed once the vehicle has
reached 25 mph (40 km/h).
The system will automatically maintain the set
speed until you tap the brake pedal, accelerate,
cancel or turn the system off.
To activate the cruise control, push the CRUISE
ON/OFF switch
1. The
CRUISE
indicator light in the instrument panel will illuminate.
To set a cruising speed, accelerate the vehicle to the desired speed, pu\
sh the
COAST/SET
switch
2 and release. The
SET indicator light
in the instrument panel will illuminate. Take
your foot off the accelerator pedal. Your vehicle will maintain the set \
speed.
To reset at a faster cruising speed, push and hold the ACCEL/RES switch 3. When the
vehicle attains the desired speed, release the switch.
To reset at a slower cruising speed, push and hold the COAST/SET switch 2. Release the
switch when the vehicle slows to the desired speed.
To cancel the preset speed, push the CANCEL switch
4.
To turn off cruise control, push the CRUISE
ON/OFF switch
1. Both the
CRUISE indicator
light and the SET indicator light in the instrument panel will extinguish.
For more information, refer to the “Starting and driving (section 5)” of your Owner’s Manual.
12
3
4
4 STATION PRESET BUTTONS
Twelve stations can be set for the FM band, 6 for the AM band and 18 for\
sa
tellite radio.
To store a station in a preset, you must first select a radio band by pr\
essing the FM•AM
5 or XM
6 button, then tune to the desired FM, AM or satellite radio station. Then press and hold the desired station preset button
(1-6) until the preset number is
updated on the display and the sound is briefly muted. The channel indic\
ator will then
display, and the sound will resume. Programing is now complete.
To retrieve a previously set station, select the radio band where the pr\
eset w as stored
then press the corresponding station select button (1-6).
F or more information, refer to the “Monitor, climate, audio, phone and voice recognition systems (secti\
on 4)” of your Owner’s Manual.
1
Page 23 of 36
21
Intelligent Cruise Control (ICC) System (if so equipped)
VEHICLE-TO-VEHICLE DISTANCE CONTROL MODE
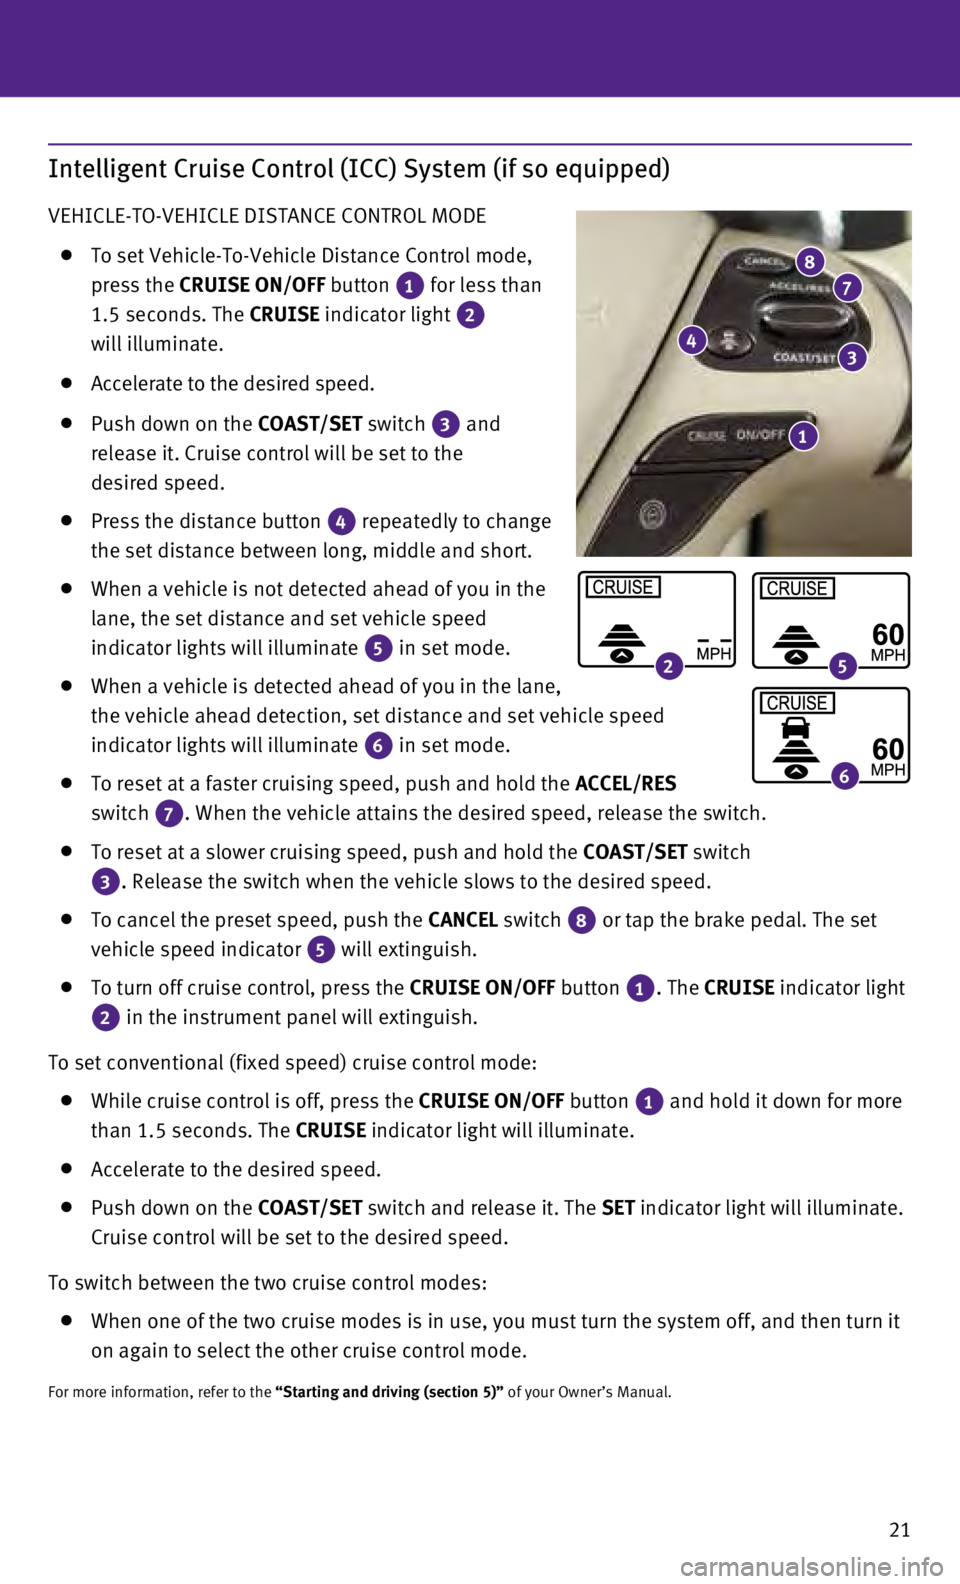
To set Vehicle-To-Vehicle Distance Control mode,
press the CRUISE ON/OFF button
1 for less than
1.5 seconds. The CRUISE indicator light 2
will illuminate.
Accelerate to the desired speed.
Push down on the COAST/SET switch
3 and
release it. Cruise control will be set to the
desired speed.
Press the distance button 4 repeatedly to change
the set distance between long, middle and short.
When a vehicle is not detected ahead of you in the
lane, the set distance and set vehicle speed
indicator lights will illuminate
5 in set mode.
When a vehicle is detected ahead of you in the lane,
the vehicle ahead detection, set distance and set vehicle speed
indicator lights will illuminate
6 in set mode.
To reset at a faster cruising speed, push and hold the
ACCEL/RES
switch
7. When the vehicle attains the desired speed, release the switch.
To reset at a slower cruising speed, push and hold the COAST/SET switch
3. Release the switch when the vehicle slows to the desired speed.
To cancel the preset speed, push the CANCEL switch
8 or tap the brake pedal. The set
vehicle speed indicator 5 will extinguish.
To turn off cruise control, press the
CRUISE ON/OFF button
1. The CRUISE indicator light
2 in the instrument panel will extinguish.
To set conventional (fixed speed) cruise control mode:
While cruise control is off, press the CRUISE ON/OFF
button 1
and hold it down for more
than 1.5 seconds. The
CRUISE indicator light will illuminate.
Accelerate to the desired speed.
Push down on the COAST/SET switch and release it. The SET indicator light will illuminate.
Cruise control will be set to the desired speed.
To switch between the two cruise control modes:
W hen one of the two cruise modes is in use, you must turn the system off,\
and then turn it
on again to select the other cruise control mode.
For more information, refer to the “Starting and driving (section 5)” of your Owner’s Manual.
1
43
78
25
6
Page 25 of 36
23
Vehicle Information Display
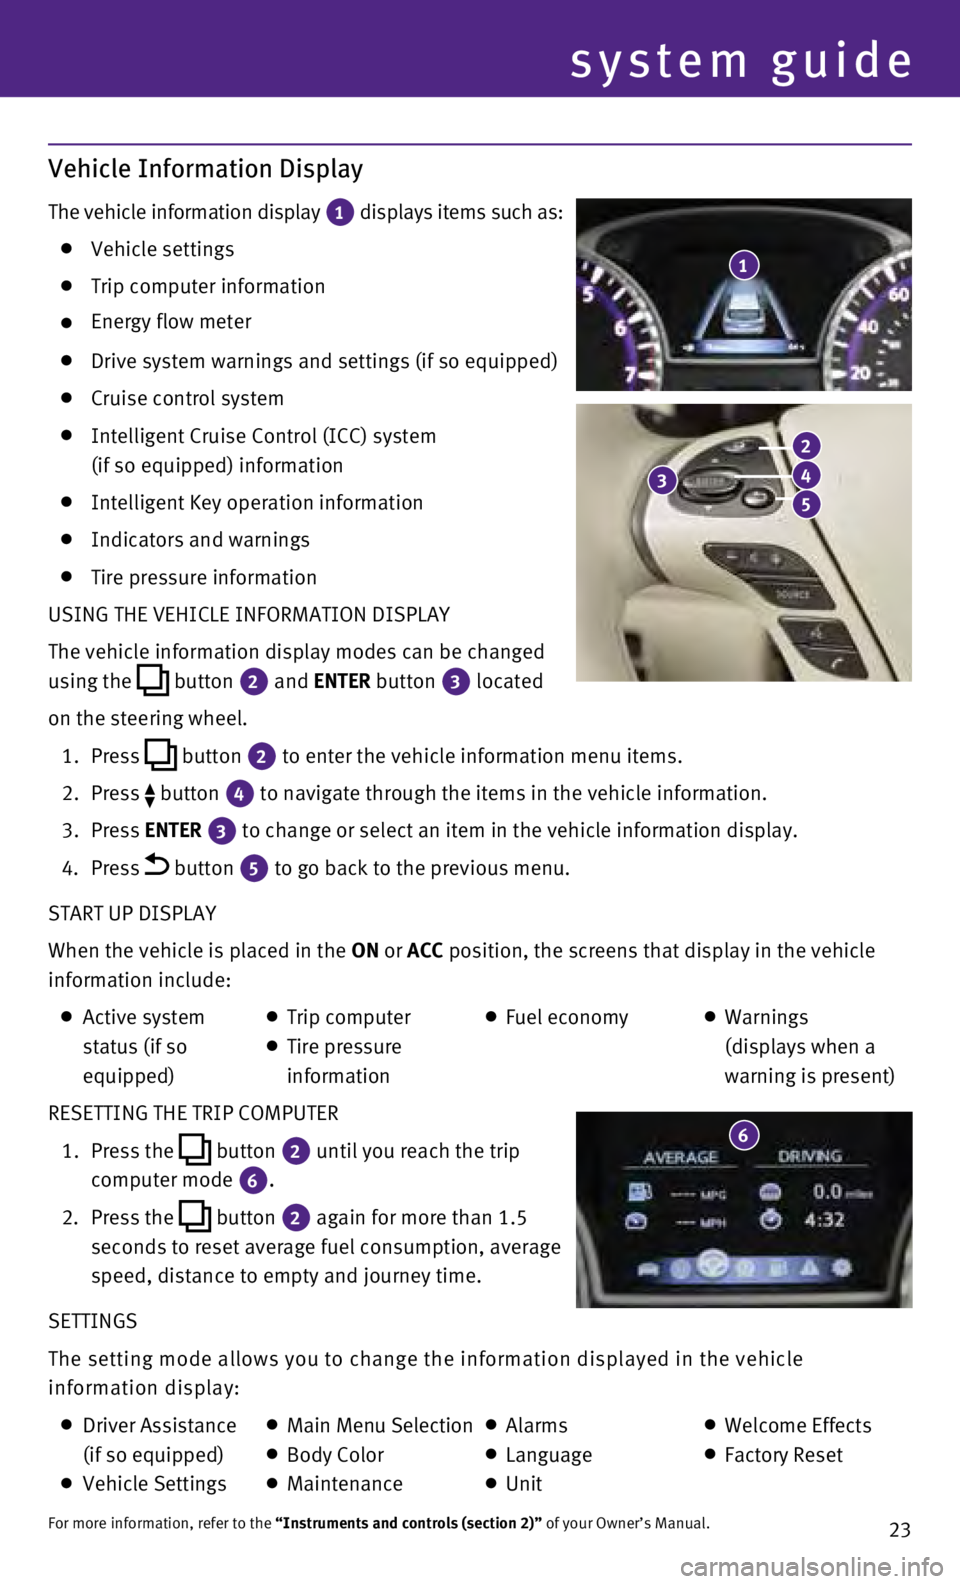
The vehicle information display 1 displays items such as: Vehicle settings
Trip computer information
Energy flow meter
Drive system warnings and settings (if so equipped)
Cruise control system
Intelligent Cruise Control (ICC) system
(if so equipped) information
Intelligent Key operation information
Indicators and warnings
Tire pressure information
USING THE VEHICLE INFORMATION DISPLAY
The vehicle information display modes can be changed
using the
button
2 and ENTER button 3
located
on the steering wheel.
1.
Press
button
2 to enter the vehicle information menu items.
2.
Press button
4 to navigate through the items in the vehicle information.
3.
Press
ENTER
3 to change or select an item in the vehicle information display.
4.
Press button 5 to go back to the previous menu.
START UP DISPLAY
When the vehicle is placed in the ON or ACC position, the screens that display in the vehicle
information include:
Active system
status (if so
equipped) Trip computer
Tire pressure
information
Fuel economy
Warnings
(displays when a
warning is present)
RESETTING THE TRIP COMPUTER
1.
Press the
button
2 until you reach the trip
computer mode 6.
2.
Press the button 2 again for more than 1.5
seconds to reset average fuel consumption, average
speed, distance to empty and journey time.
SETTINGS
The setting mode allows you to change the information displayed in the v\
ehicle
information display:
Driver Assistance
(if so equipped)
Vehicle Settings
Main Menu Selection Body Color
Maintenance
Alarms
Language
Unit
Welcome Effects
Factory Reset
For more information, refer to the “Instruments and controls (section 2)” of your Owner’s Manual.
1
system guide
3
2
4
5
6