ignition INFINITI QX60 HYBRID 2016 Quick Reference Guide
[x] Cancel search | Manufacturer: INFINITI, Model Year: 2016, Model line: QX60 HYBRID, Model: INFINITI QX60 HYBRID 2016Pages: 40, PDF Size: 2.83 MB
Page 5 of 40
3
essential information
Tire Pressure Monitoring System (TPMS) with Tire Inflation Indicator
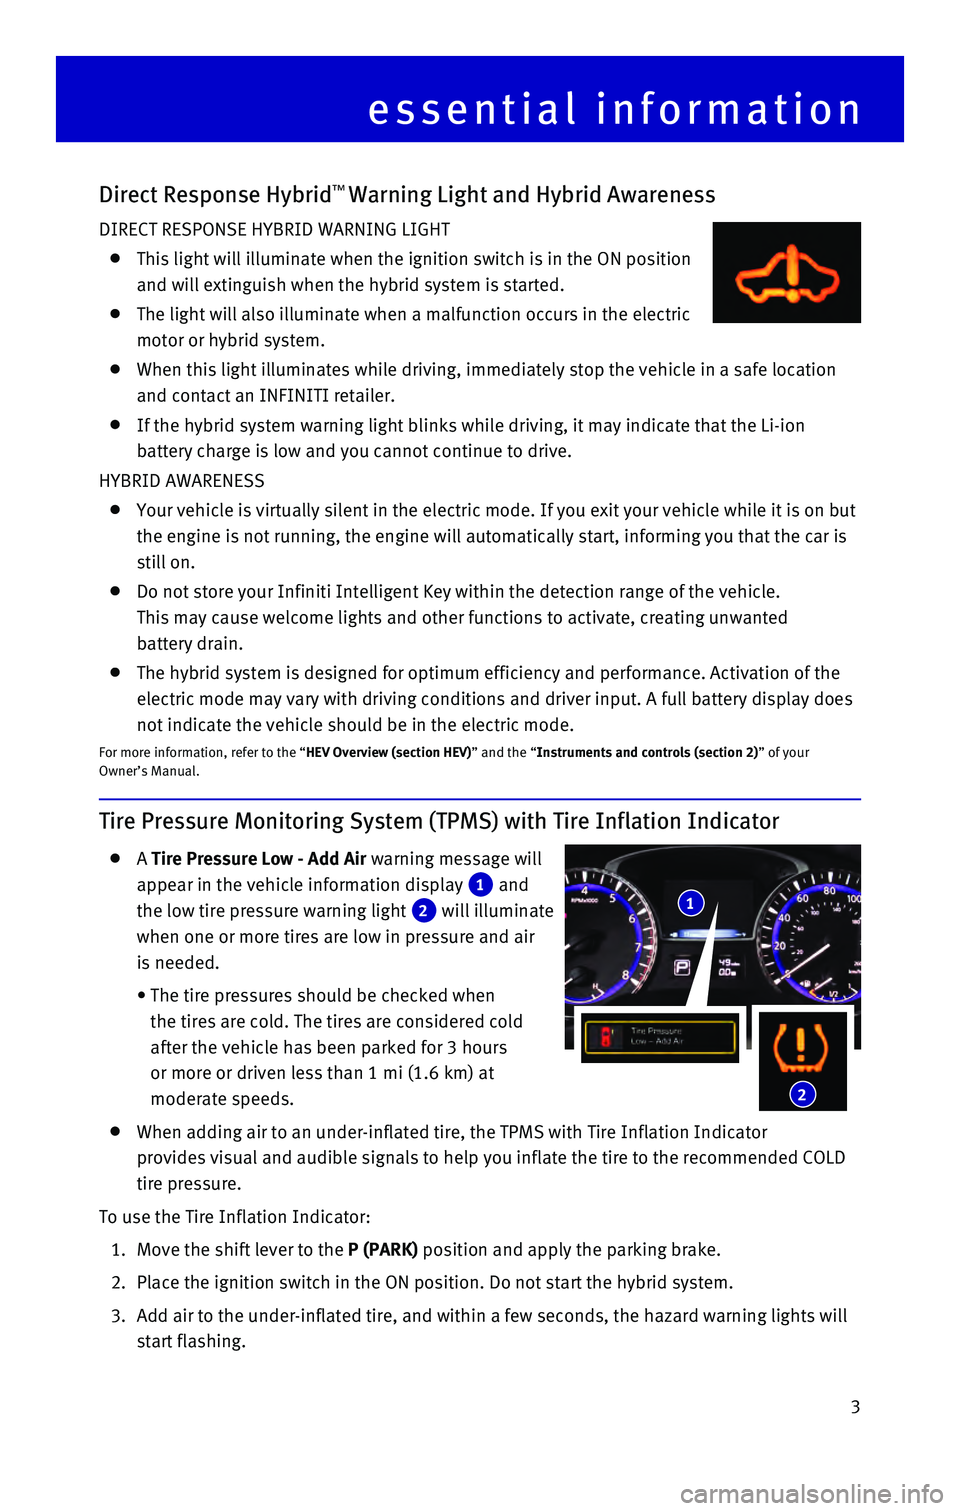
A Tire Pressure Low - Add Air warning message will
appear in the vehicle information display
1 and
the low tire pressure warning light
2 will illuminate
when one or more tires are low in pressure and air
is needed.
• The tire pressures should be checked when
the tires are cold. The tires are considered cold
after the vehicle has been parked for 3 hours
or more or driven less than 1 mi (1.6 km) at
moderate speeds.
When adding air to an under-inflated tire, the TPMS with Tire Inflation \
Indicator
provides visual and audible signals to help you inflate the tire to the \
recommended COLD
tire pressure.
To use the Tire Inflation Indicator:
1. Move the shift lever to the P (PARK) position and apply the parking brake.
2. Place the ignition switch in the ON position. Do not start the hybrid sy\
stem.
3. Add air to the under-inflated tire, and within a few seconds, the hazard\
warning lights will
start flashing.
Direct Response Hybrid™ Warning Light and Hybrid Awareness
DIRECT RESPONSE HYBRID WARNING LIGHT
This light will illuminate when the ignition switch is in the ON positio\
n
and will extinguish when the hybrid system is started.
The light will also illuminate when a malfunction occurs in the electric\
motor or hybrid system.
When this light illuminates while driving, immediately stop the vehicle \
in a safe location
and contact an INFINITI retailer.
If the hybrid system warning light blinks while driving, it may indicate\
that the Li-ion
battery charge is low and you cannot continue to drive.
HYBRID AWARENESS
Your vehicle is virtually silent in the electric mode. If you exit your \
vehicle while it is on but
the engine is not running, the engine will automatically start, informin\
g you that the car is
still on.
Do not store your Infiniti Intelligent Key within the detection range of\
the vehicle.
This may cause welcome lights and other functions to activate, creating \
unwanted
battery drain.
The hybrid system is designed for optimum efficiency and performance. Ac\
tivation of the
electric mode may vary with driving conditions and driver input. A full \
battery display does
not indicate the vehicle should be in the electric mode.
For more information, refer to the “HEV Overview (section HEV)” and the “Instruments and controls (section 2)” of your
Owner’s Manual.
1
2
Page 8 of 40
6
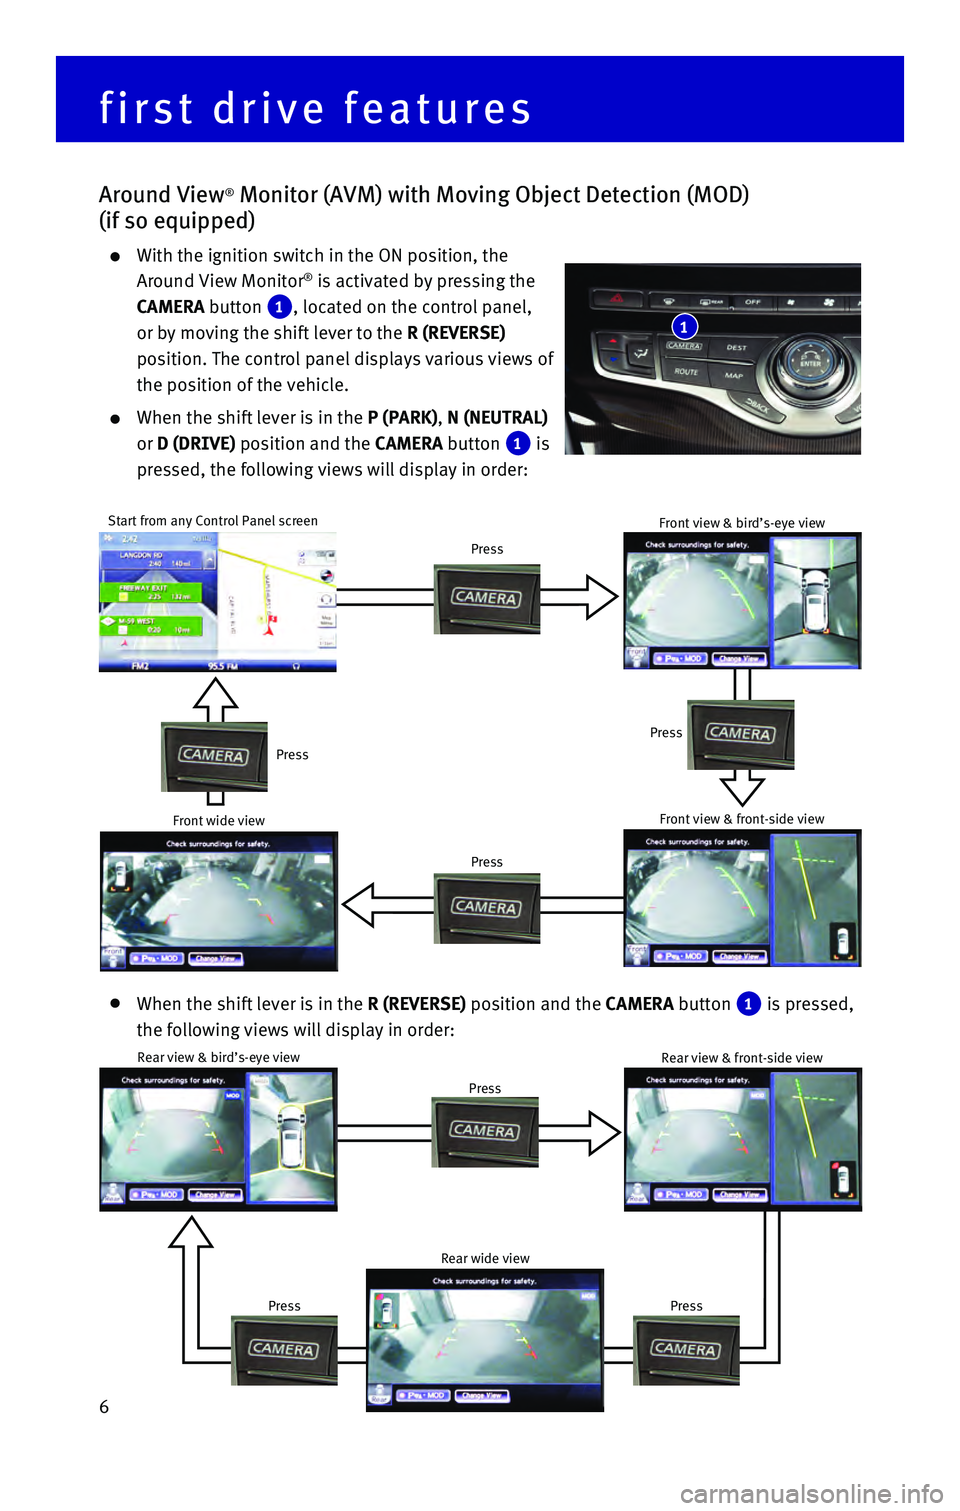
When the shift lever is in the R (REVERSE) position and the CAMERA button 1 is pressed,
the following views will display in order:
Start from any Control Panel screen
Press
Press
Press
Press
Around View® Monitor (AVM) with Moving Object Detection (MOD)
(if so equipped)
With the ignition switch in the ON position, the
Around View Monitor® is activated by pressing the
CAMERA button
1, located on the control panel,
or by moving the shift lever to the R (REVERSE)
position. The control panel displays various views of
the position of the vehicle.
When the shift lever is in the P (PARK), N (NEUTRAL)
or D (DRIVE) position and the CAMERA button
1 is
pressed, the following views will display in order:
Rear view & bird’s-eye view
Press
PressPress Rear view & front-side view
Rear wide view
Front wide view Front view & bird’s-eye viewFront view & front-side view
first drive features
1
Page 10 of 40
8
Infiniti Intelligent Key System
The Infiniti Intelligent Key system allows you to lock or unlock your ve\
hicle, open your liftgate
and remotely start the hybrid system. It is important to make sure the I\
ntelligent Key is with
you (that is, in your pocket or purse).
LOCKING AND UNLOCKING THE VEHICLE
The lock and unlock operating range of the Intelligent Key is within 31.\
5 in (80 cm) from
each request switch.
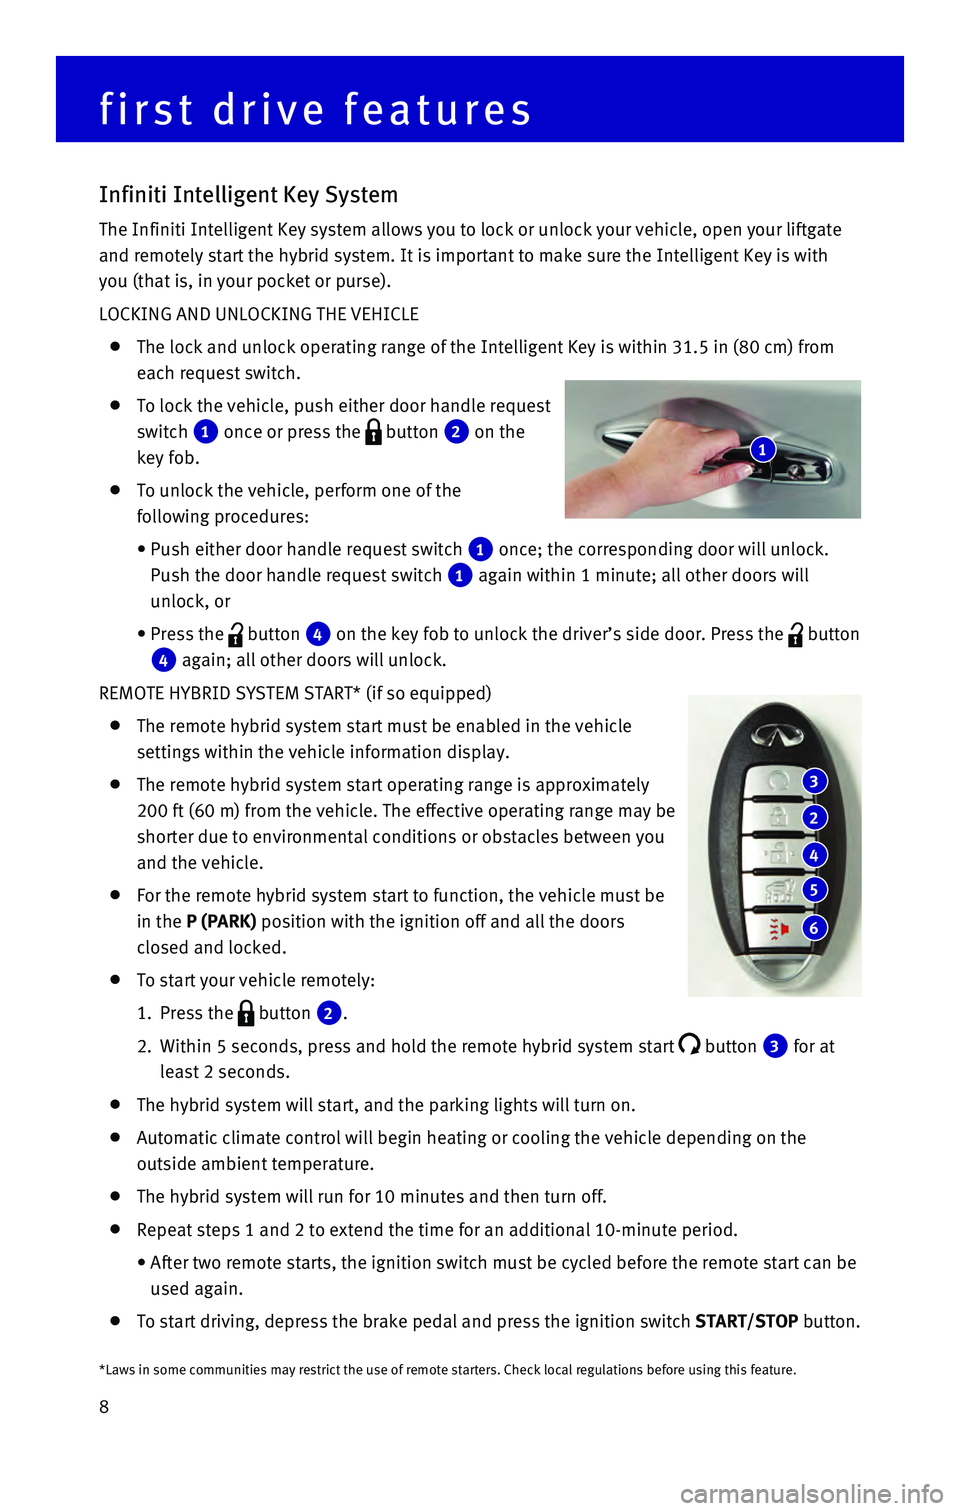
To lock the vehicle, push either door handle request
switch
1 once or press the button 2 on the
key fob.
To unlock the vehicle, perform one of the
following procedures:
• Push either door handle request switch 1 once; the corresponding door will unlock.
Push the door handle request switch
1 again within 1 minute; all other doors will
unlock, or
• Press the button 4 on the key fob to unlock the driver’s side door. Press the button
4 again; all other doors will unlock.
REMOTE HYBRID SYSTEM START* (if so equipped)
The remote hybrid system start must be enabled in the vehicle
settings within the vehicle information display.
The remote hybrid system start operating range is approximately
200 ft (60 m) from the vehicle. The effective operating range may be
shorter due to environmental conditions or obstacles between you
and the vehicle.
For the remote hybrid system start to function, the vehicle must be
in the P (PARK) position with the ignition off and all the doors
closed and locked.
To start your vehicle remotely:
1. Press the button 2.
2. Within 5 seconds, press and hold the remote hybrid system start button 3 for at
least 2 seconds.
The hybrid system will start, and the parking lights will turn on.
Automatic climate control will begin heating or cooling the vehicle depe\
nding on the
outside ambient temperature.
The hybrid system will run for 10 minutes and then turn off.
Repeat steps 1 and 2 to extend the time for an additional 10-minute peri\
od.
• After two remote starts, the ignition switch must be cycled before the r\
emote start can be
used again.
To start driving, depress the brake pedal and press the ignition switch \
START/STOP button.
first drive features
3
2
4
5
6
1
*Laws in some communities may restrict the use of remote starters. Check\
local regulations before using this feature.
Page 11 of 40
9
LIFTGATE RELEASE
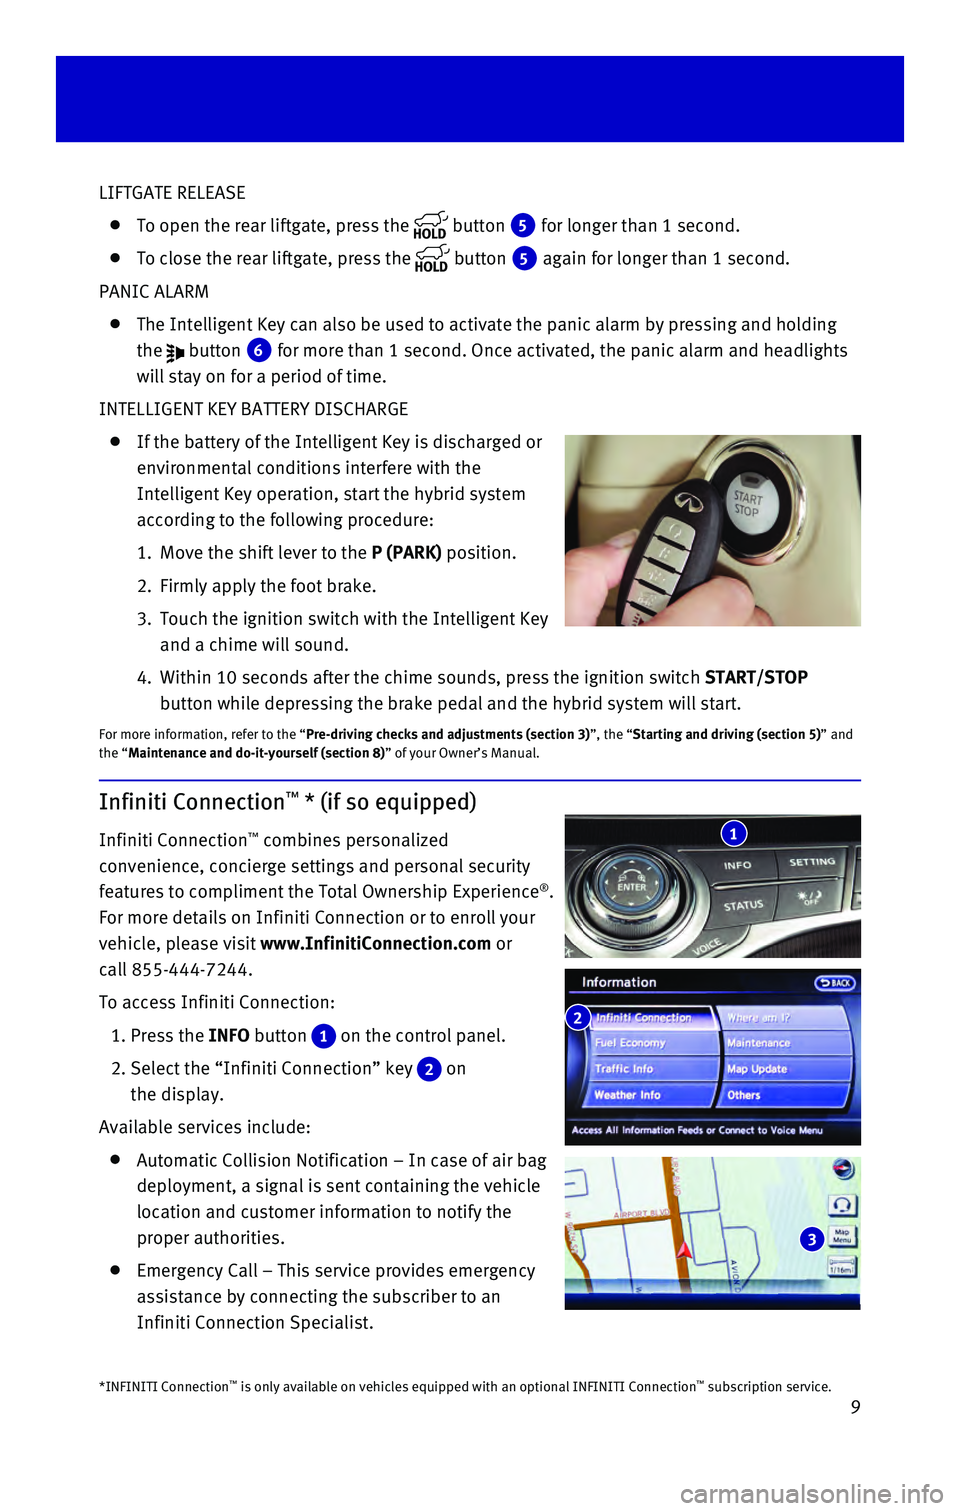
To open the rear liftgate, press the button 5 for longer than 1 second.
To close the rear liftgate, press the button 5 again for longer than 1 second.
PANIC ALARM
The Intelligent Key can also be used to activate the panic alarm by pres\
sing and holding
the
button 6 for more than 1 second. Once activated, the panic alarm and headlights \
will stay on for a period of time.
INTELLIGENT KEY BATTERY DISCHARGE
If the battery of the Intelligent Key is discharged or
environmental conditions interfere with the
Intelligent Key operation, start the hybrid system
according to the following procedure:
1. Move the shift lever to the P (PARK) position.
2. Firmly apply the foot brake.
3. Touch the ignition switch with the Intelligent Key
and a chime will sound.
4. Within 10 seconds after the chime sounds, pre
ss the ignition switch START/STOP
button while depressing the brake pedal and the hybrid system will start.
For more information, refer to the “Pre-driving checks and adjustments (section 3)”, the “Starting and driving (section 5)” and
the “Maintenance and do-it-yourself (section 8)” of your Owner’s Manual.
Infiniti Connection™ * (if so equipped)
Infiniti Connection™ combines personalized
convenience, concierge settings and personal security
features to compliment the Total Ownership Experience
®.
For more details on Infiniti Connection or to enroll your
vehicle, please visit www.InfinitiConnection.com or
call 855-444-7244.
To access Infiniti Connection:
1. Press the INFO button 1 on the control panel.
2. Select the “Infiniti Connection” key 2 on
the display.
Available services include:
Automatic Collision Notification – In case of air bag
deployment, a signal is sent containing the vehicle
location and customer information to notify the
proper authorities.
Emergency Call – This service provides emergency
assistance by connecting the subscriber to an
Infiniti Connection Specialist.
*INFINITI Connection™ is only available on vehicles equipped with an optional INFINITI Connec\
tion™ subscription service.
2
3
1
Page 17 of 40

15
Automatic Drive Positioner (if so equipped)
Two positions for the driver’s seat, steering column
and outside mirrors can be stored in the automatic
drive positioner
1 memory.
Follow this procedure to set the memory positions:
• Confirm the shift lever is in the P (PARK) position.
• Push the ignition switch to the ON position.
• Adjust the driver’s seat, steering column and
outside mirrors to the desired positions using the adjusting switches fo\
r each feature.
• Push the SET switch, and within 5 seconds, push the memory switch (
1 or 2).
• The indicator light on the memory switch you select will illuminate for \
approximately 5
seconds, and a chime will sound (if so equipped) when the memory is st\
ored correctly.
• The driver’s seat, steering column and outside mirror positions are n\
ow set to
your preferences.
These memorized positions can also be linked to your Infiniti Intelligen\
t Key. To link a
memorized position to your Infiniti Intelligent Key, press the unlock bu\
tton on the key fob
after completing the previous step.
For more information, refer to the “Pre-driving checks and adjustments (section 3)” of your Owner’s Manual.
Outside Mirror Control Switch
To select the right or left side mirror, move the
control switch
1 right or left.
Adjust each mirror to the desired position using the
control switch
2.
To fold the outside rearview mirrors, push the
control switch
3 to the position. To unfold the
outside rearview mirrors, push the control switch
3 to the position.
REVERSE TILT-DOWN FEATURE (if so equipped)
The reverse tilt-down feature will turn both outside mirror surfaces dow\
nward to provide
better rear visibility close to the vehicle.
1. Push the ignition switch to the ON position.
2. Choose the right or left outside mirror by operating the control switch \
1.
3. Move the shift lever to the R (REVERSE) position.
4. The outside mirror surfaces will move downward. (The control switch 1 must be out of
the center [neutral] position.)
The outside mirror surfaces will return to their original positions when\
one of the following
conditions has occurred:
• The shift lever is moved to any position other than R (REVERSE).
• The control switch 1 is set to the center (neutral) position.
• The ignition switch is placed in the OFF position.
For more information, refer to the “Pre-driving checks and adjustments (section 3)” of your Owner’s Manual.
1
2
1
3
Page 18 of 40
16
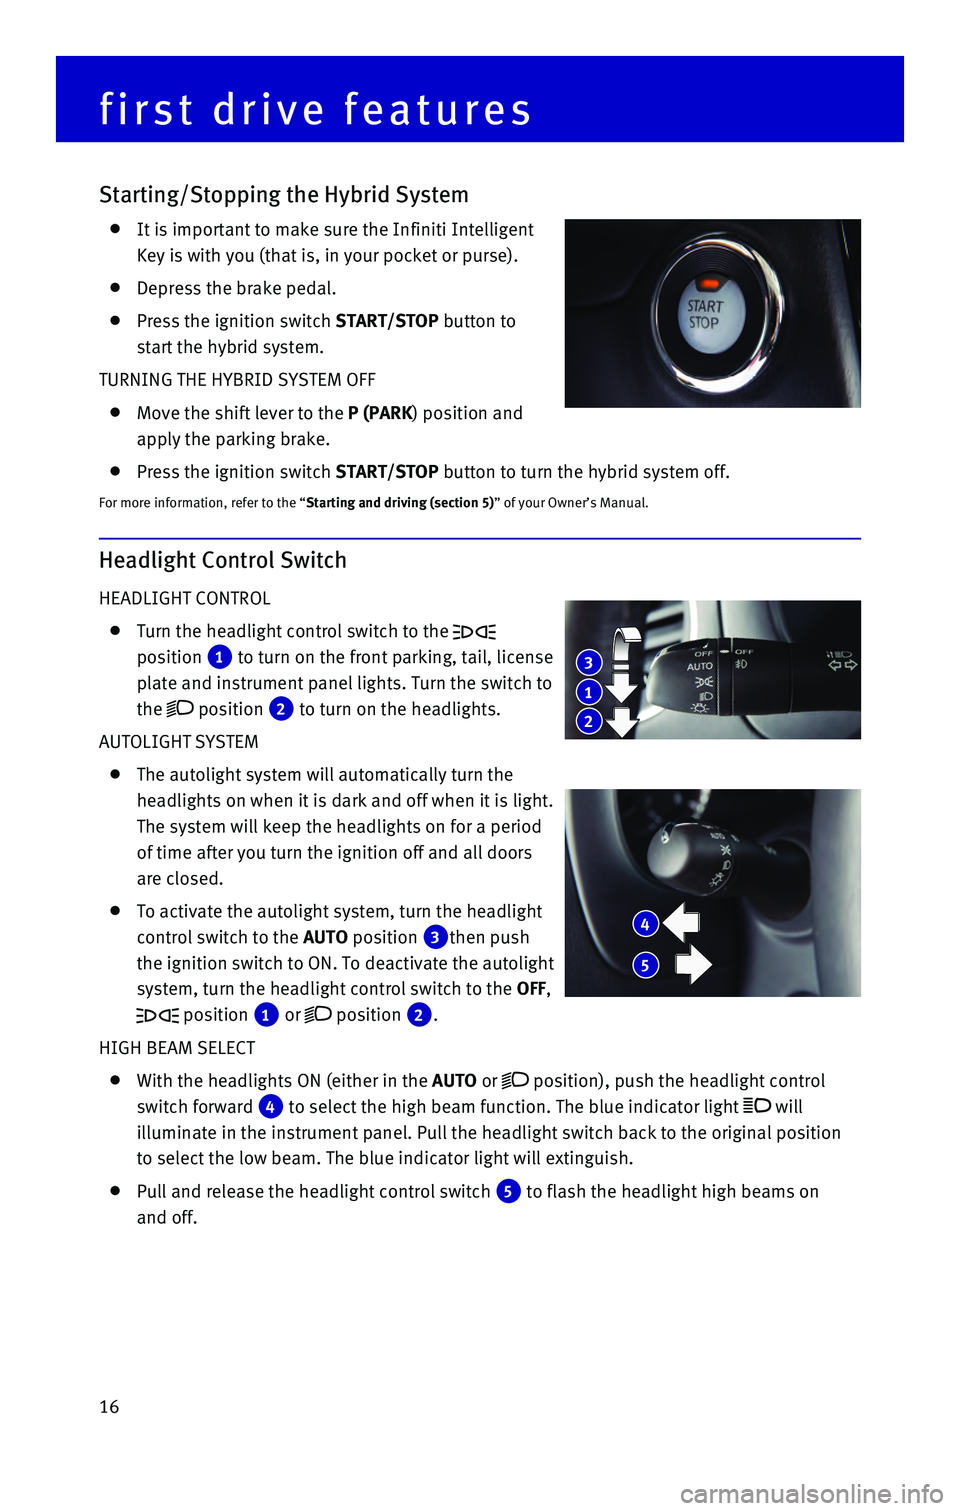
Headlight Control Switch
HEADLIGHT CONTROL
Turn the headlight control switch to the
position
1 to turn on the front parking, tail, license
plate and instrument panel lights. Turn the switch to
the
position 2 to turn on the headlights.
AUTOLIGHT SYSTEM
The autolight system will automatically turn the
headlights on when it is dark and off when it is light.
The system will keep the headlights on for a period
of time after you turn the ignition off and all doors
are closed.
To activate the autolight system, turn the headlight
control switch to the AUTO position
3then push
the ignition switch to ON. To deactivate the autolight
system, turn the headlight control switch to the OFF,
position 1 or position 2.
HIGH BEAM SELECT
With the headlights ON (either in the AUTO or position), push the headlight control
switch forward
4 to select the high beam function. The blue indicator light will
illuminate in the instrument panel. Pull the headlight switch back to th\
e original position
to select the low beam. The blue indicator light will extinguish.
Pull and release the headlight control switch 5 to flash the headlight high beams on
and off.
first drive features
Starting/Stopping the Hybrid System
It is important to make sure the Infiniti Intelligent
Key is with you (that is, in your pocket or purse).
Depress the brake pedal.
Press the ignition switch START/STOP button to
start the hybrid system.
TURNING THE HYBRID SYSTEM OFF
Move the shift lever to the P (PARK) position and
apply the parking brake.
Press the ignition switch START/STOP button to turn the hybrid system off.
For more information, refer to the “Starting and driving (section 5)” of your Owner’s Manual.
3
1
2
4
5
Page 25 of 40

23
Power Outlets
12V OUTLETS
The power outlets are for powering electrical
accessories such as cellular phones. They are rated
at 12V, 120W (10A) maximum.
• To use a power outlet, open the cap.
• The power outlets on the control panel
1, inside the center console 2, on
the back of the center console
3 and
in the cargo area
4 are powered only
when the ignition switch is in the ACC or
ON position.
120V OUTLET (if so equipped)
The 120V outlet 5 is located on the back of the
center console.
To use the outlet for devices that require 120V
power, place the ignition switch in the ON position
and push the power inverter switch
6.
The switch will illuminate when enabled.
For more information, refer to the “Instruments and controls (section 2)” of your Owner’s Manual.
3
2
USB (Universal Serial Bus) Connection Port/iPod® Interface
The USB port 1 is located in the center console
under the armrest.
When a compatible USB memory device or
iPod® is plugged into the USB port, compatible
audio and video files stored on the device can
be played through the vehicle’s audio system and
front display.
For more information, refer to the “Monitor, climate, audio, phone and voice
recognition systems (section 4)” of your Owner’s Manual.
1
1
5
4
6
Page 26 of 40
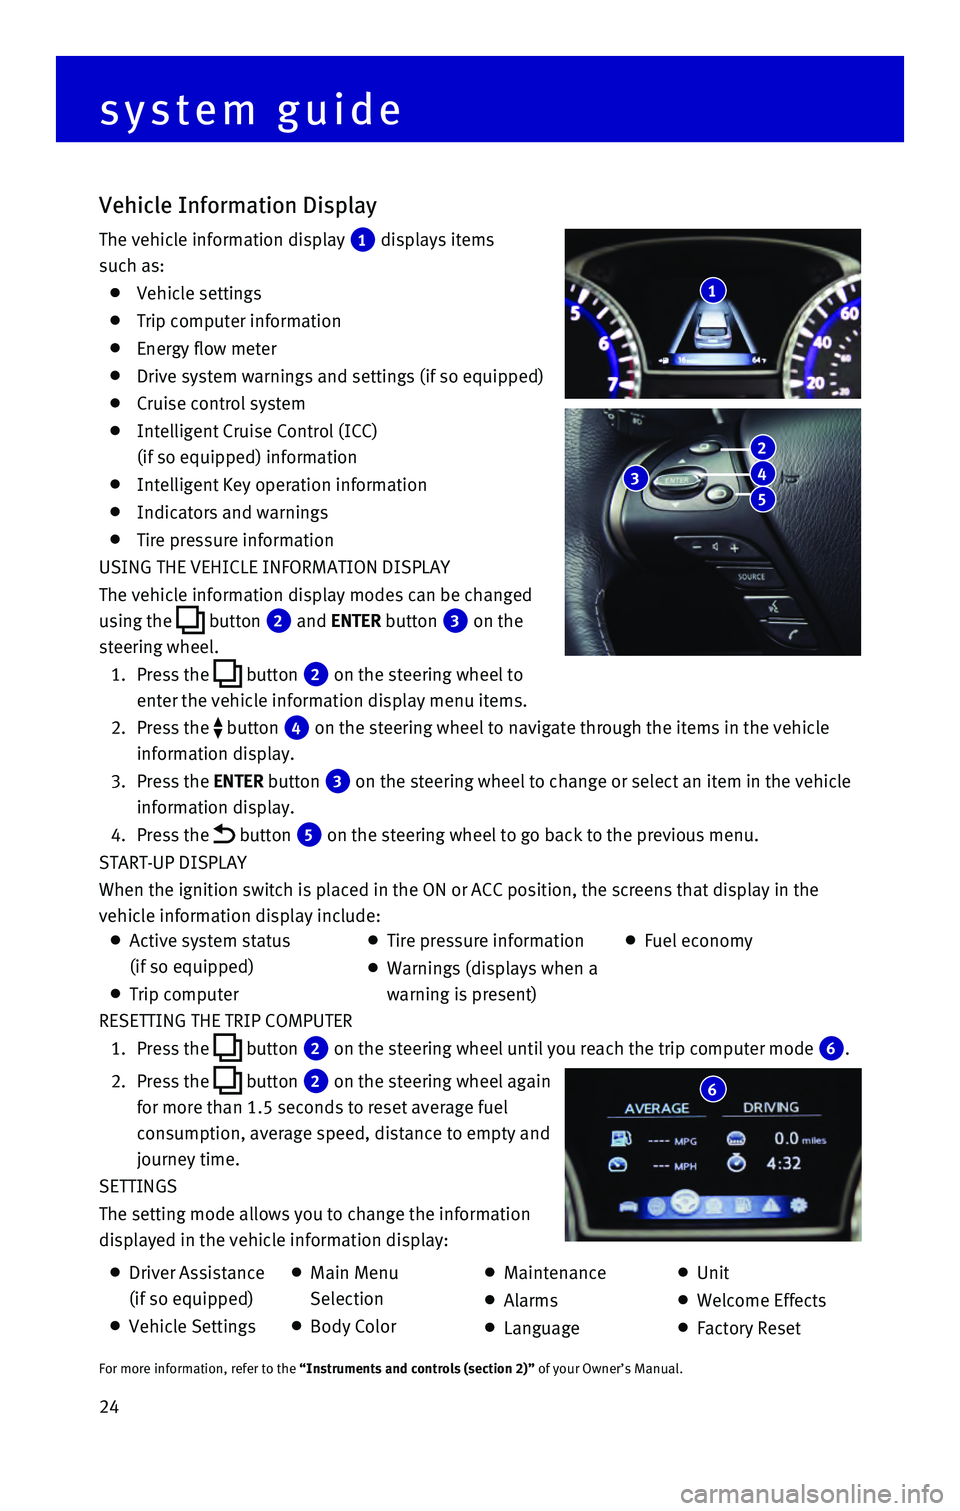
24 RESETTING THE TRIP COMPUTER
1. Press the button 2 on the steering wheel until you reach the trip computer mode 6.
2. Press the button 2 on the steering wheel again
for more than 1.5 seconds to reset average fuel
consumption, average speed, distance to empty and
journey time.
SETTINGS
The setting mode allows you to change the information
displayed in the vehicle information display:
Vehicle Information Display
The vehicle information display 1 displays items
such as:
Vehicle settings
Trip computer information
Energy flow meter
Drive system warnings and settings (if so equipped)
Cruise control system
Intelligent Cruise Control (ICC)
(if so equipped) information
Intelligent Key operation information
Indicators and warnings
Tire pressure information
USING THE VEHICLE INFORMATION DISPLAY
The vehicle information display modes can be changed
using the
button 2 and ENTER button 3 on the
steering wheel.
1. Press the button 2 on the steering wheel to
enter the vehicle information display menu items.
2. Press the button 4 on the steering wheel to navigate through the items in the vehicle
information display.
3. Press the ENTER button 3 on the steering wheel to change or select an item in the vehicle
information display.
4. Press the button 5 on the steering wheel to go back to the previous menu.
START-UP DISPLAY
When the ignition switch is placed in the ON or ACC position, the screen\
s that display in the
vehicle information display include:
1
system guide
6
Active system status
(if so equipped)
Trip computer
Tire pressure information
Warnings (displays when a
warning is present)
Fuel economy
Driver Assistance
(if so equipped)
Vehicle Settings
Main Menu
Selection
Body Color
Maintenance
Alarms
Language
Unit
Welcome Effects
Factory Reset
For more information, refer to the “Instruments and controls (section 2)” of your Owner’s Manual.
3
2
4
5