transmission INFINITI QX80 2014 User Guide
[x] Cancel search | Manufacturer: INFINITI, Model Year: 2014, Model line: QX80, Model: INFINITI QX80 2014Pages: 578, PDF Size: 2.8 MB
Page 163 of 578

2-70Instruments and controls
JVI0429X
3. Press and hold the programmedHomeLink®button and observe the
indicator light.
.If the indicator light*1is solid/
continuous, programming is com-
plete and your device should acti-
vate when the HomeLink
®button is
pressed and released.
.If the indicator light*1blinks
rapidly for two seconds and then
turns to a solid/continuous light,
continue with Steps 4-6 for a rolling
code device. A second person may
make the following steps easier. Use
a ladder or other device. Do not stand on your vehicle to perform the
next steps.
4. At the receiver located on the garage door opener motor in the garage, locate
the “learn” or“smart” button (the
name and color of the button may vary
by manufacturer but it is usually
located near where the hanging anten-
na wire is attached to the unit). If there
is difficulty locating the button, refer-
ence the garage door opener’s manual.
5. Press and release the “learn” or
“smart” button.
NOTE:
Once the button is pressed, you have
approximately 30 seconds to initiate
the next step.
6. Return to the vehicle and firmly press and hold the programmed HomeLink
®
button for two seconds and release.
Repeat the “press/hold/release” se-
quence up to 3 times to complete the
programming process. HomeLink
®
should now activate your rolling code
equipped device.
7. If you have any questions or are having difficulty programming your
HomeLink
®buttons, refer to the HomeLink
®web site at: www.
homelink.com or call 1-800-355-3515.
PROGRAMMING HomeLink®FOR
CANADIAN CUSTOMERS AND GATE
OPENERS
Canadian radio-frequency laws require
transmitter signals to “time-out”(or quit)
after several seconds of transmission –
which may not be long enough for
HomeLink
®to pick up the signal during
programming. Similar to this Canadian
law, some U.S. gate operators are de-
signed to “time-out” in the same manner.
If you live in Canada or you are having
difficulties programming a gate operator or
garage door opener by using the “Pro-
gramming HomeLink
®” procedures, re-
place “Programming HomeLink®”Step 2
with the following:
NOTE:
When programming a garage door opener,
etc., unplug the device during the “cy-
cling” process to prevent possible damage
to the garage door opener components.
Step 2: Using both hands, simultaneously
press and hold the desired HomeLink
®
button and the hand-held transmitter
Page 342 of 578

5 Starting and driving
Precautions when starting and driving ................. 5-3Exhaust gas (carbon monoxide) ....................... 5-3
Three-way catalyst........................................... 5-3
Tire Pressure Monitoring System (TPMS).......... 5-4
Avoiding collision and rollover......................... 5-7
On-pavement and off-road
driving precautions.......................................... 5-8
Off-road recovery............................................. 5-8
Rapid air pressure loss ................................... 5-8
Drinking alcohol/drugs and driving ................. 5-9
Driving safety precautions ............................... 5-9
Push-button ignition switch ............................... 5-11 Operating range for engine start function ...... 5-12
Push-button ignition switch positions ............ 5-13
Emergency engine shut off ............................ 5-13
Intelligent Key battery discharge ................... 5-13
Before starting the engine ................................. 5-14
Starting the engine ............................................ 5-14 Remote start (if so equipped) ........................ 5-15
Driving the vehicle ............................................. 5-16
Engine protection mode................................. 5-16
Automatic transmission ................................. 5-17
Parking brake .................................................... 5-21 Lane Departure Warning (LDW)/Prevention (LDP)
system (if so equipped) ................................... 5-21
Lane Departure Warning (LDW) system......... 5-22
Lane Departure Prevention (LDP) system ...... 5-26
Blind Spot Warning/Blind Spot Intervention
TM/
Back-up Collision Intervention systems
(if so equipped) ................................................ 5-31
Blind Spot Warning (BSW) and Blind Spot
Intervention
TMsystems ................................ 5-31
BSW system operation ................................. 5-33
Blind Spot Intervention
TM
system operation ......................................... 5-36
BSW/Blind Spot InterventionTM
driving situations ......................................... 5-39
Back-up Collision Intervention (BCI) system
(if so equipped) ........................................... 5-45
BCI system operation (if so equipped) ......... 5-47
System maintenance.................................... 5-53
Cruise control (if so equipped) .......................... 5-54 Precautions on cruise control....................... 5-54
Cruise control operations ............................. 5-55
Intelligent Cruise Control (ICC) system (if
so equipped)..................................................... 5-56
Selecting vehicle-to-vehicle distance
control mode ............................................... 5-57
Vehicle-to-vehicle distance control mode...... 5-57
Page 351 of 578

5-10Starting and driving
WARNING
.Drive carefully when off the road and
avoid dangerous areas. Every person
who drives or rides in this vehicle should
be seated with their seat belt fastened.
This will keep you and your passengers
in position when driving over rough
terrain.
. Do not drive across steep slopes. Instead
drive either straight up or straight down
the slopes. Off-road vehicles can tip over
sideways much more easily than they
can forward or backward.
. Many hills are too steep for any vehicle.
If you drive up them, you may stall. If
you drive down them, you may not be
able to control your speed. If you drive
across them, you may roll over.
. Do not shift ranges while driving on
downhill grades as this could cause loss
of control of the vehicle.
. Stay alert when driving to the top of a
hill. At the top there could be a drop-off
or other hazard that could cause an
accident. .
If your engine stalls or you cannot make
it to the top of a steep hill, never attempt
to turn around. Your vehicle could tip or
roll over. Always back straight down in R
(Reverse) range. Never back down in N
(Neutral), using only the brake, as this
could cause loss of control.
. Heavy braking going down a hill could
cause your brakes to overheat and fade,
resulting in loss of control and an
accident. Apply brakes lightly and use
a low range to control your speed.
. Unsecured cargo can be thrown around
when driving over rough terrain. Prop-
erly secure all cargo so it will not be
thrown forward and cause injury to you
or your passengers.
. To avoid raising the center of gravity
excessively, do not exceed the rated
capacity of the roof rack (if so equipped)
and evenly distribute the load. Secure
heavy loads in the cargo area as far
forward and as low as possible. Do not
equip the vehicle with tires larger than
specified in this manual. This could
cause your vehicle to roll over.
. Do not grip the inside or spokes of the
steering wheel when driving off-road. The steering wheel could move suddenly
and injure your hands. Instead drive with
your fingers and thumbs on the outside
of the rim.
. Before operating the vehicle, ensure that
the driver and all passengers have their
seat belts fastened.
. Always drive with the floor mats in place
as the floor may became hot.
. Lower your speed when encountering
strong crosswinds. With a higher center
of gravity, your INFINITI is more affected
by strong side winds. Slower speeds
ensure better vehicle control.
. Do not drive beyond the performance
capability of the tires, even with 4WD
engaged.
. For 4WD equipped vehicles, do not
attempt to raise two wheels off the
ground and shift the transmission to
any drive or reverse position with the
engine running. Doing so may result in
drivetrain damage or unexpected vehicle
movement which could result in serious
vehicle damage or personal injury.
. Do not attempt to test a 4WD equipped
vehicle on a 2-wheel dynamometer (such
as the dynamometers used by some
Page 357 of 578

5-16Starting and driving
ENGINE PROTECTION MODE
The engine has an engine protection mode
to reduce the chance of damage if the
coolant temperature becomes too high (for
example, when climbing steep grades in
high temperature with heavy loads, such
as when towing a trailer).
When the engine temperature reaches a
certain level:
.The engine coolant temperature gauge
will move toward the H position.
. Engine power may be reduced.
. The air conditioning cooling function
may be automatically turned OFF for a
short time (the blower will continue to
operate).
Engine power and, under some conditions,
vehicle speed will decrease. Vehicle speed
can be controlled with the accelerator
pedal, but the vehicle may not accelerate
at the desired speed. The transmission will
downshift or upshift as it reaches pre-
scribed shift points. You can also shift
manually.
As driving conditions change and engine
coolant temperature is reduced, vehicle
speed can be increased using the accel-
erator pedal, and air conditioning cooling function will automatically be turned back
ON.
If:
1. The engine coolant temperature is not
reduced.
2. The air conditioning cooling function does not turn back ON.
3. The engine oil pressure warning light
illuminates or engine coolant
temperature gauge does not return to
the normal range from the H position,
this may indicate a malfunction. Move
the vehicle off the road to a safe area
and allow the engine to cool. If after
checking the oil and coolant, the
remains on or engine coolant tempera-
ture does not return to the normal
range, do not continue to drive and
contact an INFINITI retailer.
The Malfunction Indicator Light (MIL)
may also come ON. You do not need to
have your vehicle towed, unless it remains
on, but have it inspected soon by an
INFINITI retailer. See “Warning/indicator
lights and audible reminders” in the“2.
Instruments and controls” section.
WARNING
Overheating can result in reduced engine
power and vehicle speed. The reduced speed
may be lower than other traffic, which could
increase the chance of a collision. Be
especially careful when driving. If the
vehicle cannot maintain a safe driving
speed, pull to the side of the road in a safe
area. Allow the engine to cool and return to
normal operation. See“If your vehicle over-
heats” in the“6. In case of emergency”
section.
CAUTION
Running the engine with the engine oil
pressure warning light on could cause
serious damage to the engine almost
immediately. Such damage is not covered
by warranty. Turn off the engine as soon as
it is safe to do so.
DRIVING THE VEHICLE
Page 358 of 578

AUTOMATIC TRANSMISSION
7 speed automatic transmission
The automatic transmission in your vehicle
is electronically controlled by a transmis-
sion control module to produce maximum
efficiency and smooth operation.
Shown on the following pages are the
recommended operating procedures for
this transmission. Follow these procedures
for maximum vehicle performance and
driving enjoyment.
Starting the vehicle
After starting the engine, fully depress the
foot brake pedal and push the shift lever
button before shifting the shift lever to the
R (Reverse), N (Neutral), D (Drive) or
Manual shift mode position. Be sure the
vehicle is fully stopped before attempting
to shift the shift lever.
This automatic transmission model is
designed so that the foot brake pedal
must be depressed before shifting from P
(Park) to any drive position while the
ignition switch position is ON.The shift lever cannot be moved out of the
P (Park) position and into any of the other
gear positions if the ignition switch is
pushed to the LOCK, OFF or ACC position.
1. Keep the foot brake pedal depressed
and push the shift lever button to shift
into a driving gear.
2. Release the parking brake and foot brake, then gradually start the vehicle
in motion.
WARNING
. Do not depress the accelerator pedal
while shifting from P (Park) or N
(Neutral) to R (Reverse), D (Drive) or
manual shift mode. Always depress the
brake pedal until shifting is completed.
Failure to do so could cause you to lose
control and have an accident.
. Cold engine idle speed is high, so use
caution when shifting into a forward or
reverse gear before the engine has
warmed up.
. Never shift to P (Park) or R (Reverse)
while vehicle is moving forward. Never
shift to P (Park), D (Drive) or manual shift
mode while vehicle is moving rearward. Failure to do so could cause you to lose
control and have an accident.
CAUTION
.
Except in an emergency, do not shift to
the N (Neutral) position while driving.
Coasting with the transmission in the N
(Neutral) position may cause serious
damage to the transmission.
. When stopping the vehicle on an uphill
grade, do not hold the vehicle by
depressing the accelerator pedal. The
foot brake should be used for this
purpose.
. Do not downshift abruptly on slippery
roads. This may cause a loss of control.
Starting and driving5-17
Page 359 of 578

5-18Starting and driving
SSD0945
Shift lever
To move the shift lever,
: Push the button while depressing the brake pedal,
: Push the button,
: Just move the shift lever.
Shifting
The shift lever position indicator light (next
to the shift lever) will be illuminated for
approximately 30 minutes after the ignition
switch is turned off. The indicator light may
also illuminate when the vehicle receives
radio waves. This is not a malfunction.
After starting the engine, fully depress the
brake pedal and shift the shift lever from P (Park) to R (Reverse), N (Neutral), D (Drive)
or Manual shift mode position.
Push the button to shift into P (Park) or R
(Reverse). All other positions can be
selected without pushing the button.
WARNING
Apply the parking brake if the shift lever is
in any position while the engine is not
running. Failure to do so could cause the
vehicle to move unexpectedly or roll away
and result in serious personal injury or
property damage.
CAUTION
Make sure the vehicle is completely stopped
and the transmission is in the P (Park)
position.
P (Park) position:
Use this position when the vehicle is
parked or when starting the engine. Make
sure the vehicle is completely stopped.
The
brake pedal must be depressed and the
shift lever button pushed in to move the shift lever from the N (Neutral) position or
any drive position to the P (Park) position.
Apply the parking brake. When parking on
a hill, apply the parking brake first, then
move the shift lever to the P (Park)
position.
CAUTION
Use this position only when the vehicle is
completely stopped.
R (Reverse):
Use this position to back up. Always be
sure the vehicle is completely stopped
before selecting the R (Reverse) position.
The brake pedal must be depressed and
the shift lever button pushed in to move
the shift lever from the P (Park) position,
the N (Neutral) position or any drive
position to the R (Reverse) position.
N (Neutral):
Neither forward nor reverse gear is en-
gaged. The engine can be started in this
position. You may shift to the N (Neutral)
position and restart a stalled engine while
the vehicle is moving.
Page 360 of 578

D (Drive):
Use this position for all normal forward
driving.
Manual shift mode
When the shift lever is in the manual shift
gate, the transmission is ready for the
manual shift mode. Shift ranges can be
selected manually by moving the shift lever
up or down.
When shifting up, move the shift lever to
the + (up) side. The transmission shifts to
the higher range.
When shifting down, move the shift lever to
the−(down) side. The transmission shifts
to the lower range.
When canceling the manual shift mode,
return the shift lever to the D (Drive)
position. The transmission returns to the
normal driving mode.
In the manual shift mode, the shift range is
displayed on the position indicator in the
meter.
Shift ranges up or down one by one as
follows:
M1 ?
/M2?
/M3?
/M4?
/M5?
/M6?
/M7
M7 (7th):
Use this position for all normal forward
driving at highway speeds.
M6 (6th) andM5 (5th):
Use this position when driving up long
slopes, or for engine braking when driving
down long slopes.
M4 (4th),M3 (3rd) andM2 (2nd):
Use these positions for hill climbing or
engine braking on downhill grades.
M1 (1st):
Use this position when climbing steep hills
slowly or driving slowly through deep
snow, or for maximum engine braking on
steep downhill grades.
. Remember not to drive at high speeds
for extended periods of time in lower
than 7th gear. This reduces fuel econ-
omy.
. Moving the shift lever rapidly to the
same side twice will shift the ranges in
succession.
. In the manual shift mode, the transmis-
sion may not shift to the selected gear
or may automatically shift to the other
gear. This helps maintain driving per-
formance and reduces the chance of vehicle damage or loss of control.
. When the transmission does not shift
to the selected gear, the Automatic
Transmission (AT) position indicator
light (in the vehicle information dis-
play) will blink and the buzzer will
sound.
. In the manual shift mode, the transmis-
sion automatically shifts down to 1st
gear before the vehicle comes to a
stop. When accelerating again, it is
necessary to shift up to the desired
range.
Accelerator downshift —In D (Drive)
position —
For passing or hill climbing, fully depress
the accelerator pedal to the floor. This
shifts the transmission down into the lower
gear, depending on the vehicle speed.
Fail-safe
When the fail-safe operation occurs, note
that the transmission will be locked in any
of the forward gears according to the
condition.
Starting and driving5-19
Page 361 of 578
5-20Starting and driving
If the vehicle is driven under extreme
conditions, such as excessive wheel spin-
ning and subsequent hard braking, the
fail-safe system may be activated. This will
occur even if all electrical circuits are
functioning properly. In this case, push
the switch to the OFF position and wait for
3 seconds. Then push the ignition switch
back to the ON position. The vehicle
should return to its normal operating
condition. If it does not return to its
normal operating condition, have an
INFINITI retailer check the transmission
and repair if necessary.
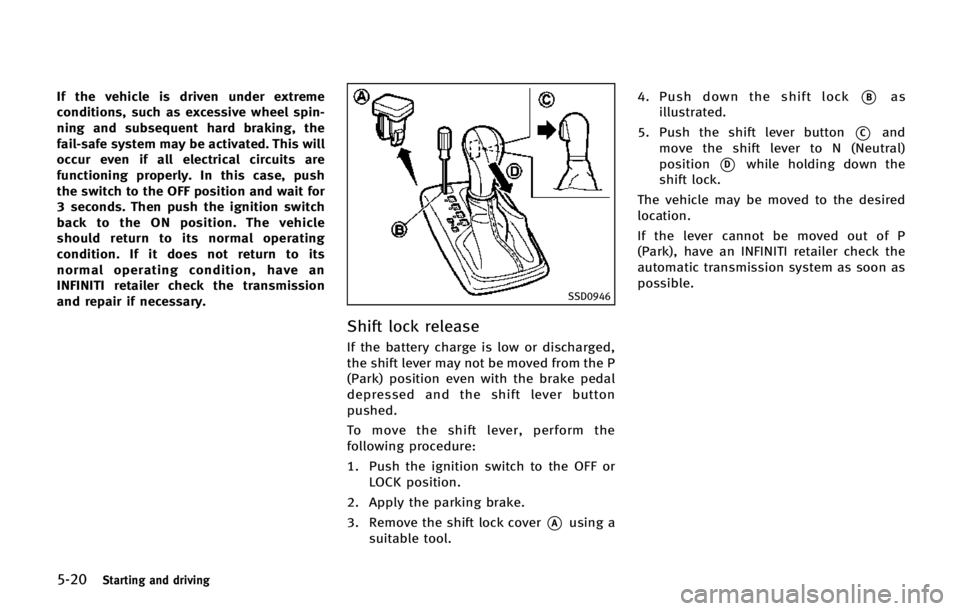
SSD0946
Shift lock release
If the battery charge is low or discharged,
the shift lever may not be moved from the P
(Park) position even with the brake pedal
depressed and the shift lever button
pushed.
To move the shift lever, perform the
following procedure:
1. Push the ignition switch to the OFF orLOCK position.
2. Apply the parking brake.
3. Remove the shift lock cover
*Ausing a
suitable tool. 4. Push down the shift lock
*Bas
illustrated.
5. Push the shift lever button
*Cand
move the shift lever to N (Neutral)
position
*Dwhile holding down the
shift lock.
The vehicle may be moved to the desired
location.
If the lever cannot be moved out of P
(Park), have an INFINITI retailer check the
automatic transmission system as soon as
possible.
Page 441 of 578

5-100Starting and driving
.Keep your engine tuned up.
. Follow the recommended scheduled
maintenance.
. Keep the tires inflated to the correct
pressure. Low tire pressure increases
tire wear and lowers fuel economy.
. Keep the wheels in correct alignment.
Improper alignment increases tire wear
and lowers fuel economy.
. Use the recommended viscosity engine
oil. (See “Engine oil and oil filter
recommendation” in the“9. Technical
and consumer information” section.)
WARNING
.Do not attempt to raise two wheels off
the ground and shift the transmission to
any drive or reverse position with the
engine running. Doing so may result in
drivetrain damage or unexpected vehicle
movement which could result in serious
vehicle damage or personal injury.
. Do not attempt to test a 4WD equipped
vehicle on a 2-wheel dynamometer or
similar equipment even if the other two
wheels are raised off the ground. Make
sure you inform test facility personnel
that your vehicle is equipped with 4WD
before it is placed on a dynamometer.
Using the wrong test equipment may
result in drivetrain damage or unex-
pected vehicle movement which could
result in serious vehicle damage or
personal injury.
CAUTION
.Do not drive the vehicle in the 4HI or 4LO
position on dry hard surface roads.
Driving on dry, hard surfaces in 4HI or 4LO may cause unnecessary noise, tire
wear and increased fuel consumption.
If the Four-Wheel Drive (4WD) warning
light turns on when driving on dry hard
surface roads:
—in the 4HI position, shift the 4WD
shift switch to AUTO.
—in the 4LO position, stop the vehicleand shift the transmission lever to
the N (Neutral) position with the
brake pedal depressed and shift the
4WD shift switch to AUTO.
If the 4WD warning light is still on
after the above operation, have your
vehicle checked by an INFINITI retai-
ler as soon as possible.
. The transfer case may be damaged if you
continue driving with the 4WD warning
light blinking.
See “On-pavement and off-road driving
precautions” earlier in this section for
other precautions for offroad driving.
INCREASING FUEL ECONOMY INFINITI ALL-MODE 4WD®(if so equipped)
Page 442 of 578
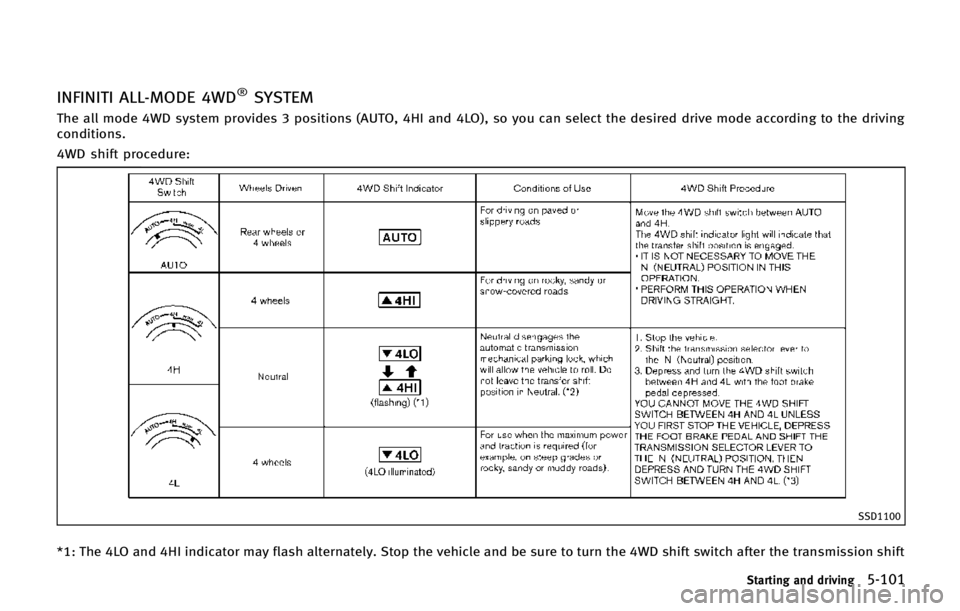
INFINITI ALL-MODE 4WD®SYSTEM
The all mode 4WD system provides 3 positions (AUTO, 4HI and 4LO), so you can select the desired drive mode according to the driving
conditions.
4WD shift procedure:
SSD1100
*1: The 4LO and 4HI indicator may flash alternately. Stop the vehicle and be sure to turn the 4WD shift switch after the transmission shift
Starting and driving5-101