lights INFINITI QX80 2016 Quick Reference Guide
[x] Cancel search | Manufacturer: INFINITI, Model Year: 2016, Model line: QX80, Model: INFINITI QX80 2016Pages: 32, PDF Size: 2.62 MB
Page 5 of 32
3
essential information
Tire Pressure Monitoring System (TPMS) with Tire Inflation Indicator
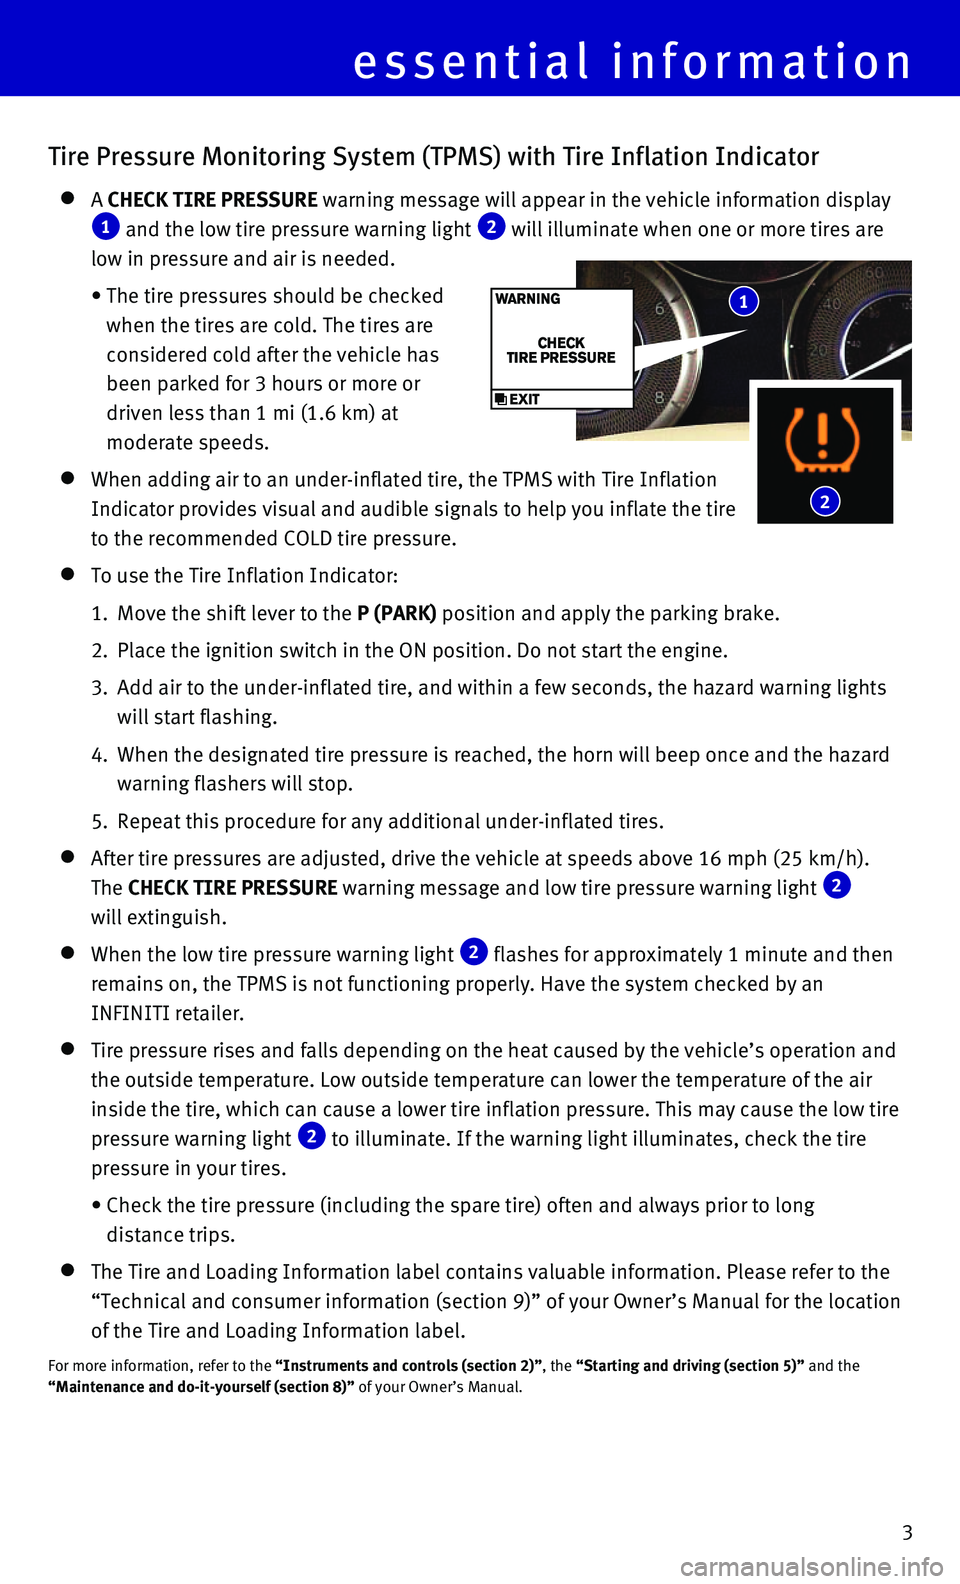
A CHECK TIRE PRESSURE warning message will appear in the vehicle information display 1 and the low tire pressure warning light 2 will illuminate when one or more tires are
low in pressure and air is needed.
• The tire pressures should be checked
when the tires are cold. The tires are
considered cold after the vehicle has
been parked for 3 hours or more or
driven less than 1 mi (1.6 km) at
moderate speeds.
When adding air to an under-inflated tire, the TPMS with Tire Inflation \
Indicator provides visual and audible signals to help you inflate the ti\
re
to the recommended COLD tire pressure.
To use the Tire Inflation Indicator:
1. Move the shift lever to the P (PARK) position and apply the parking brake.
2. Place the ignition switch in the ON position. Do not start the engine.
3. Add air to the under-inflated tire, and within a few seconds, the hazard\
warning lights
will start flashing.
4. When the designated tire pressure is reached, the horn will beep once an\
d the hazard
warning flashers will stop.
5. Repeat this procedure for any additional under-inflated tires.
After tire pressures are adjusted, drive the vehicle at speeds above 16 \
mph (25 km/h).
The CHECK TIRE PRESSURE warning message and low tire pressure warning light 2
will extinguish.
When the low tire pressure warning light 2 flashes for approximately 1 minute and then
remains on, the TPMS is not functioning properly. Have the system checke\
d by an
INFINITI retailer.
Tire pressure rises and falls depending on the heat caused by the vehicl\
e’s operation and
the outside temperature. Low outside temperature can lower the temperatu\
re of the air
inside the tire, which can cause a lower tire inflation pressure. This m\
ay cause the low tire
pressure warning light
2 to illuminate. If the warning light illuminates, check the tire
pressure in your tires.
• Check the tire pressure (including the spare tire) often and always pr\
ior to long
distance trips.
The Tire and Loading Information label contains valuable information. Pl\
ea se refer to the
“Technical and consumer information (section 9)” of your Owner’\
s Manual for the location
of the Tire and Loading Information label.
For more information, refer to the “Instruments and controls (section 2)”, the “Starting and driving (section 5)” and the
“Maintenance and do-it-yourself (section 8)” of your Owner’s Manual.
1
2
Page 9 of 32
7
Report Stolen Vehicle – A Response Specialist will attempt to obtain \
location
information from a reported stolen vehicle and provide that information \
to a local law
enforcement agency.
Remote Door Lock/Unlock – Remotely access your vehicle via an Infinit\
i Connection
Response Specialist or the designated website to remotely lock or unlock\
your vehicle.
Alarm Notification – This system will notify you when the factory-ins\
talled vehicle alarm
system has been activated.
Scheduled Maintenance Notification – Receive scheduled maintenance no\
tifications
based on mileage data provided by your vehicle.
Maintenance Alert – Receive notification of a vehicle system malfunct\
ion that triggers
instrument panel warning lights.
Destination Assistance – Receive point-of-interest assistance via a g\
uided IVR (Interactive
Voice Response) or a Response Specialist by pressing the key 3 on the map screen or
the Infiniti Connection™ web portal.
Destination Send-to-Vehicle – Find and download point-of interest inf\
ormation from
Google Maps™ mapping service.
Connected Search – Select “Connected Search” from the Destinati\
on menu on the
vehicle’s Navigation System to conduct a point-of-interest search wit\
hin a certain distance
of the vehicle’s location.
Drive Zone – Monitor the movement of your vehicle within a specified \
region. Set up
boundaries in the Monitoring section of the Infiniti Connection™ web \
portal.
Max Speed Alert – Set a maximum speed on the Infiniti Connection™ \
web portal. You will
receive notifications if your vehicle exceeds the maximum speed setting.\
Mobile Information Service – Receive the latest news headlines, stock\
quotes and sports
scores by setting up preferences on the Mobile Information Service page \
in the Infiniti
Connection™ web portal.
Valet Alert – Use to set up a 0.2-mile radius around your vehicle.
• Activate alerts by pressing the “Connect to Voice Menu” key on the\
Infiniti Connection
screen or by pressing the key 3 on the map screen.
• At the prompt, say “Valet Alert” and then “Activate” or “\
Deactivate”.
For more information, refer to the “Viewing technical information (section 7)” of your Navigation System Owner’s Manual.
Page 11 of 32
9
INFINITI Intelligent Key System
The INFINITI Intelligent Key system allows you to lock
or unlock your vehicle, open your liftgate and start the
engine. It is important to make sure the Intelligent Key
is with you (that is, in your pocket or purse).
LOCKING AND UNLOCKING YOUR VEHICLE
The operating range of the Intelligent Key is within
31.5 in (80 cm) from each request switch.
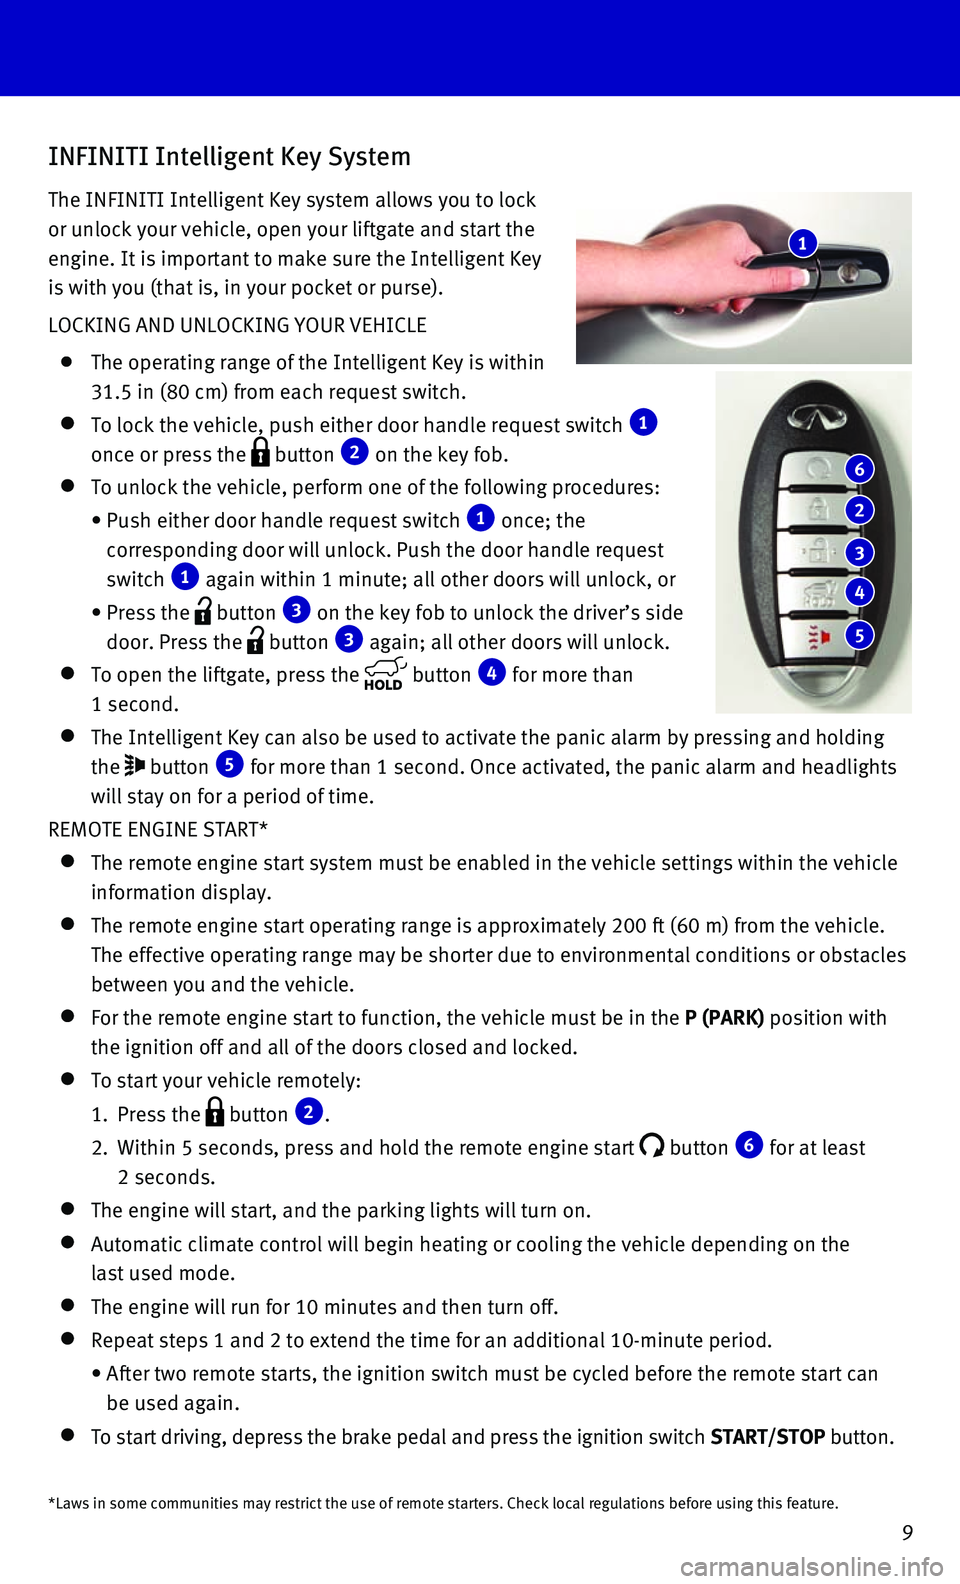
To lock the vehicle, push either door handle request switch 1
once or press the button 2 on the key fob.
To unlock the vehicle, perform one of the following procedures:
• Push either door handle request switch 1 once; the
corresponding door will unlock. Push the door handle request
switch 1 again within 1 minute; all other doors will unlock, or
• Press the button 3 on the key fob to unlock the driver’s side
door. Press the button 3 again; all other doors will unlock.
To open the liftgate, press the button 4 for more than
1 second.
The Intelligent Key can also be used to activate the panic alarm by pres\
sing and holding
the button 5 for more than 1 second. Once activated, the panic alarm and headlights \
will stay on for a period of time.
REMOTE ENGINE START*
The remote engine start system must be enabled in the vehicle settings w\
i thin the vehicle
information display.
The remote engine start operating range is approximately 200 ft (60 m)\
fro m the vehicle.
The effective operating range may be shorter due to environmental condit\
ions or obstacles
between you and the vehicle.
For the remote engine start to function, the vehicle must be in the P (PARK) position with
the ignition off and all of the doors closed and locked.
To start your vehicle remotely:
1. Press the button 2.
2. Within 5 seconds, press and hold the remote engine start button 6 for at least
2 seconds.
The engine will start, and the parking lights will turn on.
Automatic climate control will begin heating or cooling the vehicle depe\
nd ing on the
last used mode.
The engine will run for 10 minutes and then turn off.
Repeat steps 1 and 2 to extend the time for an additional 10-minute peri\
od .
• After two remote starts, the ignition switch must be cycled before the r\
emote start can
be used again.
To start driving, depress the brake pedal and press the ignition switch \
START/STOP button.
1
6
2
3
4
5
*Laws in some communities may restrict the use of remote starters. Check\
local regulations before using this feature.
Page 17 of 32
15
Headlight Control
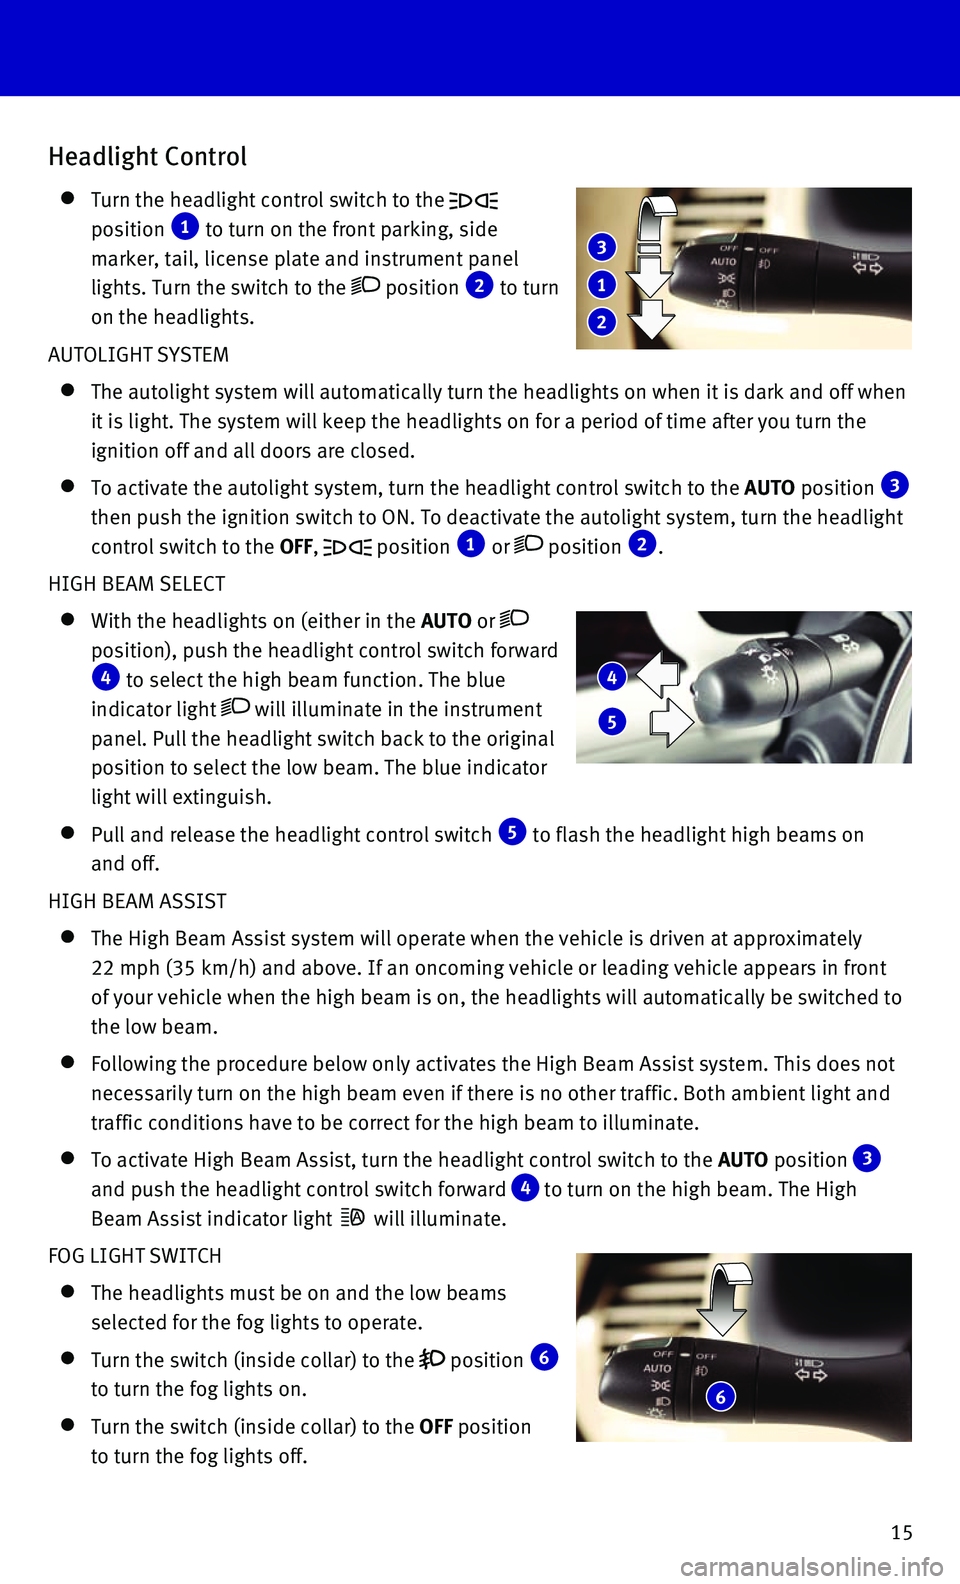
Turn the headlight control switch to the
position 1 to turn on the front parking, side
marker, tail, license plate and instrument panel
lights. Turn the switch to the
position 2 to turn
on the headlights.
AUTOLIGHT SYSTEM
The autolight system will automatically turn the headlights on when it i\
s da rk and off when
it is light. The system will keep the headlights on for a period of time\
after you turn the
ignition off and all doors are closed.
To activate the autolight system, turn the headlight control switch to t\
he AUTO position 3
then push the ignition switch to ON. To deactivate the autolight system,\
turn the headlight
control switch to the OFF,
position 1 or position 2.
HIGH BEAM SELECT
With the headlights on (either in the AUTO or
position), push the headlight control switch forward 4 to select the high beam function. The blue
indicator light
will illuminate in the instrument
panel. Pull the headlight switch back to the original
position to select the low beam. The blue indicator
light will extinguish.
Pull and release the headlight control switch 5 to flash the headlight high beams on
and off.
HIGH BEAM ASSIST
The High Beam Assist system will operate when the vehicle is driven at a\
pp roximately
22 mph (35 km/h) and above. If an oncoming vehicle or leading vehicle \
appears in front
of your vehicle when the high beam is on, the headlights will automatica\
lly be switched to
the low beam.
Following the procedure below only activates the High Beam Assist system\
. This does not
necessarily turn on the high beam even if there is no other traffic. Bot\
h ambient light and
traffic conditions have to be correct for the high beam to illuminate.
To activate High Beam Assist, turn the headlight control switch to the AUTO position 3
and push the headlight control switch forward
4 to turn on the high beam. The High
Beam Assist indicator light
will illuminate.
FOG LIGHT SWITCH
The headlights must be on and the low beams
selected for the fog lights to operate.
Turn the switch (inside collar) to the position 6
to turn the fog lights on.
Turn the switch (inside collar) to the OFF position
to turn the fog lights off.
1
2
3
4
5
6
Page 23 of 32
21
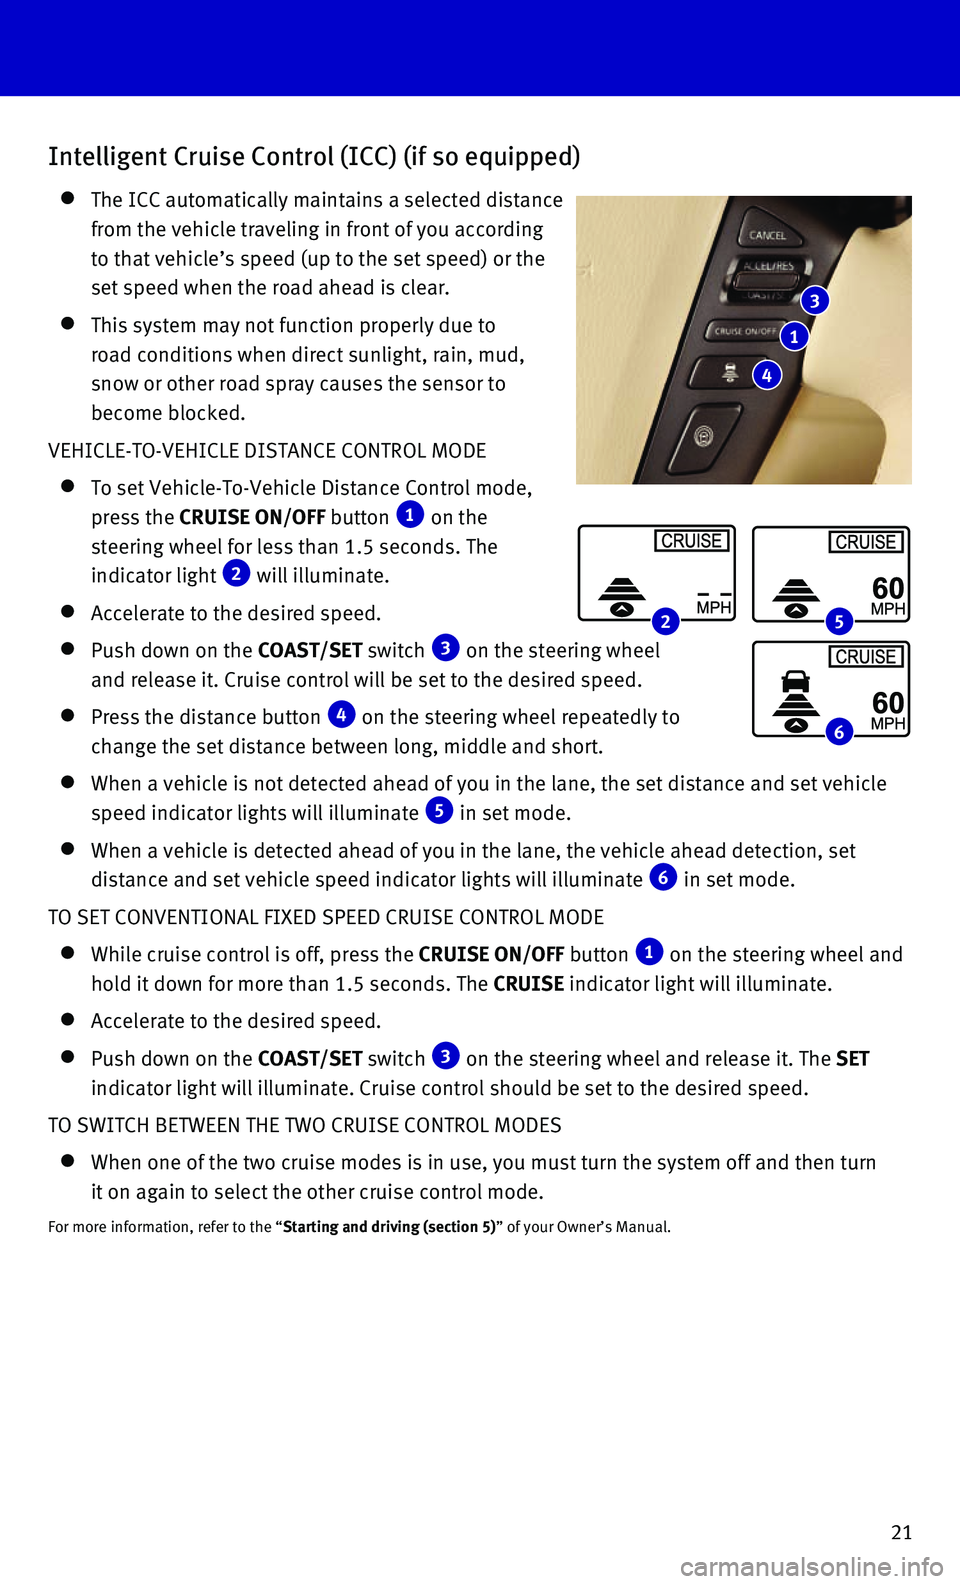
Intelligent Cruise Control (ICC) (if so equipped)
The ICC automatically maintains a selected distance
from the vehicle traveling in front of you according
to that vehicle’s speed (up to the set speed) or the
set speed when the road ahead is clear.
This system may not function properly due to
road conditions when direct sunlight, rain, mud,
snow or other road spray causes the sensor to
become blocked.
VEHICLE-TO-VEHICLE DISTANCE CONTROL MODE
To set Vehicle-To-Vehicle Distance Control mode,
press the CRUISE ON/OFF button 1 on the
steering wheel for less than 1.5 seconds. The
indicator light 2 will illuminate.
Accelerate to the desired speed.
Push down on the COAST/SET switch 3 on the steering wheel
and release it. Cruise control will be set to the desired speed.
Press the distance button 4 on the steering wheel repeatedly to
change the set distance between long, middle and short.
When a vehicle is not detected ahead of you in the lane, the set distanc\
e a nd set vehicle
speed indicator lights will illuminate 5 in set mode.
When a vehicle is detected ahead of you in the lane, the vehicle ahead d\
etection, set
distance and set vehicle speed indicator lights will illuminate 6 in set mode.
TO SET CONVENTIONAL FIXED SPEED CRUISE CONTROL MODE
While cruise control is off, press the CRUISE ON/OFF button 1 on the steering wheel and
hold it down for more than 1.5 seconds. The CRUISE indicator light will illuminate.
Accelerate to the desired speed.
Push down on the COAST/SET switch 3 on the steering wheel and release it. The SET
indicator light will illuminate. Cruise control should be set to the des\
ired speed.
TO SWITCH BETWEEN THE TWO CRUISE CONTROL MODES
When one of the two cruise modes is in use, you must turn the system off\
a nd then turn
it on again to select the other cruise control mode.
For more information, refer to the “Starting and driving (section 5)” of your Owner’s Manual.
3
1
4
2 5
6
Page 30 of 32
28
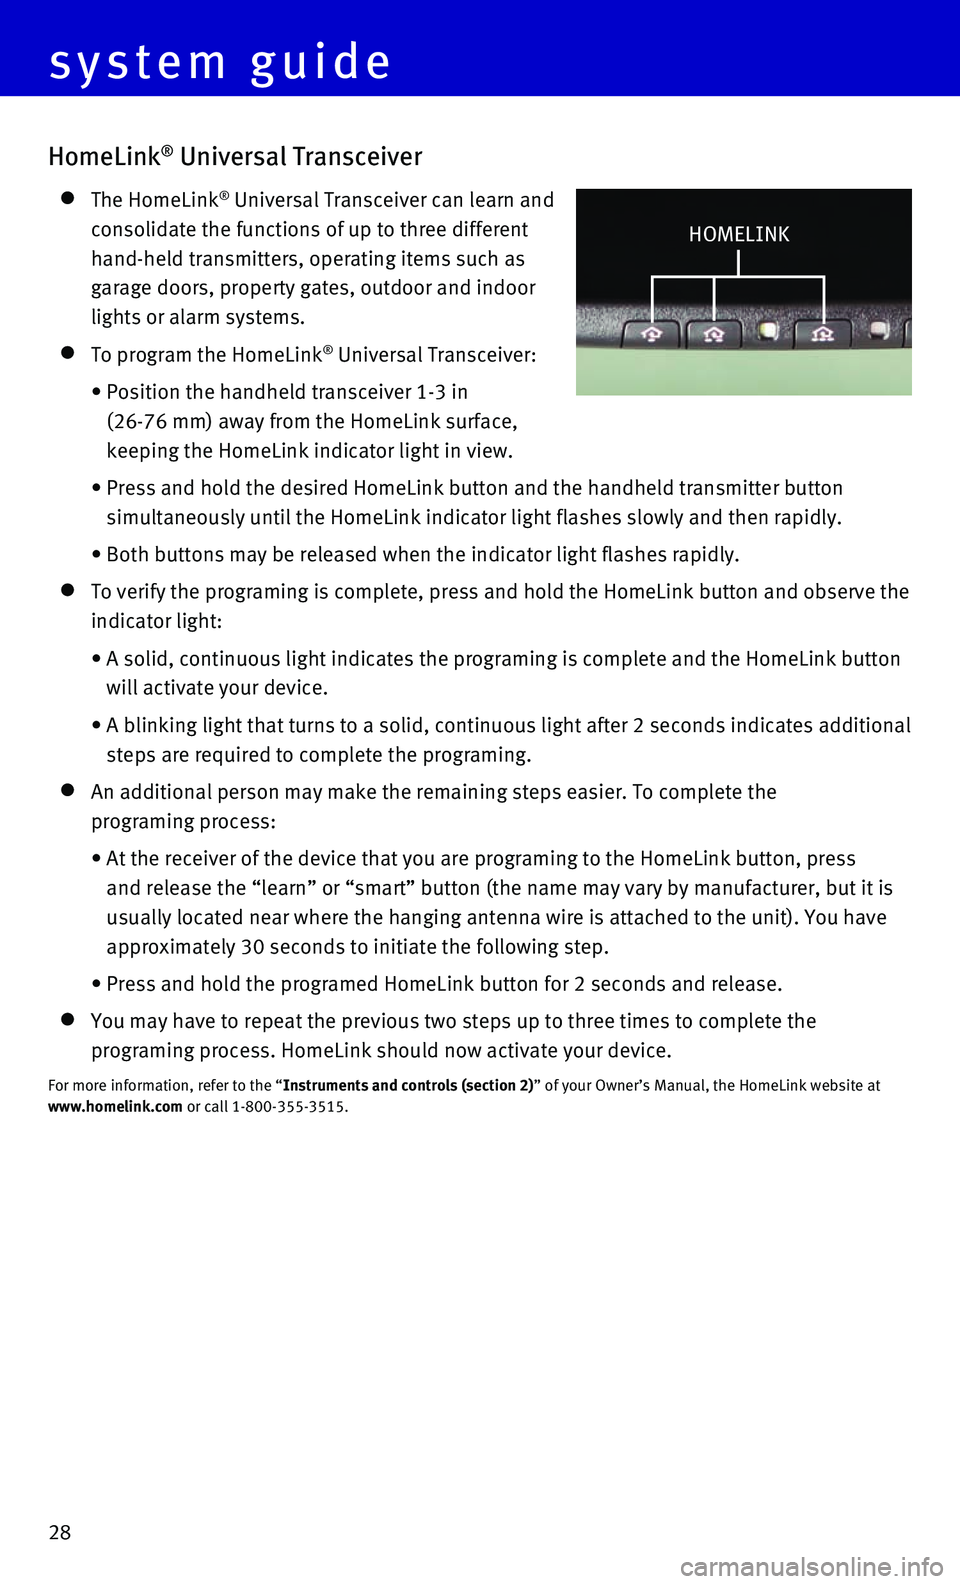
HomeLink® Universal Transceiver
The HomeLink® Universal Transceiver can learn and
consolidate the functions of up to three different
hand-held transmitters, operating items such as
garage doors, property gates, outdoor and indoor
lights or alarm systems.
To program the HomeLink® Universal Transceiver:
• Position the handheld transceiver 1-3 in
(26-76 mm) away from the HomeLink surface,
keeping the HomeLink indicator light in view.
• Press and hold the desired HomeLink button and the handheld transmitter \
button
simultaneously until the HomeLink indicator light flashes slowly and the\
n rapidly.
• Both buttons may be released when the indicator light flashes rapidly.
To verify the programing is complete, press and hold the HomeLink button\
and observe the
indicator light:
• A solid, continuous light indicates the programing is complete and the H\
omeLink button
will activate your device.
• A blinking light that turns to a solid, continuous light after 2 seconds\
indicates additional
steps are required to complete the programing.
An additional person may make the remaining steps easier. To complete th\
e
programing process:
• At the receiver of the device that you are programing to the HomeLink bu\
tton, press
and release the “learn” or “smart” button (the name may var\
y by manufacturer, but it is
usually located near where the hanging antenna wire is attached to the u\
nit). You have
approximately 30 seconds to initiate the following step.
• Press and hold the programed HomeLink button for 2 seconds and release.
You may have to repeat the previous two steps up to three times to compl\
e te the
programing process. HomeLink should now activate your device.
For more information, refer to the “Instruments and controls (section 2)” of your Owner’s Manual, the HomeLink website at
www.homelink.com or call 1-800-355-3515.
HOMELINK
system guide