audio INFINITI QX80 2019 Infiniti Connection
[x] Cancel search | Manufacturer: INFINITI, Model Year: 2019, Model line: QX80, Model: INFINITI QX80 2019Pages: 283, PDF Size: 1.59 MB
Page 59 of 283

Specification chart for CD
Supported mediaCD, CD-R, CD-RW
Supported file systems CD, CD-R, CD-RW
Supported ver-
sions*1 MP3
Version
MPEG1 Audio Layer3, MPEG2 Audio Layer3, MPEG2.5 Audio Layer3
Sampling frequency MPEG2.5 Audio Layer3: 8kHz, 11.025kHz, 12kHz
MPEG2 Audio Layer3: 16kHz, 22.05kHz, 24kHz
MPEG1 Audio Layer3: 32kHz, 44.1kHz, 48kHz
Bit rate 8 kbps - 320 kbps, VBR
WMA*2 Version
WMA7, WMA8, WMA9.1, WMA9.2
Bit rate/Sampling frequency Bit rate: Ver7, Ver8: 32-192kbps Ver9,Ver9.1,Ver9.2:32-192kbps, VBR
Sampling frequency: Ver7, Ver8:8k/11.025k/16k/22k/32k/44.1k Ver9,Ver9.1,
Ver9.2:8k/11.025k/16k/22k/32k/44.1k/48 kHz
AAC*3 Bit rate/Sampling frequency Bit rate: 8-320 kbps, VBR
Sampling frequency: 11.025-48kHz
Tag information (Song title, Artist name and Album name) ID3 tag VER1.0, VER1.1, VER2.2, VER2.3, VER2.4 (MP3 only)
WMA tag (WMA only)
AAC Tag (AAC only)
Folder levels CD, CD-R, CD-RW: Folder levels: 8, Folders: 255 (including root folder), Files: 510
(Max. 255 files for one folder)
Displayable character codes*4 01: SHIFT-JIS, ASCII, ISO-8859-1, UTF-8, UTF-16 BOM, UTF-16 Big Endian, UTF-
16 Little Endian, 02: UNICODE, 03: UTF-16
*1 Files created with a combination of 48 kHz sampling frequency and 64 kbps bit rate cannot be played.
*2 Protected WMA files (DRM) cannot be played.
*3 Made by iTunes®.
3. Audio system
3-11
Page 60 of 283

3. Audio system
*4 Available codes depend on what kind of media, versions and information are going to be displayed.
Specification chart for USB
Supported mediaUSB2.0
Supported file systems FAT32
Folder levels Folder levels: 8, Folders: 512 (including the root folder), Files: 5000
Format Sampling rateSupported/Not supported
MPEG1 Layer-1- Not supported
Layer-2 - Not supported
Layer-3 44.1, 48, 32 kHz Supported (32–320 kbps)
MPEG2 Layer-1- Not supported
Layer-2 - Not supported
Layer-3 22.05, 24, 16 kHz Supported (16–160 kbps)
MPEG2.5 Layer-1- Not supported
Layer-2 - Not supported
Layer-3 11.025, 12, 8 kHz Supported (16–160 kbps)
WMA*1 32, 44.1, 48 kHzSupported VER.7/8 (48–192 bps)
VER.9/9.1/9.2 (48–320 bps)
AAC (MPEG4)*2
(Extension “m4a” only) 8, 11.025, 12, 16, 22.05, 24, 32, 44.1, 48
kHzSupported (16–320 kbps)
*1 Professional (voice, lossless, multichannel) is not supported.
*2 AAC (MPEG-2) is not supported.
3-12
Page 61 of 283

Windows Media Player
This product is protected by certain intellec-
tual property right of Microsoft. Use or
distribution of such technology outside of
this product is prohibited without a license
from Microsoft.
BLUETOOTH® STREAMING
AUDIO
.Some Bluetooth® streaming audio de-
vices may not be recognized by the in-
vehicle audio system.
. It is necessary to set up the wireless
connection between a compatible Blue-
tooth® streaming audio device and the
in-vehicle Bluetooth® module before
using the Bluetooth® streaming audio.
. The Bluetooth® streaming audio may be
stopped under the following conditions:
— When receiving a hands-free call
— When checking the connection to the hands-free phone
— When connecting the hands-free phone or audio device
— When downloading a phonebook memory from a connected cellular
phone .
Do not place a Bluetooth® streaming
audio device in an area surrounded by
metal or far away from the in-vehicle
Bluetooth® module to prevent tone
quality degradation and wireless con-
nection disruption.
. While an audio device is connected
through Bluetooth® wireless connection,
the battery of the device may discharge
quicker than usual.
. This system supports the Bluetooth®
Advanced Audio Distribution Profile
(A2DP) and Audio/Video Remote Con-
trol Profile (AVRCP).
. Wireless LAN (Wi-Fi) and the Blue-
tooth® functions share the same fre-
quency band (2.4 GHz). Using the
Bluetooth® and the wireless LAN func-
tions at the same time may slow down or
disconnect the communication and cause
undesired noise. It is recommended that
you turn off the wireless LAN (Wi-Fi)
when using the Bluetooth® functions.
3. Audio system
3-13
Page 62 of 283
3. Audio system
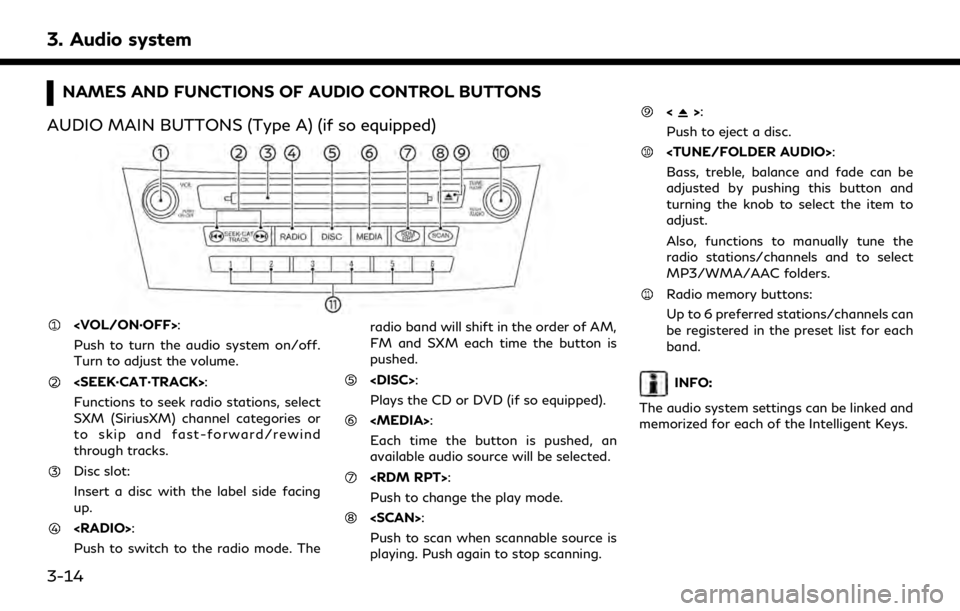
NAMES AND FUNCTIONS OF AUDIO CONTROL BUTTONS
AUDIO MAIN BUTTONS (Type A) (if so equipped)
Push to turn the audio system on/off.
Turn to adjust the volume.
Functions to seek radio stations, select
SXM (SiriusXM) channel categories or
to skip and fast-forward/rewind
through tracks.
Disc slot:
Insert a disc with the label side facing
up.
Push to switch to the radio mode. The radio band will shift in the order of AM,
FM and SXM each time the button is
pushed.
Plays the CD or DVD (if so equipped).
Each time the button is pushed, an
available audio source will be selected.
Push to change the play mode.
Push to scan when scannable source is
playing. Push again to stop scanning.
<>:
Push to eject a disc.
Bass, treble, balance and fade can be
adjusted by pushing this button and
turning the knob to select the item to
adjust.
Also, functions to manually tune the
radio stations/channels and to select
MP3/WMA/AAC folders.
Radio memory buttons:
Up to 6 preferred stations/channels can
be registered in the preset list for each
band.
INFO:
The audio system settings can be linked and
memorized for each of the Intelligent Keys.
3-14
Page 63 of 283
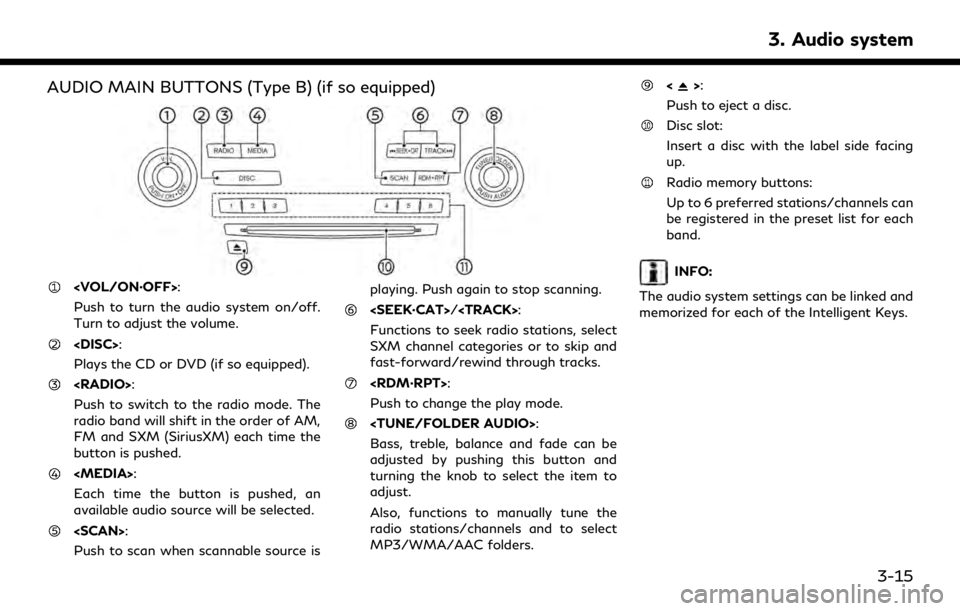
AUDIO MAIN BUTTONS (Type B) (if so equipped)
Push to turn the audio system on/off.
Turn to adjust the volume.
Plays the CD or DVD (if so equipped).
Push to switch to the radio mode. The
radio band will shift in the order of AM,
FM and SXM (SiriusXM) each time the
button is pushed.
Each time the button is pushed, an
available audio source will be selected.
Push to scan when scannable source isplaying. Push again to stop scanning.
Page 64 of 283
3. Audio system
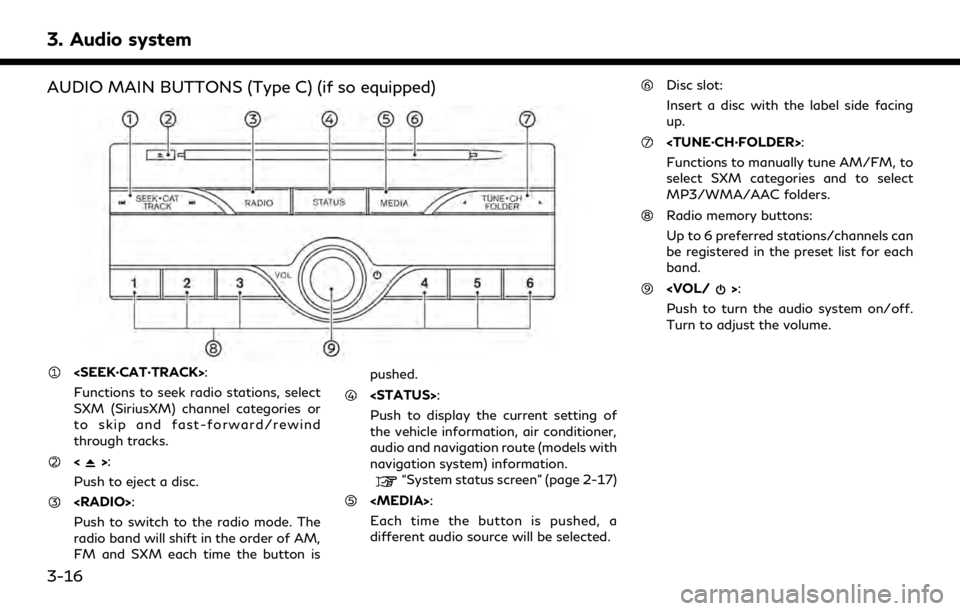
AUDIO MAIN BUTTONS (Type C) (if so equipped)
Functions to seek radio stations, select
SXM (SiriusXM) channel categories or
to skip and fast-forward/rewind
through tracks.
<>:
Push to eject a disc.
Push to switch to the radio mode. The
radio band will shift in the order of AM,
FM and SXM each time the button is pushed.
Push to display the current setting of
the vehicle information, air conditioner,
audio and navigation route (models with
navigation system) information.
“System status screen” (page 2-17)
Each time the button is pushed, a
different audio source will be selected.
Disc slot:
Insert a disc with the label side facing
up.
Functions to manually tune AM/FM, to
select SXM categories and to select
MP3/WMA/AAC folders.
Radio memory buttons:
Up to 6 preferred stations/channels can
be registered in the preset list for each
band.
Push to turn the audio system on/off.
Turn to adjust the volume.
3-16
Page 65 of 283
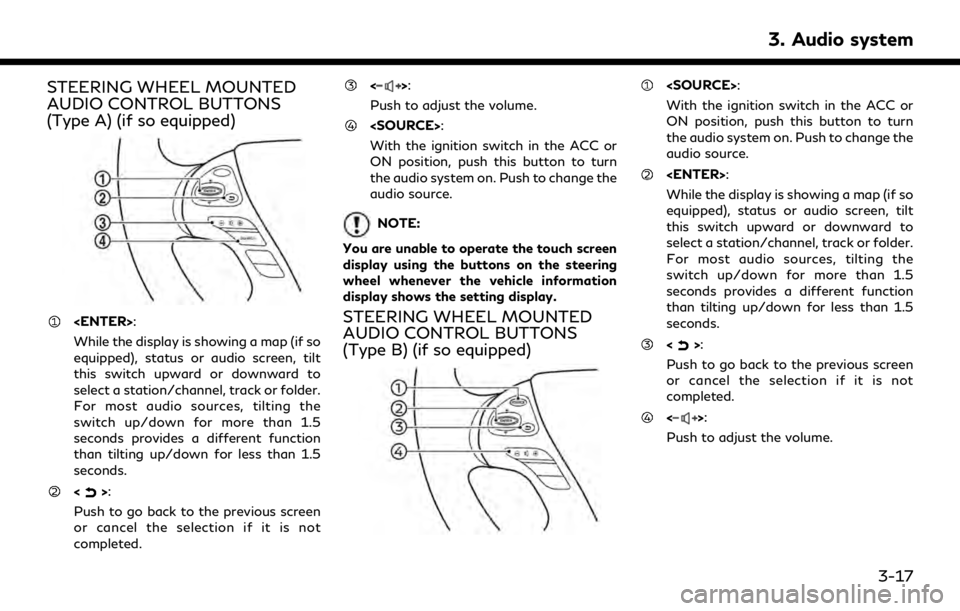
STEERING WHEEL MOUNTED
AUDIO CONTROL BUTTONS
(Type A) (if so equipped)
While the display is showing a map (if so
equipped), status or audio screen, tilt
this switch upward or downward to
select a station/channel, track or folder.
For most audio sources, tilting the
switch up/down for more than 1.5
seconds provides a different function
than tilting up/down for less than 1.5
seconds.
<>:
Push to go back to the previous screen
or cancel the selection if it is not
completed.
<>:
Push to adjust the volume.
With the ignition switch in the ACC or
ON position, push this button to turn
the audio system on. Push to change the
audio source.
NOTE:
You are unable to operate the touch screen
display using the buttons on the steering
wheel whenever the vehicle information
display shows the setting display.
STEERING WHEEL MOUNTED
AUDIO CONTROL BUTTONS
(Type B) (if so equipped)
With the ignition switch in the ACC or
ON position, push this button to turn
the audio system on. Push to change the
audio source.
While the display is showing a map (if so
equipped), status or audio screen, tilt
this switch upward or downward to
select a station/channel, track or folder.
For most audio sources, tilting the
switch up/down for more than 1.5
seconds provides a different function
than tilting up/down for less than 1.5
seconds.
<>:
Push to go back to the previous screen
or cancel the selection if it is not
completed.
<>:
Push to adjust the volume.
3. Audio system
3-17
Page 66 of 283
3. Audio system
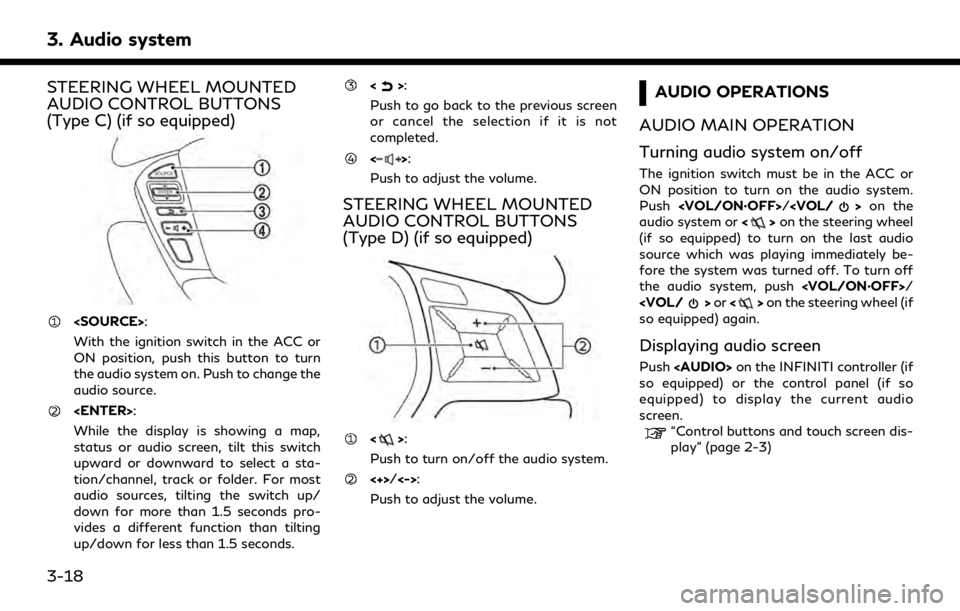
STEERING WHEEL MOUNTED
AUDIO CONTROL BUTTONS
(Type C) (if so equipped)
With the ignition switch in the ACC or
ON position, push this button to turn
the audio system on. Push to change the
audio source.
While the display is showing a map,
status or audio screen, tilt this switch
upward or downward to select a sta-
tion/channel, track or folder. For most
audio sources, tilting the switch up/
down for more than 1.5 seconds pro-
vides a different function than tilting
up/down for less than 1.5 seconds.
<>:
Push to go back to the previous screen
or cancel the selection if it is not
completed.
<>:
Push to adjust the volume.
STEERING WHEEL MOUNTED
AUDIO CONTROL BUTTONS
(Type D) (if so equipped)
<>:
Push to turn on/off the audio system.
<+>/<->:
Push to adjust the volume.
AUDIO OPERATIONS
AUDIO MAIN OPERATION
Turning audio system on/off
The ignition switch must be in the ACC or
ON position to turn on the audio system.
Push
audio system or <>on the steering wheel
(if so equipped) to turn on the last audio
source which was playing immediately be-
fore the system was turned off. To turn off
the audio system, push
so equipped) again.
Displaying audio screen
Push
Page 67 of 283
![INFINITI QX80 2019 Infiniti Connection Selecting audio source
1. Turn on the audio source menu screen bytouching [Source] on the upper left
corner of the audio screen.
2. Select an item from the audio source menu screen.
. Pushing <RADIO>/ INFINITI QX80 2019 Infiniti Connection Selecting audio source
1. Turn on the audio source menu screen bytouching [Source] on the upper left
corner of the audio screen.
2. Select an item from the audio source menu screen.
. Pushing <RADIO>/](/img/42/35077/w960_35077-66.png)
Selecting audio source
1. Turn on the audio source menu screen bytouching [Source] on the upper left
corner of the audio screen.
2. Select an item from the audio source menu screen.
. Pushing
equipped) can also change the audio
source.
“Names and functions of audio
control buttons” (page 3-14)
. If the audio system has been turned off
while one of the audio sources was
playing, turning the audio system back
on will play the audio source that was
playing when the system was turned off. .
The audio source can also be changed
with the source bar on top of the audio
screen.
Audio source bar
The audio source can be changed with the
source bar on top of the audio screen. The
source bar display can be turned on/off.
Example
Turning source bar on/off:
You can select whether the source bar on
top of the audio screens is displayed or not.
1. Touch [Source] on the upper left corner
of the audio screen.
2. Touch [Show Source Bar] to turn the indicator on/off.
Editing source bar:
The audio sources to be displayed on the
source bar can be changed. 1. Touch [Source] on the upper left corner
of the audio screen.
2. Touch [Edit Source Bar].
3. Touch one of the keys on the source bar and then touch one of the audio sources
from the source list to register the audio
source in the source bar.
3. Audio system
3-19
Page 68 of 283
![INFINITI QX80 2019 Infiniti Connection 3. Audio system
RADIO
How to view radio operation screenThe radio screen can be viewed and oper-
ated on the touch screen display.
Radio mode indicator:
The current radio mode is displayed.
[Source]:
INFINITI QX80 2019 Infiniti Connection 3. Audio system
RADIO
How to view radio operation screenThe radio screen can be viewed and oper-
ated on the touch screen display.
Radio mode indicator:
The current radio mode is displayed.
[Source]:](/img/42/35077/w960_35077-67.png)
3. Audio system
RADIO
How to view radio operation screenThe radio screen can be viewed and oper-
ated on the touch screen display.
Radio mode indicator:
The current radio mode is displayed.
[Source]:
Touch to switch to the source select
screen.
“Selecting audio source”
(page 3-19)
[Control]:
Touch to display the control screen.
“Radio controls” (page 3-23)
Radio band indicator:
Current radio band (AM, FM or SXM) is
displayed.
Reception information display:
Reception information available at the
time such as frequency, station/channel
name, etc. are displayed.
On the SXM screen, touch this area to
display the category list.
HD Radio reception status indicator (for
AM and FM) (if so equipped):
The icon is displayed when HD Radio
digital signal is received. The icon
flashes when the radio is acquiring the
3-20