mirror ISUZU TFS SERIES 1997 Workshop Manual
[x] Cancel search | Manufacturer: ISUZU, Model Year: 1997, Model line: TFS SERIES, Model: ISUZU TFS SERIES 1997Pages: 1600, PDF Size: 40.98 MB
Page 469 of 1600
CAB 10-15
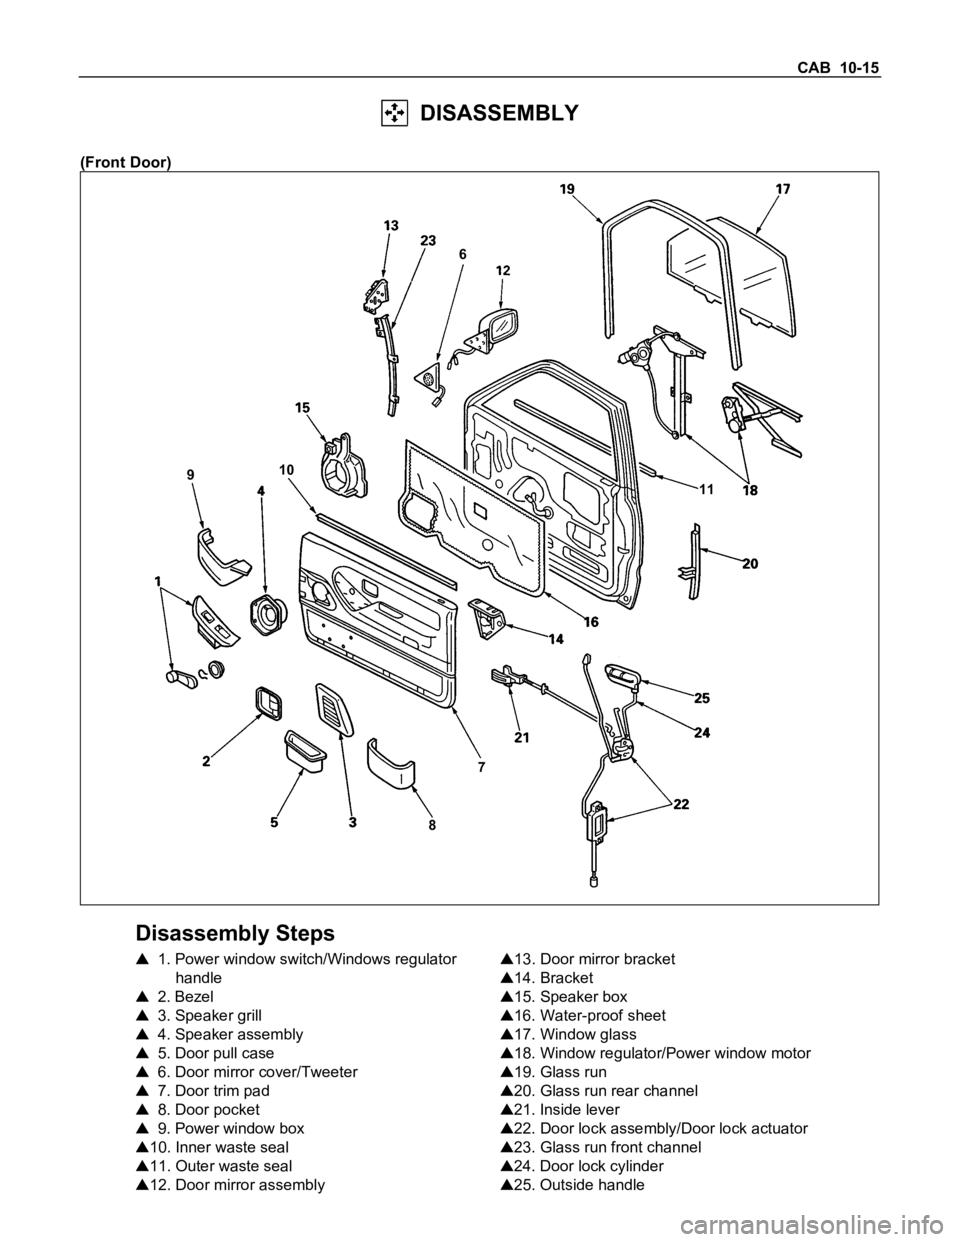
DISASSEMBLY
(Front Door)
87 910
11 6
Disassembly Steps
1. Power window switch/Windows regulator
handle
2. Bezel
3. Speaker grill
4. Speaker assembly
5. Door pull case
6. Door mirror cover/Tweeter
7. Door trim pad
8. Door pocket
9. Power window box
10. Inner waste seal
11. Outer waste seal
12. Door mirror assembly
13. Door mirror bracket
14. Bracket
15. Speaker box
16. Water-proof sheet
17. Window glass
18. Window regulator/Power window motor
19. Glass run
20. Glass run rear channel
21. Inside lever
22. Door lock assembly/Door lock actuator
23. Glass run front channel
24. Door lock cylinder
25. Outside handle
Page 471 of 1600
CAB 10-17
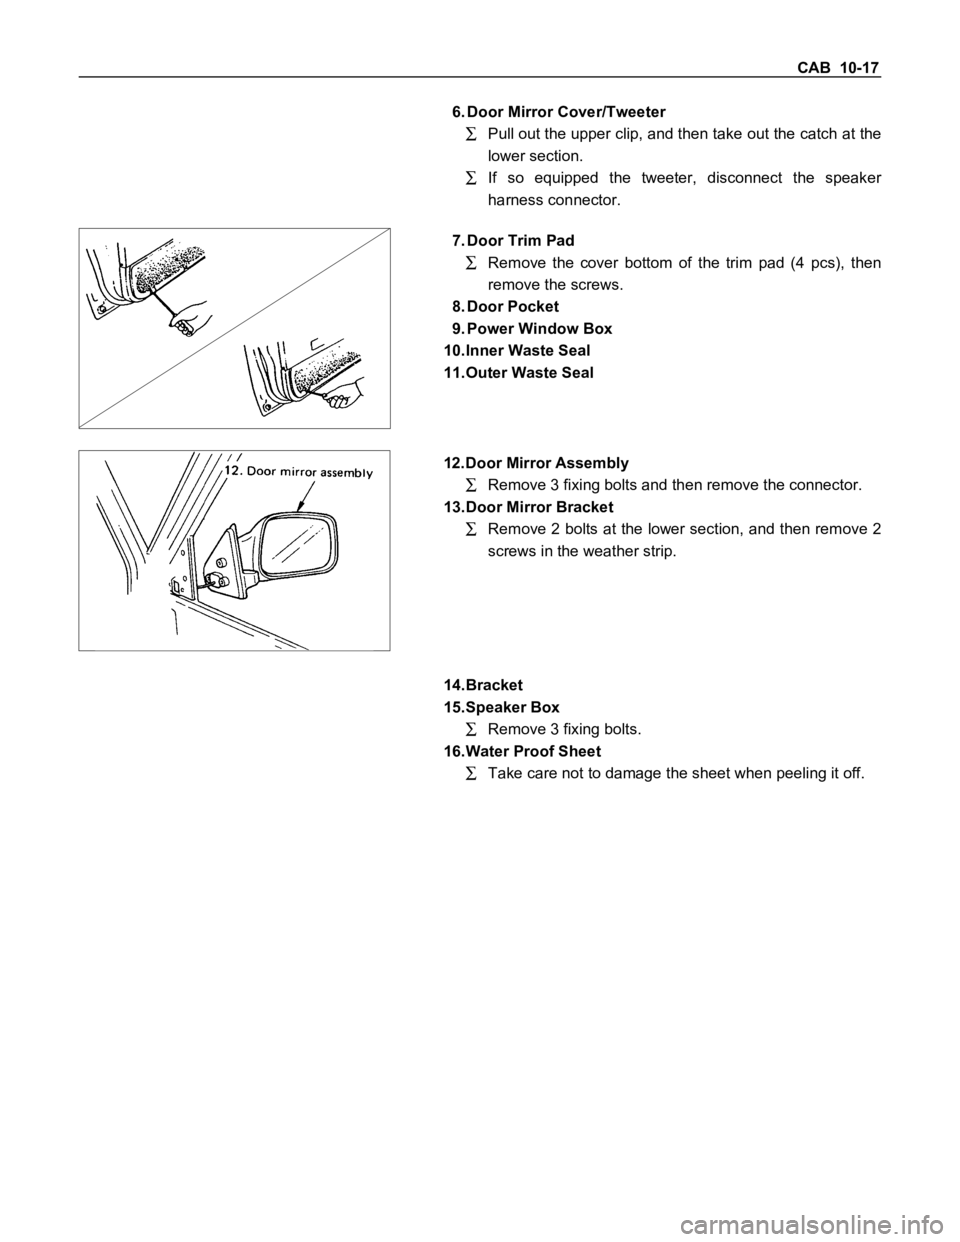
6. Door Mirror Cover/Tweeter
Pull out the upper clip, and then take out the catch at the
lower section.
If so equipped the tweeter, disconnect the speaker
harness connector.
7. Door Trim Pad
Remove the cover bottom of the trim pad (4 pcs), then
remove the screws.
8. Door Pocket
9. Power Window Box
10.Inner Waste Seal
11.Outer Waste Seal
12.Door Mirror Assembly
Remove 3 fixing bolts and then remove the connector.
13.Door Mirror Bracket
Remove 2 bolts at the lower section, and then remove 2
screws in the weather strip.
14.Bracket
15.Speaker Box
Remove 3 fixing bolts.
16.Water Proof Sheet
Take care not to damage the sheet when peeling it off.
Page 477 of 1600
CAB 10-23
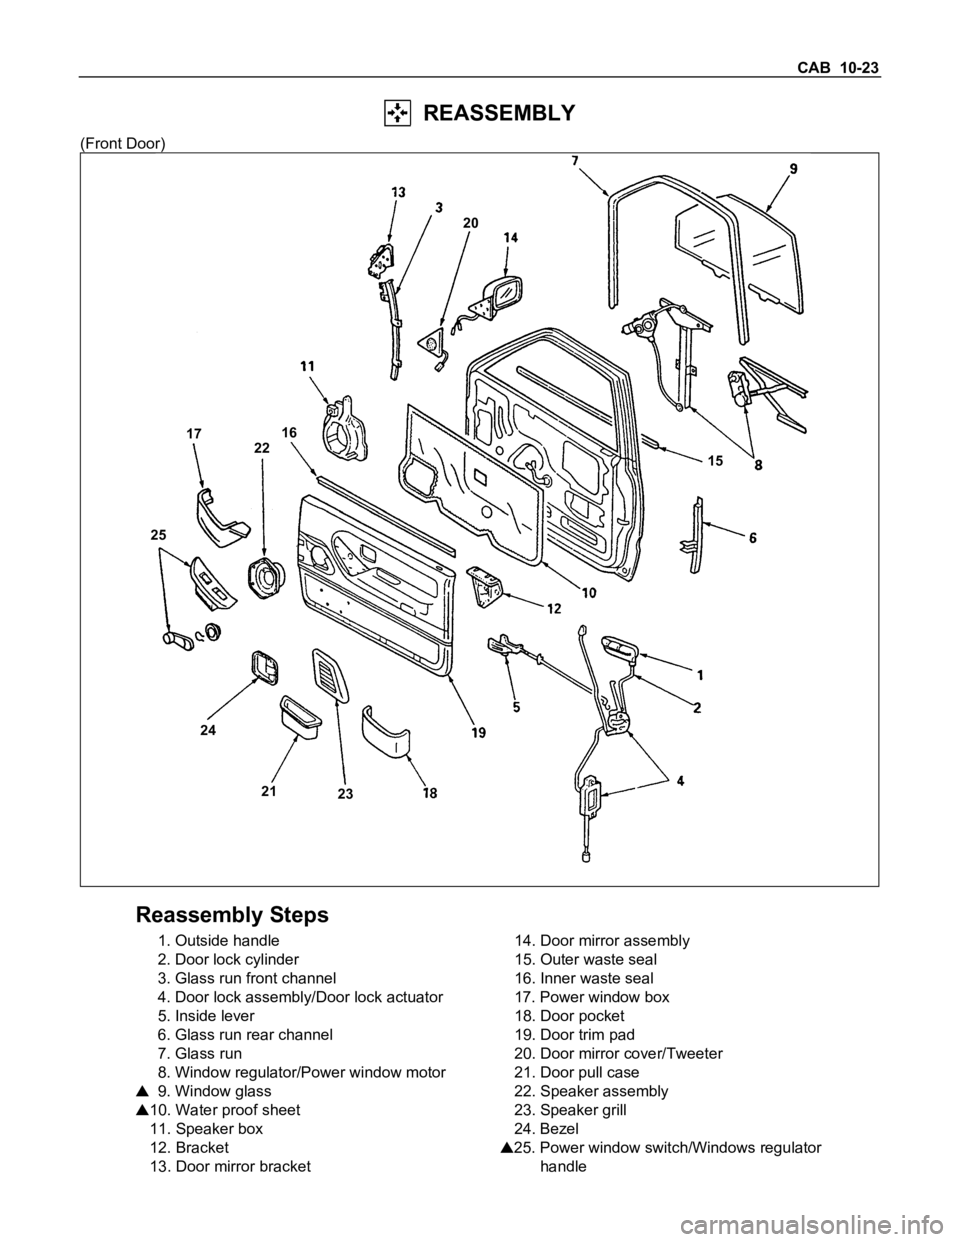
REASSEMBLY
(Front Door)
15
23 21 24 2522 171620
Reassembly Steps
1. Outside handle
2. Door lock cylinder
3. Glass run front channel
4. Door lock assembly/Door lock actuator
5. Inside lever
6. Glass run rear channel
7. Glass run
8. Window regulator/Power window motor
9. Window glass
10. Water proof sheet
11. Speaker box
12. Bracket
13. Door mirror bracket14. Door mirror assembly
15. Outer waste seal
16. Inner waste seal
17. Power window box
18. Door pocket
19. Door trim pad
20. Door mirror cover/Tweeter
21. Door pull case
22. Speaker assembly
23. Speaker grill
24. Bezel
25. Power window switch/Windows regulator
handle
Page 488 of 1600
10-34 CAB
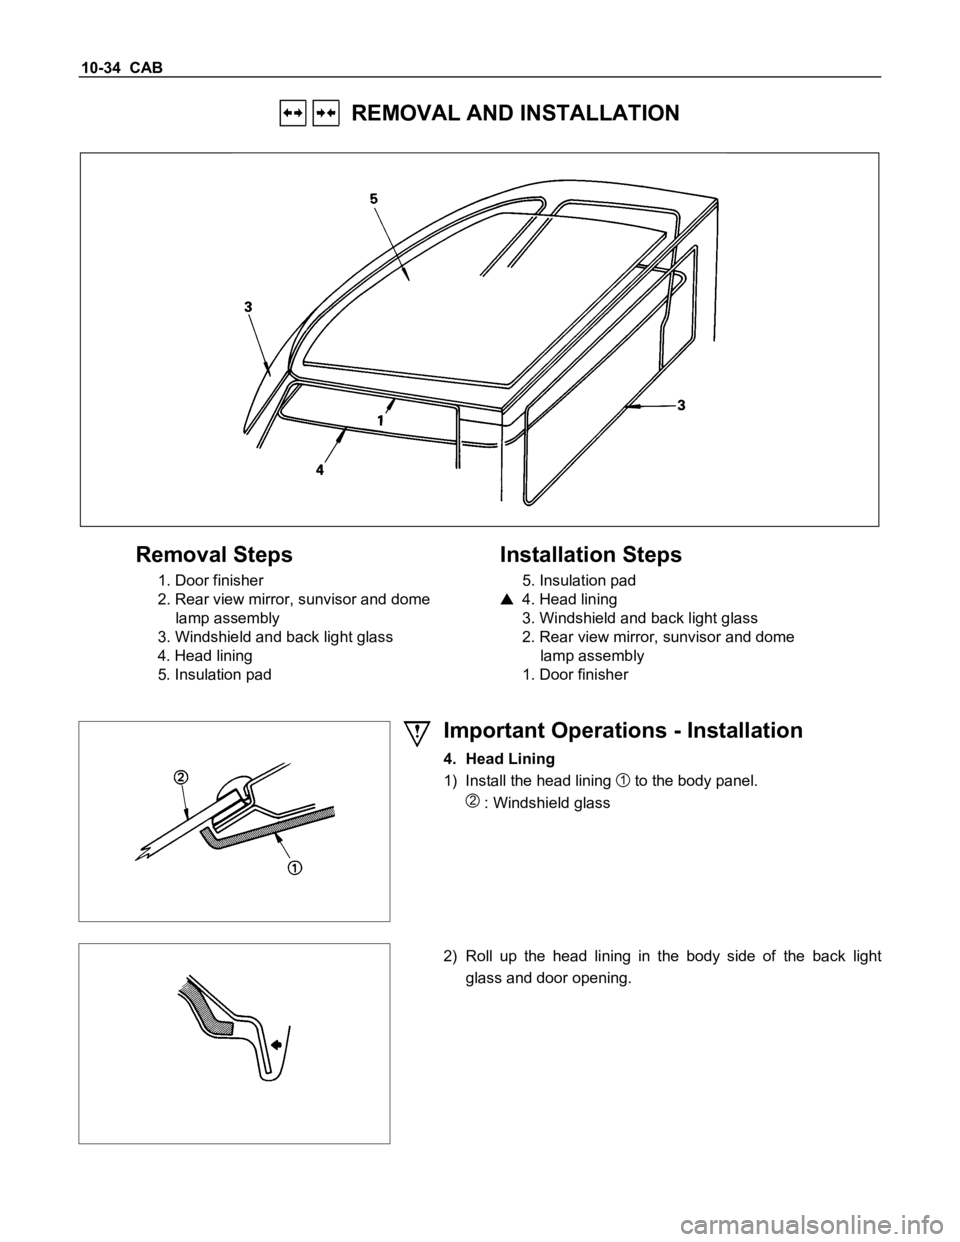
REMOVAL AND INSTALLATION
Removal Steps
1. Door finisher
2. Rear view mirror, sunvisor and dome
lamp assembly
3. Windshield and back light glass
4. Head lining
5. Insulation pad
Installation Steps
5. Insulation pad
4. Head lining
3. Windshield and back light glass
2. Rear view mirror, sunvisor and dome
lamp assembly
1. Door finisher
Important Operations - Installation
4. Head Lining
1) Install the head lining
1 to the body panel.
2 : Windshield glass
2) Roll up the head lining in the body side of the back light
glass and door opening.
Page 512 of 1600
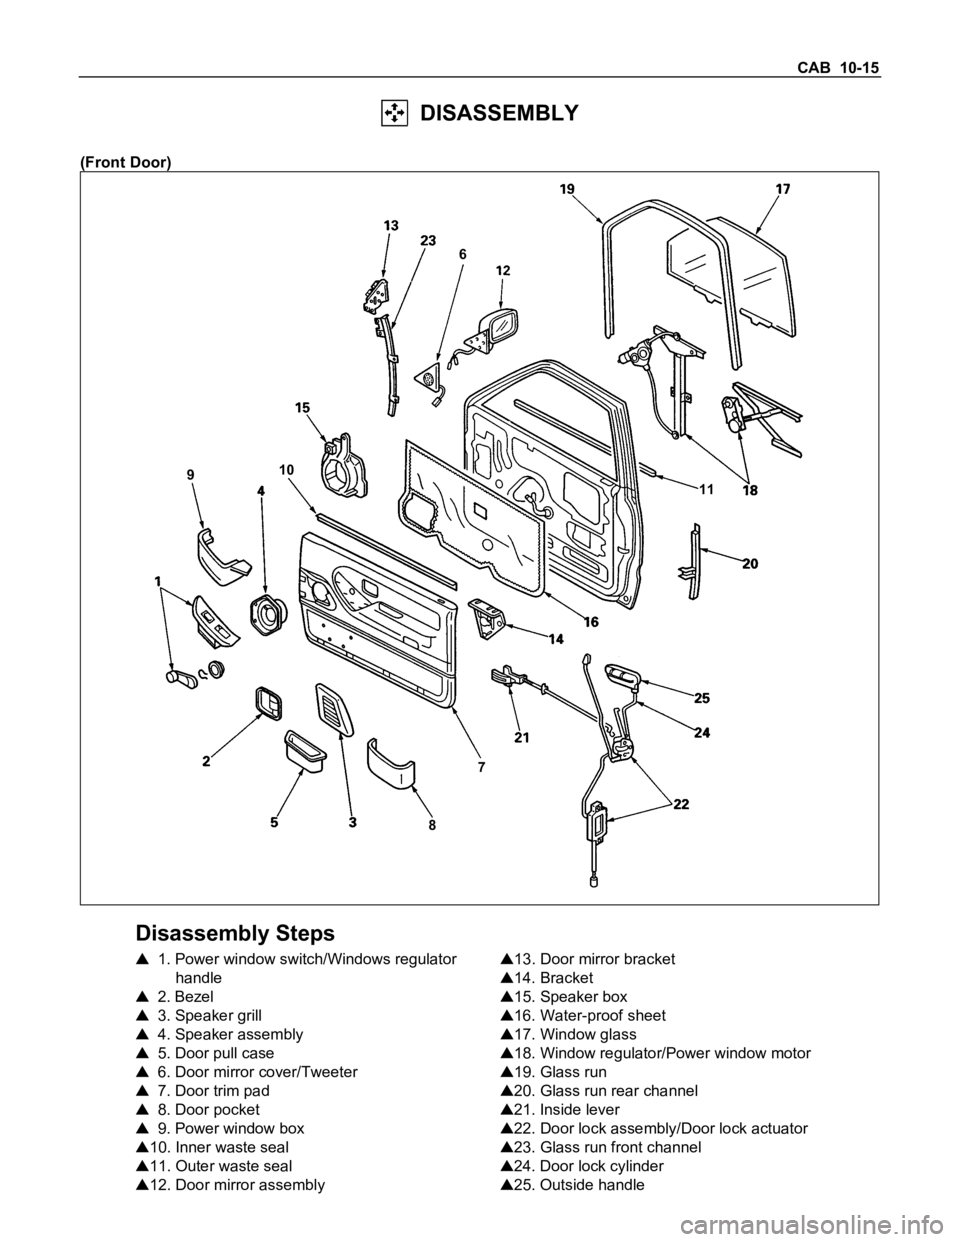
CAB 10-15
DISASSEMBLY
(Front Door)
87 910
11 6
Disassembly Steps
1. Power window switch/Windows regulator
handle
2. Bezel
3. Speaker grill
4. Speaker assembly
5. Door pull case
6. Door mirror cover/Tweeter
7. Door trim pad
8. Door pocket
9. Power window box
10. Inner waste seal
11. Outer waste seal
12. Door mirror assembly
13. Door mirror bracket
14. Bracket
15. Speaker box
16. Water-proof sheet
17. Window glass
18. Window regulator/Power window motor
19. Glass run
20. Glass run rear channel
21. Inside lever
22. Door lock assembly/Door lock actuator
23. Glass run front channel
24. Door lock cylinder
25. Outside handle
Page 514 of 1600
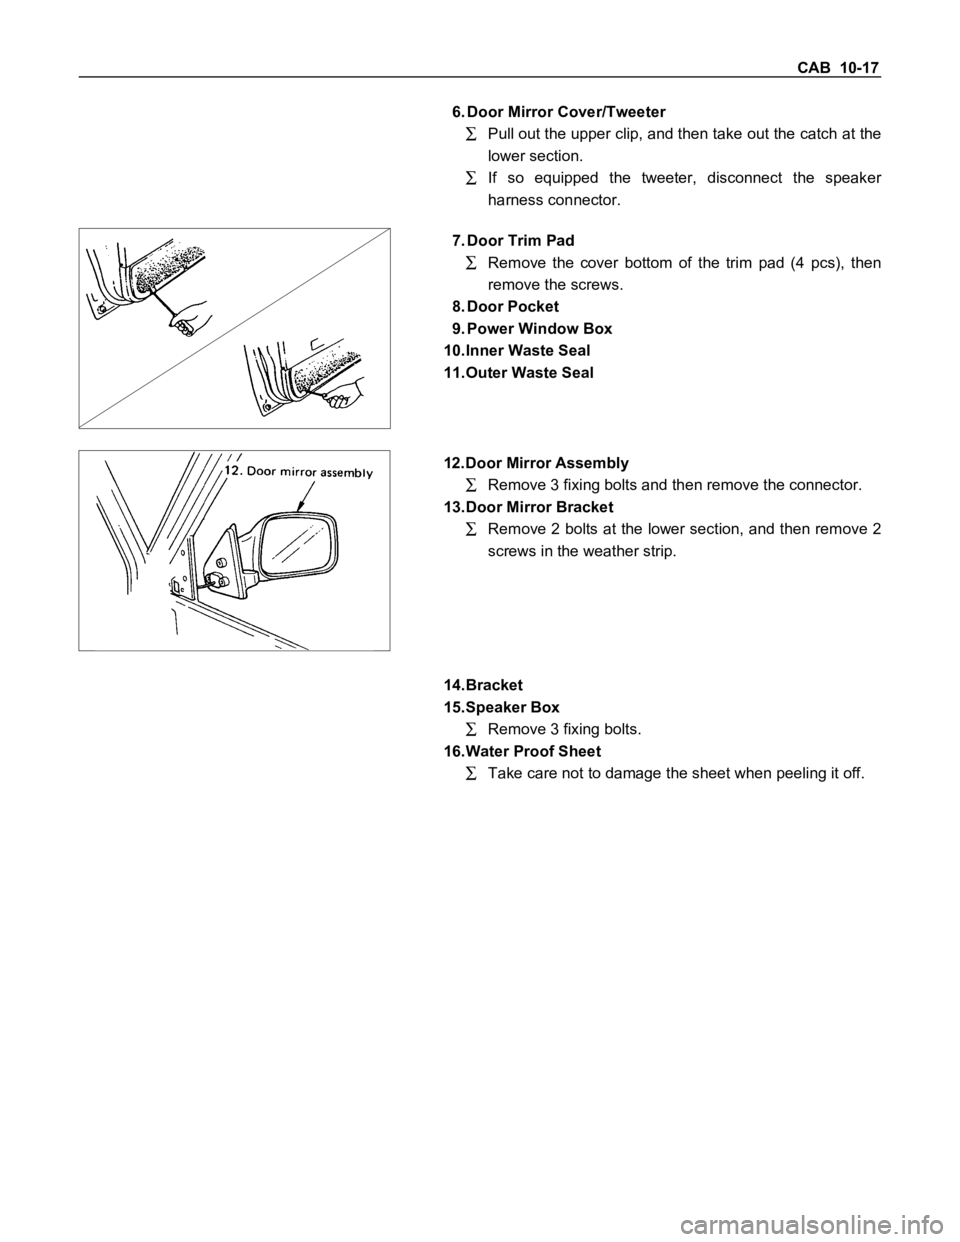
CAB 10-17
6. Door Mirror Cover/Tweeter
Pull out the upper clip, and then take out the catch at the
lower section.
If so equipped the tweeter, disconnect the speaker
harness connector.
7. Door Trim Pad
Remove the cover bottom of the trim pad (4 pcs), then
remove the screws.
8. Door Pocket
9. Power Window Box
10.Inner Waste Seal
11.Outer Waste Seal
12.Door Mirror Assembly
Remove 3 fixing bolts and then remove the connector.
13.Door Mirror Bracket
Remove 2 bolts at the lower section, and then remove 2
screws in the weather strip.
14.Bracket
15.Speaker Box
Remove 3 fixing bolts.
16.Water Proof Sheet
Take care not to damage the sheet when peeling it off.
Page 520 of 1600
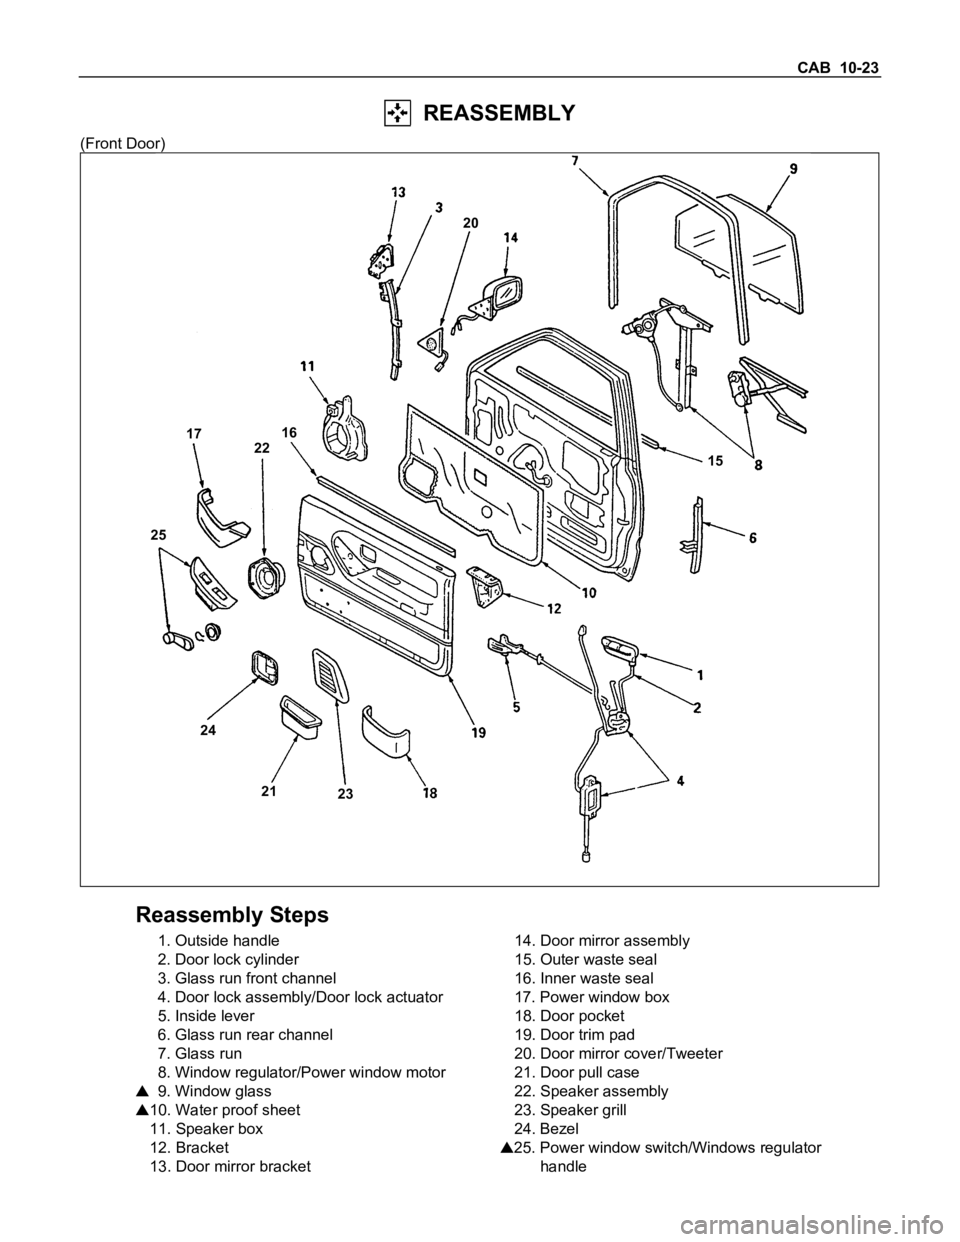
CAB 10-23
REASSEMBLY
(Front Door)
15
23 21 24 2522 171620
Reassembly Steps
1. Outside handle
2. Door lock cylinder
3. Glass run front channel
4. Door lock assembly/Door lock actuator
5. Inside lever
6. Glass run rear channel
7. Glass run
8. Window regulator/Power window motor
9. Window glass
10. Water proof sheet
11. Speaker box
12. Bracket
13. Door mirror bracket14. Door mirror assembly
15. Outer waste seal
16. Inner waste seal
17. Power window box
18. Door pocket
19. Door trim pad
20. Door mirror cover/Tweeter
21. Door pull case
22. Speaker assembly
23. Speaker grill
24. Bezel
25. Power window switch/Windows regulator
handle
Page 531 of 1600
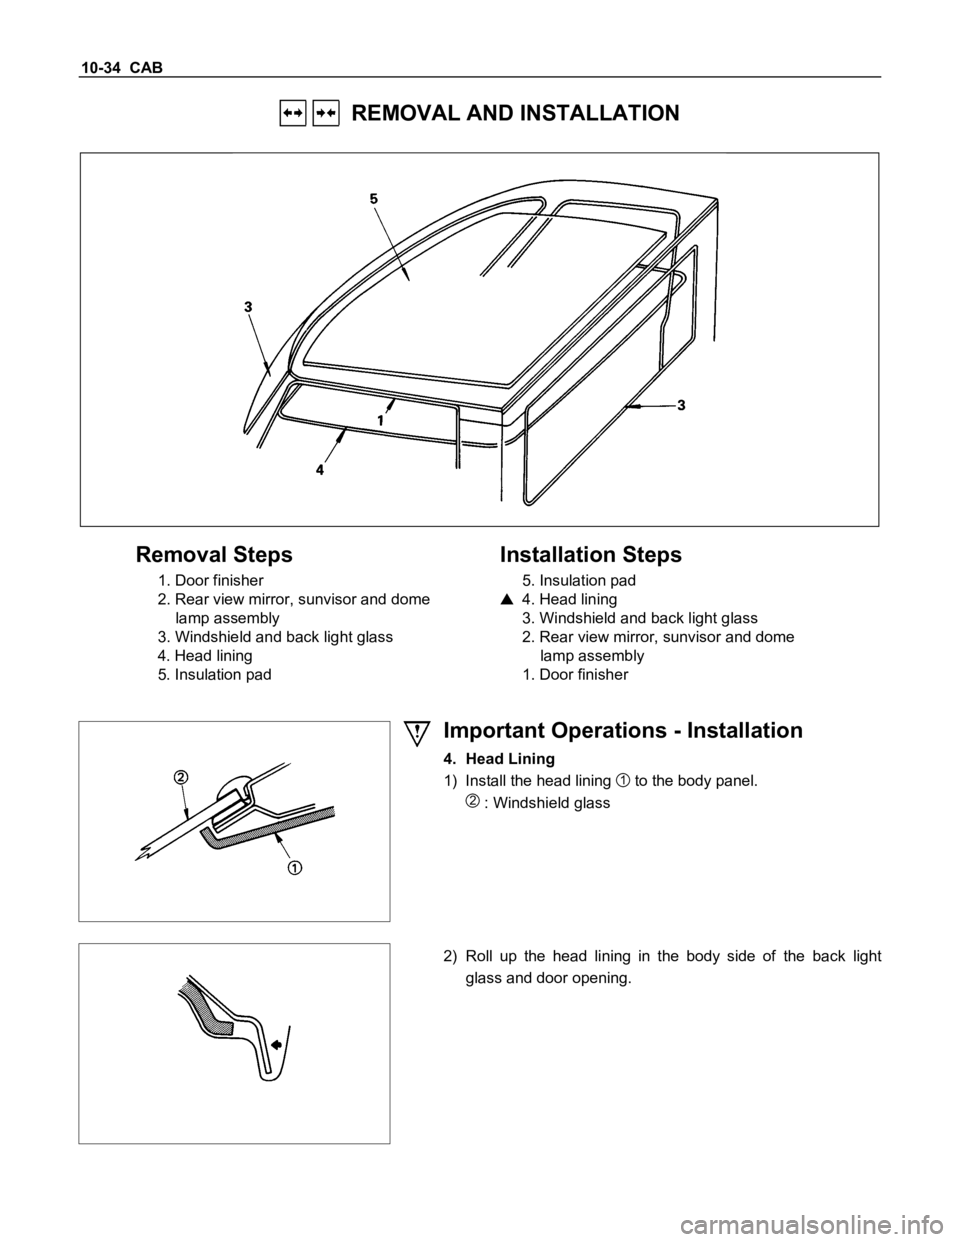
10-34 CAB
REMOVAL AND INSTALLATION
Removal Steps
1. Door finisher
2. Rear view mirror, sunvisor and dome
lamp assembly
3. Windshield and back light glass
4. Head lining
5. Insulation pad
Installation Steps
5. Insulation pad
4. Head lining
3. Windshield and back light glass
2. Rear view mirror, sunvisor and dome
lamp assembly
1. Door finisher
Important Operations - Installation
4. Head Lining
1) Install the head lining
1 to the body panel.
2 : Windshield glass
2) Roll up the head lining in the body side of the back light
glass and door opening.