high ISUZU TROOPER 1998 Service Repair Manual
[x] Cancel search | Manufacturer: ISUZU, Model Year: 1998, Model line: TROOPER, Model: ISUZU TROOPER 1998Pages: 3573, PDF Size: 60.36 MB
Page 26 of 3573
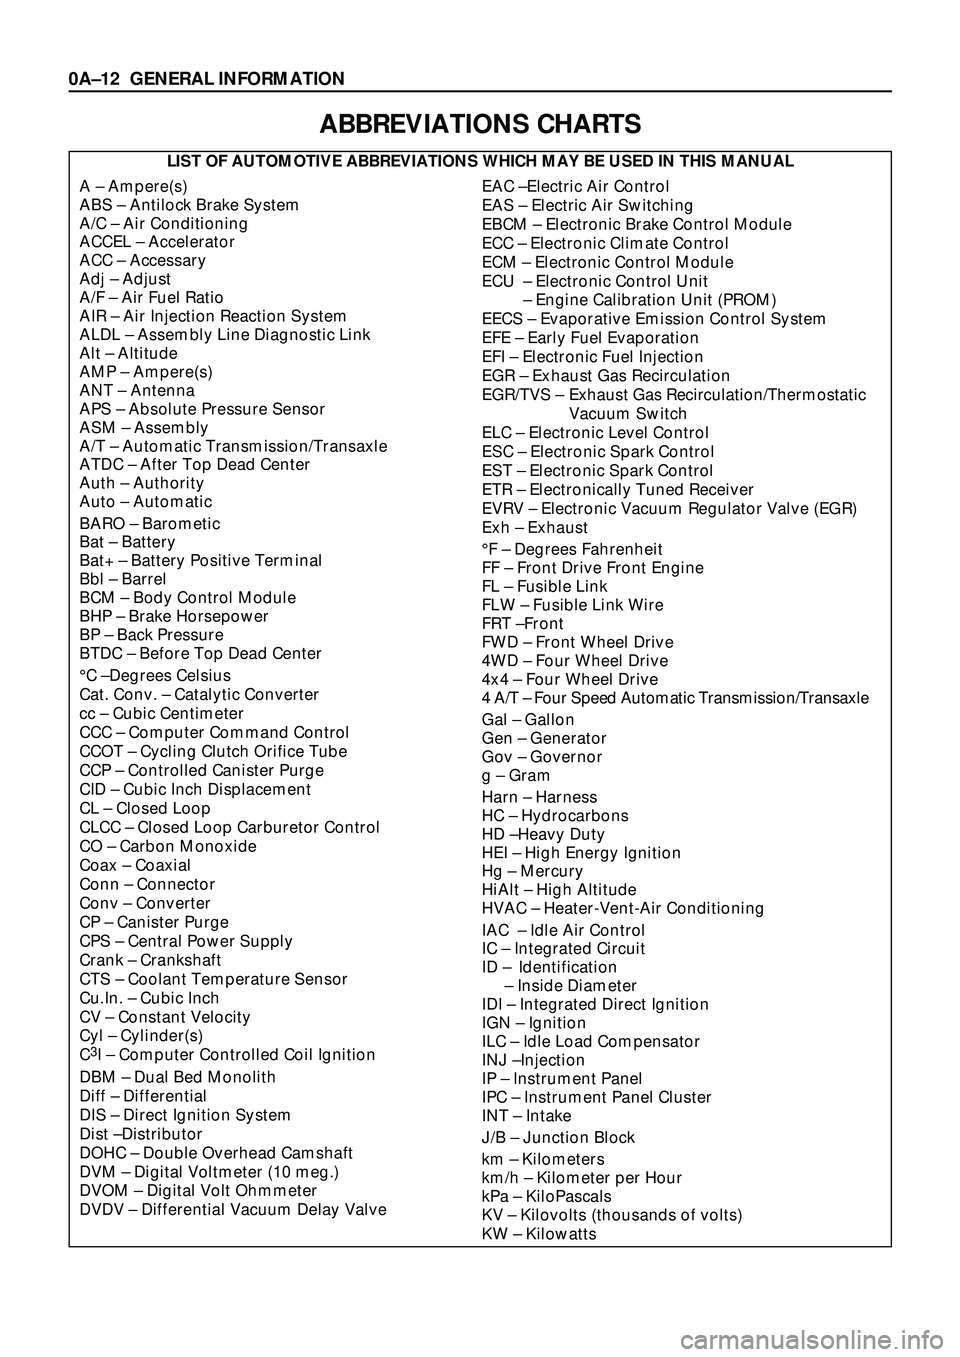
ABBREVIATIONS CHARTS
LIST OF AUTOMOTIVE ABBREVIATIONS WHICH MAY BE USED IN THIS MANUAL
A Ð Ampere(s)
ABS Ð Antilock Brake System
A/C Ð Air Conditioning
ACCEL Ð Accelerator
ACC Ð Accessary
Adj Ð Adjust
A/F Ð Air Fuel Ratio
AIR Ð Air Injection Reaction System
ALDL Ð Assembly Line Diagnostic Link
Alt Ð Altitude
AMP Ð Ampere(s)
ANT Ð Antenna
APS Ð Absolute Pressure Sensor
ASM Ð Assembly
A/T Ð Automatic Transmission/Transaxle
ATDC Ð After Top Dead Center
Auth Ð Authority
Auto Ð Automatic
BARO Ð Barometic
Bat Ð Battery
Bat+ Ð Battery Positive Terminal
Bbl Ð Barrel
BCM Ð Body Control Module
BHP Ð Brake Horsepower
BP Ð Back Pressure
BTDC Ð Before Top Dead Center
¡C ÐDegrees Celsius
Cat. Conv. Ð Catalytic Converter
cc Ð Cubic Centimeter
CCC Ð Computer Command Control
CCOT Ð Cycling Clutch Orifice Tube
CCP Ð Controlled Canister Purge
CID Ð Cubic Inch Displacement
CL Ð Closed Loop
CLCC Ð Closed Loop Carburetor Control
CO Ð Carbon Monoxide
Coax Ð Coaxial
Conn Ð Connector
Conv Ð Converter
CP Ð Canister Purge
CPS Ð Central Power Supply
Crank Ð Crankshaft
CTS Ð Coolant Temperature Sensor
Cu.In. Ð Cubic Inch
CV Ð Constant Velocity
Cyl Ð Cylinder(s)
C
3I Ð Computer Controlled Coil Ignition
DBM Ð Dual Bed Monolith
Diff Ð Differential
DIS Ð Direct Ignition System
Dist ÐDistributor
DOHC Ð Double Overhead Camshaft
DVM Ð Digital Voltmeter (10 meg.)
DVOM Ð Digital Volt Ohmmeter
DVDV Ð Differential Vacuum Delay Valve
EAC ÐElectric Air Control
EAS Ð Electric Air Switching
EBCM Ð Electronic Brake Control Module
ECC Ð Electronic Climate Control
ECM Ð Electronic Control Module
ECU Ð Electronic Control Unit
Ð Engine Calibration Unit (PROM)
EECS Ð Evaporative Emission Control System
EFE Ð Early Fuel Evaporation
EFI Ð Electronic Fuel Injection
EGR Ð Exhaust Gas Recirculation
EGR/TVS Ð Exhaust Gas Recirculation/Thermostatic
Vacuum Switch
ELC Ð Electronic Level Control
ESC Ð Electronic Spark Control
EST Ð Electronic Spark Control
ETR Ð Electronically Tuned Receiver
EVRV Ð Electronic Vacuum Regulator Valve (EGR)
Exh Ð Exhaust
¡F Ð Degrees Fahrenheit
FF Ð Front Drive Front Engine
FL Ð Fusible Link
FLW Ð Fusible Link Wire
FRT ÐFront
FWD Ð Front Wheel Drive
4WD Ð Four Wheel Drive
4x4 Ð Four Wheel Drive
4 A/T Ð Four Speed Automatic Transmission/Transaxle
Gal Ð Gallon
Gen Ð Generator
Gov Ð Governor
g Ð Gram
Harn Ð Harness
HC Ð Hydrocarbons
HD ÐHeavy Duty
HEI Ð High Energy Ignition
Hg Ð Mercury
HiAlt Ð High Altitude
HVAC Ð Heater-Vent-Air Conditioning
IAC Ð Idle Air Control
IC Ð Integrated Circuit
ID Ð Identification
Ð Inside Diameter
IDI Ð Integrated Direct Ignition
IGN Ð Ignition
ILC Ð Idle Load Compensator
INJ ÐInjection
IP Ð Instrument Panel
IPC Ð Instrument Panel Cluster
INT Ð Intake
J/B Ð Junction Block
km Ð Kilometers
km/h Ð Kilometer per Hour
kPa Ð KiloPascals
KV Ð Kilovolts (thousands of volts)
KW Ð Kilowatts
0AÐ12 GENERAL INFORMATION
Page 56 of 3573
SERVICE INFORMATION 00 Ð 17
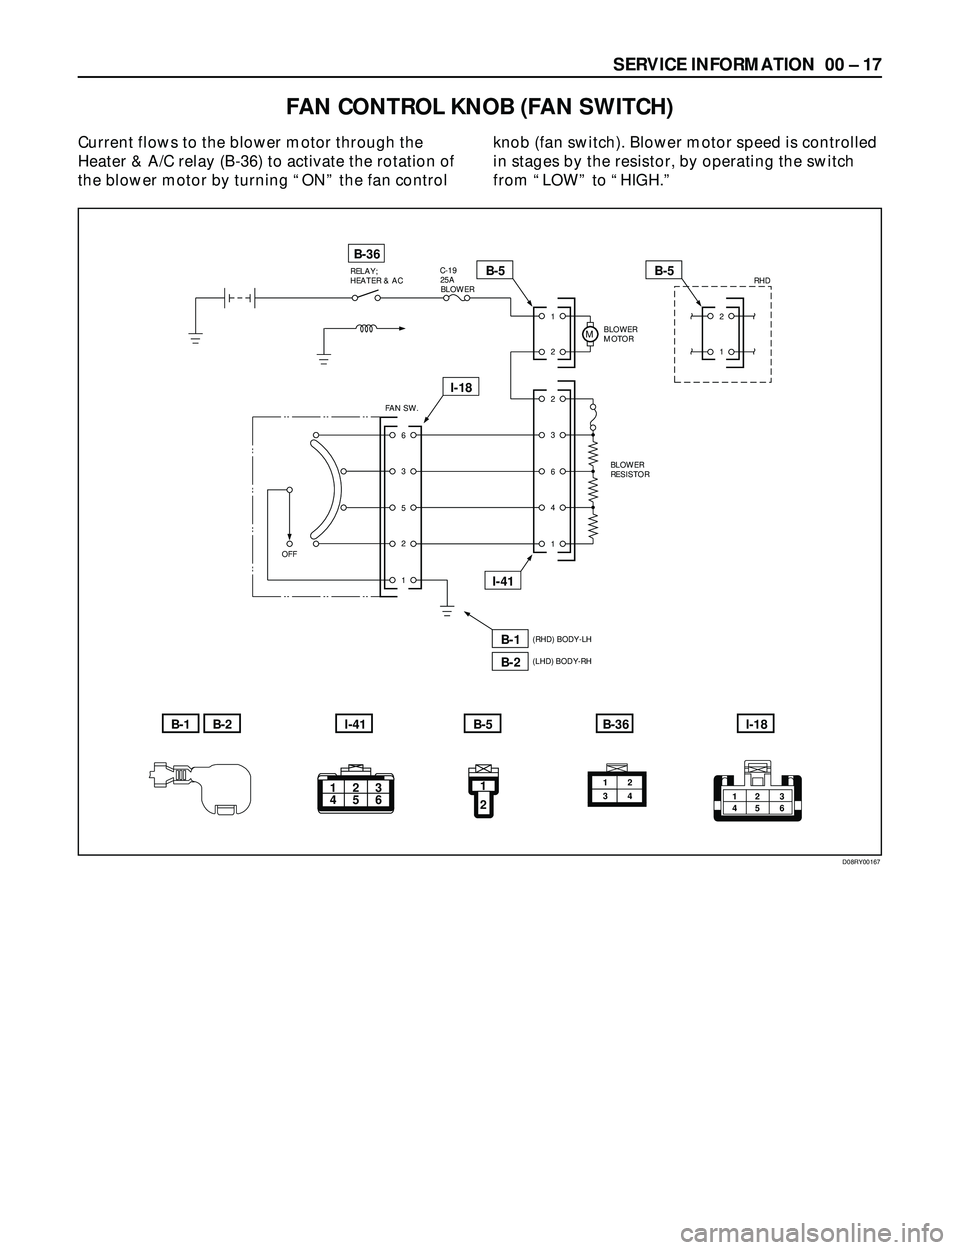
FAN CONTROL KNOB (FAN SWITCH)
Current flows to the blower motor through the
Heater & A/C relay (B-36) to activate the rotation of
the blower motor by turning ÒONÓ the fan controlknob (fan switch). Blower motor speed is controlled
in stages by the resistor, by operating the switch
from ÒLOWÓ to ÒHIGH.Ó
12
34
B-36B-1B-2
1234561
2123
45 6
I-41B-5I-18
1
2
B-36RELAY;
HEATER & ACC-19
25A
BLOWER
2
3
6
4
1
6
3
5
2
1
MBLOWER
MOTOR2
1
RHD
OFF
B-5B-5
I-18
BLOWER
RESISTOR FAN SW.
I-41
B-1
B-2(LHD) BODY-RH (RHD) BODY-LH
D08RY00167
Page 58 of 3573
SERVICE INFORMATION 00 Ð 19
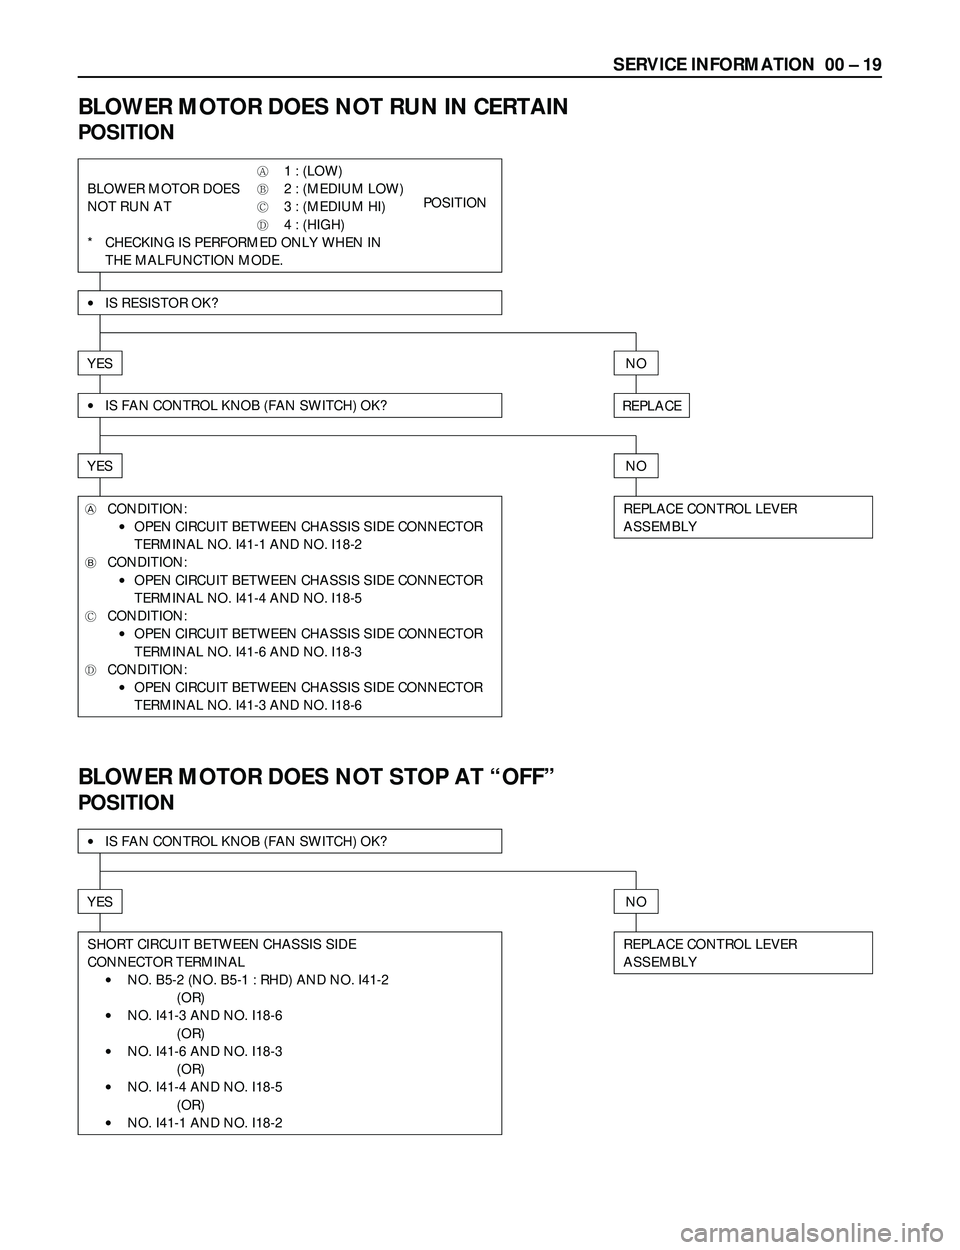
BLOWER MOTOR DOES NOT RUN IN CERTAIN
POSITION
A1 : (LOW)
BLOWER MOTOR DOES
B2 : (MEDIUM LOW)
NOT RUN AT
C3 : (MEDIUM HI) POSITION
D4 : (HIGH)
* CHECKING IS PERFORMED ONLY WHEN IN
THE MALFUNCTION MODE.
·IS RESISTOR OK?
YES
·IS FAN CONTROL KNOB (FAN SWITCH) OK?
YES
ACONDITION:
·OPEN CIRCUIT BETWEEN CHASSIS SIDE CONNECTOR
TERMINAL NO. I41-1 AND NO. I18-2
BCONDITION:
·OPEN CIRCUIT BETWEEN CHASSIS SIDE CONNECTOR
TERMINAL NO. I41-4 AND NO. I18-5
CCONDITION:
·OPEN CIRCUIT BETWEEN CHASSIS SIDE CONNECTOR
TERMINAL NO. I41-6 AND NO. I18-3
DCONDITION:
·OPEN CIRCUIT BETWEEN CHASSIS SIDE CONNECTOR
TERMINAL NO. I41-3 AND NO. I18-6
NO
REPLACE
NO
REPLACE CONTROL LEVER
ASSEMBLY
BLOWER MOTOR DOES NOT STOP AT ÒOFFÓ
POSITION
·IS FAN CONTROL KNOB (FAN SWITCH) OK?
YES
SHORT CIRCUIT BETWEEN CHASSIS SIDE
CONNECTOR TERMINAL
·NO. B5-2 (NO. B5-1 : RHD) AND NO. I41-2
(OR)
·NO. I41-3 AND NO. I18-6
(OR)
·NO. I41-6 AND NO. I18-3
(OR)
·NO. I41-4 AND NO. I18-5
(OR)
·NO. I41-1 AND NO. I18-2
NO
REPLACE CONTROL LEVER
ASSEMBLY
Page 63 of 3573
00 Ð 24 SERVICE INFORMATION
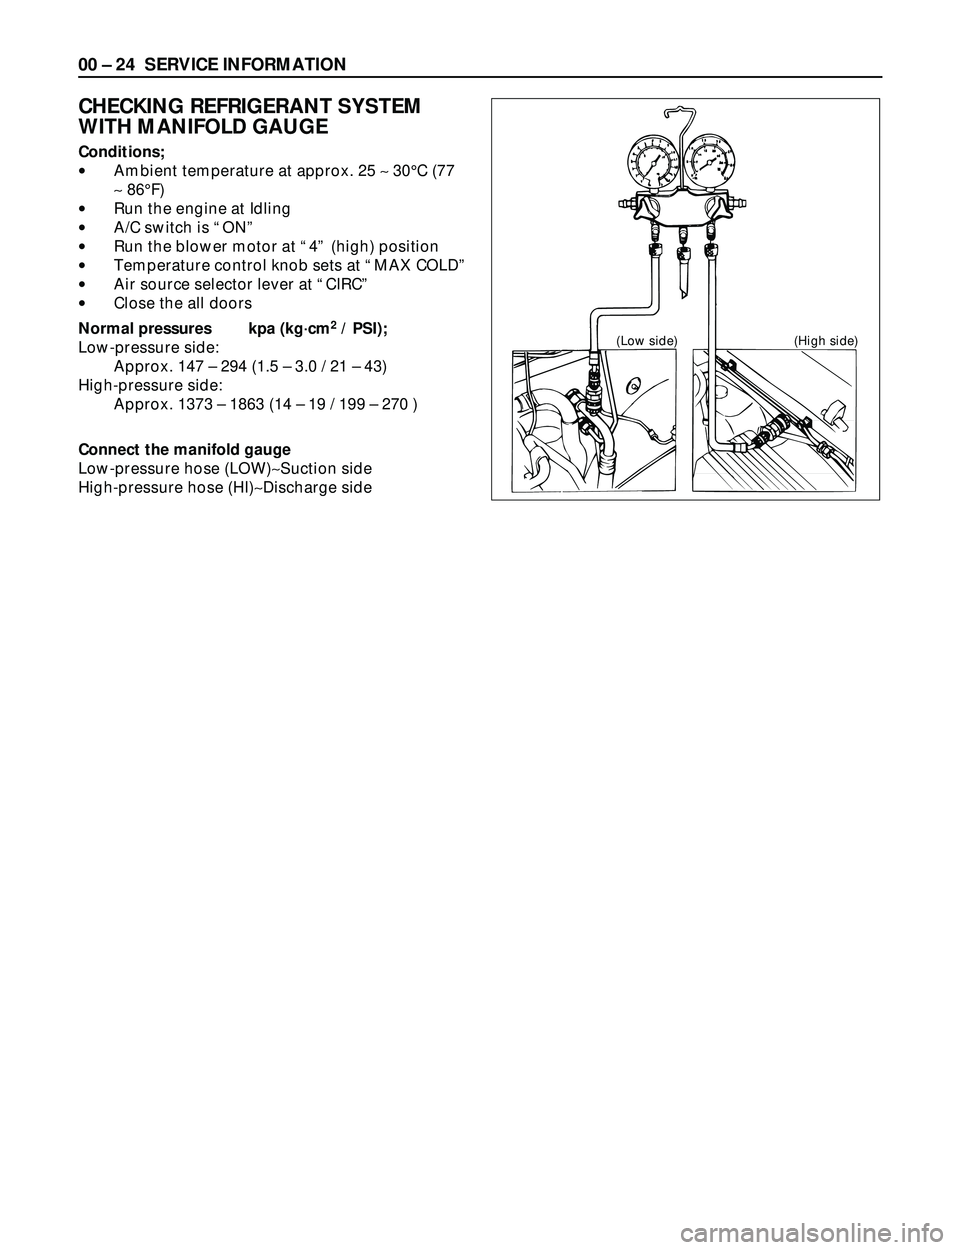
CHECKING REFRIGERANT SYSTEM
WITH MANIFOLD GAUGE
Conditions;
·Ambient temperature at approx. 25 ~30°C (77
~86°F)
·Run the engine at Idling
·A/C switch is ÒONÓ
·Run the blower motor at Ò4Ó (high) position
·Temperature control knob sets at ÒMAX COLDÓ
·Air source selector lever at ÒCIRCÓ
·Close the all doors
Normal pressures kpa (kgácm
2/ PSI);
Low-pressure side:
Approx. 147 Ð 294 (1.5 Ð 3.0 / 21 Ð 43)
High-pressure side:
Approx. 1373 Ð 1863 (14 Ð 19 / 199 Ð 270 )
Connect the manifold gauge
Low-pressure hose (LOW)~Suction side
High-pressure hose (HI)~Discharge side (Low side) (High side)
Page 64 of 3573
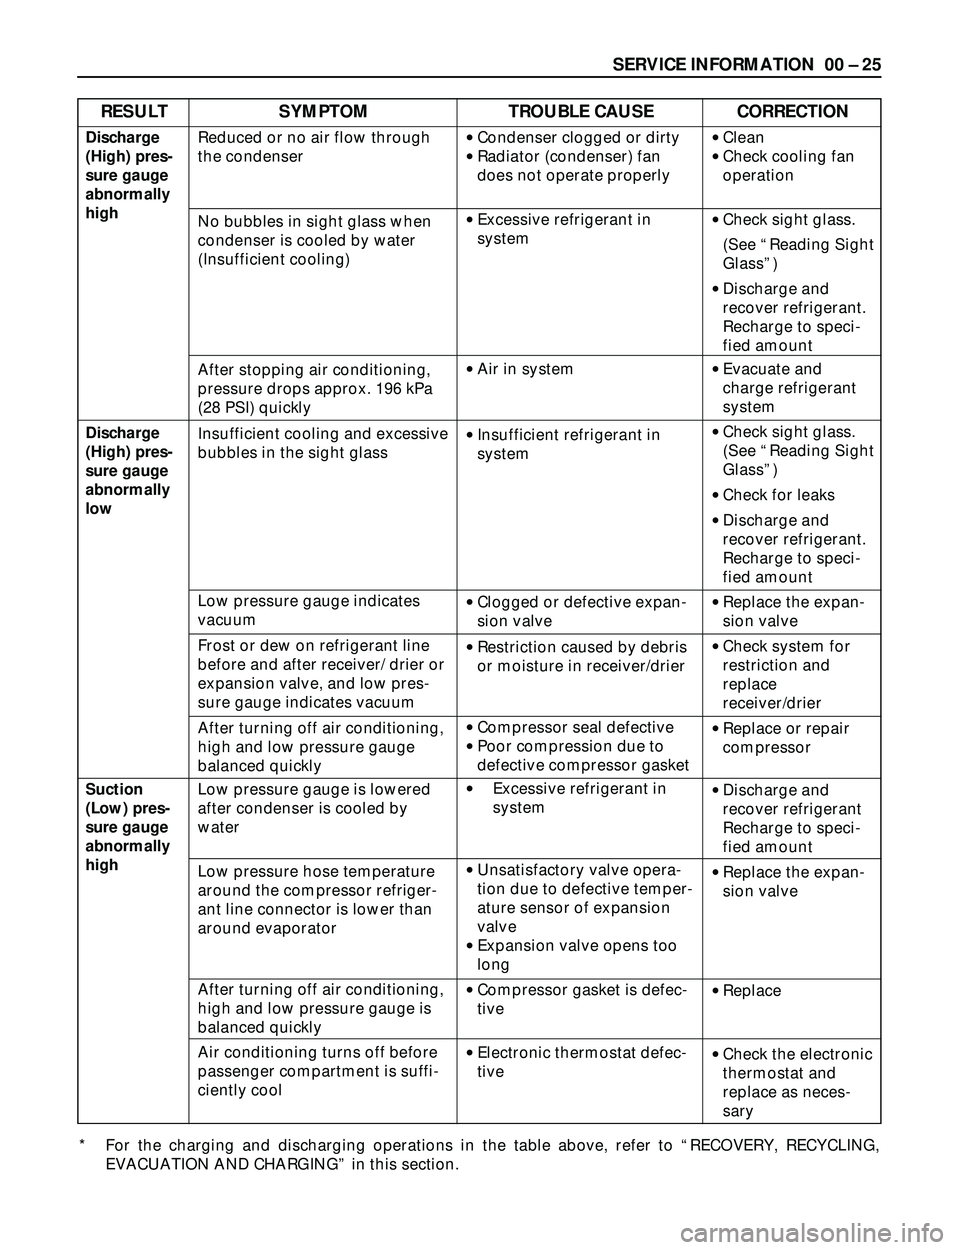
RESULT SYMPTOM TROUBLE CAUSE CORRECTION
SERVICE INFORMATION 00 Ð 25
Reduced or no air flow through
the condenser
No bubbles in sight glass when
condenser is cooled by water
(Insufficient cooling)
After stopping air conditioning,
pressure drops approx. 196 kPa
(28 PSI) quickly
Insufficient cooling and excessive
bubbles in the sight glass
Low pressure gauge indicates
vacuum
Frost or dew on refrigerant line
before and after receiver/ drier or
expansion valve, and low pres-
sure gauge indicates vacuum
After turning off air conditioning,
high and low pressure gauge
balanced quickly
Low pressure gauge is lowered
after condenser is cooled by
water
Low pressure hose temperature
around the compressor refriger-
ant line connector is lower than
around evaporator
After turning off air conditioning,
high and low pressure gauge is
balanced quickly
Air conditioning turns off before
passenger compartment is suffi-
ciently cool·Condenser clogged or dirty
·Radiator (condenser) fan
does not operate properly
·Excessive refrigerant in
system
·Air in system
·Insufficient refrigerant in
system
·Clogged or defective expan-
sion valve
·Restriction caused by debris
or moisture in receiver/drier
·Compressor seal defective
·Poor compression due to
defective compressor gasket
·Excessive refrigerant in
system
·Unsatisfactory valve opera-
tion due to defective temper-
ature sensor of expansion
valve
·Expansion valve opens too
long
·Compressor gasket is defec-
tive
·Electronic thermostat defec-
tive·Clean
·Check cooling fan
operation
·Check sight glass.
(See ÒReading Sight
GlassÓ)
·Discharge and
recover refrigerant.
Recharge to speci-
fied amount
·Evacuate and
charge refrigerant
system
·Check sight glass.
(See ÒReading Sight
GlassÓ)
·Check for leaks
·Discharge and
recover refrigerant.
Recharge to speci-
fied amount
·Replace the expan-
sion valve
·Check system for
restriction and
replace
receiver/drier
·Replace or repair
compressor
·Discharge and
recover refrigerant
Recharge to speci-
fied amount
·Replace the expan-
sion valve
·Replace
·Check the electronic
thermostat and
replace as neces-
saryDischarge
(High) pres-
sure gauge
abnormally
high
Discharge
(High) pres-
sure gauge
abnormally
low
Suction
(Low) pres-
sure gauge
abnormally
high
* For the charging and discharging operations in the table above, refer to ÒRECOVERY, RECYCLING,
EVACUATION AND CHARGINGÓ in this section.
Page 65 of 3573

RESULT SYMPTOM TROUBLE CAUSE CORRECTION
Suction
(Low) pres-
sure abnor-
mally low
Suction
(Low) and
Discharge
(High) pres-
sure abnor-
mally high
Suction
(Low) and
Discharge
(High) pres-
sure abnor-
mally low
00 Ð 26 SERVICE INFORMATION
·Check sight
glass.(See ÒReading
Sight GlassÓ)
·Check for leaks
·Discharge and
recover refrigerant.
Recharge to speci-
fied amount
·Replace the expan-
sion valve
·Replace the receiv-
er/drier
·Replace the expan-
sion valve
·Check electronic
thermostat and
replace as necessary
·Replace refrigerant
line
·Check sight
glass.(See ÒReading
Sight GlassÓ)
·Discharge and
recover refrigerant.
Recharge to speci-
fied amount
·Clean
·Check cooling fan
operation
·Evacuate and charge
refrigerant
·Check sight glass.
(See ÒReading Sight
GlassÓ)
·Check for leaks
·Discharge and
recover refrigerant.
Recharge to speci-
fied amount·Insufficient refrigerant
·Expansion valve clogged
·Receiver/drier clogged
·The temperature sensor of
the expansion valve is defec-
tive, and the valve cannot
regulate the correct flow of
the refrigerant
·Frozen evaporator core fins
·Clogged or blocked refriger-
ant line
·Excessive refrigerant in
system
·Condenser clogged
·Radiator (condenser) fan
does not rotate properly
·Air in system
·Insufficient refrigerant in
systemCondenser is not hot and exces-
sive bubble in sight glass
Frost on the expansion valve inlet
line
A distinct difference in tempera-
ture between the inlet and outlet
refrigerant lines of the
receiver/drier
Expansion valve outlet refrigerant
line is not cold and low-pressure
gauge indicates vacuum
Discharge temperature is low and
air flow from vents is restricted
Low-pressure gauge reading is
low, or a vacuum reading may be
shown
No bubbles in sight glass after
condenser is cooled by water
(Insufficient cooling)
Reduce air flow through con-
denser
Suction (Low) pressure hose is
not cold
Insufficient cooling and excessive
bubbles in the sight glass
Page 84 of 3573
SERVICE INFORMATION 00 Ð 45
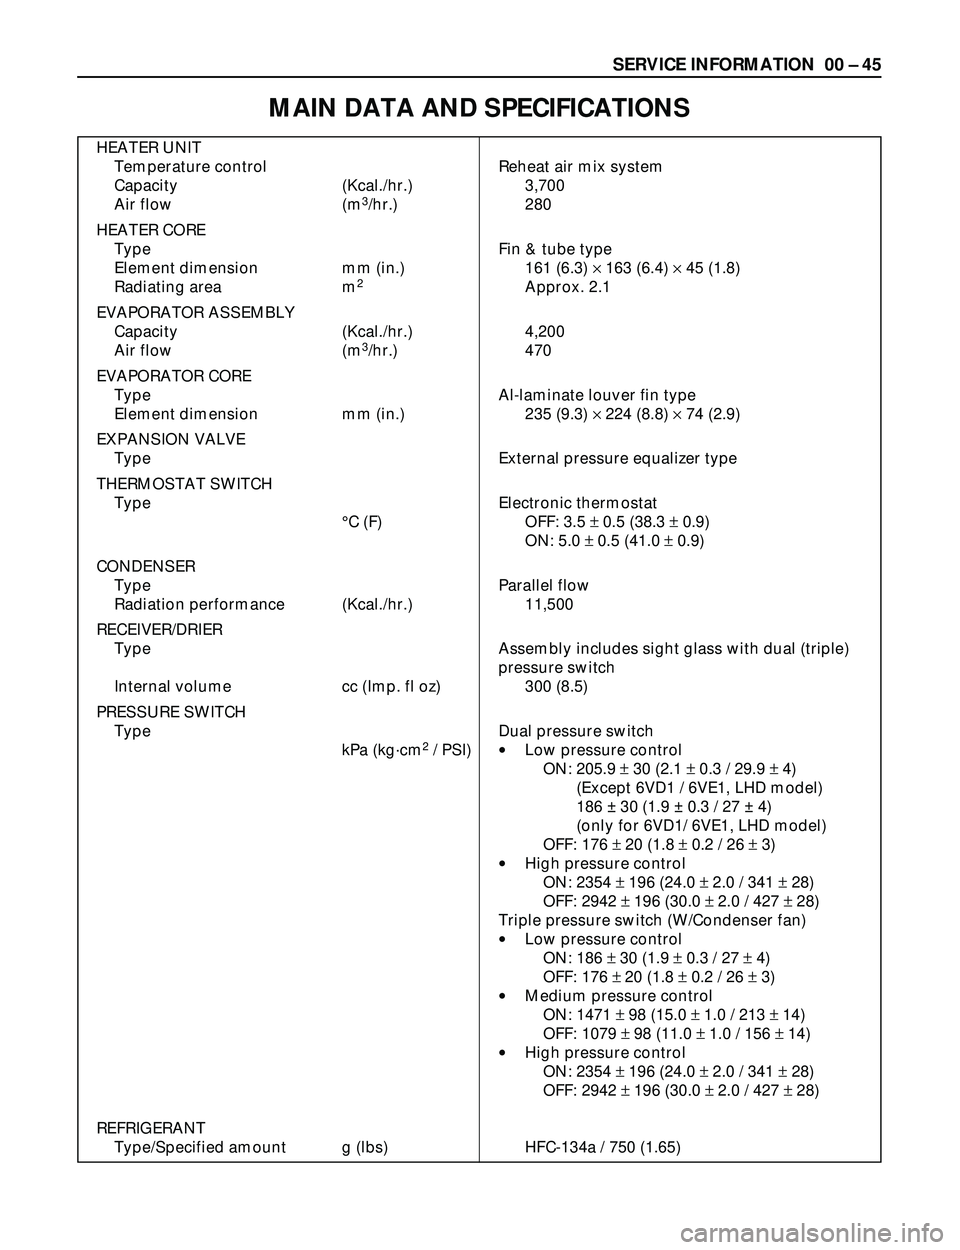
HEATER UNIT
Temperature control Reheat air mix system
Capacity (Kcal./hr.) 3,700
Air flow (m
3/hr.) 280
HEATER CORE
Type Fin & tube type
Element dimension mm (in.) 161 (6.3) ´163 (6.4) ´45 (1.8)
Radiating area m
2Approx. 2.1
EVAPORATOR ASSEMBLY
Capacity (Kcal./hr.) 4,200
Air flow (m
3/hr.) 470
EVAPORATOR CORE
Type Al-laminate louver fin type
Element dimension mm (in.) 235 (9.3) ´224 (8.8) ´74 (2.9)
EXPANSION VALVE
Type External pressure equalizer type
THERMOSTAT SWITCH
Type Electronic thermostat
°C (F) OFF: 3.5 ±0.5 (38.3 ±0.9)
ON: 5.0 ±0.5 (41.0 ±0.9)
CONDENSER
Type Parallel flow
Radiation performance (Kcal./hr.) 11,500
RECEIVER/DRIER
Type Assembly includes sight glass with dual (triple)
pressure switch
Internal volume cc (Imp. fl oz) 300 (8.5)
PRESSURE SWITCH
Type Dual pressure switch
kPa (kgácm
2/ PSI)·Low pressure control
ON: 205.9 ±30 (2.1 ±0.3 / 29.9 ±4)
(Except 6VD1 / 6VE1, LHD model)
186 ± 30 (1.9 ± 0.3 / 27 ± 4)
(only for 6VD1/ 6VE1, LHD model)
OFF: 176 ±20 (1.8 ±0.2 / 26 ±3)
·High pressure control
ON: 2354 ±196 (24.0 ±2.0 / 341 ±28)
OFF: 2942 ±196 (30.0 ±2.0 / 427 ±28)
Triple pressure switch (W/Condenser fan)
·Low pressure control
ON: 186 ±30 (1.9 ±0.3 / 27 ±4)
OFF: 176 ± 20 (1.8 ±0.2 / 26 ±3)
·Medium pressure control
ON: 1471 ±98 (15.0 ±1.0 / 213 ±14)
OFF: 1079 ±98 (11.0 ±1.0 / 156 ±14)
·High pressure control
ON: 2354 ±196 (24.0 ±2.0 / 341 ±28)
OFF: 2942 ±196 (30.0 ±2.0 / 427 ±28)
REFRIGERANT
Type/Specified amount g (lbs) HFC-134a / 750 (1.65)
MAIN DATA AND SPECIFICATIONS
Page 89 of 3573
00 Ð 50 SERVICE INFORMATION
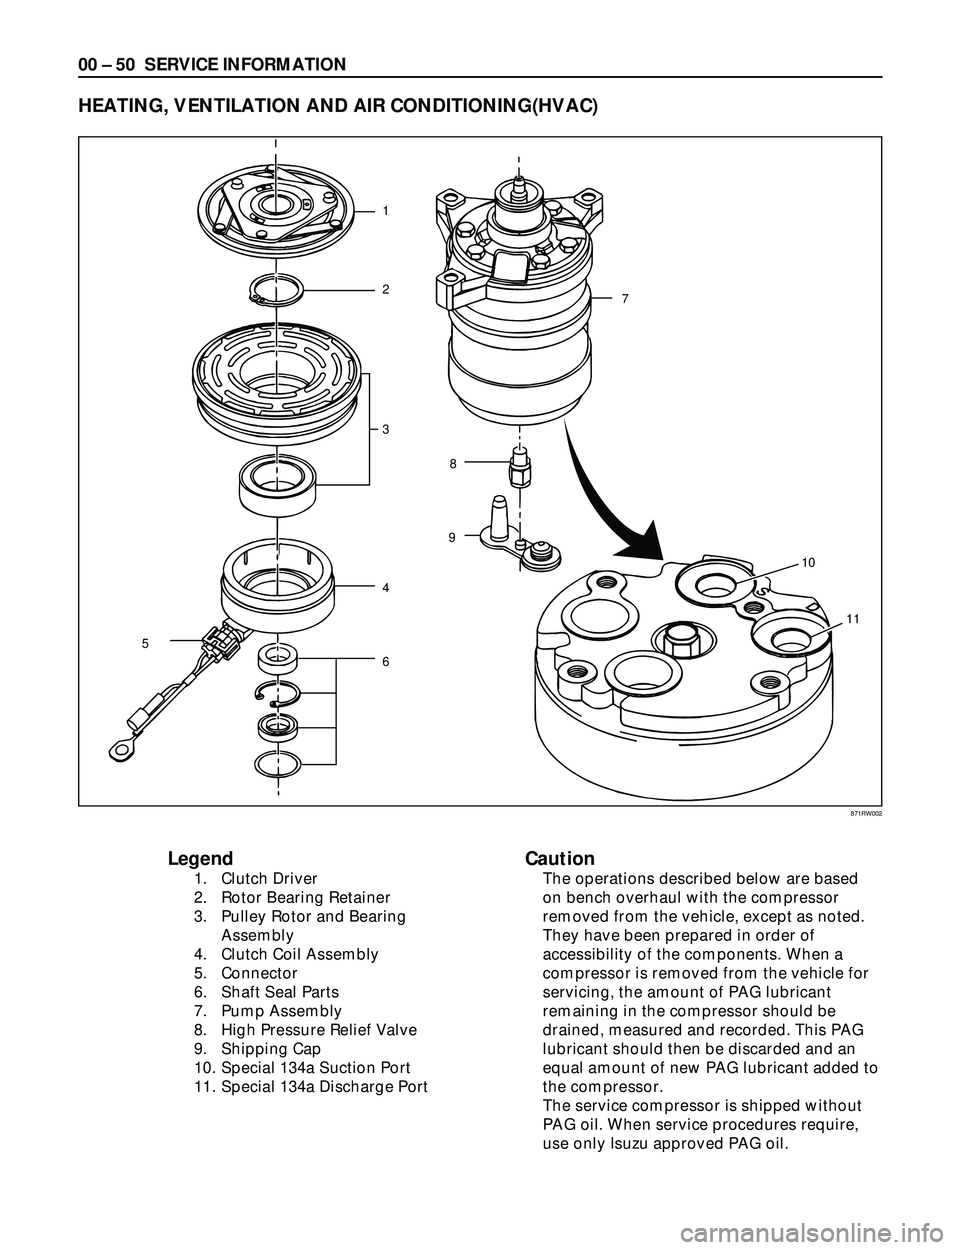
Legend
1. Clutch Driver
2. Rotor Bearing Retainer
3. Pulley Rotor and Bearing
Assembly
4. Clutch Coil Assembly
5. Connector
6. Shaft Seal Parts
7. Pump Assembly
8. High Pressure Relief Valve
9. Shipping Cap
10. Special 134a Suction Port
11. Special 134a Discharge Port
Caution
The operations described below are based
on bench overhaul with the compressor
removed from the vehicle, except as noted.
They have been prepared in order of
accessibility of the components. When a
compressor is removed from the vehicle for
servicing, the amount of PAG lubricant
remaining in the compressor should be
drained, measured and recorded. This PAG
lubricant should then be discarded and an
equal amount of new PAG lubricant added to
the compressor.
The service compressor is shipped without
PAG oil. When service procedures require,
use only Isuzu approved PAG oil.
HEATING, VENTILATION AND AIR CONDITIONING(HVAC)
1
2
3
4
5
68
97
10
11
871RW002
Page 98 of 3573
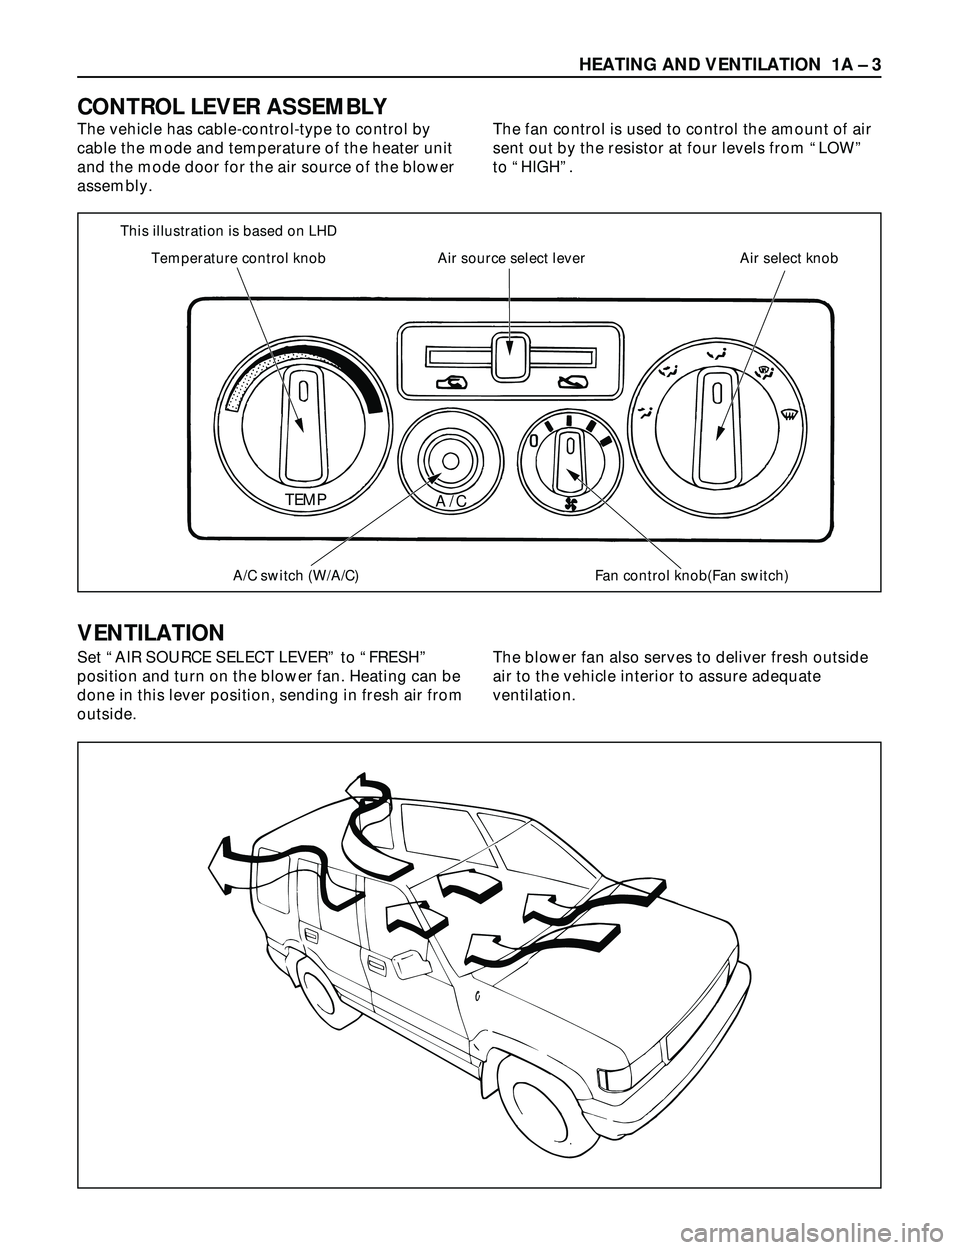
This illustration is based on LHD
Temperature control knob
A/C switch (W/A/C)
TEMP
A/C
Fan control knob(Fan switch) Air source select lever Air select knob
HEATING AND VENTILATION 1A Ð 3
The vehicle has cable-control-type to control by
cable the mode and temperature of the heater unit
and the mode door for the air source of the blower
assembly.The fan control is used to control the amount of air
sent out by the resistor at four levels from ÒLOWÓ
to ÒHIGHÓ.
CONTROL LEVER ASSEMBLY
VENTILATION
Set ÒAIR SOURCE SELECT LEVERÓ to ÒFRESHÓ
position and turn on the blower fan. Heating can be
done in this lever position, sending in fresh air from
outside.The blower fan also serves to deliver fresh outside
air to the vehicle interior to assure adequate
ventilation.
Page 99 of 3573
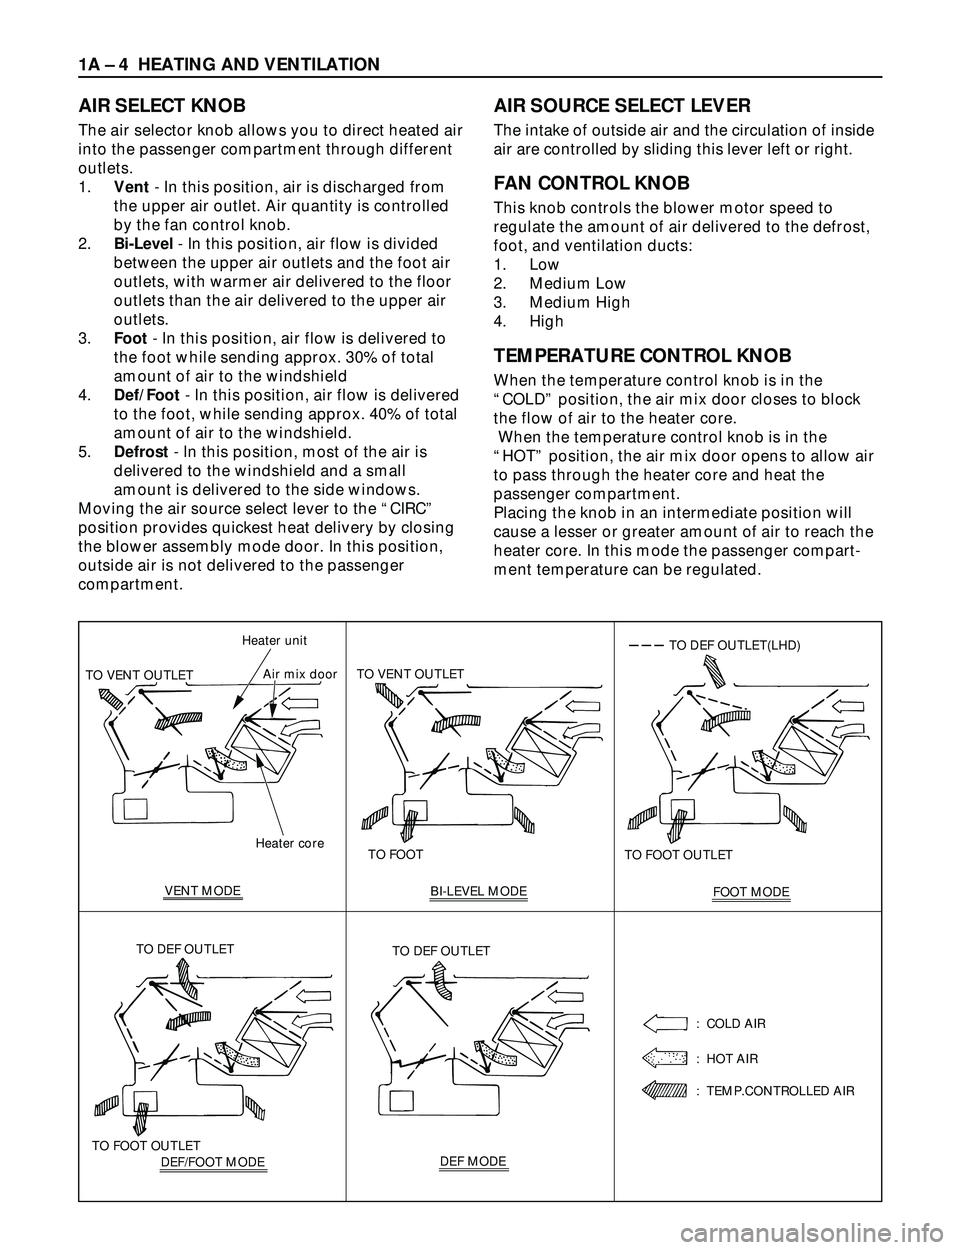
1A Ð 4 HEATING AND VENTILATION
AIR SELECT KNOB
The air selector knob allows you to direct heated air
into the passenger compartment through different
outlets.
1.Vent- In this position, air is discharged from
the upper air outlet. Air quantity is controlled
by the fan control knob.
2.Bi-Level- In this position, air flow is divided
between the upper air outlets and the foot air
outlets, with warmer air delivered to the floor
outlets than the air delivered to the upper air
outlets.
3.Foot- In this position, air flow is delivered to
the foot while sending approx. 30% of total
amount of air to the windshield
4.Def/Foot- In this position, air flow is delivered
to the foot, while sending approx. 40% of total
amount of air to the windshield.
5.Defrost- In this position, most of the air is
delivered to the windshield and a small
amount is delivered to the side windows.
Moving the air source select lever to the ÒCIRCÓ
position provides quickest heat delivery by closing
the blower assembly mode door. In this position,
outside air is not delivered to the passenger
compartment.
AIR SOURCE SELECT LEVER
The intake of outside air and the circulation of inside
air are controlled by sliding this lever left or right.
FAN CONTROL KNOB
This knob controls the blower motor speed to
regulate the amount of air delivered to the defrost,
foot, and ventilation ducts:
1. Low
2. Medium Low
3. Medium High
4. High
TEMPERATURE CONTROL KNOB
When the temperature control knob is in the
ÒCOLDÓ position, the air mix door closes to block
the flow of air to the heater core.
When the temperature control knob is in the
ÒHOTÓ position, the air mix door opens to allow air
to pass through the heater core and heat the
passenger compartment.
Placing the knob in an intermediate position will
cause a lesser or greater amount of air to reach the
heater core. In this mode the passenger compart-
ment temperature can be regulated.
Heater core Heater unit
TO VENT OUTLETAir mix door
VENT MODETO FOOT TO VENT OUTLET
BI-LEVEL MODE
FOOT MODE TO FOOT OUTLET
TO DEF OUTLET(LHD)
DEF/FOOT MODE TO FOOT OUTLETTO DEF OUTLETDEF MODE TO DEF OUTLET
: COLD AIR
: HOT AIR
: TEMP.CONTROLLED AIR