Display JAGUAR XF 2010 1.G User Guide
[x] Cancel search | Manufacturer: JAGUAR, Model Year: 2010, Model line: XF, Model: JAGUAR XF 2010 1.GPages: 225, PDF Size: 8 MB
Page 57 of 225
R
(FM8) SEMCON JLR OWNER GUIDE VER 1.00 EURO
LANGUAGE: english-en; MARQUE: jaguar; MODEL: XF
Message centre
57
METRIC/IMPERIAL/MIXED DISPLAY
The display of me tric, imperial or mixed units is
selected via the touch screen:
• With the touch screen switched on, select
Set-up from the Home menu.
• Select Security/vehicle , then select Units.
• Touch the appropriate button to select
Metric or Imperial units.
Note: Temperature display can be changed
between °C (Celsius) and °F (Fahrenheit)
independently of Metric or Imperial units.
SERVICE INTERVAL INDICATOR
The service interval message will only be
displayed when the vehicle has less than
3200 km (2000 miles) be fore the service is
due.
When the ignition is switched on, and the
vehicle has started it s service countdown,
SERVICE REQ'D XXXX km (XXXX MLS) is
displayed in the message centre.
When the service distance has been reached,
SERVICE REQUIRED is displayed in the
message centre.
If no service inte rval indicator is
displayed during the vehicle service
cycle, make sure that your vehicle is
serviced in accordance with the
intervals, as stated in the Service
Portfolio.
Page 59 of 225
R
(FM8) SEMCON JLR OWNER GUIDE VER 1.00 EURO
LANGUAGE: english-en; MARQUE: jaguar; MODEL: XF
Touch screen
59
TURNING OFF THE TOUCH SCREEN
Vehicles without Eco Stop/Start:
1. Press the screen on/off button once to
activate the screensaver (see 58, TOUCH
SCREEN HOME MENU ). If the screensaver
has not been set, a single press will turn off
the touch screen.
2. Press the screen on/off button twice to turn
off the touch screen.
3. To turn on the touch screen, press the
screen on/off button.
Vehicles with Eco Stop/Start:
1. From the Home menu , touch the screen off
soft key to activate the screensaver. If the
screensaver has not been set, touching the
screen off soft key w ill turn off the touch
screen.
2. From the screensaver, touch the screen off
soft key to turn off the touch screen.
3. To turn on the touch screen, touch
anywhere on the screen.
TOUCH SCREEN USE
Always run the engine during prolonged
use of the touch screen.
The buttons on the centre console, below the
touch screen display, are referred to as hard
buttons and should be pressed firmly. The
touch screen buttons are referred to as soft
keys and only require light pressure to
function. Do not use excessive pressure.
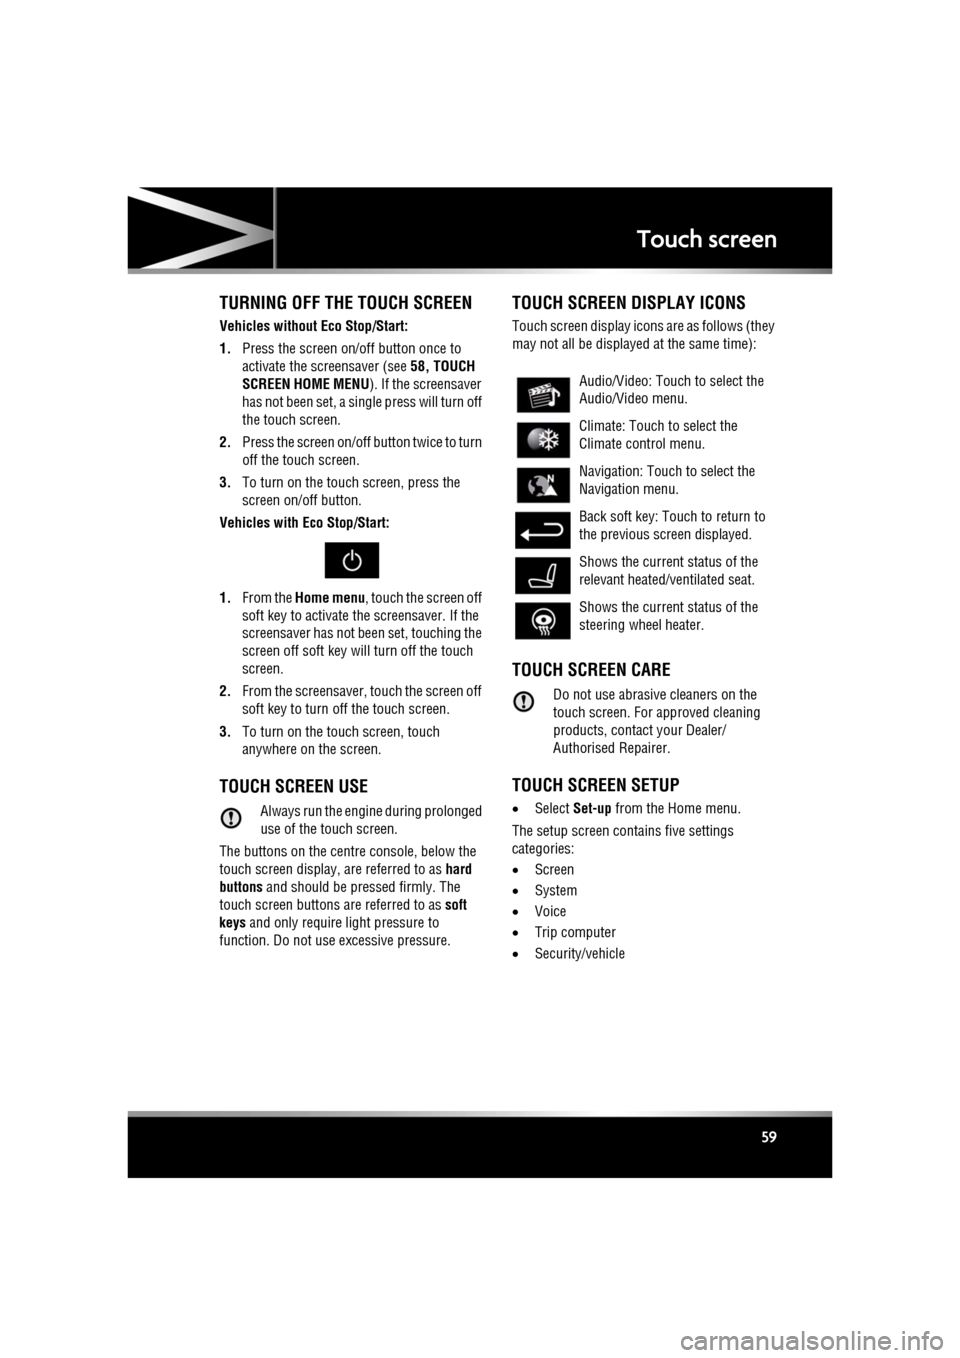
TOUCH SCREEN DISPLAY ICONS
Touch screen display icons are as follows (they
may not all be displayed at the same time):
TOUCH SCREEN CARE
Do not use abrasive cleaners on the
touch screen. For approved cleaning
products, contact your Dealer/
Authorised Repairer.
TOUCH SCREEN SETUP
• Select Set-up from the Home menu.
The setup screen cont ains five settings
categories:
• Screen
• System
• Voice
• Trip computer
• Security/vehicle
Audio/Video: Touc h to select the
Audio/Video menu.
Climate: Touch to select the
Climate control menu.
Navigation: Touch to select the
Navigation menu.
Back soft key: Touch to return to
the previous screen displayed.
Shows the current status of the
relevant heated/ventilated seat.
Shows the current status of the
steering wheel heater.
Page 60 of 225

L
(FM8) SEMCON JLR OWNER GUIDE VER 1.00 EURO
LANGUAGE: english-en; MARQUE: jaguar; MODEL: XF
Touch screen
60
SCREEN SETTINGS
Screensaver: Select to change the
screensaver. Touch an option to select.
Screen animations : Select to turn animated
transitions between screens on or off.
Note: While screen animations are on, system
response time will be slower than normal.
Time out home : Sub menu selection screens
can be set to revert to the Home menu after a
pre-determined length of time.
Theme : Changes appearance of the touch
screen soft keys.
SYSTEM SETTINGS
Button feedback : Select to turn the soft key
confirmation tone on or off.
Clock adjust : Select 12 or 24 hour clock. Set
current time. Select Date to change the date, or
to alter the date format. Select Set, to store
new settings.
Note: The clock can also be adjusted from the
touch screen time display.
Home menu shortcuts : Select up to three items
from the displayed list to appear as shortcuts
on the Home menu . Select Clear to deselect
highlighted items.
Language: Select the requir ed language. Select
Male or Female voice. Touch Change to select
alternatives for Voice and text displays. Follow
the on-screen instructions to confirm.
Note: Some languages are not yet available for
both System display text and Voice control. In
this event, it will be necessary to select a
separate language for Voice control.
Volume presets : Adjust volume for the
available sy stems (announcements, phone,
voice etc.).
VOICE SETTINGS
• Command list : View the categories and the
acceptable voice commands.
Select an Information button to view
alternative func tion commands.
• Voicetags : View the categories. Select a
category to manage the voicetags for the
chosen system. See 127, VOICETAGS.
• Operating guide: View brief Voice system
instructions. Select Voice tutorial for more
detailed instructions (cancel via the
displayed pop-up or by pressing and
holding the voice button).
• Preferences : Select to alter the following
settings:
• Voice profile: The voice system can be
trained to have a gr eater recognition of
a particular voice or accent.The default
setting is Standard. To build a voice
profile for either User 1 or User 2, it is
necessary to complete a training
program first.
To complete the training for the first
time, select either User 1 or User 2 and
follow the on-screen and audible
instructions.
• Voice feedback : Select On or Off.
• Feedback volume : Adjust using the +/-
buttons. It is not po ssible to reduce the
volume to zero.
• Voice training: Select to access the voice
system training pr ogram, designed to
enable the system to better recognise the
vocal characteristics of a user.
Select User 1 or User 2 and follow the on
screen and audible instructions. See 127,
VOICE TRAINING.
Page 61 of 225
R
(FM8) SEMCON JLR OWNER GUIDE VER 1.00 EURO
LANGUAGE: english-en; MARQUE: jaguar; MODEL: XF
Touch screen
61
The training session can be cancelled at any
time by touching the on-screen pop-up or by
pressing and holding the Voice button on the
steering wheel. See 126, USING VOICE
CONTROL .
TRIP COMPUTER SETTINGS
Trip Computer : Select to switch trip computer
readings between Trip A, Trip B and Trip Auto .
Select Reset to zero the trip computer
readings. Select Units to switch the trip
computer readings between Imperial and
Metric measurements.
VEHICLE SETTINGS
• Security : Select to enable/disable or alter
the settings of the following:
• Single/multi-point entry (2 stage
unlocking).
• Alarm sensors (interior and tilt).
• Drive-away locking.
Scroll down through the menu until the
desired feature is disp layed, then select On
or Off, as appropriate.
If drive-away locking is switched on, select
the desired speed (8, 16 or 32 km/h or 5,
10 or 20 mph).
• Windows/mirrors : Select to
enable/disable:
• Global opening/closing of windows
and sunroof.
• Exterior mirror dip when reversing.
• Automatic folding/unfo lding of exterior
mirrors when vehicle is locked/
unlocked.
• Interior mirror dimming.
Scroll down through the menu until the
desired feature is disp layed, then select On
or Off, as appropriate. •
Units : Select to switch between Imperial
and Metric measurements.
• Auto (AHB) high beam : Select to turn AHB
on or off, and set AHB for side of road
being driven on.
SELECTING VALET MODE
Valet mode allows the vehi cle to be locked by a
parking attendant, without giving access to the
luggage compartment and glove box. Valet
mode also prevents ope ration of the touch
screen, to prevent access to telephone
numbers or naviga tion addresses.
From the Home menu, select Valet, then enter
a four digit Personal Identification Number
(PIN) (personally chosen ). You will then be
prompted to re-enter the same PIN. On
completion, touch the OK soft key.
If you wish to cancel the PIN, touch the C soft
key. If the PIN is cancelled, or incorrectly
entered, you will be prompted to enter the PIN
again.
Once the PIN has been correctly entered, a
security information pop- up is displayed. Read
the information and remove the emergency key
from the Jaguar Smart Key.
Valet on is displayed to indicate that the PIN
has been accepted. The luggage compartment
and glove box are now securely locked in Valet
mode.
On exiting and securing the vehicle, remove the
emergency key from the Jaguar Smart Key.
Retain the emergency key and give the Jaguar
Smart Key to the attendant.
Note: The emergency key ca n be used to open
the luggage compartment, which may
de-activate Valet mode.
Page 62 of 225

L
(FM8) SEMCON JLR OWNER GUIDE VER 1.00 EURO
LANGUAGE: english-en; MARQUE: jaguar; MODEL: XF
Touch screen
62
DESELECTING VALET MODE
When you enter the vehicle, select the Valet
mode screen.
Enter your four digit PIN and touch the OK
button. A pop-up is displayed. Read the
information and stow th e emergency key in the
Jaguar Smart Key.
Valet off is displayed to indicate that your PIN
has been accepted.
• The luggage compartment will return to the
previously set security requirement.
• The glove box will now open as normal.
Note: If the PIN is forgotten, open the luggage
compartment using the emergency key blade
to cancel Valet mode.
Page 64 of 225

L
(FM8) SEMCON JLR OWNER GUIDE VER 1.00 EURO
LANGUAGE: english-en; MARQUE: jaguar; MODEL: XF
Heating and ventilation
64
13. Left-hand temperature control: Press to
adjust temperature for the left side of the
vehicle. The temperat ure is displayed on
the touch screen ( HI or LO is displayed
when the maximum or minimum setting is
selected).
Note: The maximum possible temperature
differential betwee n left and right hand
temperature settings is 3°C (5.4°F).
14. Right-hand temperature control: Press to
adjust temperature for the right side of the
vehicle. The temperat ure is displayed on
the touch screen ( HI or LO is displayed
when the maximum or minimum setting is
selected).
15. Press briefly to select timed recirculation.
Press and hold to select continuous
recirculation. Press again to switch off. See
64, RECIRCULATION .
16. Press to access seat heating/ climate seat
menu.
17. AUTO control: Press to switch automatic
operation on.
18. Press to turn the heated rear screen on/off.
See 64, HEATED SCREENS .
19. Press to turn the heated front screen
on/off. See 64, HEATED SCREENS .
20. Defrost: Press to remove frost or heavy
misting from the winds creen. This setting
activates the blower s, air-conditioning,
front and rear screen heaters and prohibits
recirculation, to ac hieve a rapid defrost.
In addition to the selectable controls, the
climate menu displays symbols that indicate
the status of heating a nd ventilation functions.
Note: If the climate control system is switched
off, pressing an AUTO button or the Defrost
button, will switch the climate system on.HEATED SCREENS
With the engine running, the front (F) and rear
(R ) screen heaters, may be switched on and off
in any mode, including with the climate control
system off.
The front and rear screen heaters switch off
automatically after a timed period depending
on the ambient temperature. In cold ambient
conditions, below 5°C (41°F), the screen
heaters will switch on automatically when the
engine is started, unles s the engine or vehicle
interior is already warm.
RECIRCULATION
• Press briefly to activate timed
recirculation. The button indicator
illuminates when recirculation is on.
• Press and hold the but ton to activate
continuous recirculation. the button
indicator will flash and then illuminate
constantly.
• To cancel recirculation, press the button
briefly.
When selected, the air is recirculated inside the
vehicle. This helps to maintain a high or low
temperature, and is useful for preventing
fumes from entering the vehicle.
Timed recirculation : Recirculation will switch
off automatically after a set time (dependent on
the ambient temperature).
Latched recirculation: Recirculation will
remain on until the button is pressed again.
Note: Prolonged use at low temperatures may
cause the windows to mist.
Recirculation may also be selected in AUTO
mode, if the climate control system detects
high levels of pollution in the atmosphere
outside the vehicle (if an air quality sensor is
fitted). Manual operation of the recirculation
control will override the automatic setting.
Page 65 of 225
R
(FM8) SEMCON JLR OWNER GUIDE VER 1.00 EURO
LANGUAGE: english-en; MARQUE: jaguar; MODEL: XF
Heating and ventilation
65
AIR QUALITY SENSOR
If the air quality sensor detects pollution, air
recirculation is selected automatically to
reduce pollutants entering the vehicle.
The sensitivity of the se nsor can be adjusted
using the touch screen:
1. Select Settings from the Climate menu.
2. Touch the +/- buttons on the screen to
increase/decrease sensitivity.
To switch the function o ff, decrease sensitivity
to the minimum setting.
EXTERNAL TEMPERATURE
The external temperature is displayed in the
Home menu of the touch screen and in the
instrument panel.
When the external temp erature is low enough
that ice may be present on the road, an amber
snowflake warning lamp w ill illuminate in the
instrument panel.
AUTOMATIC CLIMATE CONTROL
AUTO mode should be used as the normal
operating mode. The air conditioning, heating
and ventilation controls automatically provide
an optimum environment at the selected
temperature.
Note: Screen heating and timed air
recirculation may be se lected in AUTO mode.
Any other manual adjustment cancels AUTO
operation.
Note: Water expelled by the air conditioning
may collect underneath the vehicle when
parked. This is not cause for concern.
TEMPERATURE CONTROLS
The driver and front seat passenger zone
temperatures can be i ndependently adjusted.
The temperature for each zone is displayed on
the relevant side of the touch screen.
Note: The maximum possible temperature
differential between the driver and passenger
settings is 3°C (5.4°F).
HEATED SEATS
Note: The seat heaters will only operate when
the engine is running.
The heated seats are controlled from the Home
or Climate menu on the touch screen.
• Touch the appropriate seat icon to switch
on the seat heater at maximum
temperature (3 red bars).
• Touch the icon a second and third time to
reduce the temperature (2 and 1 red bars).
• Touch the icon a fourth time to switch the
seat heater off.
This icon appears at the top of the
touch screen when the air quality
sensor is switched on.
Page 74 of 225
L
(FM8) SEMCON JLR OWNER GUIDE VER 1.00 EURO
LANGUAGE: english-en; MARQUE: jaguar; MODEL: XF
Starting the engine
74
Starting the engineSTARTING A PETROL ENGINE
The Smart Key may not be detected if it
is placed within a metal container or if it
is shielded by a device with a back-lit
LCD screen, such as a smart phone,
laptop (including laptop bag), games
console etc. Keep the Smart Key clear of
such devices when attempting Keyless
entry or Keyless starting.
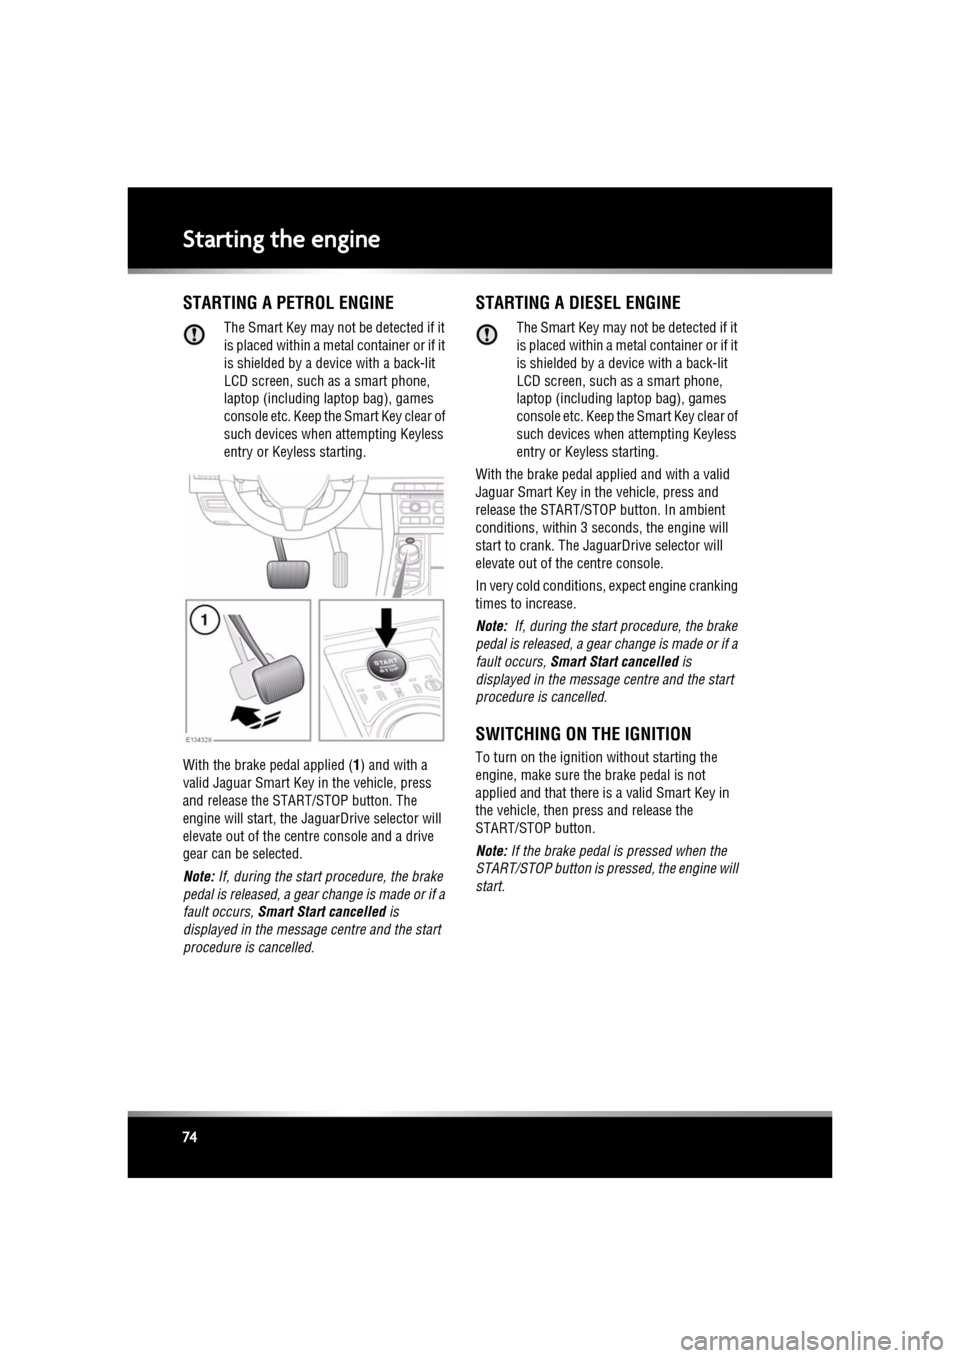
With the brake pedal applied ( 1) and with a
valid Jaguar Smart Key in the vehicle, press
and release the STAR T/STOP button. The
engine will start, the Ja guarDrive selector will
elevate out of the cent re console and a drive
gear can be selected.
Note: If, during the start procedure, the brake
pedal is released, a gear change is made or if a
fault occurs, Smart Start cancelled is
displayed in the message centre and the start
procedure is cancelled.
STARTING A DIESEL ENGINE
The Smart Key may not be detected if it
is placed within a meta l container or if it
is shielded by a device with a back-lit
LCD screen, such as a smart phone,
laptop (including la ptop bag), games
console etc. Keep the Smart Key clear of
such devices when attempting Keyless
entry or Keyless starting.
With the brake pedal applied and with a valid
Jaguar Smart Key in the vehicle, press and
release the START/STOP button. In ambient
conditions, within 3 se conds, the engine will
start to crank. The JaguarDrive selector will
elevate out of the centre console.
In very cold conditions, expect engine cranking
times to increase.
Note: If, during the start procedure, the brake
pedal is released, a gear change is made or if a
fault occurs, Smart Start cancelled is
displayed in the message centre and the start
procedure is cancelled.
SWITCHING ON THE IGNITION
To turn on the ignition without starting the
engine, make sure th e brake pedal is not
applied and that there is a valid Smart Key in
the vehicle, then press and release the
START/STOP button.
Note: If the brake pedal is pressed when the
START/STOP button is pressed, the engine will
start.
Page 75 of 225

R
(FM8) SEMCON JLR OWNER GUIDE VER 1.00 EURO
LANGUAGE: english-en; MARQUE: jaguar; MODEL: XF
Starting the engine
75
STEERING COLUMN LOCK
The steering column has an electronic lock,
which locks and unlocks in conjunction with
the vehicle Locking/Alarm system. The steering
column lock also locks when the ignition is
switched off, after a time delay. If the steering
column lock malfunctions, Steering Column
Locked is displayed in the message centre. If
this occurs:
1. Lock and then unlock the vehicle using the
Smart Key.
2. Try again to unlock the steering column
lock, by turning the steering wheel gently
to the left and right.
3. If the malfunction pers ists, seek qualified
assistance immediately.
SWITCHING OFF THE ENGINE
With the gear sele ctor in position P, press the
engine START/STOP butt on. The engine will
stop and the ignition sy stem will return to
convenience mode. The audio, telephone and
touch screen systems will revert to stand-by
mode and the JaguarDrive selector will retract
into the centre console.
Page 76 of 225
L
(FM8) SEMCON JLR OWNER GUIDE VER 1.00 EURO
LANGUAGE: english-en; MARQUE: jaguar; MODEL: XF
Starting the engine
76
IF THE ENGINE FAILS TO START
If the brake pedal has been pumped prior to an
attempt to start the engine, it may require
greater pressure on the pedal in order for the
engine to start.
If the Jaguar Smart Key is placed in the door
pocket, it may be outside the range of the
sensors when the door is open.
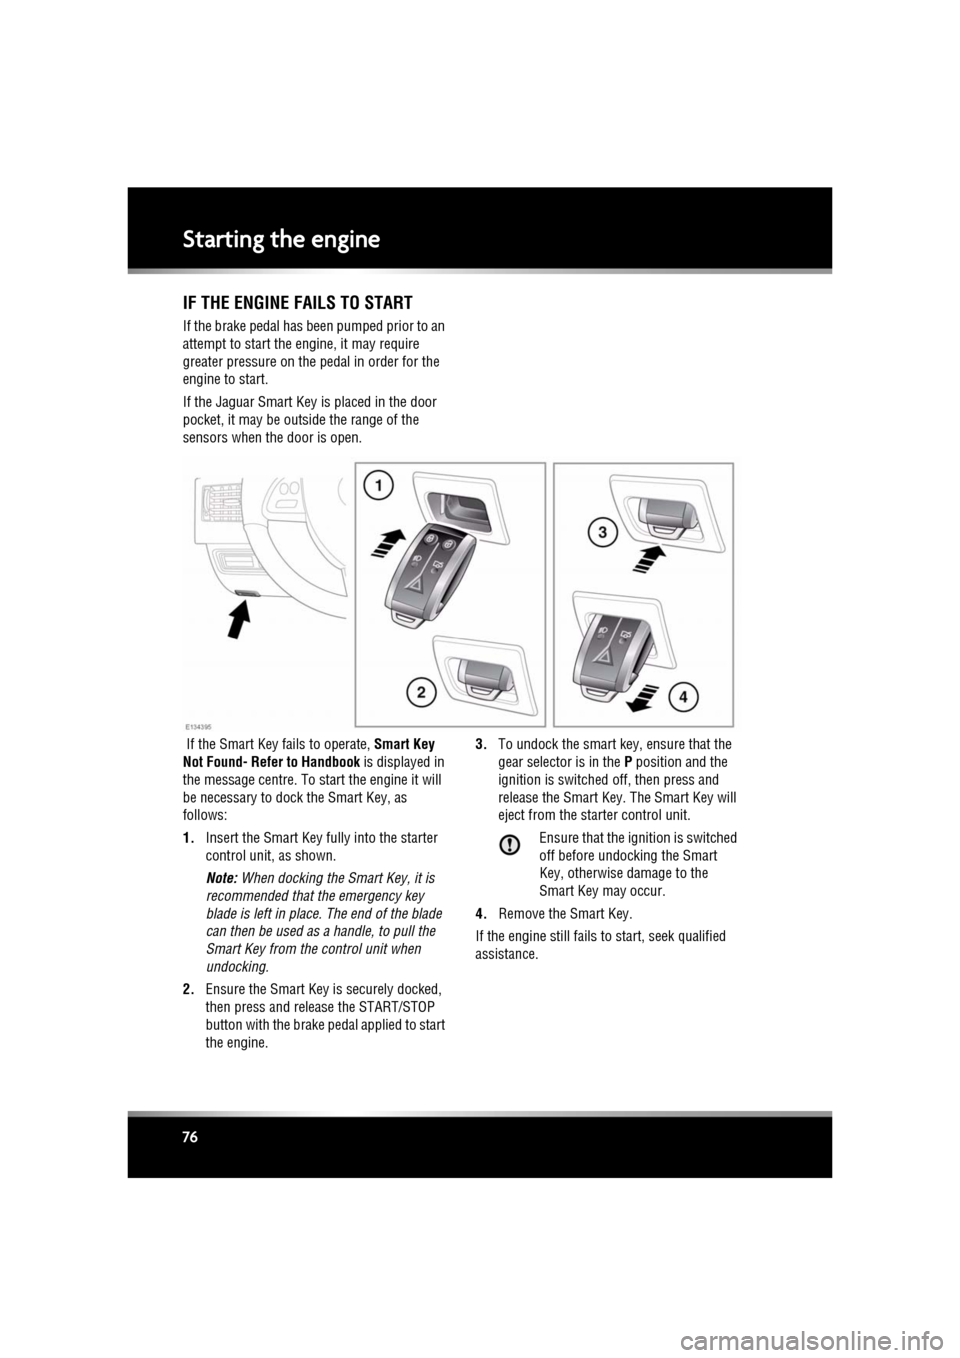
If the Smart Key fails to operate, Smart Key
Not Found- Refer to Handbook is displayed in
the message centre. To start the engine it will
be necessary to dock the Smart Key, as
follows:
1. Insert the Smart Key fully into the starter
control unit, as shown.
Note: When docking the Smart Key, it is
recommended that the emergency key
blade is left in place. The end of the blade
can then be used as a handle, to pull the
Smart Key from the control unit when
undocking.
2. Ensure the Smart Key is securely docked,
then press and release the START/STOP
button with the brake pe dal applied to start
the engine. 3.
To undock the smart key, ensure that the
gear selector is in the P position and the
ignition is switched off, then press and
release the Smart Key. The Smart Key will
eject from the st arter control unit.
Ensure that the ignition is switched
off before undocking the Smart
Key, otherwise damage to the
Smart Key may occur.
4. Remove the Smart Key.
If the engine still fails to start, seek qualified
assistance.