warning lights JAGUAR XF 2010 1.G Owners Manual
[x] Cancel search | Manufacturer: JAGUAR, Model Year: 2010, Model line: XF, Model: JAGUAR XF 2010 1.GPages: 225, PDF Size: 8 MB
Page 3 of 225

R
english-en (10, 18, 21 & 25)
Contents
3
Introduction...................................... 2
Entering the vehicle .......................... 4
Exiting the vehicle............................. 9
Front seats...................................... 12
Rear seats ...................................... 17
Head restraints ............................... 20
Steering wheel ................................ 22
Occupant safety .............................. 23
Exterior lights ................................. 36
Interior lights .................................. 39
Wipers and washers ....................... 40
Windows ........................................ 42
Mirrors ........................................... 44
Blind spot monitoring ..................... 46
Garage door opener........................ 48
Warning lamps ............................... 51
Message centre .............................. 56
Touch screen .................................. 58
Heating and ventilation ................... 63
Luggage compartment ................... 67
Towing ........................................... 69
Storage compartments ................... 72
Starting the engine ......................... 74
Intelligent stop/start ....................... 79
Gearbox .......................................... 81
Stability control .............................. 83
Brakes ............................................ 87
Tyre pressure monitoring system... 89
Parking aids.................................... 92
Cruise control ................................. 94
Adaptive cruise control ................... 96
Automatic speed limiter................ 103
Audio/video overview ................... 104
Radio ............................................ 109DAB radio ..................................... 111
Portable media ............................. 113
CD player...................................... 119
Television ..................................... 122
Video media player ....................... 124
Voice control ................................ 126
Telephone..................................... 128
Navigation system ........................ 134
Tyre repair kit ............................... 147
Fuel and refuelling ........................ 152
Maintenance ................................. 158
Fluid level checks ......................... 168
Technical specifications ............... 175
Vehicle battery.............................. 182
Tyres ............................................ 185
Fuses ............................................ 188
Wheel changing............................ 194
Vehicle recovery ........................... 197
After a collision ............................ 198
Vehicle identification .................... 200
Type approval ............................... 202
Controls overview......................... 224
Page 9 of 225
R
(FM8) SEMCON JLR OWNER GUIDE VER 1.00 EURO
LANGUAGE: english-en; MARQUE: jaguar; MODEL: XF
Exiting the vehicle
9
Exiting the vehicleDOOR LOCK AND RELEASE LEVERS
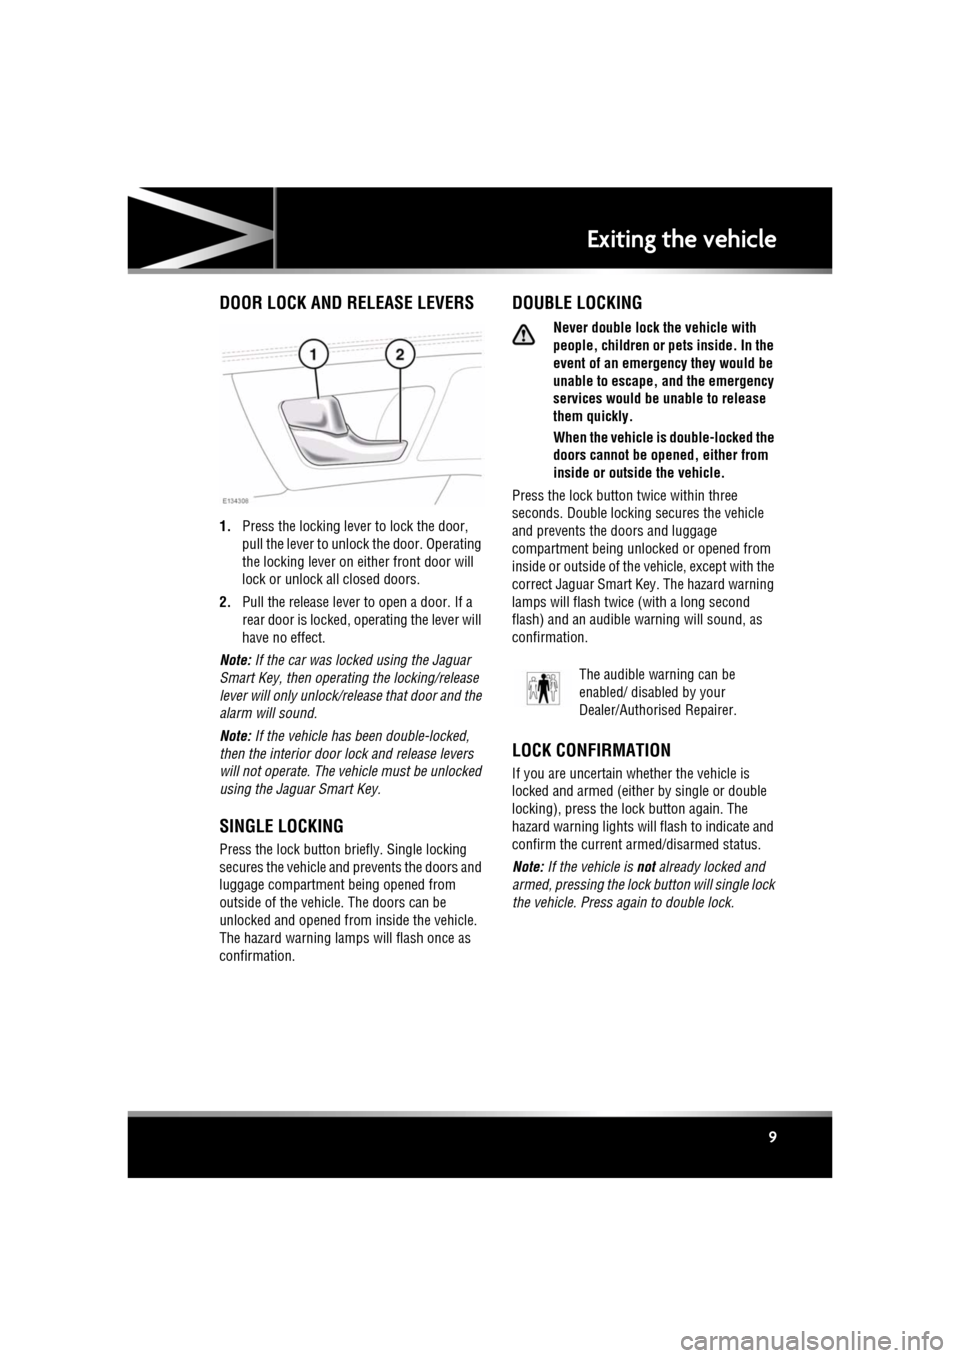
1. Press the locking lever to lock the door,
pull the lever to unlock the door. Operating
the locking lever on either front door will
lock or unlock all closed doors.
2. Pull the release lever to open a door. If a
rear door is locked, ope rating the lever will
have no effect.
Note: If the car was locked using the Jaguar
Smart Key, then operating the locking/release
lever will only unlock/release that door and the
alarm will sound.
Note: If the vehicle has been double-locked,
then the interior door lock and release levers
will not operate. The vehicle must be unlocked
using the Jaguar Smart Key.
SINGLE LOCKING
Press the lock button br iefly. Single locking
secures the vehicle and prevents the doors and
luggage compartment being opened from
outside of the vehicle. The doors can be
unlocked and opened from inside the vehicle.
The hazard warning lamps will flash once as
confirmation.
DOUBLE LOCKING
Never double lock the vehicle with
people, children or pets inside. In the
event of an emergenc y they would be
unable to escape, and the emergency
services would be unable to release
them quickly.
When the vehicle is double-locked the
doors cannot be opened, either from
inside or outside the vehicle.
Press the lock button twice within three
seconds. Double locking secures the vehicle
and prevents the doors and luggage
compartment being unlocked or opened from
inside or outside of the vehicle, except with the
correct Jaguar Smart Key. The hazard warning
lamps will flash twice (with a long second
flash) and an audible warning will sound, as
confirmation.
LOCK CONFIRMATION
If you are uncertain whether the vehicle is
locked and armed (either by single or double
locking), press the lock button again. The
hazard warning lights will flash to indicate and
confirm the current armed/disarmed status.
Note: If the vehicle is not already locked and
armed, pressing the lock button will single lock
the vehicle. Press again to double lock.
The audible warning can be
enabled/ disabled by your
Dealer/Authorised Repairer.
Page 10 of 225
L
(FM8) SEMCON JLR OWNER GUIDE VER 1.00 EURO
LANGUAGE: english-en; MARQUE: jaguar; MODEL: XF
Exiting the vehicle
10
MISLOCK
If one of the doors, the bonnet, or the luggage
compartment are not shut fully when the
vehicle is locked using the Jaguar Smart Key or
by Keyless locking, the vehicle will not lock and
two warning tones will sound. Check that all
doors, the bonnet and the luggage
compartment are closed properly and lock the
vehicle again.
If one or more of the doors fails to lock
properly when a lock attempt is made using the
Jaguar Smart Key, tw o warning tones will
sound and one or more of the doors may not be
locked.
GLOBAL CLOSING
Ensure that no children, pets, or
obstructions are in any open aperture
before operating global closing.
Ensure that all doors are closed, then press and
hold the lock button on the Smart Key for 3
seconds or press and hold the lock button on
the exterior door handle. The vehicle will single
lock and the alarm will be fully armed
immediately. After 3 seconds all of the
windows will close.
Note: If the button on the door handle is
released before the windows have fully closed,
the windows will stop closing.
Note: Global closing can be enabled/disabled
via the Security/ vehicle settings menu on the
touch screen. See 61, VEHICLE SETTINGS .
KEYLESS LOCKING
Remove all Jaguar Smart Keys and
emergency key blades from the vehicle
when it is left unattended. This will help
prevent the alarm being disarmed and
therefore help prevent theft. The Smart Key may not be detected if it
is placed within a meta
l container or if it
is shielded by a device with a back-lit
LCD screen, such as a smart phone,
laptop (including la ptop bag), games
console etc.
The vehicle will not lock automatically.
To single-lock the vehicle, press the button on
the door handle once. The hazard warning
lamps will flash once as confirmation (in some
markets, an audible warning will sound).
To double-lock the vehicle, press the button
twice within three seconds. The hazard
warning lamps will flash twice (with a long
second flash). In some markets, a double
audible warning will sound.
Note: Keyless locking will onl y activate if all
doors, bonnet and the luggage compartment
are closed and the Jagua r Smart Key is outside
the vehicle. If the abov e conditions are not met,
two audible error warnings will sound.
FULL ALARM
To set full alarm protection, ensure that all the
windows and the sunroof are closed. Then, on
vehicles fitted with double-locking, press the
lock button twice within three seconds. The
hazard warning lights will flash twice to
confirm the alarm state and, in some markets,
an audible tone will sound.
Note: If the alarm is armed and a window or the
sunroof are left open, the alarm may sound due
to movement of air currents, detected by the
intrusion sensors in th e front interior light
console.
Note: The intrusion sensors can be temporarily
disabled, for the next time the vehicle is locked,
via the Security/ vehicle settings menu on the
touch screen. See 61, VEHICLE SETTINGS .
Page 11 of 225
R
(FM8) SEMCON JLR OWNER GUIDE VER 1.00 EURO
LANGUAGE: english-en; MARQUE: jaguar; MODEL: XF
Exiting the vehicle
11
PERIMETER ALARM
To set perimeter alarm protection, briefly press
the lock button once. The hazard warning lights
will flash once to confirm the alarm state.
BATTERY-BACKED SOUNDER
In certain markets, a separate battery backed
sounder is fitted. This device will sound the
alarm if the vehicle battery or the alarm
sounder is disconnected when the security
system is armed.
DEACTIVATING THE ALARM WHEN
TRIGGERED
If the alarm has been triggered, it can be
deactivated by any one of the following
methods:-
• Pressing the unlock button on the Jaguar
Smart Key.
• Opening a door using keyless entry.
• Pressing the START/STOP button with a
valid Jaguar Smart Key present.
TILT SENSOR
The tilt sensor detects any change in the
vehicle's angle to the ground. When the alarm
is armed and the vehicle double-locked, any
change in the vehicle's angle will activate the
tilt alarm.
Note: The tilt sensor ca n be temporarily
disabled, for the next time the vehicle is locked,
via the Security/ vehicle settings menu on the
touch screen. See 61, VEHICLE SETTINGS .
PASSIVE ARMING
This vehicle is fitted with a passive arming
feature which can, if enabled, automatically
arm the anti-theft system. Passive arming will
automatically arm the perimeter alarm system
60 seconds after the driver's door is closed,
provided all doors, bonnet and luggage
compartment are closed, the ignition is
switched off and there are no valid Jaguar
Smart Keys inside the vehicle.
Passive arming will not lock the vehicle,
although access to the luggage compartment
via the interior or exteri or release buttons will
be prevented and the fuel filler flap will be
locked.
AUTOMATIC RELOCKING AND
RE-ARMING OF THE ALARM
Automatic relock and re-arm is a feature which,
if enabled, automatically relocks the vehicle
and arms the anti-theft system.
If the vehicle is in a locked and armed state and
the remote unlock button is pressed, but none
of the doors or the luggage compartment are
opened within 1 minute, the vehicle will
automatically relock all the doors and the
luggage compartment and will re-arm the
alarm system.
Note: Automatic relocking and arming will only
relock and arm to the last locked and armed
state.
SENSOR FAULTS
If the security systems detect a fault with one
of the security sensors, 2 error tones will
sound from the alarm after the vehicle is
unlocked and disarmed. If this condition
occurs, please visit your Dealer/Authorised
Repairer for rectification.
Page 36 of 225
L
(FM8) SEMCON JLR OWNER GUIDE VER 1.00 EURO
LANGUAGE: english-en; MARQUE: jaguar; MODEL: XF
Exterior lights
36
Exterior lightsLIGHTING CONTROL
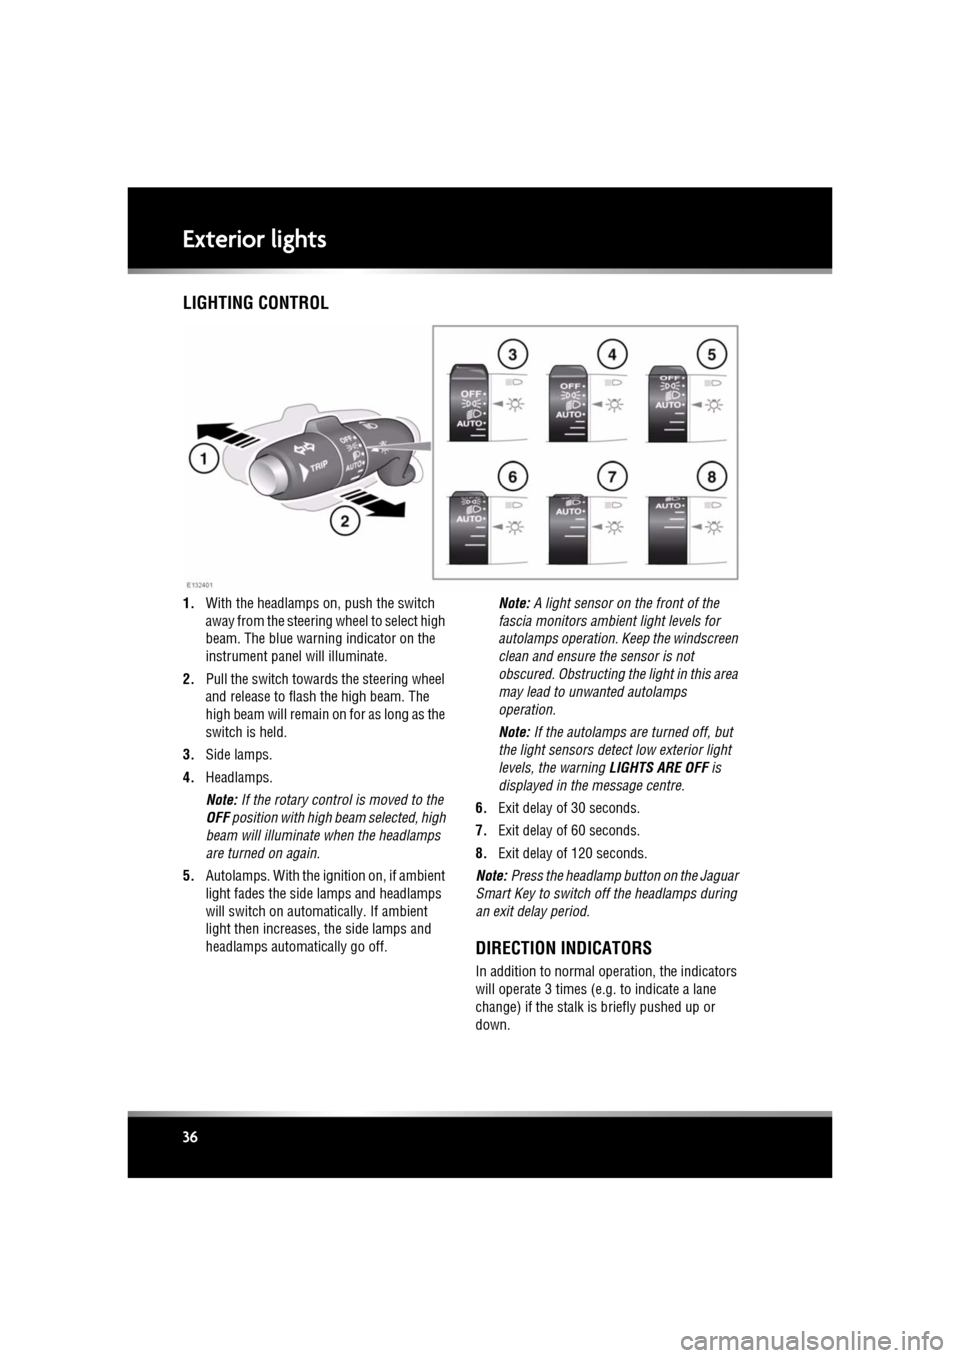
1. With the headlamps on, push the switch
away from the steering wheel to select high
beam. The blue warning indicator on the
instrument panel will illuminate.
2. Pull the switch towards the steering wheel
and release to flash the high beam. The
high beam will remain on for as long as the
switch is held.
3. Side lamps.
4. Headlamps.
Note: If the rotary control is moved to the
OFF position with high beam selected, high
beam will illuminate when the headlamps
are turned on again.
5. Autolamps. With the ignition on, if ambient
light fades the side lamps and headlamps
will switch on automatically. If ambient
light then increases, the side lamps and
headlamps automatically go off. Note:
A light sensor on the front of the
fascia monitors ambi ent light levels for
autolamps operation. Keep the windscreen
clean and ensure the sensor is not
obscured. Obstructing the light in this area
may lead to unwanted autolamps
operation.
Note: If the autolamps are turned off, but
the light sensors detect low exterior light
levels, the warning LIGHTS ARE OFF is
displayed in the message centre.
6. Exit delay of 30 seconds.
7. Exit delay of 60 seconds.
8. Exit delay of 120 seconds.
Note: Press the headlamp button on the Jaguar
Smart Key to switch off the headlamps during
an exit delay period.
DIRECTION INDICATORS
In addition to normal ope ration, the indicators
will operate 3 times (e.g . to indicate a lane
change) if the stalk is briefly pushed up or
down.
Page 54 of 225
L
(FM8) SEMCON JLR OWNER GUIDE VER 1.00 EURO
LANGUAGE: english-en; MARQUE: jaguar; MODEL: XF
Warning lamps
54
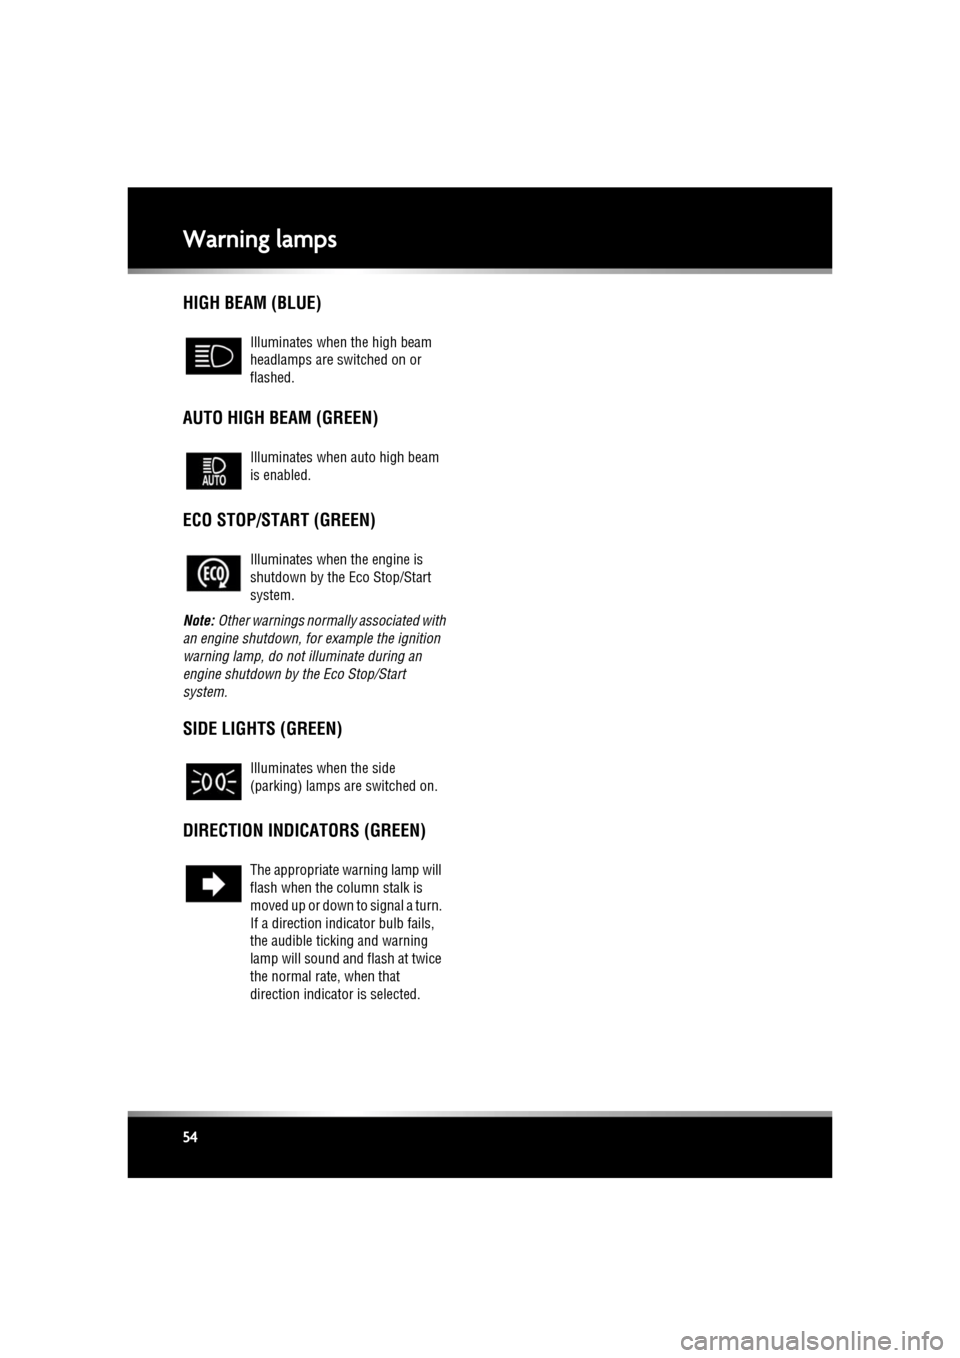
HIGH BEAM (BLUE)
AUTO HIGH BEAM (GREEN)
ECO STOP/START (GREEN)
Note: Other warnings normall y associated with
an engine shutdown, for example the ignition
warning lamp, do not illuminate during an
engine shutdown by the Eco Stop/Start
system.
SIDE LIGHTS (GREEN)
DIRECTION INDICATORS (GREEN)
Illuminates when the high beam
headlamps are switched on or
flashed.
Illuminates when auto high beam
is enabled.
Illuminates when the engine is
shutdown by the Eco Stop/Start
system.
Illuminates when the side
(parking) lamps are switched on.
The appropriate warning lamp will
flash when the column stalk is
moved up or down to signal a turn.
If a direction indi cator bulb fails,
the audible ticking and warning
lamp will sound and flash at twice
the normal rate, when that
direction indicator is selected.
Page 77 of 225
R
(FM8) SEMCON JLR OWNER GUIDE VER 1.00 EURO
LANGUAGE: english-en; MARQUE: jaguar; MODEL: XF
Starting the engine
77
PETROL ENGINES
If the engine persistently fails to start, press the
START/STOP button (without applying the
brake pedal) to return the ignition to
convenience mode. Slowly depress the
accelerator pedal fully, ho ld it in this position
and press the START/STOP button with the
brake pedal applied, the engine will start to
crank. Release the accelerator pedal when the
engine starts.
If the engine still fails to start, consult your
Dealer/Authorised Repairer.
DIESEL ENGINES
If the engine persistently fails to start, press
and hold the START/STOP button (with the
brake pedal applied). Keep the START/STOP
button and the brake pedal pressed until the
engine starts, then release.
If the engine still fails to start, consult your
Dealer/Authorised Repairer.
SWITCHING OFF THE ENGINE WHILE
MOVING
It is not advisable to switch off the
engine whilst the vehicle is moving.
However, should such a situation
arise, then the following procedure
applies.
• Press and hold the engine START/STOP
button for 2 seconds, or;
• Press the engine START/STOP button
twice within 2 seconds.
In either case, the warning Engine stop button
pressed will be displayed in the message
centre.
ROLLING RE-START
If the engine is switched off whilst the vehicle
is moving, a rolling re-sta rt can be initiated by
selecting neut ral and pressing the engine
START/STOP button.
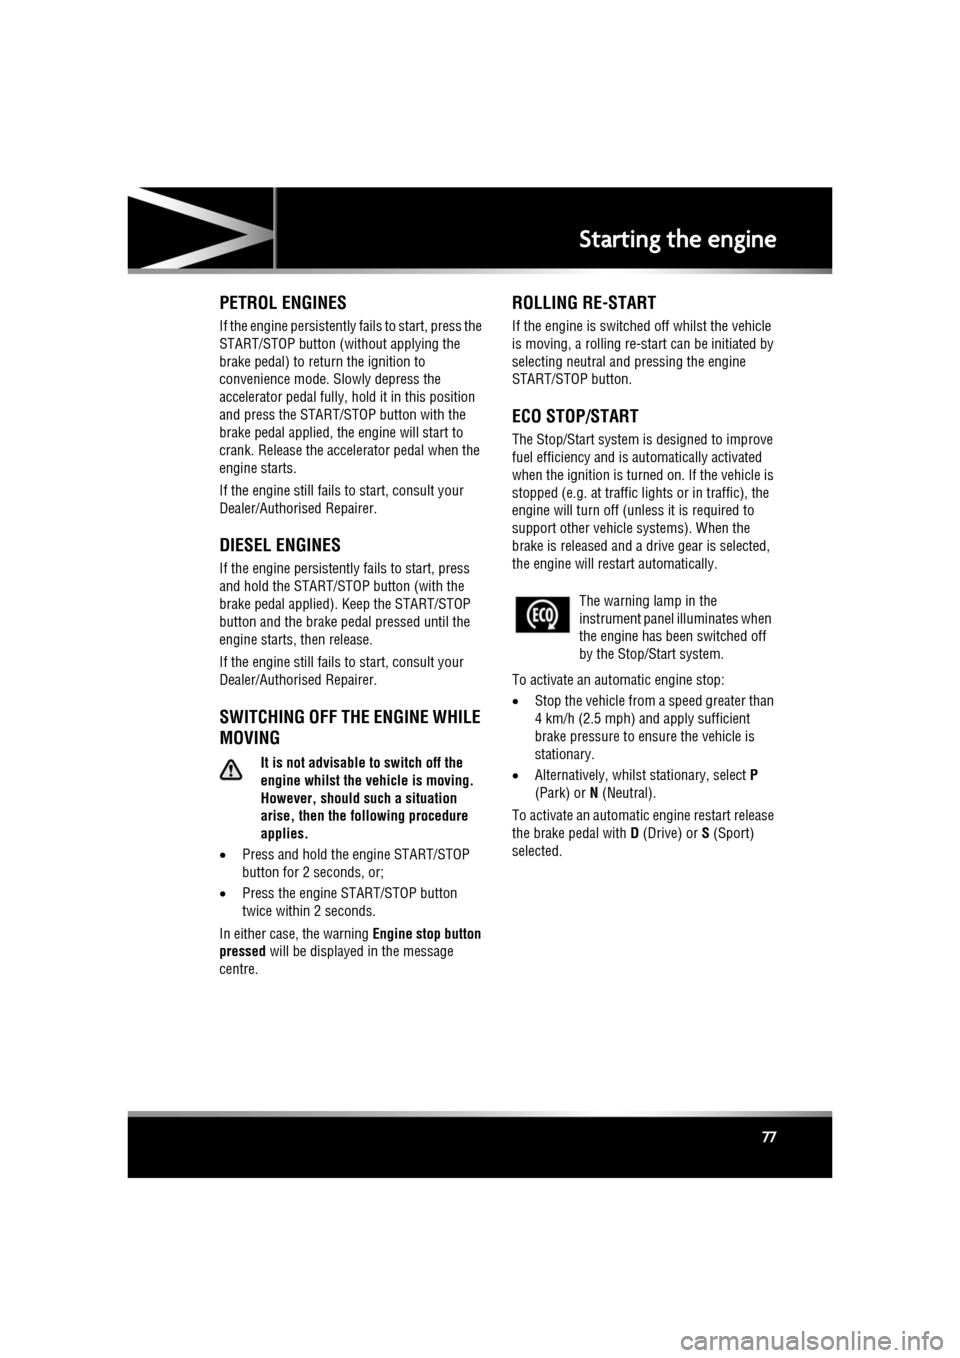
ECO STOP/START
The Stop/Start system is designed to improve
fuel efficiency and is automatically activated
when the ignition is turned on. If the vehicle is
stopped (e.g. at traffic lights or in traffic), the
engine will turn off (unl ess it is required to
support other vehicle systems). When the
brake is released and a drive gear is selected,
the engine will restart automatically.
To activate an automatic engine stop:
• Stop the vehicle from a speed greater than
4 km/h (2.5 mph) and apply sufficient
brake pressure to ensure the vehicle is
stationary.
• Alternatively, whilst stationary, select P
(Park) or N (Neutral).
To activate an automatic engine restart release
the brake pedal with D (Drive) or S (Sport)
selected.
The warning lamp in the
instrument panel illuminates when
the engine has been switched off
by the Stop/Start system.
Page 79 of 225

R
(FM8) SEMCON JLR OWNER GUIDE VER 1.00 EURO
LANGUAGE: english-en; MARQUE: jaguar; MODEL: XF
Intelligent stop/start
79
Intelligent stop/startECO STOP/START
The Stop/Start system is designed to improve
fuel efficiency and is automatically activated
when the ignition is turned on. If the vehicle is
stopped (e.g. at traffic lights or in traffic), the
engine will turn off ( unless it is required to
support other vehicle systems). When the
brake is released and a drive gear is selected,
the engine will restart automatically.
To activate an automatic engine stop:
• Stop the vehicle from a speed greater than
4 km/h (2.5 mph) and apply sufficient
brake pressure to ensure the vehicle is
stationary.
• Alternatively, whilst stationary, select P
(Park) or N (Neutral).
To activate an automatic engine restart release
the brake pedal with D (Drive) or S (Sport)
selected. The engine will also restart if one of the
following occurs:
•
The accelerator pedal is pressed.
• A shift paddle is used to select a gear.
• R (Reverse) is selected.
• Climate control system demand increases.
• The vehicle’s speed exceeds approximately
1 km/h (0.5 mph).
• Battery charge becomes low.
• Brake vacuum has be en reduced (e.g.
using the brake pedal repeatedly with the
engine off).
• Stop/Start is deactivated.
The following conditions will prevent an
automatic engine stop:
• A shift paddle has been used to select a
gear.
• The external temperature is less than
approximately 0 °C (32 °F).
• The external temperature is more than
approximately 40 °C (104 °F).
• The engine has not reached operating
temperature.
• The driver's door is opened.
• The driver’s seat belt is not fastened.
• The climate control system demand
requires the engine to be running (for
example, in Defrost mode).
• The battery charge is low.
• The bonnet is opened.
• Stop/Start is deactivated.
The warning lamp in the
instrument panel
illuminates when
the engine has been switched off
by the Stop/Start system.
Page 87 of 225
R
(FM8) SEMCON JLR OWNER GUIDE VER 1.00 EURO
LANGUAGE: english-en; MARQUE: jaguar; MODEL: XF
Brakes
87
BrakesIMPORTANT INFORMATION
Do not rest your foot on the brake
pedal whilst the vehicle is in motion.
Never allow the vehicle to coast
(freewheel) with the engine turned off.
The engine must be running to provide
full braking assistance. The brakes
will still function wi th the engine off,
but far more pressure will be required
to operate them.
If the red brake warning lamp
illuminates, safely bring the vehicle to
a stop, as quickly as possible and
seek qualified assistance.
Never place non-approved floor
matting or any other obstructions
under the brake pedal. This restricts
pedal travel and braking efficiency.
Driving through heavy rain or water can have
an adverse effect on braking efficiency. Under
such circumstances, it is recommended that
you lightly apply the brak es intermittently to
dry the brakes.
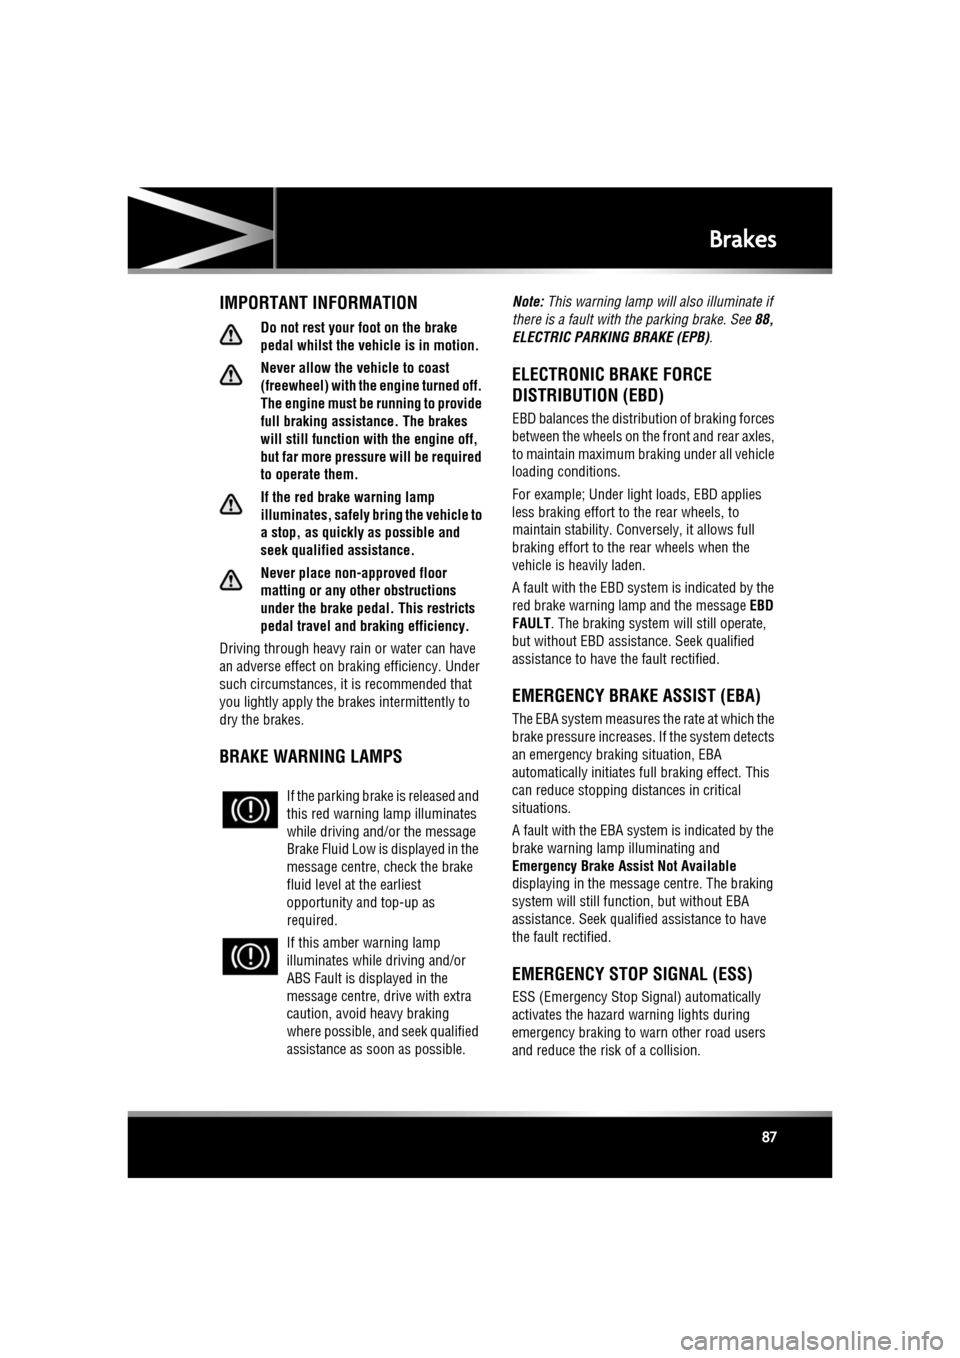
BRAKE WARNING LAMPS
Note: This warning lamp will also illuminate if
there is a fault with the parking brake. See 88,
ELECTRIC PARKIN G BRAKE (EPB).
ELECTRONIC BRAKE FORCE
DISTRIBUTION (EBD)
EBD balances the distribution of braking forces
between the wheels on the front and rear axles,
to maintain maximum braking under all vehicle
loading conditions.
For example; Under light loads, EBD applies
less braking effort to the rear wheels, to
maintain stability. Conv ersely, it allows full
braking effort to the rear wheels when the
vehicle is heavily laden.
A fault with the EBD system is indicated by the
red brake warning lamp and the message EBD
FAULT . The braking system will still operate,
but without EBD assist ance. Seek qualified
assistance to have the fault rectified.
EMERGENCY BRAKE ASSIST (EBA)
The EBA system measures the rate at which the
brake pressure increases. If the system detects
an emergency braki ng situation, EBA
automatically initiates fu ll braking effect. This
can reduce stopping distances in critical
situations.
A fault with the EBA system is indicated by the
brake warning lamp illuminating and
Emergency Brake Assist Not Available
displaying in the message centre. The braking
system will still func tion, but without EBA
assistance. Seek qualified assistance to have
the fault rectified.
EMERGENCY STOP SIGNAL (ESS)
ESS (Emergency Stop Signal) automatically
activates the hazard warning lights during
emergency braking to warn other road users
and reduce the risk of a collision.
If the parking brake
is released and
this red warning lamp illuminates
while driving and/or the message
Brake Fluid Low is displayed in the
message centre, check the brake
fluid level at the earliest
opportunity and top-up as
required.
If this amber warning lamp
illuminates while driving and/or
ABS Fault is displayed in the
message centre, drive with extra
caution, avoid heavy braking
where possible, and seek qualified
assistance as soon as possible.
Page 149 of 225
R
(FM8) SEMCON JLR OWNER GUIDE VER 1.00 EURO
LANGUAGE: english-en; MARQUE: jaguar; MODEL: XF
Tyre repair kit
149
USING THE TYRE REPAIR KIT
Avoid skin contact with the sealant
which contains natural rubber latex.
If the tyre inflation pressure does not
reach 1.8 bar (26 psi, 180 kPa) within
seven minutes, the tyre may have
suffered excessive damage. A
temporary repair will not be possible,
and the vehicle should not be driven
until the tyre has been replaced.
Before attempting a tyre repair, ensure
that the vehicle is parked safely, as far
away from passing traffic as possible.
Ensure that the parking brake is applied
and P (Park) is selected.
Do not attempt to remove foreign
objects such as nails, screws, etc. from
the tyre.
Always run the engine when using the
compressor, unless the vehicle is in an
enclosed or poorly ventilated space, as
this may cause asphyxiation.
To prevent overheatin g, do not operate
the compressor continuously for longer
than ten minutes.
Note: All vehicle drivers and occupants should
be made aware that a temporary repair has
been made to a tyre fitt ed to the vehicle. They
should also be made aware of the special
driving conditions im posed when using a
repaired tyre.
REPAIR PROCEDURE
Check the tyre sidewall prior to
inflation. If there are any cracks,
bumps or similar damage, do not
attempt to inflate the tyre. Do not
stand directly besi de the tyre while
the compressor is pumping. Watch the
tyre sidewall. If any cracks, bumps or
similar damage appear, turn off the
compressor and let the air out by
means of the pressure relief valve. Do
not continue to use the tyre.
1. Open the tyre repair kit and peel off the
maximum speed label. Attach the label to
the facia in the driver's field of vision. Take
care not to obstruct an y of the instruments
or warning lights.
2. Uncoil the compressor power cable and
the inflation hose.
3. Unscrew the orange cap from the sealant
bottle receiver and the sealant bottle cap.
4. Screw the sealant bottle into the receiver
(clockwise) until tight.
•Screwing the bottle onto the receiver
will pierce the bottle's seal. Once the
receiver has been fitted, a ratchet
prevents it from being removed.
5. Remove the valve cap from the damaged
tyre.
6. Remove the protective cap from the
inflation hose and connect the inflation
hose to the tyre valve. Ensure that the hose
is screwed on firmly.
7. Ensure that the compressor switch is in the
off ( 0) position.
8. Insert the power cable connector into the
auxiliary power socket.
9. Unless the vehicle is in an enclosed area,
start the engine.