JAGUAR XF 2011 1.G Owners Manual
Manufacturer: JAGUAR, Model Year: 2011, Model line: XF, Model: JAGUAR XF 2011 1.GPages: 225, PDF Size: 7.32 MB
Page 181 of 225
R
(FM8) SEMCON JLR OWNER GUIDE VER 1.00 EURO
LANGUAGE: english-en; MARQUE: jaguar; MODEL: XF
Technical specifications
181
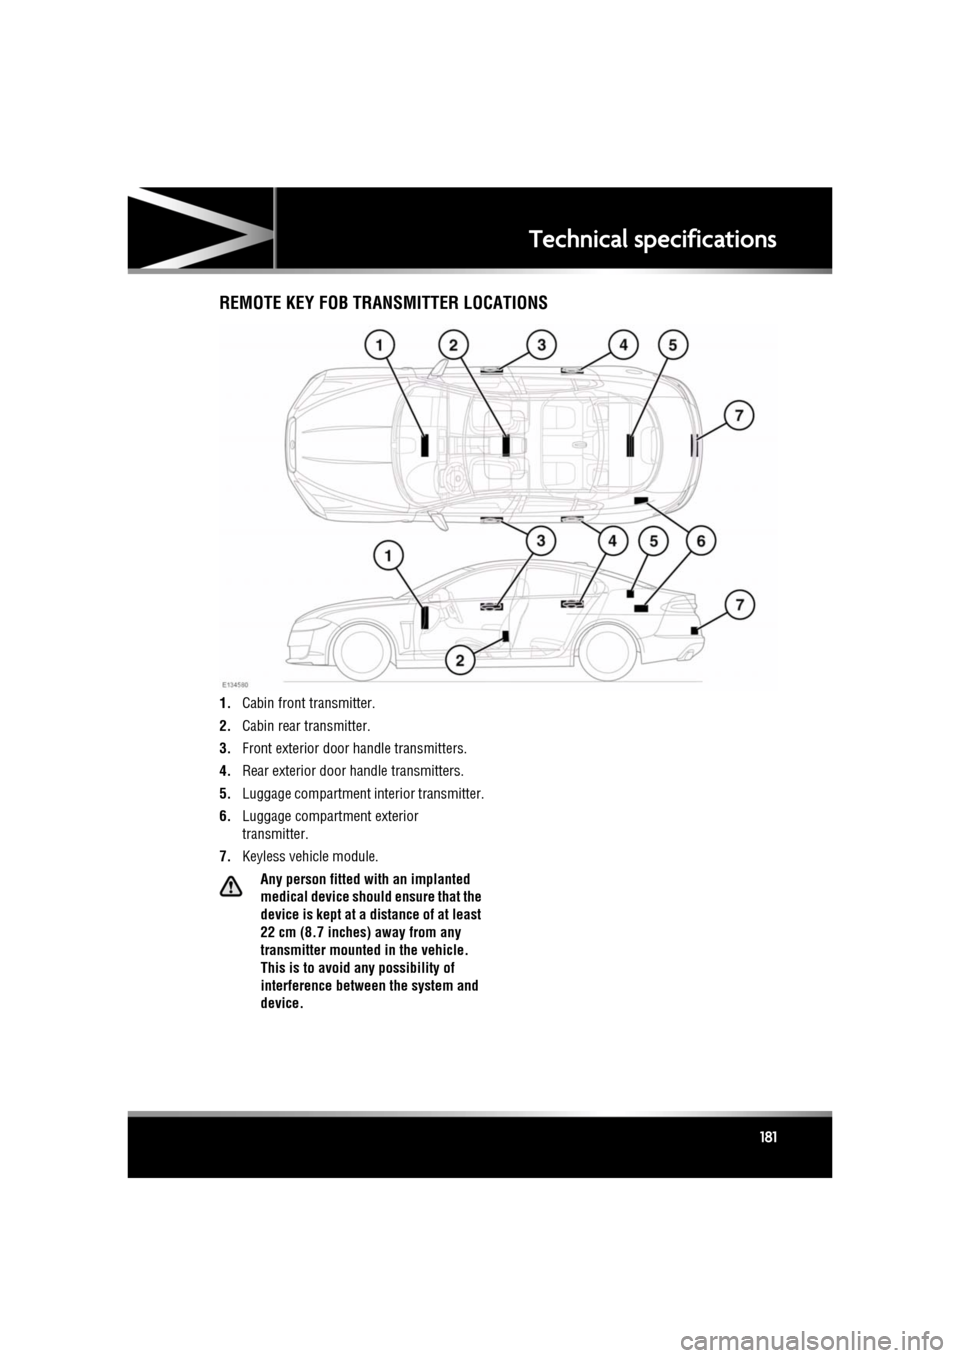
REMOTE KEY FOB TRANSMITTER LOCATIONS
1. Cabin front transmitter.
2. Cabin rear transmitter.
3. Front exterior door handle transmitters.
4. Rear exterior door ha ndle transmitters.
5. Luggage compartment in terior transmitter.
6. Luggage compartment exterior
transmitter.
7. Keyless vehicle module.
Any person fitted with an implanted
medical device should ensure that the
device is kept at a distance of at least
22 cm (8.7 inches) away from any
transmitter mounted in the vehicle.
This is to avoid any possibility of
interference between the system and
device.
Page 182 of 225
L
(FM8) SEMCON JLR OWNER GUIDE VER 1.00 EURO
LANGUAGE: english-en; MARQUE: jaguar; MODEL: XF
Vehicle battery
182
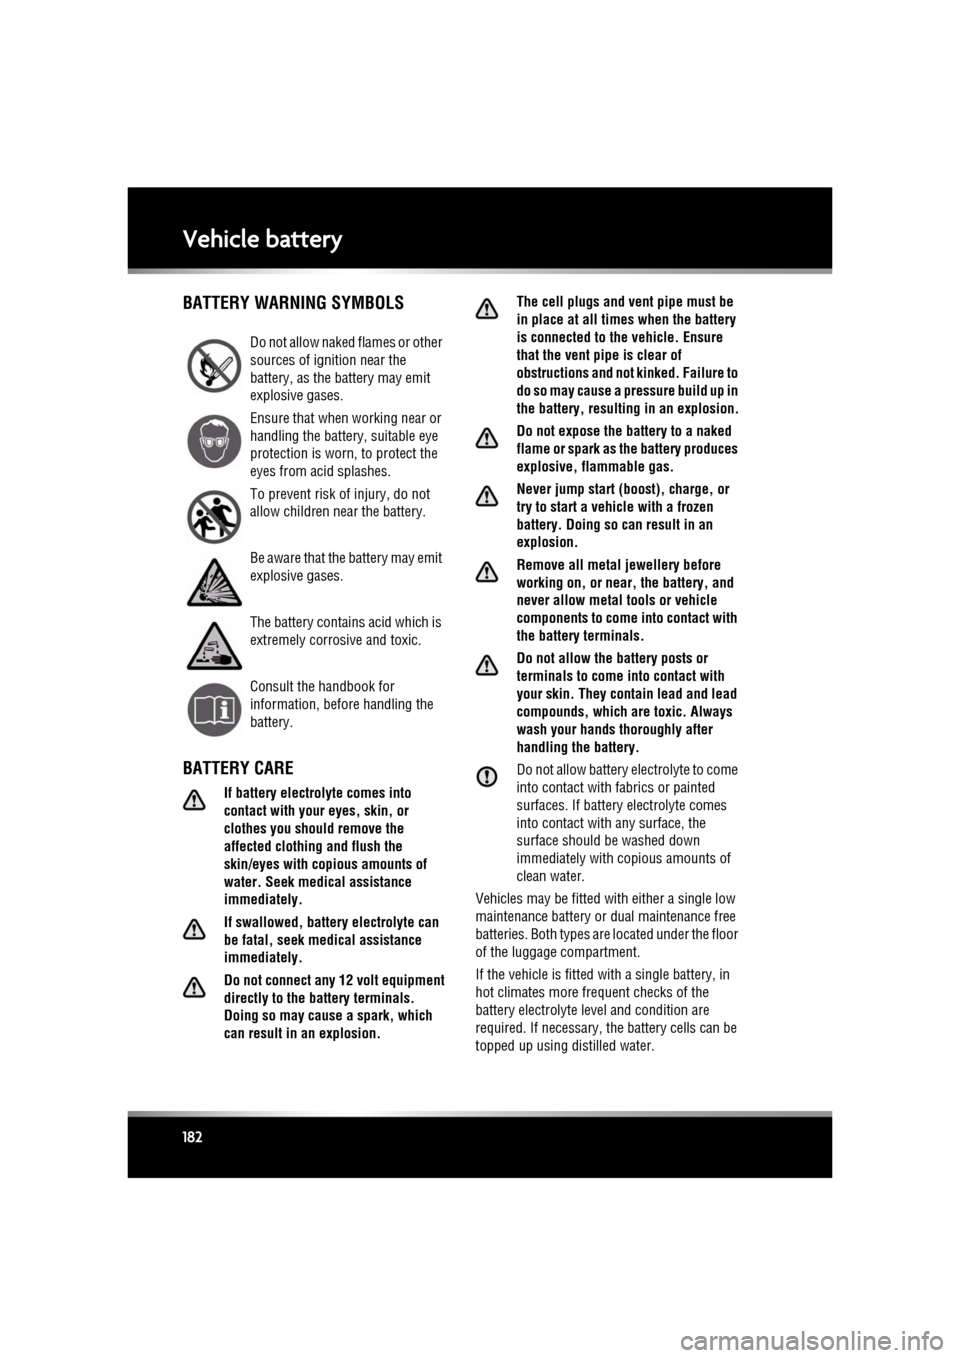
Vehicle batteryBATTERY WARNING SYMBOLS
BATTERY CARE
If battery electrolyte comes into
contact with your eyes, skin, or
clothes you should remove the
affected clothing and flush the
skin/eyes with copious amounts of
water. Seek medical assistance
immediately.
If swallowed, battery electrolyte can
be fatal, seek medical assistance
immediately.
Do not connect any 12 volt equipment
directly to the bat tery terminals.
Doing so may cause a spark, which
can result in an explosion. The cell plugs and vent pipe must be
in place at all tim
es when the battery
is connected to t he vehicle. Ensure
that the vent pipe is clear of
obstructions and not kinked. Failure to
do so may cause a pressure build up in
the battery, resulting in an explosion.
Do not expose the battery to a naked
flame or spark as the battery produces
explosive, flammable gas.
Never jump start (boost), charge, or
try to start a vehicle with a frozen
battery. Doing so can result in an
explosion.
Remove all metal jewellery before
working on, or near, the battery, and
never allow metal tools or vehicle
components to come into contact with
the battery terminals.
Do not allow the battery posts or
terminals to come into contact with
your skin. They contain lead and lead
compounds, which are toxic. Always
wash your hands thoroughly after
handling the battery.
Do not allow battery electrolyte to come
into contact with fabrics or painted
surfaces. If battery electrolyte comes
into contact with any surface, the
surface should be washed down
immediately with copious amounts of
clean water.
Vehicles may be fitted with either a single low
maintenance battery or dual maintenance free
batteries. Both types are located under the floor
of the luggage compartment.
If the vehicle is fitted with a single battery, in
hot climates more fre quent checks of the
battery electrolyte level and condition are
required. If necessary, the battery cells can be
topped up using distilled water.
Do not allow naked flames or other
sources of ignition near the
battery, as the battery may emit
explosive gases.
Ensure that when working near or
handling the battery, suitable eye
protection is worn, to protect the
eyes from acid splashes.
To prevent risk of injury, do not
allow children near the battery.
Be aware that the battery may emit
explosive gases.
The battery contains acid which is
extremely corrosive and toxic.
Consult the handbook for
information, before handling the
battery.
Page 183 of 225
R
(FM8) SEMCON JLR OWNER GUIDE VER 1.00 EURO
LANGUAGE: english-en; MARQUE: jaguar; MODEL: XF
Vehicle battery
183
BATTERY MONITORING SYSTEM
(BMS)
If excessive battery discharge is occurring
when the engine isn't running, the system will
shut down non-essential el ectrical systems to
protect battery power.
CONNECTING BOOSTER CABLES
Always wear appropriate eye
protection when working with
batteries.
Make sure both batteries are of the 12
volt type and that the booster cables
have insulated clamps and are
approved for use with 12 volt
batteries.
Do not disconnect the discharged
battery.
Do not connect a booster cable to the
negative (-) terminal of the battery.
Always connect to the recommended
earthing point.
Ensure the bodywork of the donor and
disabled vehicles do not touch.
If the vehicle is fitted with a dual
battery system, the larger of the two
batteries must be used when
connecting booster cables.
Note: Before connecting booster cables,
ensure that the battery connections on the
disabled vehicle are correct and that all
electrical equipment has been switched off.
1. Connect the positive booster cable to the
positive terminal on the donor vehicle's
battery.
2. Connect the other e nd of the positive
booster cable to the positive terminal on
the disabled vehicle's battery. If the vehicle is fitted with a dual
battery system, t
he larger of the
two batteries must be used when
connecting booster cables.
3. Connect the negative booster cable to the
recommended jump starting earth point of
the donor vehicle.
4. Connect the other e nd of the negative
booster cable to a suitable earth point on
the disabled vehicle. The earth point should
be at least 0.5 metres (20 inches) away
from the battery and as far as possible
from any fuel or brake pipes.
• Check that all cables are clear of any
moving components and that all four
connections are secure.
5. Start the engine of the donor vehicle, and
allow it to idle for a few minutes.
6. Start the engine of the disabled vehicle.
7. Allow both vehicles to idle for two minutes.
8. Switch off the donor vehicle.
DISCONNECTING THE BOOSTER
CABLES
To avoid serious injury use extreme
caution when removing the booster
cables as the engine will be running
on the previously disabled vehicle.
This means that you may be working
close to components which are
moving at high speed, carry high
voltage, or may be hot.
Note: Do not switch on any electrical
equipment until after th e cables have been
disconnected.
The engine should be running on the
previously disabled ve hicle and the engine
switched off on the donor vehicle. Disconnect
the booster cables in the exact reverse order of
that used for connection.
Page 184 of 225
L
(FM8) SEMCON JLR OWNER GUIDE VER 1.00 EURO
LANGUAGE: english-en; MARQUE: jaguar; MODEL: XF
Vehicle battery
184
CHARGING THE VEHICLE BATTERY
The battery must be disconnected and
removed from the vehicle before
charging.
Battery disconnection, removal and
replacement, should only be carried out
by qualified personnel. Consult your
Dealer/Authorised Repairer.
REPLACING THE VEHICLE BATTERY
Battery disconnection, removal and
replacement, should only be carried out
by qualified personnel. Consult your
Dealer/Authorised Repairer.
Used batteries must be disposed
of correctly, as they contain a
number of harmful substances.
Seek advice from your Dealer/
Authorised Repairer and/or your
local authority.
Page 185 of 225
R
(FM8) SEMCON JLR OWNER GUIDE VER 1.00 EURO
LANGUAGE: english-en; MARQUE: jaguar; MODEL: XF
Tyres
185
TyresTYRE CARE
Do not drive the vehi cle if a tyre is
damaged, excessively worn, or
incorrectly inflated.
Avoid contaminating the tyres with
vehicle fluids as they may cause
damage to the tyre.
Avoid spinning the wheels. The forces
released can damage the structure of
the tyre and cause it to fail.
If wheel spin is unavoidable due to a
loss of traction (in deep snow, for
example), do not exceed 50 km/h (30
mph).
Do not exceed the maximum pressure
stated on the sidewall of the tyre.
TYRE PRESSURES
Never drive your vehicle if the tyre
pressures are incorrect.
Pressure checks should only be
carried out when the tyres are cold,
and the vehicle has been stationary
for more than three hours. A hot tyre at
or below recommended cold inflation
pressure is dangerously
under-inflated.
If the vehicle has been parked in
strong sunlight, or used in high
ambient temperatures, do not reduce
the tyre pressures. Move the vehicle
into the shade and allow the tyres to
cool before re-checking the
pressures.
CHECKING THE TYRE PRESSURES
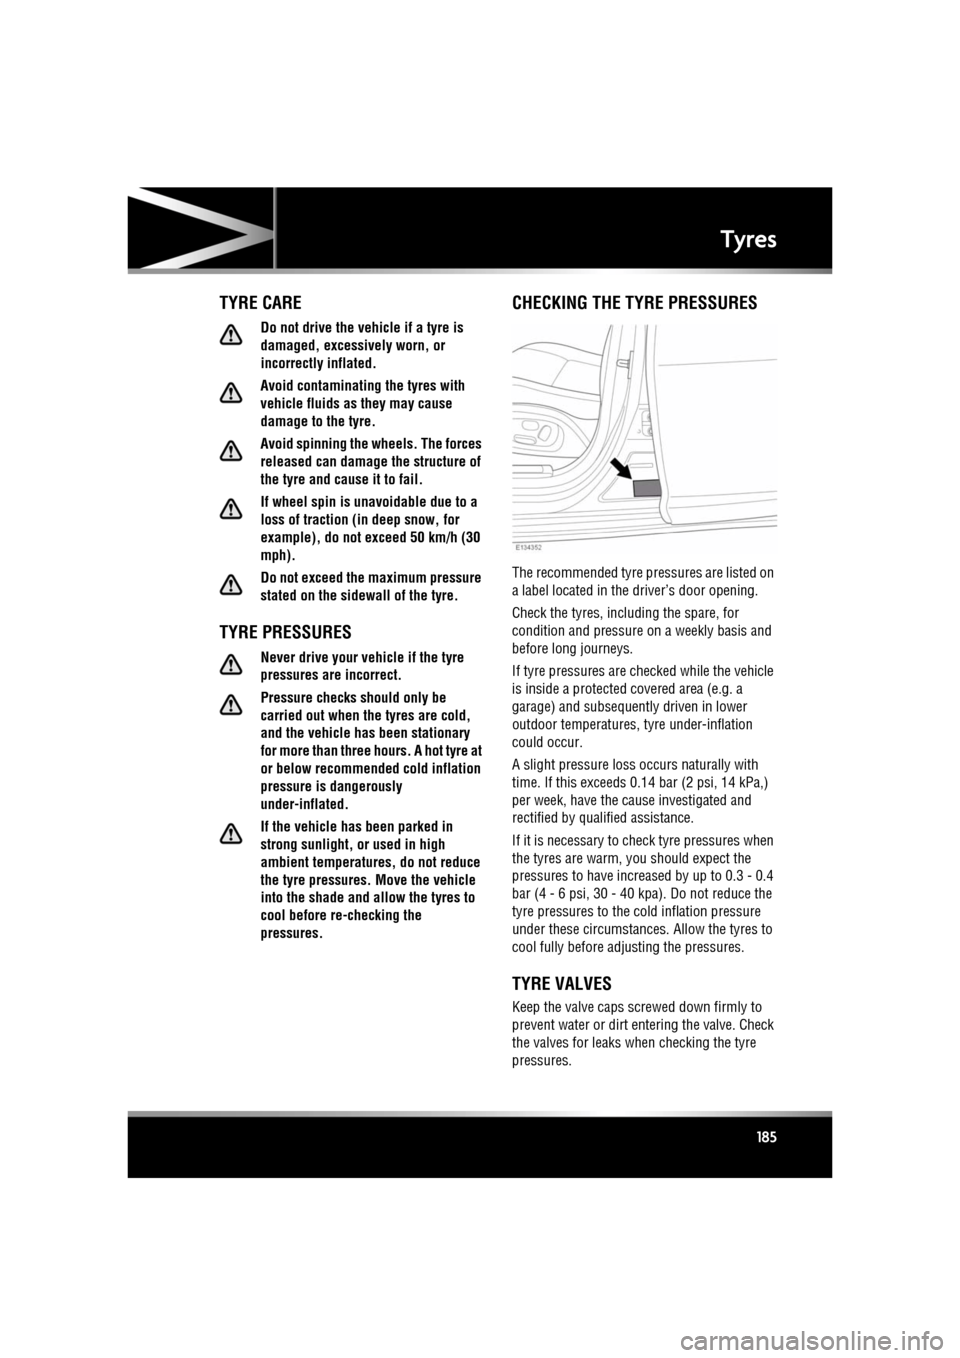
The recommended tyre pressures are listed on
a label located in the driver’s door opening.
Check the tyres, including the spare, for
condition and pressure on a weekly basis and
before long journeys.
If tyre pressures are checked while the vehicle
is inside a protected covered area (e.g. a
garage) and subsequent ly driven in lower
outdoor temperatures, tyre under-inflation
could occur.
A slight pressure loss occurs naturally with
time. If this exceeds 0. 14 bar (2 psi, 14 kPa,)
per week, have the cause investigated and
rectified by qualified assistance.
If it is necessary to check tyre pressures when
the tyres are warm, you should expect the
pressures to have increased by up to 0.3 - 0.4
bar (4 - 6 psi, 30 - 40 kpa). Do not reduce the
tyre pressures to the cold inflation pressure
under these circumstances. Allow the tyres to
cool fully before ad justing the pressures.
TYRE VALVES
Keep the valve caps screwed down firmly to
prevent water or dirt entering the valve. Check
the valves for leaks when checking the tyre
pressures.
Page 186 of 225
L
(FM8) SEMCON JLR OWNER GUIDE VER 1.00 EURO
LANGUAGE: english-en; MARQUE: jaguar; MODEL: XF
Tyres
186
PUNCTURED TYRES
Do not drive the vehicle with a
punctured tyre. Even if the punctured
tyre has not deflated, it is unsafe to
use, as the tyre may deflate suddenly
at any time.
REPLACEMENT TYRES
Always fit replacement tyres of the
same type, and wherever possible of
the same make and tread pattern.
If the use of tyres not recommended by
Jaguar is unavoidable, ensure that
you read, and fully comply with, the
tyre manufacturer’s instructions.
Ideally, tyres should be re placed in sets of four.
If this is not possible, replace the tyres in pairs
(both front or both rear). When tyres are
replaced, the wheels should always be
re-balanced and alignment checked.
The correct tyre specification for your vehicle
can be found on the ty re placard label.
PRESSURE COMPENSATION FOR
TEMPERATURE CHANGES
A colder ambient local temperature will reduce
pressure within the tyre. An effect is to
decrease sidewall height and to increase tyre
shoulder wear with the potential for tyre failure.
Vehicle dynamics could also be adversely
affected.
Tyre pressures can be adjusted to compensate
before the start of the journey. Alternatively,
tyre pressures can be adjusted when the area
of lower ambient temperature is reached.
In this situation, the vehicle must be left in the
ambient local temperature for at least one hour
before tyre pressure is adjusted. To compensate for colder ambient
temperatures, tyre pressures should be
increased by 0.14 bar (2 psi, 14 kPa) for each
10°C (20°F) decrease.
Note:
Ensure that correct tyre pressures are
maintained when moving to areas of differing
ambient temperature.
AVOIDING FLAT SPOTS
In order to minimise fl at spotting, the tyre
pressures can be increased to the maximum as
stated on the tyre sidewall, for the period when
the vehicle is stationary. Tyres must be
returned to the specified running pressures
before driving.
TYRE DEGRADATION
Tyres degrade over time due to the effects of
ultraviolet light, extreme temperatures, high
loads, and environmen tal conditions. It is
recommended that tyres are replaced at least
every six years, but they may require
replacement more frequently.
USING WINTER TYRES
Do not exceed 240 km/h (150 mph) when
using Jaguar approv ed winter tyres.
Winter tyres must be fitted to all four wheels.
Note: Tyres with an all season icon or M+S
have a level of winter performance and need
not be replaced.
Page 187 of 225
R
(FM8) SEMCON JLR OWNER GUIDE VER 1.00 EURO
LANGUAGE: english-en; MARQUE: jaguar; MODEL: XF
Tyres
187
APPROVED WINTER TYRE SIZES
Front :
• Dunlop Wintersport M3 - 235/55R17 99H,
245/45R18 96V, 245/45R18 100V,
245/40R19 98V.
• W240 Pirelli Sotto Zero - 245/45R18 100V,
245/40R19 98V, 255/35R20 97V.
Rear:
• Dunlop Wintersport M3 - 235/55R17 99H,
245/45R18 96V, 245/45R18 100V,
245/40R19 98V.
• W240 Pirelli Sotto Zero - 245/45R18 100V,
245/40R19 98V, 285/30R20 97V.
WINTER TYRE PRESSURES USING SNOW CHAINS
It is essential that
only snow chains of
the recommended type are fitted.
Snow chains can only be fitted to rear wheels.
They should not be used on temporary use
spare wheels.
Contact your Dealer/Authorised Repairer for
details and availabilit y of approved snow
chains.
The maximum speed when using snow chains
is 50 km/h (30 mph).
Note: When using snow chains, select
JaguarDrive Contro l Winter mode and switch
DSC off. DSC would reduce the deep snow
traction capability as it would limit wheel spin
to a level below that which is required to
generate maximum traction.
Up to 210 km/h (130 mph)
17 inch Wheels - Front and Rear 2.3 bar (34 psi,
230 kPa)
18 inch Wheels - Front and Rear 2.4 bar (35 psi,
240 kPa)
19 inch Wheels - Front and Rear 2.6 bar (38 psi,
260 kPa)
20 inch Wheels - Front and Rear 2.7 bar (40 psi,
270 kPa)
Page 188 of 225
L
(FM8) SEMCON JLR OWNER GUIDE VER 1.00 EURO
LANGUAGE: english-en; MARQUE: jaguar; MODEL: XF
Fuses
188
FusesFUSE BOX LOCATIONS
When a fuse box lid is removed, take
care to protect the box from moisture,
and refit the lid at the earliest
opportunity.
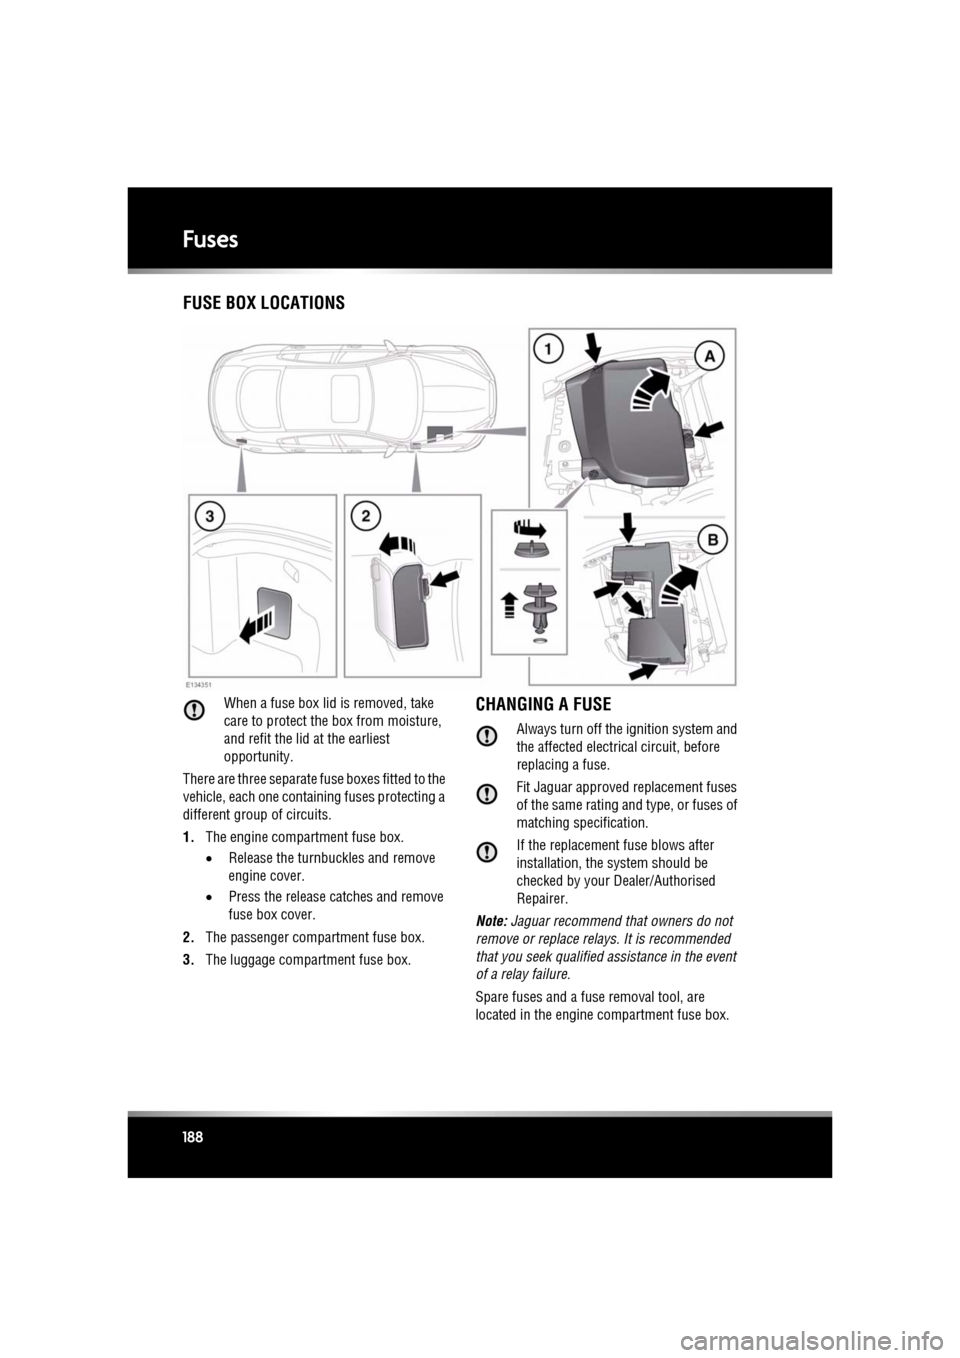
There are three separate fuse boxes fitted to the
vehicle, each one cont aining fuses protecting a
different group of circuits.
1. The engine compar tment fuse box.
• Release the turnbuckles and remove
engine cover.
• Press the release catches and remove
fuse box cover.
2. The passenger compartment fuse box.
3. The luggage compar tment fuse box.CHANGING A FUSE
Always turn off the ignition system and
the affected electrical circuit, before
replacing a fuse.
Fit Jaguar approved replacement fuses
of the same rating and type, or fuses of
matching specification.
If the replacement fuse blows after
installation, the system should be
checked by your Dealer/Authorised
Repairer.
Note: Jaguar recommend th at owners do not
remove or replace rela ys. It is recommended
that you seek qualified assistance in the event
of a relay failure.
Spare fuses and a fuse removal tool, are
located in the engine compartment fuse box.
Page 189 of 225
R
(FM8) SEMCON JLR OWNER GUIDE VER 1.00 EURO
LANGUAGE: english-en; MARQUE: jaguar; MODEL: XF
Fuses
189
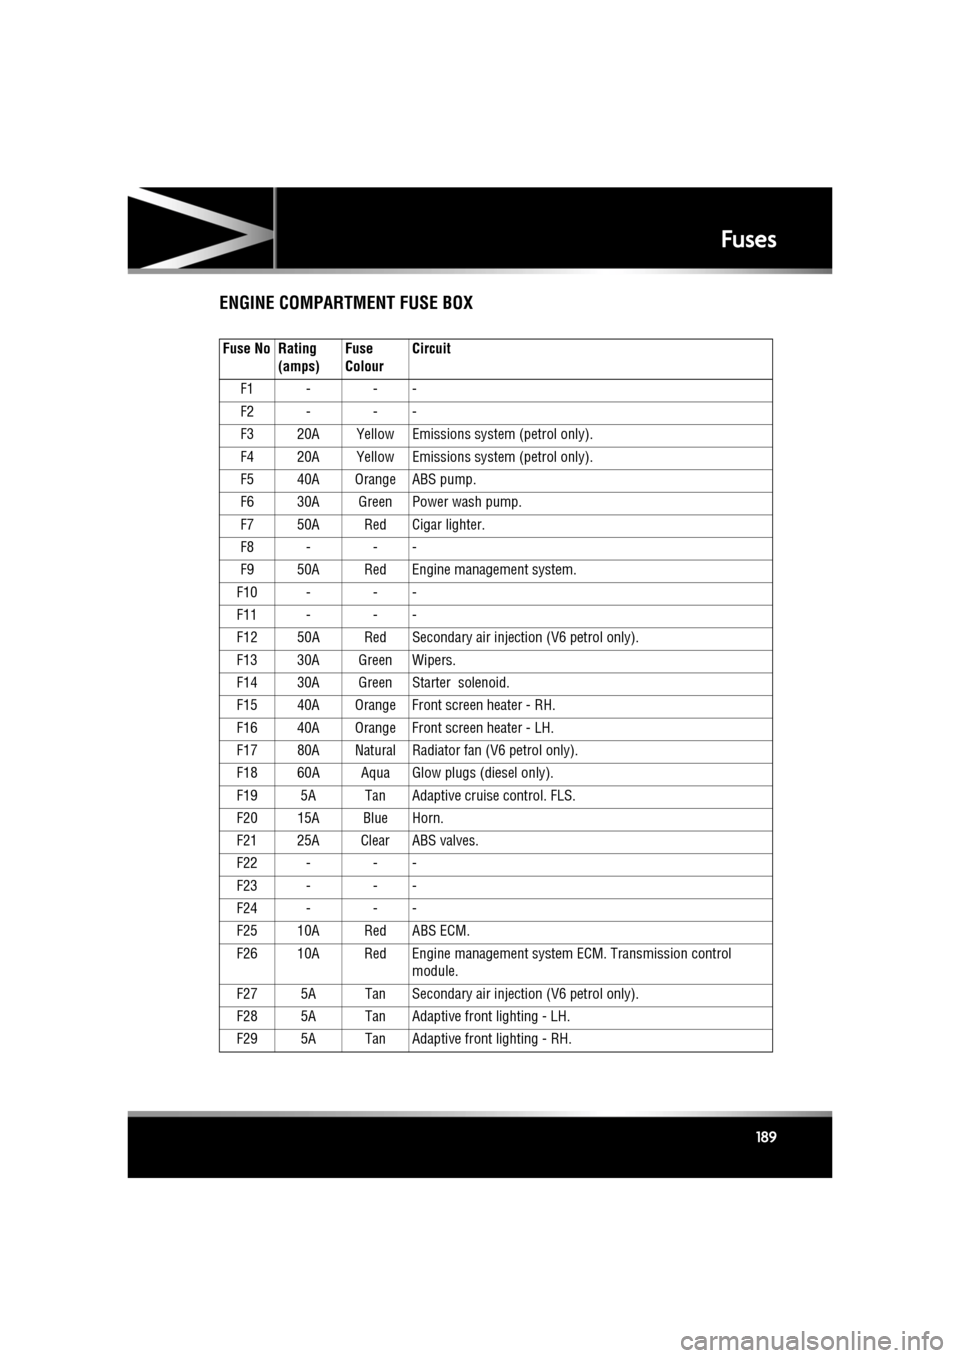
ENGINE COMPARTMENT FUSE BOX
Fuse No Rating
(amps) Fuse
ColourCircuit
F1 - - -
F2 - - -
F3 20A Yellow Emissions system (petrol only).
F4 20A Yellow Emissions system (petrol only).
F5 40A Orange ABS pump.
F6 30A Green Power wash pump.
F7 50A Red Cigar lighter.
F8 - - -
F9 50A Red Engine management system.
F10 - - -
F11 - - -
F12 50A Red Secondary air inje ction (V6 petrol only).
F13 30A Green Wipers.
F14 30A Green Starter solenoid.
F15 40A Orange Front screen heater - RH.
F16 40A Orange Front screen heater - LH.
F17 80A Natural Radiator fan (V6 petrol only).
F18 60A Aqua Glow pl ugs (diesel only).
F19 5A Tan Adaptive cruise control. FLS.
F20 15A Blue Horn.
F21 25A Clear ABS valves.
F22 - - -
F23 - - -
F24 - - -
F25 10A Red ABS ECM.
F26 10A Red Engine management syst em ECM. Transmission control
module.
F27 5A Tan Secondary air inje ction (V6 petrol only).
F28 5A Tan Adaptive front lighting - LH.
F29 5A Tan Adaptive front lighting - RH.
Page 190 of 225

L
(FM8) SEMCON JLR OWNER GUIDE VER 1.00 EURO
LANGUAGE: english-en; MARQUE: jaguar; MODEL: XF
Fuses
190
F30 - - -
F31 20A Yellow Auxiliary power socket - rear.
F32 20A Yellow Cigar lighter.
F33 - - -
F34 - - -
F35 5A Tan Air conditioning compressor clutch.
F36 15A Blue Engine management system 5 (V6 diesel only).
20A Yellow Engine management system 5 (V8 petrol only).
F37 15A Blue Ignition system (petrol only).
F38 5A Tan Power steering.
F39 5A Tan Headlamp levelling system.
F40 15A Blue Water pump (sup ercharged vehicles only).
F41 5A Tan Engine management system 1 (V6 diesel only). 10A Red Engine management system 1 (petrol and I4 diesel only).
F42 10A Red Engine management system 2 (V8 petrol only). 20A Yellow Engine management sy stem 2 (I4 diesel only).
30A Green Engine management system 2 (V6 petrol and V6 diesel only).
F43 5A Tan Engine management system 3 (diesel only). 10A Red Engine management system 3 (petrol only).
F44 5A Tan Engine management system 4 (V6 diesel only). 10A Red Engine management sy stem 4 (I4 diesel only).
15A Blue Engine management system 4 (V8 petrol only).
F45 100A Violet Radiator fan (d iesel and V8 petrol only).
Fuse No Rating
(amps) Fuse
ColourCircuit