JAGUAR XF 2011 1.G Owners Manual
Manufacturer: JAGUAR, Model Year: 2011, Model line: XF, Model: JAGUAR XF 2011 1.GPages: 225, PDF Size: 7.32 MB
Page 161 of 225
R
(FM8) SEMCON JLR OWNER GUIDE VER 1.00 EURO
LANGUAGE: english-en; MARQUE: jaguar; MODEL: XF
Maintenance
161
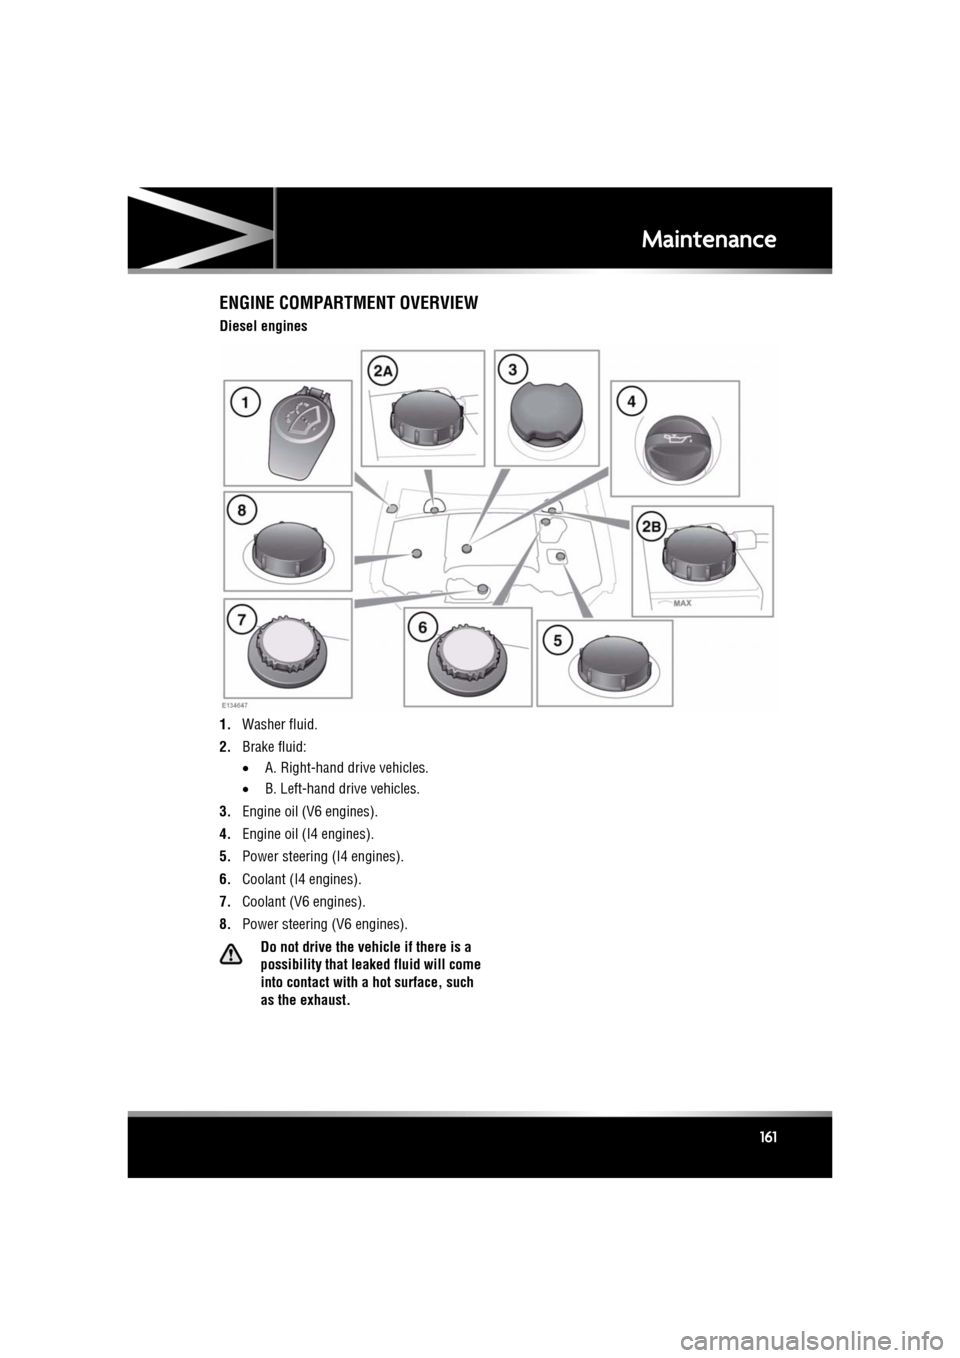
ENGINE COMPARTMENT OVERVIEW
Diesel engines
1. Washer fluid.
2. Brake fluid:
•A. Right-hand drive vehicles.
• B. Left-hand dr ive vehicles.
3. Engine oil (V6 engines).
4. Engine oil (I4 engines).
5. Power steering (I4 engines).
6. Coolant (I4 engines).
7. Coolant (V6 engines).
8. Power steering (V6 engines).
Do not drive the vehicle if there is a
possibility that leak ed fluid will come
into contact with a hot surface, such
as the exhaust.
Page 162 of 225
L
(FM8) SEMCON JLR OWNER GUIDE VER 1.00 EURO
LANGUAGE: english-en; MARQUE: jaguar; MODEL: XF
Maintenance
162
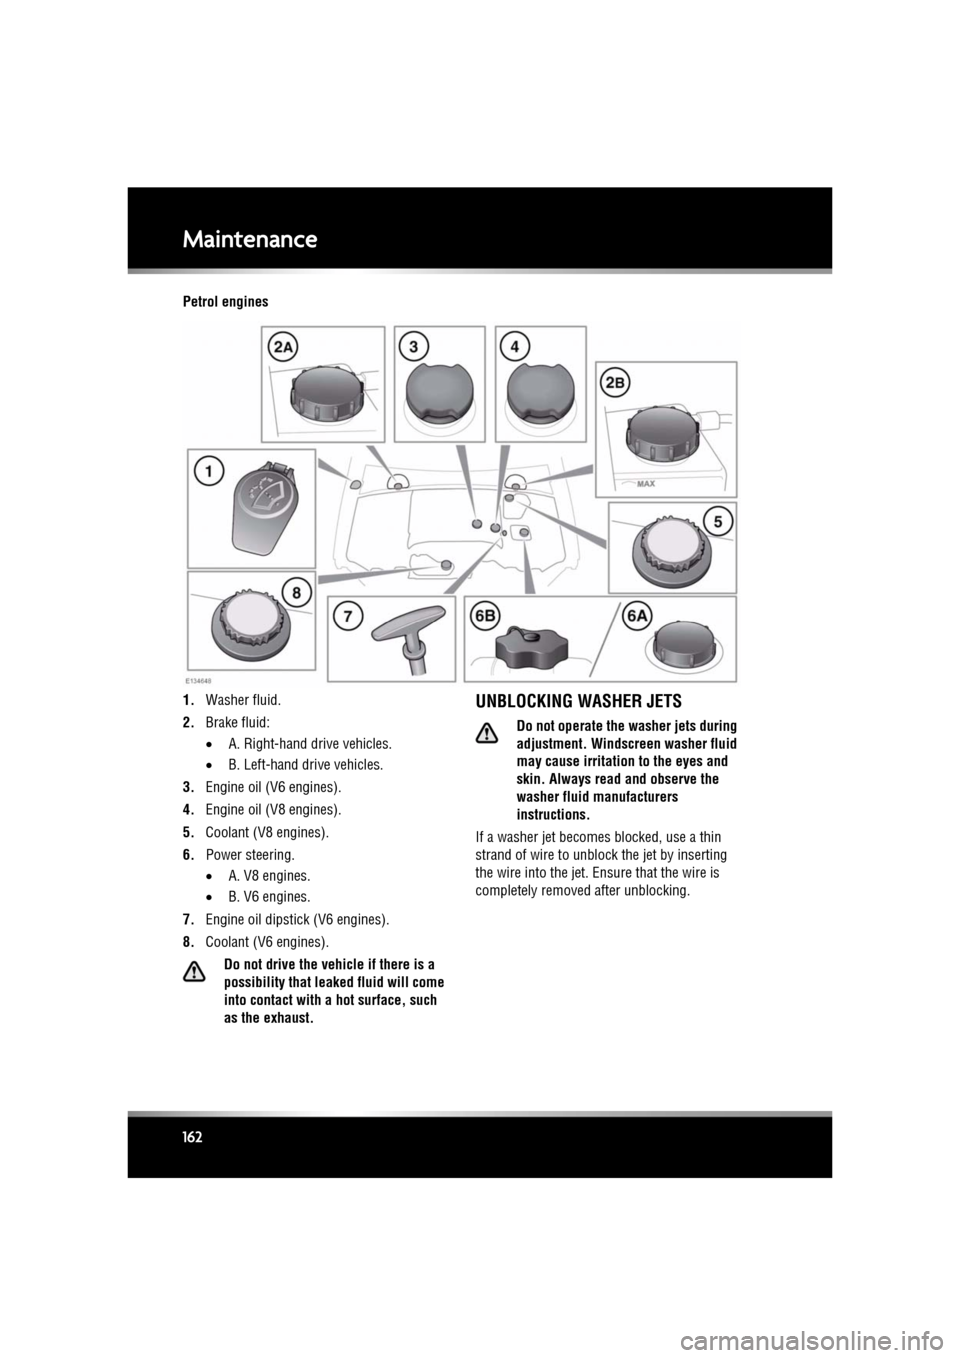
Petrol engines
1. Washer fluid.
2. Brake fluid:
•A. Right-hand drive vehicles.
• B. Left-hand drive vehicles.
3. Engine oil (V6 engines).
4. Engine oil (V8 engines).
5. Coolant (V8 engines).
6. Power steering.
•A. V8 engines.
• B. V6 engines.
7. Engine oil dipstick (V6 engines).
8. Coolant (V6 engines).
Do not drive the vehicle if there is a
possibility that leak ed fluid will come
into contact with a hot surface, such
as the exhaust.
UNBLOCKING WASHER JETS
Do not operate the washer jets during
adjustment. Windscreen washer fluid
may cause irritation to the eyes and
skin. Always read and observe the
washer fluid manufacturers
instructions.
If a washer jet becomes blocked, use a thin
strand of wire to unblock the jet by inserting
the wire into the jet. Ensure that the wire is
completely removed after unblocking.
Page 163 of 225
R
(FM8) SEMCON JLR OWNER GUIDE VER 1.00 EURO
LANGUAGE: english-en; MARQUE: jaguar; MODEL: XF
Maintenance
163
LAMP FAILURE
Headlamp unit:
The headlamps are Xenon High
Illumination Density (HID) units.
Replacement or maintenance of
Xenon lamps should only be carried
out by qualified peronnel.
High voltage is required to ignite the
Xenon lamps.
Xenon lamp units operate at a very
high temperature. Ensure that the
lamp units have cooled before
attempting to touch them.
Used Xenon lamp units contain
mercury which is hazardous and can
be injurious to health.
All other lamps within the headlamp
unit are LEDs and should only be
replaced by a Dealer/Authorised
Repairer.
Correct disposal of th e Xenon lamp unit should
be referred to your Ja guar Dealer/Authorised
Repairer or your local authority.
Side, repeater and rear lamps:
These lamps are LED units and should
only be replaced by a Dealer/Authorised
Repairer.
LICENSE PLATE LAMP BULB
REPLACEMENT
Always replace bulbs with the correct
type and specification. If you are in any
doubt contact your Dealer/Authorised
Repairer for advice.
Before attempting to replace a bulb,
ensure that both the affected lamp and
the ignition are turned off. Otherwise,
damage to the vehicle’s electrical
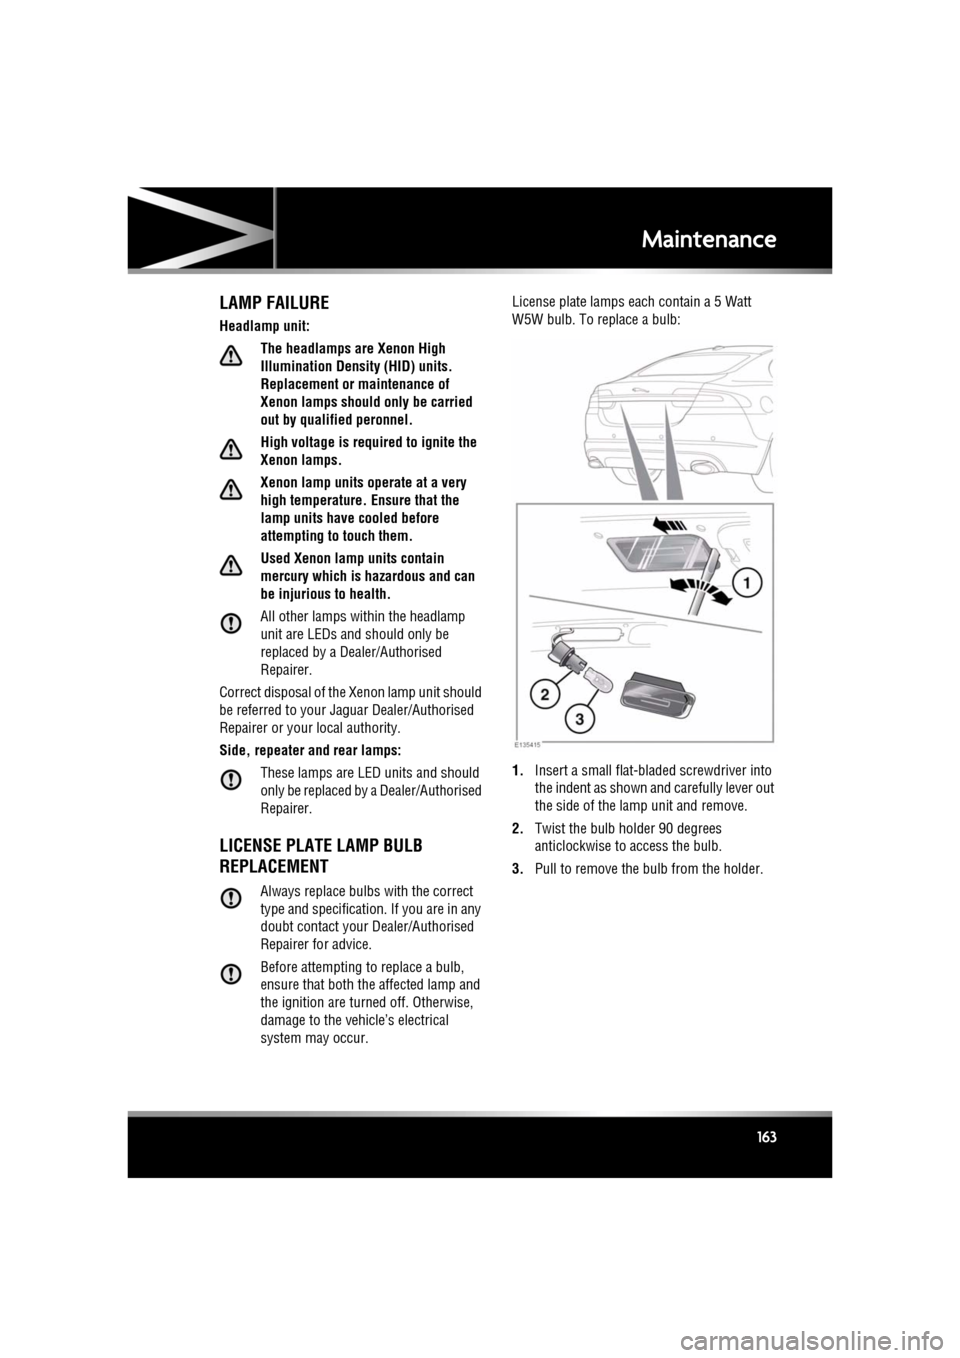
system may occur. License plate lamps each contain a 5 Watt
W5W bulb. To replace a bulb:
1.
Insert a small flat-bladed screwdriver into
the indent as shown and carefully lever out
the side of the lamp unit and remove.
2. Twist the bulb holder 90 degrees
anticlockwise to access the bulb.
3. Pull to remove the bulb from the holder.
Page 164 of 225
L
(FM8) SEMCON JLR OWNER GUIDE VER 1.00 EURO
LANGUAGE: english-en; MARQUE: jaguar; MODEL: XF
Maintenance
164
SUNROOF RESET
If the battery is disconnected, or the power
supply is interrupted, whilst the sunroof is
partially open it will need to be reset.
Once the power supply is restored, reset the
sunroof as follows:
1. Switch the ignition on.
2. Press the front of the sunroof switch, so
that the sunroof is in the tilt position, then
release the switch.
3. Press the front of the sunroof switch, and
hold for 30 seconds.
4. After 30 seconds the sunroof will begin to
move. Keep the front of the switch pressed
until the sunroof has fully opened, then
closed.
5. Once the open/close cycle has completed
and the sunroof has stopped moving,
release the switch.
The sunroof can now be operated as normal.
WINDOW RESET
The windows will need to be reset if the battery
is disconnected, becomes discharged or power
supply is interrupted.
Once the power supply is restored, reset the
windows as follows:
1. Close the window fully.
2. Release the switch, then lift it to the close
position and hold for 2 seconds.
3. Open the window fully.
4. Release the switch, then push it to the open
position and hold for 2 seconds.
5. Lift and release the switch to operate the
one-touch function.
6. Repeat the procedure on each window.
WARNING TRIANGLE
The warning triangle is located in the luggage
compartment, attached to an anchor point.
FIRST AID KIT
If supplied, the first aid kit is strapped to the
side of the luggage compartment.
FIRE EXTINGUISHER
If supplied, the fire exti nguisher will be located
either in the luggage compartment, or mounted
to the front passenger seat.
REPAIRING MINOR PAINT DAMAGE
Regularly inspect the paintwork for damage.
Any stone chips, fractures, or deep scratches,
in the paint/bodywork should be repaired
promptly. Bare metal wi ll corrode quickly, and
if left untreated can resu lt in expensive repairs.
CLEANING THE ALLOY WHEELS
Only use approved wheel cleaning
products.
CLEANING THE EXTERIOR
Some high pressure cleaning systems
are sufficiently powerful to penetrate
door and window seals, and damage
trim and door locks. Never aim the
water jet directly at the engine air intake,
heater air intakes, body seals or at any
components which may be damaged.
Never use cleaning products which are
not approved for use on vehicles.
Following cleaning of the vehicle
exterior (particularly with a pressure
washer), it is recommended that the
vehicle is taken for a short drive in order
to dry out the brakes.
Page 165 of 225
R
(FM8) SEMCON JLR OWNER GUIDE VER 1.00 EURO
LANGUAGE: english-en; MARQUE: jaguar; MODEL: XF
Maintenance
165
WASHING THE VEHICLE PAINTWORK
Substances which are corrosive can
damage the vehicle's paintwork and
should be removed to prevent damage.
USING AN AUTOMATIC WASH
Commercially operated automatic car
washes, jet washes and
power-operated mops, are not
recommended.
UNDER BONNET CLEANING
Do not use a high pressure washer or
steam cleaner in the engine
compartment.
Ensure that the brake fluid reservoir is
kept dry at all times. Only use a clean,
dry cloth to clean the brake fluid cap
and reservoir.
CLEANING GLASS SURFACES
Clean the rear window with a soft cloth to avoid
damaging the heating element. Do not scrape
the glass or use any abrasive cleaning fluid.
Mirror glass is particul arly susceptible to
damage. Wash with soapy water. Do not use
abrasive cleaning compounds or metal
scrapers to remove ice.
To avoid damaging the protecting coating, only
clean the interior side of the sunroof glass with
a soft cloth. Don not sc rape the glass or use
abrasive cleaning fluids.
CLEANING THE REAR SCREEN
To avoid damaging the heating elements when
cleaning the inside of th e rear screen, use only
a soft damp cloth or ch amois leather. Do not
use solvents or sharp objects to clean the
glass.
CLEANING THE SUNROOF WIND
DEFLECTOR
A mild solution of soap and water, or car
shampoo should be used to clean the wind
deflector net period ically. Support the
underside of the net with a soft cloth, and
gently scrub the net usi ng a soft bristled brush.
REMOVING GREASE AND TAR
Remove grease or tar with Jaguar Tar Remover
or methylated spirit (a lcohol). White spirit is
also effective, but must not be applied to
rubber, particularly the windscreen wiper
blades.
Ensure that after using methylated or
white spirit, the area is washed
immediately with soapy water, to
remove all traces of spirit.
POLISHING
Chrome polish, or other abrasive
cleaners, must not be used on the
vehicle's brightwork.
It is recommended that the vehicle is polished
regularly using Jaguar polish and a polishing
cloth.
CLEANING THE INTERIOR
The steering wheel ce ntre pad and other
areas containing airbags should only be
cleaned sparingly with a damp cloth,
warm water and a non-detergent soap.
Page 166 of 225
L
(FM8) SEMCON JLR OWNER GUIDE VER 1.00 EURO
LANGUAGE: english-en; MARQUE: jaguar; MODEL: XF
Maintenance
166
LEATHER
To prevent ingrained dirt and staining, inspect
the seat upholstery regularly and clean every
one to two months, as follows:
• Wipe off fine dust from the seat surfaces
using a clean, damp, non-coloured cloth.
Change frequently to a clean area of cloth,
to avoid abrasive action on the leather
surface. Avoid over-wetting.
• If this is not sufficient, use a cloth which
has been dampened with warm soapy
water and then wrun g out. Use only mild
non-caustic soap.
• Use Jaguar Leather Cleaner for heavily
soiled areas. Dry off and rub with a clean
soft cloth, changing surfaces regularly.
Use Jaguar Leather Cleaner several times a
year to maintain its appearance and
suppleness. The clea ner will nourish and
moisturise and help to improve the surface
protective film agains t dust and substances.
• Do not use solvents. Do not use
detergents, furniture polish or household
cleaners. While these products may
initially give impressive results, their use
will lead to rapid deterioration of the leather
and will invalidate the warranty. Jaguar
recommend a basic se t of products that
have been specially selected for the type of
leather in your vehicle.
• Dark clothing may stain leather seats just
like other upholstery products.
• Sharp objects such as belts, zip fasteners,
rivets, etc., can leave permanent scratches
and scratch marks on the leather surface.
• Unless spillages such as tea, coffee or ink
are washed away immediately, permanent
staining may have to be accepted.
If a valet service is used, ensure that the
specialist concer ned is aware of, and follows,
these instructions precisely.
CLEANING FABRIC UPHOLSTERY
Never use soap, ammonia, bleach or
other cleaners inte nded for use on hard
surfaces.
Do not use upholstery cleaner on
electrical equipment such as facia
switches.
When cleaning around electrical
equipment such as switches, ensure
that fluids do not leak into any gaps
around the components or between
panels or trim.
Use Jaguar Upholstery Cleaner, following the
instructions. Avoid over-wetting.
REMOVING STAINS
Most stains on woollen fabric can be removed
if treatment is carried out immediately, before
the stain has a chance to dry-in.
Most stains can be treated with one of three
cleaning fluids: Jaguar U pholstery Cleaner, dry
cleaning fluid or clean water. Follow the
instructions on the package.
INSTRUMENT PANEL, CLOCK AND
AUDIO EQUIPMENT
Only use a soft dry cloth to clean the
instrument panel, cloc k and audio equipment.
Do not use cleaning fluids or sprays.
TOUCH SCREEN
Do not use abrasive cleaners on the
touch screen. For approved cleaning
products, contact your Dealer/
Authorised Repairer.
Page 167 of 225
R
(FM8) SEMCON JLR OWNER GUIDE VER 1.00 EURO
LANGUAGE: english-en; MARQUE: jaguar; MODEL: XF
Maintenance
167
CARPETS AND MATS
Marks or stains can be removed by gentle
scrubbing with a weak solution of soap and
warm water.
For more stubborn stains a commercially
available carpet cleaner should be used.
SEAT BELTS
Do not allow any water, cleaning
products, or fabric from cloths to enter
the seat belt mechanism. Any
substance which enters the
mechanism may affect the
performance of the seat belt in an
impact.
Extend the seat belts fully, then use warm
water and a non-detergent soap to clean. Allow
the seat belts to dry naturally whilst fully
extended and do not allow the belts to retract
until fully dry.
Note: Whilst cleaning the seat belt, take the
opportunity to examine the webbing for
damage and wear. Any wear or damage should
be reported to, and rectified by, a Dealer/
Authorised Repairer.
AIRBAG MODULE COVERS
Airbag covers should only be cleaned
using a slightly dampened cloth, and
a small amount of upholstery cleaner.
Any substance which enters the
mechanism, can prevent correct
deployment of an airbag during an
impact.
Page 168 of 225
L
(FM8) SEMCON JLR OWNER GUIDE VER 1.00 EURO
LANGUAGE: english-en; MARQUE: jaguar; MODEL: XF
Fluid level checks
168
Fluid level checksCHECKING THE ENGINE OIL LEVEL
Check the engine oil weekly. If any
significant or sudden drop in oil level is
noted, seek qualified assistance.
If the message ENGINE OIL PRESSURE
LOW is displayed, stop the engine as
soon as it is safe to do so and seek
qualified assistance. Do not start the
engine until the cause has been
rectified.
Prior to checking the oil level ensure that the
vehicle is on level ground.
All except V6 petrol engines
Ensure that:
• The engine oil has reached working
temperature (oil is hot).
• The engine has been switched off for ten
minutes, as the syst em will not give an
accurate reading until the oil level has
stabilised.
The oil level can then be checked as follows:
1. Switch on the ignition (do not start the
engine).
2. Ensure Park (P ) is selected.
3. Press the trip button (on the end of the
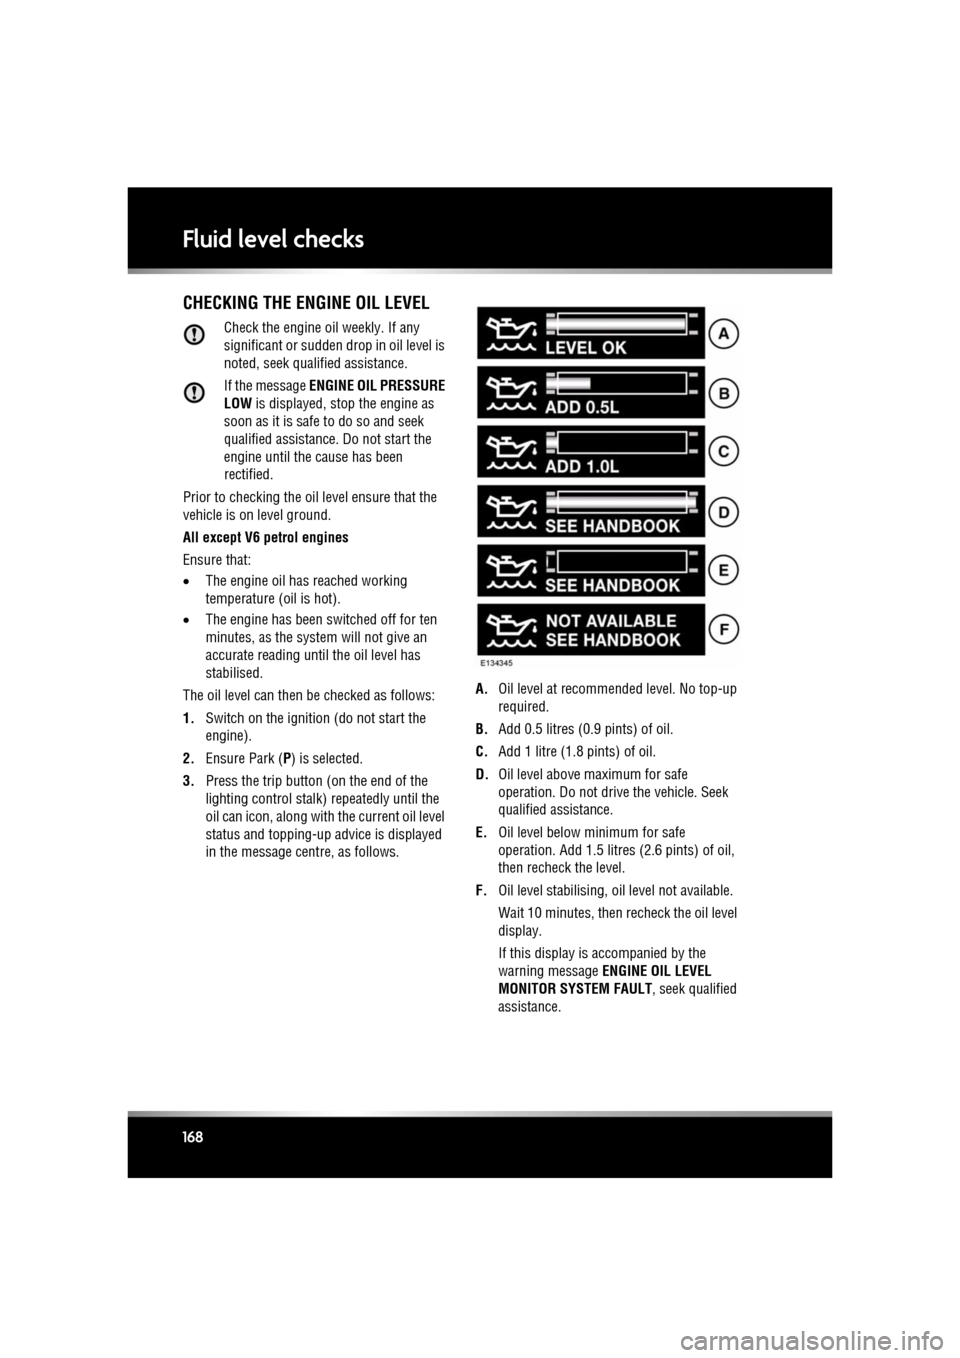
lighting control stalk) repeatedly until the
oil can icon, along with the current oil level
status and topping-up ad vice is displayed
in the message centre, as follows. A.
Oil level at recommended level. No top-up
required.
B. Add 0.5 litres (0.9 pints) of oil.
C. Add 1 litre (1.8 pints) of oil.
D. Oil level above maximum for safe
operation. Do not drive the vehicle. Seek
qualified assistance.
E. Oil level below mi nimum for safe
operation. Add 1.5 litres (2.6 pints) of oil,
then recheck the level.
F. Oil level stabilising, oil level not available.
Wait 10 minutes, then recheck the oil level
display.
If this display is accompanied by the
warning message ENGINE OIL LEVEL
MONITOR SYSTEM FAULT , seek qualified
assistance.
Page 169 of 225
R
(FM8) SEMCON JLR OWNER GUIDE VER 1.00 EURO
LANGUAGE: english-en; MARQUE: jaguar; MODEL: XF
Fluid level checks
169
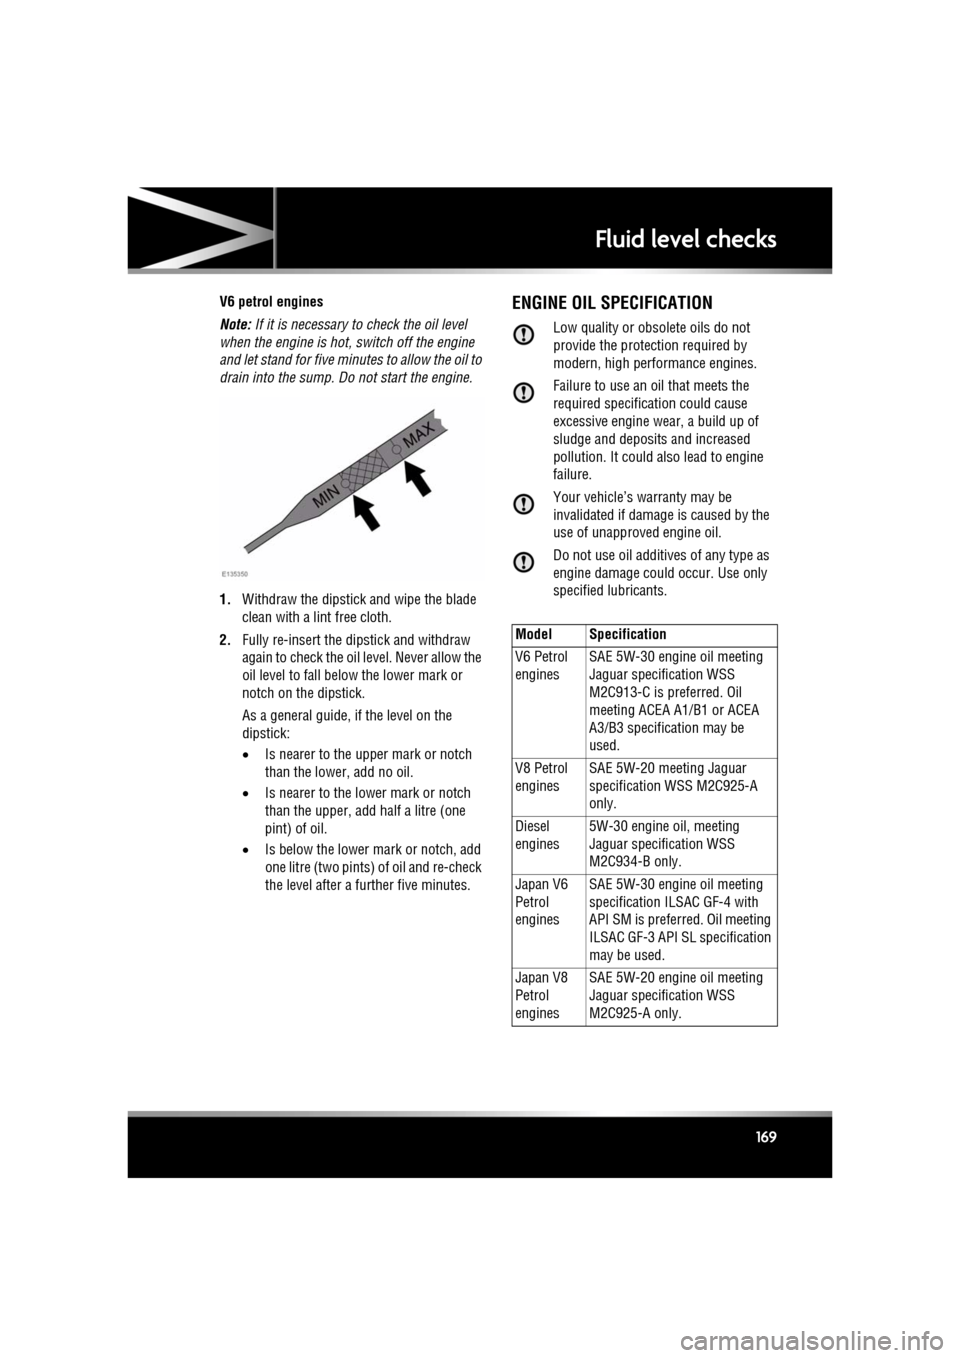
V6 petrol engines
Note: If it is necessary to check the oil level
when the engine is hot, switch off the engine
and let stand for five minutes to allow the oil to
drain into the sump. Do not start the engine.
1. Withdraw the dipstick and wipe the blade
clean with a lint free cloth.
2. Fully re-insert the dipstick and withdraw
again to check the oil level. Never allow the
oil level to fall below the lower mark or
notch on the dipstick.
As a general guide, if the level on the
dipstick:
•Is nearer to the upper mark or notch
than the lower, add no oil.
• Is nearer to the lower mark or notch
than the upper, add half a litre (one
pint) of oil.
• Is below the lower mark or notch, add
one litre (two pints) of oil and re-check
the level after a further five minutes.ENGINE OIL SPECIFICATION
Low quality or obsolete oils do not
provide the protection required by
modern, high perfor mance engines.
Failure to use an oil that meets the
required specification could cause
excessive engine wear, a build up of
sludge and deposit s and increased
pollution. It could also lead to engine
failure.
Your vehicle’s warranty may be
invalidated if damage is caused by the
use of unapproved engine oil.
Do not use oil additives of any type as
engine damage could occur. Use only
specified lubricants.
Model Specification
V6 Petrol
engines SAE 5W-30 engine oil meeting
Jaguar specification WSS
M2C913-C is preferred. Oil
meeting ACEA A1/B1 or ACEA
A3/B3 specification may be
used.
V8 Petrol
engines SAE 5W-20 meeting Jaguar
specification WSS M2C925-A
only.
Diesel
engines 5W-30 engine oil, meeting
Jaguar specification WSS
M2C934-B only.
Japan V6
Petrol
engines SAE 5W-30 engine oil meeting
specification ILSAC GF-4 with
API SM is prefe
rred. Oil meeting
ILSAC GF-3 API SL specification
may be used.
Japan V8
Petrol
engines SAE 5W-20 engine oil meeting
Jaguar specification WSS
M2C925-A only.
Page 170 of 225
L
(FM8) SEMCON JLR OWNER GUIDE VER 1.00 EURO
LANGUAGE: english-en; MARQUE: jaguar; MODEL: XF
Fluid level checks
170
Jaguar recommends:
TOPPING UP THE OIL
Overfilling with oil could result in severe
engine damage.
1. Unscrew the oil filler cap.
2. Add oil as indicated by the message centre
display.
3. Wait five minutes fo r the oil level to
stabilise then re-check.
It is essential to use the correct specification
oil, and to ensure it is suitable for the climatic
conditions in which the vehicle is to be
operated.
ENGINE OIL CONSUMPTION
A certain amount of oil consumption is normal.
The rate of consumpt ion will depend on the
following:
• The quality and viscosity of the oil.
• Climatic conditions.
• The speed at which the engine is being
operated.
• Road conditions.
Drivers should expect above normal
consumption when the engi ne is new, and after
running-in if high speeds are sustained.
CHECKING THE COOLANT LEVEL
Running the engine without coolant will
cause serious engine damage.
If persistent coolant loss is noticed,
seek qualified assistance immediately.
The coolant level in the expansion tank should
be checked at least weekly (more frequently in
high mileage or severe operating conditions).
Always check the level when the system is
cold.
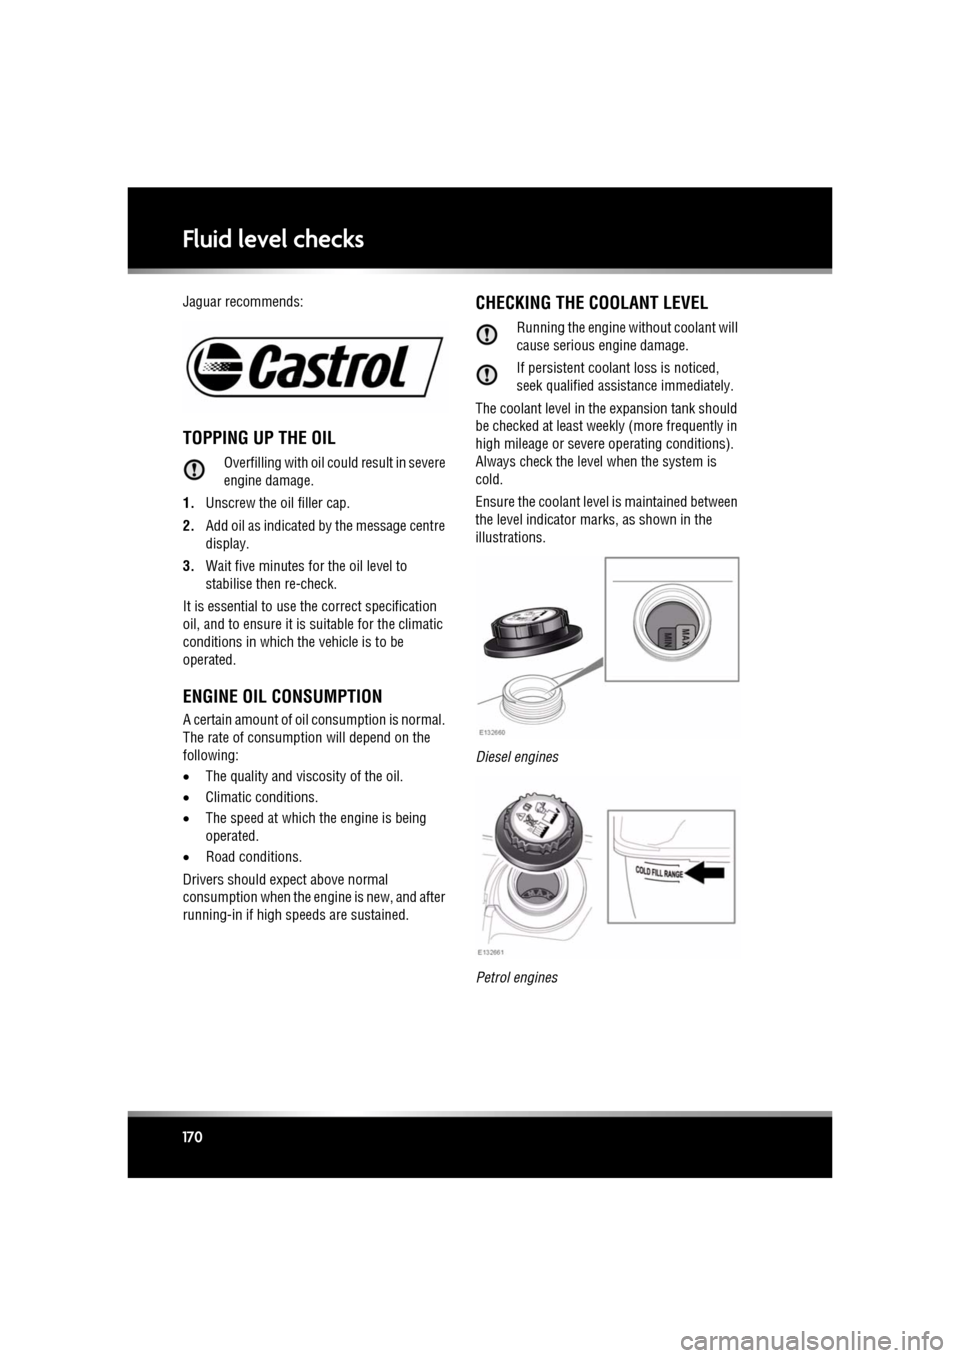
Ensure the coolant level is maintained between
the level indicator marks, as shown in the
illustrations.
Diesel engines
Petrol engines