ad blue JAGUAR XF 2011 1.G Owners Manual
[x] Cancel search | Manufacturer: JAGUAR, Model Year: 2011, Model line: XF, Model: JAGUAR XF 2011 1.GPages: 225, PDF Size: 7.32 MB
Page 36 of 225
L
(FM8) SEMCON JLR OWNER GUIDE VER 1.00 EURO
LANGUAGE: english-en; MARQUE: jaguar; MODEL: XF
Exterior lights
36
Exterior lightsLIGHTING CONTROL
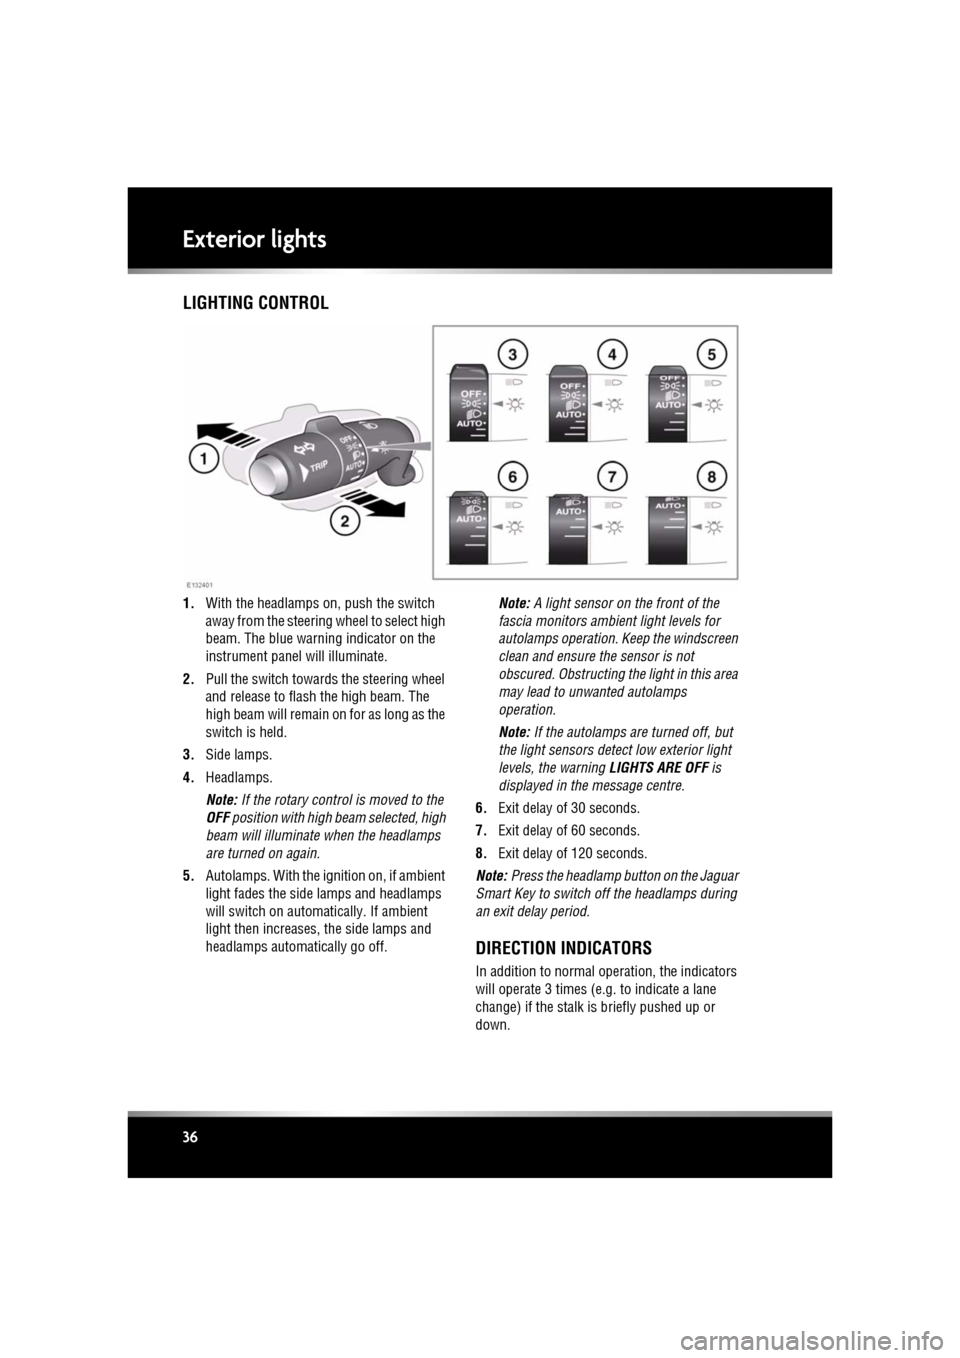
1. With the headlamps on, push the switch
away from the steering wheel to select high
beam. The blue warning indicator on the
instrument panel will illuminate.
2. Pull the switch towards the steering wheel
and release to flash the high beam. The
high beam will remain on for as long as the
switch is held.
3. Side lamps.
4. Headlamps.
Note: If the rotary control is moved to the
OFF position with high beam selected, high
beam will illuminate when the headlamps
are turned on again.
5. Autolamps. With the ignition on, if ambient
light fades the side lamps and headlamps
will switch on automatically. If ambient
light then increases, the side lamps and
headlamps automatically go off. Note:
A light sensor on the front of the
fascia monitors ambi ent light levels for
autolamps operation. Keep the windscreen
clean and ensure the sensor is not
obscured. Obstructing the light in this area
may lead to unwanted autolamps
operation.
Note: If the autolamps are turned off, but
the light sensors detect low exterior light
levels, the warning LIGHTS ARE OFF is
displayed in the message centre.
6. Exit delay of 30 seconds.
7. Exit delay of 60 seconds.
8. Exit delay of 120 seconds.
Note: Press the headlamp button on the Jaguar
Smart Key to switch off the headlamps during
an exit delay period.
DIRECTION INDICATORS
In addition to normal ope ration, the indicators
will operate 3 times (e.g . to indicate a lane
change) if the stalk is briefly pushed up or
down.
Page 51 of 225
R
(FM8) SEMCON JLR OWNER GUIDE VER 1.00 EURO
LANGUAGE: english-en; MARQUE: jaguar; MODEL: XF
Warning lamps
51
Warning lampsWARNING LAMPS AND INDICATORS
RED warning lamps are for primary warnings.
A primary warning must be investigated
immediately, seek qualified assistance if
necessary.
AMBER warning lamps are for secondary
warnings. Some indicate that a vehicle system
is in operation, others i ndicate that the driver
must take action and then seek qualified
assistance as soon as possible
Other warning lamps within the instrument
panel indicate system st atus, such as blue for
main beam and green for direction indicators,
when in operation.
LAMP CHECK
A warning lamp bulb check is initiated when the
ignition system is switched on and lasts for 3
seconds (except for the airbag warning lamp
which will remain on for 6 seconds). If any
warning lamp remains on after this period,
investigate the cause before driving.
Some warning lamps have associated
messages displayed on the message centre.
Note: Not all warning lamps are included in the
check (e.g. high beam headlamps and direction
indicators).
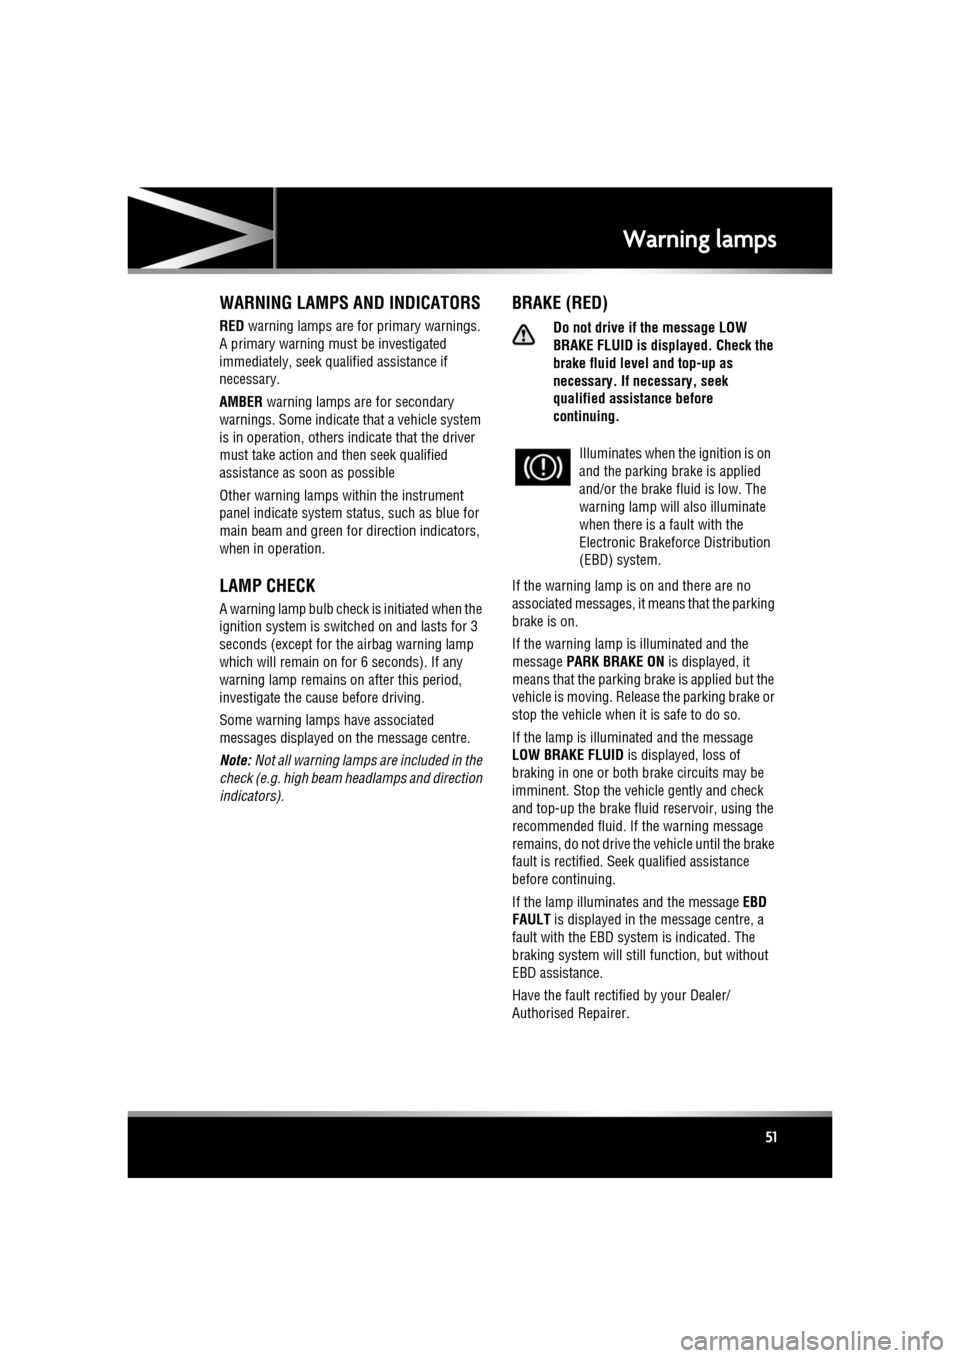
BRAKE (RED)
Do not drive if the message LOW
BRAKE FLUID is disp layed. Check the
brake fluid level and top-up as
necessary. If necessary, seek
qualified assistance before
continuing.
If the warning lamp is on and there are no
associated messages, it means that the parking
brake is on.
If the warning lamp is illuminated and the
message PARK BRAKE ON is displayed, it
means that the parking brake is applied but the
vehicle is moving. Release the parking brake or
stop the vehicle when it is safe to do so.
If the lamp is illuminated and the message
LOW BRAKE FLUID is displayed, loss of
braking in one or both brake circuits may be
imminent. Stop the vehicle gently and check
and top-up the brake fluid reservoir, using the
recommended fluid. If the warning message
remains, do not drive the vehicle until the brake
fault is rectified. Seek qualified assistance
before continuing.
If the lamp illuminates and the message EBD
FAULT is displayed in the message centre, a
fault with the EBD system is indicated. The
braking system will st ill function, but without
EBD assistance.
Have the fault rectified by your Dealer/
Authorised Repairer. Illuminates when the ignition is on
and the parking brake is applied
and/or the brake fl
uid is low. The
warning lamp will also illuminate
when there is a fault with the
Electronic Brakefor ce Distribution
(EBD) system.
Page 54 of 225
L
(FM8) SEMCON JLR OWNER GUIDE VER 1.00 EURO
LANGUAGE: english-en; MARQUE: jaguar; MODEL: XF
Warning lamps
54
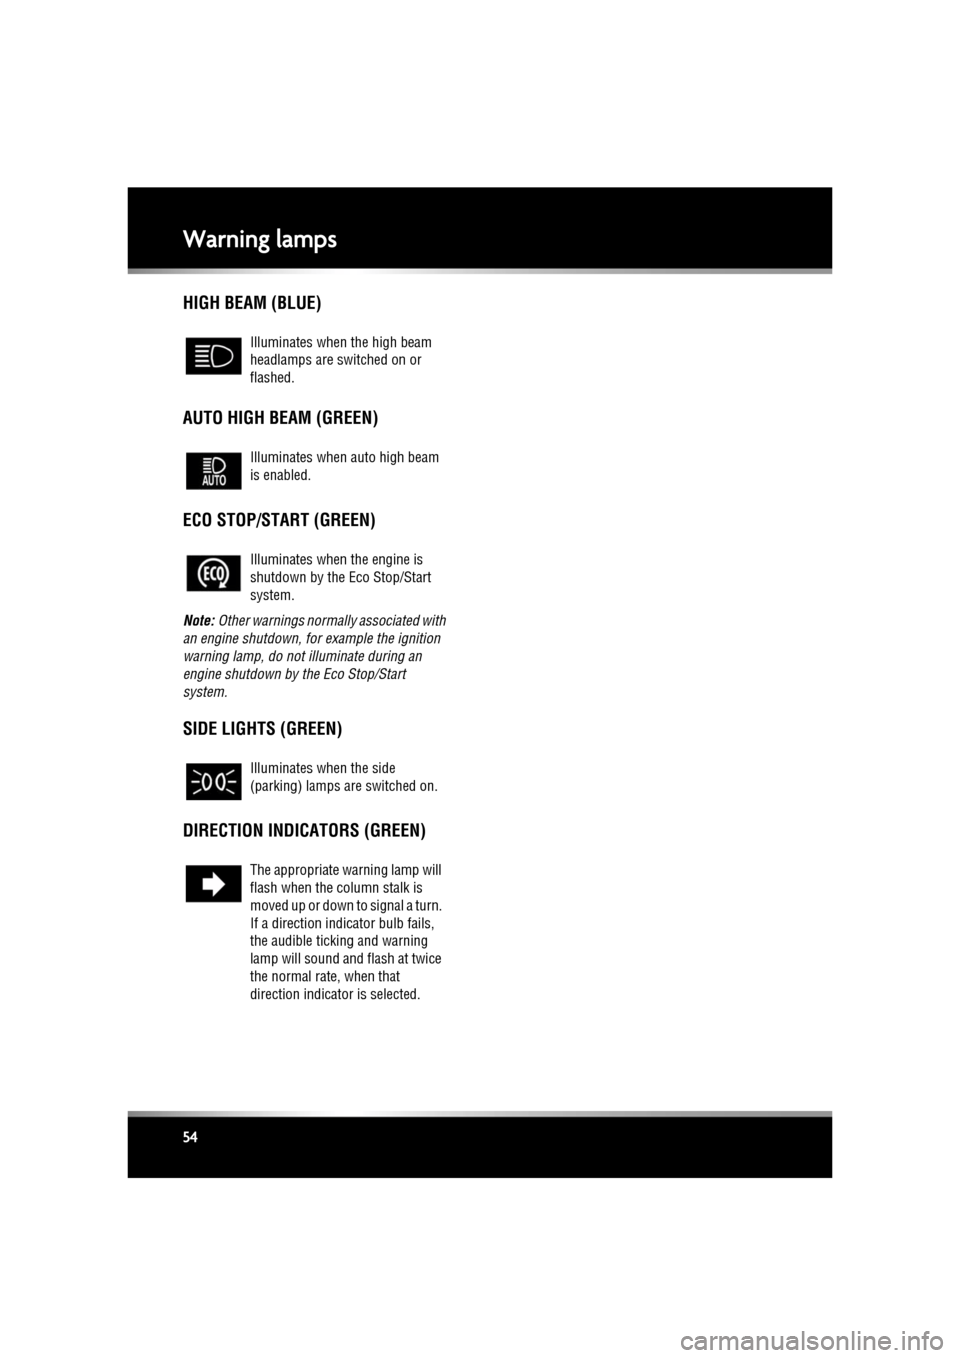
HIGH BEAM (BLUE)
AUTO HIGH BEAM (GREEN)
ECO STOP/START (GREEN)
Note: Other warnings normall y associated with
an engine shutdown, for example the ignition
warning lamp, do not illuminate during an
engine shutdown by the Eco Stop/Start
system.
SIDE LIGHTS (GREEN)
DIRECTION INDICATORS (GREEN)
Illuminates when the high beam
headlamps are switched on or
flashed.
Illuminates when auto high beam
is enabled.
Illuminates when the engine is
shutdown by the Eco Stop/Start
system.
Illuminates when the side
(parking) lamps are switched on.
The appropriate warning lamp will
flash when the column stalk is
moved up or down to signal a turn.
If a direction indi cator bulb fails,
the audible ticking and warning
lamp will sound and flash at twice
the normal rate, when that
direction indicator is selected.
Page 66 of 225
L
(FM8) SEMCON JLR OWNER GUIDE VER 1.00 EURO
LANGUAGE: english-en; MARQUE: jaguar; MODEL: XF
Heating and ventilation
66
CLIMATE SEATS
Note: The climate seats w ill only operate when
the engine is running.
Seat ventilation is cont rolled from the Home or
Climate menu on the touch screen.
Heated ventilation:
• Touch the red arrow above the appropriate
seat icon to switch he ated ventilation on at
maximum (3 red bars).
• Touch the blue arrow below the seat icon
once or twice to reduce the ventilation
setting (2 and 1 red bars).
• Touch the blue arrow a third time to switch
off seat ventilation.
Cooled ventilation:
• Touch the blue arrow below the
appropriate seat icon to switch cooled
ventilation on at maximum (3 blue bars).
• Touch the red arrow above the seat icon
once or twice to reduce the ventilation
setting (2 and 1 blue bars).
• Touch the red arrow a third time to switch
off seat ventilation.
To select backrest ventilation only:
• Select Settings from the Climate menu.
• Select the appropriate icon for full seat or
backrest only ventilation.
Page 113 of 225
R
(FM8) SEMCON JLR OWNER GUIDE VER 1.00 EURO
LANGUAGE: english-en; MARQUE: jaguar; MODEL: XF
Portable media
113
Portable mediaPORTABLE MEDIA CONNECTIONS
Portable media devices can be connected to
the media hub located in the cubby box.
Compatible portable devices include:
• USB mass storage devices (e.g. a memory
stick). Devices must use FAT or FAT32 file
format.
• iPod (iPod Classic, iP od Touch, iPhone and
iPod Nano are supported - full functionality
for older devices cannot be guaranteed).
iPod Shuffle functi onality cannot be
guaranteed.
Note: iPod and iPhone are trademarks of
Apple Inc., registered in the USA and other
countries.
• Auxiliary device (personal audio, MP3
players, all iPods).
Note: Auxiliary devices have no touch
screen control.
If you are connecting an iPod, mass storage or
Bluetooth® device, use the touch screen to
operate and search the device. Many of the
controls are similar to those available for CD
play.
Please disconnect your iPod when
leaving the vehicle. Failure to do so may
result in the iPod battery discharging.
Note: The audio system will play MP3, WMA
and AAC files.
To maximise playba ck quality, it is
recommended that lossless compression is
used for any media file s on USB or iPod. Failing
this, it is recommended that compressed files
utilise a minimum bitrate of 192 kb/s (a higher
bitrate is strongly recommended).
Note: Some MP3 players have their own file
system that is not suppor ted by this system. To
use your MP3 player, you must set it to USB
Removable Device or Mass Storage Device
mode. Only music that has been added to the
device in this mode can be played.
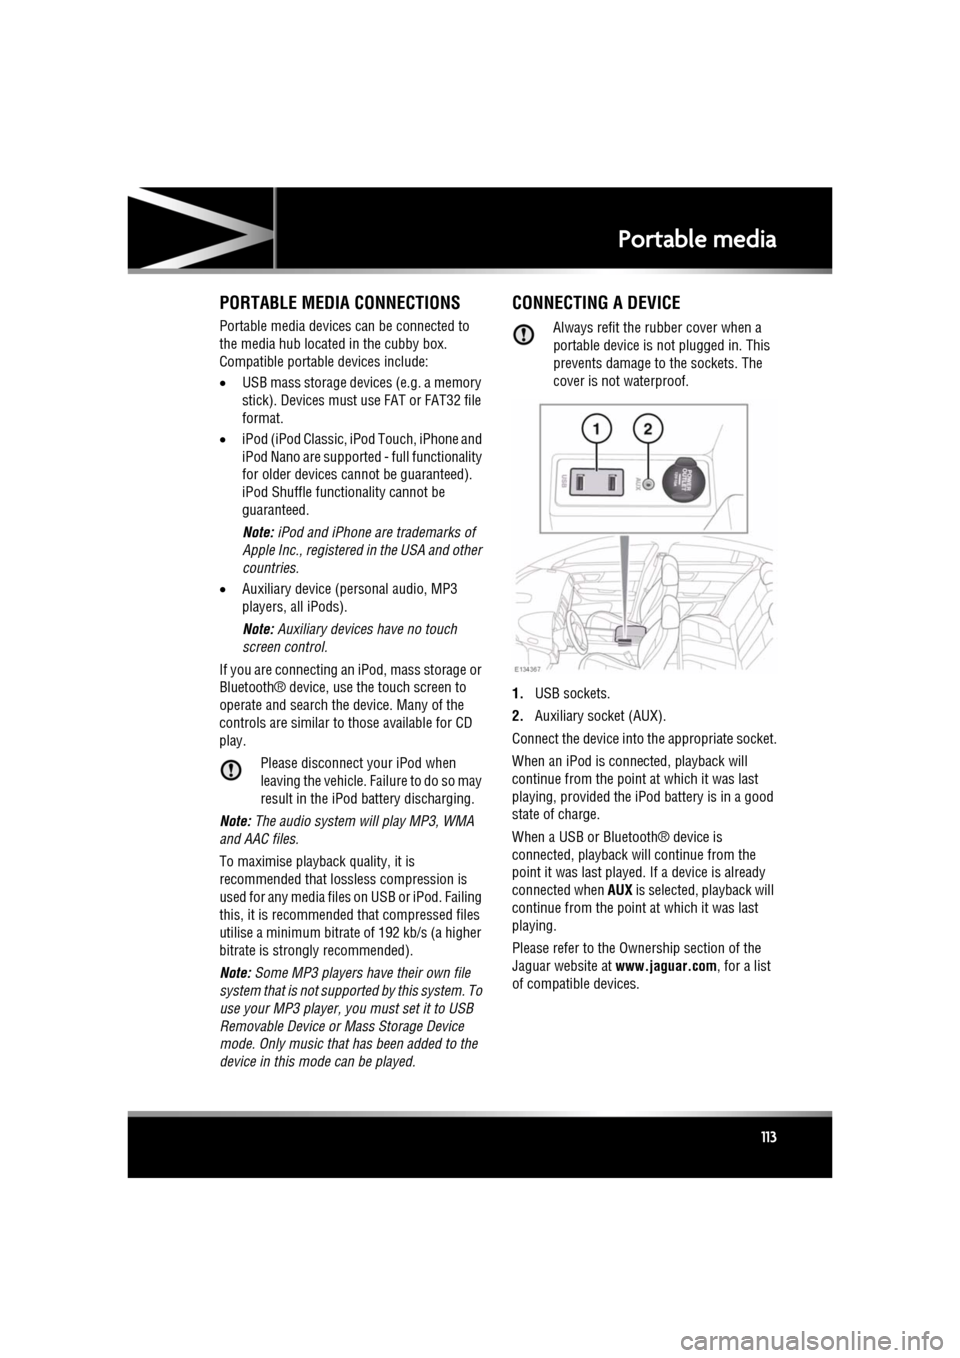
CONNECTING A DEVICE
Always refit the rubber cover when a
portable device is not plugged in. This
prevents damage to the sockets. The
cover is not waterproof.
1. USB sockets.
2. Auxiliary socket (AUX).
Connect the device into the appropriate socket.
When an iPod is conne cted, playback will
continue from the point at which it was last
playing, provided the iPod battery is in a good
state of charge.
When a USB or Bluetooth® device is
connected, playback will continue from the
point it was last played. If a device is already
connected when AUX is selected, playback will
continue from the point at which it was last
playing.
Please refer to the Ow nership section of the
Jaguar website at www.jaguar.com, for a list
of compatible devices.
Page 114 of 225
L
(FM8) SEMCON JLR OWNER GUIDE VER 1.00 EURO
LANGUAGE: english-en; MARQUE: jaguar; MODEL: XF
Portable media
114
The Bluetooth® equippe d devices listed on
Jaguar.com have been tested for compatibility
with Jaguar vehicles. Performance will vary,
based on the device’s software version and
battery condition. Devices are warranted by
their manufacturer, not Jaguar.
Do not plug non-audio devices into the
USB port.
Note: You cannot use a USB hub to connect
more than one USB device to the audio unit.
Note: Devices connected to the USB ports will
be charged, but devices that are fully
discharged will not play.
Note: Options such as Repeat and Mix relate
to the device currently playing, they will not
apply to any subsequent device.
Page 115 of 225
R
(FM8) SEMCON JLR OWNER GUIDE VER 1.00 EURO
LANGUAGE: english-en; MARQUE: jaguar; MODEL: XF
Portable media
115
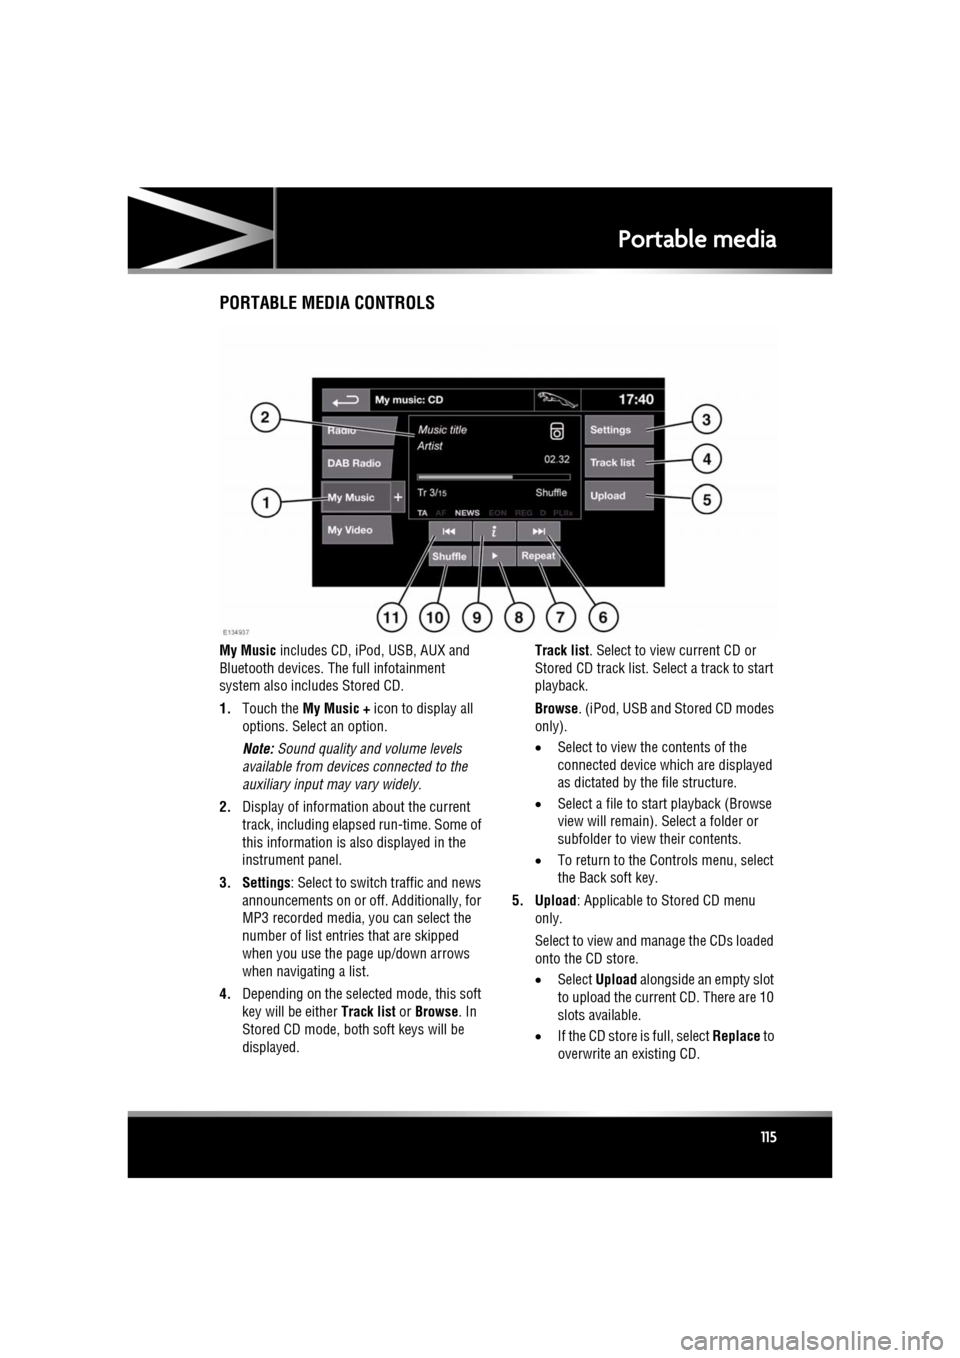
PORTABLE MEDIA CONTROLS
My Music includes CD, iPod, USB, AUX and
Bluetooth devices. Th e full infotainment
system also includes Stored CD.
1. Touch the My Music + icon to display all
options. Select an option.
Note: Sound quality and volume levels
available from devices connected to the
auxiliary input may vary widely.
2. Display of information about the current
track, including elapse d run-time. Some of
this information is also displayed in the
instrument panel.
3. Settings : Select to switch traffic and news
announcements on or off. Additionally, for
MP3 recorded media, you can select the
number of list entries that are skipped
when you use the page up/down arrows
when navigating a list.
4. Depending on the selected mode, this soft
key will be either Track list or Browse . In
Stored CD mode, both soft keys will be
displayed. Track list
. Select to view current CD or
Stored CD track list. Select a track to start
playback.
Browse . (iPod, USB and Stored CD modes
only).
• Select to view the contents of the
connected device wh ich are displayed
as dictated by the file structure.
• Select a file to start playback (Browse
view will remain). Se lect a folder or
subfolder to view their contents.
• To return to the Cont rols menu, select
the Back soft key.
5. Upload : Applicable to Stored CD menu
only.
Select to view and manage the CDs loaded
onto the CD store.
• Select Upload alongside an empty slot
to upload the current CD. There are 10
slots available.
• If the CD store is full, select Replace to
overwrite an existing CD.
Page 116 of 225
L
(FM8) SEMCON JLR OWNER GUIDE VER 1.00 EURO
LANGUAGE: english-en; MARQUE: jaguar; MODEL: XF
Portable media
116
In each case a confirmation pop-up will
appear. Select Yes to continue.
Note: Loading time is dependent on
content type. A % count up is displayed.
Other features can be selected while
upload is in progress.
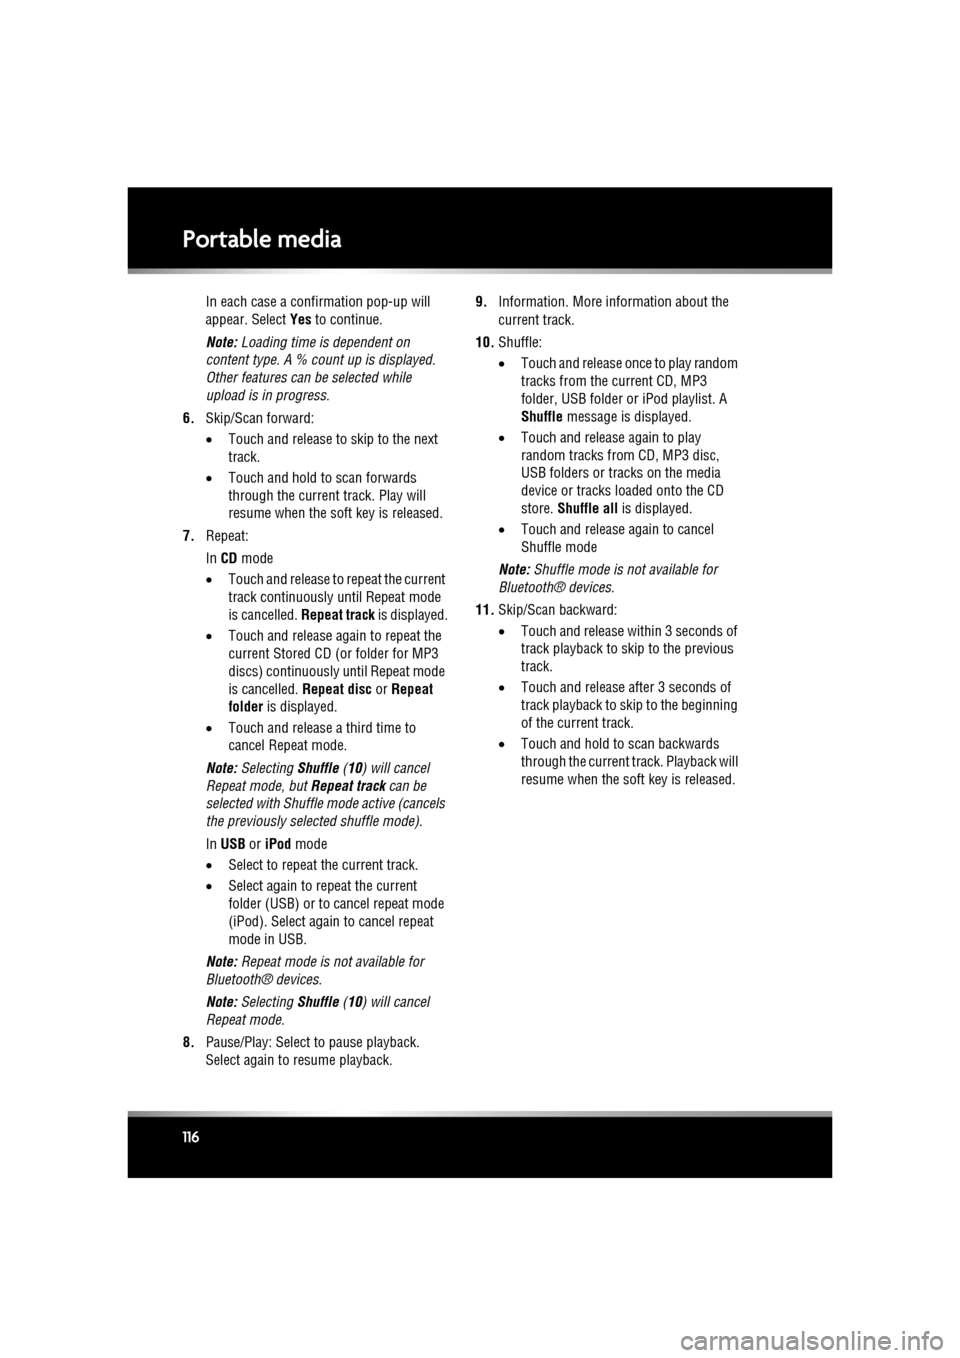
6. Skip/Scan forward:
•Touch and release to skip to the next
track.
• Touch and hold to scan forwards
through the current track. Play will
resume when the soft key is released.
7. Repeat:
In CD mode
• Touch and release to repeat the current
track continuously until Repeat mode
is cancelled. Repeat track is displayed.
• Touch and release again to repeat the
current Stored CD (or folder for MP3
discs) continuously until Repeat mode
is cancelled. Repeat disc or Repeat
folder is displayed.
• Touch and release a third time to
cancel Repe at mode.
Note: Selecting Shuffle (10) will cancel
Repeat mode, but Repeat track can be
selected with Shuffle mode active (cancels
the previously sele cted shuffle mode).
In USB or iPod mode
• Select to repeat the current track.
• Select again to repeat the current
folder (USB) or to cancel repeat mode
(iPod). Select again to cancel repeat
mode in USB.
Note: Repeat mode is not available for
Bluetooth® devices.
Note: Selecting Shuffle (10) will cancel
Repeat mode.
8. Pause/Play: Select to pause playback.
Select again to resume playback. 9.
Information. More information about the
current track.
10. Shuffle:
•Touch and release once to play random
tracks from the current CD, MP3
folder, USB folder or iPod playlist. A
Shuffle message is displayed.
• Touch and release again to play
random tracks from CD, MP3 disc,
USB folders or tracks on the media
device or tracks loaded onto the CD
store. Shuffle all is displayed.
• Tou
ch and release again to cancel
Shuffle mode
Note: Shuffle mode is not available for
Bluetooth® devices.
11. Skip/Scan backward:
•Touch and release wi thin 3 seconds of
track playback to skip to the previous
track.
• Touch and release after 3 seconds of
track playback to skip to the beginning
of the current track.
• Touch and hold to scan backwards
through the current track. Playback will
resume when the soft key is released.
Page 117 of 225
R
(FM8) SEMCON JLR OWNER GUIDE VER 1.00 EURO
LANGUAGE: english-en; MARQUE: jaguar; MODEL: XF
Portable media
117
PLAYING A PORTABLE DEVICE
If you are using a USB mass storage device or
approved iPod, you can control playback using
the touch screen controls.
If you are using a Blue tooth® device, you can
control playback using the touch screen, but
some controls are unavailable.
If you are using any portable media device via
the AUX socket, then you must control
playback from the device itself.
Jaguar does not recommend the use of
a Hard Disc Drive via the USB link while
the vehicle is in motion. These devices
are not designed for in car use and may
be damaged.
CONNECTING MULTIPLE DEVICES
Do not plug non-audio devices into the
USB port.
You can connect multiple devices
simultaneously to the portable media interface
and switch between th em using the touch
screen. Select iPod, USB , Bluetooth or AUX, to
switch between modes.
The device docked first will remain the active
device until you choose to change.
If, after changing to the newly-docked device,
you change back to the first device, play will
resume at the point you left it (USB and iPod
only).
Note: You cannot use a USB hub to connect
more than one USB devi ce to the audio unit.
Note: Devices connected to the iPod and USB
ports will be charged, but devices that are fully
discharged will not play.
Note: Options such as Repeat and Shuffle
relate to the device curre ntly playing, they will
not apply to any subsequent device.
PAIRING AND CONNECTING USING
THE MEDIA PLAYER
For further information on Bluetooth®, see
129, BLUETOOTH® INFORMATION .
Note: The process of pairing and connecting
your media device with the vehicle, using the
media device, will vary depending on the type
of media device.
1. Switch on the ignition and ensure the touch
screen is active.
2. From the Home menu, select Audio/Video,
then My Music .
3. A menu will appear. Select Search new.
4. Select Device to vehicle option.
Note: The vehicle’s Bluetooth® system is
only discoverable for 3 minutes.
5. Using the media device, search for
Bluetooth® devices. On some media
devices, this is referred to as new paired
device. See your medi a device’s operating
instructions for further information.
6. When the vehicle’s Bluetooth® system is
discovered, follow the on-screen
instructions. Select Yes when prompted, to
confirm the pairing.
Either your device or the vehicle system
will ask for a PIN (Personal Identification
Number). When prompted, enter a PIN of
your choice and select OK to confirm.
7. Enter the same PIN into the other device.
8. Once your device is paired and connected
to the system, a confirmation message will
be displayed, before switching to the My
music: Bluetooth screen.
Note: Some media devices do not
automatically connect and need to be
manually connected, via the device or by
using the Change device option.
Page 118 of 225
L
(FM8) SEMCON JLR OWNER GUIDE VER 1.00 EURO
LANGUAGE: english-en; MARQUE: jaguar; MODEL: XF
Portable media
118
PAIRING AND CONNECTING A
BLUETOOTH® DEVICE USING THE
TOUCH SCREEN
For further informatio n on Bluetooth®, see
129, BLUETOOTH® INFORMATION .
1. Switch on your device’s Bluetooth®
connection. Make sure that it is in
Bluetooth® discov erable mode,
sometimes referred to as find me mode
(see your device’s operating instructions
for more information).
2. Switch on the ignition and ensure the touch
screen is active.
3. From the Home menu, select Audio/Video,
then My Music .
4. A menu will appear. Select Search new.
5. Select Vehicle to device option.
6. Identify your device fr om the displayed list
and select the corresponding Pair and
connect option.
Note: If more than 5 devices are detected,
it may be necessary to use the scroll bar to
see the entire list.
7. When prompted, enter the PIN (Personal
Identification Number) code into your
device. See your device's operating
instructions for more information.
8. Once your device is paired and connected
to the system, a confirmation message will
be displayed before switching to the My
music: Bluetooth screen.
Note: Due to the duration of a Bluetooth®
search, it is advised that the time-out to home
screen feature is switched off before
attempting to search fo r Bluetooth® devices.
This setting can be changed within Set-up,
Screen, Time out home .
AUTOMATIC BLUETOOTH®
RECONNECTION
If devices have already been paired and
connected, when Bluetoot h® is selected from
the My music menu, the system will
automatically connect to th e last used device (a
confirmation pop-up appears) . If the last used
device is not present, then the system will
search for other previously connected devices
and automatically conne ct if one is found.
If no previously connect ed device is found,
Please connect device is displayed and the
Change device option is given.
LOSS OF CONNECTION
If a loss of connection between the vehicle and
the Bluetooth® device occurs, a pop-up is
displayed. Select Reconnect to automatically
restore the connection. A confirmation pop-up
will appear before the touch screen reverts to
its previous mode.
CHANGING/DISCONNECTING A
DEVICE
1. From the menu, select Change device.
2. Select Disconnect . A confirmation pop-up
will appear and then you will be given the
option to Search new or select a different
device from the list of paired devices.