ECO mode JAGUAR XF 2015 1.G Quick Start Guide
[x] Cancel search | Manufacturer: JAGUAR, Model Year: 2015, Model line: XF, Model: JAGUAR XF 2015 1.GPages: 16, PDF Size: 1.28 MB
Page 2 of 16
2
DRIVER CONTROLSVEHICLE ACCESS
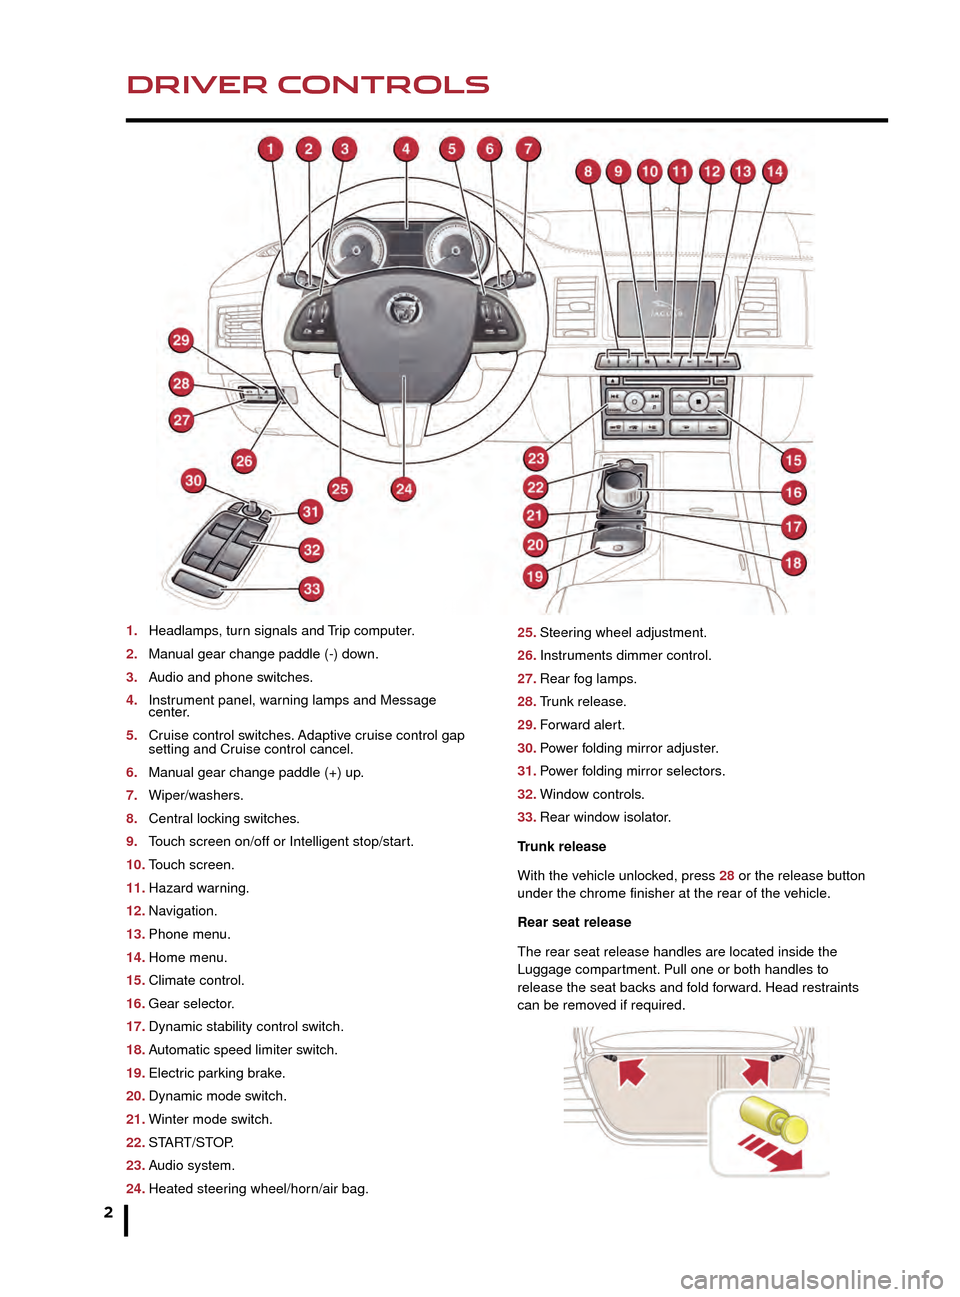
1. Headlamps, turn signals and Trip computer.
2.
Man
ual gear change paddle (-) down.
3.
A
udio and phone switches.
4.
Instr
ument panel, warning lamps and Message
center.
5.
Cr
uise control switches. Adaptive cruise control gap
setting and Cr
uise control cancel.
6.
Man
ual gear change paddle (+) up.
7.
Wiper/w
ashers.
8.
Centr
al locking switches.
9.
T
ouch screen on/off or Intelligent stop/start.
10.
T
ouch screen.
11.
Hazard w
arning.
12.
Na
vigation.
13.
Phone men
u.
14.
Home men
u.
15.
Climate control.
16.
Gear selector
.
17.
Dynamic stability control s
witch.
18.
A
utomatic speed limiter switch.
19.
Electr
ic parking brake.
20.
Dynamic mode s
witch.
21.
Winter mode s
witch.
22.
ST
ART/STOP.
23.
A
udio system.
24.
Heated steer
ing wheel/horn/air bag. 25. Steer
ing wheel adjustment.
26.
Instr
uments dimmer control.
27.
Rear f
og lamps.
28.
T
runk release.
29.
F
orward alert.
30.
P
ower folding mirror adjuster.
31.
P
ower folding mirror selectors.
32.
Windo
w controls.
33.
Rear windo
w isolator.
Trunk release
With the vehicle unlocked, press 28 or the release button
under the chrome finisher at the rear of the vehicle.
Rear seat release
The rear seat release handles are located inside the
Luggage compartment. Pull one or both handles to
release the seat backs and fold forward. Head restraints
can be removed if required.
Unlocking mode alternatives
Single-point entry allows only the driver’s door to
unlock with a single press. A second press unlocks all
other doors and the trunk.
Multi-point entry will unlock all of the doors and the
trunk with a single press.
To change between modes, with the vehicle unlocked,
press the lock and unlock buttons simultaneously for 3
seconds. The hazard warning lamps will flash twice to
confirm the change.
Smart key
Keyless entry/exit
To unlock the vehicle and disarm the alarm, first make
sure that the Smart key is outside of the vehicle but within
3 ft (1 m).
Operate a door handle or the trunk release button.
To lock the vehicle and arm the alarm, first make sure
that the Smart key is outside the vehicle but within 3 ft
(1 m).
Press a door handle button once to Single lock.
JJM189640151.indd 226/02/2014 16:29:04
Page 3 of 16
3
DRIVER CONTROLSVEHICLE ACCESS
The Smart key may not be detected if it is placed in
a metal container, or if it is shielded by a device with
a back-lit LCD screen, (e.g., laptop, smart phone,
etc). Keep the Smart key clear of such devices
when attempting Keyless entry or Keyless starting.
Do not leave your Smart key in the trunk, as the
vehicle WILL NOT automatically unlock (should it
become shielded).
25. Steering wheel adjustment.
26. Instruments dimmer control.
27. Rear fog lamps.
28. Trunk release.
29. Forward alert.
30. Power folding mirror adjuster.
31. Power folding mirror selectors.
32. Window controls.
33. Rear window isolator.
Trunk release
With the vehicle unlocked, press 28 or the release button
under the chrome finisher at the rear of the vehicle.
Rear seat release
The rear seat release handles are located inside the
Luggage compartment. Pull one or both handles to
release the seat backs and fold forward. Head restraints
can be removed if required.
Unlocking mode alternatives
Single-point entry allows only the driver’s door to
unlock with a single press. A second press unlocks all
other doors and the trunk.
Multi-point entry will unlock all of the doors and the
trunk with a single press.
To change between modes, with the vehicle unlocked,
press the lock and unlock buttons simultaneously for 3
seconds. The hazard warning lamps will flash twice to
confirm the change.
Smart key
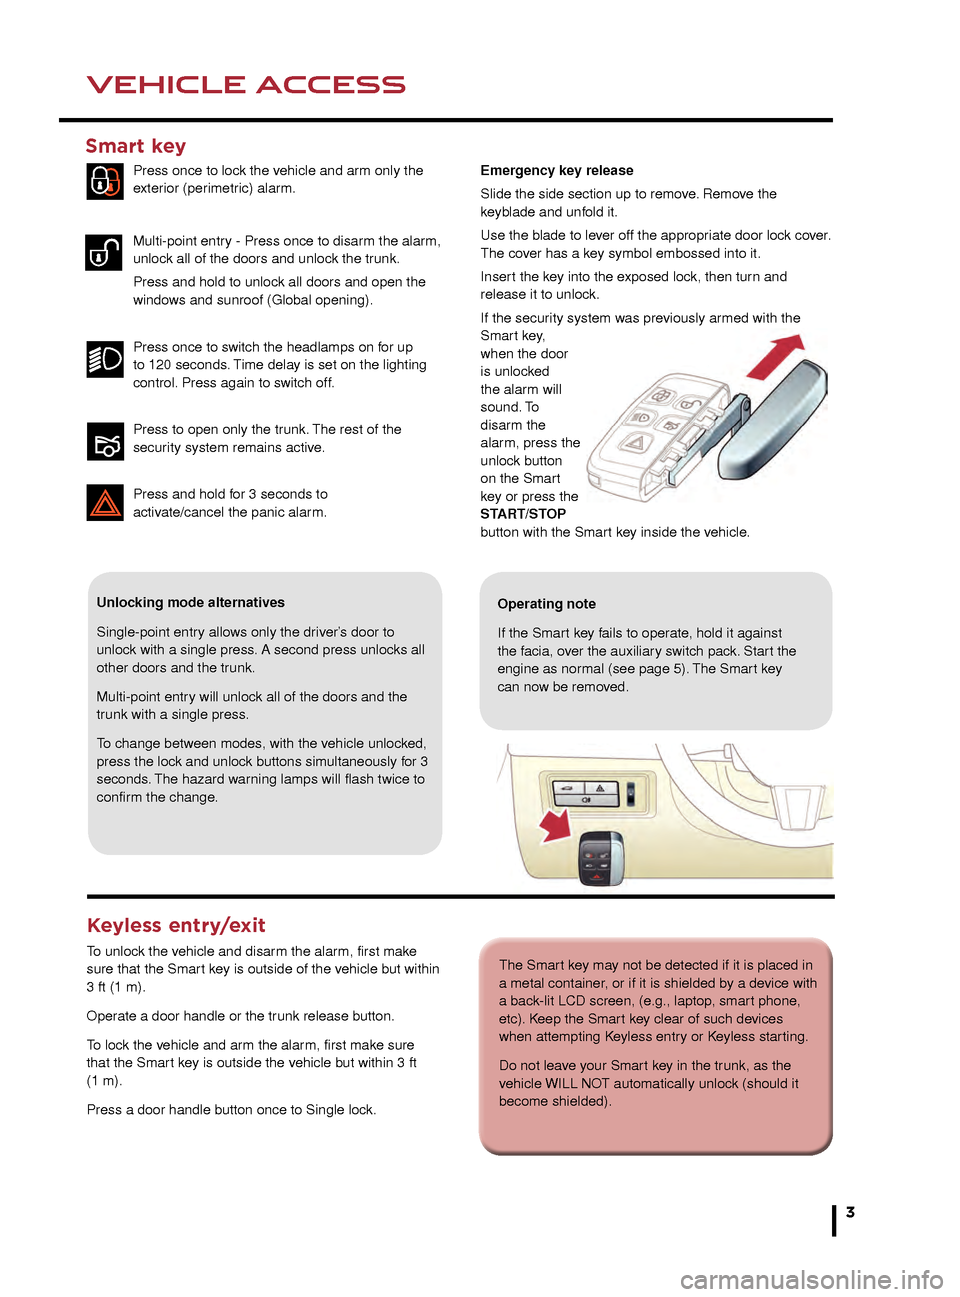
Press once to lock the vehicle and arm only the
exterior (perimetric) alarm.
Multi-point entry - Press once to disarm the alarm,
unlock all of the doors and unlock the trunk.
Press and hold to unlock all doors and open the
windows and sunroof (Global opening).
Press once to switch the headlamps on for up
to 120 seconds. Time delay is set on the lighting
control. Press again to switch off.
Press to open only the trunk. The rest of the
security system remains active.
Press and hold for 3 seconds to
activ
ate/cancel the panic alarm.
Keyless entry/exit
To unlock the vehicle and disarm the alarm, first make
sure that the Smart key is outside of the vehicle but within
3 ft (1 m).
Operate a door handle or the trunk release button.
To lock the vehicle and arm the alarm, first make sure
that the Smart key is outside the vehicle but within 3 ft
(1 m).
Press a door handle button once to Single lock.
Operating note
If the Smart key fails to operate, hold it against
the facia, over the auxiliary switch pack. Start the
engine as normal (see page 5). The Smart key
can now be removed.
Emergency key release
Slide the side section up to remove. Remove the
keyblade and unfold it.
Use the blade to lever off the appropriate door lock cover.
The cover has a key symbol embossed into it.
Insert the key into the exposed lock, then turn and
release it to unlock.
If the security system was previously armed with the
Smart key,
when the door
is unlocked
the alarm will
sound. To
disarm the
alarm, press the
unlock button
on the Smart
key or press the
START/STOP
button with the Smart key inside the vehicle.
JJM189640151.indd 326/02/2014 16:29:07
Page 6 of 16
STARTING AND DRIVING
6
STARTING AND DRIVING
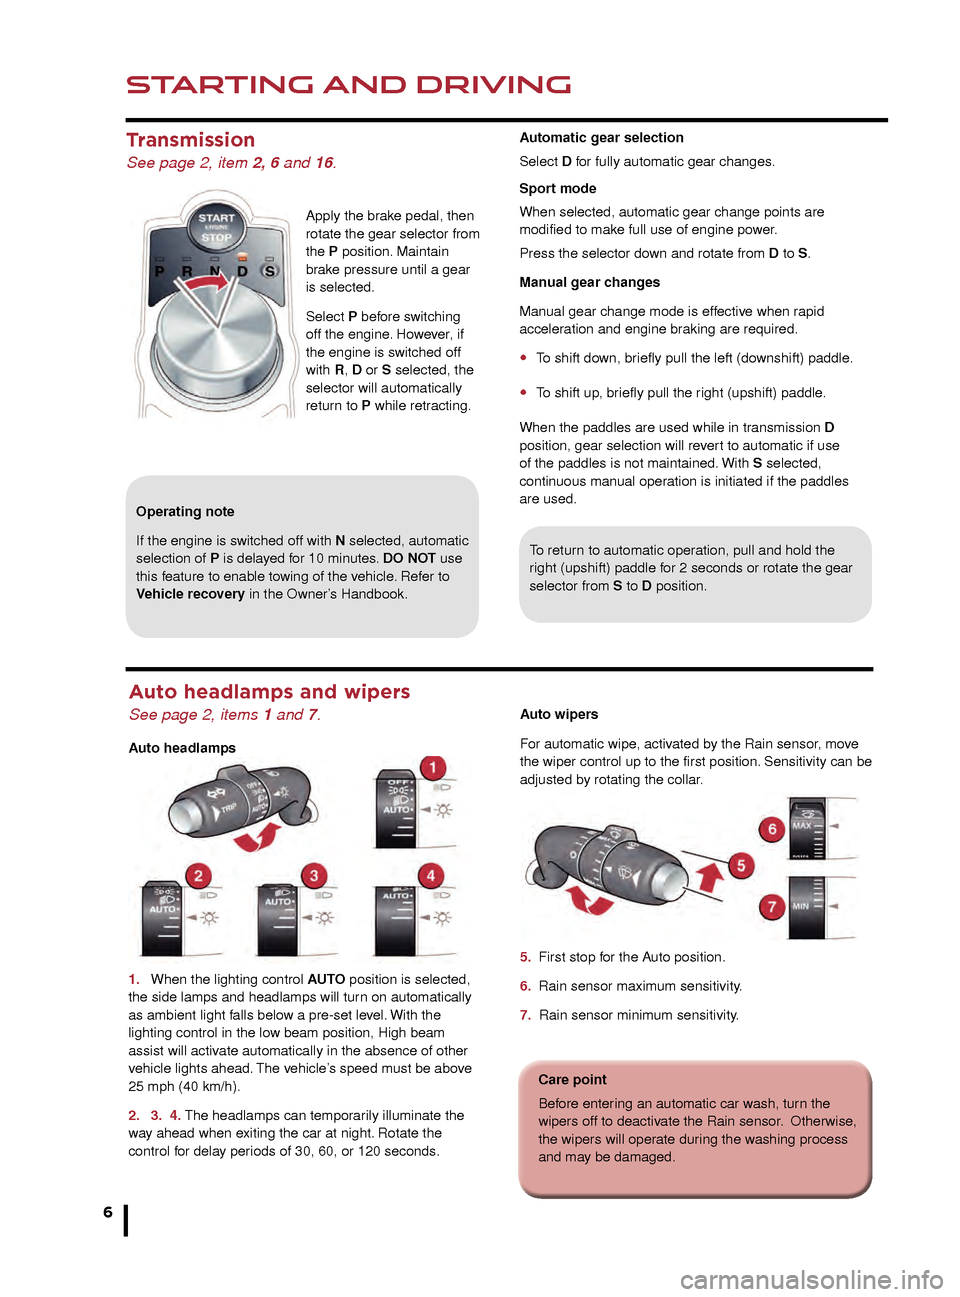
Transmission
See page 2, item 2, 6 and 16.
Apply the brake pedal, then
rotate the gear selector from
the P position. Maintain
brake pressure until a gear
is selected.
Select P before switching
off the engine. However, if
the engine is switched off
with R, D or S selected, the
selector will automatically
return to P while retracting.
To return to automatic operation, pull and hold the
right (upshift) paddle for 2 seconds or rotate the gear
selector from S to D position.
Operating note
If the engine is switched off with N selected, automatic
selection of P is delayed for 10 minutes. DO NOT use
this feature to enable towing of the vehicle. Refer to
Vehicle recovery in the Owner’s Handbook.
Cruise control and Forward alert
Setting Cruise control speed
1. Use to set the cruise speed or to increase/decrease
speed while Cruise control is operating.
2. Resumes the set speed after a cancellation.
3. Press to cancel but retain the set speed in memory.
Cruise control will also cancel if the brake pedal is
pressed or if the vehicle’s speed falls below 18 mph (30
km/h).
Adaptive cruise control (ACC)
This enhancement uses a front mounted radar to monitor
traffic ahead. ACC can be programed to maintain a set
gap to the vehicle ahead. If the vehicle ahead is traveling
slower than the set speed, your vehicle will automatically
slow down and then maintain the set gap until the road
ahead clears. At that point, your vehicle will accelerate to
the set speed.
Auto headlamps and wipers
See page 2, items 1 and 7.
Auto headlamps
1.
When the lighting control
AUTO position is selected,
the side lamps and headlamps will turn on automatically
as ambient light falls below a pre-set level. With the
lighting control in the low beam position, High beam
assist will activate automatically in the absence of other
vehicle lights ahead. The vehicle’s speed must be above
25 mph (40 km/h).
2.
3.
4. The headlamps can temporarily illuminate the
way ahead when exiting the car at night. Rotate the
control for delay periods of 30, 60, or 120 seconds.
Auto wipers
For automatic wipe, activated by the Rain sensor, move
the wiper control up to the first position. Sensitivity can be
adjusted by rotating the collar.
5. First stop for the Auto position.
6. Rain sensor maximum sensitivity.
7. Rain sensor minimum sensitivity.
Care point
Before entering an automatic car wash, turn the
wipers off to deactivate the Rain sensor. Otherwise,
the wipers will operate during the washing process
and may be damaged.
Automatic gear selection
Select D for fully automatic gear changes.
Sport mode
When selected, automatic gear change points are
modified to make full use of engine power.
Press the selector down and rotate from D to S.
Manual gear changes
Manual gear change mode is effective when rapid
acceleration and engine braking are required.
• To shift down, briefly pull the left (downshift) paddle.
• To shift up, briefly pull the right (upshift) paddle.
When the paddles are used while in transmission D
position, gear selection will revert to automatic if use
of the paddles is not maintained. With S selected,
continuous manual operation is initiated if the paddles
are used.
Electric parking brake (EPB)
See page 2, item 19.
Applying
• With the vehicle stationary, lift up the EPB switch and
then release it. The red warning lamp in the Instrument
panel will illuminate.
Automatic EPB operation
The EPB will apply automatically if the ignition is
switched off and the vehicle’s speed is below 2 mph
(3 km/h), unless transmission P is selected.
JJM189640151.indd 626/02/2014 16:29:16
Page 7 of 16
STARTING AND DRIVINGSTARTING AND DRIVING
7
To return to automatic operation, pull and hold the
right (upshift) paddle for 2 seconds or rotate the gear
selector from S to D position.
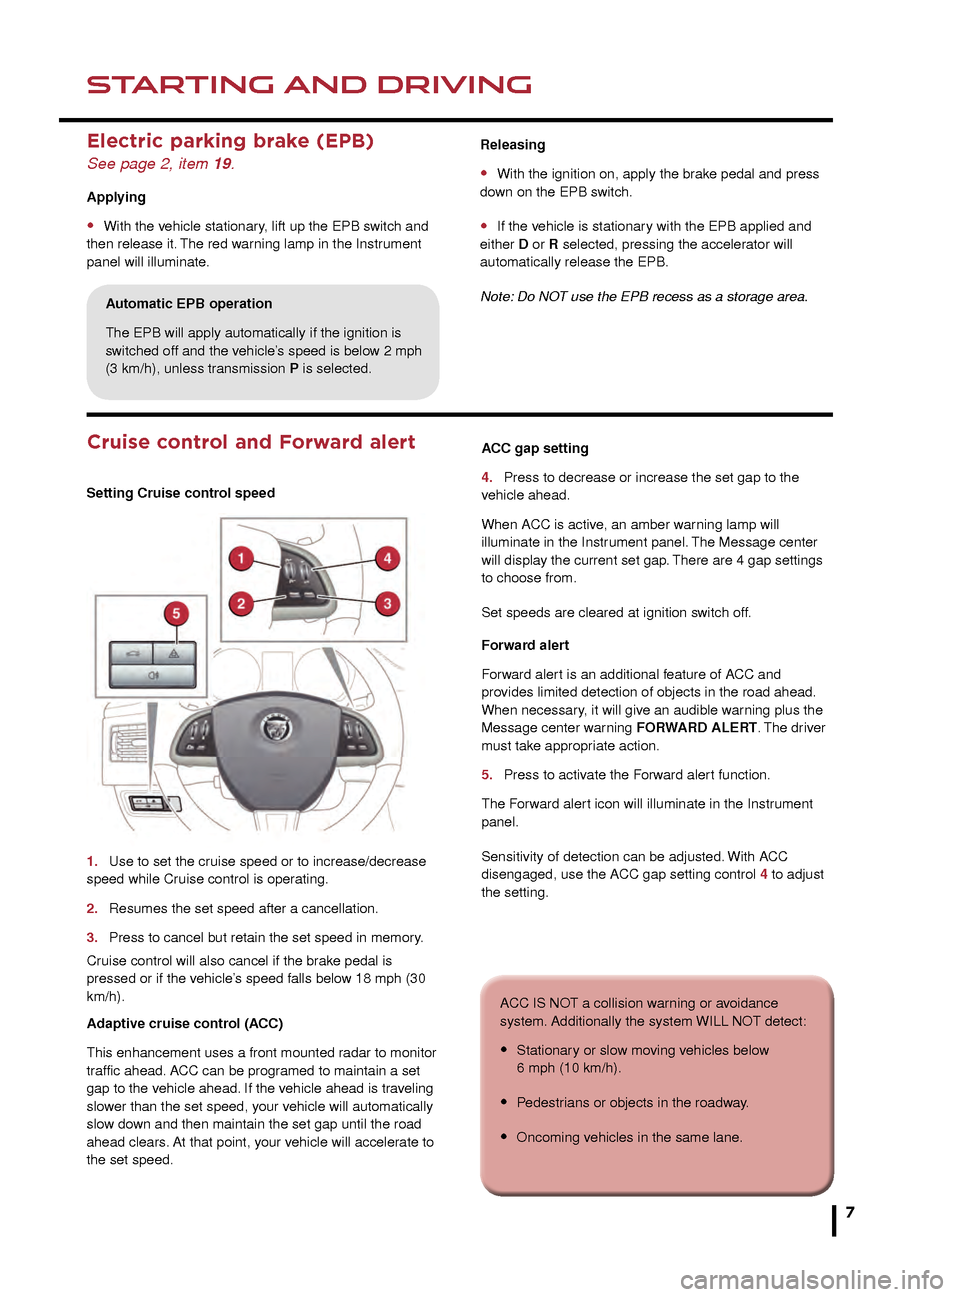
Cruise control and Forward alert
Setting Cruise control speed
1.
Use to set the cr
uise speed or to increase/decrease
speed while Cr
uise control is operating.
2.
Resumes the set speed after a cancellation.
3
.
Press to cancel b
ut retain the set speed in memory.
Cruise control will also cancel if the brake pedal is
pressed or if the vehicle’s speed falls below 18 mph (30
km/h).
Adaptive cruise control (ACC)
This enhancement uses a front mounted radar to monitor
traffic ahead. ACC can be programed to maintain a set
gap to the vehicle ahead. If the vehicle ahead is traveling
slower than the set speed, your vehicle will automatically
slow down and then maintain the set gap until the road
ahead clears. At that point, your vehicle will accelerate to
the set speed.
7
ACC gap setting
4.
Press to decrease or increase the set gap to the
v ehicle ahead.
When ACC is active, an amber warning lamp will
illuminate in the Instrument panel. The Message center
will display the current set gap. There are 4 gap settings
to choose from.
Set speeds are cleared at ignition switch off.
Forward alert
Forward alert is an additional feature of ACC and
provides limited detection of objects in the road ahead.
When necessary, it will give an audible warning plus the
Message center warning FORWARD ALERT. The driver
must take appropriate action.
5.
Press to activ
ate the Forward alert function.
The Forward alert icon will illuminate in the Instrument
panel.
Sensitivity of detection can be adjusted. With ACC
disengaged, use the ACC gap setting control 4 to adjust
the setting.
Auto wipers
For automatic wipe, activated by the Rain sensor, move
the wiper control up to the first position. Sensitivity can be
adjusted by rotating the collar.
5. First stop for the Auto position.
6. Rain sensor maximum sensitivity.
7. Rain sensor minimum sensitivity.
Care point
Before entering an automatic car wash, turn the
wipers off to deactivate the Rain sensor. Otherwise,
the wipers will operate during the washing process
and may be damaged.
Automatic gear selection
Select D for fully automatic gear changes.
Sport mode
When selected, automatic gear change points are
modified to make full use of engine power.
Press the selector down and rotate from D to S.
Manual gear changes
Manual gear change mode is effective when rapid
acceleration and engine braking are required.
• To shift down, briefly pull the left (downshift) paddle.
• To shift up, briefly pull the right (upshift) paddle.
When the paddles are used while in transmission D
position, gear selection will revert to automatic if use
of the paddles is not maintained. With S selected,
continuous manual operation is initiated if the paddles
are used.
Releasing
• With the ignition on, apply the brake pedal and press
down on the EPB switch.
• If the vehicle is stationary with the EPB applied and
either D or R selected, pressing the accelerator will
automatically release the EPB.
Note: Do NOT use the EPB recess as a storage area.
Electric parking brake (EPB)
See page 2, item 19.
Applying
• With the vehicle stationary, lift up the EPB switch and
then release it. The red warning lamp in the Instrument
panel will illuminate.
Automatic EPB operation
The EPB will apply automatically if the ignition is
switched off and the vehicle’s speed is below 2 mph
(3 km/h), unless transmission P is selected.
ACC IS NOT a collision warning or avoidance
system. Additionally the system WILL NOT detect:
• Stationary or slow moving vehicles below
6 mph (10 km/h).
• Pedestrians or objects in the roadway.
• Oncoming vehicles in the same lane.
JJM189640151.indd 726/02/2014 16:29:17
Page 8 of 16
STARTING AND DRIVING
8
STARTING AND DRIVING
Automatic speed limiter (ASL)
See page 2, items 18.
ASL allows any speed above 20 mph (32 km/h) to be set
as a maximum speed. This is useful in making sure that
any given speed limit is not exceeded.
Setting a speed
The setting procedure can be made
while the vehicle is stationary.
1.
Press the ASL b
utton. An ASL
warning lamp illuminates in the
speedometer.
2.
Use the Cr
uise control increase
and decrease controls to set a speed.
The Message center will display the
set speed. Adjustment can be made
at any time, to suit variable speed
limits.
Rear camera and Parking aids
Rear camera
If ASL is suspended due to kick-down acceleration or
by pressing the Cruise control CANCEL button, the
Message center will display a LIMITER
CANCELLED
message.
Press the RESUME control to reinstate the ASL set
speed. ASL will resume if the vehicle’s speed is below the
previously set speed limit.
Door mirrors and Blind spot
monitoring (BSM)
See page 2, items 30 and 31.
Door mirror dip when reversing
This feature can be used to improve lower side views
while reversing. It can be enabled or disabled via the
Touch screen. From the Home menu, select Setup then
Secrity/Vehicle. Now select Windows/Mirrors followed
by Reverse mirror dip - On or Off.
To set a mirror dip position:
• With the Parking brake on, select transmission R.
• Adjust the mirror position to view the lower rear curb
and vehicle.
Subsequently, each time transmission R is selected, the
set dip position will be automatically selected. The mirrors
will return to their normal position when a forward gear is
selected. When negotiating a steep downhill gradient, vehicle
speed may exceed the set speed. The Message
center will display a warning. Driver intervention
may be required to reduce the vehicle’s speed.
JaguarDrive control
See page 2, items 17, 20 and 21.
Winter mode, Dynamic mode and Dynamic Stability
Control (DSC) allow the driver to more finely tune
the vehicle’s driving characteristics to suit prevailing
conditions.
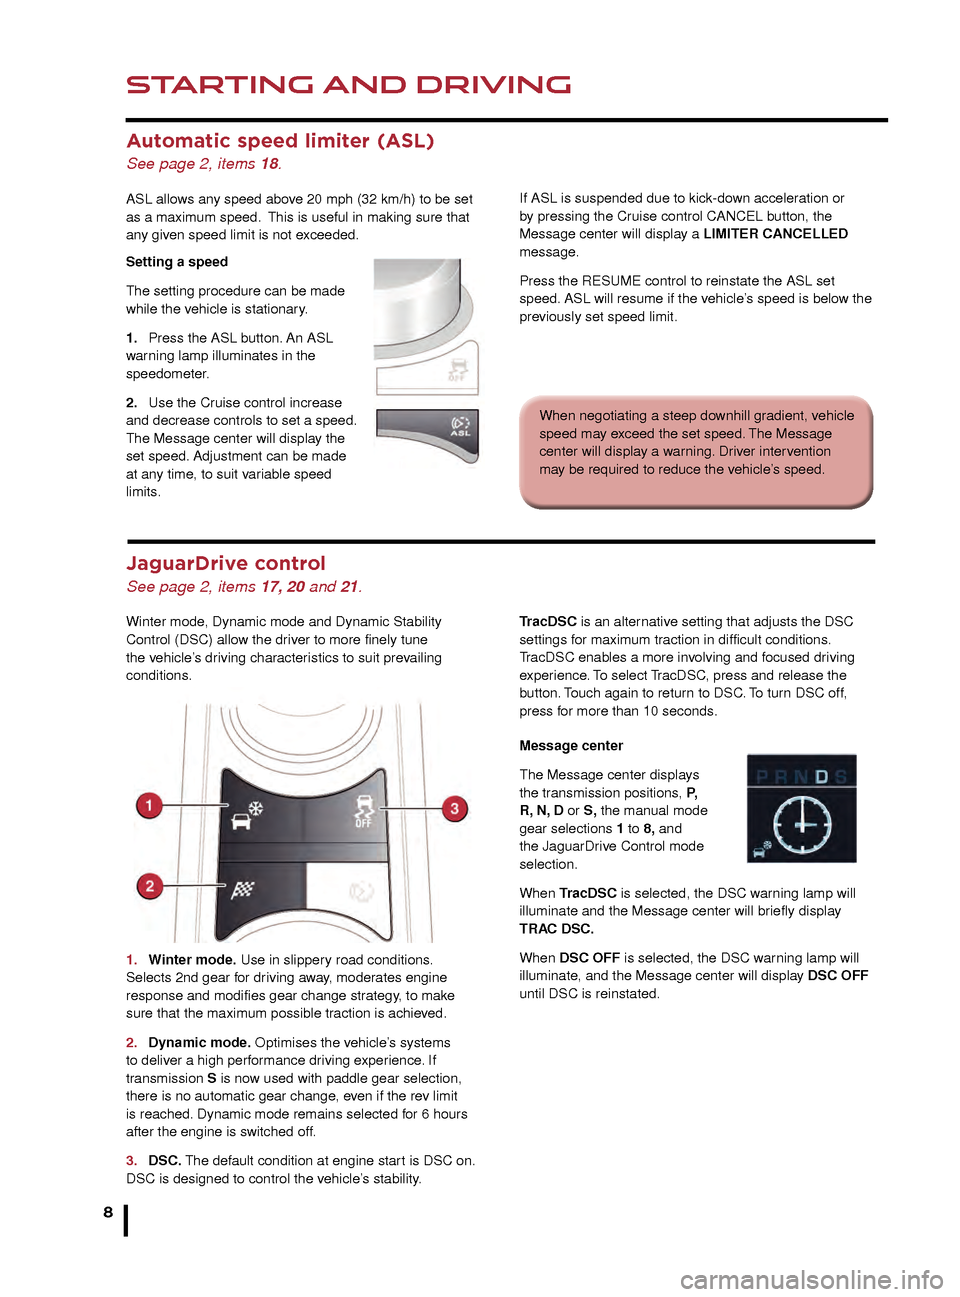
1.
Winter mode
. Use in slippery road conditions.
Selects 2nd gear for driving away, moderates engine
response and modifies gear change strategy, to make
sure that the maximum possible traction is achieved.
2.
Dynamic mode
. Optimises the vehicle’s systems
to deliver a high performance driving experience. If
transmission S is now used with paddle gear selection,
there is no automatic gear change, even if the rev limit
is reached. Dynamic mode remains selected for 6 hours
after the engine is switched off.
3.
DSC.
The default condition at engine start is DSC on.
DSC is designed to control the vehicle’s stability.TracDSC is an alternative setting that adjusts the DSC
settings for maximum traction in difficult conditions.
TracDSC enables a more involving and focused driving
experience. To select TracDSC, press and release the
button. Touch again to return to DSC. To turn DSC off,
press for more than 10 seconds.
Message center
The Message center displays
the transmission positions, P,
R, N, D or S, the manual mode
gear selections 1 to 8, and
the JaguarDrive Control mode
selection.
When TracDSC is selected, the DSC warning lamp will
illuminate and the Message center will briefly display
TRAC DSC.
When DSC OFF is selected, the DSC warning lamp will
illuminate, and the Message center will display DSC OFF
until DSC is reinstated.
Folding mirrors
Press both buttons simultaneously to fold the mirrors
inward. Press again to unfold.
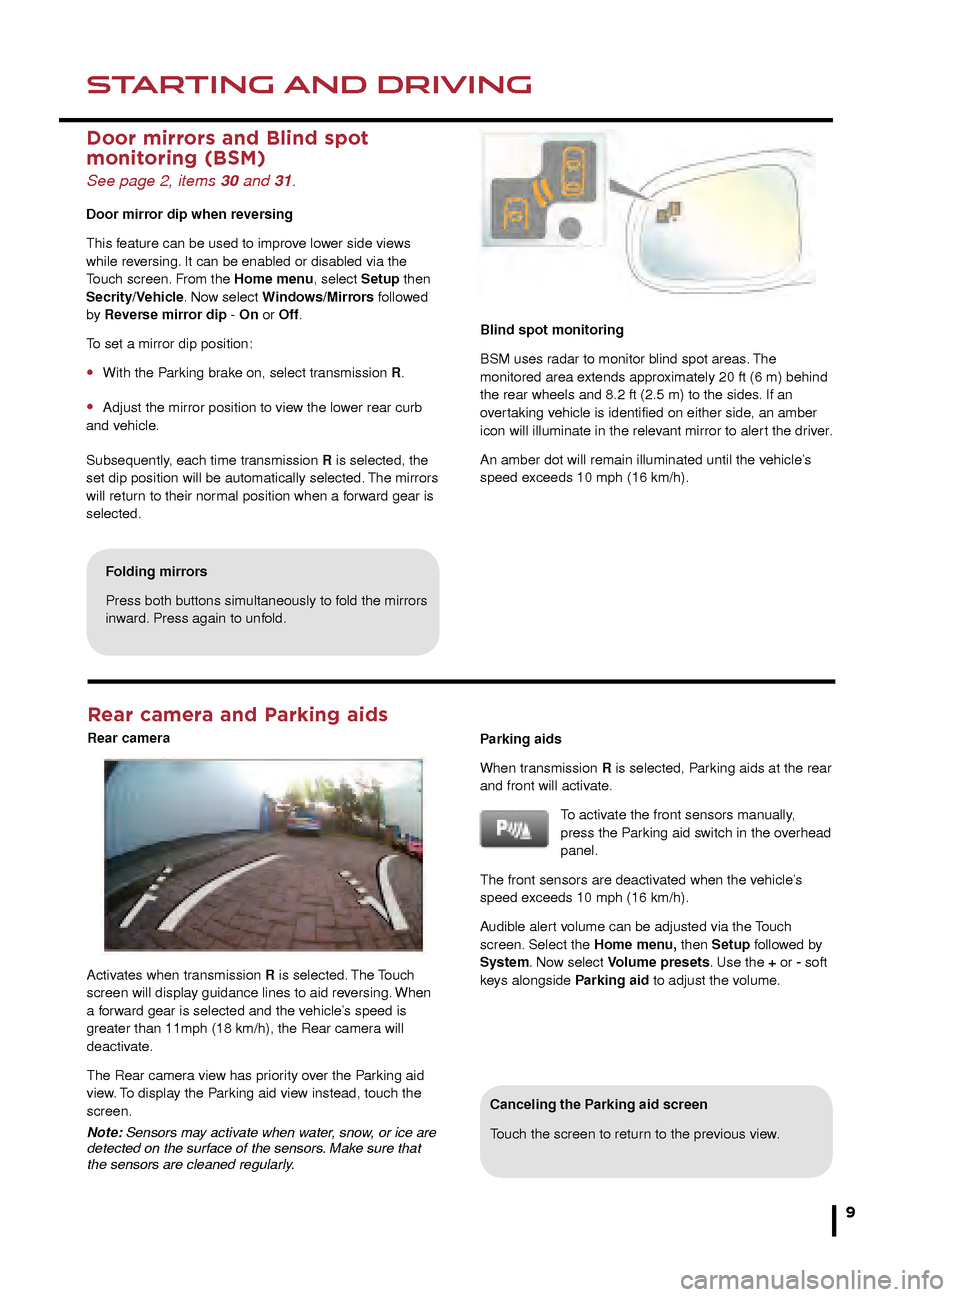
Activates when transmission R is selected. The Touch
screen will display guidance lines to aid reversing. When
a forward gear is selected and the vehicle’s speed is
greater than 11mph (18 km/h), the Rear camera will
deactivate.
The Rear camera view has priority over the Parking aid
view. To display the Parking aid view instead, touch the
screen.
Note: Sensors may activate when water, snow, or ice are
detected on the surface of the sensors. Make sure that
the sensors are cleaned regularly.
JJM189640151.indd 826/02/2014 16:29:19
Page 9 of 16
STARTING AND DRIVINGSTARTING AND DRIVING
9
Rear camera and Parking aids
Rear camera
Canceling the Parking aid screen
Touch the screen to return to the previous view.
If ASL is suspended due to kick-down acceleration or
by pressing the Cruise control CANCEL button, the
Message center will display a LIMITER CANCELLED
message.
Press the RESUME control to reinstate the ASL set
speed. ASL will resume if the vehicle’s speed is below the
previously set speed limit.
Door mirrors and Blind spot
monitoring (BSM)
See page 2, items 30 and 31.
Door mirror dip when reversing
This feature can be used to improve lower side views
while reversing. It can be enabled or disabled via the
Touch screen. From the Home menu, select Setup then
Secrity/Vehicle. Now select Windows/Mirrors followed
by Reverse mirror dip - On or Off.
To set a mirror dip position:
• With the Parking brake on, select transmission R.
• Adjust the mirror position to view the lower rear curb
and vehicle.
Subsequently, each time transmission R is selected, the
set dip position will be automatically selected. The mirrors
will return to their normal position when a forward gear is
selected. When negotiating a steep downhill gradient, vehicle
speed may exceed the set speed. The Message
center will display a warning. Driver intervention
may be required to reduce the vehicle’s speed.
TracDSC is an alternative setting that adjusts the DSC
settings for maximum traction in difficult conditions.
TracDSC enables a more involving and focused driving
experience. To select TracDSC, press and release the
button. Touch again to return to DSC. To turn DSC off,
press for more than 10 seconds.
Message center
The Message center displays
the transmission positions, P,
R, N, D or S, the manual mode
gear selections 1 to 8, and
the JaguarDrive Control mode
selection.
When TracDSC is selected, the DSC warning lamp will
illuminate and the Message center will briefly display
TRAC DSC.
When DSC OFF is selected, the DSC warning lamp will
illuminate, and the Message center will display DSC OFF
until DSC is reinstated.
Blind spot monitoring
BSM uses radar to monitor blind spot areas. The
monitored area extends approximately 20 ft (6 m) behind
the rear wheels and 8.2 ft (2.5 m) to the sides. If an
overtaking vehicle is identified on either side, an amber
icon will illuminate in the relevant mirror to alert the driver.
An amber dot will remain illuminated until the vehicle’s
speed exceeds 10 mph (16 km/h).
Folding mirrors
Press both buttons simultaneously to fold the mirrors
inward. Press again to unfold.
Activates when transmission R is selected. The Touch
screen will display guidance lines to aid reversing. When
a forward gear is selected and the vehicle’s speed is
greater than 11mph (18 km/h), the Rear camera will
deactivate.
The Rear camera view has priority over the Parking aid
view. To display the Parking aid view instead, touch the
screen.
Note: Sensors may activate when water, snow, or ice are
detected on the surface of the sensors. Make sure that
the sensors are cleaned regularly. Parking aids
When transmission R is selected, Parking aids at the rear
and front will activate.
To activate the front sensors manually,
press the Parking aid switch in the overhead
panel.
The front sensors are deactivated when the vehicle’s
speed exceeds 10 mph (16 km/h).
Audible alert volume can be adjusted via the Touch
screen. Select the Home menu, then Setup followed by
System. Now select Volume presets. Use the + or - soft
keys alongside Parking aid to adjust the volume.
JJM189640151.indd 926/02/2014 16:29:19
Page 10 of 16
HEATING AND VENTILATION
10
AUDIO AND TOUCH SCREEN
Heating and ventilation
See page 2, items 12 and 15.
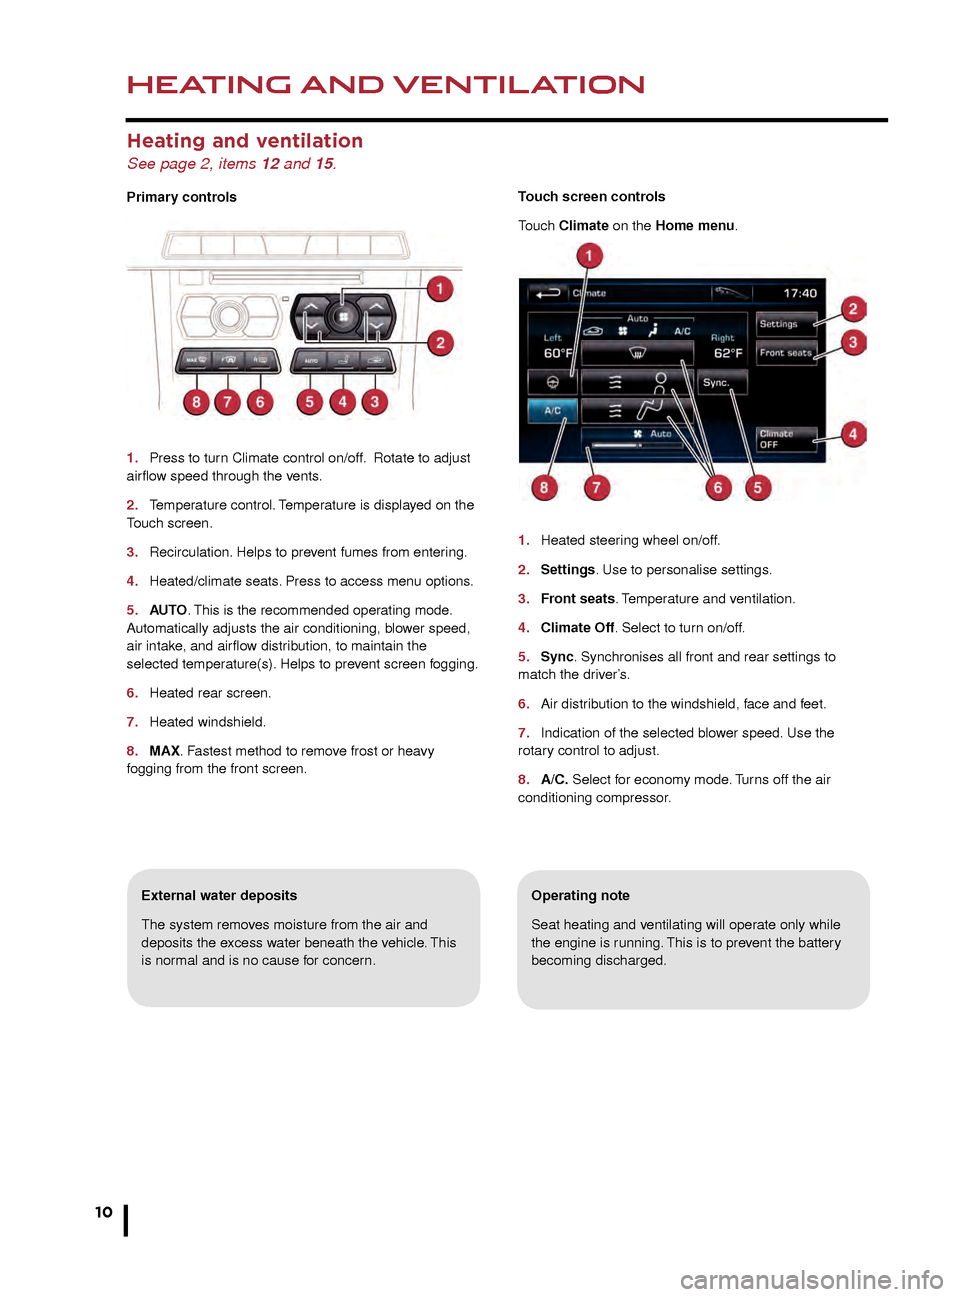
Primary controls
1.
Press to tur
n Climate control on/off. Rotate to adjust
airflow speed through the vents.
2.
T
emperature control. Temperature is displayed on the
Touch screen.
3.
Recirculation.
Helps to prevent fumes from entering.
4.
Heated/climate seats
. Press to access menu options.
5.
AU
TO. This is the recommended operating mode.
Automatically adjusts the air conditioning, blower speed,
air intake, and airflow distribution, to maintain the
selected temperature(s). Helps to prevent screen fogging.
6.
Heated rear screen.
7
.
Heated windshield.
8
.
MAX
. Fastest method to remove frost or heavy
fogging from the front screen.
Operating note
Seat heating and ventilating will operate only while
the engine is running. This is to prevent the battery
becoming discharged.External water deposits
The system removes moisture from the air and
deposits the excess water beneath the vehicle. This
is normal and is no cause for concern. Touch screen controls
Touch Climate on the Home menu.
1.
Heated steer
ing wheel on/off.
2.
Settings
. Use to personalise settings.
3. Front seats. Temperature and ventilation.
4.
Climate Off
. Select to turn on/off.
5
.
Sync
. Synchronises all front and rear settings to
match the driver’s.
6.
Air distr
ibution to the windshield, face and feet.
7.
Indication of the selected b
lower speed. Use the
rotary control to adjust.
8.
A/C.
Select for economy mode. Turns off the air
conditioning compressor
.
Home menu
See page 2, items 10, 14 and 23.
Steering wheel audio/video control
See page 2, item 3.
1. Audio volume.
2. Scroll through preset radio stations, CD tracks, or music folders. Hold to select the
next/previous radio station or the next CD.
3. Audio mute/unmute or activate Voice control.
4. Scroll through the audio/video source options.
The Touch screen requires only light touches.
Excess pressure could result in damage.
JJM189640151.indd 1026/02/2014 16:29:24
Page 11 of 16
HEATING AND VENTILATIONAUDIO AND TOUCH SCREEN
11
Operating note
Seat heating and ventilating will operate only while
the engine is running. This is to prevent the battery
becoming discharged.
Touch screen controls
Touch Climate on the Home menu.
1.
Heated steering wheel on/off.
2. Settings. Use to personalise settings.
3. Front seats. Temperature and ventilation.
4. Climate Off. Select to turn on/off.
5. Sync. Synchronises all front and rear settings to
match the driver’s.
6. Air distribution to the windshield, face and feet.
7. Indication of the selected blower speed. Use the
rotary control to adjust.
8. A/C. Select for economy mode. Turns off the air
conditioning compressor.
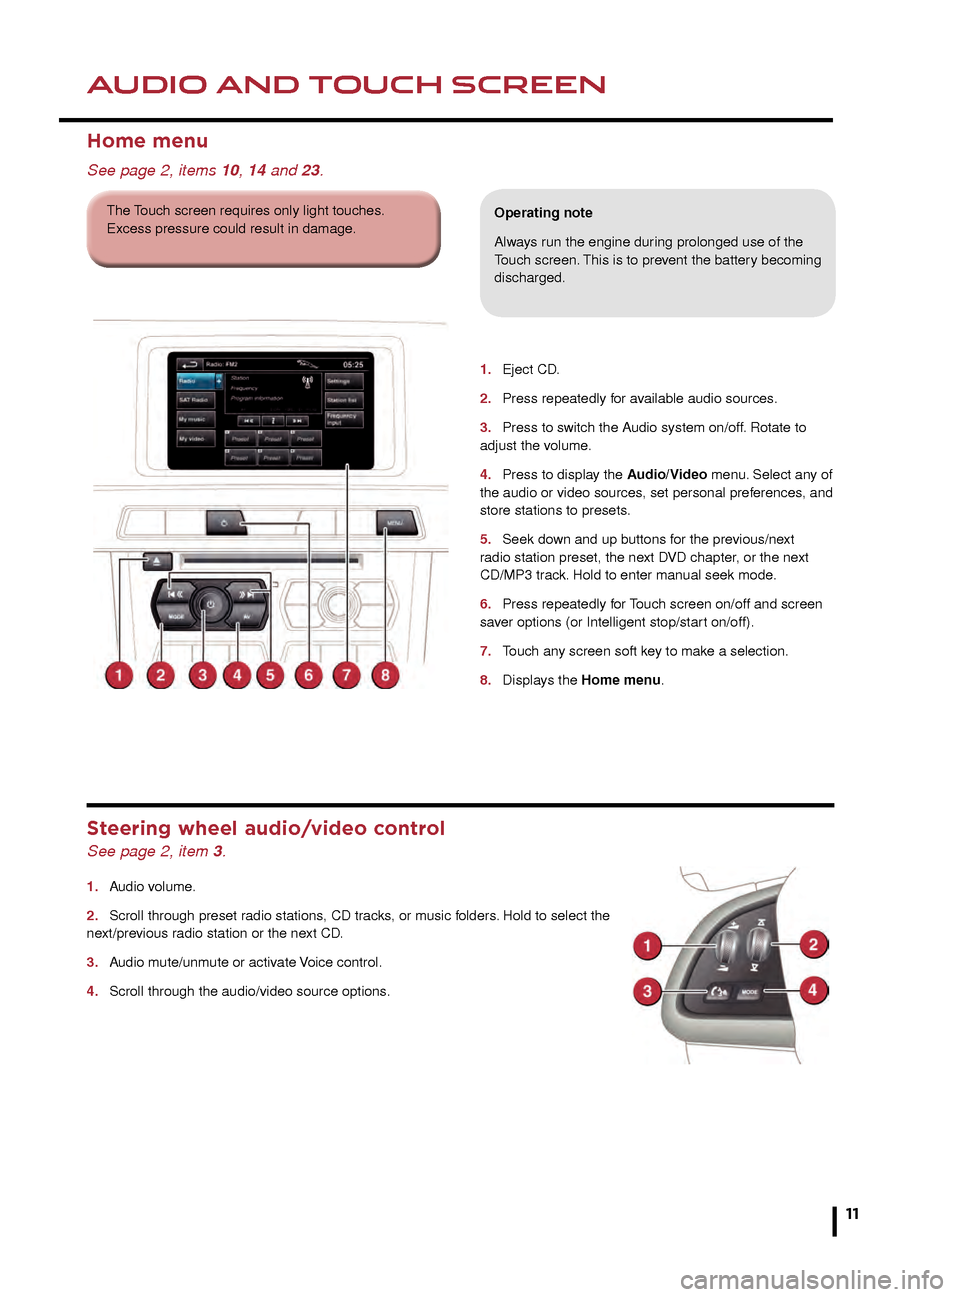
1. Eject CD .
2.
Press repeatedly f
or available audio sources.
3.
Press to s
witch the Audio system on/off. Rotate to
adjust the volume.
4.
Press to displa
y the Audio/Video menu. Select any of
the audio or video sources, set personal preferences, and
store stations to presets.
5.
Seek do
wn and up buttons for the previous/next
r
adio station preset, the next DVD chapter, or the next
CD/MP3 track. Hold to enter manual seek mode.
6.
Press repeatedly f
or Touch screen on/off and screen
saver options (or Intelligent stop/start on/off).
7.
T
ouch any screen soft key to make a selection.
8.
Displa
ys the Home menu.
Home menu
See page 2, items 10, 14 and 23.
Operating note
Always run the engine during prolonged use of the
Touch screen. This is to prevent the battery becoming
discharged.
Steering wheel audio/video control
See page 2, item 3.
1. Audio volume.
2.
Scroll through preset r
adio stations, CD tracks, or music folders. Hold to select the
next/previous radio station or the next CD.
3.
A
udio mute/unmute or activate Voice control.
4.
Scroll through the audio/video source options
.
The Touch screen requires only light touches.
Excess pressure could result in damage.
JJM189640151.indd 1126/02/2014 16:29:25
Page 13 of 16
AUDIO AND TOUCH SCREENAUDIO AND TOUCH SCREEN
13
CD player and portable media
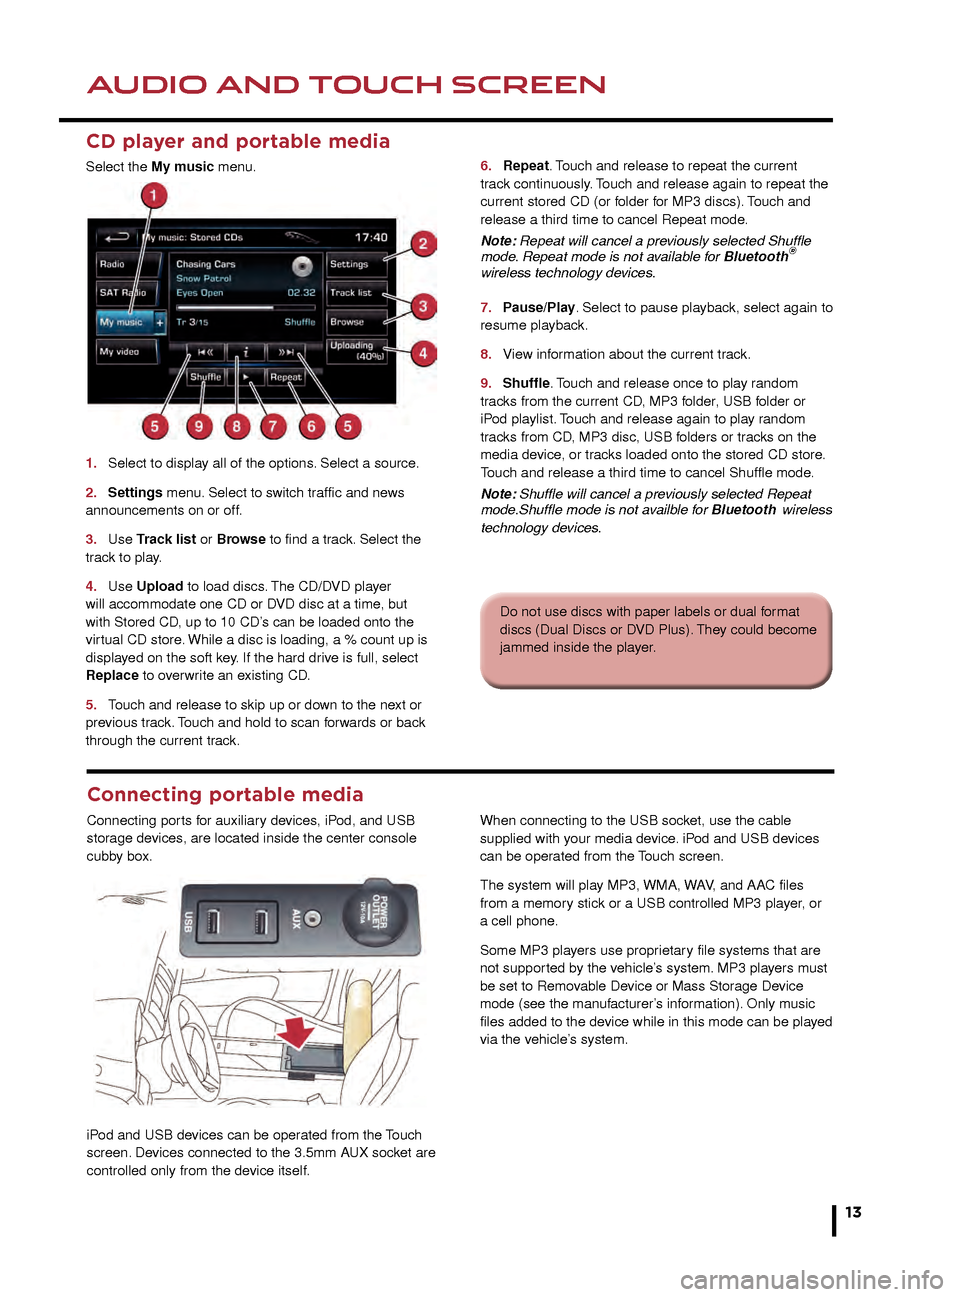
Select the My music menu.
1.
Select to displa
y all of the options. Select a source.
2
.
Settings
menu. Select to switch traffic and news
announcements on or off.
3.
Use
Track list or Browse to find a track. Select the
track to play.
4.
Use
Upload to load discs. The CD/DVD player
will accommodate one CD or DVD disc at a time, but
with Stored CD, up to 10 CD’s can be loaded onto the
virtual CD store. While a disc is loading, a % count up is
displayed on the soft key. If the hard drive is full, select
Replace to overwrite an existing CD.
5.
T
ouch and release to skip up or down to the next or
previous track. Touch and hold to scan forwards or back
through the current track. 6.
Repeat . Touch and release to repeat the current
track continuously. Touch and release again to repeat the
current stored CD (or folder for MP3 discs). Touch and
release a third time to cancel Repeat mode.
Note: Repeat will cancel a previously selected Shuffle
mode. Repeat mode is not available for Bluetooth
®
wireless technology devices.
7.
P
ause/Play. Select to pause playback, select again to
resume playback.
8.
Vie
w information about the current track.
9.
Shuffle
. Touch and release once to play random
tracks from the current CD, MP3 folder, USB folder or
iPod playlist. Touch and release again to play random
tracks from CD, MP3 disc, USB folders or tracks on the
media device, or tracks loaded onto the stored CD store.
Touch and release a third time to cancel Shuffle mode.
Note: Shuffle will cancel a previously selected Repeat
mode.Shuffle mode is not availble for Bluetooth
wireless
technology devices.
5. Settings. Select to make personal settings in
Options, Channel skip, and Parental lock areas.
6. Channel list. View a list of available categories.
7. Channel input. Select to access the touch pad. Enter
any 3 digit channel number and then select OK.
8. Browse. Touch to view a list of channel categories.
Select one to display full details of that channel and the
current track.
9. Add song. Store the currently playing track to the
song memory. If the Audio system subsequently finds a
stored track playing on a subscribed channel, notification
will be given.
Note: Use the seek buttons on the steering wheel to find
preset channels.
Activating satellite radio
1. Call SIRIUS on the displayed telephone number.
2. Provide them with the ID number, also displayed on
the screen.
You will also need your credit card. Make sure you are
parked with a clear view of the sky while activation takes
place. Activation can take up to 15 minutes.
3.
View information broadcast by the radio station.
4. Settings menu. Select from RDS, Traffic, News, AF
, and REG. The Advanced soft key allows favorite stations
to be set for traffic and news information.
5. Station list. Options are available only for FM
wavebands. All available FM stations will be listed. The list
can be sorted by Frequency, Name, or Category (pop,
news, sport), by selecting the appropriate soft key.
Autostore replaces Station list when an AM
waveband is selected. Select to store the 6 strongest AM
stations. These stations will be on the preset keys.
6. Frequency input. Enter a station frequency. When
the final digit is entered, the station will be tuned.
7. Preset soft keys. Can store 6 stations for each
waveband. Touch and hold a soft key to store the
current radio station.
Do not use discs with paper labels or dual format
discs (Dual Discs or DVD Plus). They could become
jammed inside the player.
Connecting portable media
Connecting ports for auxiliary devices, iPod, and USB
storage devices, are located inside the center console
cubby box.
iPod and USB devices can be operated from the Touch
screen. Devices connected to the 3.5mm AUX socket are
controlled only from the device itself.When connecting to the USB socket, use the cable
supplied with your media device. iPod and USB devices
can be operated from the Touch screen.
The system will play MP3, WMA, WAV, and AAC files
from a memory stick or a USB controlled MP3 player, or
a cell phone.
Some MP3 players use proprietary file systems that are
not supported by the vehicle’s system. MP3 players must
be set to Removable Device or Mass Storage Device
mode (see the manufacturer’s information). Only music
files added to the device while in this mode can be played
via the vehicle’s system.
JJM189640151.indd 1326/02/2014 16:29:31