Brake vacuum pump JAGUAR XFR 2010 1.G Workshop Manual
[x] Cancel search | Manufacturer: JAGUAR, Model Year: 2010, Model line: XFR, Model: JAGUAR XFR 2010 1.GPages: 3039, PDF Size: 58.49 MB
Page 8 of 3039

Parking Brake Module
Parking Brake Switch
Parking Brake Release Actuator206-06: Hydraulic Brake ActuationSpecificationDescription and OperationComponent Location
Overview
System Operation and Component DescriptionDiagnosis and TestingHydraulic Brake ActuationRemoval and InstallationBrake Fluid Reservoir (70.30.16)
Brake Master Cylinder (70.30.08)206-07: Power Brake ActuationSpecificationDescription and OperationComponent Location
OverviewDiagnosis and TestingPower Brake SystemRemoval and InstallationBrake Booster (70.50.17)
Brake Vacuum Pump - V8 5.0L Petrol/V8 S/C 5.0L Petrol206-09: Anti-Lock Control - Stability AssistSpecificationDescription and OperationComponent Location
Overview
System Operation and Component DescriptionDiagnosis and TestingAnti-Lock Control - Stability AssistRemoval and InstallationAnti-Lock Brake System (ABS) Module (70.60.02)
Front Wheel Speed Sensor
Hydraulic Control Unit (HCU) (70.60.18) (70.60.19)
Rear Wheel Speed Sensor (70.60.04)
Steering Wheel Rotation Sensor
Yaw Rate Sensor and Accelerometer211: Steering System
211-00: Steering System - General InformationSpecification
Page 586 of 3039

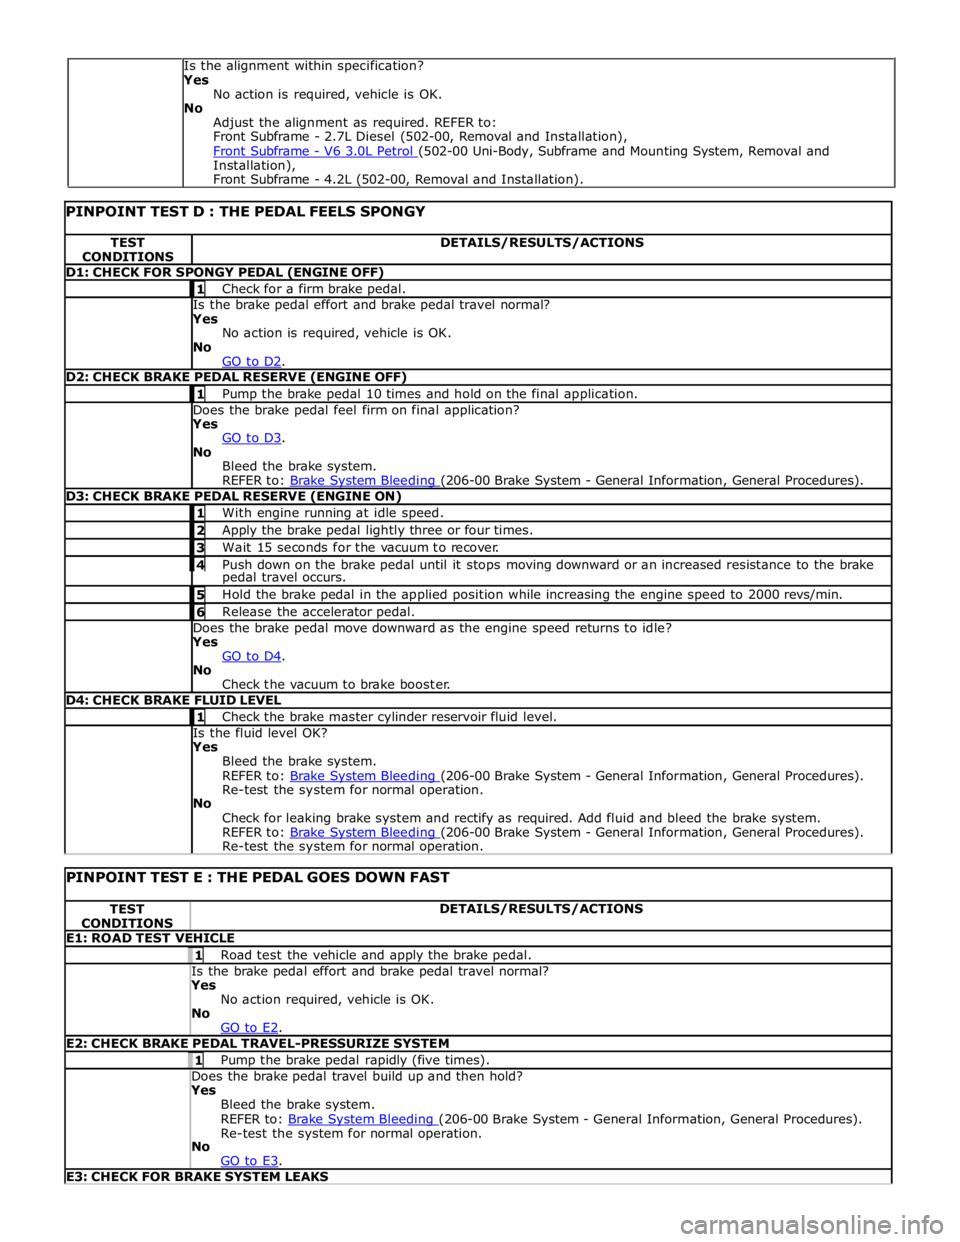
TEST
CONDITIONS DETAILS/RESULTS/ACTIONS D1: CHECK FOR SPONGY PEDAL (ENGINE OFF) 1 Check for a firm brake pedal. Is the brake pedal effort and brake pedal travel normal? Yes
No action is required, vehicle is OK.
No
GO to D2. D2: CHECK BRAKE PEDAL RESERVE (ENGINE OFF) 1 Pump the brake pedal 10 times and hold on the final application. Does the brake pedal feel firm on final application? Yes
GO to D3. No
Bleed the brake system.
REFER to: Brake System Bleeding (206-00 Brake System - General Information, General Procedures). D3: CHECK BRAKE PEDAL RESERVE (ENGINE ON) 1 With engine running at idle speed. 2 Apply the brake pedal lightly three or four times. 3 Wait 15 seconds for the vacuum to recover. 4 Push down on the brake pedal until it stops moving downward or an increased resistance to the brake pedal travel occurs. 5 Hold the brake pedal in the applied position while increasing the engine speed to 2000 revs/min. 6 Release the accelerator pedal. Does the brake pedal move downward as the engine speed returns to idle? Yes
GO to D4. No
Check the vacuum to brake booster. D4: CHECK BRAKE FLUID LEVEL 1 Check the brake master cylinder reservoir fluid level. Is the fluid level OK? Yes
Bleed the brake system.
REFER to: Brake System Bleeding (206-00 Brake System - General Information, General Procedures). Re-test the system for normal operation.
No
Check for leaking brake system and rectify as required. Add fluid and bleed the brake system.
REFER to: Brake System Bleeding (206-00 Brake System - General Information, General Procedures). Re-test the system for normal operation.
PINPOINT TEST E : THE PEDAL GOES DOWN FAST TEST
CONDITIONS DETAILS/RESULTS/ACTIONS E1: ROAD TEST VEHICLE 1 Road test the vehicle and apply the brake pedal. Is the brake pedal effort and brake pedal travel normal? Yes
No action required, vehicle is OK.
No
GO to E2. E2: CHECK BRAKE PEDAL TRAVEL-PRESSURIZE SYSTEM 1 Pump the brake pedal rapidly (five times). Does the brake pedal travel build up and then hold? Yes
Bleed the brake system.
REFER to: Brake System Bleeding (206-00 Brake System - General Information, General Procedures). Re-test the system for normal operation.
No
GO to E3. E3: CHECK FOR BRAKE SYSTEM LEAKS Is the alignment within specification?
Yes
No action is required, vehicle is OK.
No
Adjust the alignment as required. REFER to:
Front Subframe - 2.7L Diesel (502-00, Removal and Installation),
Front Subframe - V6 3.0L Petrol (502-00 Uni-Body, Subframe and Mounting System, Removal and Installation),
Front Subframe - 4.2L (502-00, Removal and Installation).
Page 588 of 3039

Inspect the brake booster, rubber grommet, and all vacuum plumbing for cracks, holes, damaged connections, or missing clamps. 4 Pump the brake pedal several times to exhaust the vacuum. Push down on the brake pedal and hold. Does the brake pedal move down when the engine is started?
Yes
Vacuum system is OK.
No
GO to G4. G4: CHECK POWER BRAKE BOOSTER VALVE 1 Check the brake booster valve. For additional information, refer to Brake Booster component test in this section. Is the power brake booster valve OK?
Yes
Check the brake booster. For additional information, refer to Brake Booster component test in this
section. Install a new brake booster as required. REFER to:
Brake Booster (206-07 Power Brake Actuation, Removal and Installation), Brake Booster - RHD (206-07, Removal and Installation).
Re-test the system for normal operation.
No
Install a new brake booster valve. Re-test the system for normal operation.
PINPOINT TEST H : BRAKE LOCKUP DURING LIGHT BRAKE PEDAL FORCE TEST
CONDITIONS DETAILS/RESULTS/ACTIONS H1: TEST BRAKE LOCKUP 1 Road test the vehicle and apply the brake pedal lightly. Do the brakes lockup?
Yes
GO to H2. No
No action required, vehicle is OK. H2: INSPECT BRAKE PADS 1 Inspect brake pads for contamination, correct installation, damage and type. Has a concern been identified?
Yes
Correctly install or install new brake pads as required. REFER to:
Brake Pads - Vehicles With: Standard Brakes (206-03A Front Disc Brake - V6 3.0L Petrol, Removal and Installation),
Brake Pads - Vehicles With: High Performance Brakes (206-03A Front Disc Brake - V6 3.0L Petrol, Removal and Installation),
Brake Pads (206-04A Rear Disc Brake - V6 3.0L Petrol, Removal and Installation), Brake Pads - Vehicles With: High Performance Brakes (206-04, Removal and Installation).
Re-test the system for normal operation.
No
GO to H3. H3: INSPECT BRAKE CALIPERS 1 Inspect brake calipers for binding, leaking or sticking. Has a concern been identified?
Yes
Correctly install or install new brake calipers as required. REFER to:
Brake Caliper - Vehicles With: Standard Brakes (206-03A Front Disc Brake - V6 3.0L Petrol, Removal and Installation),
Brake Caliper - Vehicles With: High Performance Brakes (206-03A Front Disc Brake - V6 3.0L Petrol, Removal and Installation),
Brake Caliper (206-04A Rear Disc Brake - V6 3.0L Petrol, Removal and Installation), Brake Caliper - Vehicles With: High Performance Brakes (206-04, Removal and Installation).
Re-test the system for normal operation.
No
No action required, vehicle is OK.
PINPOINT TEST I : BRAKES DRAG TEST
CONDITIONS DETAILS/RESULTS/ACTIONS I1: ROAD TEST VEHICLE 1 Road test the vehicle and apply the brakes. Are the brakes functioning correctly? Yes
No action required, vehicle is OK.
No
GO to I2. I2: CHECK BRAKE CALIPERS 1 Check the front and rear calipers pistons and pins for binding, leaking or sticking.
Page 590 of 3039

Does the brake pedal return to its original position? Yes
No action required, vehicle is OK.
No
GO to K2. K2: CHECK FOR BRAKE PEDAL BINDING 1 Disconnect the brake booster from the brake pedal. Check the brake pedal to ensure free operation. Is the brake pedal operating freely? Yes
Install a new brake booster as required. REFER to:
Brake Booster (206-07 Power Brake Actuation, Removal and Installation), Brake Booster - RHD (206-07, Removal and Installation).
Re-test the system for normal operation.
No
Repair or install new brake pedal. Re-test the system for normal operation. Component Tests
Brake Booster
1. Check all hoses and connections. All unused vacuum connectors should be capped. Hoses and their connections should
be correctly secured and in good condition with no holes and no collapsed areas. Inspect the valve on the brake booster
for damage.
2. Check the hydraulic brake system for leaks or low fluid.
3. With the automatic transmission in PARK, stop the engine and apply the parking brake. Pump the brake pedal several
times to exhaust all vacuum in the system. With the engine switched off and all vacuum in the system exhausted,
apply the brake pedal and hold it down. Start the engine. If the vacuum system is operating, the brake pedal will tend
to move downward under constant foot pressure. If no motion is felt, the vacuum booster system is not functioning.
4. Remove the vacuum hose from the brake booster. Manifold vacuum should be available at the brake booster end of the
hose with the engine at idle speed and the automatic transmission in PARK. Make sure that all unused vacuum outlets
are correctly capped, hose connectors are correctly secured and vacuum hoses are in good condition. When it is
established that manifold vacuum is available to the brake booster, connect the vacuum hose to the brake booster and
repeat Step 3. If no downward movement of the brake pedal is felt, install a new brake booster.
5. Operate the engine for a minimum of 10 seconds at a fast idle. Stop the engine and allow the vehicle to stand for 10
minutes. Then, apply the brake pedal with approximately 89 N (20lb) of force. The pedal feel (brake application) should
be the same as that noted with the engine running. If the brake pedal feels hard (no power assist), install a new valve
and then repeat the test. If the brake pedal still feels hard, install a new brake booster. If the brake pedal movement
feels spongy, bleed the brake system.
REFER to: Brake System Bleeding (206-00 Brake System - General Information, General Procedures). Brake Master Cylinder
Usually, the first and strongest indicator of anything wrong in the brake system is a feeling through the brake pedal. In
diagnosing the condition of the brake master cylinder, check pedal feel as evidence of a brake concern. Check for brake warning
lamp illumination and the brake fluid level in the brake master cylinder reservoir.
Normal Conditions
The following conditions are considered normal and are not indications that the brake master cylinder is in need of repair.
Modern brake systems are designed to produce a pedal effort that is not as hard as in the past. Complaints of light
pedal efforts should be compared to the pedal efforts of another vehicle of the same model and year.
The fluid level will fall with brake pad wear.
Abnormal Conditions
Changes in the brake pedal feel or brake pedal travel are indicators that something could be wrong in the brake system. The
diagnostic procedure and techniques use brake pedal feel, warning indicator illumination and low brake fluid level as indicators
to diagnosing brake system concerns. The following conditions are considered abnormal and indicate that the brake master
cylinder is in need of repair:
NOTE: Prior to carrying out any diagnosis, make sure the brake system warning indicator is functional.
Brake pedal goes down fast. This could be caused by an external or internal leak.
Brake pedal goes down slowly. This could be caused by an internal or external leak.
Brake pedal is low or feels spongy. This condition may be caused by no fluid in the brake master cylinder, reservoir cap
vent holes clogged or air in the hydraulic system.
Brake pedal effort is excessive. This may be caused by a bind or obstruction in the pedal/linkage, a faulty non-return
valve, booster or insufficient booster vacuum.
Rear brakes lock up during light pedal force. This may be caused by damaged brake pads, a partially applied parking
brake, a damaged ABS sensor or bearing failure.
Brake pedal effort erratic. This condition could be caused by the brake booster or incorrectly installed brake pads.
Brake warning indicator is on. This may be caused by low fluid level or float assembly damaged. www.JagDocs.com
Page 679 of 3039

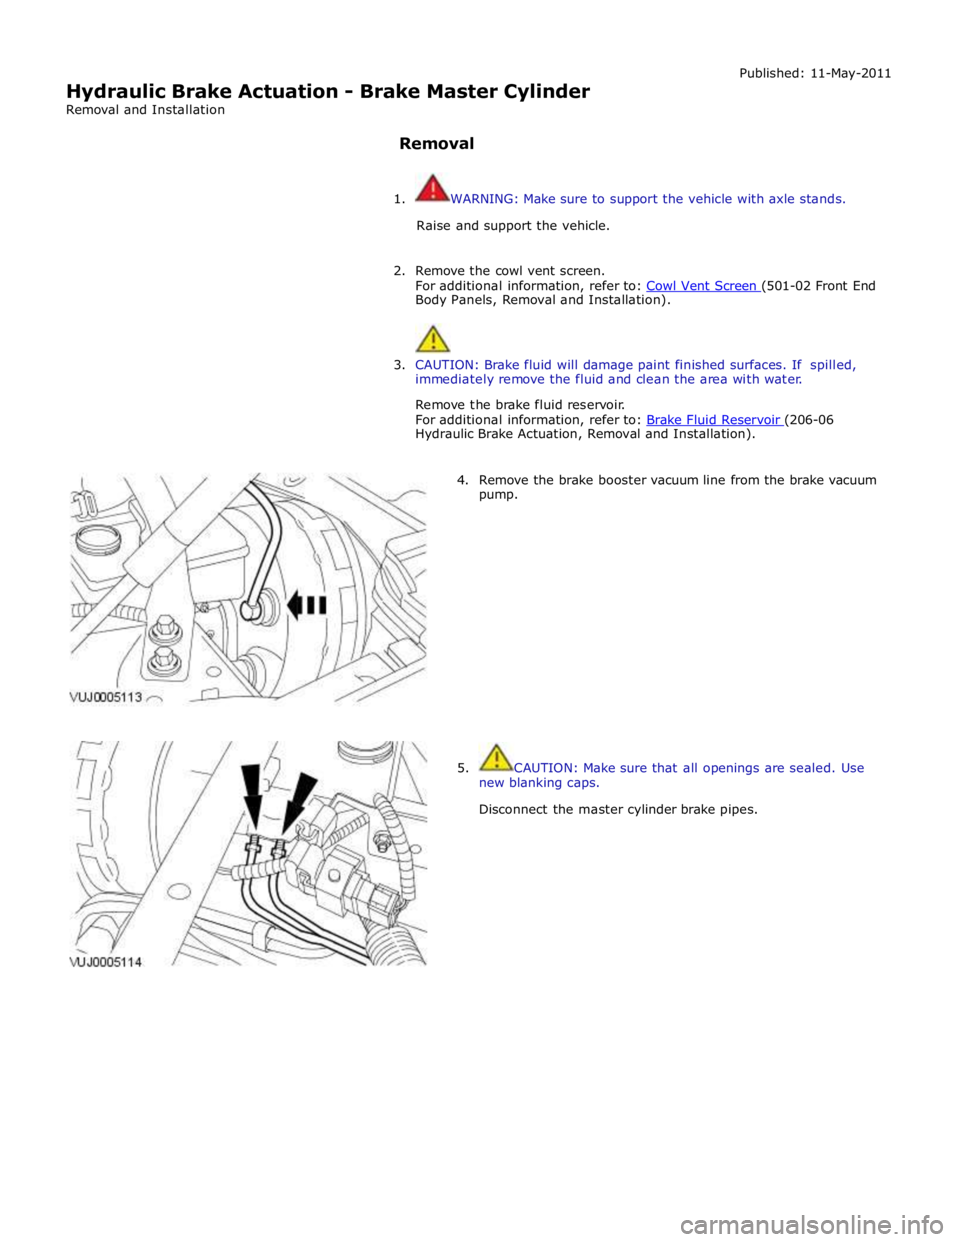
Hydraulic Brake Actuation - Brake Master Cylinder
Removal and Installation
Removal Published: 11-May-2011
1. WARNING: Make sure to support the vehicle with axle stands.
Raise and support the vehicle.
2. Remove the cowl vent screen.
For additional information, refer to: Cowl Vent Screen (501-02 Front End Body Panels, Removal and Installation).
3. CAUTION: Brake fluid will damage paint finished surfaces. If spilled,
immediately remove the fluid and clean the area with water.
Remove the brake fluid reservoir.
For additional information, refer to: Brake Fluid Reservoir (206-06 Hydraulic Brake Actuation, Removal and Installation).
4. Remove the brake booster vacuum line from the brake vacuum
pump.
5. CAUTION: Make sure that all openings are sealed. Use
new blanking caps.
Disconnect the master cylinder brake pipes.
Page 682 of 3039

Brake booster retaining nuts - all vehicles 25 18 - Exhaust gas recirculation valve coolant pipe - vehicles with 3.0L Diesel 9 - 80 Brake vacuum pump nut - vehicles with 3.0L Diesel 23 17 - Brake vacuum pump threaded stud - vehicles with 3.0L Diesel 13 10 - Brake vacuum pump bolts - vehicles with 3.0L Diesel 23 17 - Brake vacuum pump bolts - vehicles with 5.0L 12 9 -
Page 688 of 3039

Published: 08-Oct-2012
Power Brake Actuation - Brake Vacuum Pump V8 5.0L Petrol/V8 S/C 5.0L
Petrol
Removal and Installation
Removal
CAUTION: Make sure that all openings are sealed. Use new blanking caps.
NOTE: Removal steps in this procedure may contain installation details.
1. WARNING: Make sure to support the vehicle with axle stands.
Raise and support the vehicle.
2. Refer to: Engine Oil Draining and Filling (303-01, General Procedures).
3.
4. CAUTION: Be prepared to collect escaping oil.
Torque: 12 Nm
Page 1079 of 3039

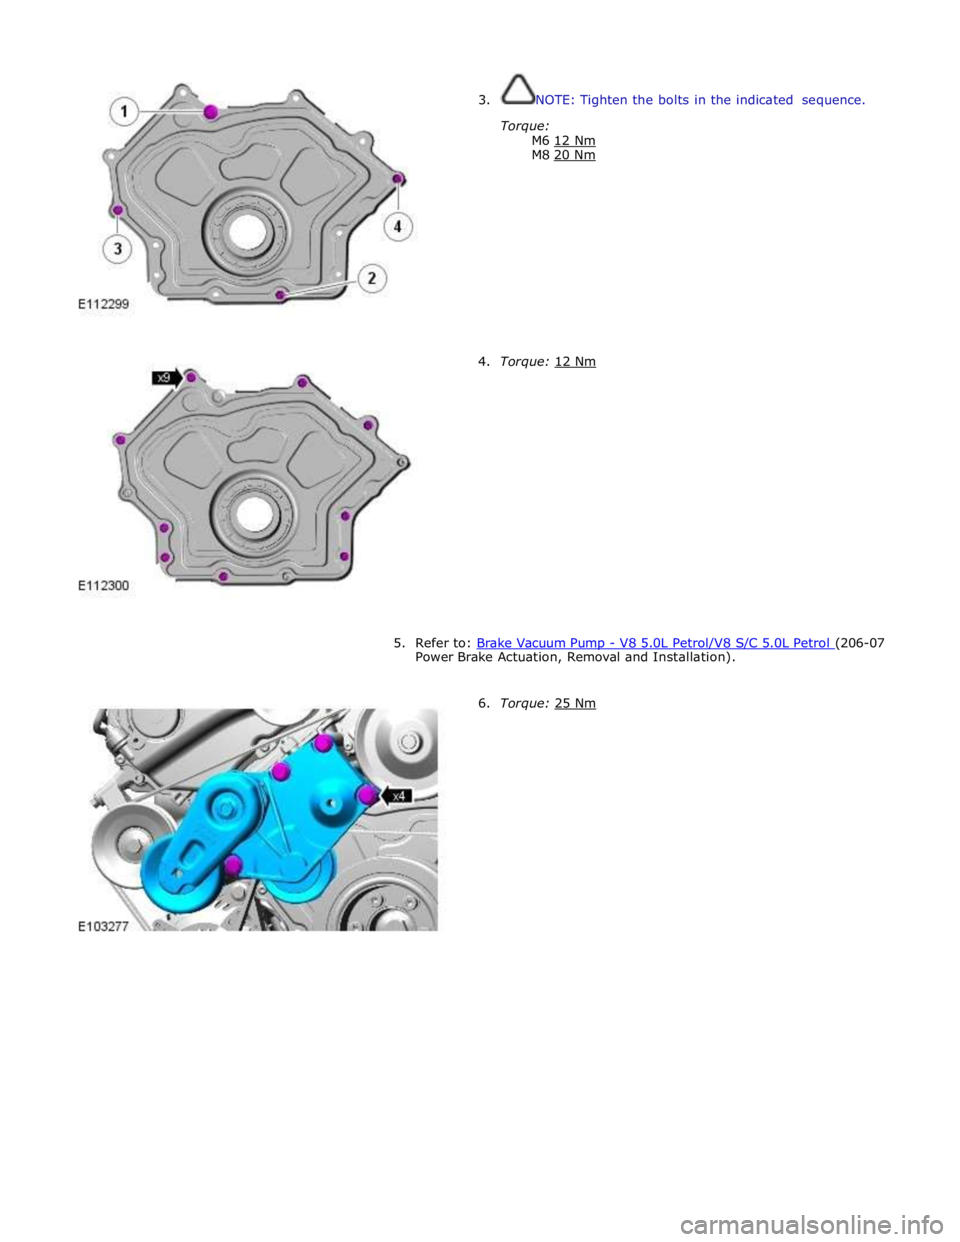
3. NOTE: Tighten the bolts in the indicated sequence.
Torque:
M6 12 Nm M8 20 Nm
4. Torque: 12 Nm
5. Refer to: Brake Vacuum Pump - V8 5.0L Petrol/V8 S/C 5.0L Petrol (206-07 Power Brake Actuation, Removal and Installation).
6. Torque: 25 Nm