torque JAGUAR XJ 1994 2.G AJ16 Engine Manual
[x] Cancel search | Manufacturer: JAGUAR, Model Year: 1994, Model line: XJ, Model: JAGUAR XJ 1994 2.GPages: 73, PDF Size: 2.06 MB
Page 37 of 73
AJ16 Engine Service Manual
. The dimension must be taken between the valve stem and
the back of the cam. Should
this dimension not be ob-
tained, metal must be ground from thevalveseat of the in-
sert.
&&: Use only suitable grinding equipment.
* Remove only very small amounts of metal from the valve
seat at one time before re-checking the clearance.
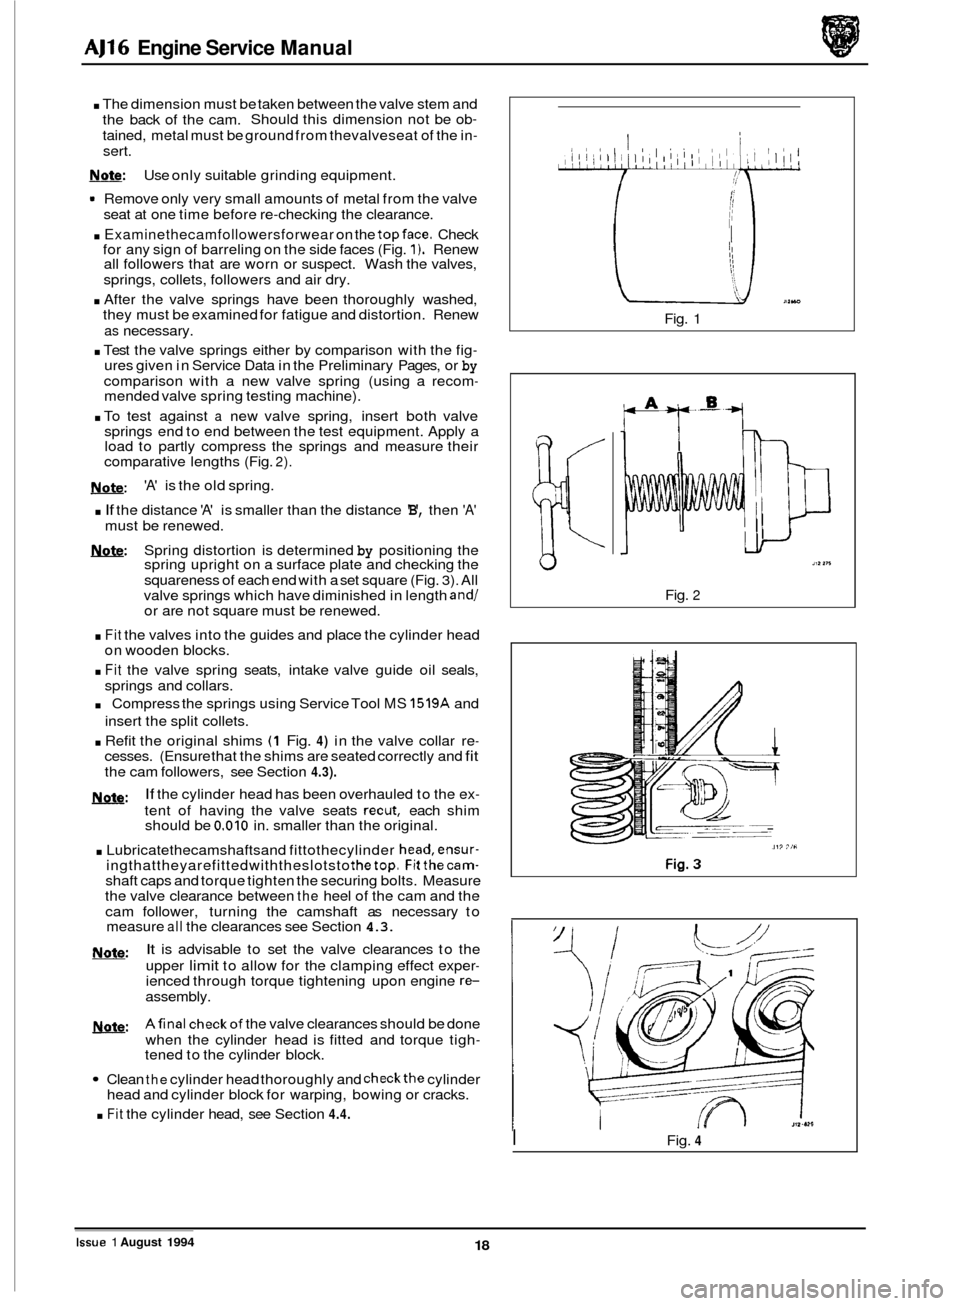
. Examinethecamfollowersforwear on the topface. Check
for any sign of barreling on the side faces (Fig. 1). Renew
all followers that are worn or suspect. Wash the valves,
springs, collets, followers and air dry.
. After the valve springs have been thoroughly washed,
they must be examined for fatigue and distortion. Renew
as necessary.
. Test the valve springs either by comparison with the fig- ures given in Service Data in the Preliminary Pages, or by
comparison with a new valve spring (using a recom- mended valve spring testing machine).
. To test against a new valve spring, insert both valve
springs end to end between the test equipment. Apply a
load to partly compress the springs and measure their
comparative lengths (Fig.
2).
&@:
. If the distance 'A' is smaller than the distance 'B', then 'A'
b: Spring distortion is determined by positioning the
spring upright on a surface plate and checking the
squareness of each end with a set square (Fig.
3). All
valve springs which have diminished in length and/ or are not square must be renewed.
. Fit the valves into the guides and place the cylinder head
on wooden blocks.
. Fit the valve spring seats, intake valve guide oil seals,
springs and collars.
. Compress the springs using Service Tool MS 1519A and
insert the split collets.
. Refit the original shims (1 Fig. 4) in the valve collar re- cesses. (Ensure that the shims are seated correctly and fit
the cam followers, see Section 4.3).
If the cylinder head has been overhauled to the ex-
tent of having the valve seats recut, each shim
should be 0,010 in. smaller than the original.
. Lubricatethecamshaftsand fittothecylinder head,ensur- ingthattheyarefittedwiththeslotsto thetop. Fitthecam- shaft caps and torque tighten the securing bolts. Measure
the valve clearance between the heel of the cam and the
cam follower, turning the camshaft as necessary to
measure
all the clearances see Section 4.3.
It is advisable to set the valve clearances to the
upper
limit to allow for the clamping effect exper- ienced through torque tightening upon engine re- assembly.
Afinal checkof the valve clearances should be done
when the cylinder head is fitted and torque tigh
- tened to the cylinder block.
Clean the cylinder head thoroughly and checkthe cylinder
head and cylinder block for warping, bowing or cracks.
. Fit the cylinder head, see Section 4.4.
'A' is the old spring.
must be renewed.
&&:
m:
&@:
Fig. 1
K
Fig. 2
I Fig. 4
Issue 1 August 1994 18
Page 38 of 73
0 4.6 Cylinder Head Casting, Renew
SRO 12.29.15
1 Remove the cylinder head, see Section 4.4.
1 Place the cylinder head on suitable blocks on a bench.
1 Remove the spark plugs.
1 Remove the intake valve camshaft cap securing bolts.
1 Remove the camshaft caps.
1 Remove the camshaft.
1 Repeat the procedure for the exhaust camshaft.
1 Remove the cam followers and shims, noting the posi-
1 Remove the valves using Service Tool MS 1519A valve
1 Remove the seals from the intake valve guides.
1 Remove the rear blanking plate.
1 Clean all components and examine for wear and damage.
Renew any worn or damaged parts as necessary.
1 Clean thoroughly the new cylinder head casting.
1 Refit the rear blanking plate to the new cylinder head.
0 1 Smearfinegrindingcompound on tothe face ofonevalve.
1 Oil the valve stem.
1 Fit the valve to the head.
1 Lightly lap the valves into the seats, leaving a smooth fin-
ish to both surfaces.
Note: Excessive lapping will groove the valve face, result- ing in poor seating when hot.
1 Clean the valve and seat.
1 Repeat the procedure for the remaining valves.
1 Fit a new seal to the intake valve guide.
1 Lubricate the valve stem. Fit the valve to the guide. Fit the
. Fit Service Tool MS 1519A spring compressor to the valve.
1 Compress the valve spring, fit and seat the collets, and re- lease the clamp.
1 Repeat the procedure for the remaining valves.
. Refit the shims.
1 Ensure that the shims are seated correctly.
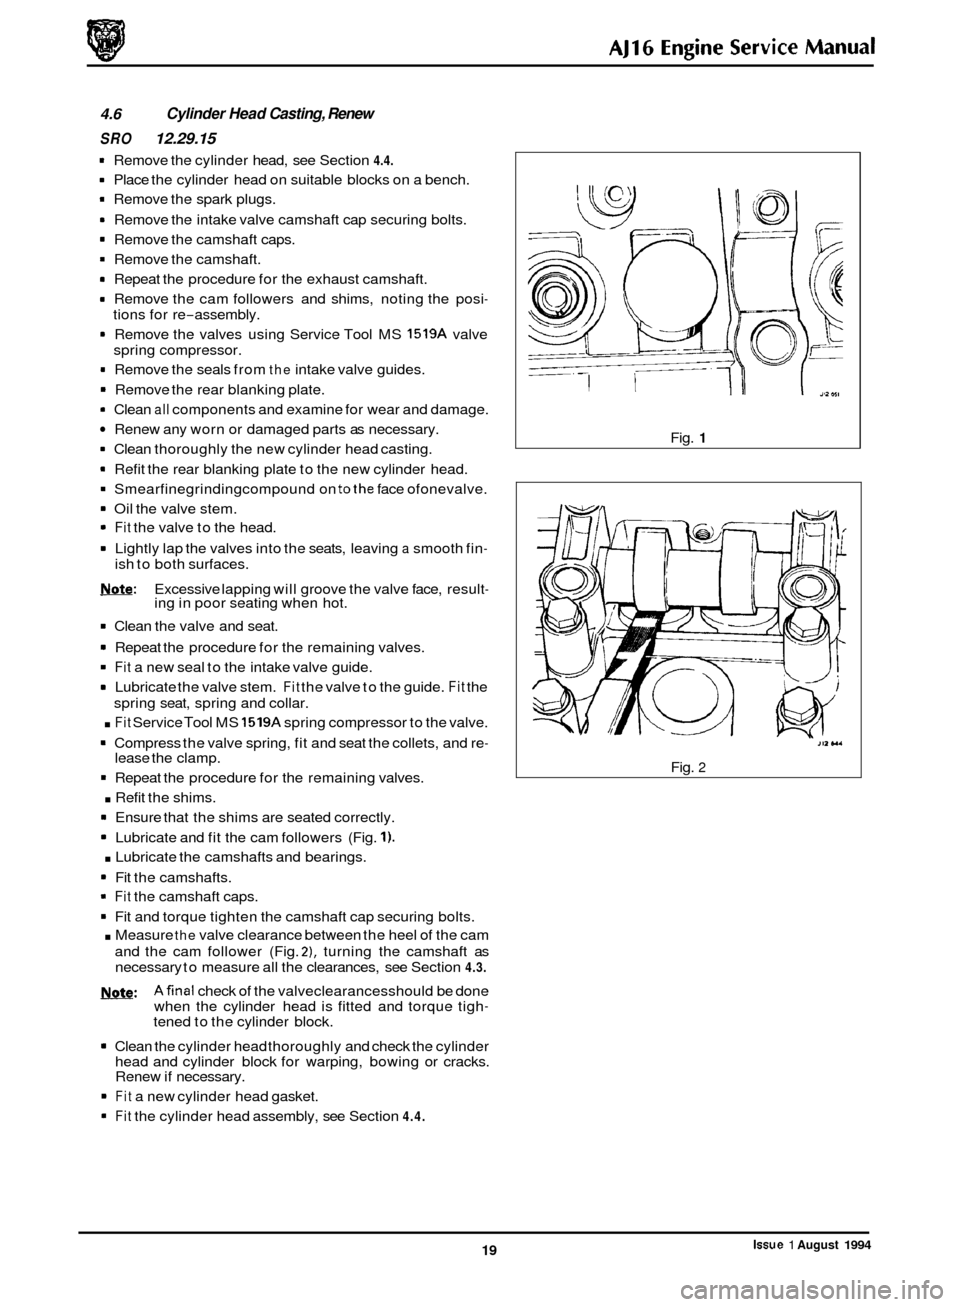
1 Lubricate and fit the cam followers (Fig. 1).
. Lubricate the camshafts and bearings.
1 Fit the camshafts.
1 Fit the camshaft caps.
1 Fit and torque tighten the camshaft cap securing bolts.
. Measure the valve clearance between the heel of the cam
and the cam follower (Fig.
21, turning the camshaft as
necessary to measure all the clearances, see Section 4.3.
Afinal check of the valveclearancesshould be done
when the cylinder head is fitted and torque tigh- tened to the cylinder block.
1 Clean the cylinder head thoroughly and check the cylinder
head and cylinder block for warping, bowing or cracks.
Renew if necessary.
tions
for re
-assembly.
spring compressor.
spring seat, spring and collar.
Note:
1 Fit a new cylinder head gasket.
1 Fit the cylinder head assembly, see Section 4.4.
I II
Fig. 1
JI1 U4
Fig. 2
Issue 1 August 1994 19
Page 40 of 73
AJ16 Engine Service Manual
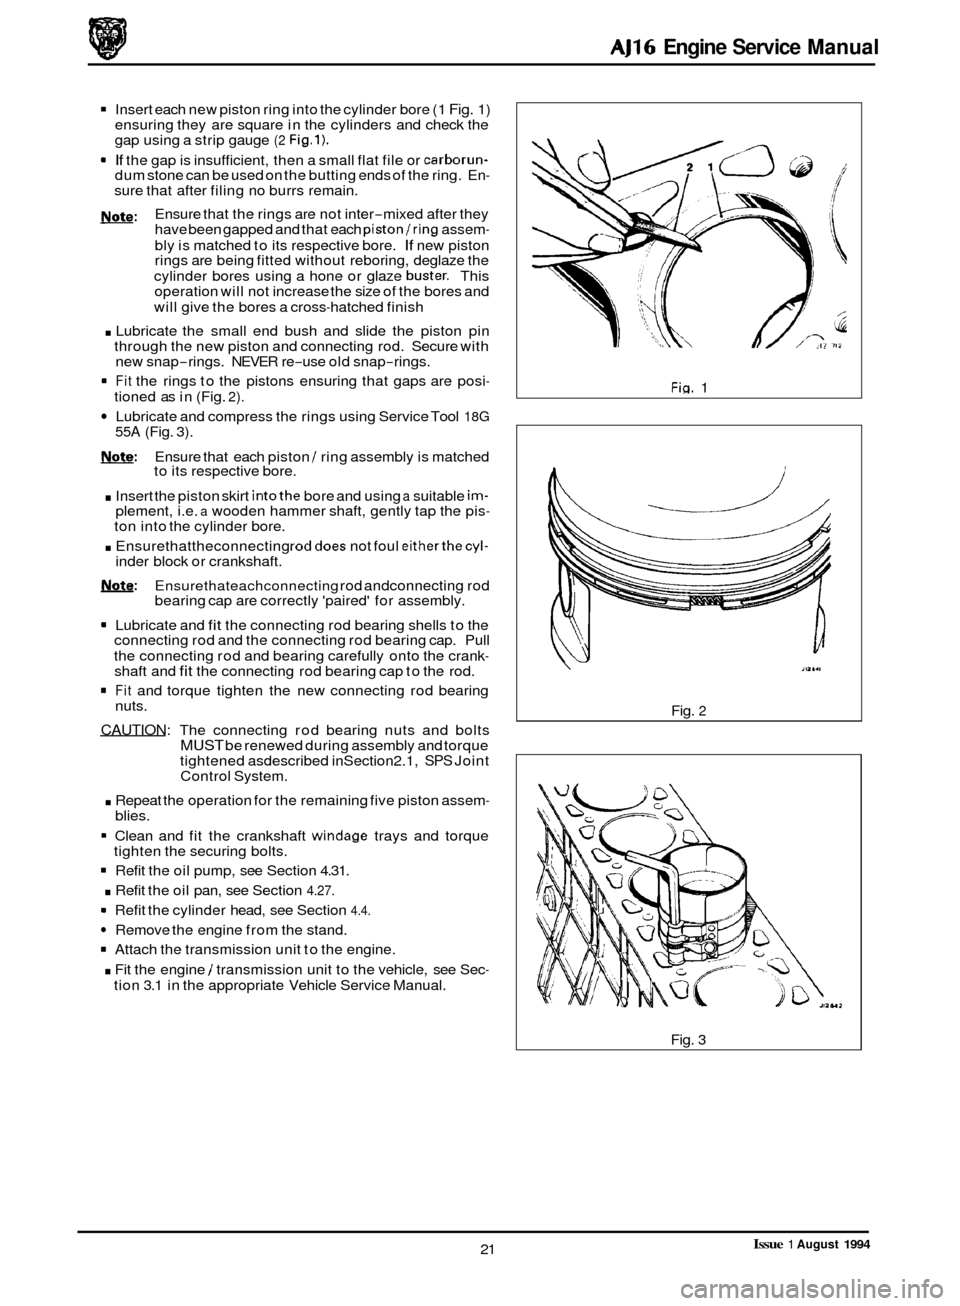
Insert each new piston ring into the cylinder bore (1 Fig. 1)
ensuring they are square in the cylinders and check the
gap using a strip gauge
(2 Fig.1).
9 If the gap is insufficient, then a small flat file or carborun- dum stone can be used on the butting ends of the ring. En- sure that after filing no burrs remain.
Ensure that the rings are not inter
-mixed after they
have been gapped and that each piston/ring assem-
bly is matched to its respective bore. If new piston
rings are being fitted without reboring, deglaze the
cylinder bores using a hone or glaze
buster. This
operation will not increase the size of the bores and
will give the bores a cross
-hatched finish
. Lubricate the small end bush and slide the piston pin
through the new piston and connecting rod. Secure with
new snap
-rings. NEVER re-use old snap-rings.
Fit the rings to the pistons ensuring that gaps are posi- tioned as in (Fig. 2).
Lubricate and compress the rings using Service Tool 18G 55A (Fig. 3).
w:
b: Ensure that each piston / ring assembly is matched
to its respective bore.
. Insert the piston skirt intothe bore and using a suitable im- 0
plement, i.e. a wooden hammer shaft, gently tap the pis- ton into the cylinder bore.
. Ensurethattheconnecting roddoes not foul eitherthecyl- inder block or crankshaft.
Note: Ensurethateachconnecting rod andconnecting rod
m Lubricate and fit the connecting rod bearing shells to the
connecting rod and the connecting rod bearing cap. Pull
the connecting rod and bearing carefully onto the crank
- shaft and fit the connecting rod bearing cap to the rod.
Fit and torque tighten the new connecting rod bearing
nuts.
CAUTION: The connecting rod bearing nuts and bolts MUST be renewed during assembly and torque
tightened asdescribed inSection2.1, SPS Joint
Control System.
. Repeat the operation for the remaining five piston assem-
bearing cap are correctly 'paired' for assembly.
blies.
Clean and fit the crankshaft
windage trays and torque
-
0 - - tighten the securing bolts.
Refit the oil pump, see Section 4.31.
. Refit the oil pan, see Section 4.27.
Refit the cylinder head, see Section 4.4.
Remove the engine from the stand.
Attach the transmission unit to the engine.
. Fit the engine / transmission unit to the vehicle, see Sec- tion 3.1 in the appropriate Vehicle Service Manual.
Fin. 1
itl6.l
Fig. 2
Fig. 3
Issue 1 August 1994 21
Page 41 of 73
AJ16 Engine Service Manual
4.8
SRO 12.17.16
Remove components as required for access and proceed as
follows.
Remove the oil pan, see Section 4.27.
. Remove the bolts securing the crankshaft windage trays
. Rotate the crankshaft for access to the first connecting rod.
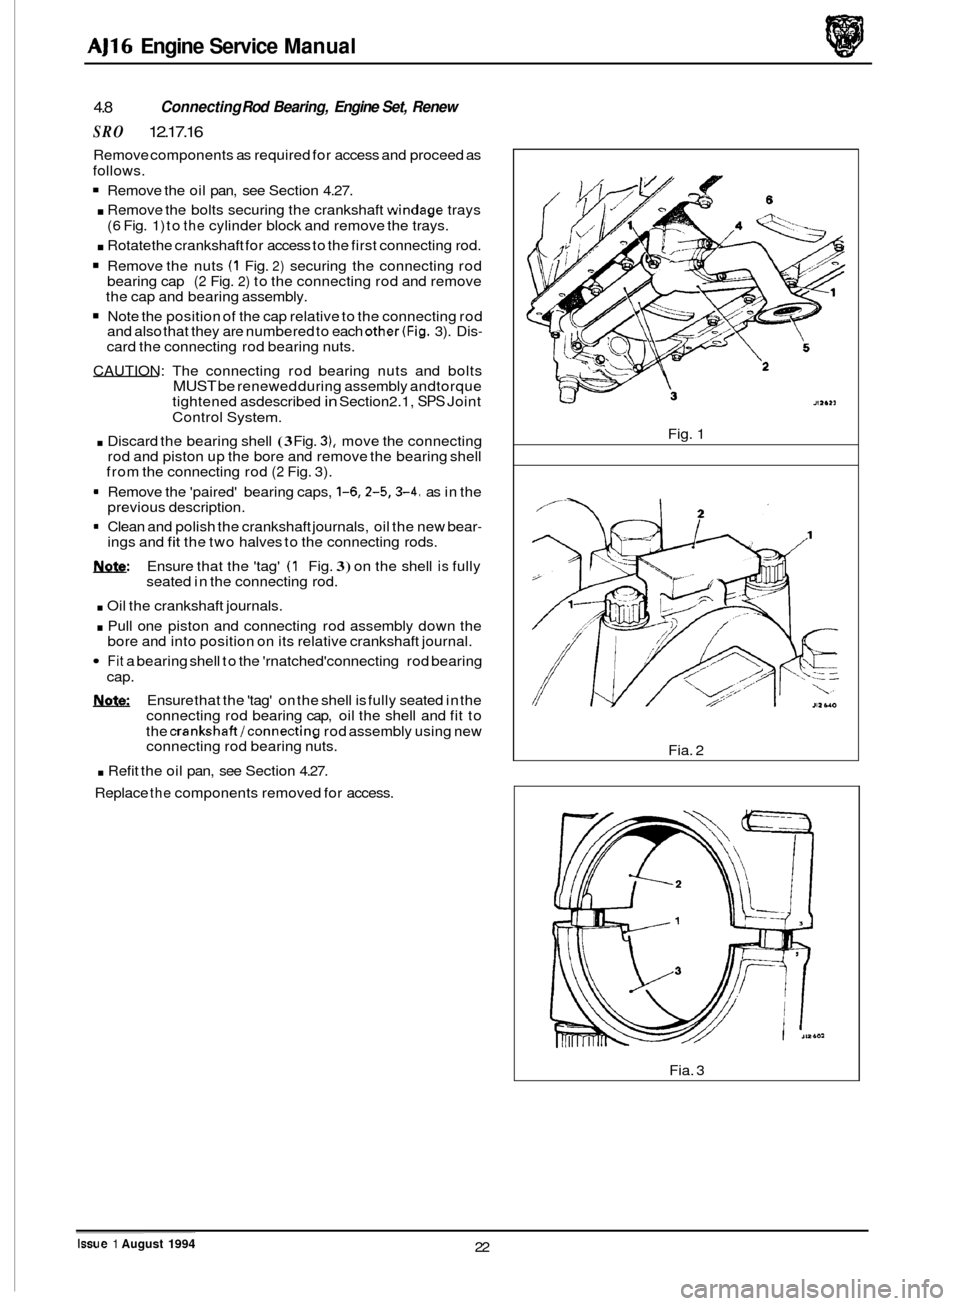
Remove the nuts (1 Fig. 2) securing the connecting rod
bearing cap (2 Fig. 2) to the connecting rod and remove
the cap and bearing assembly.
Note the position of the cap relative to the connecting rod
and also that they are numbered to each other(Fig. 3). Dis- card the connecting rod bearing nuts.
CAUTION: The connecting rod bearing nuts and bolts
MUST be renewed during assembly and torque
tightened asdescribed in Section2.1, SPS Joint
Control
System.
. Discard the bearing shell (3 Fig. 31, move the connecting
rod and piston up the bore and remove the bearing shell
from the connecting rod
(2 Fig. 3).
9 Remove the 'paired' bearing caps, 1-6,2-5,3-4. as in the
previous description.
9 Clean and polish the crankshaft journals, oil the new bear- ings and fit the two halves to the connecting rods.
Ensure that the 'tag'
(1 Fig. 3) on the shell is fully
seated in the connecting rod.
Connecting Rod Bearing, Engine Set, Renew
(6 Fig. 1) to the cylinder block and remove the trays.
. Oil the crankshaft journals.
. Pull one piston and connecting rod assembly down the
bore and into position on its relative crankshaft journal.
Fit a bearing shell to the 'rnatched'connecting rod bearing
cap.
Ensure that the 'tag' on the shell is fully seated in the
connecting rod bearing cap, oil the shell and fit to
the
crankshaft/connecting rod assembly using new
connecting rod bearing nuts.
. Refit the oil pan, see Section 4.27.
Replace
the components removed for access. Fig.
1
Fia. 2
Fia. 3 ~~
Issue 1 August 1994 22
Page 42 of 73
AJ16 Engine Service Manual
4.9
SRO 12.21.39
Main Bearing, Engine Set, Renew
Remove components required for access and proceed as fol- lows.
1 Remove the oil pan see, see Section 4.27.
1 Remove the oil pump, see Section 4.31.
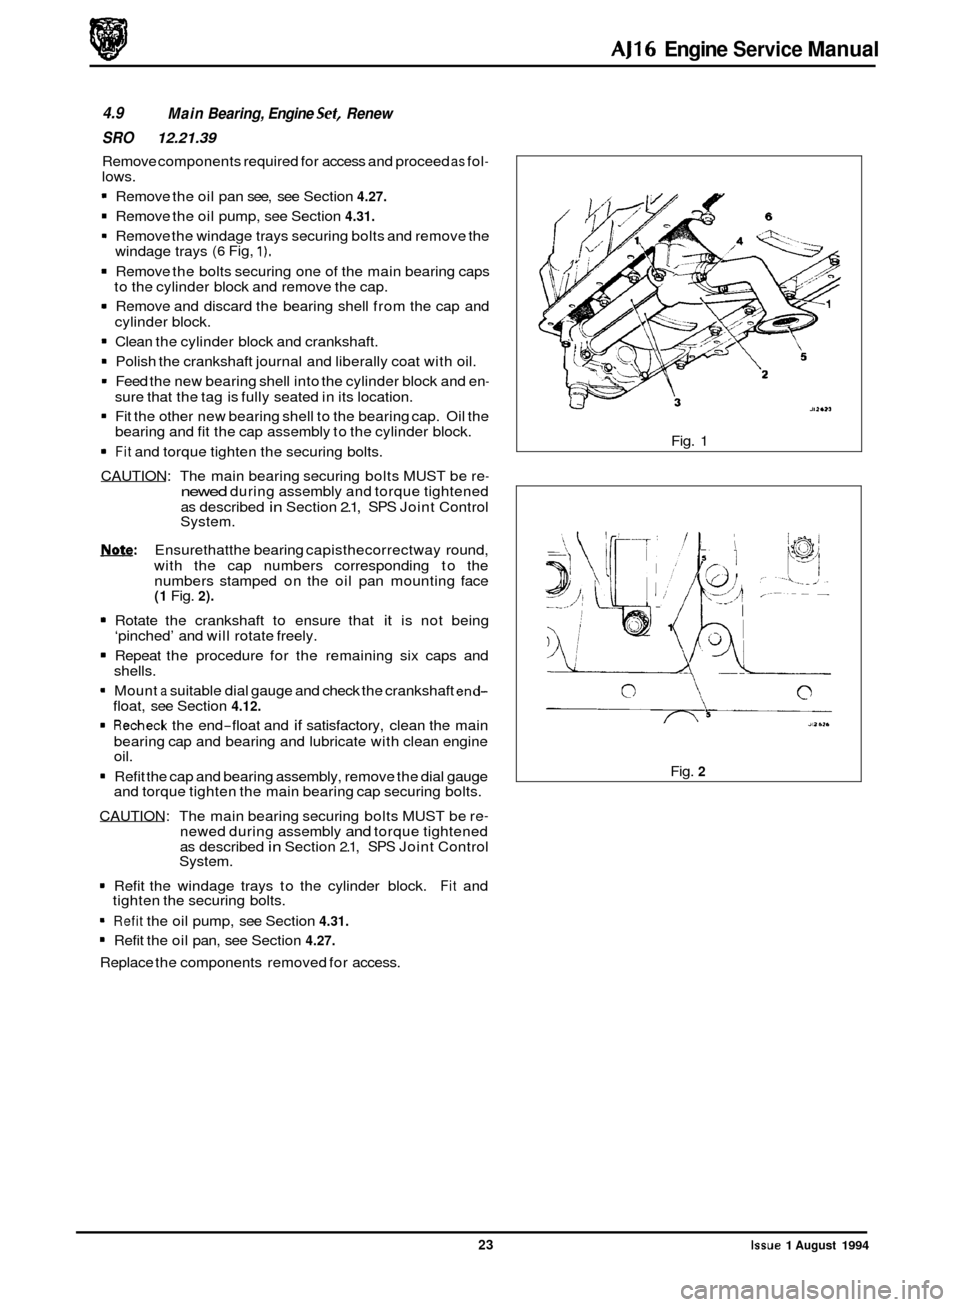
* Remove the windage trays securing bolts and remove the
1 Remove the bolts securing one of the main bearing caps
1 Remove and discard the bearing shell from the cap and
1 Clean the cylinder block and crankshaft.
1 Polish the crankshaft journal and liberally coat with oil.
1 Feed the new bearing shell into the cylinder block and en- sure that the tag is fully seated in its location.
1 Fit the other new bearing shell to the bearing cap. Oil the
bearing and fit the cap assembly to the cylinder block.
1 Fit and torque tighten the securing bolts.
CAUTION: The main bearing securing bolts MUST be re
- newed during assembly and torque tightened
as described
in Section 2.1, SPS Joint Control
System.
Note: Ensurethatthe bearing capisthecorrectway round,
with the cap numbers corresponding to the
numbers stamped on the oil pan mounting face
(1 Fig. 2).
1 Rotate the crankshaft to ensure that it is not being
‘pinched’ and will rotate freely.
1 Repeat the procedure for the remaining six caps and
shells.
1 Mount a suitable dial gauge and check the crankshaft end- float, see Section 4.12.
1 Recheck the end-float and if satisfactory, clean the main
bearing cap and bearing and lubricate with clean engine
oil.
1 Refit the cap and bearing assembly, remove the dial gauge
and torque tighten the main bearing cap securing bolts.
CAUTION: The main bearing securing bolts MUST be re
- newed during assembly and torque tightened
as described in Section 2.1, SPS Joint Control
System.
1 Refit the windage trays to the cylinder block. Fit and
1 Refit the oil pump, see Section 4.31.
1 Refit the oil pan, see Section 4.27.
Replace the components removed for access.
windage trays
(6 Fig, 1).
to
the cylinder block and remove the cap.
cylinder block.
0
tighten the securing bolts. Fig.
1
Fig. 2
23
Issue 1 August 1994
Page 44 of 73
AJ16 Engine Service Manual
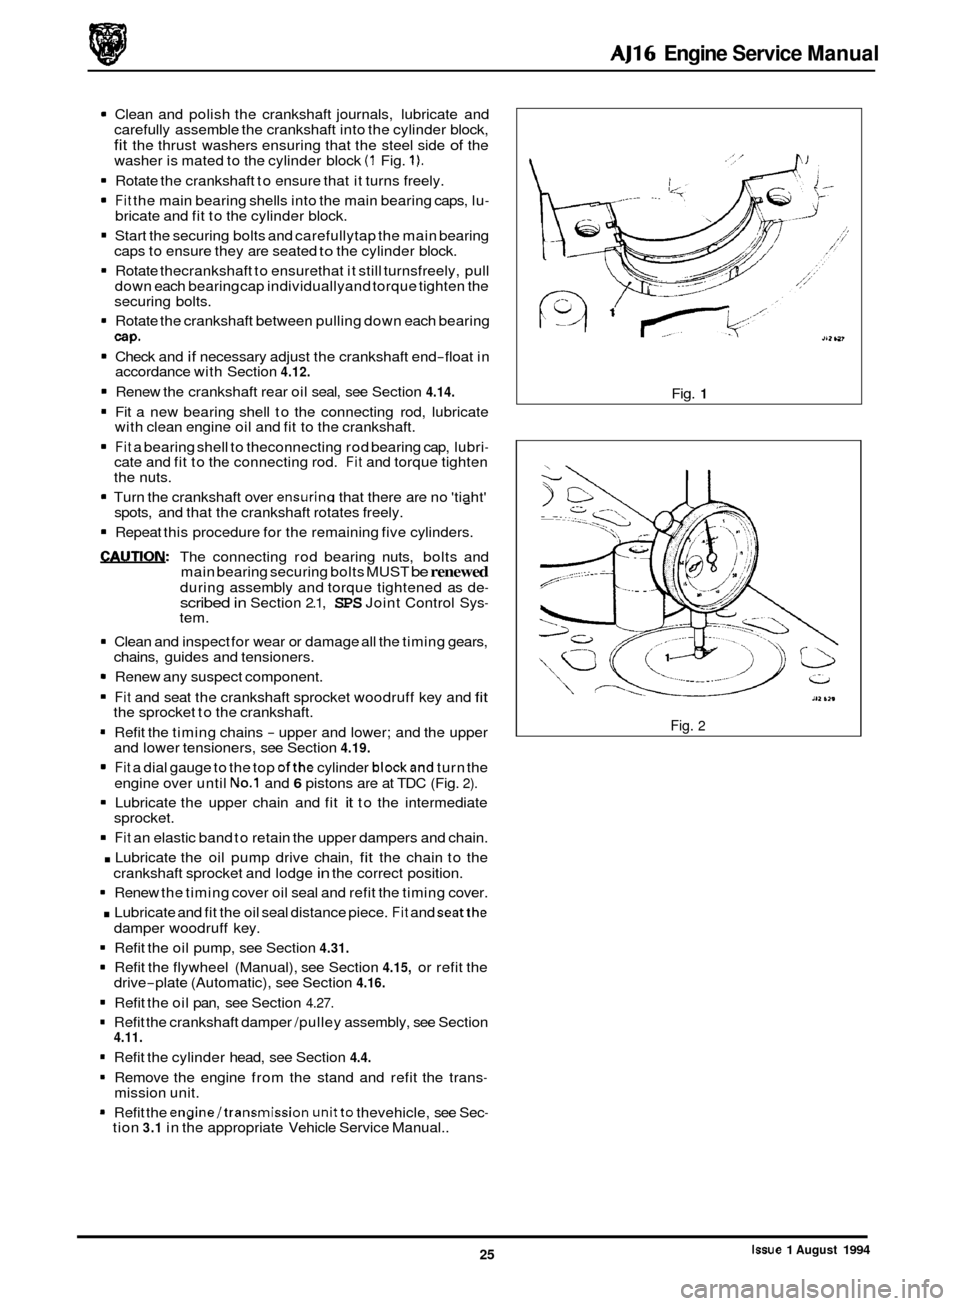
1 Clean and polish the crankshaft journals, lubricate and
carefully assemble the crankshaft into the cylinder block,
fit the thrust washers ensuring that the steel side of the
washer is mated to the cylinder block (1 Fig. 1).
1 Rotate the crankshaft to ensure that it turns freely.
1 Fit the main bearing shells into the main bearing caps, lu- bricate and fit to the cylinder block.
1 Start the securing bolts and carefullytap the main bearing
caps to ensure they are seated to the cylinder block.
1 Rotate thecrankshaft to ensurethat it still turnsfreely, pull
down each bearing cap individuallyand torque tighten the
securing bolts.
1 Rotate the crankshaft between pulling down each bearing
cap.
1 Check and if necessary adjust the crankshaft end-float in
accordance with Section 4.12.
1 Renew the crankshaft rear oil seal, see Section 4.14.
1 Fit a new bearing shell to the connecting rod, lubricate
1 Fit a bearing shell to theconnecting rod bearing cap, lubri-
with clean engine oil and fit to the crankshaft.
cate and fit to the connecting rod.
Fit and torque tighten
1 Turn the crankshaft over ensuring that there are no 'tiaht'
the nuts.
spots, and that the crankshaft rotates freely.
-
1 Repeat this procedure for the remaining five cylinders.
WUTION: The connecting rod bearing nuts, bolts and
main bearing securing bolts MUST be renewed during assembly and torque tightened as de- scribed in Section 2.1, SPS Joint Control Sys- tem.
1 Clean and inspect for wear or damage all the timing gears,
chains, guides and tensioners.
1 Renew any suspect component.
1 Fit and seat the crankshaft sprocket woodruff key and fit the sprocket to the crankshaft.
1 Refit the timing chains - upper and lower; and the upper
and lower tensioners, see Section 4.19.
1 Fit a dial gauge to the top ofthe cylinder blockand turn the
engine over until No.1 and 6 pistons are at TDC (Fig. 2).
1 Lubricate the upper chain and fit it to the intermediate
sprocket.
0 1 Fit an elastic band to retain the upper dampers and chain.
. Lubricate the oil pump drive chain, fit the chain to the
crankshaft sprocket and lodge in the correct position.
1 Renew the timing cover oil seal and refit the timing cover.
. Lubricate and fit the oil seal distance piece. Fit and seatthe
1 Refit the oil pump, see Section 4.31.
1 Refit the flywheel (Manual), see Section 4.15, or refit the
1 Refit the oil pan, see Section 4.27.
1 Refit the crankshaft damper /pulley assembly, see Section
1 Refit the cylinder head, see Section 4.4.
1 Remove the engine from the stand and refit the trans-
1 Refit the engine/transmission unitto thevehicle, see Sec-
damper woodruff key.
drive
-plate (Automatic), see Section 4.16.
4.11.
mission unit.
tion
3.1 in the appropriate Vehicle Service Manual.. Fig.
1
Fig. 2
Issue 1 August 1994 25
Page 45 of 73
AJ16 Engine Service Manual
4.11
SRO 12.21.09
. Remove the air conditioning compressor drive belt.
. Remove the generator drive belt.
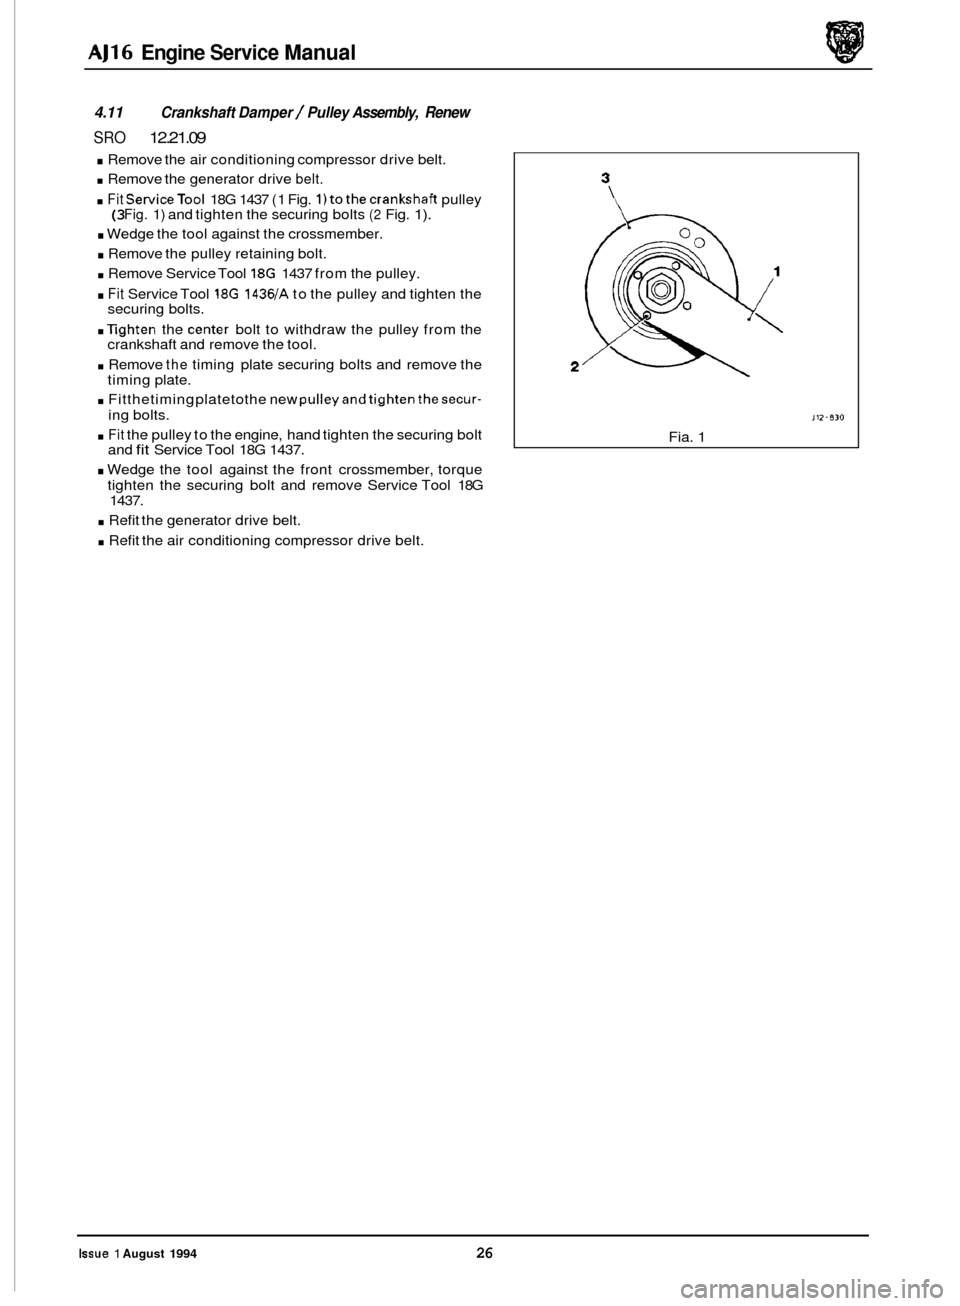
. Fit ServiceTool 18G 1437 (1 Fig. 1)tothecrankshaft pulley
. Wedge the tool against the crossmember.
. Remove the pulley retaining bolt.
. Remove Service Tool 18G 1437 from the pulley.
. Fit Service Tool 18G 1436/A to the pulley and tighten the
securing bolts.
. Eghten the center bolt to withdraw the pulley from the
crankshaft and remove the tool.
. Remove the timing plate securing bolts and remove the
timing plate.
. Fitthetiming platetothe new pulleyandtightenthesecur-
ing bolts.
. Fit the pulley to the engine, hand tighten the securing bolt
and fit Service Tool 18G 1437.
. Wedge the tool against the front crossmember, torque
tighten the securing bolt and remove Service Tool 18G
1437.
Crankshaft Damper / Pulley Assembly, Renew
(3 Fig. 1) and tighten the securing bolts (2 Fig. 1).
. Refit the generator drive belt.
. Refit the air conditioning compressor drive belt.
.. J
J12-830
Fia. 1
Issue 1 August 1994 26
0
0
0
Page 46 of 73
AJ16 Engine Service Manual
4.12
SRO 12.21.26
Crankshaft End-float, Check and A4ust
Remove components as required for access and proceed as
follows.
Remove the oil pan, see Section 4.27.
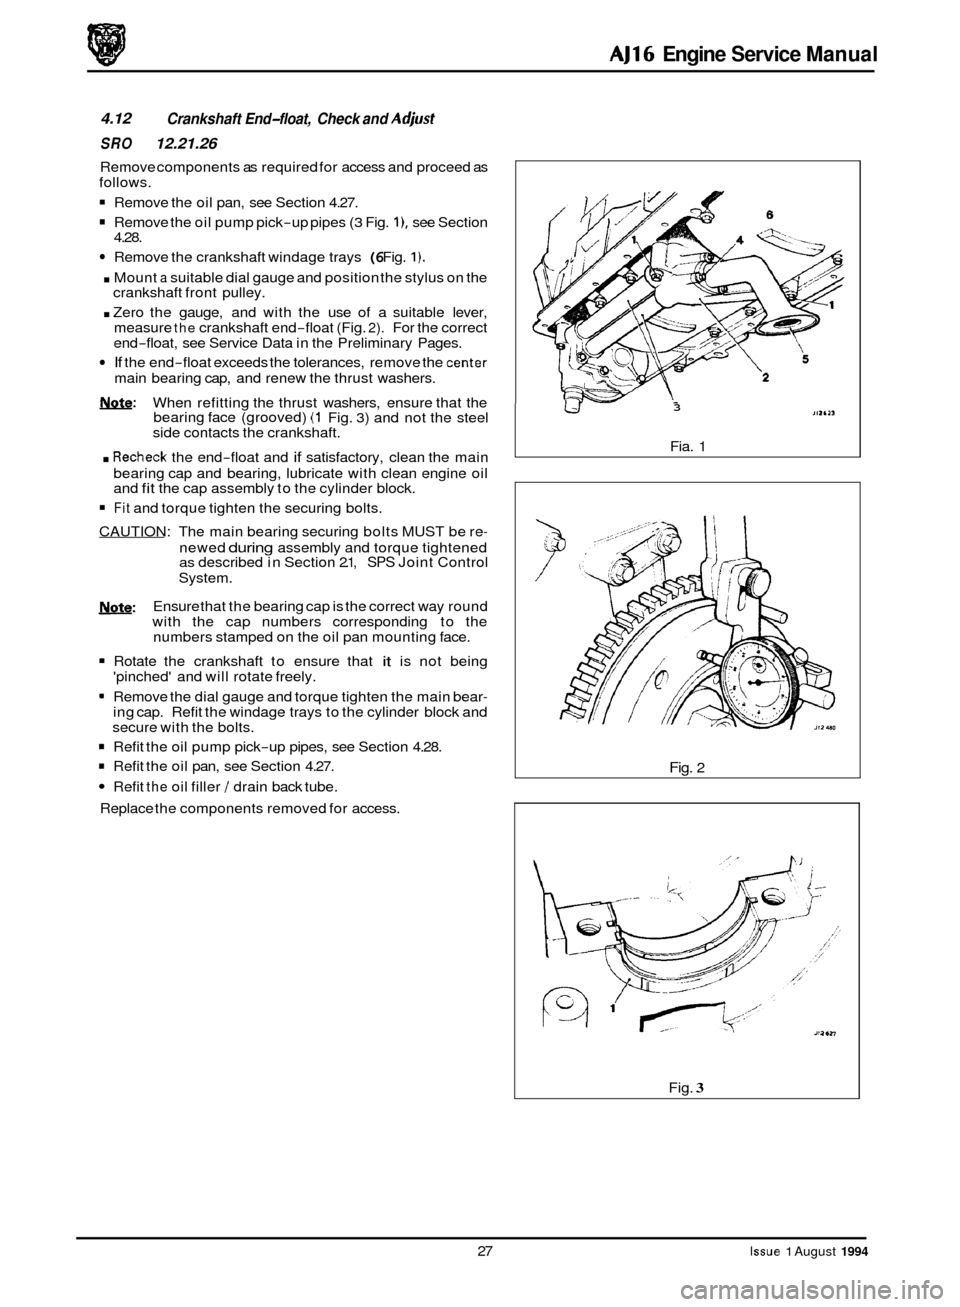
Remove the oil pump pick-up pipes (3 Fig. I), see Section
Remove the crankshaft windage trays (6 Fig. 1).
. Mount a suitable dial gauge and position the stylus on the
crankshaft front pulley.
. Zero the gauge, and with the use of a suitable lever,
measure the crankshaft end-float (Fig. 2). For the correct
end-float, see Service Data in the Preliminary Pages.
If the end-float exceeds the tolerances, remove the center
main bearing cap, and renew the thrust washers.
&&: When refitting the thrust washers, ensure that the
bearing face (grooved) (1 Fig. 3) and not the steel
side contacts the crankshaft.
. Recheck the end-float and if satisfactory, clean the main
bearing cap and bearing, lubricate with clean engine oil
and
fit the cap assembly to the cylinder block.
4.28. 0
Fit and
torque tighten the securing bolts.
CAUTION: The main bearing securing bolts MUST be re
-
newed during assembly and torque tightened as described in Section 2.1, SPS Joint Control
System.
Ensure that the bearing cap is the correct way round
with the cap numbers corresponding to the
numbers stamped on the oil pan mounting face.
Rotate the crankshaft to ensure that it is not being
'pinched' and will rotate freely.
m Remove the dial gauge and torque tighten the main bear- ing cap. Refit the windage trays to the cylinder block and
secure with the bolts.
w:
Refit the oil pump pick-up pipes, see Section 4.28.
Refit the oil pan, see Section 4.27.
Refit the oil filler / drain back tube.
Replace the components removed for access.
0
3
Fia. 1
Fig. 2
Fig.
3
27 Issue 1 August 1994
Page 48 of 73
AJ16 Engine Service Manual
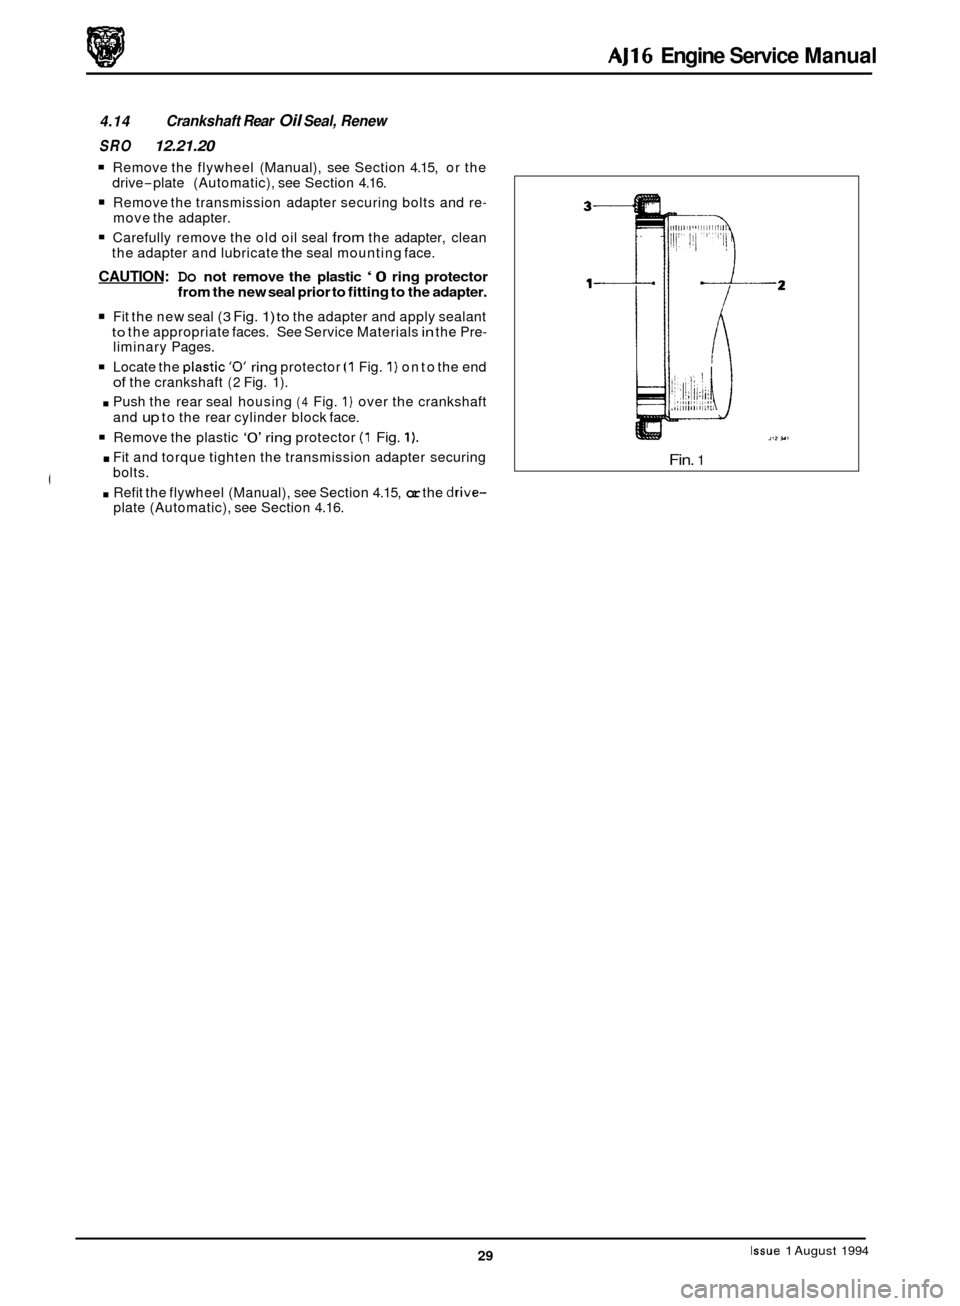
4.14 Crankshaft Rear Oil Seal, Renew
SRO 12.21.20
Remove the flywheel (Manual), see Section 4.15, or the
Remove the transmission adapter securing bolts and re-
Carefully remove the old oil seal from the adapter, clean
CAUTION: Do not remove the plastic ‘0 ring protector
from the new seal prior to fitting to the adapter.
Fit the new seal (3 Fig. 1) to the adapter and apply sealant to the appropriate faces. See Service Materials in the Pre- liminary Pages.
Locate the plastic’o’ ring protector (1 Fig. 1) on to the end of the crankshaft (2 Fig. 1).
. Push the rear seal housing (4 Fig. 1) over the crankshaft
and
up to the rear cylinder block face.
Remove the plastic ‘0’ ring protector (1 Fig. 1).
. Fit and torque tighten the transmission adapter securing
drive
-plate
(Automatic), see Section 4.16.
move the adapter.
the adapter and lubricate
the seal mounting face.
bolts.
. Refit the flywheel (Manual), see Section 4.15, or the drive- plate (Automatic), see Section 4.16.
Fin. 1
Issue 1 August 1994 29
Page 49 of 73
AJ16 Engine Service Manual
4.15 Engine Flywheel, Renew
SRO 12.53.07
1 Remove the transmission unit.
. Hold the flywheel in one position and remove the bolts se-
CAUTION: Make a note of the position of any balance
weights relative to the clutch cover.
Remove the balance weights. Remove the clutch assem-
curing the clutch cover to the flywheel.
bly.
WARNING: THE TWIN-MASS FLYWHEEL IS EXTREMELY HEAVY. ASSISTANCE WILL BE REQUIRED
DURING REMOVAL / REFIlTING.
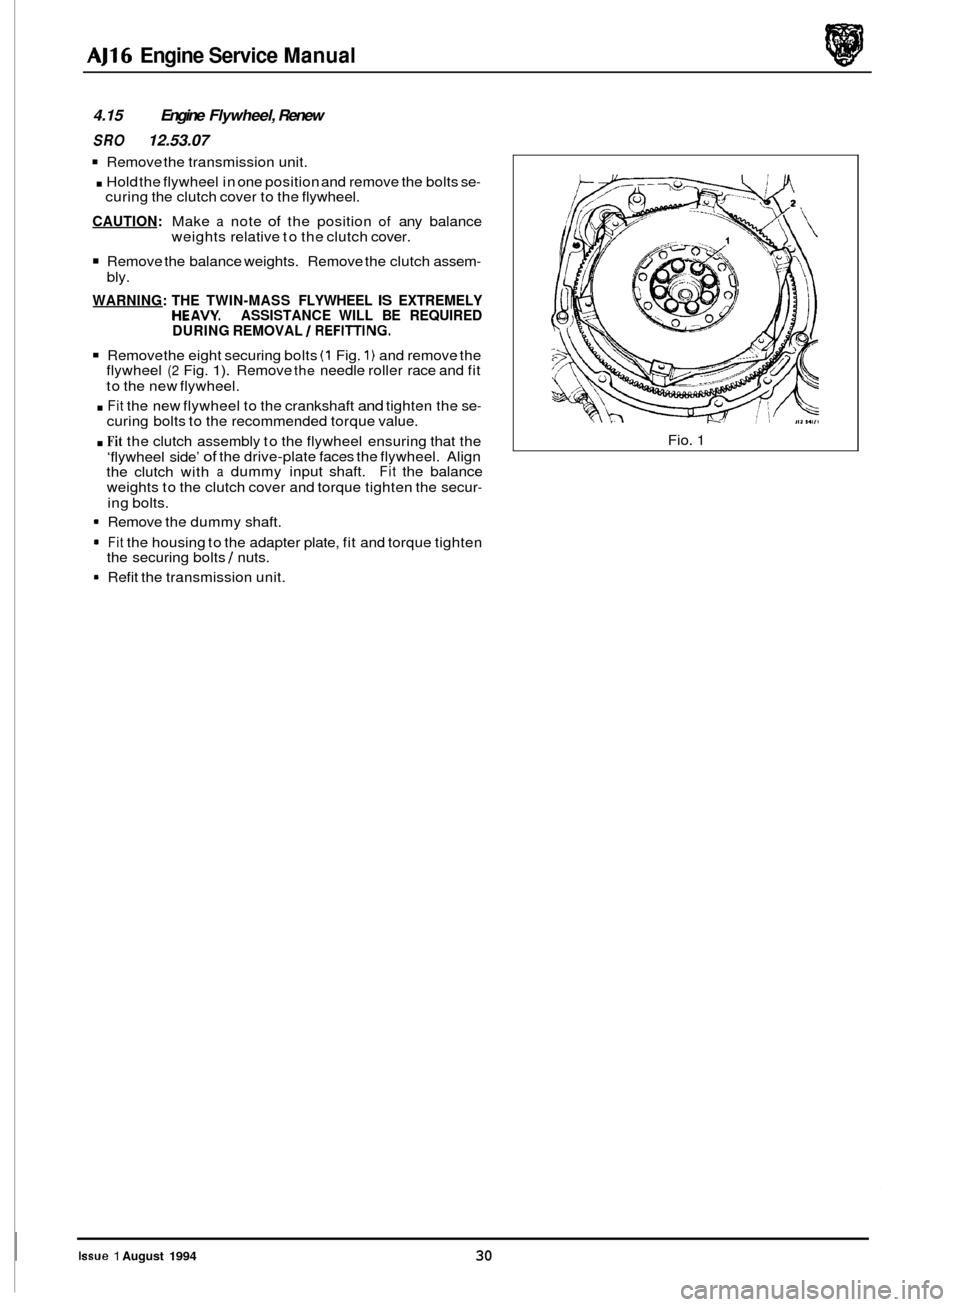
Remove the eight securing bolts (1 Fig. 1) and remove the
flywheel (2 Fig. 1). Remove the needle roller race and fit
to the new flywheel.
. Fit the new flywheel to the crankshaft and tighten the se- curing bolts to the recommended torque value.
. Fit the clutch assembly to the flywheel ensuring that the
‘flywheel side’
of the drive-plate faces the flywheel. Align
the clutch with a dummy input shaft. Fit the balance
weights to the clutch cover and torque tighten the secur- ing bolts.
1 Remove the dummy shaft.
Fit the housing to the adapter plate, fit and torque tighten
the securing bolts I nuts.
1 Refit the transmission unit. Fio.
1
Issue 1 August 1994 30