Adjust seats JAGUAR XJ 2004 X350 / 3.G Owners Manual
[x] Cancel search | Manufacturer: JAGUAR, Model Year: 2004, Model line: XJ, Model: JAGUAR XJ 2004 X350 / 3.GPages: 227, PDF Size: 4.22 MB
Page 3 of 227
Contents
Section Contents
Owner Information . . . . . . . . . . . . . . . . . . . . . . . . . 1
Security and Locks . . . . . . . . . . . . . . . . . . . . . . . . . . 2
Before Driving . . . . . . . . . . . . . . . . . . . . . . . . . . . . . 3
On the Road . . . . . . . . . . . . . . . . . . . . . . . . . . . . . . . 4
Climate Control . . . . . . . . . . . . . . . . . . . . . . . . . . . . 5
Roadside Emergency . . . . . . . . . . . . . . . . . . . . . . . . 6
Maintenance . . . . . . . . . . . . . . . . . . . . . . . . . . . . . . . 7
Specifications . . . . . . . . . . . . . . . . . . . . . . . . . . . . . . 8
A comprehensive index is located at the back of this handbook.
Quick Overview
Fascia Controls . . . . . . . . . . . . . . . . . . . . . . . . . . . . . . . . . . . ii
Warning Lamps . . . . . . . . . . . . . . . . . . . . . . . . . . . . . . . . . . . iii
Overhead Console . . . . . . . . . . . . . . . . . . . . . . . . . . . . . . . . . iv
Seats and Headrest Adjustment . . . . . . . . . . . . . . . . . . . . . . . iv
Steering Column Adjustment . . . . . . . . . . . . . . . . . . . . . . . . . iv
Entry/Exit Mode . . . . . . . . . . . . . . . . . . . . . . . . . . . . . . . . . . . iv
Pedal Adjustment. . . . . . . . . . . . . . . . . . . . . . . . . . . . . . . . . . iv
Door Mirror Adjustment . . . . . . . . . . . . . . . . . . . . . . . . . . . . v
Window Operation . . . . . . . . . . . . . . . . . . . . . . . . . . . . . . . . v
Gearshift Interlock . . . . . . . . . . . . . . . . . . . . . . . . . . . . . . . . . v
Parkbrake . . . . . . . . . . . . . . . . . . . . . . . . . . . . . . . . . . . . . . . v
Exterior Lights . . . . . . . . . . . . . . . . . . . . . . . . . . . . . . . . . . . . vi
Direction Indicators . . . . . . . . . . . . . . . . . . . . . . . . . . . . . . . . vi
Trip Computer Reset Button. . . . . . . . . . . . . . . . . . . . . . . . . . vi
Wipers and Washers . . . . . . . . . . . . . . . . . . . . . . . . . . . . . . . vi
Audio System (CD Player model) . . . . . . . . . . . . . . . . . . . . . vii
Climate Control . . . . . . . . . . . . . . . . . . . . . . . . . . . . . . . . . . viii
Filling Station Information
Fuel Filling . . . . . . . . . . . . . . . . . . . . . . . . . . . . . . . . . . . . . . . ix
Hood Release . . . . . . . . . . . . . . . . . . . . . . . . . . . . . . . . . . . . . ix
Underhood Top Up . . . . . . . . . . . . . . . . . . . . . . . . . . . . . . . . ix
Tyre Pressures . . . . . . . . . . . . . . . . . . . . . . . . . . . . . . . . . . . . ix
Page 40 of 227
Before Driving
Seats . . . . . . . . . . . . . . . . . . . . . . . . . . . . . . . . . . 3 - 3
Steering Column Adjustment . . . . . . . . . . . . . . . 3 - 7
Door Mirrors . . . . . . . . . . . . . . . . . . . . . . . . . . . 3 - 8
Interior Rear View Mirror . . . . . . . . . . . . . . . . . . 3 - 9
Occupant Protection . . . . . . . . . . . . . . . . . . . . 3 - 11
Seat Belts . . . . . . . . . . . . . . . . . . . . . . . . . . . . . 3 - 11
Air Bags . . . . . . . . . . . . . . . . . . . . . . . . . . . . . . 3 - 14
Child Safety . . . . . . . . . . . . . . . . . . . . . . . . . . . 3 - 23
LATCH Child Restraint System . . . . . . . . . . . . . 3 - 27
Memory Setting . . . . . . . . . . . . . . . . . . . . . . . . 3 - 31
Clock Adjustment . . . . . . . . . . . . . . . . . . . . . . . 3 - 32
Luggage Compartment . . . . . . . . . . . . . . . . . . . 3 - 33
Ski Hatch . . . . . . . . . . . . . . . . . . . . . . . . . . . . . 3 - 34
Page 42 of 227
Before Driving 3 - 3
3 Before Driving
Seats
!WARNING:
1. Do not make adjustments when the vehicle is moving.
2. Front passengers must not ride with the seat fully reclined.
All seats, except the rear bench type,
are adjusted electrically by switches on
the side of the seat cushion. Adjustment
can be made with or without the ignition
key inserted.
Three different positions can be stored
and recalled by a memory system for
each seat. (Steering wheel, pedals and
door mirrors positions are also
memorised for the driver.) See Memory
Setting on page 3 - 31.
Note: It is advisable to move the seat to
the correct position in relation to the gear
lever and front and side vision before
adjusting the steering column, pedals,
mirrors and seat belt.
Front Seat Adjustment
Note: The full range of front seat
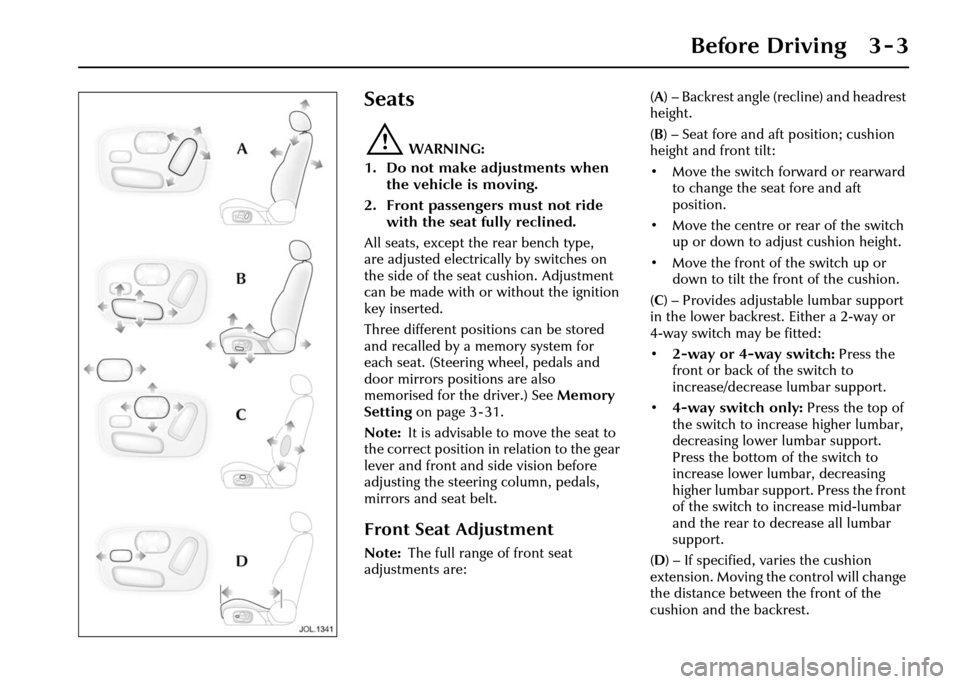
adjustments are: (
A ) – Backrest angle (recline) and headrest
height.
( B ) – Seat fore and aft position; cushion
height and front tilt:
• Move the switch forward or rearward to change the seat fore and aft
position.
• Move the centre or rear of the switch up or down to adjust cushion height.
• Move the front of the switch up or down to tilt the front of the cushion.
( C ) – Provides adjustable lumbar support
in the lower backrest. Either a 2-way or
4-way switch may be fitted:
• 2-way or 4-way switch: Press the
front or back of the switch to
increase/decrease lumbar support.
• 4-way switch only: Press the top of
the switch to increase higher lumbar,
decreasing lower lumbar support.
Press the bottom of the switch to
increase lower lumbar, decreasing
higher lumbar support. Press the front
of the switch to increase mid-lumbar
and the rear to decrease all lumbar
support.
( D ) – If specified, varies the cushion
extension. Moving the control will change
the distance between the front of the
cushion and the backrest.
Page 43 of 227
3 - 4 Before Driving
Head Restraint Adjustment
!WARNING:
Adjust the head restraint so that it is
just behind your head and never
behind your neck.
All headrests may be manually tilted,
except those fitted with rear display
screens. Rear head restraint adjustment
The rear head restraints on vehicles
without electrically operated rear seats
may be manually adjusted.
To raise the outer rear seat headrests,
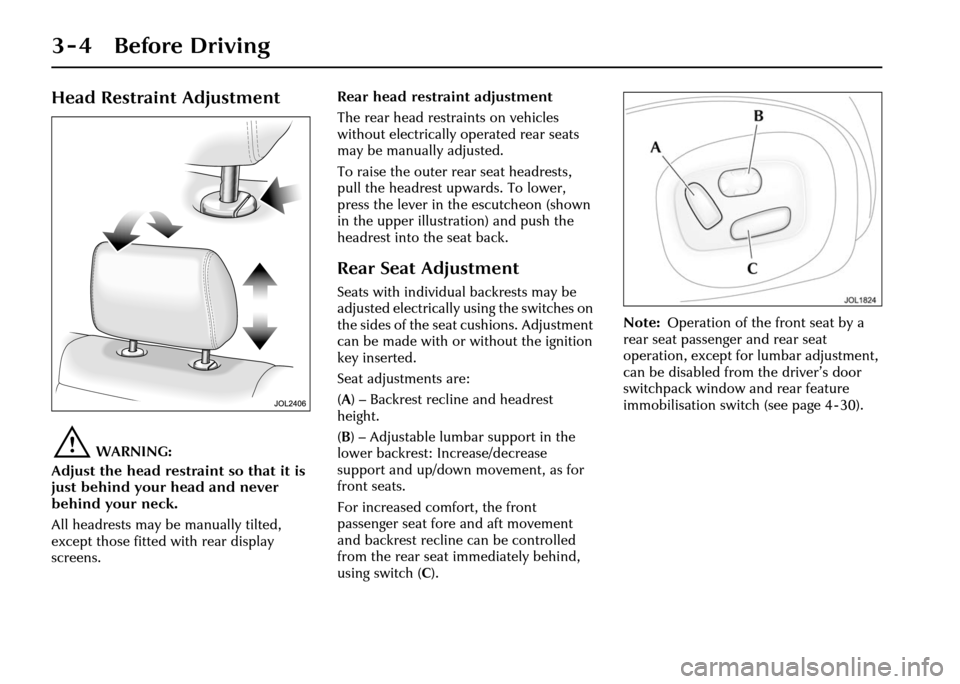
pull the headrest upwards. To lower,
press the lever in the escutcheon (shown
in the upper illustra
tion) and push the
headrest into the seat back.
Rear Seat Adjustment
Seats with individual backrests may be
adjusted electrically using the switches on
the sides of the seat cushions. Adjustment
can be made with or without the ignition
key inserted.
Seat adjustments are:
( A ) – Backrest recline and headrest
height.
( B ) – Adjustable lumbar support in the
lower backrest: Increase/decrease
support and up/down movement, as for
front seats.
For increased comfort, the front
passenger seat fore and aft movement
and backrest recline can be controlled
from the rear seat immediately behind,
using switch ( C). Note:
Operation of the front seat by a
rear seat passenger and rear seat
operation, except for lumbar adjustment,
can be disabled from the driver’s door
switchpack window and rear feature
immobilisation switch (see page 4 - 30).
Page 50 of 227
Before Driving 3 - 11
Occupant Protection
Seat Belts
The use of front and rear seat belts is
mandatory in most countries. Using seat
belts saves lives. They should be worn by
all occupants whenever the vehicle is in
use, for maximum protection.
Lap/shoulder inertia reel seat belts are
provided for both front occupants and
three rear seat positions.
The inertia operating mechanism of the
seat belts allows the wearers to move
their upper bodies to reach various
controls. The seat belts lock automatically
with accelerated body movement or in
the event of emergency braking.
The seat belt assemblies incorporate
additional safety devices. All have belt
pretensioners and the front belts also
have force limiters. These devices provide
increased protection in the event of a
severe frontal impact.
The pretensioners operate with the air
bags as part of the Advanced Restraints
Technology System (see page 3 - 14). All passenger seat belt mechanisms
incorporate an automatic locking device
to allow child seats to be secured safely.
Forchild safety seepage3-23.
Comfort belts are fitted to both individual
electrically operated rear seats. They are
also fitted to the outer seats only on the
electrically operated rear bench seat.
These belts incorporate a twin tension
facility. When the belt is buckled around
the occupant, a reduced tension is
applied to provide a more comfortable
fitting. When the belt is unfastened,
a higher tension is applied to allow it to
retract correctly.
Beltminder
The Beltminder feature is a supplemental
warning to the seat belt warning function
(see page 4 - 6). This feature provides
additional reminders to the driver that
the driver’s and/or front passenger’s seat
belt is unbuckled by intermittently
sounding a chime and illuminating the
seat belt warning lamp in the instrument
cluster.
Note:
Not all countries have the warning
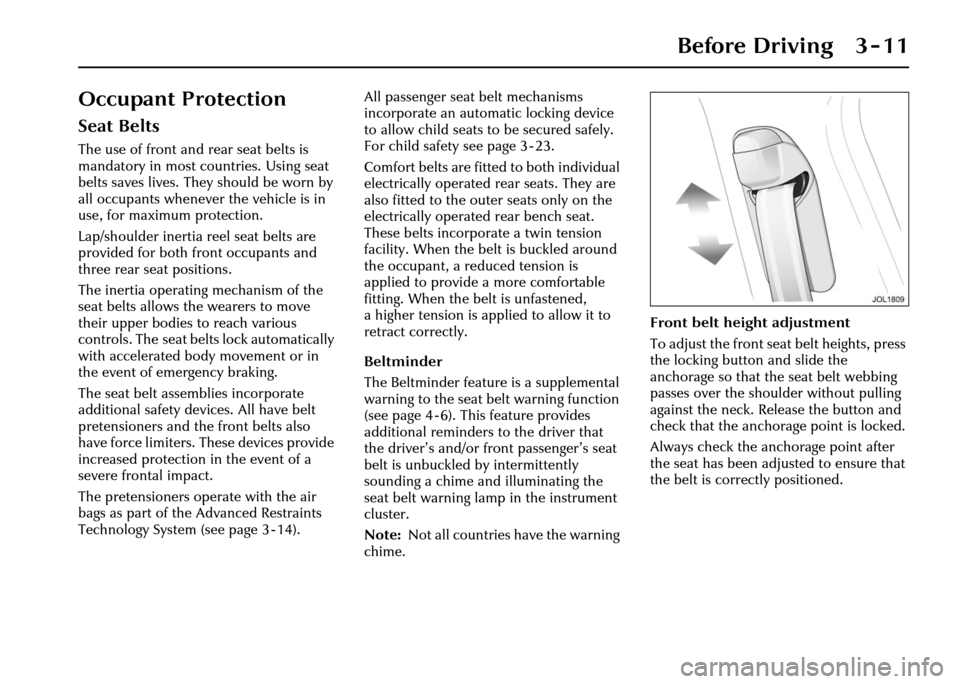
chime. Front belt height adjustment
To adjust the front seat belt heights, press
the locking button and slide the
anchorage so that the seat belt webbing
passes over the shoulder without pulling
against the neck. Release the button and
check that the anchorage point is locked.
Always check the anchorage point after
the seat has been adjusted to ensure that
the belt is correctly positioned.
Page 59 of 227
3 - 20 Before Driving
Rear Impact Protection
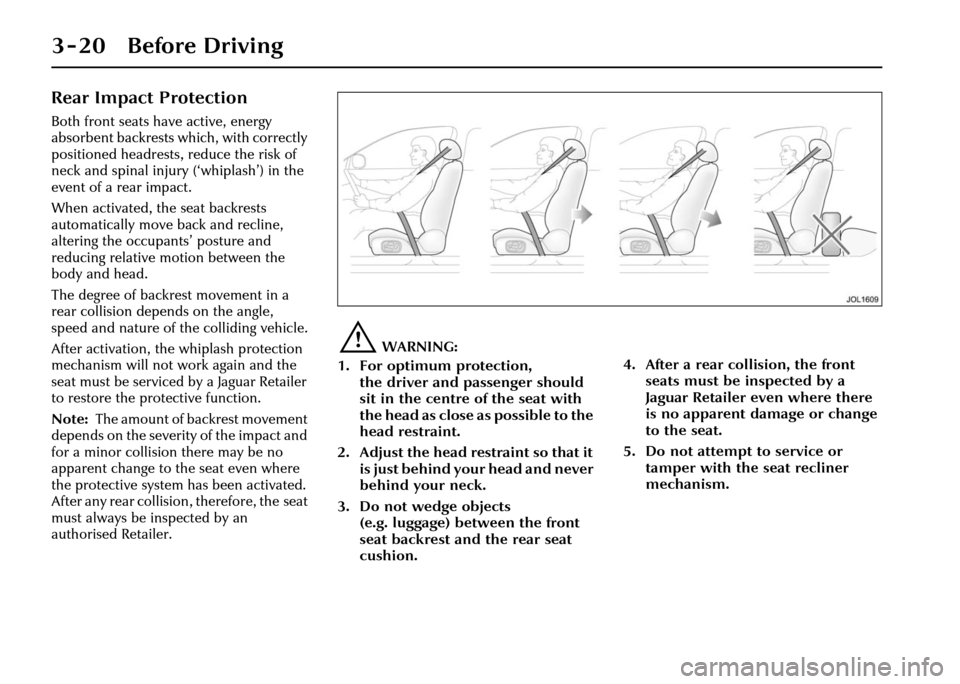
Both front seats have active, energy
absorbent backrests which, with correctly
positioned headrests, reduce the risk of
neck and spinal injury (‘whiplash’) in the
event of a rear impact.
When activated, the seat backrests
automatically move back and recline,
altering the occupants’ posture and
reducing relative motion between the
body and head.
The degree of backrest movement in a
rear collision depends on the angle,
speed and nature of the colliding vehicle.
After activation, the w hiplash protection
mechanism will not work again and the
seat must be serviced by a Jaguar Retailer
to restore the protective function.
Note: The amount of backrest movement
depends on the severity of the impact and
for a minor collision there may be no
apparent change to the seat even where
the protective system has been activated.
After any rear collisio n, therefore, the seat
must always be inspected by an
authorised Retailer.
!WARNING:
1. For optimum protection, the driver and passenger should
sit in the centre of the seat with
the head as close as possible to the
head restraint.
2. Adjust the head re straint so that it
is just behind your head and never
behind your neck.
3. Do not wedge objects (e.g. luggage) between the front
seat backrest and the rear seat
cushion. 4. After a rear collision, the front
seats must be inspected by a
Jaguar Retailer even where there
is no apparent da mage or change
to the seat.
5. Do not attempt to service or tamper with the seat recliner
mechanism.
Page 61 of 227
3 - 22 Before Driving
Driving Position
!WARNING:
Driver and front seat passenger
should always move their seats as far
rearwards as is practical.
Ideally, drivers should sit with at least
10 inches (25.4 cm) between the centre
of their breastbone and the cover of the
steering wheel air bag.
Since the risk zone at the time of
deployment is the first 2 to 3 inches
(5.5 cm – 7.5 cm) from the air bag cover,
sitting back 10 inches (25.4 cm) provides
a clear margin of safety. Very few drivers
are unable to achieve and maintain that
safety gap. The vast majority of drivers who do not
now sit that far back can change their
position and achieve that distance.
• If adjustable pedals are fitted, move
them towards the seat.
• Move your seat back as far as you can while still comfortably reaching the
pedals.
• Recline the back of your seat one or two notches from the upright
position. If reclining the back of your
seat makes it hard to see the road,
raise the seat.
• Tilt the steering wheel/column downwards so as to point the air bag
at your chest instead of your head and
neck. Adjust the steering wheel/
column fore/aft so that it extends
towards the driver as little as possible,
ensuring that the air bag has plenty of
room to deploy.
• Sit in the centre of the seat with the head as close to the head restraint as
possible. Note:
Seat, steering wheel and pedal
adjustment controls are described
elsewhere in this section.
Page 64 of 227
Before Driving 3 - 25
Securing child restraints with an
adult seat belt
All passenger seat belts (not the driver’s)
have an automatic locking device for use
with child seats.
If engaged, this device allows the belt to
be retracted (tightened) but not pulled
out. When used to secure a child seat,
therefore, the belt will automatically lock
at any point to which it has retracted.
Always ensure that child restraint
assemblies are fitted in strict accordance
with the child restraint manufacturer’s
instructions. Keep the fitting instructions
for future reference.
The following checks should always be
carried out:
• Fit the child seat in the correct position and secure with the seat belt
in accordance with the
manufacturer’s instructions.
If necessary, remove the headrest to
accommodate a larger child seat.
• Pull the seat belt all the way out to engage the locking device.
• Make sure the child seat is fitted firmly to the car seat. There should
not be excessive forward or sideways
movement. • To fix the seat firm
ly, retract the belt
back onto the reel; a ratchet
operation may be felt as the belt
retracts. Continue to pay the belt back
onto the reel until it fits snugly around
the child seat.
• Regularly check and refit the child seat to ensure there is no slack in the
installation.
• The seat belt must not be twisted and
the buckle must not rest on the child
seat frame, as it may snap open in an
accident.
• Never modify the seat, or install it differently to the instructions.
The above is a guide only. Depending on
the features of a particular child seat,
e.g. forward or rearwa rd-facing, engage
the locking device before or after
attaching the belt, as convenient.
Unbuckling the belt and releasing the
child seat will allow th e belt to resume its
normal operation.
Always secure an unoccupied child seat
safely. In an accident an unsecured child
seat may pose a risk to the vehicle
occupants. Safe use of child restraints
!WARNING:
The top tether anchor point must
always be used to secure forward-
facing child seats (see page 3 - 29).
Ensure that there is no slack in the
webbing and that the restraints fits the
child snugly across the rib cage and hips.
These are the parts of the body most able
to take the force of an impact.
• Ensure the path and position of an integral harness across the shoulders
is appropriate for your child’s
development – consult the
manufacturer’s instructions.
• The lap strap should pass across the top of the child’s thighs, bearing on
the pelvis, not the abdominal area.
• Adjust the harness every time so that one or two fingers only can be
inserted between the child and the
harness. Different clothing on a child
can make a difference to the correct
fitting of the harness.
• Make sure that the webbing is not twisted.
Page 65 of 227
3 - 26 Before Driving
• Never modify the seat harness or buckles as this may affect the quick
release mechanism.
• Always secure your child correctly, even for a short journey.
• Follow the manufacturer’s instructions for harness adjustments.
Booster seats
If a booster seat is used, position the lap
section of the adult seat belt over the
child’s pelvis. The diagonal seat belt
should rest on the child’s shoulder,
not the neck.Check List – Non-LATCH Child
Restraints
Follow the check list each time a child
travels in the vehicle:
• Always attach the top tether when
installing a forward-facing child seat.
• Carefully follow the instructions provided by the manufacturer of the
restraint system.
• Always use the appropriate child restraints and adjust harnesses for
every child, every trip.
• Avoid dressing a child in bulky clothing and do not place any objects
between the child and the restraint
system.
• No child seat is completely child- proof. Encourage your child not to
play with buckle or harness. • Regularly check the fit of your child
seat and replace seats or harnesses
that show signs of wear.
• Ensure that you have removed all slack from the adult seat belt and that
the automatic locking device is
activated.
• Never leave a child unsupervised in the vehicle.
• Activate the rear door child safety locks (see page 2 - 14).
• Ensure your child does not exit the vehicle from the side where there is
traffic.
• Set your child a good example – always wear your seat belt.
Page 67 of 227
3 - 28 Before Driving
Fitting LATCH seats
For further information regarding a LATCH child seat, please
consult your Jaguar Retailer.
Always use the additional top tether anchorage.
LATCH child seats can only be fi tted to the two outer rear seat
positions, as shown on the previous page.
Caution: When fitting a LATCH child seat, the seat
manufacturers instructions must always be followed.
The following is a guide only.
Note: So as not to interfere with the fitment of large child seats,
push the adult seat buckles into their buckle recesses and,
if necessary, remove the headrest.
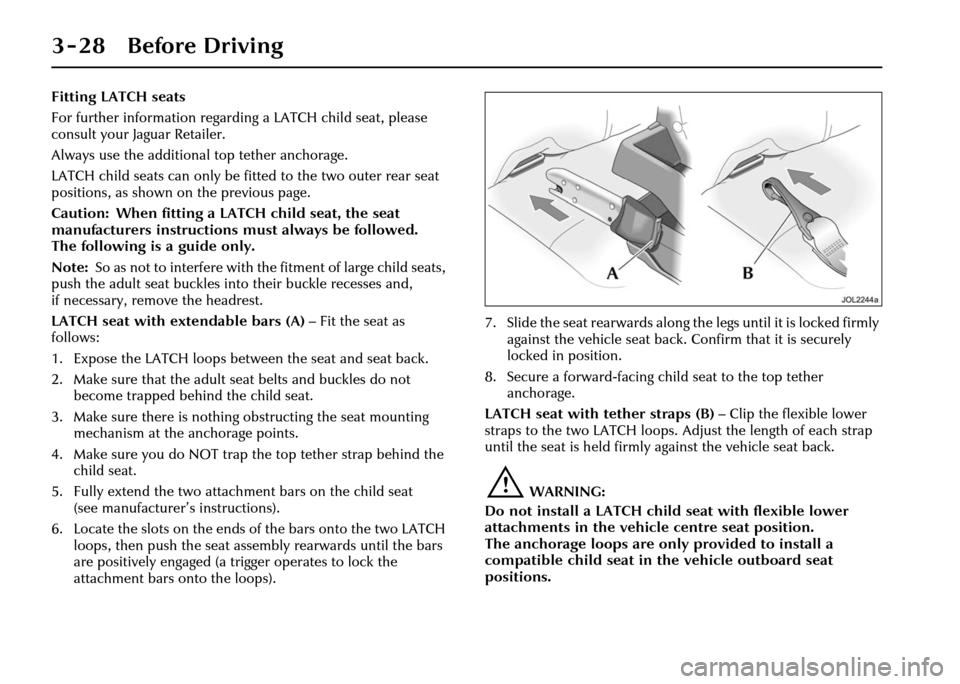
LATCH seat with extendable bars (A) – Fit the seat as
follows:
1. Expose the LATCH loops between the seat and seat back.
2. Make sure that the adult seat belts and buckles do not become trapped behind the child seat.
3. Make sure there is nothing obstructing the seat mounting mechanism at the anchorage points.
4. Make sure you do NOT trap the top tether strap behind the child seat.
5. Fully extend the two attachme nt bars on the child seat
(see manufacturer’s instructions).
6. Locate the slots on the ends of the bars onto the two LATCH
loops, then push the seat asse mbly rearwards until the bars
are positively engaged (a trigger operates to lock the
attachment bars onto the loops). 7. Slide the seat rearwards along the legs until it is locked firmly
against the vehicle seat back. Confirm that it is securely
locked in position.
8. Secure a forward-facing ch ild seat to the top tether
anchorage.
LATCH seat with tether straps (B) – Clip the flexible lower
straps to the two LATCH loops. Adjust the length of each strap
until the seat is held firmly against the vehicle seat back.
!WARNING:
Do not install a LATCH child seat with flexible lower
attachments in the vehicle centre seat position.
The anchorage loops are only provided to install a
compatible child seat in the vehicle outboard seat
positions.