climate control JAGUAR XJ 2004 X350 / 3.G Owners Manual
[x] Cancel search | Manufacturer: JAGUAR, Model Year: 2004, Model line: XJ, Model: JAGUAR XJ 2004 X350 / 3.GPages: 227, PDF Size: 4.22 MB
Page 3 of 227
Contents
Section Contents
Owner Information . . . . . . . . . . . . . . . . . . . . . . . . . 1
Security and Locks . . . . . . . . . . . . . . . . . . . . . . . . . . 2
Before Driving . . . . . . . . . . . . . . . . . . . . . . . . . . . . . 3
On the Road . . . . . . . . . . . . . . . . . . . . . . . . . . . . . . . 4
Climate Control . . . . . . . . . . . . . . . . . . . . . . . . . . . . 5
Roadside Emergency . . . . . . . . . . . . . . . . . . . . . . . . 6
Maintenance . . . . . . . . . . . . . . . . . . . . . . . . . . . . . . . 7
Specifications . . . . . . . . . . . . . . . . . . . . . . . . . . . . . . 8
A comprehensive index is located at the back of this handbook.
Quick Overview
Fascia Controls . . . . . . . . . . . . . . . . . . . . . . . . . . . . . . . . . . . ii
Warning Lamps . . . . . . . . . . . . . . . . . . . . . . . . . . . . . . . . . . . iii
Overhead Console . . . . . . . . . . . . . . . . . . . . . . . . . . . . . . . . . iv
Seats and Headrest Adjustment . . . . . . . . . . . . . . . . . . . . . . . iv
Steering Column Adjustment . . . . . . . . . . . . . . . . . . . . . . . . . iv
Entry/Exit Mode . . . . . . . . . . . . . . . . . . . . . . . . . . . . . . . . . . . iv
Pedal Adjustment. . . . . . . . . . . . . . . . . . . . . . . . . . . . . . . . . . iv
Door Mirror Adjustment . . . . . . . . . . . . . . . . . . . . . . . . . . . . v
Window Operation . . . . . . . . . . . . . . . . . . . . . . . . . . . . . . . . v
Gearshift Interlock . . . . . . . . . . . . . . . . . . . . . . . . . . . . . . . . . v
Parkbrake . . . . . . . . . . . . . . . . . . . . . . . . . . . . . . . . . . . . . . . v
Exterior Lights . . . . . . . . . . . . . . . . . . . . . . . . . . . . . . . . . . . . vi
Direction Indicators . . . . . . . . . . . . . . . . . . . . . . . . . . . . . . . . vi
Trip Computer Reset Button. . . . . . . . . . . . . . . . . . . . . . . . . . vi
Wipers and Washers . . . . . . . . . . . . . . . . . . . . . . . . . . . . . . . vi
Audio System (CD Player model) . . . . . . . . . . . . . . . . . . . . . vii
Climate Control . . . . . . . . . . . . . . . . . . . . . . . . . . . . . . . . . . viii
Filling Station Information
Fuel Filling . . . . . . . . . . . . . . . . . . . . . . . . . . . . . . . . . . . . . . . ix
Hood Release . . . . . . . . . . . . . . . . . . . . . . . . . . . . . . . . . . . . . ix
Underhood Top Up . . . . . . . . . . . . . . . . . . . . . . . . . . . . . . . . ix
Tyre Pressures . . . . . . . . . . . . . . . . . . . . . . . . . . . . . . . . . . . . ix
Page 77 of 227
4-6 On the Road
Charge Indicator (RED)
This lights up when the ignition
is switched ON and should go
out when the engine is
running.
If the light stays ON when the engine is
running it indicates that there is either a
battery voltage fault or a generator fault.
Turn OFF all electrical accessories, radio,
climate control, rear screen heater etc.
Try to use the minimum electrical load as
possible such as power windows, electric
sunroof etc. Report the fault to a Jaguar
Retailer.
Seat Belt (RED)
The warning lamp lights when
the ignition is ON and:
• The driver’s seat belt is not fastened.
• A passenger is sitting in the front seat and their seat belt is not fastened.
The light should go out when the driver’s
seat belt (and the front passenger’s if the
seat is occupied) is fastened.
Note: The vehicle must be moving above
10 mph (16 km/h) for the lamp to
illuminate if the passeng er seat belt is not
fastened.
Beltminder
The Beltminder feature is a supplemental
warning to the seat be lt warning function.
This feature provides additional
reminders to the driver that the driver’s
and/or front passenger’s seat belt is
unbuckled by intermittently sounding a
chime and illuminating the seat belt
warning light in the instrument cluster. If the vehicle is moving above 10 mph
(16 km/h) and one or both front seats are
occupied and a seat belt is not fastened,
a warning chime will be heard and the
light will flash.
The chime sound and the light flashing
will last for 10 seconds and then repeat
every 30 seconds for five minutes or until
the belts are fastened or the vehicle
stops.
If the warning light stays ON steady with
the seat belt(s) fastened, report the fault
to a Jaguar Retailer. It is safe to drive the
vehicle with the light ON steady,
provided that the seat belt(s) is properly
fastened. Ensure that all occupants seat
belts are fastened before driving.
Although not advisable, it is possible to
disable or reinstate the Beltminder
function. Please see a Jaguar Retailer.
Note:
If a heavy object is placed on the
front passenger seat it may activate the
Beltminder feature. It is recommended
that the object be placed in the luggage
compartment.
Page 96 of 227
On the Road 4 - 25
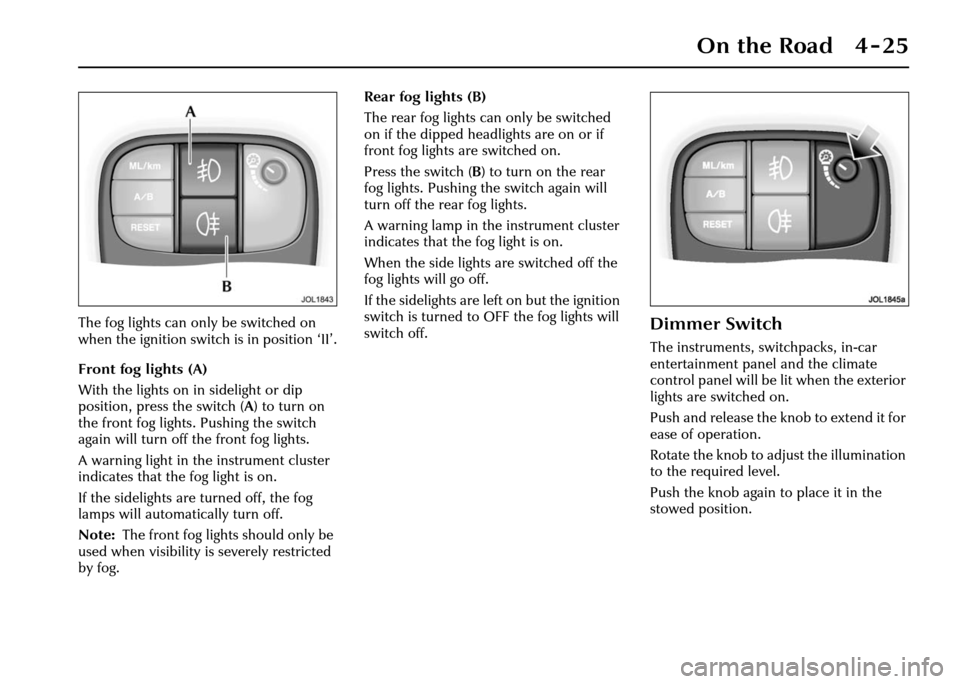
The fog lights can only be switched on
when the ignition switch is in position ‘II’.
Front fog lights (A)
With the lights on in sidelight or dip
position, press the switch (A) to turn on
the front fog lights. Pushing the switch
again will turn off the front fog lights.
A warning light in the instrument cluster
indicates that the fog light is on.
If the sidelights are turned off, the fog
lamps will automatically turn off.
Note: The front fog lights should only be
used when visibility is severely restricted
by fog. Rear fog lights (B)
The rear fog lights can only be switched
on if the dipped headlights are on or if
front fog lights are switched on.
Press the switch (
B) to turn on the rear
fog lights. Pushing the switch again will
turn off the rear fog lights.
A warning lamp in the instrument cluster
indicates that the fog light is on.
When the side lights are switched off the
fog lights will go off.
If the sidelights are le ft on but the ignition
switch is turned to OFF the fog lights will
switch off.Dimmer Switch
The instruments, switchpacks, in-car
entertainment panel and the climate
control panel will be lit when the exterior
lights are switched on.
Push and release the knob to extend it for
ease of operation.
Rotate the knob to adjust the illumination
to the required level.
Push the knob again to place it in the
stowed position.
Page 140 of 227
Climate Control
Introduction . . . . . . . . . . . . . . . . . . . . . . . . . . . . 5 - 3
Front Climate Controls . . . . . . . . . . . . . . . . . . . . 5 - 6
Rear Controls (4-zone) . . . . . . . . . . . . . . . . . . . 5 - 10
Page 142 of 227
Climate Control 5 - 3
5 Climate Control
Introduction
The cabin is supplied with filtered air
from a fully automatic electronic climate
control system with manual overrides.
Two systems are available:
• A two zone system which allows the front occupants to set individual
temperatures for the left and right
sides of the interior.
• A four zone system which allows front and rear occupants to set individual
temperatures, i.e. two front zones and
two rear zones.
Occupant controls
The main climate control panel is located
in the centre console above the radio and
audio controls. There are two types of
control panel for either two or four zone
systems:
• A dedicated control panel with LCD (liquid crystal display) screen
(see page 5 - 6).
• A multi-function touch control and display unit shared with navigation
and other systems. Where this control
unit is fitted, refer to the Jaguar
Touch-screen Handbook for the
detailed operating instructions. Where the four zone climate control
system is fitted, an additional control/
display panel for rear passenger use is
located at the rear of the centre console,
between the front seats.
Voice control
The climate control system may also be
operated by spoken commands if the
optional voice activation system is fitted.
For full information on the use of this
system refer to the JaguarVoice
Handbook.
Recommended Operation
Automatic climate control
Automatic climate control provides
efficient regulation of the vehicle
environment without constant
adjustments from the occupant.
Sensors inside the vehicle monitor
temperature, humidity and direct
sunlight. In response, the electronic
control system automatically adjusts the
heat input, blower speed, air intake and
airflow distribution so as to maintain the
selected temperature(s) and reduce
misting.
Automatic operation provides optimum
comfort under most driving conditions. It is recommended that automatic
control (AUTO) is selected as the
normal operating mode.
Use of air conditioning
Air conditioning is an integral part of the
climate control system, providing cooled
and dehumidified
air for occupant
comfort; the dry airflow is also effective
in preventing misting of the windows.
While the air conditioner can be
manually switched off, it is recommended
that it is used in all climatic conditions
throughout the year, preferably in AUTO
mode.
Close all windows and the sunroof when
the air conditioning is on to ensure
satisfactory operation.
Use of air recirculation
The air conditioner/heater system is
supplied with fresh air via an intake flap.
Closing the flap causes the air inside the
vehicle to be recirculated. This helps to
prevent unpleasant odours from being
drawn into the vehicle and also to
improve the performance of the air
conditioner in very hot conditions.
However, the use of recirculated air will
cause screen misting after a short period
and should only be used as necessary.
Page 143 of 227
5 - 4 Climate Control
In AUTO mode, the air intake flap is
controlled automatically. If required,
air recirculation may be manually
selected for either a short or indefinite
period.
Air Recirculation
Timed air recirculationPress the button briefly to select
timed air recirculation.
The fresh air intake is opened
and the button LED extinguished at the
end of the time out period.
Latched air re circulation
Press and hold the button for a
few seconds to select latched air
recirculation. Selection is
indicated by the scre en symbol and two
beeps.
Selecting latched air recirculation cancels
AUTO operation.
To deselect latched air recirculation,
press the recirculat ion button again,
or select AUTO.
!WARNING:
To prevent humidity build up inside
the vehicle and possible screen
misting, avoid driving with the air
conditioning system off or with
manual air recirculation selected for
prolonged periods.
General Points
To ensure the satisfactory operation of
the climate control system, note the
following points:
• Ensure that the external grille at the base of the windscreen, which
provides fresh air for the climate
control system, is kept clear of leaves,
snow or obstructions.
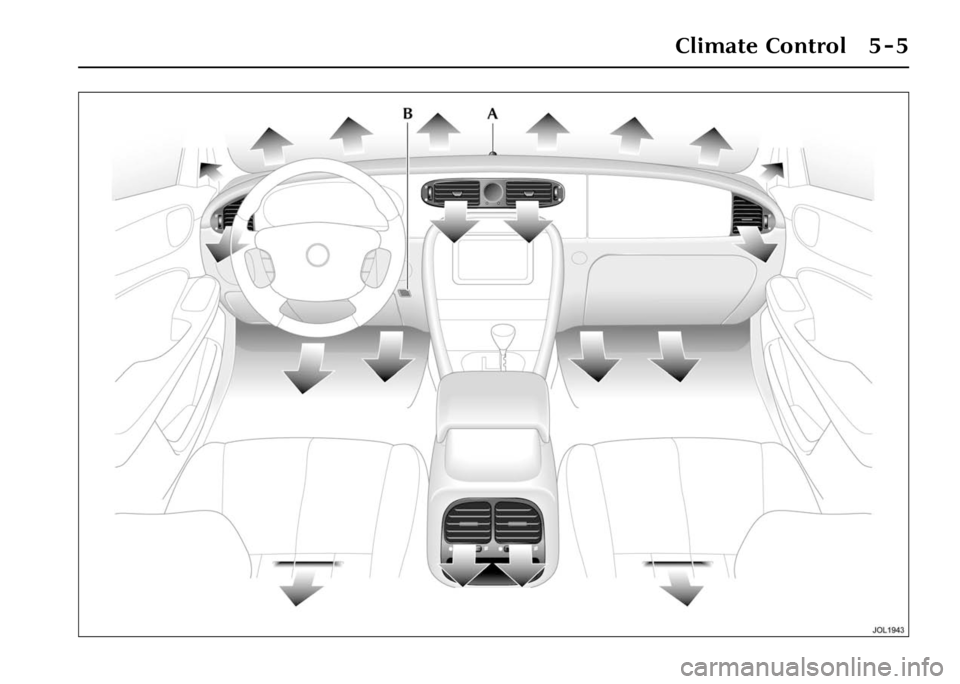
• A solar sensor is mounted on the centre top of the fascia, as shown
opposite ( A) . E n s u r e t h a t this sensor is
not covered.
• Temperature and humidity sensors are located behind the small grille ( B).
Do not cover or obstruct the opening.
• Air ducts under the front seats supply the rear passenger footwells (see
illustration opposite). Objects or
material placed under the seats may
block or obstruct the open ducts. • The external air intake to the air
conditioner/heater system is fitted
with a filter. Ensure that the filter is
changed at the specified service
intervals to maintain efficient
operation.
• If the air conditioning system is not used frequently, it should be run
briefly at least once each week, with a
cold setting, to prevent the seals from
drying out with subsequent
refrigerant leaks.
• Moisture removed from the air by the air conditioning unit is discharged
onto the road underneath the vehicle.
After stopping, puddles of water may
form underneath the vehicle.
Air Distribution
The illustration opposite shows the
location of the air vents within the
vehicle. The airflow from the fascia face
level vents is regulated using thumbwheel
controls and adjustable direction vanes.
Air distribution between the windscreen,
fascia and floor levels is selected
automatically when operating in AUTO
mode but can be selected manually.
Page 144 of 227
Climate Control 5 - 5
Page 145 of 227
5 - 6 Climate Control
Front Climate Controls
The climate control functions are selected
by push buttons and a rotary control.
When a button is pressed, selection of
the function is confirmed by a beep; most
buttons also have an illuminated LED.
Many system functions also have graphic
symbols displayed on the LCD (liquid
crystal display) screen.
Automatic control (AUTO) may be
overridden at any time. Defrost/demist
operation is available and also manual
selection of blower speed,
air distribution, recirculation,
air conditioning and windscreen heating.
Panel illumination
With the exterior lighting switched on or
Autolamps selected at night, the graphics
on the panel controls are illuminated by
low level backlighting.
In countries with daytime runnin g lamps,
the panel illumination will not be on
during daytime if the headlamp switch is
off or in Autolamp position unless it is
dark and the autolamp selects the
headlamps on.
The illumination level is adjusted by the
common instrument panel dimmer
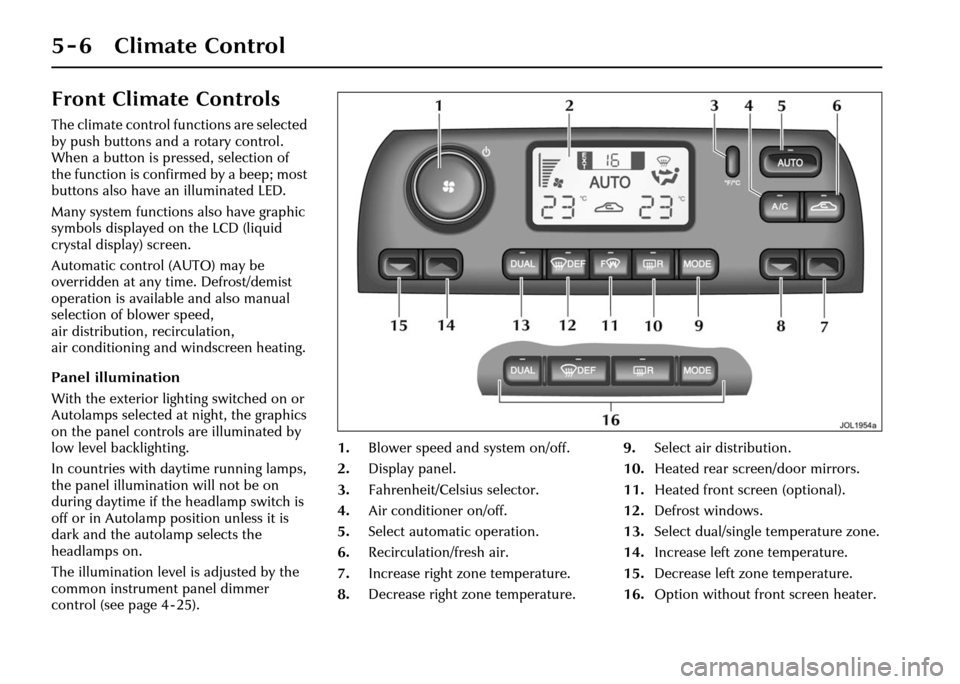
control (see page 4 - 25). 1.
Blower speed and system on/off.
2. Display panel.
3. Fahrenheit/Celsius selector.
4. Air conditioner on/off.
5. Select automatic operation.
6. Recirculation/fresh air.
7. Increase right zone temperature.
8. Decrease right zone temperature. 9.
Select air distribution.
10. Heated rear screen/door mirrors.
11. Heated front screen (optional).
12. Defrost windows.
13. Select dual/single temperature zone.
14. Increase left zone temperature.
15. Decrease left zone temperature.
16. Option without fron t screen heater.
Page 146 of 227
Climate Control 5 - 7
To Switch the System On
The climate control system operates in
position ‘II’ (run) of the ignition switch.
With the ignition key turned to the run
position, the system will switch on in the
operating mode last set.
For normal usage select AUTO mode.
AUTO Mode
Automatic operation provides a
controlled environment over a
temperature range of 61°F to 89°F (17°C
to 31°C) and should be regarded as the
normal operating mode.To select automatic climate
control press the AUTO
button; the word AUTO
appears on the LCD screen to confirm
selection.
Select the required temperature.
Front and rear screen heating and timed
air recirculation may be selected in AUTO
mode. Selecting any other control will
cancel AUTO operation.
Automatic operation cannot be
deselected using the AUTO button.
To exit AUTO mode, select another mode
or press the blower control knob to
switch the system off.
Temperature Selection
Separate controls allow
the driver and front
passenger zone
temperatures to be independently
adjusted. Press the red buttons to
increase temperature and the blue
buttons to decrease temperature.
Both driver and front passenger selected
temperatures are always displayed.
Pressing the driver’s buttons to select the
maximum or minimum temperature
settings causes the display to change
to HI or LO respectively and cancel
AUTO mode.
To quickly jump from HI or LO to a
convenient midrange temperature of 73°F
(23°C), press and hold AUTO for a few
seconds.
Dual Temperature Zones
With the DUAL button LED
illuminated, the system provides
separate temperature control of
the driver and front passenger zones.
Press DUAL to deselect dual temperature
control (LED off); the front passenger
temperature will change to that of the
driver side. Using the driver side
temperature control buttons will now
change both zone temperatures together.
To select dual temperature control, press
either the DUAL button or one of the
front passenger side red/blue
temperature control buttons. The DUAL
LED is illuminated.
External Temperature
The external (EXT) temperature is
displayed at the top of the screen.
Fahrenheit/Celsius Selection
Press the button to change the
scale between degrees
Fahrenheit (°F) and degrees
Celsius (°C) for the displayed
internal and external (EXT)
temperatures.
Page 147 of 227
5 - 8 Climate Control
Windscreen Defrost/Demist
Frost and heavy mistingTo remove frost or heavy
misting from the windscreen,
press the DEF button.
• The blower switches on automatically at a high speed but the speed can be
increased or decrea sed manually if
required.
• Air conditioning switches on automatically and cannot be
deselected.
• Recirculation is ca ncelled and cannot
be selected.
• The front screen heater and the rear screen heater/door mirror heaters
switch on automatically, provided the
engine is running.
To deselect defrost mode, press AUTO
(recommended operating mode).
Light misting To prevent or remove light
windscreen misting, select
manual air distribution to
windscreen and feet
(see page 5 - 9).
Heated Screens and Door
Mirrors
The front ( F) and
rear ( R) screen heaters
may be switched on and
off in any mode, including system off,
but only operate when the engine is
running. The door mirror heaters are also
controlled by the rear screen heater
button.
The front screen heater (if fitted) switches
off automatically after 6½ minutes.
The rear screen and door mirror heaters
switch off automatica lly after 21 minutes.
The windscreen heaters may be manually
deselected during the timed period using
the push buttons.
In cold ambient conditions, at the start of
a journey, the front and rear screen
heaters may switch on automatically for
the timed period.
Where a front screen he ater is not fitted,
the windscreen has a wiper park zone
heater which operates automatically with
no manual control.
Note: The top three lines of the rear
screen pattern are a concealed antenna
system and do not defrost the rear screen.
Air Conditioning
Press to switch the air
conditioning on or off.
The air conditioning system is
controlled automatically in AUTO mode.
Deselecting A/C cancels AUTO mode.
The air conditioning system is also
switched on automatically in defrost
mode (DEF) but cann ot be deselected.
Blower Speed
Set the blower speed as
required with the rotary
control knob. Blower speed is
shown as a series of bars on the
LCD screen.
When operating in AUTO mode, blower
speed is controlled automatically (but not
displayed) and any adjustment of the
knob will cancel AUTO mode.
Note: In AUTO mode, the blower only
operates at low speed, if heating is
required, until the engine is warm.