engine JAGUAR XJ 2004 X350 / 3.G Owners Manual
[x] Cancel search | Manufacturer: JAGUAR, Model Year: 2004, Model line: XJ, Model: JAGUAR XJ 2004 X350 / 3.GPages: 227, PDF Size: 4.22 MB
Page 7 of 227
Owner Information 1 - 3
1 Owner Information
General Information
Whether you are new to the Jaguar
marque or have previously owned Jaguar
vehicles, we are pleased that you have
made Jaguar your choice of vehicle this
time.
For safety and the pleasure you will get
from your new vehicle, please take the
time to get well acquainted with your
vehicle by reading the handbooks.
Please note that it is essential to refer to
the XJ handbooks for complete operating
and safety information.
When left-hand or right-hand is used in
the text, this refers to the left-hand side
or right-hand side of the vehicle, viewed
from the rear.
Vehicle Handbooks
!WARNING:
Remember to pass on the Vehicle
Handbooks when reselling the
vehicle. Handbooks are integral parts
of the vehicle.
Jaguar Retailers
Jaguar Retailers are chosen with care.
Each is dedicated to providing a Sales,
Service and Spare Parts facility of the
highest standard.
Jaguar Retailers are provided with full
technical support from the factory, with
comprehensive training for all their
technicians.
Retailers’ workshops operate to a high
standard and have all the necessary tools
and equipment essential to maintain or
repair Jaguar vehicles.
Accessories
A full range of Jaguar Engineering
approved accessories including safety,
stowage, touring, leisure and lifestyle
products are just some of those available
from your Jaguar Retailer.
Please ask your Jaguar Retailer for an
up-to-date brochure so you can select
your requirements from the latest range.
Jaguar Body Repair Centres
Your Jaguar incorporates the latest
technology in aluminium body structures.
A specialist network of vehicle Body
Repair Centres is provided with full
technical support from the factory, and
with comprehensive training for all their
body shop technicians.
The Body Repair Centres operate to a
high standard and have all the necessary
tools and equipment essential to repair
Jaguar vehicles.
A current list of Body Repair Centres is
included in the vehicle literature pack.
Page 10 of 227
1 - 6 Owner Information
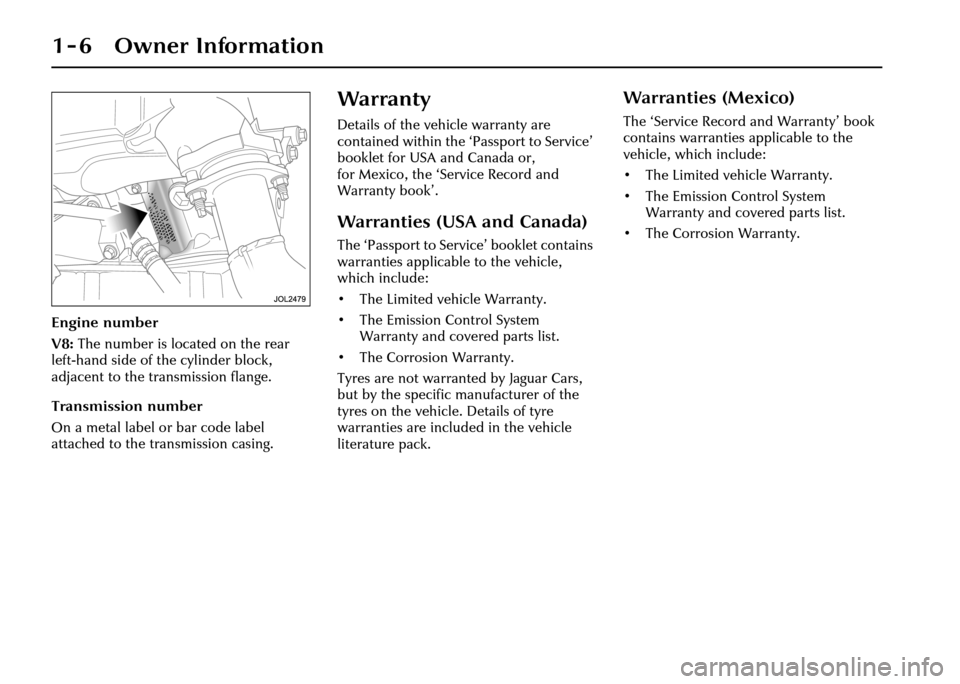
Engine number
V8: The number is located on the rear
left-hand side of the cylinder block,
adjacent to the tr ansmission flange.
Transmission number
On a metal label or bar code label
attached to the transmission casing.
Warranty
Details of the vehicle warranty are
contained within the ‘P assport to Service’
booklet for USA and Canada or,
for Mexico, the ‘Service Record and
Warranty book’.
Warranties (USA and Canada)
The ‘Passport to Service’ booklet contains
warranties applicable to the vehicle,
which include:
• The Limited vehicle Warranty.
• The Emission Control System Warranty and covered parts list.
• The Corrosion Warranty.
Tyres are not warranted by Jaguar Cars,
but by the specific manufacturer of the
tyres on the vehicle. Details of tyre
warranties are included in the vehicle
literature pack.
Warranties (Mexico)
The ‘Service Record and Warranty’ book
contains warranties applicable to the
vehicle, which include:
• The Limited vehicle Warranty.
• The Emission Control System Warranty and covered parts list.
• The Corrosion Warranty.
Page 11 of 227
Owner Information 1 - 7
Health and Safety
!WARNING:
1. Many liquids and other substances used in vehicles are
poisonous and should never be
consumed and must be kept away
from open wounds.
These substances include anti-
freeze, brake fluid, fuel,
windscreen washer additives,
lubricants and various adhesives.
2. The presence of any unusual fumes (for example; petrol or
exhaust fumes) in the passenger
compartment and/or luggage
compartment should be corrected
immediately by a Jaguar Retailer.
If you must drive under these
conditions do so only with all
windows fully open.
3. By operating other electronic equipment (for example; a mobile
phone without an exterior
antenna) electro-magnetic fields
can cause malfunctions of the
vehicle electronics.
Therefore, you should observe the
instructions of the equipment
manufacturers. 4. Any modifications to the fuel
system not specifically designed
for this Jaguar are prohibited.
Such modifications in some
circumstances could result in a
fire. All service actions must be
entrusted to a Jaguar Retailer.
5. Alterations to the electrical system, including the fitting of
accessories not designed for this
Jaguar, will cause damage to the
electrical circuits and systems.
In some circumstances this could
result in a malfunction or fire.
All accessory work should be
entrusted to a Jaguar Retailer.
6. No attempt should be made to repair a fuse that has blown.
Always install a new fuse of the
correct amperage. Failure to
comply with the above may cause
a fire hazard or create serious
damage elsewhere in the
electrical circuit.
7. Avoid contact with battery acid which is poisonous and corrosive.
Acid will cause burns to the skin
as well as to the eyes. In the event
of skin or eye contamination,
wash the affected area with water
thoroughly. Seek immediate medical attention when eye
contact has occurred.
8. Do not disconnect any pipes in the air conditioning refrigeration
system. A refrigerant is used
which can cause blindness if
allowed to contact the eyes.
If refrigerant should contact the
eyes or skin, wash the eyes or
affected area with cold water for
several minutes. Do not rub.
As soon as possible thereafter,
obtain treatment from a doctor or
eye specialist.
9. When working within the engine compartment, take care to avoid
contact with moving parts and hot
components.
10. California Proposition 65: Engine exhaust, some of it’s
constituents, and certain vehicle
components, contain or emit
chemicals known to the State of
California to cause cancer and
birth defects or other
reproductive harm.
Page 13 of 227
Owner Information 1 - 9
Protect the Environment
We must all play our part in protecting
the environment. Correct vehicle usage
and disposal of waste cleaning and
lubrication materials are significant steps
towards this aim.
Avoid using high engine speeds. You will
then protect your engine, reduce fuel
consumption, lower the engine noise
level and help towards reducing the
environmental burden.
Dispose of batteries, tyres, engine, brake
and coolant fluids at your local
authorised waste disposal facilities.
Window Tinting
!WARNING:
Do not have your vehicle windows
tinted with a metal oxide tinting (for
maximum heat reduction from sun
load).
Metal oxide tinting prevents the
reception of the Global Positioning
Satellite (GPS) signals by the antenna
causing the navigation system to stop
functioning.
Metal oxide tinting also prevents the
reception of the Remote Keyless Entry
(RKE) signals by the antenna, causing
reduced operation of the arming/
disarming/locking/unlocking system of the
vehicle.
A non-metal tinting should be used if you
require window tinting and if in doubt,
contact your Jaguar Retailer for advice.
Window marking
It is a worthwhile precaution to have the
vehicle registration number etched into
each window glass by a Jaguar Retailer.
Mobile/Portable
Telephones
!WARNING:
Using a mobile/portable telephone
without an exterior antenna is not
recommended when driving as the
electro-magnetic fields produced can
cause malfunctions with the vehicle
electronic systems.
Check the laws and regulations on the
use of cellular telephones in the areas
where you drive. Always obey them. Also,
give full attention to driving.
Use hands-free operation (if fitted) and
pull off the road and park before making
or answering a call, if driving conditions
so require.
Page 18 of 227
Security and Locks 2 - 3
2 Security and Locks
Ignition Switch
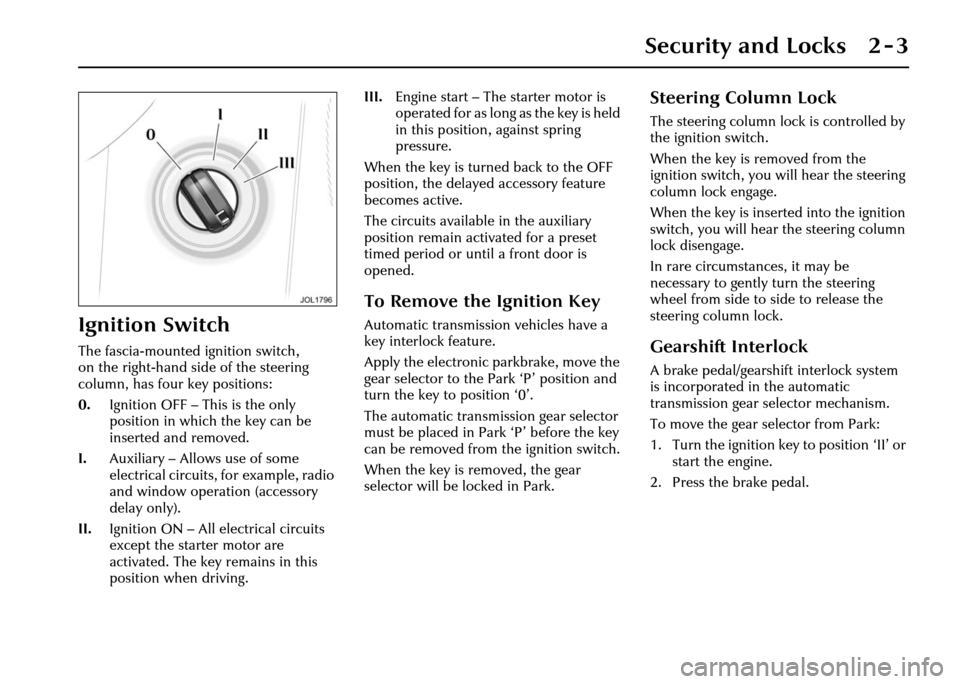
The fascia-mounted ignition switch,
on the right-hand side of the steering
column, has four key positions:
0.Ignition OFF – This is the only
position in which the key can be
inserted and removed.
I. Auxiliary – Allows use of some
electrical circuits, for example, radio
and window oper ation (accessory
delay only).
II. Ignition ON – All electrical circuits
except the starter motor are
activated. The key remains in this
position when driving. III.
Engine start – The starter motor is
operated for as long as the key is held
in this position, against spring
pressure.
When the key is turned back to the OFF
position, the delayed accessory feature
becomes active.
The circuits available in the auxiliary
position remain activated for a preset
timed period or until a front door is
opened.
To Remove the Ignition Key
Automatic transmissi on vehicles have a
key interlock feature.
Apply the electronic parkbrake, move the
gear selector to the Park ‘P’ position and
turn the key to position ‘0’.
The automatic transmis sion gear selector
must be placed in Park ‘P’ before the key
can be removed from the ignition switch.
When the key is removed, the gear
selector will be locked in Park.
Steering Column Lock
The steering column lock is controlled by
the ignition switch.
When the key is removed from the
ignition switch, you will hear the steering
column lock engage.
When the key is inserted into the ignition
switch, you will hear the steering column
lock disengage.
In rare circumstances, it may be
necessary to gently turn the steering
wheel from side to side to release the
steering column lock.
Gearshift Interlock
A brake pedal/gearshift interlock system
is incorporated in the automatic
transmission gear selector mechanism.
To move the gear selector from Park:
1. Turn the ignition key to position ‘II’ or start the engine.
2. Press the brake pedal.
Page 22 of 227
Security and Locks 2 - 7
Keys
Vehicles are supplied with two integrated
transmitter keys and one green-headed
valet key. Additionally, black-headed keys
are available and for further details,
contact a Jaguar Retailer.
Integrated transmitter key
The integrated tr ansmitter key is
comprised of the key body, which is
integrated with a re mote transmitter.
The key operates all the locks on your
vehicle.
Green-headed valet key
The green-headed valet key is not
integrated with a re mote transmitter.
The key operates the driver’s door lock
and the ignition switch, but does not
operate the luggage compartment lock.
Black-headed key
The black-headed key is not integrated
with a remote transm itter, but it does
operate all the locks and the ignition
switch on your vehicle. The key is not
supplied with your vehicle.
Additional keys
Five additional keys can be programmed
to operate the locks on your vehicle. Note:
A maximum of three additional
integrated transmitter keys can be used.
All additional keys mu st be obtained from
and programmed by, a Jaguar Retailer.
Key number label
The key number is recorded on an
adhesive label which is affixed to the rear
of the integrated transmitter keys.
Peel off the label and keep safely, not in
the vehicle.
Immobilisation System
This vehicle is fitted with an
immobilisation system. The system
prevents the vehicle be ing driven away by
unauthorised persons. The features of the
system include the following:
Programmable key
An electronic device is fitted in the head
of each key which is programmed to the
vehicle electronic systems.
When a programmed key is inserted into
the ignition switch it is recognised and
accepted by the vehicle’s electronic
systems.
The engine cannot be started with a key
that is not programmed to the vehicle
electronic systems. Immobilisation system status light
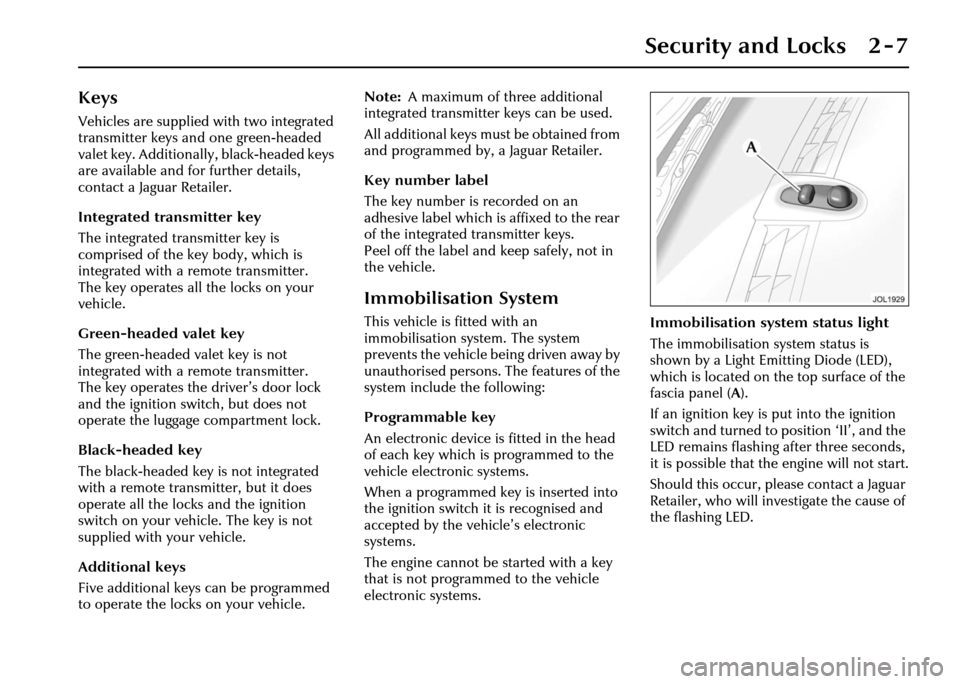
The immobilisation system status is
shown by a Light Emitting Diode (LED),
which is located on the top surface of the
fascia panel (
A).
If an ignition key is put into the ignition
switch and turned to position ‘II’, and the
LED remains flashing af ter three seconds,
it is possible that the engine will not start.
Should this occur, please contact a Jaguar
Retailer, who will inve stigate the cause of
the flashing LED.
Page 32 of 227
Security and Locks 2 - 17
Security Features
The security system has been designed
for:
• Prevention of theft of the vehicle.
• Prevention of theft of items from the vehicle.
• Personal security.
The security system is integrated with the
vehicle electronics and engine
management systems making it far more
difficult for a thief to penetrate and steal
the vehicle.
Panic Alarm (if enabled)
When in or near the vehicle, the alarm
can be set off to dete r a possible offender.
For this feature to operate, the key must
not be in the ignition switch.
Pressing the headlamp convenience/panic
button on the key transmitter three times
within three seconds will activate the
‘Panic Alarm’.
The alarm is stopped by:
• Putting the key into the ignition switch and turning to position ‘II’.
Note:
1. The key transmitter cannot be used to cancel the Panic alarm. This prevents
unauthorised cancellation in an
emergency.
2. The panic alarm is normally enabled. If required, this feature can be
disabled or enabled by a Jaguar
Retailer.
3. The vehicle locking status will not change when the panic alarm is
activated.
Passive Arming (Retailer
Option)
Passive arming wi ll not lock the
doors, it only arms the security alarm
system.
Passive arming, if enabled by a Jaguar
Retailer, will automatically arm the
vehicle alarm system 30 seconds after the
last protected entry (door, luggage
compartment) is closed following the key
being removed from th e ignition switch.
When passive arming occurs the direction
indicators will flash once and a single
tone will be heard (if enabled). The red
security light on the fascia will start to
flash and will continue for as long as the
alarm is armed.
Opening the drivers door causes a
warning sound which continues for
15 seconds before the system goes into
the full alarm state. If any other door is
opened before the drivers door,
the system goes into the full alarm state
immediately.
When the system is pa ssively armed and a
key is used to open the trunk, a seven
second warning audible ticking will
sound before the full alarm is activated.
Page 36 of 227
Security and Locks 2 - 21
Before Programming
Caution: When programming a
garage door opener or entry gate that
may require you to press and re-press
the hand-held transmitter (cycle),
unplug the device during the ‘cycling’
process to prevent possible motor
failure.
It is recommended that for best results,
fit a new battery to the hand-held
transmitter of the garage door opener
(or other device) before programming.
If your garage door opener receiver
(located in the garage) is equipped with
an antenna, ensure that the antenna is
hanging straight down.
To Erase All Programming
For first time progra mming, ensure that
the engine is switched off:
1. Turn the ignition switch to position ‘I’.
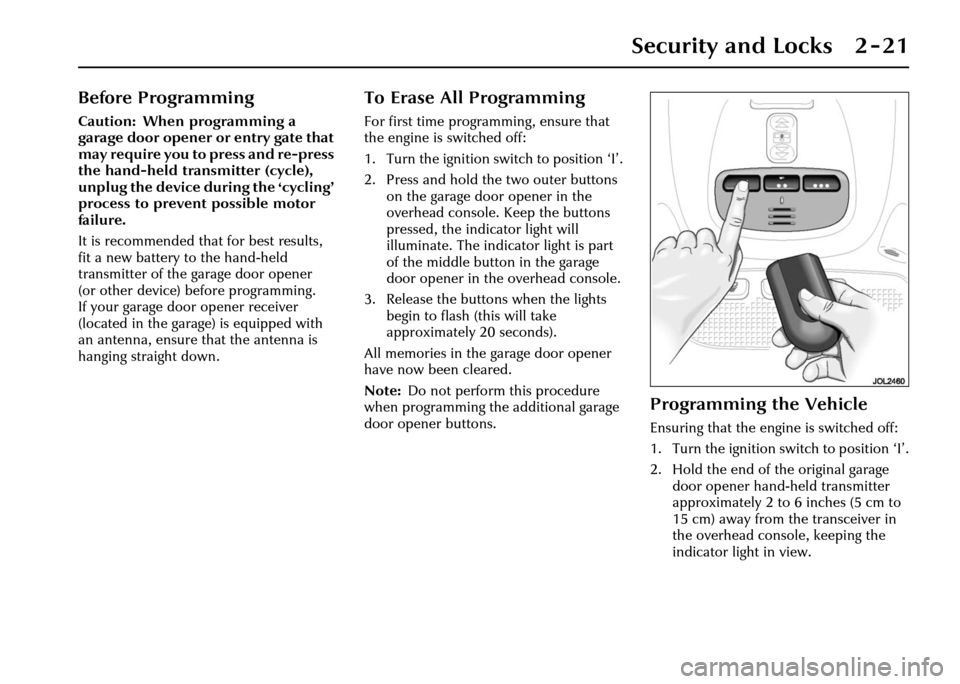
2. Press and hold th e two outer buttons
on the garage door opener in the
overhead console. Keep the buttons
pressed, the indicator light will
illuminate. The indicator light is part
of the middle button in the garage
door opener in the overhead console.
3. Release the buttons when the lights
begin to flash (this will take
approximately 20 seconds).
All memories in the garage door opener
have now been cleared.
Note: Do not perform this procedure
when programming the additional garage
door opener buttons.
Programming the Vehicle
Ensuring that the engine is switched off:
1. Turn the ignition switch to position ‘I’.
2. Hold the end of the original garage door opener hand -held transmitter
approximately 2 to 6 inches (5 cm to
15 cm) away from the transceiver in
the overhead console, keeping the
indicator light in view.
Page 44 of 227
Before Driving 3 - 5
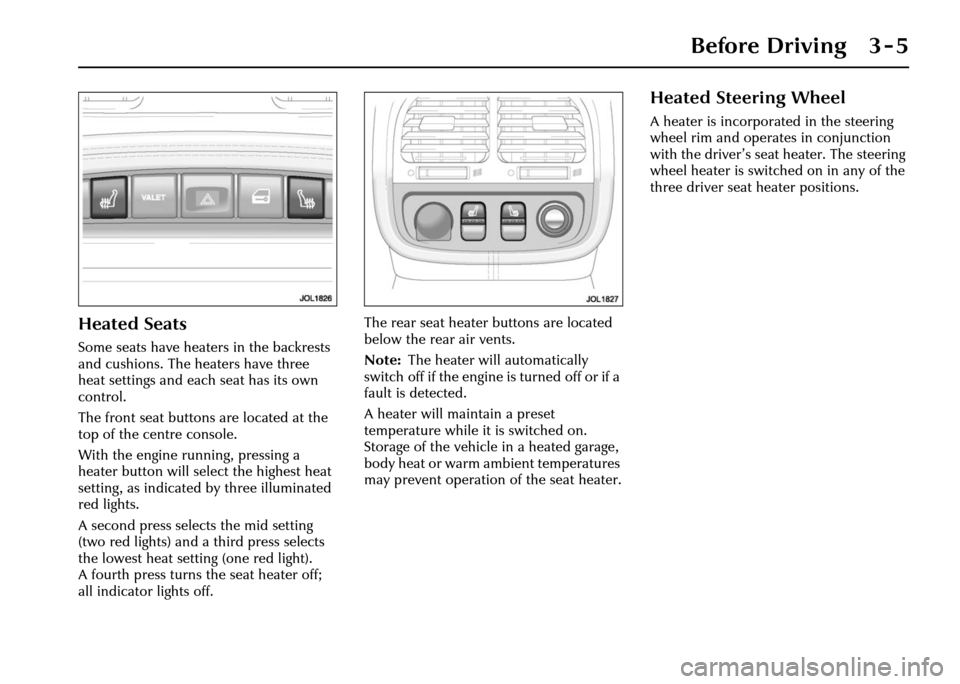
Heated Seats
Some seats have heaters in the backrests
and cushions. The heaters have three
heat settings and each seat has its own
control.
The front seat buttons are located at the
top of the centre console.
With the engine running, pressing a
heater button will select the highest heat
setting, as indicated by three illuminated
red lights.
A second press selects the mid setting
(two red lights) and a third press selects
the lowest heat setting (one red light).
A fourth press turns the seat heater off;
all indicator lights off. The rear seat heater buttons are located
below the rear air vents.
Note:
The heater will automatically
switch off if the engine is turned off or if a
fault is detected.
A heater will maintain a preset
temperature while it is switched on.
Storage of the vehicle in a heated garage,
body heat or warm ambient temperatures
may prevent operation of the seat heater.
Heated Steering Wheel
A heater is incorporated in the steering
wheel rim and operates in conjunction
with the driver’s seat heater. The steering
wheel heater is switched on in any of the
three driver seat heater positions.
Page 74 of 227
On the Road 4 - 3
4 On the Road
Instruments
None of the instruments will show
correct indications until the ignition is
switched ON (position ‘II’).
If the exterior light switch is ON and the
ignition is ON, the display brightness can
be varied using the dimmer switch
(page 4 - 25).
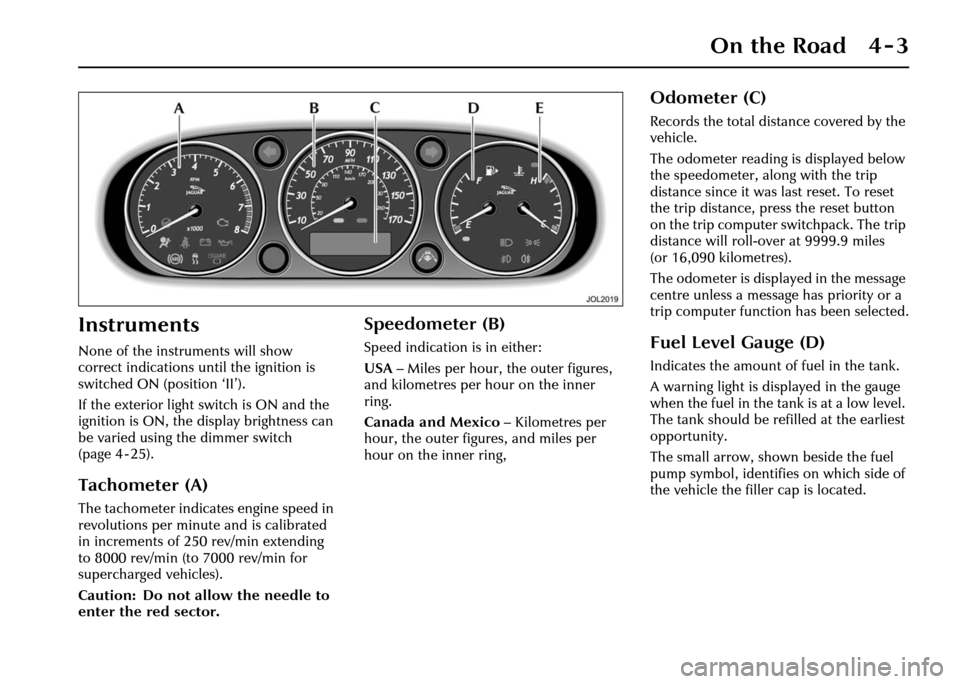
Tachometer (A)
The tachometer indicates engine speed in
revolutions per minute and is calibrated
in increments of 250 rev/min extending
to 8000 rev/min (to 7000 rev/min for
supercharged vehicles).
Caution: Do not allow the needle to
enter the red sector.
Speedometer (B)
Speed indication is in either:
USA– Miles per hour, the outer figures,
and kilometres per hour on the inner
ring.
Canada and Mexico – Kilometres per
hour, the outer figures, and miles per
hour on the inner ring,
Odometer (C)
Records the total distance covered by the
vehicle.
The odometer reading is displayed below
the speedometer, al ong with the trip
distance since it was last reset. To reset
the trip distance, press the reset button
on the trip computer switchpack. The trip
distance will roll-over at 9999.9 miles
(or 16,090 kilometres).
The odometer is displayed in the message
centre unless a message has priority or a
trip computer function has been selected.
Fuel Level Gauge (D)
Indicates the amount of fuel in the tank.
A warning light is displayed in the gauge
when the fuel in the tank is at a low level.
The tank should be refilled at the earliest
opportunity.
The small arrow, shown beside the fuel
pump symbol, identifies on which side of
the vehicle the filler cap is located.