light JAGUAR XJ 2011 X351 / 4.G Quick Start Guide
[x] Cancel search | Manufacturer: JAGUAR, Model Year: 2011, Model line: XJ, Model: JAGUAR XJ 2011 X351 / 4.GPages: 16, PDF Size: 1.06 MB
Page 2 of 16

2
J A G U A R X JJ A G U A R X J J A G U A R X J
Vehicle access
Jaguar Smart Key
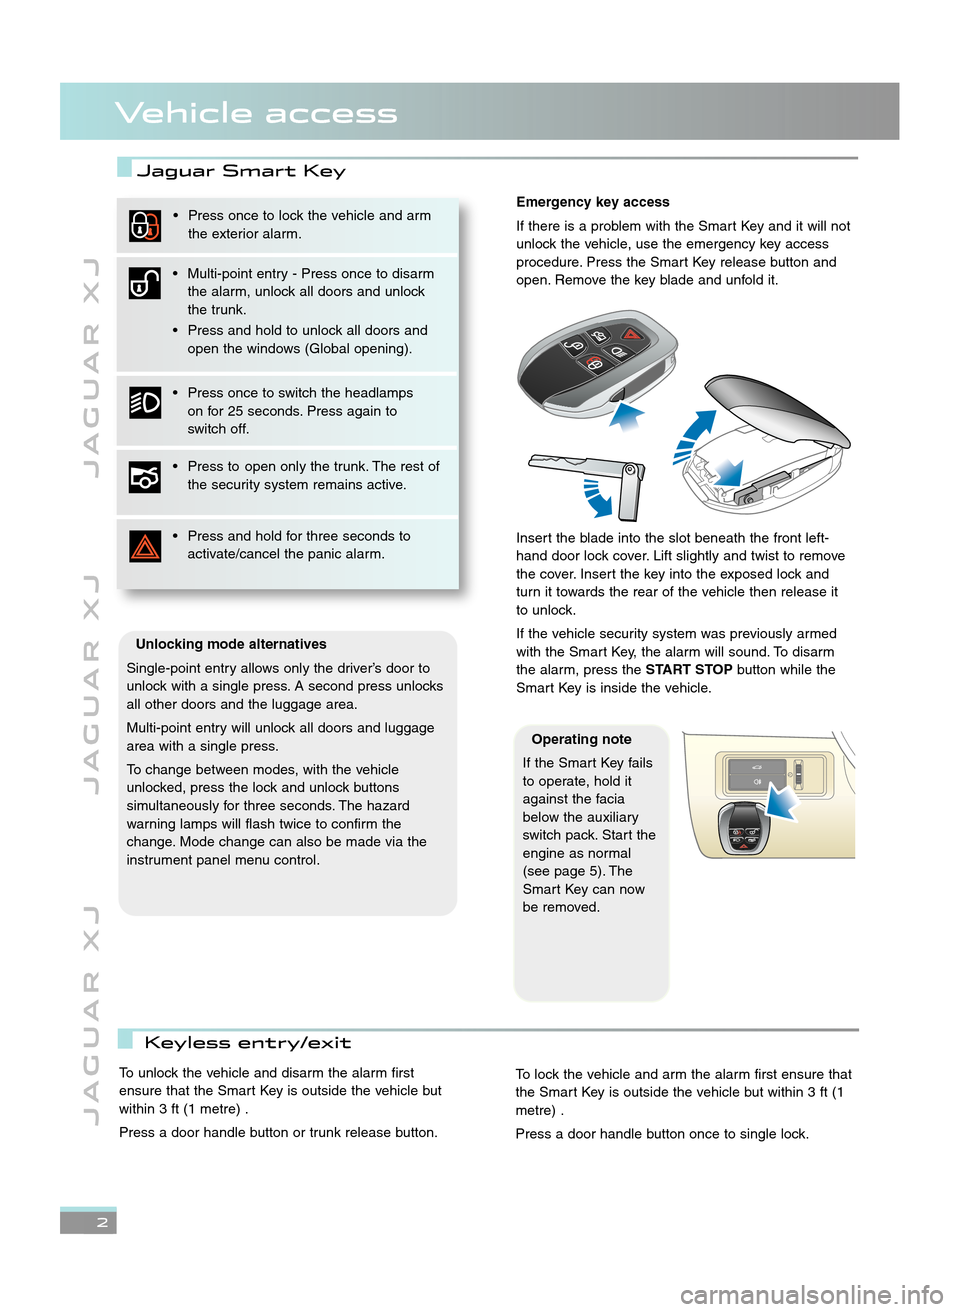
Emergency key access
If there is a problem with the Smart Key and it will not
unlock the vehicle, use the emergency key access
procedure. Press the Smart Key release button and
open. Remove the key blade and unfold it.
Insert the blade into the slot beneath the front left\b
hand door lock cover. Lift slightly and twist to remove
the cover. Insert the key into the exposed lock and
turn it towards the rear of the vehicle then release it
to unlock.
If the vehicle security system was previously armed
with the Smart Key, the alarm will sound. To disarm
the alarm, press the START STOPbutton while the
Smart Key is inside the vehicle.
Unlocking mode alternatives
Single\bpoint entry allows only the driver’s door to
unlock with a single press. A second press unlocks
all other doors and the luggage area.
Multi\bpoint entry will unlock all doors and luggage
area with a single press.
To change between modes, with the vehicle
unlocked, press the lock and unlock buttons
simultaneously for three seconds. The hazard
warning lamps will flash twice to confirm the
change. Mode change can also be made via the
instrument panel menu control.
• Press once to lock the vehicle and arm the exterior alarm.
• Multi\bpoint entry \b Press once to disarm the alarm, unlock all doors and unlock
the trunk.
• Press and hold to unlock all doors and open the windows (Global opening).
• Press once to switch the headlamps on for 25 seconds. Press again to
switch off.
• Press to open only the trunk. The rest of the security system remains active.
• Press and hold for three seconds to activate/cancel the panic alarm.
Operating note
If the Smart Key fails
to operate, hold it
against the facia
below the auxiliary
switch pack. Start the
engine as normal
(see page 5). The
Smart Key can now
be removed.
To unlock the vehicle and disarm the alarm first
ensure that the Smart Key is outside the vehicle but
within 3 ft (\f metre) .
Press a door handle button or trunk release button.To lock the vehicle and arm the alarm first ensure that
the Smart Key is outside the vehicle but within 3 ft (\f
metre) .
Press a door handle button once to single lock.
Keyless entry/exit
JJM 18 96 34 111:X351 10MY.qxd 05/07/2010 15:04 Page 2
Page 7 of 16

J A G U A R X JJ A G U A R X J J A G U A R X J
7
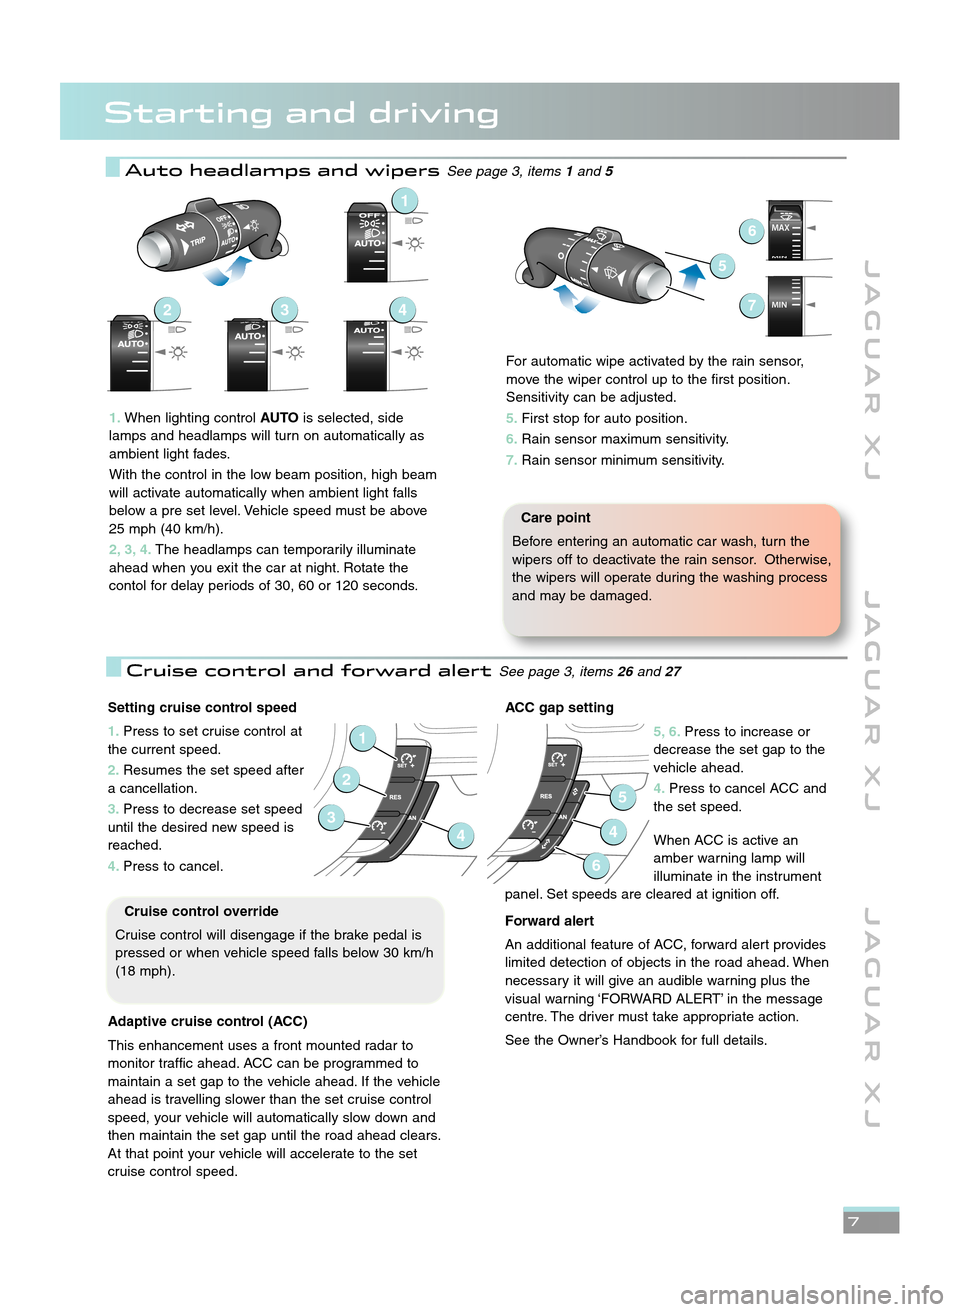
Auto headlamps and wipersSee page 3, items1and \b
Starting and driving
MAX
MINMAX
MIN
6
5
7
1\bWhen lighting control AUTOis selected, side
lamps and headlamps will turn on automatically as
ambient light fades.
With the control in the low beam position, high beam
will activate automatically when ambient light falls
below a pre set level. Vehicle speed must be above
25 mph (40 km/h).
\f, 3, 4\b The headlamps can temporarily illuminate
ahead when you exit the car at night. Rotate the
contol for delay periods of 30, 60 or \f20 seconds.
1
432
Care point
Before entering an automatic car wash, turn the
wipers off to deactivate the rain sensor. Otherwise,
the wipers will operate during the washing process
and may be damaged.
Setting cruise control speed
1\b Press to set cruise control at
the current speed.
\f\b Resumes the set speed after
a cancellation.
3\b Press to decrease set speed
until the desired new speed is
reached.
4\b Press to cancel.
Adaptive cruise control (ACC)
This enhancement uses a front mounted radar to
monitor traffic ahead. ACC can be programmed to
maintain a set gap to the vehicle ahead. If the vehicle
ahead is travelling slower than the set cruise control
speed, your vehicle will automatically slow down and
then maintain the set gap until the road ahead clears.
At that point your vehicle will accelerate to the set
cruise control speed.
1
2
34
Cruise control override
Cruise control will disengage if the brake pedal is
pressed or when vehicle speed falls below 30 km/h
(\f8 mph).
ACC gap setting
5, 6\bPress to increase or
decrease the set gap to the
vehicle ahead.
4\b Press to cancel ACC and
the set speed.
When ACC is active an
amber warning lamp will
illuminate in the instrument
panel. Set speeds are cleared at ignition off.
Forward alert
An additional feature of ACC, forward alert provides
limited detection of objects in the road ahead. When
necessary it will give an audible warning plus the
visual warning ‘FORWARD ALERT’ in the message
centre. The driver must take appropriate action.
See the Owner’s Handbook for full details.
5
4
6
Cruise control and forward alertSee page 3, items 26and 27
For automatic wipe activated by the rain sensor,
move the wiper control up to the first position.
Sensitivity can be adjusted.
5\b First stop for auto position.
6\b Rain sensor maximum sensitivity.
7\b Rain sensor minimum sensitivity.
JJM 18 96 34 111:X351 10MY.qxd 05/07/2010 15:04 Page 7
Page 8 of 16

8
J A G U A R X JJ A G U A R X J J A G U A R X J
Driving aids
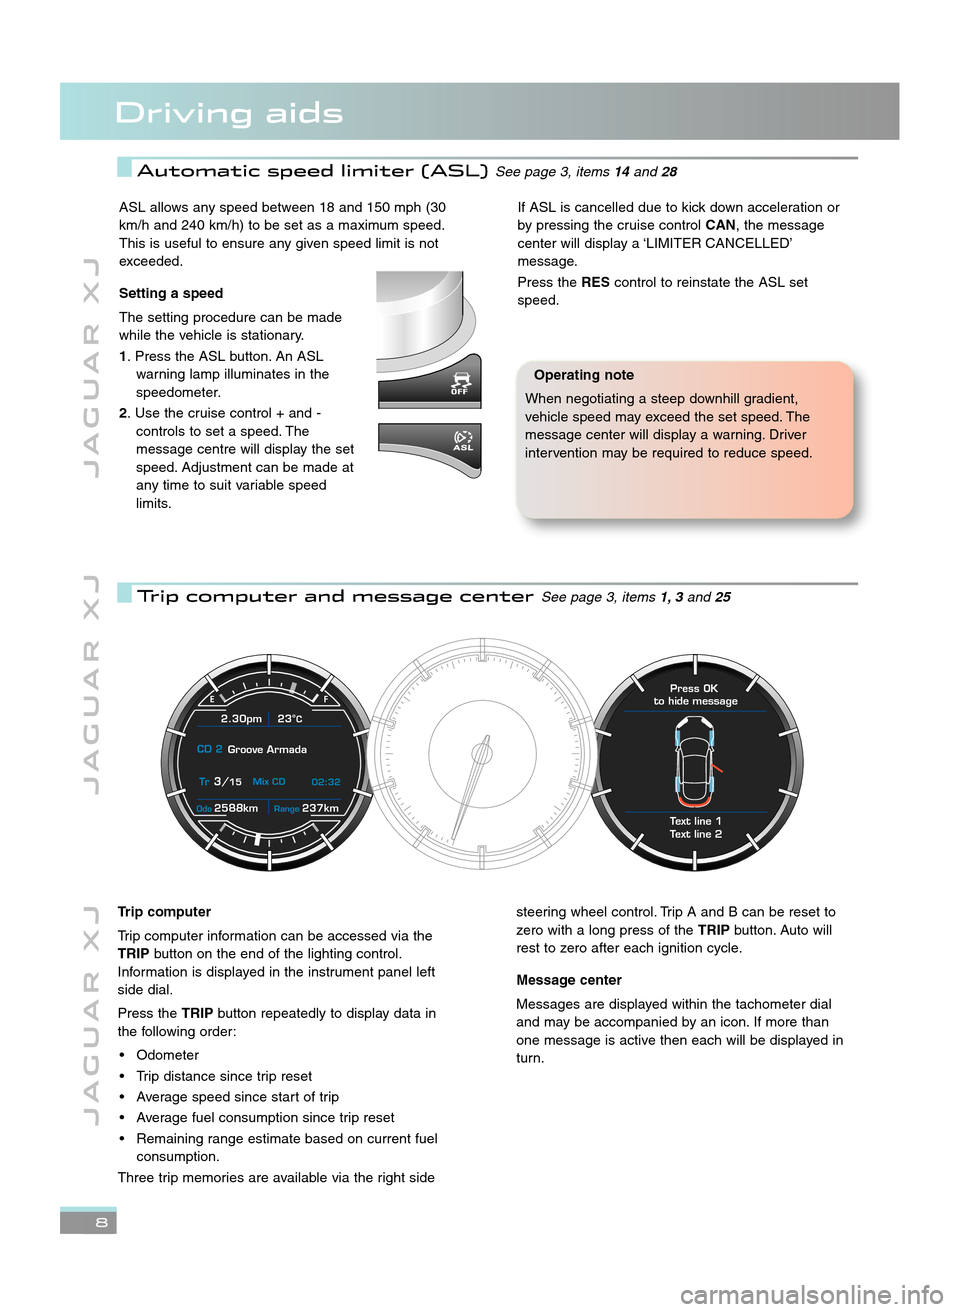
Automatic speed limiter (ASL)See page 3, items14and 28
Trip computer and message centerSee page 3, items 1, 3and 2\b
ASL allows any speed between \f8 and \f50 mph (30
km/h and 240 km/h) to be set as a maximum speed.
This is useful to ensure any given speed limit is not
exceeded.
Setting a speed
The setting procedure can be made
while the vehicle is stationary.
1. Press the ASL button. An ASL warning lamp illuminates in the
speedometer.
\f. Use the cruise control + and \b controls to set a speed. The
message centre will display the set
speed. Adjustment can be made at
any time to suit variable speed
limits.If ASL is cancelled due to kick down acceleration or
by pressing the cruise control CAN, the message
center will display a ‘LIMITER CANCELLED’
message.
Press the REScontrol to reinstate the ASL set
speed.
Operating note
When negotiating a steep downhill gradient,
vehicle speed may exceed the set speed. The
message center will display a warning. Driver
intervention may be required to reduce speed.
2588kmOdo237kmRange
2.30pm 23°C
CD 2 Groove Armada
Tr
3/15 Mix CD
02:32
Text line 1
Text line 2 Press OK
to hide message
Trip computer
Trip computer information can be accessed via the
TRIP button on the end of the lighting control.
Information is displayed in the instrument panel left
side dial.
Press the TRIPbutton repeatedly to display data in
the following order:
• Odometer
• Trip distance since trip reset
• Average speed since start of trip
• Average fuel consumption since trip reset
• Remaining range estimate based on current fuel consumption.
Three trip memories are available via the right sidesteering wheel control. Trip A and B can be reset to
zero with a long press of the TRIPbutton. Auto will
rest to zero after each ignition cycle.
Message center
Messages are displayed within the tachometer dial
and may be accompanied by an icon. If more than
one message is active then each will be displayed in
turn.
JJM 18 96 34 111:X351 10MY.qxd 05/07/2010 15:04 Page 8
Page 10 of 16

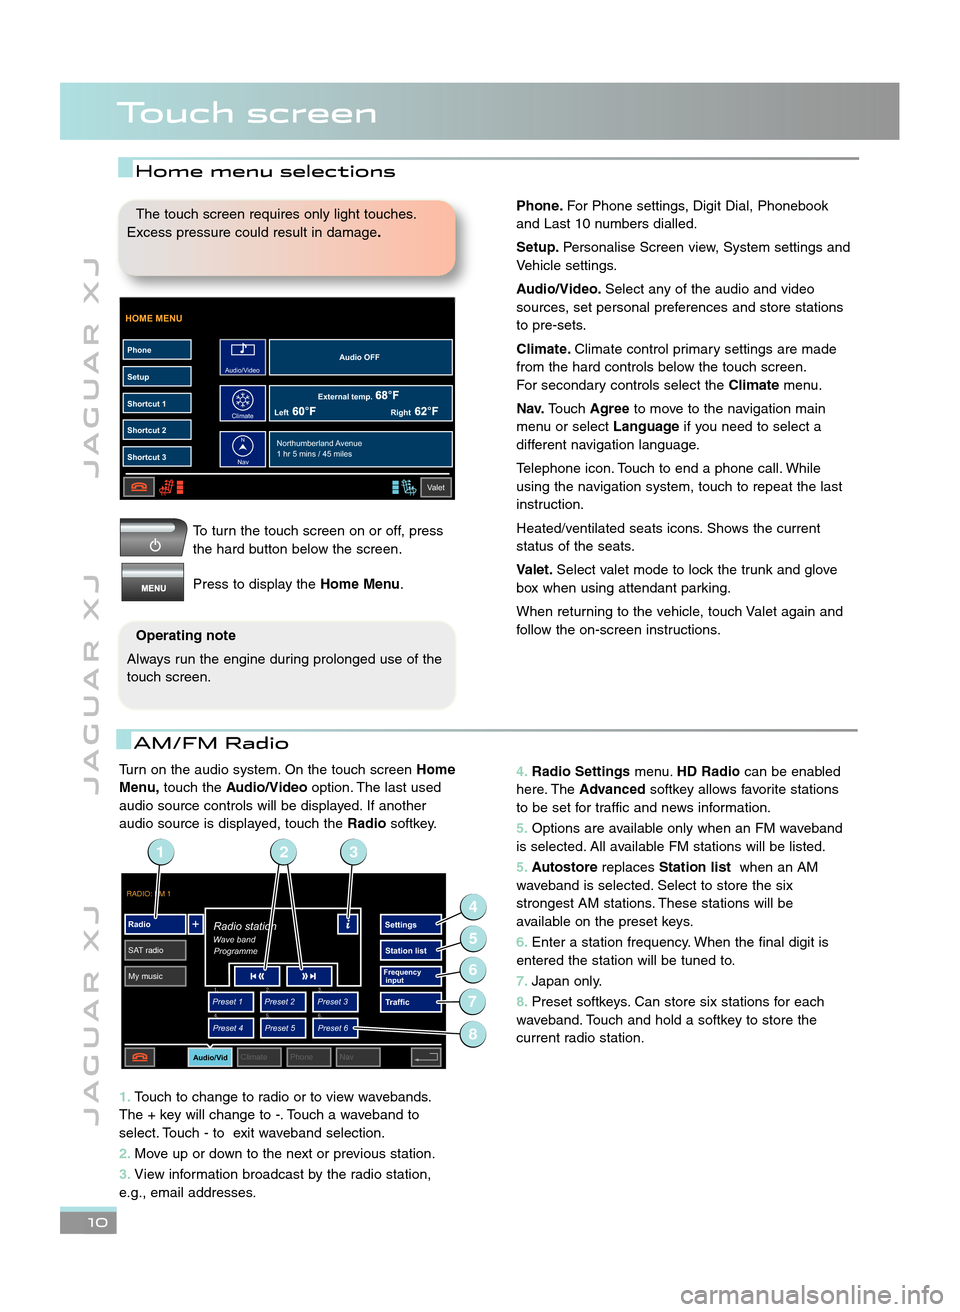
Turn on the audio system. On the touch screenHome
Menu, touch the Audio/Video option. The last used
audio source controls will be displayed. If another
audio source is displayed, touch the Radiosoftkey.
1\b Touch to change to radio or to view wavebands.
The + key will change to \b. Touch a waveband to
select. Touch \b to exit waveband selection.
\f\b Move up or down to the next or previous station.
3\b View information broadcast by the radio station,
e.g., email addresses.
J A G U A R X J J A G U A R X J J A G U A R X J
Touch screen
\b0
To turn the touch screen on or off, press
the hard button below the screen.
Press to display the Home Menu.
HOME MENU
External temp.Audio OFF
Left Right
PhoneSetup
Shortcut 1
Shortcut 2
Shortcut 3
Valet
Northumberland Avenue
1 hr 5 mins / 45 miles
Audio/Video
Climate
Nav
N
The touch screen requires only light touches.
Excess pressure could result in damage \b
Operating note
Always run the engine during prolonged use of the
touch screen.
AM/FM Radio
4\b Radio Settings menu.HD Radio can be enabled
here. The Advanced softkey allows favorite stations
to be set for traffic and news information.
5\b Options are available only when an FM waveband
is selected. All available FM stations will be listed.
5\b Autostore replacesStation list when an AM
waveband is selected. Select to store the six
strongest AM stations. These stations will be
available on the preset keys.
6\b Enter a station frequency. When the final digit is
entered the station will be tuned to.
7\b Japan only.
8\b Preset softkeys. Can store six stations for each
waveband. Touch and hold a softkey to store the
current radio station.
RADIO: FM 1
Radio
SAT radio My music Settings
Station list
Traffic
Preset 1
Preset 3
Preset 2
Audio/VidClimate Phone Nav
Wave bandRadio station
Programme
Preset 4
Preset 6
Preset 5
Frequency
input1. 2.
3.
4. 5.
6.
2
4
6
5
7
13
8
Home menu selections
Phone\bFor Phone settings, Digit Dial, Phonebook
and Last \f0 numbers dialled.
Setup\b Personalise Screen view, System settings and
Vehicle settings.
Audio/Video\b Select any of the audio and video
sources, set personal preferences and store stations
to pre\bsets.
Climate\b Climate control primary settings are made
from the hard controls below the touch screen.
For secondary controls select the Climatemenu.
Nav\b Touch Agree to move to the navigation main
menu or select Languageif you need to select a
different navigation language.
Telephone icon. Touch to end a phone call. While
using the navigation system, touch to repeat the last
instruction.
Heated/ventilated seats icons. Shows the current
status of the seats.
Valet\b Select valet mode to lock the trunk and glove
box when using attendant parking.
When returning to the vehicle, touch Valet again and
follow the on\bscreen instructions.
JJM 18 96 34 111:X351 10MY.qxd 05/07/2010 15:04 Page 10