sensor JAGUAR XJ 2011 X351 / 4.G Quick Start Guide
[x] Cancel search | Manufacturer: JAGUAR, Model Year: 2011, Model line: XJ, Model: JAGUAR XJ 2011 X351 / 4.GPages: 16, PDF Size: 1.06 MB
Page 4 of 16

4
J A G U A R X JJ A G U A R X J J A G U A R X J
Comfort adjustments
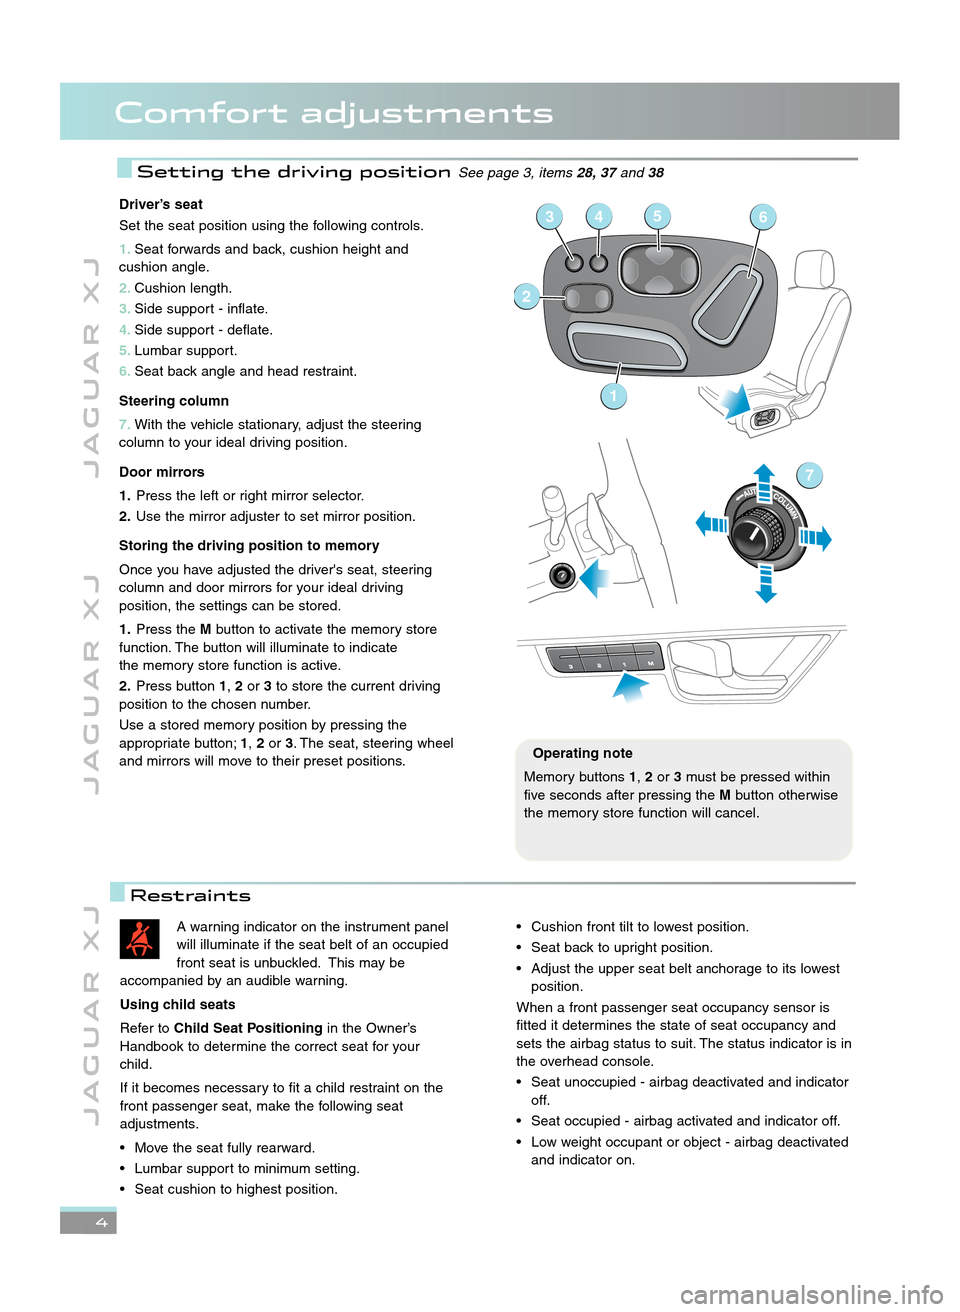
Driver’s seat
Set the seat position using the following controls.
1\bSeat forwards and back, cushion height and
cushion angle.
\f\b Cushion length.
3\b Side support \b inflate.
4\b Side support \b deflate.
5\b Lumbar support.
6\b Seat back angle and head restraint.
Steering column
7\b With the vehicle stationary, adjust the steering
column to your ideal driving position.
Door mirrors
1\b Press the left or right mirror selector.
\f\b Use the mirror adjuster to set mirror position.
Storing the driving position to memory
Once you have adjusted the driver's seat, steering
column and door mirrors for your ideal driving
position, the settings can be stored.
1\b Press the Mbutton to activate the memory store
function. The button will illuminate to indicate
the memory store function is active.
\f\b Press button 1,\for 3to store the current driving
position to the chosen number.
Use a stored memory position by pressing the
appropriate button; 1,\for 3. The seat, steering wheel
and mirrors will move to their preset positions.
1
2
3456
7
A warning indicator on the instrument panel
will illuminate if the seat belt of an occupied
front seat is unbuckled. This may be
accompanied by an audible warning.
Using child seats
Refer to Child Seat Positioning in the Owner’s
Handbook to determine the correct seat for your
child.
If it becomes necessary to fit a child restraint on the
front passenger seat, make the following seat
adjustments.
• Move the seat fully rearward.
• Lumbar support to minimum setting.
• Seat cushion to highest position.• Cushion front tilt to lowest position.
• Seat back to upright position.
• Adjust the upper seat belt anchorage to its lowest position.
When a front passenger seat occupancy sensor is
fitted it determines the state of seat occupancy and
sets the airbag status to suit. The status indicator is in
the overhead console.
• Seat unoccupied \b airbag deactivated and indicator off.
• Seat occupied \b airbag activated and indicator off.
• Low weight occupant or object \b airbag deactivated and indicator on.
Operating note
Memory buttons 1,\for 3must be pressed within
five seconds after pressing the Mbutton otherwise
the memory store function will cancel.
Setting the driving positionSee page 3, items 28, 37and38
Restraints
JJM 18 96 34 111:X351 10MY.qxd 05/07/2010 15:04 Page 4
Page 7 of 16

J A G U A R X JJ A G U A R X J J A G U A R X J
7
Auto headlamps and wipersSee page 3, items1and \b
Starting and driving
MAX
MINMAX
MIN
6
5
7
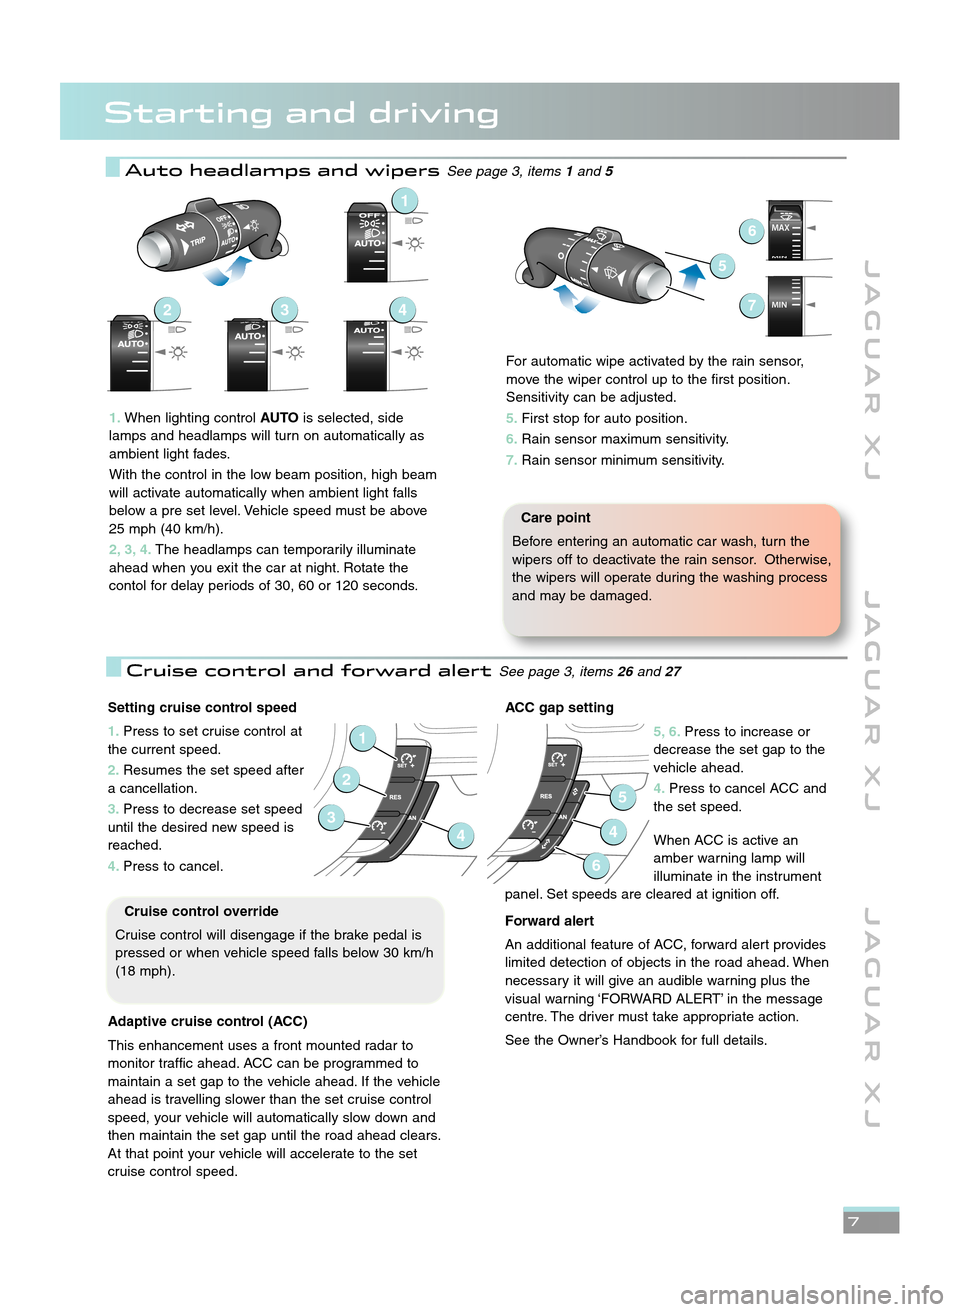
1\bWhen lighting control AUTOis selected, side
lamps and headlamps will turn on automatically as
ambient light fades.
With the control in the low beam position, high beam
will activate automatically when ambient light falls
below a pre set level. Vehicle speed must be above
25 mph (40 km/h).
\f, 3, 4\b The headlamps can temporarily illuminate
ahead when you exit the car at night. Rotate the
contol for delay periods of 30, 60 or \f20 seconds.
1
432
Care point
Before entering an automatic car wash, turn the
wipers off to deactivate the rain sensor. Otherwise,
the wipers will operate during the washing process
and may be damaged.
Setting cruise control speed
1\b Press to set cruise control at
the current speed.
\f\b Resumes the set speed after
a cancellation.
3\b Press to decrease set speed
until the desired new speed is
reached.
4\b Press to cancel.
Adaptive cruise control (ACC)
This enhancement uses a front mounted radar to
monitor traffic ahead. ACC can be programmed to
maintain a set gap to the vehicle ahead. If the vehicle
ahead is travelling slower than the set cruise control
speed, your vehicle will automatically slow down and
then maintain the set gap until the road ahead clears.
At that point your vehicle will accelerate to the set
cruise control speed.
1
2
34
Cruise control override
Cruise control will disengage if the brake pedal is
pressed or when vehicle speed falls below 30 km/h
(\f8 mph).
ACC gap setting
5, 6\bPress to increase or
decrease the set gap to the
vehicle ahead.
4\b Press to cancel ACC and
the set speed.
When ACC is active an
amber warning lamp will
illuminate in the instrument
panel. Set speeds are cleared at ignition off.
Forward alert
An additional feature of ACC, forward alert provides
limited detection of objects in the road ahead. When
necessary it will give an audible warning plus the
visual warning ‘FORWARD ALERT’ in the message
centre. The driver must take appropriate action.
See the Owner’s Handbook for full details.
5
4
6
Cruise control and forward alertSee page 3, items 26and 27
For automatic wipe activated by the rain sensor,
move the wiper control up to the first position.
Sensitivity can be adjusted.
5\b First stop for auto position.
6\b Rain sensor maximum sensitivity.
7\b Rain sensor minimum sensitivity.
JJM 18 96 34 111:X351 10MY.qxd 05/07/2010 15:04 Page 7
Page 9 of 16

J A G U A R X JJ A G U A R X J J A G U A R X J
9
Driving aids
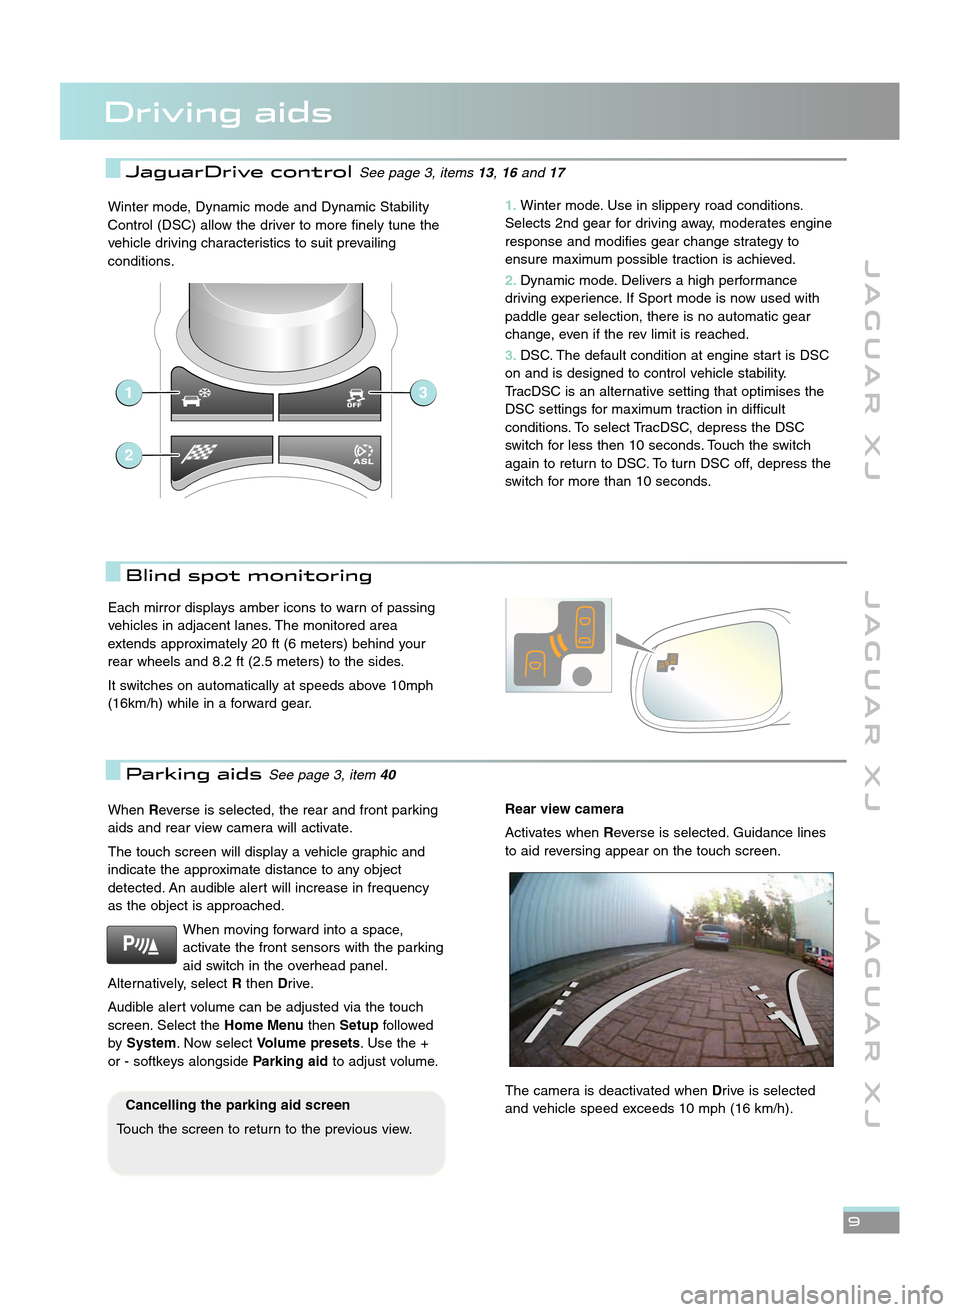
Winter mode, Dynamic mode and Dynamic Stability
Control (DSC) allow the driver to more finely tune the
vehicle driving characteristics to suit prevailing
conditions.
When Reverse is selected, the rear and front parking
aids and rear view camera will activate.
The touch screen will display a vehicle graphic and
indicate the approximate distance to any object
detected. An audible alert will increase in frequency
as the object is approached.
When moving forward into a space,
activate the front sensors with the parking
aid switch in the overhead panel.
Alternatively, select Rthen Drive.
Audible alert volume can be adjusted via the touch
screen. Select the Home MenuthenSetup followed
by System . Now select Volume presets. Use the +
or \b softkeys alongside Parking aidto adjust volume.Rear view camera
Activates when Reverse is selected. Guidance lines
to aid reversing appear on the touch screen.
The camera is deactivated when Drive is selected
and vehicle speed exceeds \f0 mph (\f6 km/h).
Blind spot monitoring
Cancelling the parking aid screen
Touch the screen to return to the previous view.
Each mirror displays amber icons to warn of passing
vehicles in adjacent lanes. The monitored area
extends approximately 20 ft (6 meters) behind your
rear wheels and 8.2 ft (2.5 meters) to the sides.
It switches on automatically at speeds above \f0mph
(\f6km/h) while in a forward gear.
Parking aidsSee page 3, item 40
1\bWinter mode. Use in slippery road conditions.
Selects 2nd gear for driving away, moderates engine
response and modifies gear change strategy to
ensure maximum possible traction is achieved.
\f\b Dynamic mode. Delivers a high performance
driving experience. If Sport mode is now used with
paddle gear selection, there is no automatic gear
change, even if the rev limit is reached.
3\b DSC. The default condition at engine start is DSC
on and is designed to control vehicle stability.
TracDSC is an alternative setting that optimises the
DSC settings for maximum traction in difficult
conditions. To select TracDSC, depress the DSC
switch for less then \f0 seconds. Touch the switch
again to return to DSC. To turn DSC off, depress the
switch for more than \f0 seconds.
1
2
3
JaguarDrive controlSee page 3, items 13,16and 17
JJM 18 96 34 111:X351 10MY.qxd 05/07/2010 15:04 Page 9
Page 13 of 16

Heating and ventilation
J A G U A R X JJ A G U A R X J J A G U A R X J
\b3
Climate controlSee page 3, items10, 11, 12and20
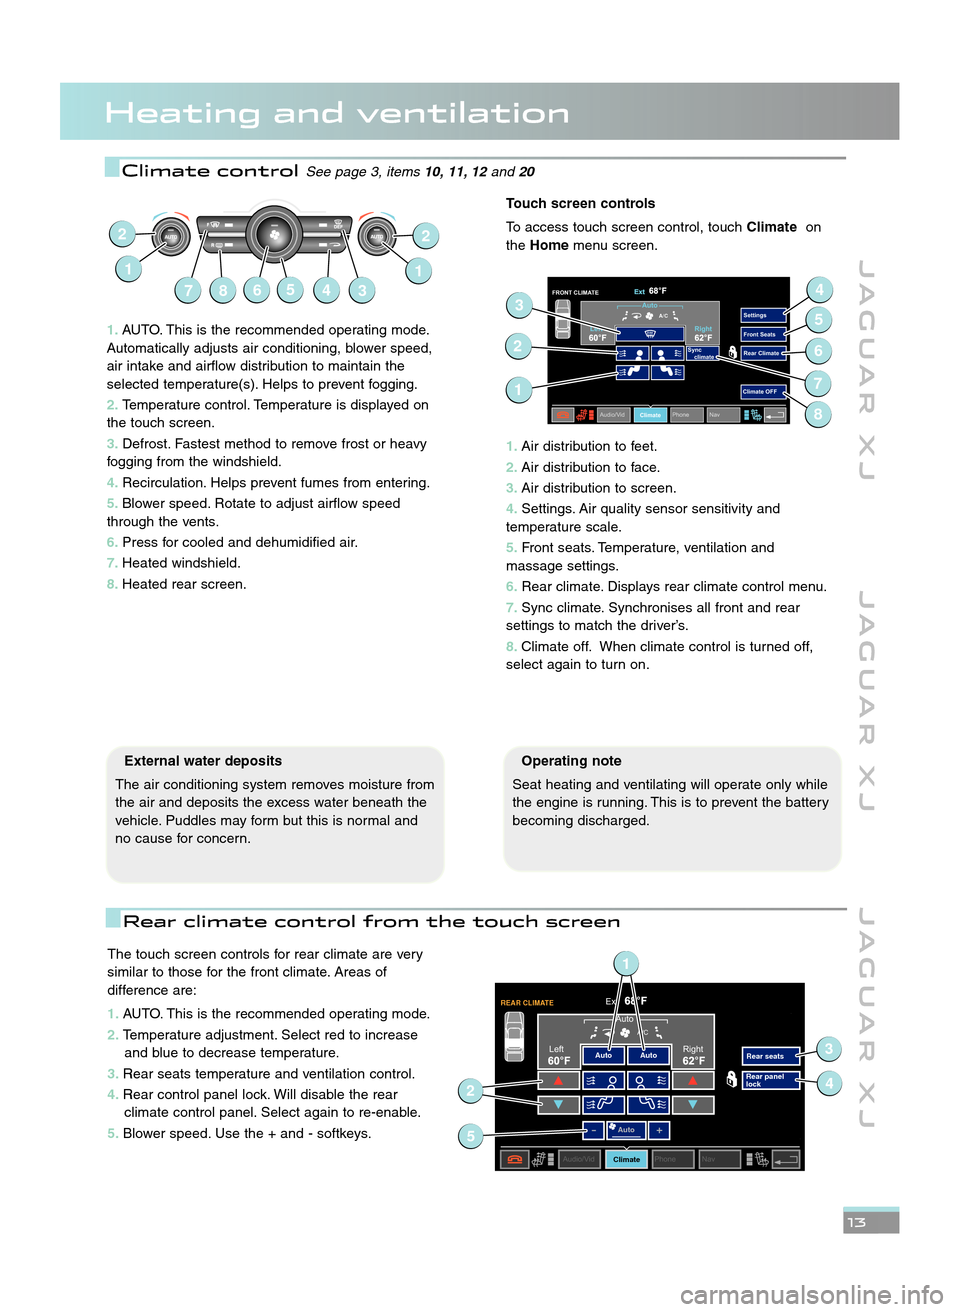
1\bAUTO. This is the recommended operating mode.
Automatically adjusts air conditioning, blower speed,
air intake and airflow distribution to maintain the
selected temperature(s). Helps to prevent fogging.
\f\b Temperature control. Temperature is displayed on
the touch screen.
3\b Defrost. Fastest method to remove frost or heavy
fogging from the windshield.
4\b Recirculation. Helps prevent fumes from entering.
5\b Blower speed. Rotate to adjust airflow speed
through the vents.
6\b Press for cooled and dehumidified air.
7\b Heated windshield.
8\b Heated rear screen.
Touch screen controls
To access touch screen control, touch Climateon
the Home menu screen.
1\b Air distribution to feet.
\f\b Air distribution to face.
3\b Air distribution to screen.
4\b Settings. Air quality sensor sensitivity and
temperature scale.
5\b Front seats. Temperature, ventilation and
massage settings.
6\b Rear climate. Displays rear climate control menu.
7\b Sync climate. Synchronises all front and rear
settings to match the driver’s.
8\b Climate off. When climate control is turned off,
select again to turn on.
SettingsRightA/CAuto
Ext
LeftFRONT CLIMATE
Climate OFF
Nav
Phone
Climate
Audio/Vid Front Seats
Rear Climate
Sync
climate
Ext3
7
2
1
4
6
5
8
External water deposits
The air conditioning system removes moisture from
the air and deposits the excess water beneath the
vehicle. Puddles may form but this is normal and
no cause for concern.Operating note
Seat heating and ventilating will operate only while
the engine is running. This is to prevent the battery
becoming discharged.
The touch screen controls for rear climate are very
similar to those for the front climate. Areas of
difference are:
1\b AUTO. This is the recommended operating mode.
\f\b Temperature adjustment. Select red to increase
and blue to decrease temperature.
3\b Rear seats temperature and ventilation control.
4\b Rear control panel lock. Will disable the rear
climate control panel. Select again to re\benable.
5\b Blower speed. Use the + and \b softkeys.
RightAuto
Auto
Auto
A/CAuto
Ext
LeftREAR CLIMATE
Nav
Phone
Climate
Audio/Vid Rear seats
Rear panel
lock
1
42
5
3
Rear climate control from the touch screen
67
22
143
1
58
JJM 18 96 34 111:X351 10MY.qxd 05/07/2010 15:04 Page 13