radio controls JAGUAR XJ 2015 X351 / 4.G Quick Start Guide
[x] Cancel search | Manufacturer: JAGUAR, Model Year: 2015, Model line: XJ, Model: JAGUAR XJ 2015 X351 / 4.GPages: 16, PDF Size: 6.16 MB
Page 10 of 16

HEATING AND VENTILATION
10
AUDIO AND TOUCH SCREEN
Heating and ventilation
See page 2, items 13, 14, 15 and 38
Primary controls
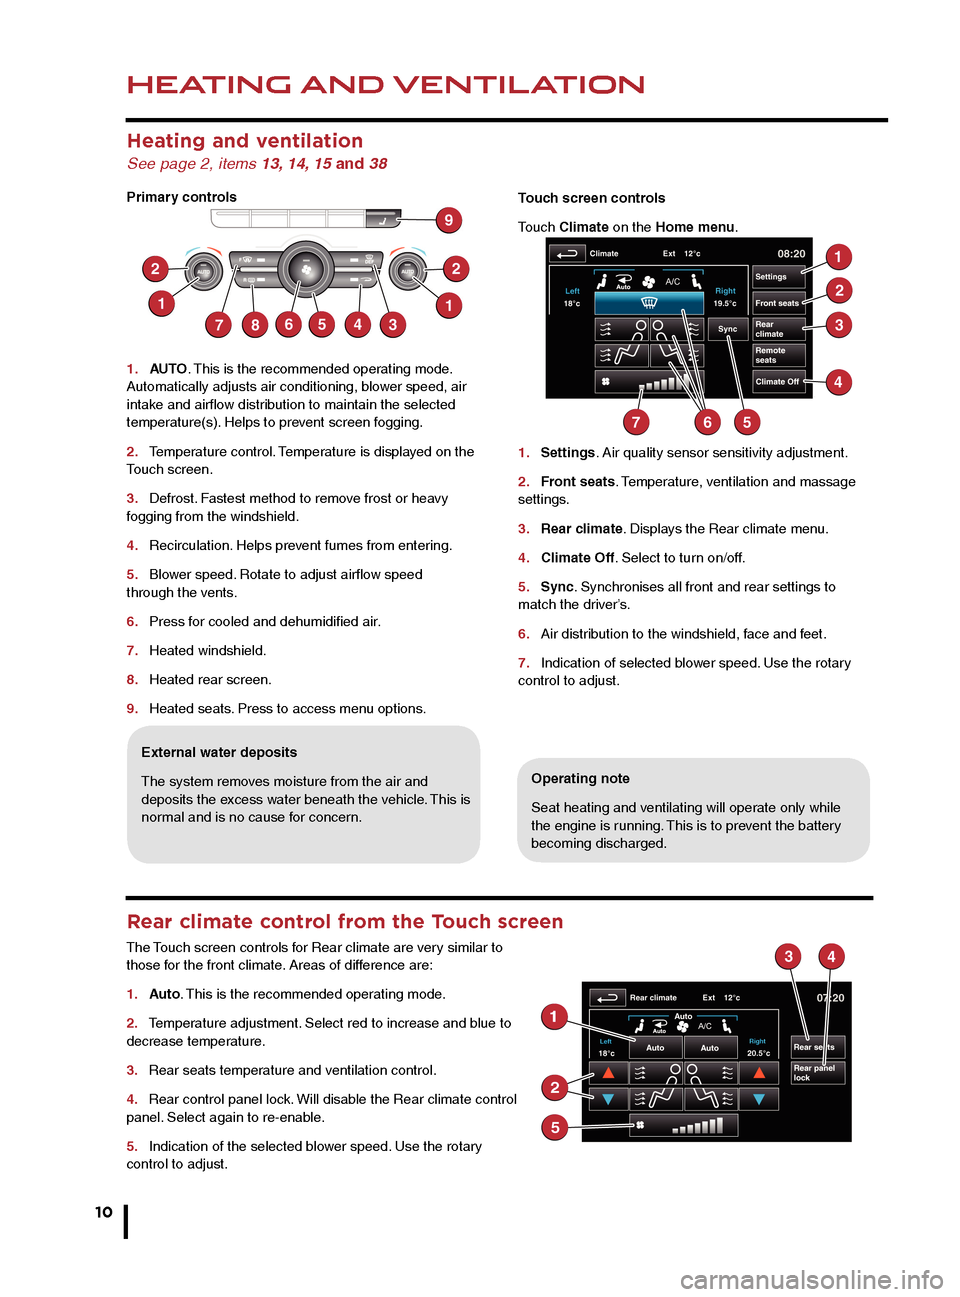
1. AUTO . This is the recommended operating mode.
Automatically adjusts air conditioning, blower speed, air
intake and airflow distribution to maintain the selected
temperature(s). Helps to prevent screen fogging.
2. Temperature control. Temperature is displayed on the
Touch screen.
3. Defrost. Fastest method to remove frost or heavy
fogging from the windshield.
4. Recirculation. Helps prevent fumes from entering.
5. Blower speed. Rotate to adjust airflow speed
through the vents.
6. Press for cooled and dehumidified air.
7. Heated windshield.
8. Heated rear screen.
9. Heated seats. Press to access menu options.
Operating note
Seat heating and ventilating will operate only while
the engine is running. This is to prevent the battery
becoming discharged.
External water deposits
The system removes moisture from the air and
deposits the excess water beneath the vehicle. This is
normal and is no cause for concern. Touch screen controls
Touch Climate on the Home menu.
1.
Settings. Air quality sensor sensitivity adjustment.
2. Front seats. Temperature, ventilation and massage
settings.
3. Rear climate. Displays the Rear climate menu.
4. Climate Off. Select to turn on/off.
5. Sync. Synchronises all front and rear settings to
match the driver’s.
6. Air distribution to the windshield, face and feet.
7. Indication of selected blower speed. Use the rotary
control to adjust.
Rear climate control from the Touch screen
The Touch screen controls for Rear climate are very similar to
those for the front climate. Areas of difference are:
1. Auto. This is the recommended operating mode.
2. Temperature adjustment. Select red to increase and blue to
decrease temperature.
3. Rear seats temperature and ventilation control.
4. Rear control panel lock. Will disable the Rear climate control
panel. Select again to re-enable.
5. Indication of the selected blower speed. Use the rotary
control to adjust.
Home menu
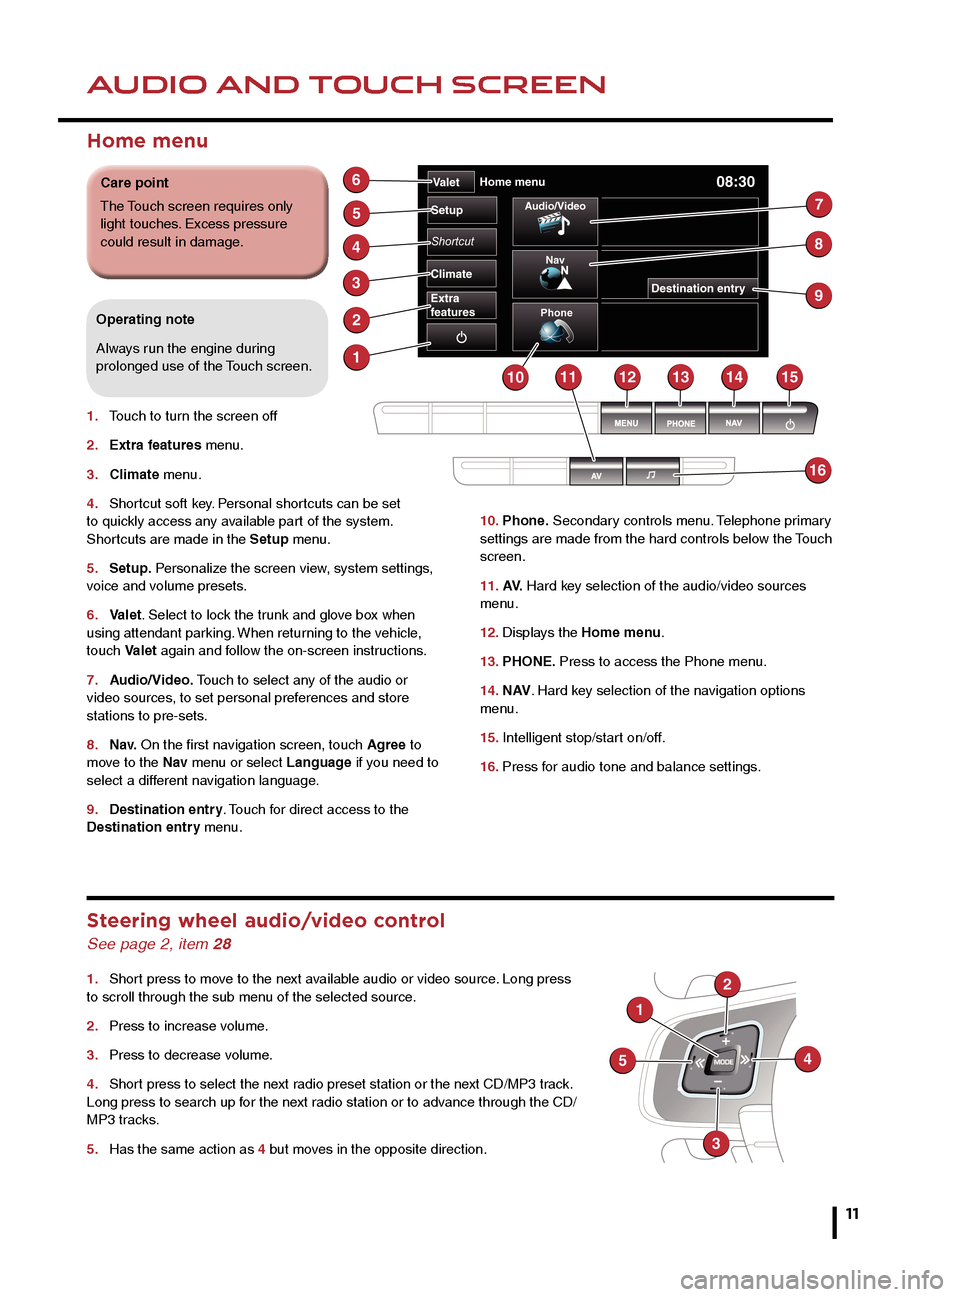
1. Touch to turn the screen off
2. Extra features menu.
3. Climate menu.
4. Shortcut soft key. Personal shortcuts can be set
to quickly access any available part of the system.
Shortcuts are made in the Setup menu.
5. Setup. Personalize the screen view, system settings,
voice and volume presets.
6. Valet. Select to lock the trunk and glove box when
using attendant parking. When returning to the vehicle,
touch Valet again and follow the on-screen instructions.
7. Audio/Video. Touch to select any of the audio or
video sources, to set personal preferences and store
stations to pre-sets.
8. N a v. On the first navigation screen, touch Agree to
move to the Nav menu or select Language if you need to
select a different navigation language.
9. Destination entry. Touch for direct access to the
Destination entry menu.
Operating note
Always run the engine during
prolonged use of the Touch screen.
Steering wheel audio/video control
See page 2, item 28
1. Short press to move to the next available audio or video source. Long press
to scroll through the sub menu of the selected source.
2. Press to increase volume.
3. Press to decrease volume.
4. Short press to select the next radio preset station or the next CD/MP3 track.
Long press to search up for the next radio station or to advance through the CD/
MP3 tracks.
5. Has the same action as 4 but moves in the opposite direction.
Care point
The Touch screen requires only
light touches. Excess pressure
could result in damage.
Page 11 of 16

HEATING AND VENTILATIONAUDIO AND TOUCH SCREEN
11
Operating note
Seat heating and ventilating will operate only while
the engine is running. This is to prevent the battery
becoming discharged.
Touch screen controls
Touch Climate on the Home menu.
1.
Settings. Air quality sensor sensitivity adjustment.
2. Front seats. Temperature, ventilation and massage
settings.
3. Rear climate. Displays the Rear climate menu.
4. Climate Off. Select to turn on/off.
5. Sync. Synchronises all front and rear settings to
match the driver’s.
6. Air distribution to the windshield, face and feet.
7. Indication of selected blower speed. Use the rotary
control to adjust.
10. Phone. Secondary controls menu. Telephone primary
settings are made from the hard controls below the Touch
screen.
11. AV. Hard key selection of the audio/video sources
menu.
12. Displays the Home menu.
13. PHONE. Press to access the Phone menu.
14. N AV . Hard key selection of the navigation options
menu.
15. Intelligent stop/start on/off.
16. Press for audio tone and balance settings.
Home menu
1. Touch to turn the screen off
2. Extra features menu.
3. Climate menu.
4. Shortcut soft key. Personal shortcuts can be set
to quickly access any available part of the system.
Shortcuts are made in the Setup menu.
5. Setup. Personalize the screen view, system settings,
voice and volume presets.
6. Valet. Select to lock the trunk and glove box when
using attendant parking. When returning to the vehicle,
touch Valet again and follow the on-screen instructions.
7. Audio/Video. Touch to select any of the audio or
video sources, to set personal preferences and store
stations to pre-sets.
8. N a v. On the first navigation screen, touch Agree to
move to the Nav menu or select Language if you need to
select a different navigation language.
9. Destination entry. Touch for direct access to the
Destination entry menu.
Operating note
Always run the engine during
prolonged use of the Touch screen.
Steering wheel audio/video control
See page 2, item 28
1. Short press to move to the next available audio or video source. Long press
to scroll through the sub menu of the selected source.
2. Press to increase volume.
3. Press to decrease volume.
4. Short press to select the next radio preset station or the next CD/MP3 track.
Long press to search up for the next radio station or to advance through the CD/
MP3 tracks.
5. Has the same action as 4 but moves in the opposite direction.
Care point
The Touch screen requires only
light touches. Excess pressure
could result in damage.
Page 12 of 16

AUDIO AND TOUCH SCREEN
12
AUDIO AND TOUCH SCREEN
Satellite radio subscription service
Use channel 184 to preview satellite radio. The SIRIUS
telephone number and ID number will be displayed.
When the preview time expires you will need to subscribe
to SIRIUS to enable further satellite reception.
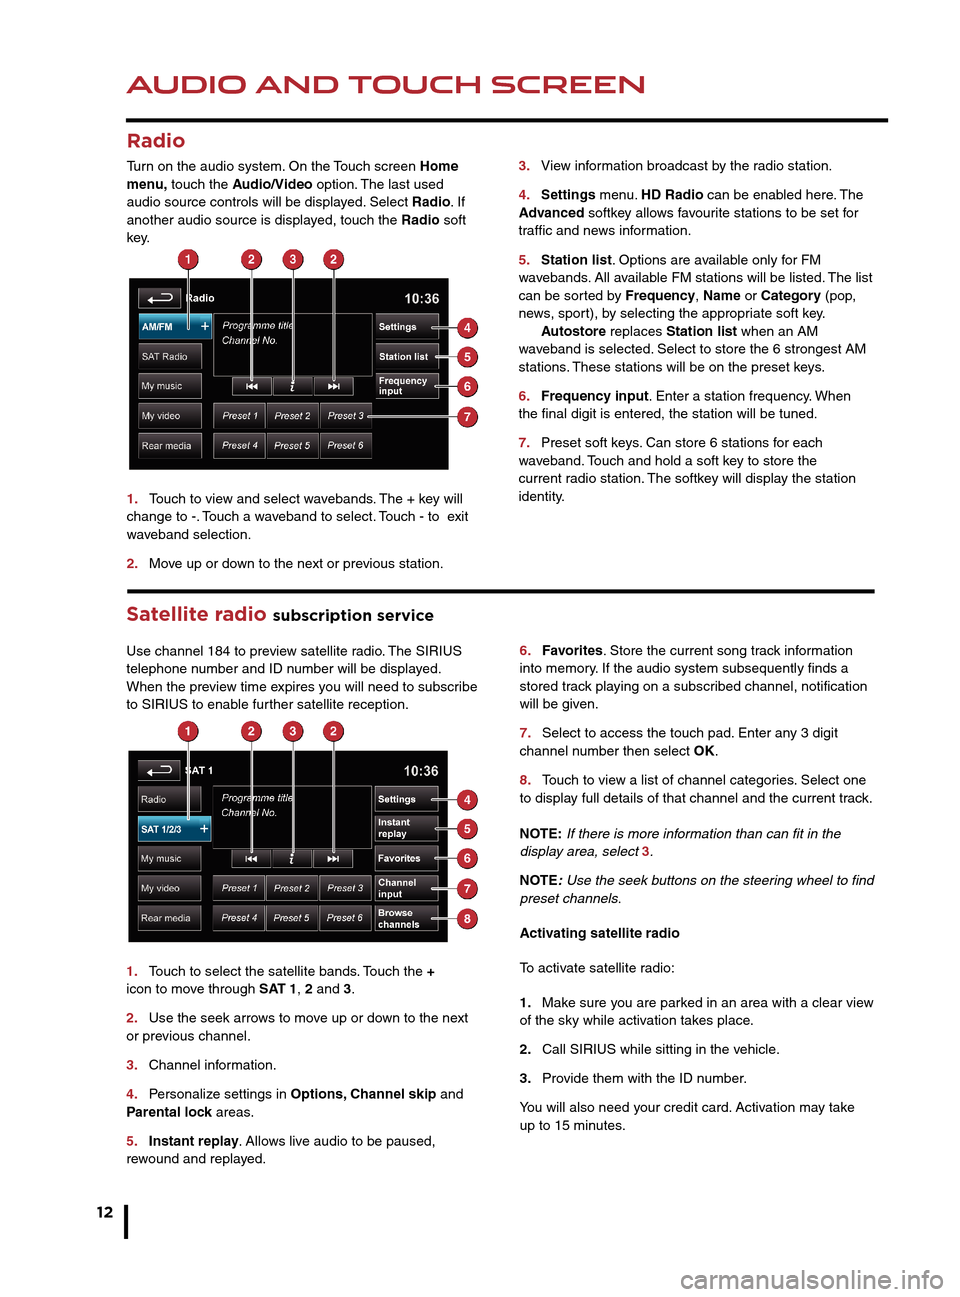
1. Touch to select the satellite bands. Touch the +
icon to move through SAT 1, 2 and 3.
2. Use the seek arrows to move up or down to the next
or previous channel.
3. Channel information.
4. Personalize settings in Options, Channel skip and
Parental lock areas.
5. Instant replay. Allows live audio to be paused,
rewound and replayed. 6.
Favorites. Store the current song track information
into memory. If the audio system subsequently finds a
stored track playing on a subscribed channel, notification
will be given.
7. Select to access the touch pad. Enter any 3 digit
channel number then select OK.
8. Touch to view a list of channel categories. Select one
to display full details of that channel and the current track.
NOTE: If there is more information than can fit in the
display area, select 3.
NOTE: Use the seek buttons on the steering wheel to find
preset channels.
Activating satellite radio
To activate satellite radio:
1. Make sure you are parked in an area with a clear view
of the sky while activation takes place.
2. Call SIRIUS while sitting in the vehicle.
3. Provide them with the ID number.
You will also need your credit card. Activation may take
up to 15 minutes.
3.
View information broadcast by the radio station.
4. Settings menu. HD Radio can be enabled here. The
Advanced softkey allows favourite stations to be set for
traffic and news information.
5. Station list. Options are available only for FM
wavebands. All available FM stations will be listed. The list
can be sorted by Frequency, Name or Category (pop,
news, sport), by selecting the appropriate soft key.
Autostore replaces Station list when an AM
waveband is selected. Select to store the 6 strongest AM
stations. These stations will be on the preset keys.
6. Frequency input. Enter a station frequency. When
the final digit is entered, the station will be tuned.
7. Preset soft keys. Can store 6 stations for each
waveband. Touch and hold a soft key to store the
current radio station. The softkey will display the station
identity.
Radio
Turn on the audio system. On the Touch screen Home
menu, touch the Audio/Video option. The last used
audio source controls will be displayed. Select Radio. If
another audio source is displayed, touch the Radio soft
key.
1. Touch to view and select wavebands. The + key will
change to -. Touch a waveband to select. Touch - to exit
waveband selection.
2. Move up or down to the next or previous station.
CD player and portable media
Select the My music menu.
1. Select to display all options. Select a source.
2. Use Track list or Browse to find a track. Select the
track to play.
3. Use Upload to load discs. The CD player will
accommodate one CD disc at a time but with Stored CD,
up to 10 CD’s can be loaded onto the virtual CD store. If
the drive is full, select Replace to overwrite an existing
C D.
Connecting ports for auxiliary devices, iPod, USB and
Bluetooth wireless technology devices are located in
the cubby box and rear center armrest. The 3.5mm AUX
socket allows extra equipment (e.g., personal stereos
HD radio
HD radio can provide much improved audio quality when
compared to normal AM/FM reception. It can also provide
additional information about available channel services.
When HD radio is activated and standard AM/FM is in
use, if an HD signal is detected the radio will gradually
transfer to the digital broadcast. Generally, no action is
required but HD radio volume may be greater.
HD radio and AM/FM broadcasts are broadcast
simultaneously, however, when switching between HD
and AM/FM, there may be a slight time difference in
delivery.