door lock JAGUAR XJ6 1994 2.G Electrical Diagnostic Manual
[x] Cancel search | Manufacturer: JAGUAR, Model Year: 1994, Model line: XJ6, Model: JAGUAR XJ6 1994 2.GPages: 327, PDF Size: 13.73 MB
Page 74 of 327
Climate Control Systems
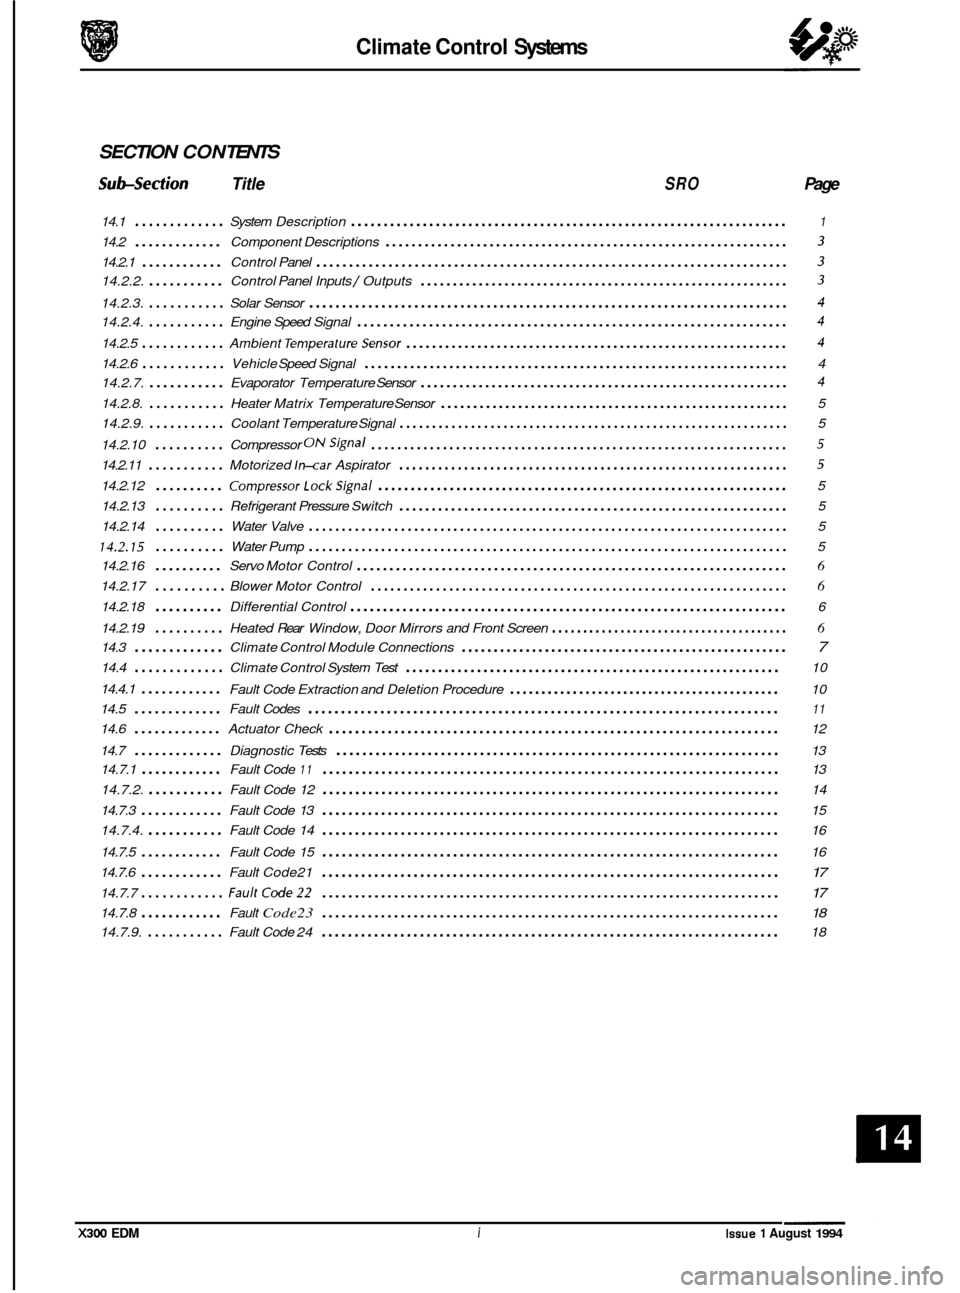
SECTION CON TENTS
Subsection Title SRO Page
14.1 ............. System Description ................................................................... 1
14.2 ............. Component Descriptions .............................................................. 3
14.2.1 ............ Control Panel ........................................................................\
3
14.2.2. ........... Control Panel Inputs / Outputs ......................................................... 3
14.2.3. ........... Solar Sensor ........................................................................\
. 4
14.2.4. ........... Engine Speed Signal .................................................................. 4
14.2.5 ............ Ambient Temperaturesensor ........................................................... 4
14.2.6 ............ Vehicle Speed Signal ................................................................. 4
14.2.7.
........... Evaporator Temperature Sensor ......................................................... 4
14.2.8. ........... Heater Matrix Temperature Sensor ...................................................... 5
14.2.9.
........... Coolant Temperature Signal ............................................................ 5
14.2.10
.......... Compressor ONSignal ................................................................ 5
14.2.11 ........... Motorized ln-car Aspirator ............................................................ 5
14.2.12 .......... CompressorLockSignal ............................................................... 5
14.2.13
.......... Refrigerant Pressure Switch ............................................................ 5
14.2.14
.......... Water Valve ........................................................................\
. 5
14.2.15 .......... Water Pump ........................................................................\
. 5
14.2.16
.......... Servo Motor Control .................................................................. 6
14.2.17 .......... Blower Motor Control ................................................................ 6
14.2.18 .......... Differential Control ................................................................... 6
14.2.19
.......... Heated Rear Window, Door Mirrors and Front Screen ...................................... 6
14.3 ............. Climate Control Module Connections ................................................... 7
14.4 ............. Climate Control System Test .......................................................... 10
14.4.1
............ Fault Code Extraction and Deletion Procedure ........................................... 10
14.5
............. Fault Codes ........................................................................\
11
14.6 ............. Actuator Check ..................................................................... 12
14.7
............. Diagnostic Tests .................................................................... 13
14.7.1
............ Fault Code 11 ...................................................................... 13
14.7.2.
........... Fault Code 12 ...................................................................... 14
14.7.3
............ Fault Code 13 ...................................................................... 15
14.7.4.
........... Fault Code 14 ...................................................................... 16
14.7.5
............ Fault Code 15 ...................................................................... 16
14.7.6
............ Fault Code21 ...................................................................... 17
14.7.7 ............ FaultCode22 ...................................................................... 17
14.7.8 ............ Fault Code23 ...................................................................... 18
14.7.9. ........... Fault Code 24 ...................................................................... 18
X300 EDM i Issue 1 August 1994
Page 81 of 327
Climate Control Systems
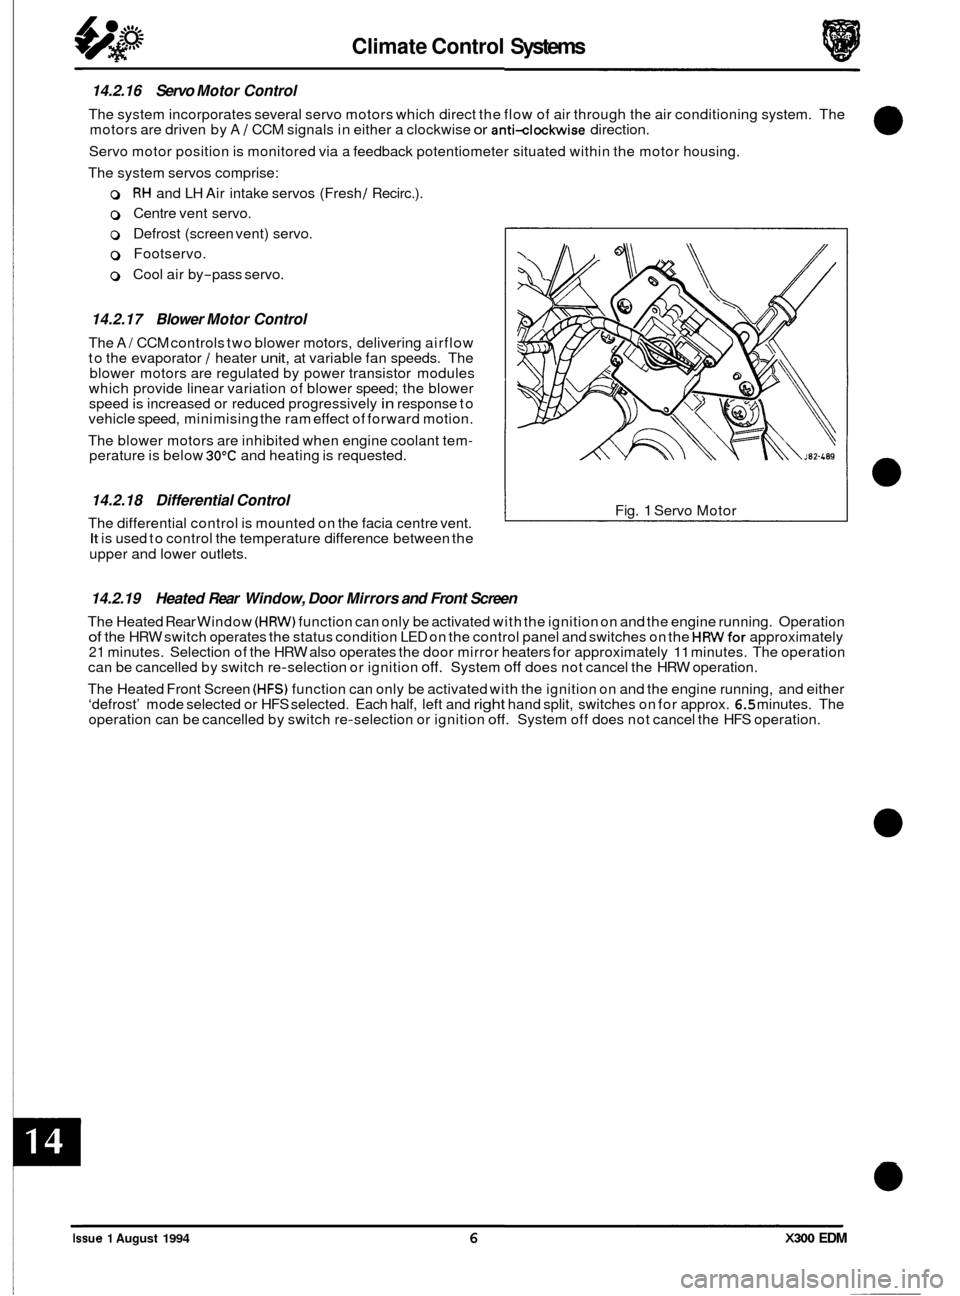
14.2.16 Servo Motor Control
The system incorporates several servo motors which direct the flow of air through the air conditioning system. The
motors are driven by A / CCM signals in either a clockwise or anti-clockwise direction.
Servo motor position is monitored via
a feedback potentiometer situated within the motor housing.
The system servos comprise:
o RH and LH Air intake servos (Fresh / Recirc.).
0 Centre vent servo.
o Defrost (screen vent) servo.
0 Footservo.
0 Cool air by-pass servo.
14.2.17 Blower Motor Control
The A/ CCM controls two blower motors, delivering airflow
to the evaporator / heater unit, at variable fan speeds. The
blower motors are regulated by power transistor modules
which provide linear variation of blower speed; the blower
speed
is increased or reduced progressively in response to
vehicle speed, minimising the ram effect of forward motion.
The blower motors are inhibited when engine coolant tem
- perature is below 30°C and heating is requested.
14.2.18 Differential Control
The differential control is mounted on the facia centre vent. It is used to control the temperature difference between the
upper and lower outlets. Fig.
1 Servo
Motor
14.2.19 Heated Rear Window, Door Mirrors and Front Screen
The Heated Rear Window (HRW) function can only be activated with the ignition on and the engine running. Operation of the HRW switch operates the status condition LED on the control panel and switches on the HRWfor approximately 21 minutes. Selection of the HRW also operates the door mirror heaters for approximately 11 minutes. The operation
can be cancelled by switch re-selection or ignition off. System off does not cancel the HRW operation.
The Heated Front Screen
(HFS) function can only be activated with the ignition on and the engine running, and either
‘defrost’ mode selected or HFS selected. Each half, left and right hand split, switches on for approx. 6.5 minutes. The
operation can be cancelled by switch re-selection or ignition off. System off does not cancel the HFS operation.
0
0
Issue 1 August 1994 6 X300 EDM
Page 83 of 327
Climate Control Systems
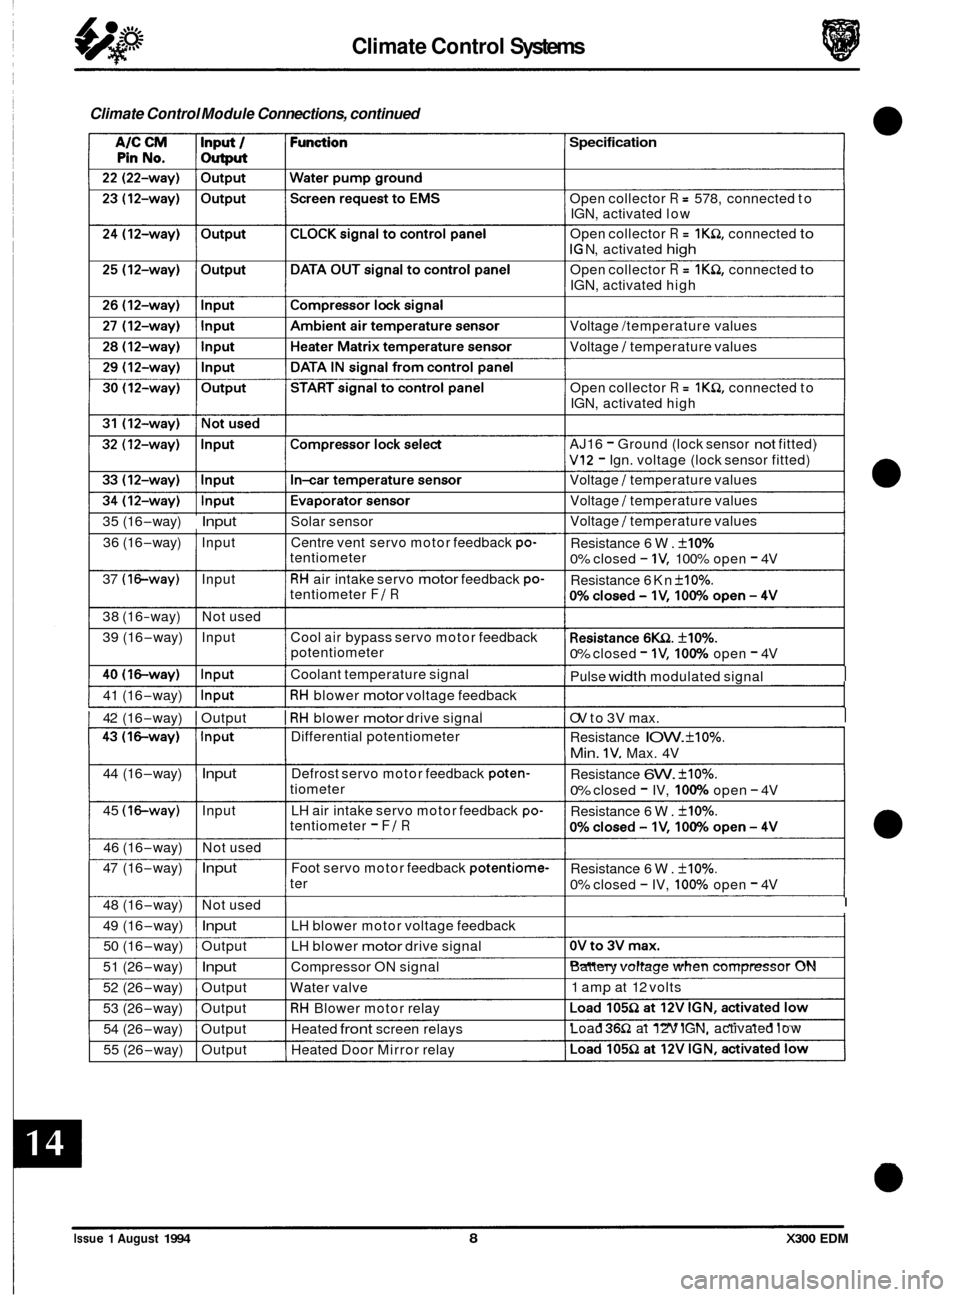
Climate Control Module Connections, continued
35 (16-way) Input Solar sensor
36 (16
-way) Input Centre vent servo motor feedback po- tentiometer
37
(16-way) Input RH air intake servo motor feedback po- tentiometer F / R
38 (16-way) Not used
39 (16
-way) Input Cool air bypass servo motor feedback
potentiometer
I 40(16-way) llnput I Coolant temperature signal
1 41 (16-way) llnput I RH blower motor voltage feedback
I 42 (16-way) I Output I RH blower motor drive signal
I 43(16-way) I Input
I Differential potentiometer
44 (16
-way) Input Defrost servo motor feedback poten-
tiometer
45
(%-way) Input LH air intake servo motor feedback po- tentiometer - F / R
46 (16-way) Not used
47 (16
-way) Input Foot servo motor feedback potentiome-
ter
48 (16
-way) Not used
49 (16
-way) Input LH blower motor voltage feedback
50 (16
-way) Output LH blower motor drive signal
51 (26
-way) Input Compressor ON signal
52 (26
-way) Output Water valve
53 (26
-way) Output RH Blower motor relay
54 (26
-way) Output Heated front screen relays
55 (26
-way) Output Heated Door Mirror relay
Specification
Open collector R = 578, connected to
IGN, activated low
Open collector
R = IKn, connected to
IG N, activated high
Open collector R = IKQ, connected to
IGN, activated high
Voltage /temperature values
Voltage
/ temperature values
Open collector
R = IKQ, connected to
IGN, activated high
AJ16
- Ground (lock sensor not fitted)
VI2 - Ign. voltage (lock sensor fitted)
Voltage
/ temperature values
Voltage
/ temperature values
Voltage
/ temperature values
Resistance 6W.
&IO%
0% closed - IV, 100% open - 4V
Resistance 6Kn
+IO%.
0% closed - IV, IOW0 open - 4V
Pulse
width modulated signal I
OV to 3V max. I
Resistance IOW. &IO%.
Min. IV, Max. 4V
Resistance
6W. +IO%.
0% closed - IV, IOW0 open - 4V
Resistance 6W.
+IO%.
Resistance 6W. &IO%.
0% closed - IV, 10096 open - 4V
I
Battery voltage when compressor ON
1 amp at 12 volts
Load
36Q at 12V IGN, activated low
0
0
0
0
Issue 1 August 1994 8 X300 EDM
Page 102 of 327
Electrical IT
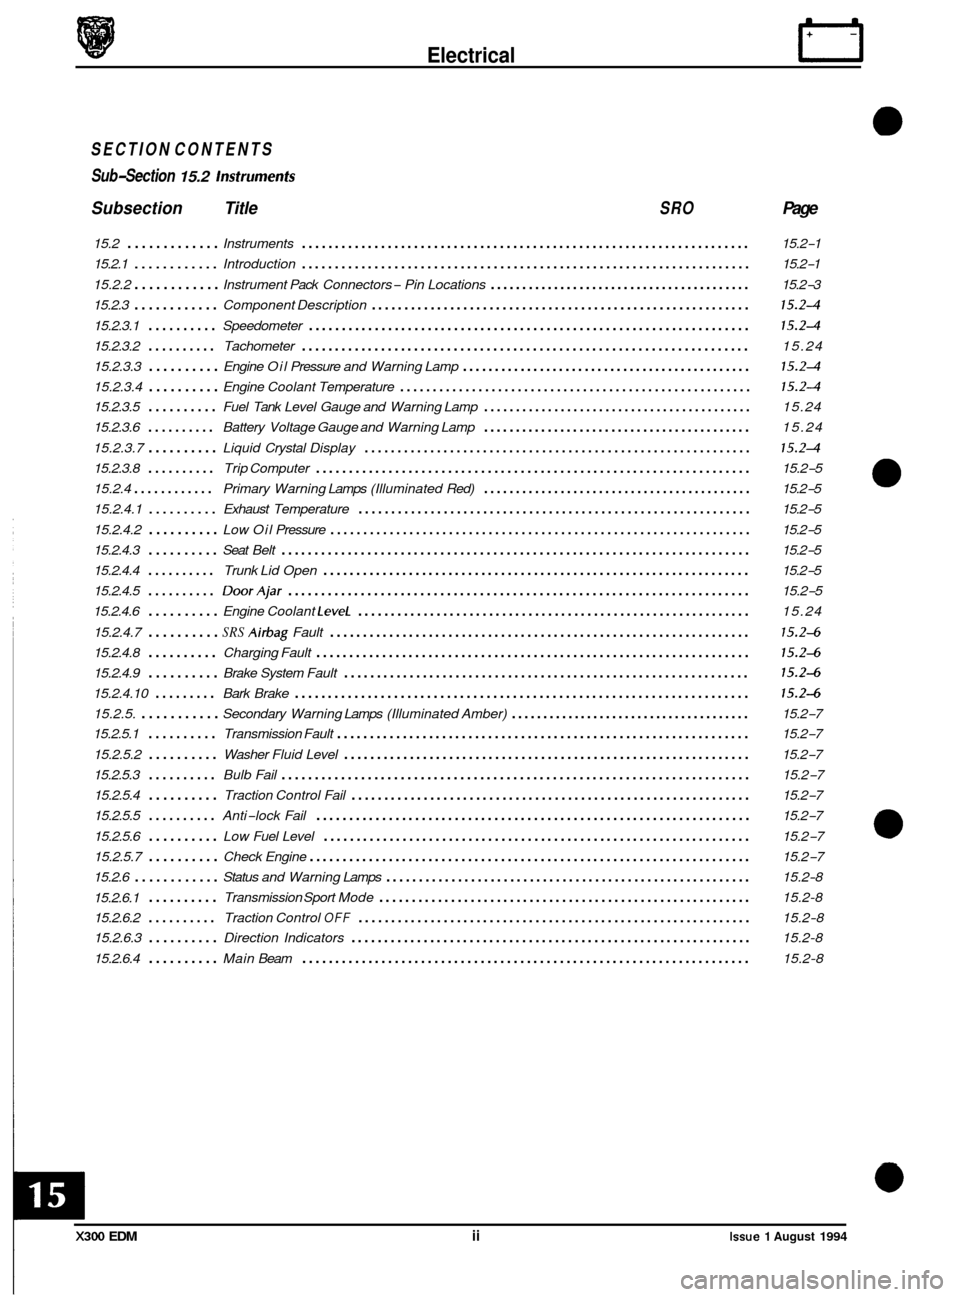
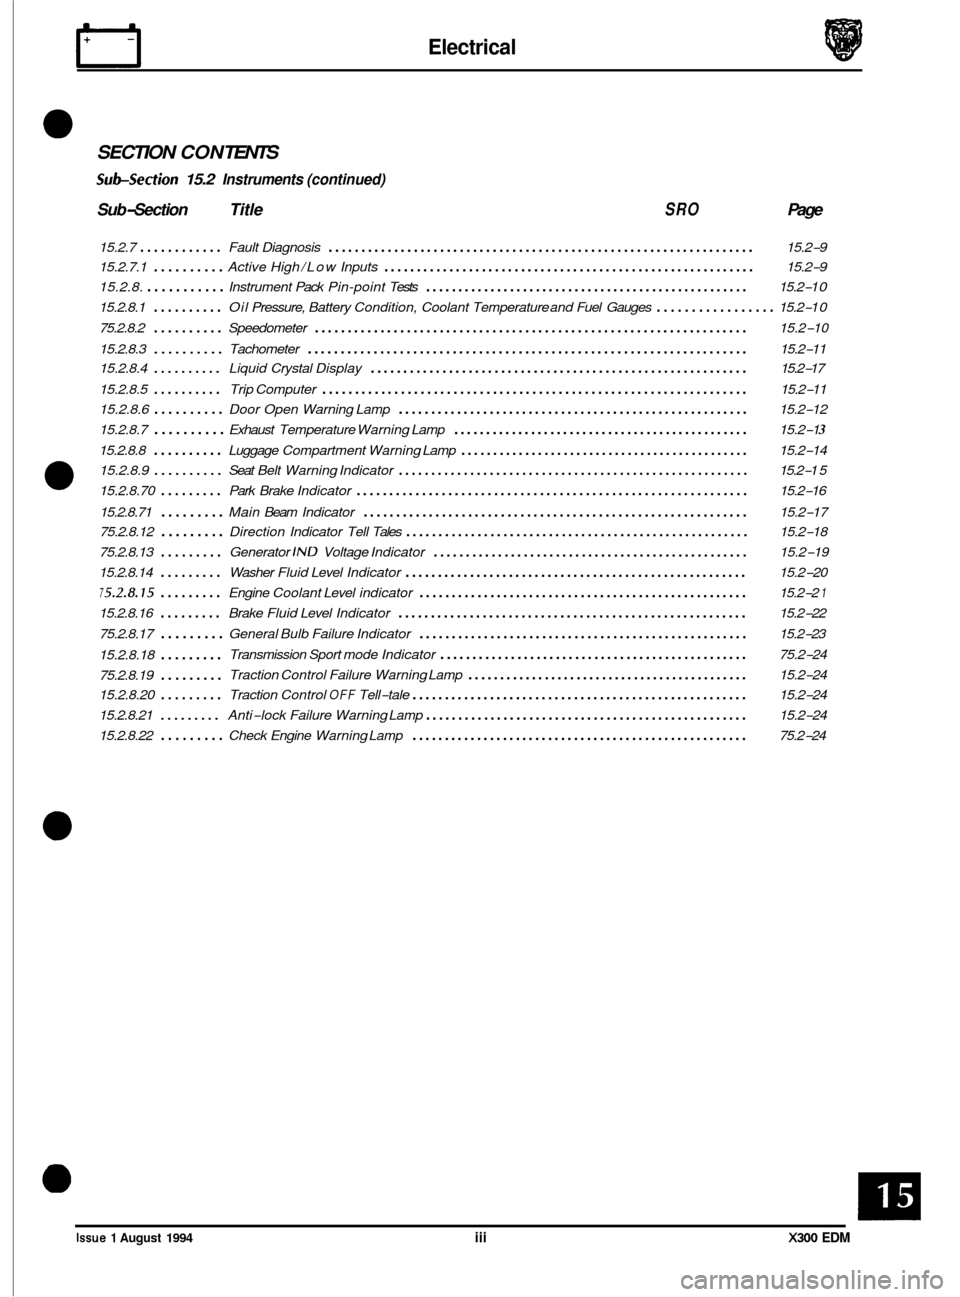
SECTION CONTENTS
Sub
-Section 15.2 lnsfrumenfs
Subsection Title SRO Page
15.2 ............. Instruments .................................................................... 15.2-1
15.2.1
............ Introduction .................................................................... 15.2-1
15.2.2
............ Instrument Pack Connectors - Pin Locations ......................................... 15.2-3
15.2.3
............ Component Description .......................................................... 15.24
15.2.3.1 .......... Speedometer ................................................................... 15.24
15.2.3.2 .......... Tachometer .................................................................... 15.24
15.2.3.3
.......... Engine Oil Pressure and Warning Lamp ............................................. 15.24
15.2.3.4 .......... Engine Coolant Temperature ...................................................... 15.24
15.2.3.5 .......... Fuel Tank Level Gauge and Warning Lamp .......................................... 15.24
15.2.3.6
.......... Battery Voltage Gauge and Warning Lamp .......................................... 15.24
15.2.3.7
.......... Liquid Crystal Display ........................................................... 15.24
15.2.3.8 .......... Trip Computer .................................................................. 15.2-5
15.2.4
............ Primary Warning Lamps (Illuminated Red) .......................................... 15.2-5
15.2.4.1
.......... Exhaust Temperature ............................................................ 15.2-5
15.2.4.2
.......... Low Oil Pressure ................................................................ 15.2-5
15.2.4.3
.......... Seat Belt ....................................................................... \
15.2-5
15.2.4.4
.......... Trunk Lid Open ................................................................. 15.2-5
15.2.4.5
.......... DoorAjar ...................................................................... 15.2-5
15.2.4.6
.......... Engine Coolant LeveL ............................................................ 15.24
15.2.4.7
.......... SRS Airbag Fault ................................................................ 15.24
15.2.4.8 .......... Charging Fault .................................................................. 15.24
15.2.4.9 .......... Brake System Fault .............................................................. 15.24
15.2.4.10 ......... Bark Brake ..................................................................... 15.24
15.2.5. ........... Secondary Warning Lamps (Illuminated Amber) ...................................... 15.2-7
15.2.5.1
.......... Transmission Fault ............................................................... 15.2-7
15.2.5.2
.......... Washer Fluid Level .............................................................. 15.2-7
15.2.5.3
.......... Bulb Fail ....................................................................... \
15.2-7
15.2.5.4
.......... Traction Control Fail ............................................................. 15.2-7
15.2.5.5
.......... Anti-lock Fail .................................................................. 15.2-7
15.2.5.6
.......... Low Fuel Level ................................................................. 15.2-7
15.2.5.7
.......... Check Engine ................................................................... 15.2-7
15.2.6.1
.......... Transmission Sport Mode ......................................................... 15.2-8
15.2.6.2
.......... Traction Control OFF ............................................................ 15.2-8
15.2.6.3
.......... Direction Indicators ............................................................. 15.2-8
15.2.6.4
.......... Main Beam .................................................................... 15.2-8
15.2.6
............ Status
and Warning Lamps ........................................................ 15.2-8
m
a
0
e
0
X300 EDM ii Issue 1 August 1994
Page 103 of 327
Electrical IT
SECTION CON TENTS
Subsection 15.2 Instruments (continued)
Sub-Section Title SRO Page
15.2.7 ............ Fault Diagnosis ................................................................. 15.2-9
15.2.7.1
.......... Active High /Low Inputs ......................................................... 15.2-9
15.2.8.
........... Instrument Pack Pin-point Tests .................................................. 15.2-1 0
15.2.8.1 .......... Oil Pressure, Battery Condition, Coolant Temperature and Fuel Gauges ................. 15.2-1 0
75.2.8.2
.......... Speedometer .................................................................. 15.2-10
15.2.8.4
.......... Liquid Crystal Display .......................................................... 15.2-17
15.2.8.6
.......... Door Open Warning Lamp ...................................................... 15.2-12
15.2.8.7
.......... Exhaust Temperature Warning Lamp .............................................. 15.2-1 3
15.2.8.8 .......... Luggage Compartment Warning Lamp ............................................. 15.2-14
15.2.8.9
.......... Seat Belt Warning Indicator ...................................................... 15.2-1 5
15.2.8.3
.......... Tachometer ................................................................... 15.2-11
15.2.8.5
.......... Trip Computer ................................................................. 15.2-11
15.2.8.70
......... Park Brake Indicator ............................................................ 15.2-16
15.2.8.71
......... Main Beam Indicator ........................................................... 15.2-17
75.2.8.12
......... Direction Indicator Tell Tales ..................................................... 15.2-18
15.2.8.14
......... Washer Fluid Level Indicator ..................................................... 15.2-20
15.2.8.16
......... Brake Fluid Level Indicator ...................................................... 15.2-22
75.2.8.17
......... General Bulb Failure Indicator ................................................... 15.2-23
15.2.8.18
.........
75.2.8.19 .........
15.2.8.20 ......... Traction Control OFF Tell-tale .................................................... 15.2-24
0
75.2.8.13 ......... Generator IND Voltage Indicator ................................................. 15.2-19
7 5.2.8.15 ......... Engine Coolant Level indicator ................................................... 15.2-2 1
Transmission Sport mode Indicator ................................................ 75.2-24
Traction Control Failure Warning Lamp
............................................ 15.2-24
15.2.8.21
......... Anti-lock Failure Warning Lamp .................................................. 15.2-24
15.2.8.22
......... Check Engine Warning Lamp .................................................... 75.2-24
Issue 1 August 1994 iii X300 EDM
Page 156 of 327
Electrical IT
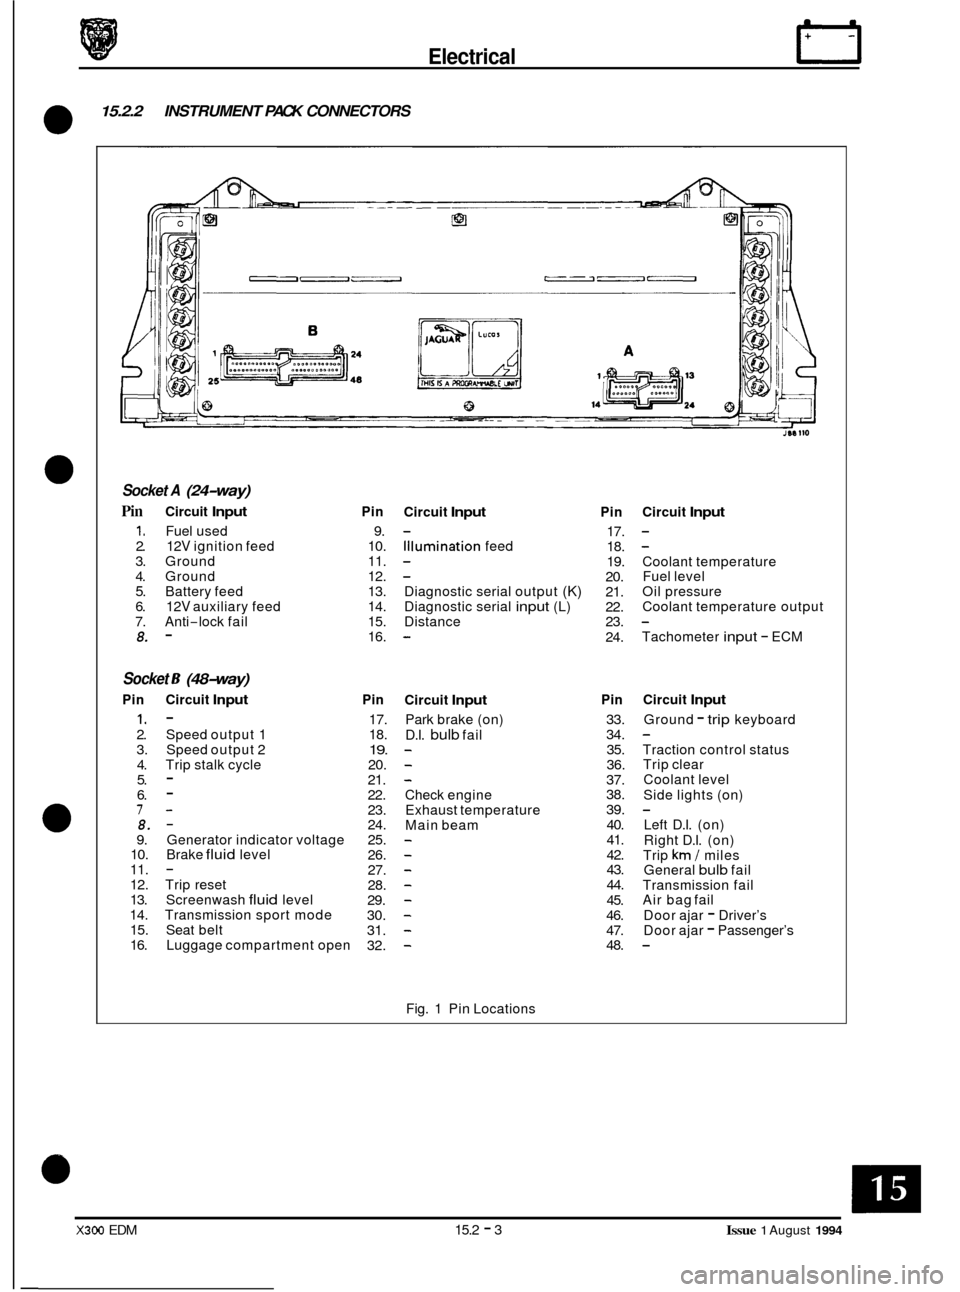
15.2.2 INSTRUMENT PACK CONNECTORS
0
Socket A (24-way)
Pin Circuit Input
1. Fuel used 2. 12V ignition feed 3. Ground 4. Ground 5. Battery feed 6. 12V auxiliary feed 7. Anti-lock fail 8. -
Socket 6 (48-way)
Pin Circuit Input
1. - 2. Speed output 1
3. Speed output 2
4. Trip stalk cycle 5. - 6. - 7- 8. - 9. Generator indicator voltage 10. Brake fluid level 11. - 12. Trip reset 13. Screenwash fluid level 14. Transmission sport mode 15. Seat belt 16. Luggage compartment open
Pin
9.
10.
11.
12.
13.
14.
15.
16.
Pin
17.
18.
19. 20.
21.
22.
23.
24.
25.
26.
27.
28.
29.
30.
31.
32.
Circuit Input
Illumination feed
-
- -
Diagnostic serial output (K) Diagnostic serial input (L)
Distance
-
Circuit Input
Park brake (on)
D.I.
bulb fail - - -
Check engine
Exhaust temperature
Main beam
- - - - - - - -
Fig. 1 Pin Locations
Pin
17.
18.
19.
20.
21.
22.
23.
24.
Pin
33.
34. 35.
36.
37.
38.
39. 40.
41.
42.
43.
44.
45.
46.
47.
48.
Circuit Input
-
Coolant temperature
Fuel level
Oil pressure
Coolant temperature output
Tachometer
input - ECM
-
Circuit Input
Ground - trip keyboard
Traction control status
Trip clear
Coolant level
Side lights (on)
Left D.I. (on)
Right D.I. (on)
Trip
km / miles
General bulb fail
Transmission fail
Air bag fail
Door ajar
- Driver’s
Door ajar - Passenger’s
-
X300 EDM 15.2 - 3 Issue 1 August 1994
Page 158 of 327
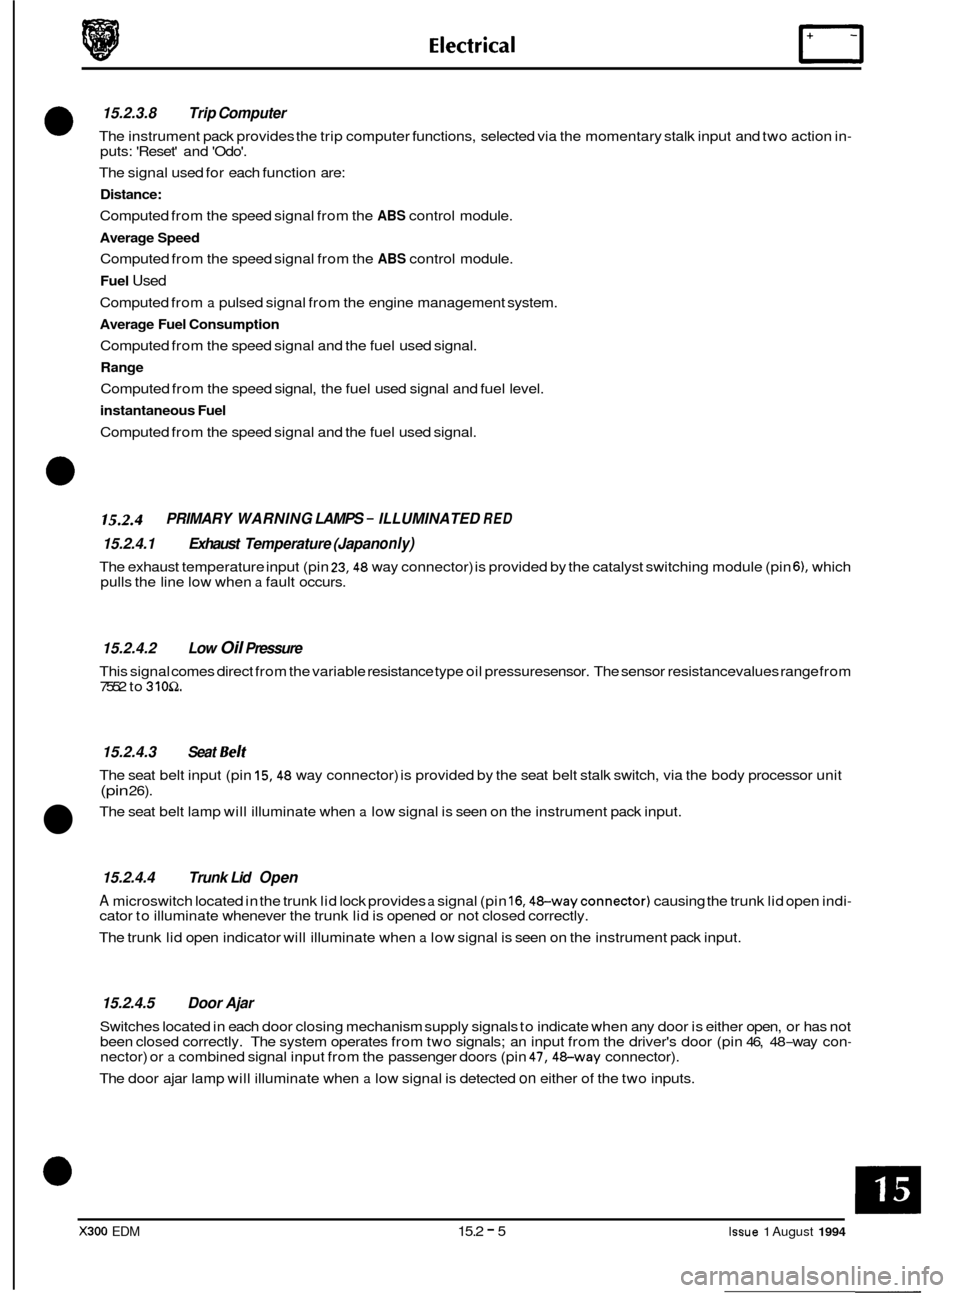
15.2.3.8 Trip Computer
The instrument pack provides the trip computer functions, selected via the momentary stalk input and two action in- puts: 'Reset' and 'Odo'.
The signal used for each function are:
Distance:
Computed from the speed signal from the ABS control module.
Average Speed
Computed from the speed signal from the ABS control module.
Fuel Used
Computed from a pulsed signal from the engine management system.
Average Fuel Consumption
Computed from the speed signal and the fuel used signal.
Range
Computed from the speed signal, the fuel used signal and fuel level.
instantaneous Fuel
Computed from the speed signal and the fuel used signal.
15.2.4 PRIMARY WARNING LAMPS - ILLUMINATED RED
15.2.4.1 Exhaust Temperature (Japan only)
The exhaust temperature input (pin 23,48 way connector) is provided by the catalyst switching module (pin 6), which
pulls the line low when a fault occurs.
15.2.4.2 Low Oil Pressure
This signal comes direct from the variable resistance type oil pressure sensor. The sensor resistancevalues range from
7552 to 310Q.
15.2.4.3 Seat Selt
The seat belt input (pin 15,48 way connector) is provided by the seat belt stalk switch, via the body processor unit
(pin 26).
The seat belt lamp will illuminate when
a low signal is seen on the instrument pack input.
15.2.4.4 Trunk Lid Open
A microswitch located in the trunk lid lock provides a signal (pin 16,4&wayconnector) causing the trunk lid open indi- cator to illuminate whenever the trunk lid is opened or not closed correctly.
The trunk lid open indicator will illuminate when
a low signal is seen on the instrument pack input.
15.2.4.5 Door Ajar
Switches located in each door closing mechanism supply signals to indicate when any door is either open, or has not
been closed correctly. The system operates from two signals; an input from the driver's door (pin 46, 48-way con- nector) or a combined signal input from the passenger doors (pin 47,4&way connector).
The door ajar lamp will illuminate when
a low signal is detected on either of the two inputs.
X300 EDM 15.2 - 5 Issue 1 August 1994
Page 208 of 327
0
I I- - I 13 l-
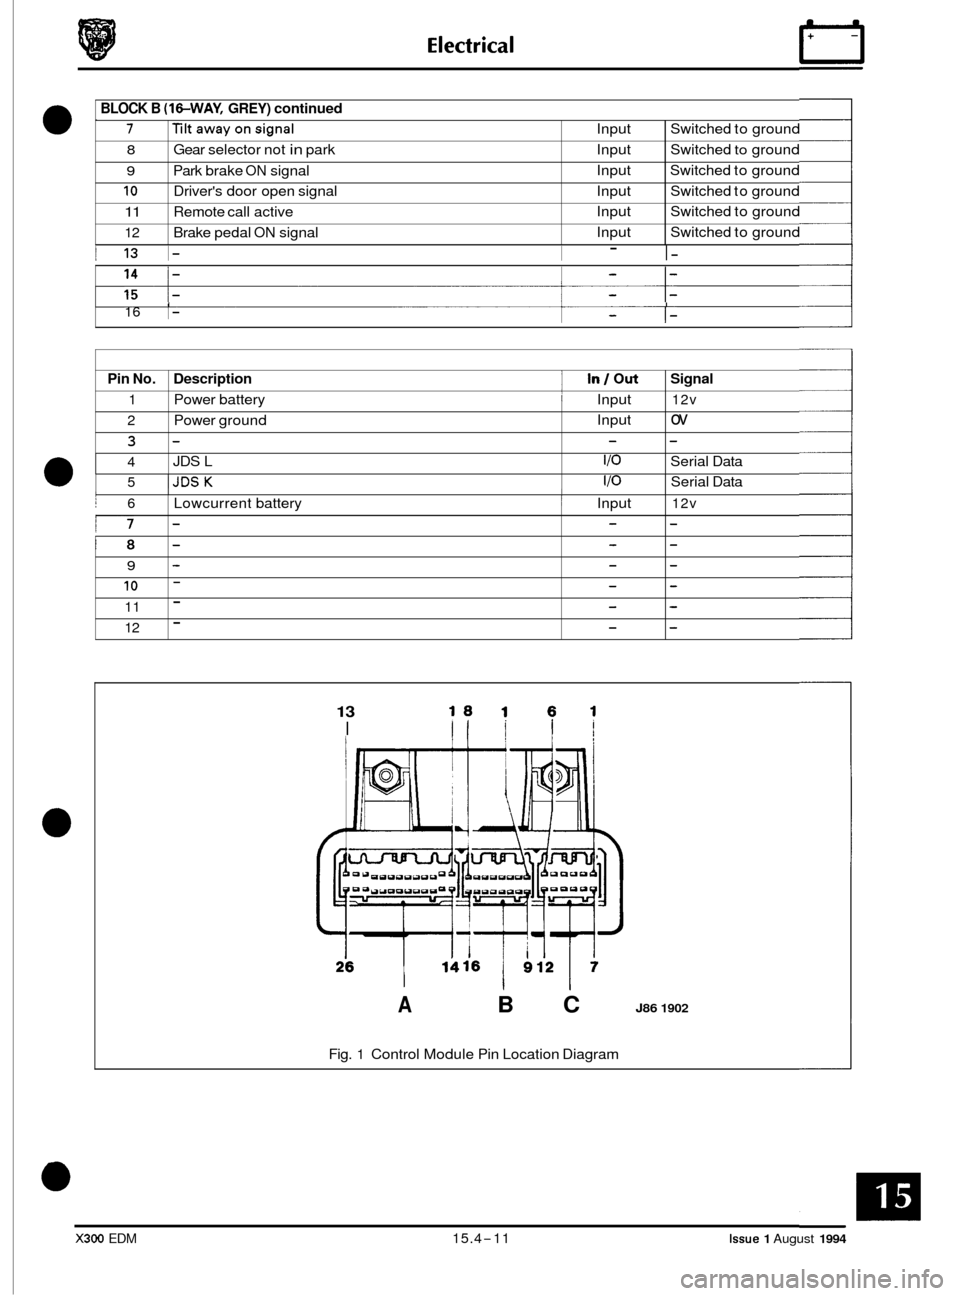
BLOCK B (W-WAY, GREY) continued
' 7 Tiltawayonsignal Input Switched to ground
8 Gear selector not in park Input Switched to ground
9 Park brake ON signal Input
Switched to ground
10 Driver's door open signal Input Switched to ground
11 Remote call active Input
Switched to ground
12 Brake pedal ON signal Input
Switched to ground
I I 16 1- - -
Pin No.
1
2
3
4
Description I In/ out Signal
Power battery i Input 12v
Power ground Input ov
- - -
JDS
L I/O Serial Data
5 IJDSK I/O
13
I I
Serial Data
A B C J86 1902
I j 6
i7
'8
9
10
11
12
Fig. 1 Control Module Pin Location Diagram
I Lowcurrent battery ~ Input 12v
- - -
- - -
- - -
- - -
- - -
- - -
X300 EDM 15.4-11 Issue 1 August 1994
Page 211 of 327
Rear view mirror position adjustments
1. Locate mirror select switch on driver's door switch pack and select driver's side mirror, ie
rotate switch towards the door.
2. Locate rear view mirror joystick switch on driver's door pack.
Operate the switch to give left
/ right and up / down movement. Does the mirror respond
in the correct manner?
3. Yes: Proceed to step 4 or 5.
No:
Japanese market vehicles only
Operate the switch to action 'fold away mode'. Does mirror respond in the correct manner
in each case?
Yes: Proceed to step
5.
No:
All markets
Operate mirror select switch to opposite position and repeat steps
1 to 4 for passenger side
mirror.
With ignition switched to auxiliary, select reverse gear and operate mirror joy
-stick
downwards. Does passenger side mirror dip automatically?
Yes: Proceed to step
7.
No:
Remove key from ignition, close driver's door and allow 30 seconds to elapse. Repeat
steps
1 - 6 and check that adjustment cannot be made.
Test complete; proceed to Memory Position Set.
Abort
test and refer to Diagnostic Sub
-Routines.
4.
Abort test and refer to Diagnostic Sub-Routines.
5.
6.
Abort test and refer to Diagnostic Sub-Routines.
7.
8.
Memory set position - drivefs side
1.
2.
3.
4.
5.
6.
7.
8.
Position the entry / exit switch, located on the LH side of the steering column, to off and
insert the key in the ignition.
Operate switches to position column, mirrors and seats to preferred positions.
Select 'memory' on the driver's door switch pack. Check that switch illuminates.
Depress desired memory button,
1,2 or 3, on door switch pack within 4 seconds of
memory select. Check that a chime sounds to confirm memory storage.
Operate the switches
so that memorized positions are changed. Depress relevant memory
option button,
1,2 or 3 and check that all positional settings are restored as memorized.
Remove key from ignition, close all doors and allow
30 seconds to elapse. Repeat steps 1
to 4 and check that adjustment cannot be made.
Readjust settings so that memorized positions are changed, leave the vehicle and operate
remote memory recall by locking and unlocking using the remote transmitter. Use both
transmitters to check both memory positions. Check all positional settings are restored as
memorized.
Yes: Proceed to step
8.
No:
Test complete. Abort
test and refer to Diagnostic Sub
-Routines.
X300 EDM Issue 1 August 1994 15.4 - 14
Page 229 of 327
13. Mirror movement switches
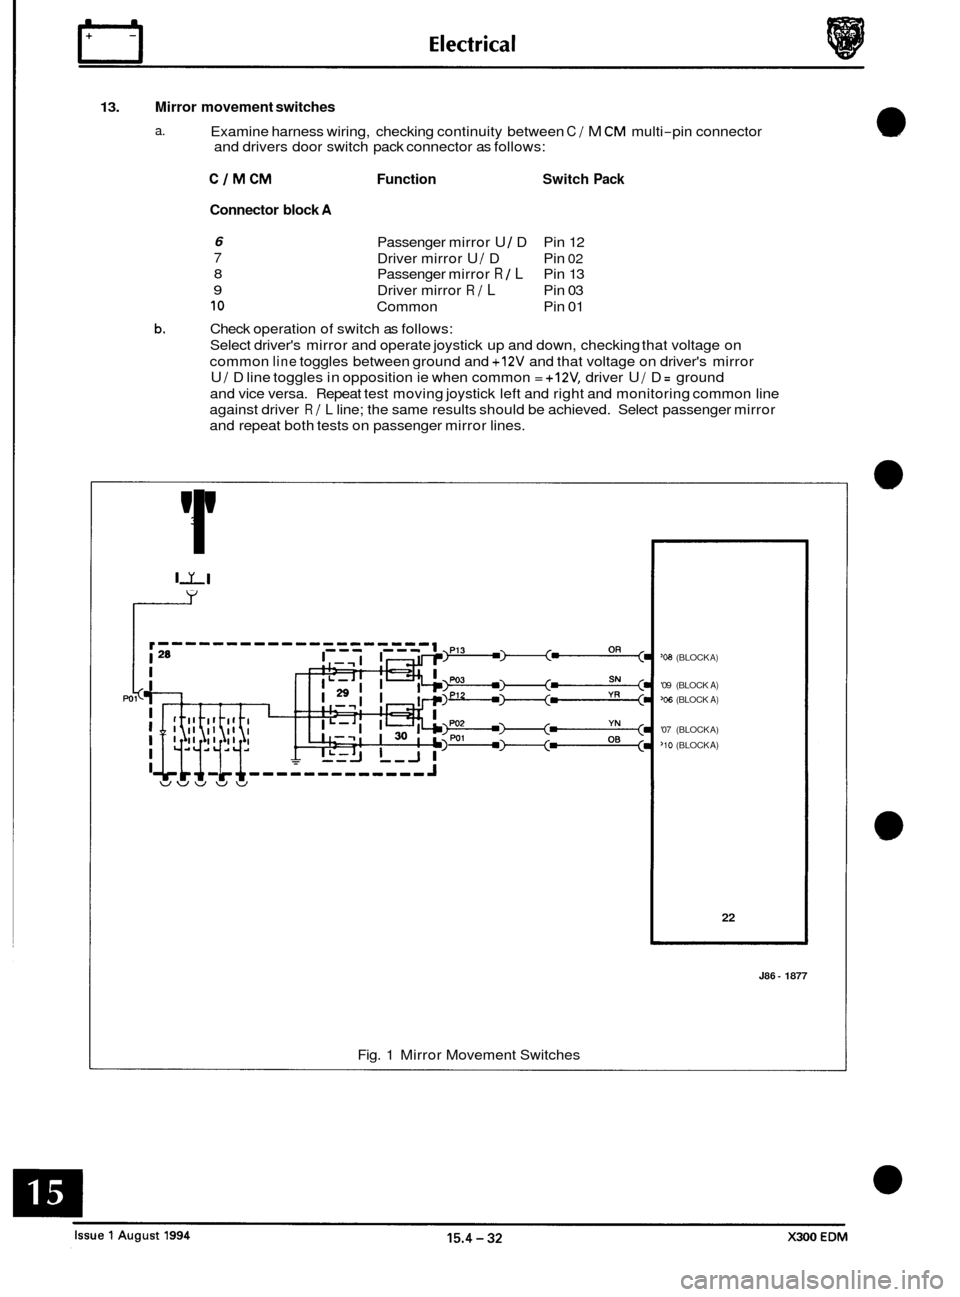
a. Examine harness wiring, checking continuity between C 1 M CM multi-pin connector
and drivers door switch pack connector as follows:
CJMCM Function Switch Pack
Connector block A
6
7
8
9
10
Passenger mirror U / D Pin 12
Driver mirror
U 1 D Pin 02
Passenger mirror R / L Pin 13
Driver mirror
R 1 L Pin 03
Common Pin 01
b. Check operation of switch as follows:
Select driver's mirror and operate joystick up and down, checking that voltage on
common
line toggles between ground and +12V and that voltage on driver's mirror
U I D line toggles in opposition ie when common = +12V, driver U / D = ground
and vice versa. Repeat test moving joystick left and right and monitoring common line
against driver
R / L line; the same results should be achieved. Select passenger mirror
and repeat both tests on passenger mirror lines.
3
'I'
II v
r-
'08 (BLOCK A)
'09 (BLOCK A) 'ob (BLOCK A)
'07 (BLOCK A)
'10 (BLOCK A)
22
J86 - 1877
Fig. 1 Mirror Movement Switches