power steering JAGUAR XJ6 1994 2.G Electrical Diagnostic Manual
[x] Cancel search | Manufacturer: JAGUAR, Model Year: 1994, Model line: XJ6, Model: JAGUAR XJ6 1994 2.GPages: 327, PDF Size: 13.73 MB
Page 59 of 327
Steering 69
SECTION CONTENTS
Sub
-Section Title SRO Page
10.1 ............. System Description ................................................................... 1
10.2.1 ............ Power Steering Control Module ........................................................ 1
10.2.2. ........... Steering Rack Transducer .............................................................. 1
10.2 ............. Component Descriptions .............................................................. 1
10.3 ............. Diagnostics ........................................................................\
. 3
X300 EDM i Issue 1 August 1994
Page 61 of 327
Q Steering
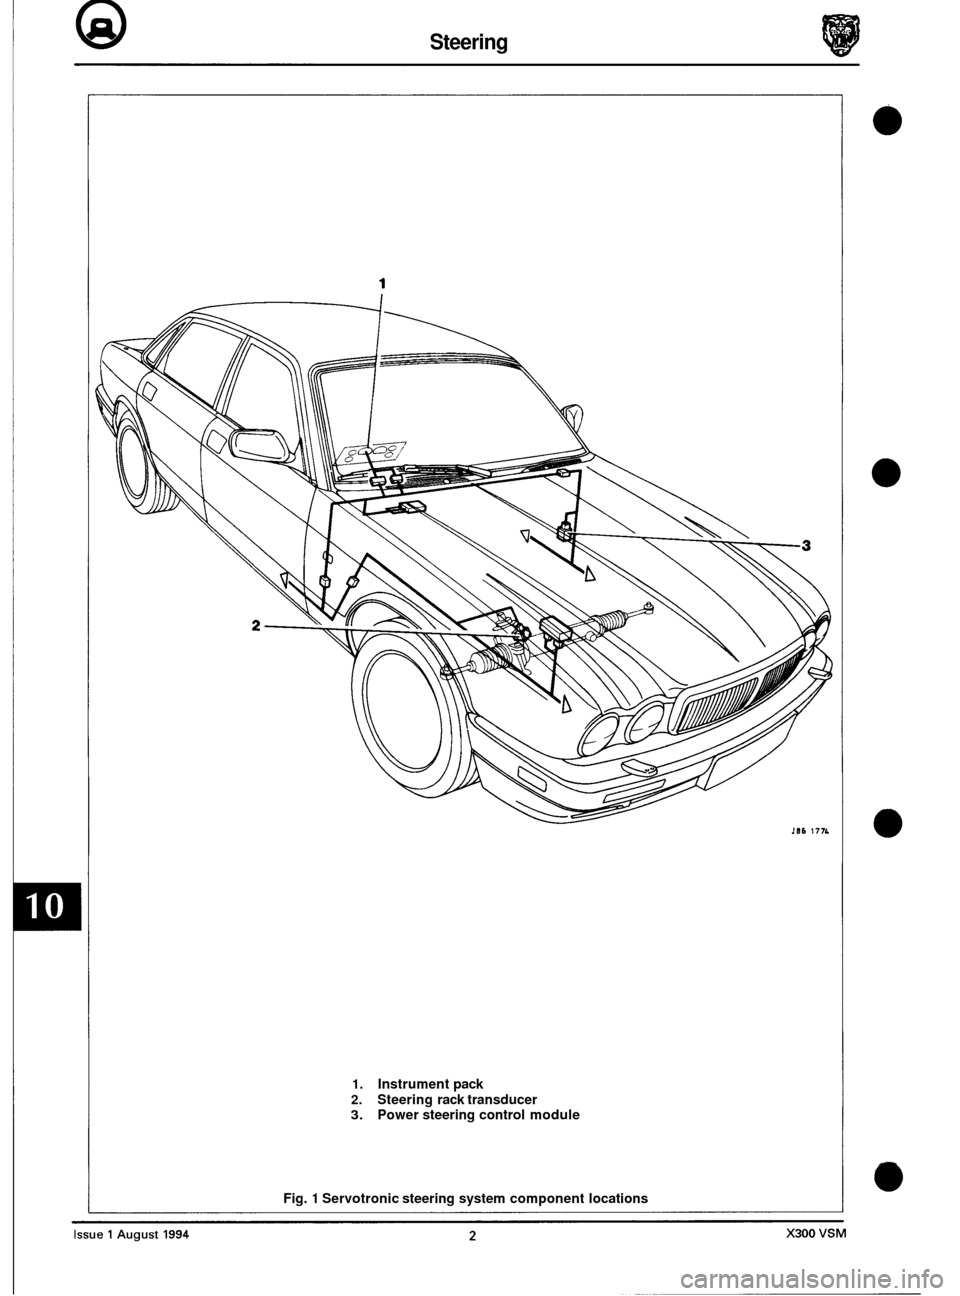
I86 177L
1. Instrument pack
2. Steering rack transducer 3. Power steering control module
Fig.
1 Servotronic steering system component locations
Page 63 of 327
@ Steering
R
. WIP
+ Y
1- -------q I I +I" I
*Ti m) wp I
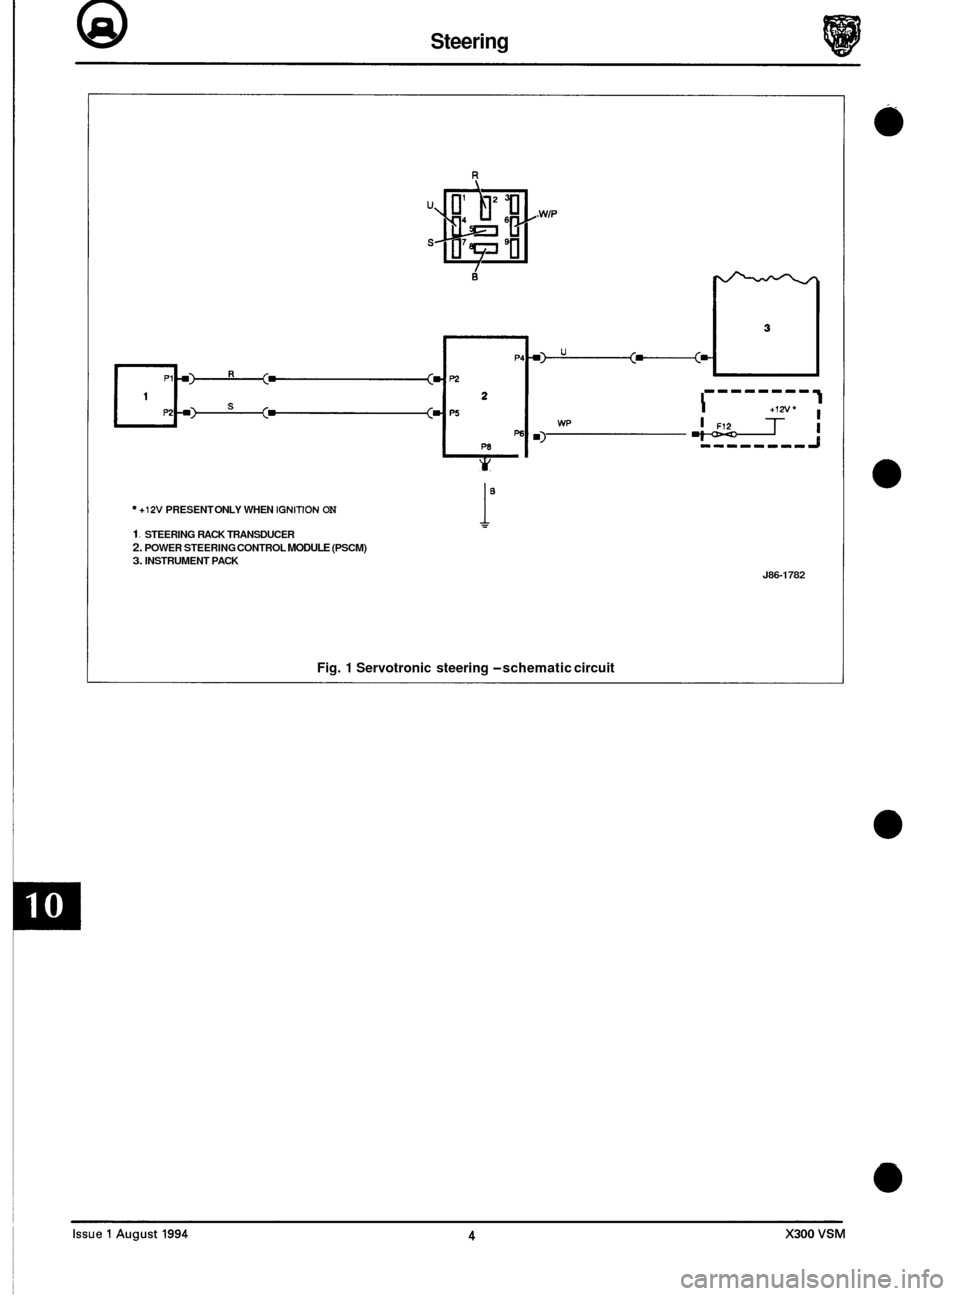
+12V PRESENT ONLY WHEN IGNITION ON
1. STEERING RACK TRANSDUCER 2. POWER STEERING CONTROL MODULE (PSCM) 3. INSTRUMENT PACK
i"
J86-1782
Fig. 1 Servotronic steering -schematic circuit
Page 98 of 327
Climate Control Systems
14.7.22 BLOWER MOTORS
Disconnect the blower motors (LH & RH) multi-plugs and check motor operation by applying battery voltage (+12V) across pin 5 (+vel and pin 9 (-ve).
Non-functioning of both L H and RH motors *
Cause:
1. Loss of ignition voltage.
Remedy:
1.
2.
*
Examine fuse F12 in RH heelboard fuse-box. If fuse is blown determine reason for failure and renew.
Examine harness wiring from
RH heelboard fuse-box connection CA044/010 to splice CAS53. Repair or renew
wiring as necessary.
This fault will also affect the operation of seat control modules, power steering control module and door mirror
heaters.
Non-functioning of RH blower motor only
Cause:
1. Faulty relay operation.
2. Faulty harness wiring.
Remedy:
1. Ensure 12Vsupply between relay pin 1 and ground.
Ensure continuity between pins 3 and
5 when relay operated.
Ensure relay coil impedance of
7552 to 135Q across pins 1 and 2.
Ensure correct seating of relay on base. Examine pins for damage or deformity.
Check continuity of wiring from fuse F12
(RH heelboard fuse-box) to relay pin 1 and from relay pin 2 to A / CCM
pin 53 (26-way connector).
Check continuity of wiring from fuse
F11 (RH heelboard fuse-box) to relay pin 3, from relay pin 5 to motor pin 5, from motor pin 13 to A / CCM pin 41 (16-way connector), from motor pin 8 to ground and from motor pin 10 to A / CCM pin 42 (16-way connector).
2.
Non-functioning of L H blower motor only
Cause:
1. Faulty relay operation.
2. Faulty harness wiring.
Remedy:
1. Ensure 12V supply between relay pin 1 and ground.
Ensure continuity between pins 3 and
5 when relay operated.
Ensure relay coil impedance
of 7552 to 135Q across pins 1 and 2.
Ensure correct seating of relay on base. Examine pins for damage or deformity.
2. Check continuity of wiring from fuse F12 (RH heelboard fuse-box) to relay pin 1 and from relay pin 2 to A / CCM
pin 66 (26-way connector).
Check continuity of wiring from fuse
F11 (LH heelboard fuse box) to relay pin 3, from relay pin 5 to motor pin 5, from motor pin 13 to A / CCM pin 49 (16-way connector), from motor pin 8 to ground and from motor pin 10 to
A / CCM pin 50 (16-way connector).
X300 EDM 23 Issue 1 August 1994
Page 107 of 327
E I ect r ica I
15.1 SUPPLEMENTAL RESTRAINT SYSTEM
15.1.1 System Description
The Supplemental Restraint System (SRS) installation comprises:
0 electronic Diagnostic Module (DM)
0 driver and passenger-side air bag modules (including firing mechanisms)
0 two front impact sensors (left and right)
0 one safing sensor
0 dedicated wiring harness
0 two cable reel cassettes (integral part of the steering column harness)
0 Malfunction Indicator Lamp (MIL) and driver information message
The system is designed to provide protection for both driver and front seat passenger by automatically deploying air
bags in the event of a collision during forward travel. The driver
-side air bag is located in the centre of the steering
wheel assembly and the passenger-side air bag in the fascia panel.
In the event of a collision the impact
/ safing sensors operate, completing the electrical firing circuit and causing the
air bags to inflate within 32 milliseconds. At least two of the three sensors (at least one impact, and the safing sensor)
.must be activated to initiate firing. System operation is dependent upon battery voltage supplied directly, and via the
ignition switch, to the DM and the correct installation and operation of all system components, including the wiring
harness. Faults in system components, installation or wiring will be indicated by the MIL Lamp, located on the instru
- ment panel, which will illuminate 'SRS AIR BAG'. Indication is also given by the driver information message'AIR BAG'
displayed on the LCD panel below the speedometer.
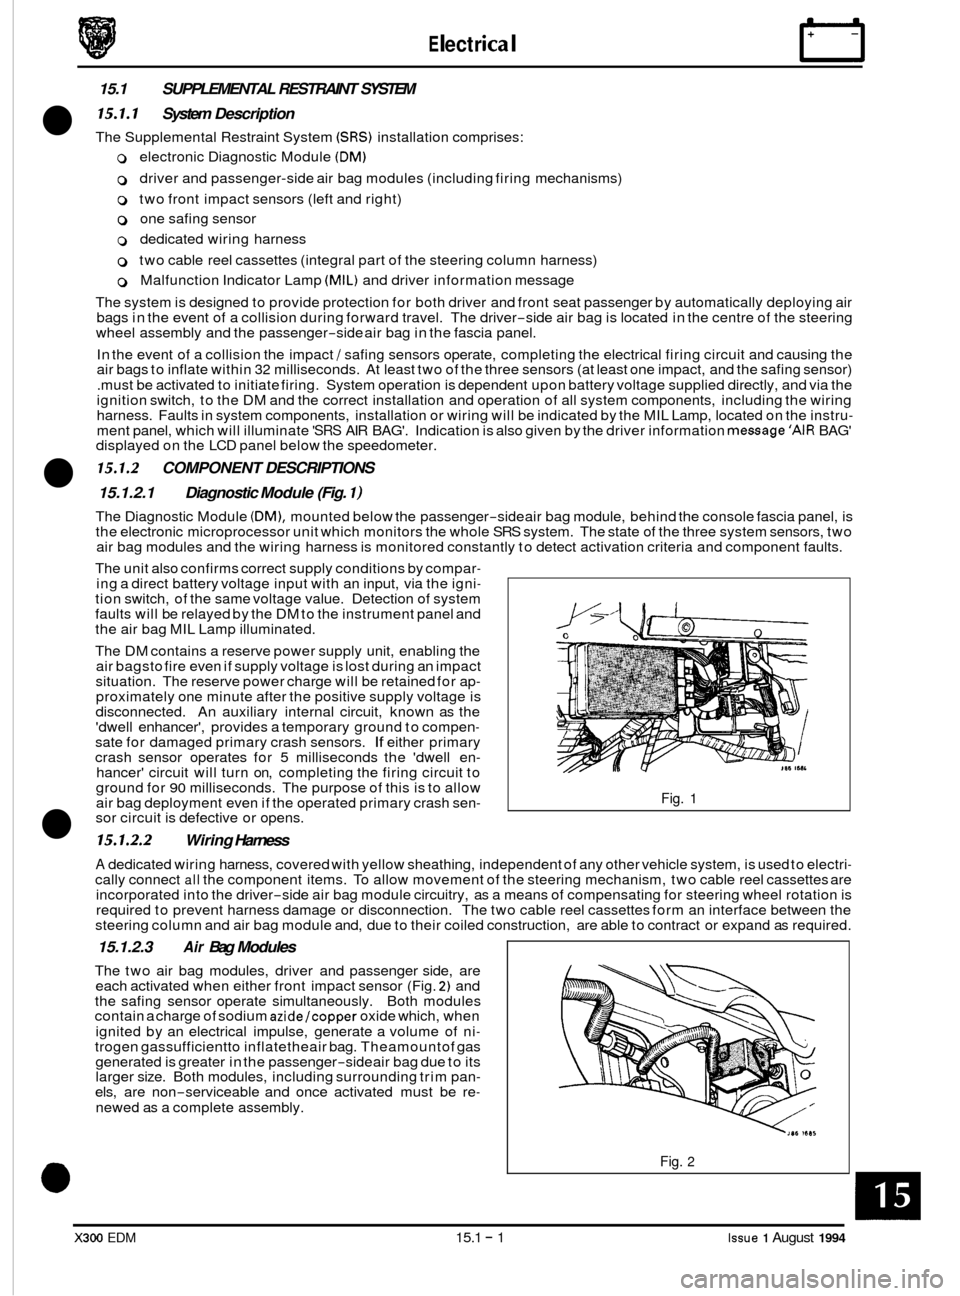
15.1.2.1 Diagnostic Module (Fig. I)
The Diagnostic Module (DM), mounted below the passenger-side air bag module, behind the console fascia panel, is
the electronic microprocessor unit which monitors the whole SRS system. The state of the three system sensors, two
air bag modules and the wiring harness is monitored constantly to detect activation criteria and component faults.
15.1.2 COMPONENT DESCRIPTIONS
The unit also confirms correct supply conditions by compar- ing a direct battery voltage input with an input, via the igni- tion switch, of the same voltage value. Detection of system
faults will be relayed by the DM to the instrument panel and
the air bag MIL Lamp illuminated.
The DM contains a reserve power supply unit, enabling the
air bagsto fire even if supply voltage is lost during an impact
situation. The reserve power charge will be retained for ap
- proximately one minute after the positive supply voltage is
disconnected. An auxiliary internal circuit, known as the
'dwell enhancer', provides a temporary ground to compen
- sate for damaged primary crash sensors. If either primary
crash sensor operates for 5 milliseconds the 'dwell en- hancer' circuit will turn on, completing the firing circuit to
ground for 90 milliseconds. The purpose of this is to allow
air bag deployment even if the operated primary crash sen- sor circuit is defective or opens.
15.1.2.2 Wiring Harness
Fig. 1
A dedicated wiring harness, covered with yellow sheathing, independent of any other vehicle system, is used to electri- cally connect all the component items. To allow movement of the steering mechanism, two cable reel cassettes are
incorporated into the driver-side air bag module circuitry, as a means of compensating for steering wheel rotation is
required to prevent harness damage or disconnection. The two cable reel cassettes form an interface between the
steering column and air bag module and, due to their coiled construction, are able to contract or expand as required.
15.1.2.3 Air Bag Modules
The two air bag modules, driver and passenger side, are
each activated when either front impact sensor (Fig. 2) and
the safing sensor operate simultaneously. Both modules
contain a charge of sodium
azide/copper oxide which, when
ignited by an electrical impulse, generate a volume of ni
- trogen gassufficientto inflatetheair bag. Theamountof gas
generated is greater in the passenger-side air bag due to its
larger size. Both modules, including surrounding trim pan- els, are non-serviceable and once activated must be re-
newed as a complete assembly.
Fig. 2
X300 EDM 15.1 - 1 Issue 1 August 1994
Page 109 of 327
Electrical rl
15.1.3 AIR BAG DISARMING/ ARMING PROCEDURE
warnings and cautions
WARNING: DISARM SRS BEFORE SERVICING ANY SRS OR STEERING COLUMN COMPONENT.
ALLOW A MINIMUM OF ONE MINUTE TIME DELAY FOR THE BACK
-UP POWER SUPPLY TO DISCHARGE,
AFTER THE BATTERY GROUND LEAD HAS BEEN DISCONNECTED.
THE SYSTEM COMPONENTS ARE NON
-SERVICEABLE, IF FAULTS ARE SUSPECTED, CHANGE COMPO- NENTS FOR NEW ITEMS ONLY.
NEVER PROBE THE CONNECTORS OF AN AIR BAG MODULE.
FAILURE TO OBSERVE THE ABOVE PROCEDURES MAY RESULT
IN ACCIDENTAL DEPLOYMENT OF AIR
BAG.
ALWAYS WEAR SAFETY GLASSES WHEN WORKING ON AIR BAG EQUIPPED VEHICLES.
PERSONNEL CARRYING AN AIR BAG MODULE MUST ENSURE THAT THE MODULE AND TRIM COVER
ARE POINTED AWAY FROM THE BODY. WHEN POSITIONED ON A BENCH
OR WORK SURFACE ENSURE
THAT THE AIR BAG MODULE AND TRIM COVER FACE UPWARDS, LIMITING MOTION ON ACCIDENTAL
DEPLOYMENT.
ALWAYS WEAR GLOVES WHEN HANDLING DEPLOYED AIR BAG MODULE, DEPOSITS OF SODIUM HY
- DROXIDE MAY BE PRESENT ON THE MODULE SURFACE. IF SODIUM HYDROXIDE CONTACTS ANY
AREA OF SKIN, WASH THE AFFECTED AREA IMMEDIATELY WITH MILD SOAP AND WATER. DISPOSE OF
THE DEPLOYED AIR BAG USING THE CORRECT PROCEDURES, REFER TO SECTION
15 OF THE VSM.
CAUTION:
When scrapping vehicles ensure air bags have been deployed.
If
a component has been renewed and the fault does not clear, refit original item and repeat diagnostic
procedure.
After servicing repeat diagnostic procedures to ensure correct system operation.
Renew air bag module if surrounding trim panels are damaged.
Do not attempt to repaint trim covers as paint may damage cover material.
Disarming
. Allow a minimum 1 minute time delay before attempting to diagnose or renew any component in the SRS system.
Remove driver-side air bag module and connect air bag simulator to cable reel cassette multi-plug.
. Remove passenger-side air bag module and connect air bag simulator to harness.
. Re-connect battery ground lead.
Disconnect
the battery ground lead.
This delay allows the DM back
-up power supply to discharge, preventing accidental firing of the air bag.
0
Arming
Disconnect the battery ground lead.
. Remove air bag simulators and install driver and passenger-side air bag modules. Ensure fasteners are tightened
. Re-connect battery ground lead.
Switch ignition 'on' and ensure air bag MIL Lamp extinguishes.
to specified torque.
X300 EDM 15.1 -3 Issue 1 August 1994
Page 157 of 327
E I ect r ical
15.2.3 COMPONENT DESCRIPTION
15.2.3.1 Speedometer
The speed indication input signal, sent as a pulse rate, is generated by an open collectortransistor within the ABS con- trol module. The instrument pack converts the frequency of this signal to drive the speedometer and to provide two
road speed outputs:
Speed output
1 (pin 2,48 way connector)
This output is connected to the radio head unit, security control module and the power steering module.
Speed output 2 (pin
3,48 way connector)
This output is connected to the body processor unit, cruise control control module, air conditioning control module
and the engine management system.
15.2.3.2 Tachometer
The tachometer input, all engine variants, is provided by the engine management control module. When the engine
is running the control module generates three high state pulses per engine revolution.
15.2.3.3
This signal comes direct from the variable resistance type oil pressure sensor, mounted on the engine. The sensor
resistance values range from 75Q (8 Bar) to 330Q (0 Bar).
When the gauge reaches
a pre-determined reading the instrument pack illuminates the warning light.
Engine Oil Pressure and Warning lamp
15.2.3.4 Engine Coolant Temperature
This signal comes direct from the coolant temperature sensor (variable resistance type), mounted on the engine. The
sensor resistance values range from 34Q (hot) to 241Q (cold), when disconnected from the vehicle.
Note: The coolant temperature gauge is calibrated to indicate at approximately 'Normal' for a wide range of normal
engine operating temperatures.
15.2.3.5 Fuel Tank level Gauge and Warning lamp
This signal (pin 20,24-way connector) comes direct from the variable resistor type fuel level sensor. The sensor resis- tance values range from 80 ohms (full tank) to 900 ohms (empty tank).
When the gauge reaches a pre
-determined reading, the instrument pack illuminates the warning lamp.
15.2.3.6
Battery voltage is displayed on the gauge by measuring the ignition voltage.
The red charge warning lamp will illuminate if either the voltage is too low (below
10.5V) or too high (above 15.5V). In addition, the generator provides a low signal to the instrument pack (pin 9,48-way connector) when battery charging
is unsatisfactory.
Battery Voltage Gauge and Warning lamp
15.2.3.7 Liquid Crystal Display
A single line, six digit, 7 segment display with six trip function flags used for odometer, trip computer and driver mess- ages.
!Y,Q&: If the instrument pack has not been PECUS programmed, the back illumination of the LCD will not switch on.
Check that a PECUS label is attached to the back of the pack.
Issue 1 August 1994 15.2 - 4 X300 EDM
Page 190 of 327
15.4 DRIVER ERGONOMICS
15.4.1 System Description
Adjustment of the seats, steering column and exterior rear view mirrors position is effected by means of control
switches. The switches maintain the adjustment facility while depressed, movement ceasing when the switch is re- leased.
Manual adjustment can be achieved either with the ignition key in place or with the driver‘s door open, or having been
closed within the last
30 seconds.
The system offers the following facilities:
Entry
/ Exit mode; an automatic seat /column position setting for ease of driver entry into / exit from the vehicle.
Driving position set; automatic recall of up to three preferred settings.
Passenger seat set; automatic recall of up to three preferred settings.
Remote recall; automatic recall of up to two memory positions from
a remote transmitter (in key fob).
Reverse mirror dip; automatic adjustment of passenger rear view mirror when reversing.
U: Vehicles intended for the Japanese market are fitted with an additional ‘fold away’ mirror function. This func- tion allows mirrors to fold flat against the car when parking in enclosed areas.
15.4.1.1 Entry/ Exit Mode
Entry / Exit mode is designed to give easier vehicle entry and exit for the driver. The facility is selected by positioning
the mode switch, located on the LH side of the column cowl, to ‘auto’ which designates the current seat / column posi- tion, ie driving positions, as the memorized position. On removal of ignition key or opening of driver‘s door, with igni- tion key still in place, the driver’s seat will move to the rear (current position allowing) and the column will adopt ‘tilt
away’ mode automatically creating additional space for driver exit
/ entry. Insertion of key in ignition or closure of
driver‘s door (with ignition key in place) returns seat / column positions to the memorized (previous) position.
Operation of eitherthe brake pedal or
seat/column manual controls during entry/exit mode execution will abort posi- tional adjustments. Setting the mode switch to OFF disables operation of entry / exit mode.
15.4.1.2 Driving Position Set
Setting of seat, column and external rear view mirrors to preferred driving position is available using the memory but- tons located on the drivers door switch pack. With the ignition key in place enter settings to be memorized as follows:
Adjust seat, column and mirrors to desired positions.
Press the ’memory’ button
so that it becomes illuminated.
Press button
1,2 or 3 to store configuration within four seconds of memory button operation. Memory light will extin- guish and a chime will sound, indicating procedure complete.
The above procedure may be repeated two more times until each button
(1,2 & 3) has a preferred position stored in
memory, accommodating different driver settings. Operation of any push-button (1,2 or 3) will re-position seat col-
umn and mirrors to the stored settings.
Memory recall will operate under the following conditions:
. Ignition key in and gear selector in park.
8 Ignition key in and handbrake on.
8 Ignition key out and driver’s door open (or having been closed within the last 30 seconds).
Re
-setting the preferred position on any setting button automatically erases previously stored information. Memory
information is not erased if power supply to the seat and column / mirror control modules is lost (e.g. battery discon- nected).
15.4.1.3 Passenger Seat Set
The procedure for setting and recalling a preferred passenger seat position is identical to that for a driving position.
Memory recall will only operate with ignition key in auxiliary position or passenger door open, or having been closed
within the last
30 seconds.
X300 EDM 15.4 - 1 Issue 1 August 1994
Page 215 of 327
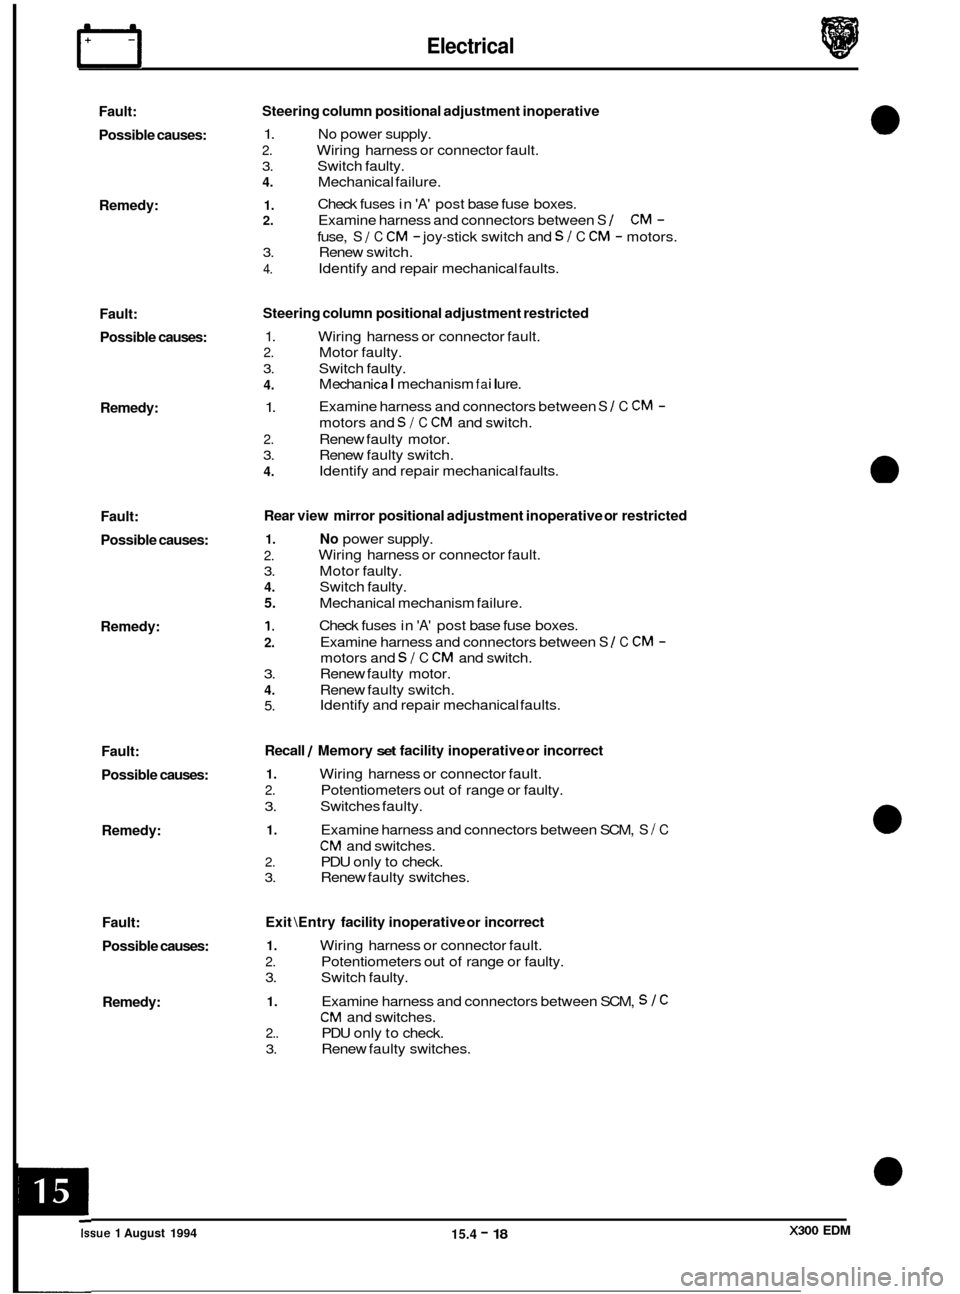
Electrical IT
Fault:
Possible causes:
Remedy:
Fault: Possible causes:
Remedy:
Fault:
Possible causes:
Remedy:
Fault:
Possible causes:
Remedy:
Fault:
Possible causes:
Remedy: Steering
column positional adjustment inoperative
1. No power supply.
2. Wiring harness or connector fault.
3. Switch faulty.
4. Mechanical failure.
1. 2. Examine harness and connectors between S 1 CM -
3. Renew switch.
4.
Check fuses in 'A' post base fuse boxes.
fuse,
S I C CM - joy-stick switch and SI C CM - motors.
Identify and repair mechanical faults.
Steering column positional adjustment restricted
1. Wiring harness or connector fault.
2. Motor faulty.
3. Switch faulty.
4.
1.
2. Renew faulty motor.
3. Renew faulty switch.
4.
M echa n ica I mechanism fa i I u re.
Examine harness and connectors between
S 1 C CM -
motors and SI C CM and switch.
Identify and repair mechanical faults.
Rear view mirror positional adjustment inoperative or restricted
1. No power supply.
2.
3. Motor faulty.
4. Switch faulty.
5. Mechanical mechanism failure.
1.
2.
3. Renew faulty motor.
4. Renew faulty switch.
5.
Wiring harness or connector fault.
Check fuses in
'A' post base fuse boxes.
Examine harness and connectors between
S 1 C CM -
motors and SI C CM and switch.
Identify and repair mechanical faults.
Recall / Memory set facility inoperative or incorrect
1. Wiring harness or connector fault.
2. Potentiometers out of range or faulty.
3. Switches faulty.
1. Examine harness and connectors between SCM, S I C
CM and switches.
2. PDU only to check.
3. Renew faulty switches.
Exit \Entry facility inoperative or incorrect
1. Wiring harness or connector fault.
2. Potentiometers out of range or faulty.
3. Switch faulty.
1. Examine harness and connectors between SCM, S 1 C
CM and switches.
2.. PDU only to check.
3. Renew faulty switches. ~
Issue 1 August 1994 15.4 - 18 X300 EDM