display JAGUAR XJ6 1994 2.G User Guide
[x] Cancel search | Manufacturer: JAGUAR, Model Year: 1994, Model line: XJ6, Model: JAGUAR XJ6 1994 2.GPages: 521, PDF Size: 17.35 MB
Page 318 of 521
Climate Control Systems
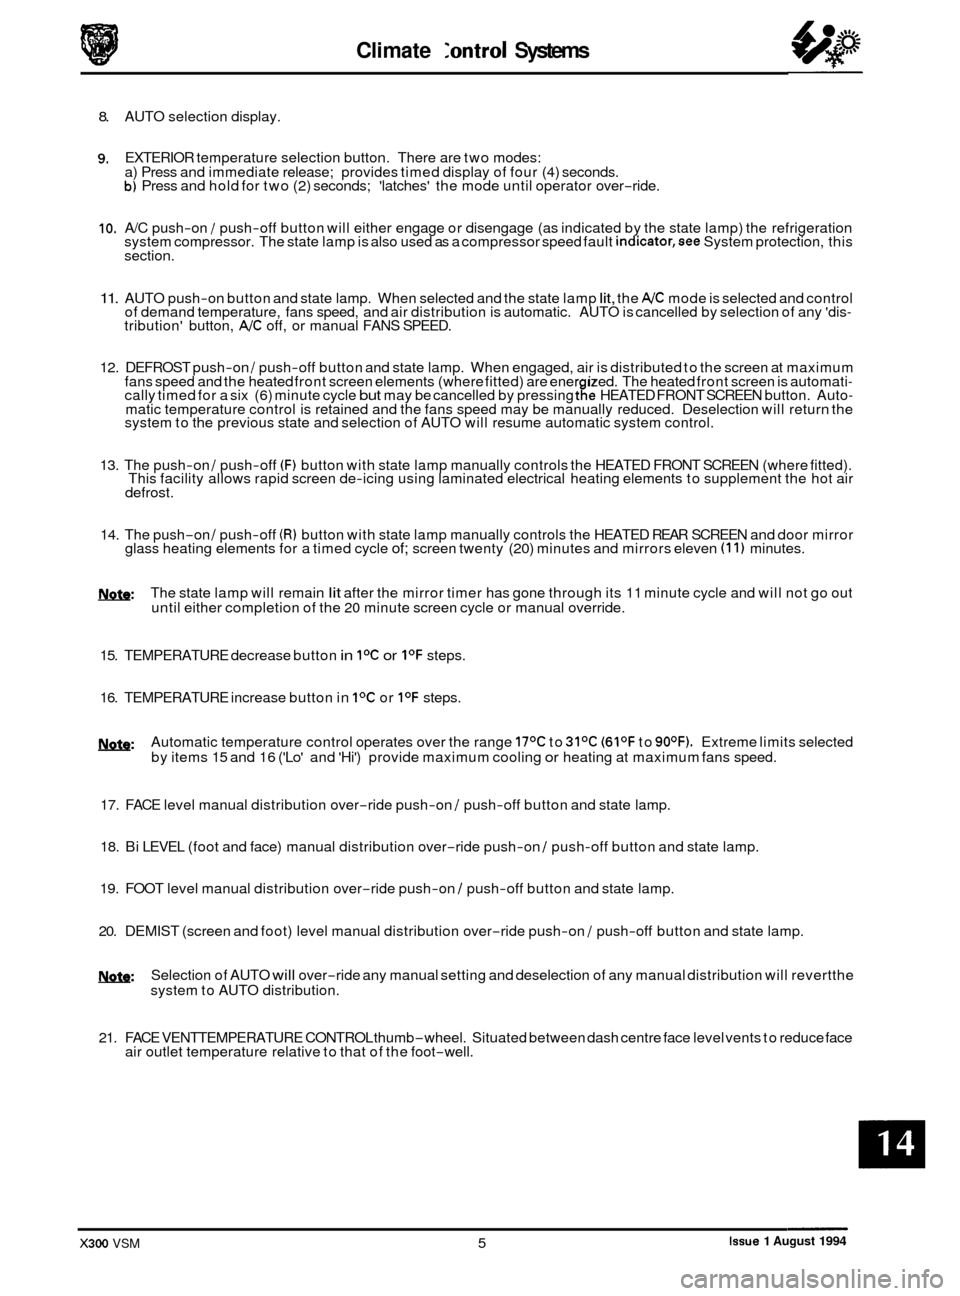
8. AUTO selection display.
9. EXTERIOR temperature selection button. There are two modes:
a) Press and immediate release; provides timed display of four (4) seconds.
b) Press and hold for two (2) seconds; 'latches' the mode until operator over-ride.
10. A/C push-on / push-off button will either engage or disengage (as indicated by the state lamp) the refrigeration
system compressor. The state lamp is also used as a compressor speed fault indicator,see System protection, this
section.
11. AUTO push-on button and state lamp. When selected and the state lamp lit, the A/C mode is selected and control
of demand temperature, fans speed, and air distribution is automatic. AUTO is cancelled by selection of any 'dis- tribution' button, A/C off, or manual FANS SPEED.
12. DEFROST push
-on / push-off button and state lamp. When engaged, air is distributed to the screen at maximum
fans speed and the heated front screen elements (where fitted) are ener ized. The heated front screen is automati- cally timed for a six (6) minute cycle but may be cancelled by pressing tfe HEATED FRONT SCREEN button. Auto- matic temperature control is retained and the fans speed may be manually reduced. Deselection will return the
system to the previous state and selection of AUTO will resume automatic system control.
13. The push
-on / push-off (F) button with state lamp manually controls the HEATED FRONT SCREEN (where fitted).
This facility allows rapid screen de-icing using laminated electrical heating elements to supplement the hot air
defrost.
14. The push-on / push-off (R) button with state lamp manually controls the HEATED REAR SCREEN and door mirror
glass heating elements for a timed cycle of; screen twenty (20) minutes and mirrors eleven (1 1) minutes.
m: The state lamp will remain lit after the mirror timer has gone through its 11 minute cycle and will not go out
until either completion of the 20 minute screen cycle or manual override.
15. TEMPERATURE decrease button
in IoC or I0F steps.
16. TEMPERATURE increase button in
IoC or I0F steps.
w: Automatic temperature control operates over the range 17OC to 31OC (61OF to 90OF). Extreme limits selected
by items 15 and 16 ('Lo' and 'Hi') provide maximum cooling or heating at maximum fans speed.
17. FACE level manual distribution over
-ride push-on / push-off button and state lamp.
0 18. Bi LEVEL (foot and face) manual distribution over-ride push-on / push-off button and state lamp.
19. FOOT level manual distribution over
-ride push-on / push-off button and state lamp.
20. DEMIST (screen and foot) level manual distribution over
-ride push-on / push-off button and state lamp.
!Y&Q: Selection of AUTO will over-ride any manual setting and deselection of any manual distribution will revertthe
system to AUTO distribution.
21. FACE VENTTEMPERATURE CONTROL thumb
-wheel. Situated between dash centre face level vents to reduce face
air outlet temperature relative to that of the foot-well.
Issue 1 August 1994 X300 VSM 5
Page 321 of 521
Climate Control Systems
. Centre vent flap
Foot flap
Defrost flap
I I
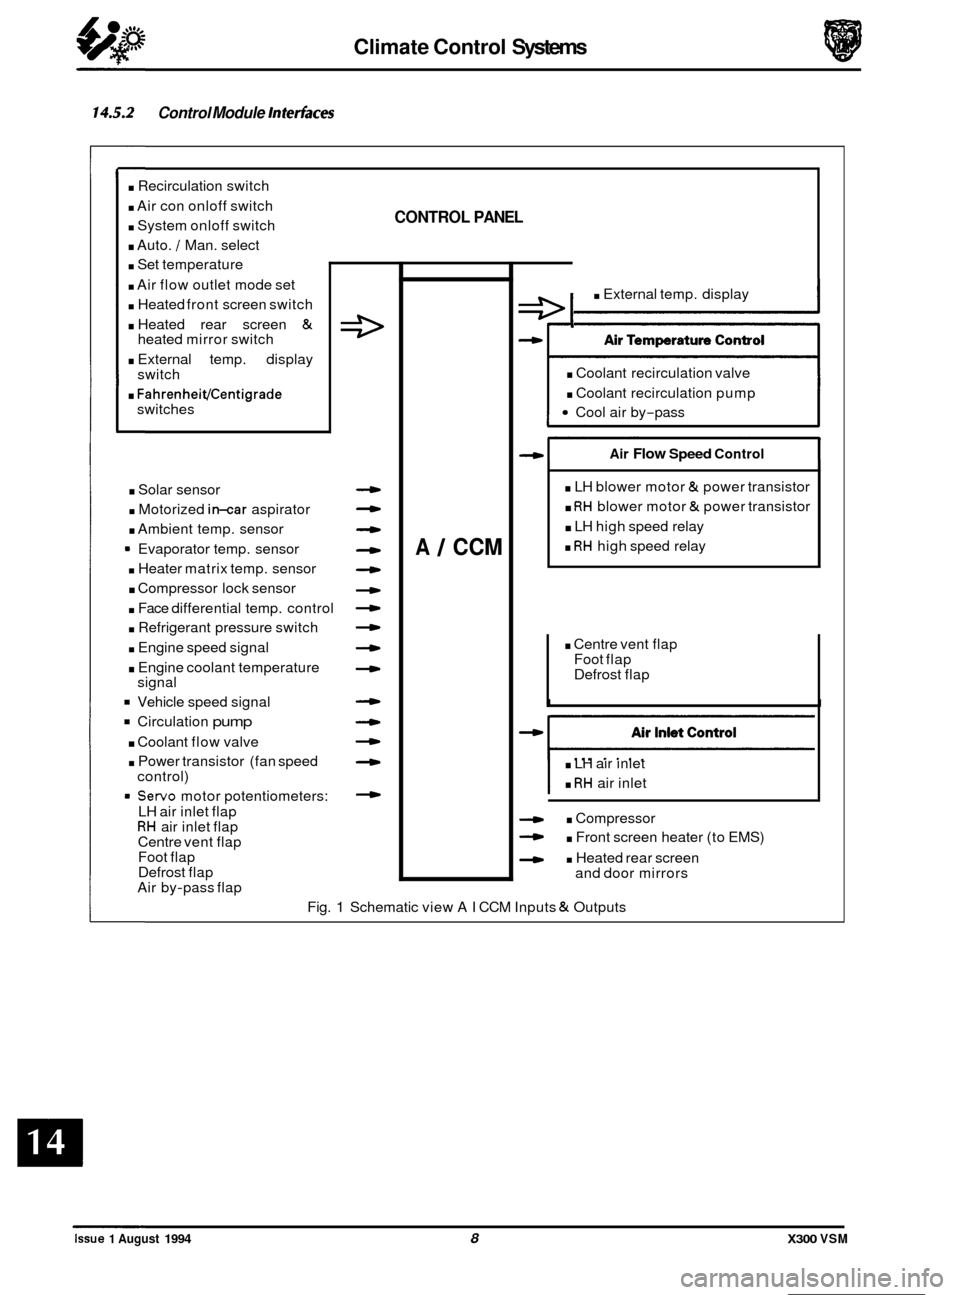
14.5.2 Control Module Interfaces
. Recirculation switch
. Air con onloff switch
. System onloff switch
. Auto. / Man. select
. Set temperature
. Air flow outlet mode set
. Heated front screen switch
. Heated rear screen &
. External temp. display
. FahrenheiVCentigrade
heated mirror switch
switch
switches
. Solar sensor
. Motorized in-car aspirator
. Ambient temp. sensor
9 Evaporator temp. sensor
. Heater matrix temp. sensor
. Compressor lock sensor
. Face differential temp. control
. Refrigerant pressure switch
. Engine speed signal
. Engine coolant temperature
Vehicle speed signal
Circulation pump
. Coolant flow valve
. Power transistor (fan speed
= Servo motor potentiometers:
signal
control)
LH air inlet flap
RH air inlet flap
Centre vent flap
Foot flap
Defrost flap
Air by
-pass flap
CONTROL PANEL
4
-
4
4
4
4
4
4
A 1 CCM
e I . External temp. display
. Coolant recirculation valve
. Coolant recirculation pump
Cool air by-pass
Air Flow Speed Control
. LH blower motor & power transistor
. RH blower motor & power transistor
. LH high speed relay
. RH high speed relay
. LH air inlet
. RH air inlet
. Compressor
- . Front screen heater (to EMS)
- . Heated rear screen
and door mirrors
Fig.
1 Schematic view AI CCM Inputs & Outputs
0
0
0
0
Issue 1 August 1994 8 X300 VSM
Page 322 of 521
Climate Control Systems
CONTROL MODULE FAULT & CONDITION SELF-ANALYSIS
0 14.6 14.6.1 System Health
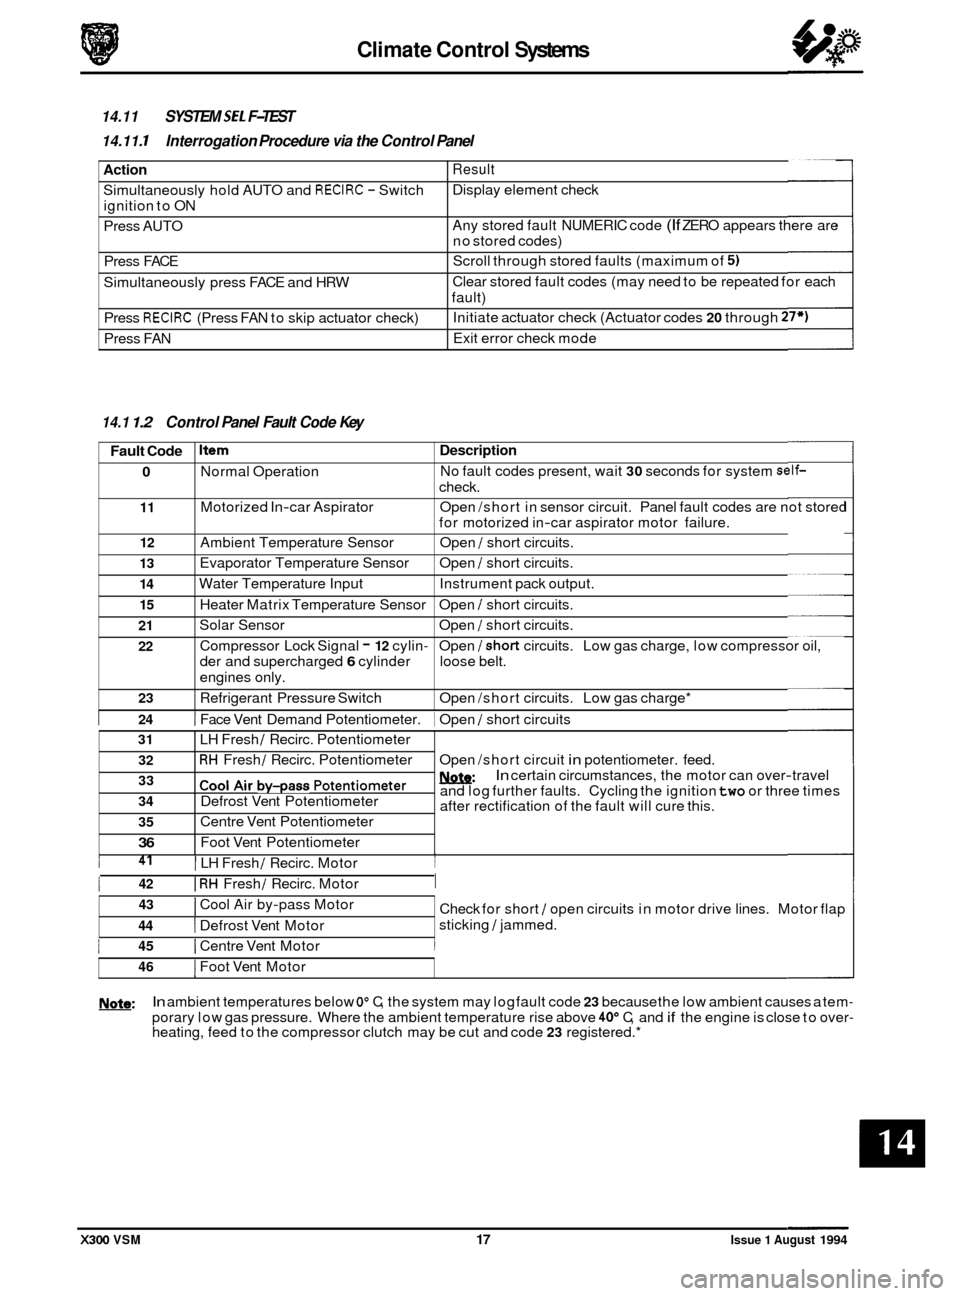
The climate control system has a 'self-test' facility, accessible from the control panel. The self test sequence has two
basic modes:
0 System error information is stored in the A/CCM up to a maximum of five faults. Should a fault occur there will
be an audible 'beep' and the message 'Er' will be displayed on the control panel LCD for approximately five (5)
seconds after ignition on. Please note that this will happen only once in any ignition switch cycle. The error
source may be accessed by the procedure described in 'Self Test System Diagnosis', this section.
0 Panel communication check may be initiated by following the instruction in 'Self Test System Diagnosis', this
section.
Nsfe: Displayed error codes are NOT directly related to Jaguar Diagnostic Equipment (JDE) but more detailed fault
related information may be accessed using Portable Diagnostic Unit (PDU).
14.6.2 System Protection
Power to the compressor clutch may be cut should either the engine management or air conditioning control systems
detect certain conditions; these conditions may be caused by Fault or Demand and can be classified thus:
0 Engine coolant overheat,
0 Refrigerant excessive pressure.
0 Refrigerant, insufficient pressure or low charge weight.
0 Speed differential between compressor and crankshaft caused by belt slippage or compressor seizure (indi-
cated by A/C state lamp flashing once per second) - 12 cylinder engine only. This feature, 'lock sensing' is fully
explained
in the EDM.
Demand
0 Engine maximum power requirement
0 Electrical system drain at engine idle.
X300 VSM 9 Issue 1 August 1994
Page 328 of 521
Climate Control Systems
14.10 FAULT DIAGNOSIS
14.10.1 Introduction
It is very important to positively identifythe area of concern before starting a rectification procedure. A little time spent
with your customer to identify the conditions under which a problem occurs will be beneficial. Relevant criteria are:
Weather conditions, ambient temperature, intermittent or continuous fault, airflow fault, temperature control fault, dis
- tribution fault and air inlet problem.
14.10.2 Functional Check
This simple 'first line check' will allow you to ascertain whether the system is operating within its design parameters,
without recourse to (JDE). Please carry out the following, in order.
0 Start engine and attain normal running temperature.
0 Presss AUTO to display selected temperature and illuminate AUTO & AJC state lamps.
0 Rotate FAN to increase or decrease lower speed, verify bar graph representation.
0 Operate AJC to toggle on or off. Because the compressor can be inhibited by the engine management system,
ensure that the engine temperature is normal and that the ambient is above 5O C.
0 Operate RECIRC, state lamp should be lit and the flap behind the blower grille open.
0 Operate distribution buttons in turn, verify correct air distribution and relevant state lamp.
0 Operate DEFROST, check max fans and air to front screen.
0 Cycle TEMPERATURE to 'Hi' and 'Lo' to verify demanded variations and display operation. Note that extremes
will provide max heat or cold independent of in-car temperature.
0 Operate EX to toggle between ambient and control temperatures.
0 Operate HFS and HRW to note timer and mirror operation.
0 Initiate System Self Test to check for, and extract, stored faults should any of the above not perform as stated.
14.10.3 System symptoms
There are five basic symptoms associated with air conditioning fault diagnosis. The following conditions are not in order of priority.
No Cooling
0 Is the electrical circuit to the compressor clutch functional?
0 Is the electrical circuit to the blower motor(s) functional?
0 Slack or broken compressor drive belt.
0 Compressor partially or completely seized.
0 Compressor shaft seal leak.
0 Compressor valve or piston damage (may be indicated by small variation between HIGH &LOW side pressures
relative to engine speed).
0 Broken refrigerant pipe (causing total loss of refrigerant).
0 Leak in system (causing total loss of refrigerant) - possible code 23.
0 Blocked filter in the receiver drier.
0 Evaporator sensor disconnected - possible code 13.
0 Pressure switch faulty - possible code 23.
X300 VSM Issue 1 August 1994
Page 330 of 521
Climate Control Systems
Action
Simultaneously hold AUTO and RECIRC - Switch
ignition to ON
Press AUTO
Press FACE
Simultaneously press FACE and HRW
Press
RECIRC (Press FAN to skip actuator check)
Press FAN
14.11 SYSTEM SE1 F-TEST
14.11. I Interrogation Procedure via the Control Panel
Result
Display element check
Any stored fault NUMERIC code
(If ZERO appears there are
no stored codes)
Scroll through stored faults (maximum of
5)
Clear stored fault codes (may need to be repeated for each
fault)
Initiate actuator check (Actuator codes
20 through 27*)
Exit error check mode
Fault Code
0
11
12
13
14
15
21
22
0
23
14.1 1.2 Control Panel Fault Code Key
Item Description
Normal Operation No
fault codes present, wait 30 seconds for system self-
check.
Motorized In
-car Aspirator Open /short in sensor circuit. Panel fault codes are not stored
for motorized in
-car aspirator motor failure.
Ambient Temperature Sensor Open
/ short circuits.
Evaporator Temperature Sensor Open
/ short circuits.
Water Temperature Input Instrument pack output.
Heater Matrix Temperature Sensor Open
/ short circuits.
Solar Sensor Open
/ short circuits.
Compressor Lock Signal
- 12 cylin- Open /short circuits. Low gas charge, low compressor oil,
der and supercharged
6 cylinder loose belt.
engines only.
Refrigerant Pressure Switch Open /short circuits. Low gas charge*
31
32
33
34
35
36 0
I 24 1 Face Vent Demand Potentiometer. 1 Open / short circuits
LH Fresh
/ Recirc. Potentiometer
RH Fresh / Recirc. Potentiometer
cool ~i~ by-pass potentiometer
Defrost Vent Potentiometer
Centre Vent Potentiometer
Foot Vent Potentiometer Open
/short circuit
in potentiometer. feed.
w: and log further faults. Cycling the ignition two or three times
after rectification of the fault will cure this.
In certain circumstances, the motor can over-travel
43
44
I Defrost Vent Motor
I Cool Air by-pass Motor
I 41 I LH Fresh / Recirc. Motor I
Check for short / open circuits in motor drive lines. Motor flap
sticking
/ jammed.
1 42 I RH Fresh / Recirc. Motor I
1 45 I Centre Vent Motor I
46 I Foot Vent Motor
w: In ambient temperatures below Oo C, the system may log fault code 23 because the low ambient causes a tem-
porary low gas pressure. Where the ambient temperature rise above 40" C, and if the engine is close to over- heating, feed to the compressor clutch may be cut and code 23 registered.*
X300 VSM 17 Issue 1 August 1994
Page 333 of 521
Climate Control Systems
14.13 SYSTEM CHECKING WITH MANIFOLD GAUGE Sm
14.13.1 Evacuating the Manifold Gauge Set
Attach the centre (service) hose to a vacuum pump and start the pump. Open fully both high anddow valves and allow
the vacuum to remove air and moisture from the manifold set for at least five minutes.
Turn the vacuum pump off and isolate it from the centre service hose but do not open the hose to atmosphere.
CAUTION: It is imperative that the vacuum pump is not subjected to a positive pressure of any degree. Therefore
the pump must be frtted with an isolation valve at the centre (service hose) connection and this valve
must be closed before the pump is switched off. This operation replaces the 'purge' procedure used on
previous systems. Observe the manufacturefs recommendation with regard to vacuum pump oil
changes.
14.13.2 Connecting the Manifold Gauge Set
CAUTION: Only use hoses with connectors which are dedicated to HFC 134A charge ports.
Attachment of the hose quick release connectors to the high and low side system ports is straightfotward, provided
that the high and low valves are closed and the system is NOT operational.
Assessment of system operating efficiency and fault classification may be achieved by using the facilities on your
Re- covery / Recharging / Recycling station, follow the manufacturers instructions implicitly and observe all safety con- siderations.
WARNING: UNDER NO CIRCUMSTANCES SHOULD THE CONNECTIONS BE MADE WITH THE SYSTEM IN
OPERATION OR THE VALVES OPEN. SHOULD THE VALVES BE OPEN AND A VACUUM PUMP OR
REFRIGERANT CONTAINER ATTACHED, AN EXPLOSION COULD OCCUR AS A RESULT OF HIGH
PRESSURE REFRIGERANT BEING FORCED BACK INTO THE VACUUM PUMP
OR CONTAINER.
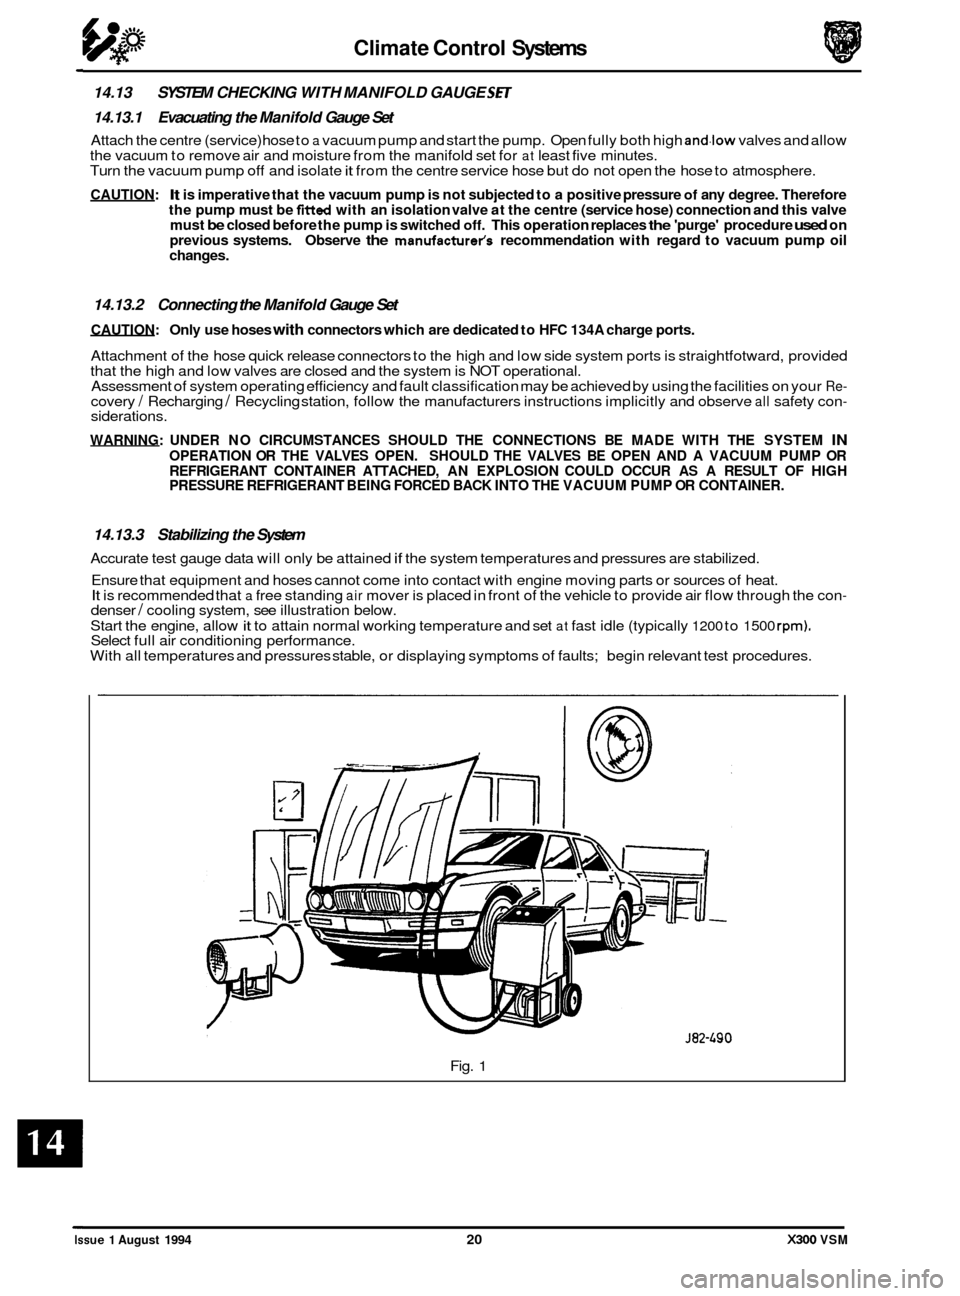
14.13.3 Stabilizing the System
Accurate test gauge data will only be attained if the system temperatures and pressures are stabilized.
Ensure that equipment and hoses cannot come into contact with engine moving parts or sources of heat.
It is recommended that a free standing air mover is placed in front of the vehicle to provide air flow through the con- denser / cooling system, see illustration below.
Start the engine, allow
it to attain normal working temperature and set at fast idle (typically 1200 to 1500 rpm). Select full air conditioning performance.
With all temperatures and pressures stable, or displaying symptoms of faults; begin relevant test procedures.
Fig.
1
Issue 1 August 1994 20 X300 VSM
Page 338 of 521
Electrical cl
.
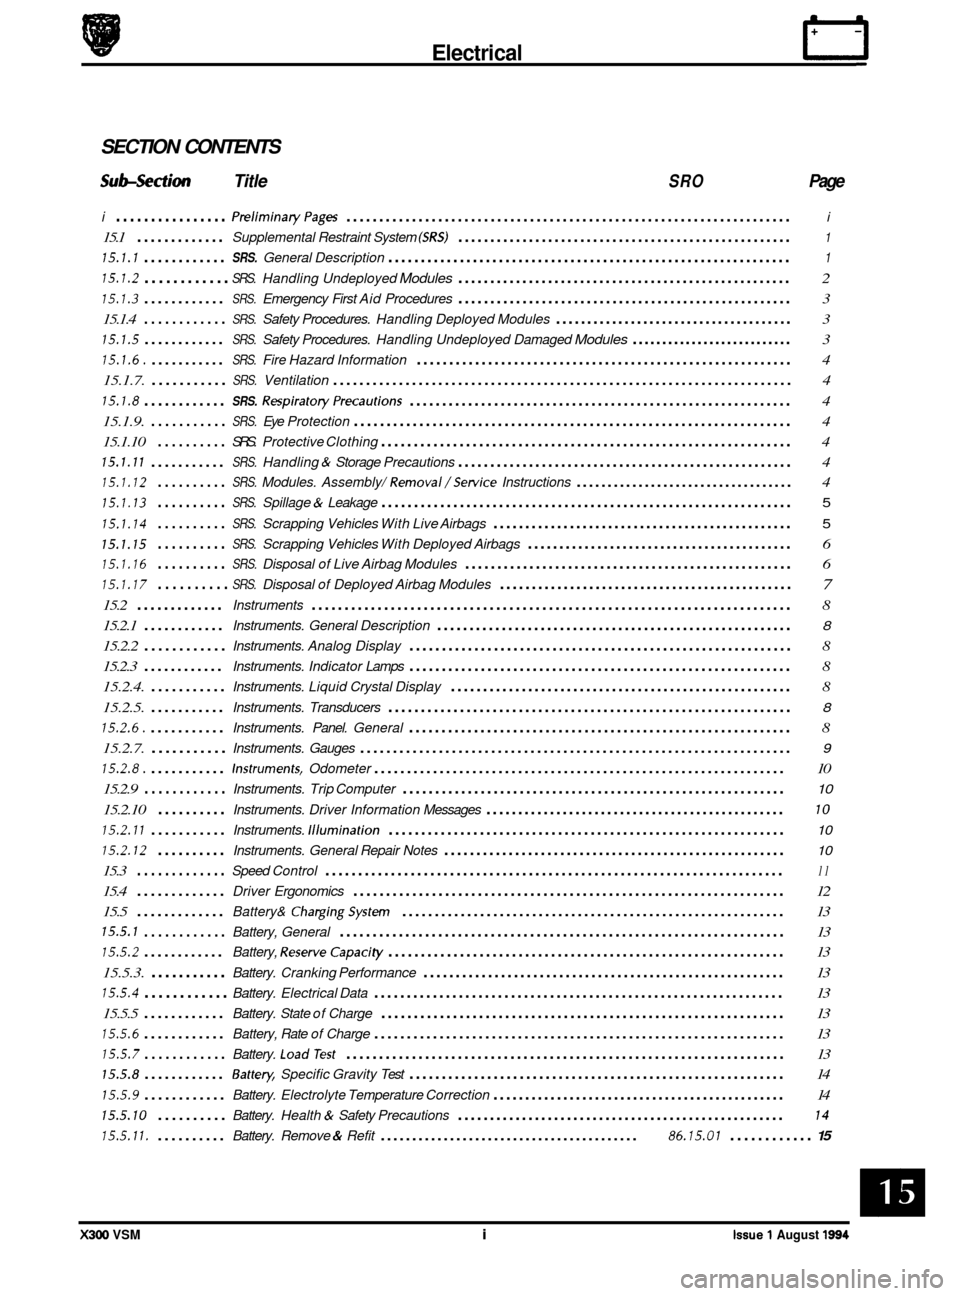
SECTION CONTENTS
Subsection Title SRO Page
i ................ PreliminaryPages .................................................................... i
15.1 ............. Supplemental Restraint System (SRS) .................................................... 1
15.1.1 ............ SRS. General Description .............................................................. 1
15.1.2 ............ SRS. Handling Undeployed Modules .................................................... 2
15.1.3 ............ SRS. Emergency First Aid Procedures .................................................... 3
15.1.4
............ SRS. Safety Procedures. Handling Deployed Modules ...................................... 3
15.1.5 ............ SRS. Safety Procedures. Handling Undeployed Damaged Modules ........................... 3
15.1.6. ........... SRS. Fire Hazard Information .......................................................... 4
15.1.7.
........... SRS. Ventilation ...................................................................... 4
15.1.8 ............ SRS. RespiratoryPrecautions ........................................................... 4
15.1.9.
........... SRS. Eye Protection ................................................................... 4
15.1.10
.......... SRS. Protective Clothing ............................................................... 4
15.1.11 ........... SRS. Handling & Storage Precautions .................................................... 4
15.1.12 .......... SRS. Modules. Assembly/ Removal/Setvice Instructions ................................... 4
15.1.13 .......... SRS. Spillage & Leakage ............................................................... 5
15.1.14 .......... SRS. Scrapping Vehicles With Live Airbags ............................................... 5
15.1.15 .......... SRS. Scrapping Vehicles With Deployed Airbags .......................................... 6
15.1.16 .......... SRS. Disposal of Live Airbag Modules ................................................... 6
15.1.17 .......... SRS. Disposal of Deployed Airbag Modules .............................................. 7
15.2 ............. Instruments ........................................................................\
. 8
15.2.1
............ Instruments. General Description ....................................................... 8
15.2.2 ............ Instruments. Analog Display ........................................................... 8
15.2.3
............ Instruments. Indicator Lamps ........................................................... 8
15.2.4.
........... Instruments. Liquid Crystal Display ..................................................... 8
15.2.5.
........... Instruments. Transducers .............................................................. 8
15.2.6. ........... Instruments. Panel. General ........................................................... 8
15.2.7.
........... Instruments. Gauges .................................................................. 9
15.2.8. ........... Instruments. Odometer ............................................................... 10
15.2.9
............ Instruments. Trip Computer ........................................................... 10
15.2.10 .......... Instruments. Driver Information Messages ............................................... 10
15.2.11 ........... Instruments. Illumination ............................................................. 10
15.2.12 .......... Instruments. General Repair Notes ..................................................... 10
15.3 ............. Speed Control ...................................................................... 11
15.4 ............. Driver Ergonomics .................................................................. 12
15.5
............. Battery& ChargingSystem ........................................................... 13
15.5.1 ............ Battery, General .................................................................... 13
15.5.2 ............ Battery, ReserveCapaci ty ............................................................. 13
15.5.3.
........... Battery. Cranking Performance ........................................................ 13
15.5.4 ............ Battery. Electrical Data ............................................................... 13
15.5.5
............ Battery. State of Charge .............................................................. 13
15.5.6 ............ Battery, Rate of Charge ............................................................... 13
15.5.7 ............ Battery. LoadTest ................................................................... 13
15.5.8 ............ Battey. Specific Gravity Test .......................................................... 14
15.5.9 ............ Battery. Electrolyte Temperature Correction .............................................. 14
15.5.10 .......... Battery. Health & Safety Precautions ................................................... 14
15.5.11. .......... Battery. Remove & Refit ......................................... 86.15.01 ............ 15
e
e
X300 VSM i Issue 1 August 1994
Page 349 of 521
Electrical rl
15.2 INSTRUMENTS
15.2.1 General Description
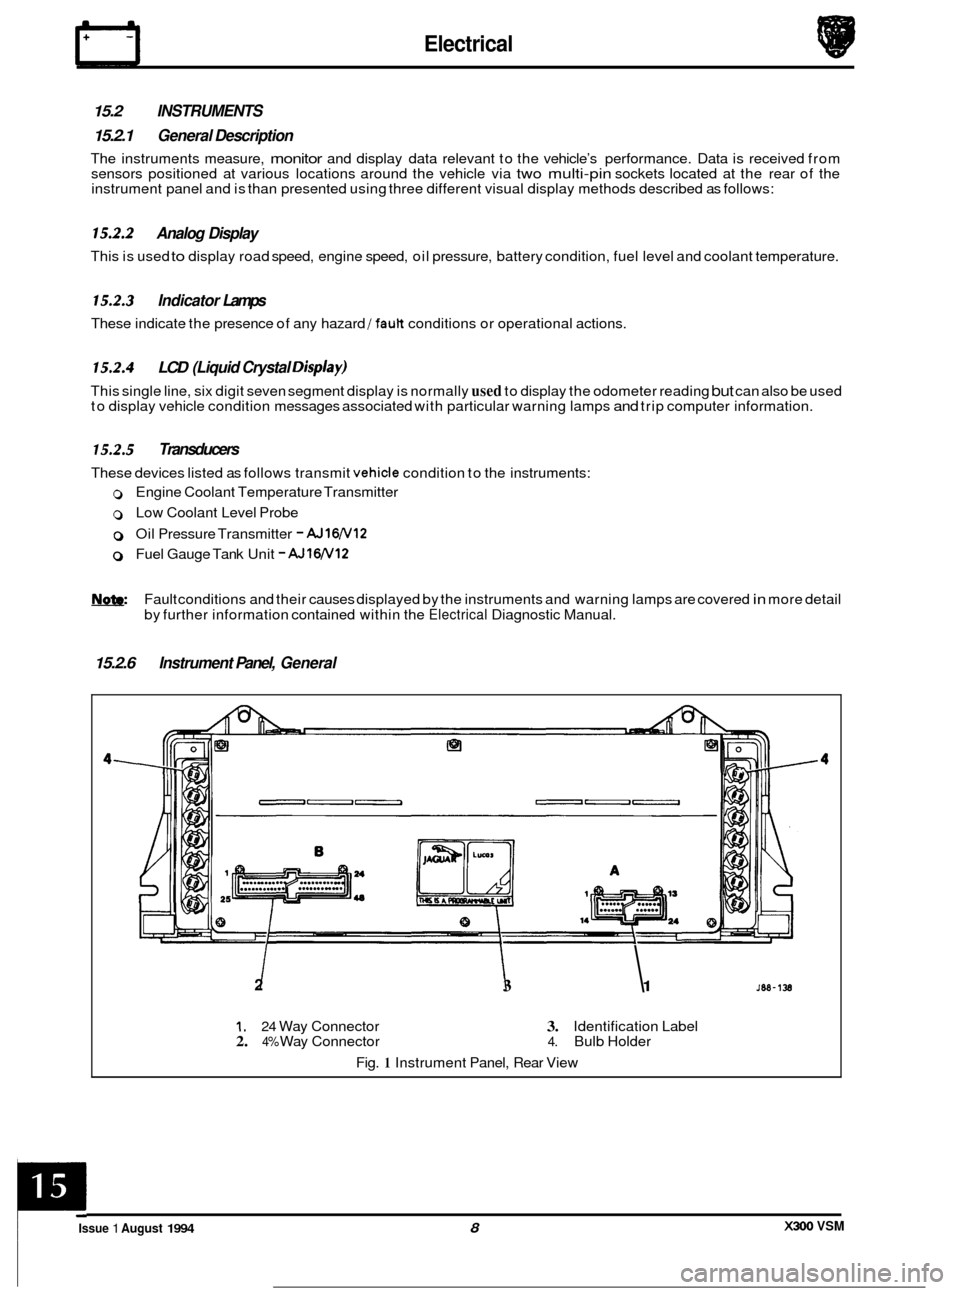
The instruments measure, monitor and display data relevant to the vehicle’s performance. Data is received from
sensors positioned at various locations around the vehicle via two multi-pin sockets located at the rear of the
instrument panel and is than presented using three different visual display methods described as follows:
15.2.2 Analog Display
This is used to display road speed, engine speed, oil pressure, battery condition, fuel level and coolant temperature.
15.2.3 Indicator Lamps
These indicate the presence of any hazard /fault conditions or operational actions.
15.2.4 LCD (Liquid Crystal Disp/ay)
This single line, six digit seven segment display is normally used to display the odometer reading but can also be used
to display vehicle condition messages associated with particular warning lamps and trip computer information.
15.2.5 Transducers
These devices listed as follows transmit vehicle condition to the instruments:
0 Engine Coolant Temperature Transmitter
0 Low Coolant Level Probe
0 Oil Pressure Transmitter - AJ16N12
0 Fuel Gauge Tank Unit - AJlW12
Fault conditions and their causes displayed by the instruments and warning lamps are covered in more detail
by further information contained within the
Electrical Diagnostic Manual.
15.2.6 Instrument Panel, General
2 I I 3 1
1. 24 Way Connector 3. Identification Label 2. 4% Way Connector 4. Bulb Holder
Fig.
1 Instrument Panel, Rear View
X300 VSM Issue 1 August 1994 8
c
Page 350 of 521
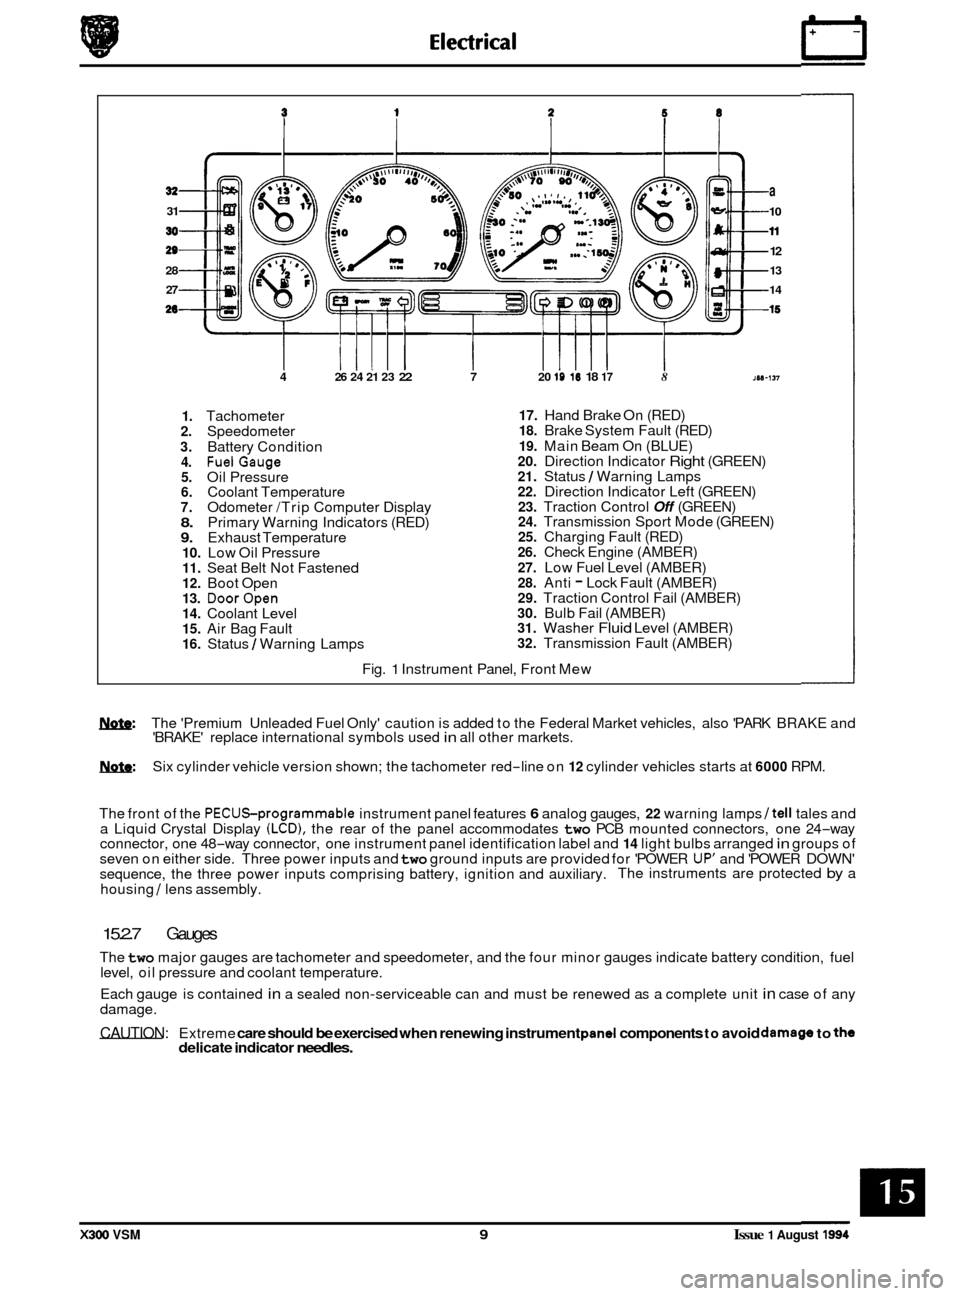
31
30
29
28 27
26
4 26 24 21 23 22 7 20 19 18 18 17 8
a
10
11
12
13
14
1s
1M-137
1. Tachometer 2. Speedometer
3. Battery Condition 4. FuelGauge 5. Oil Pressure 6. Coolant Temperature 7. Odometer /Trip Computer Display 8. Primary Warning Indicators (RED) 9. Exhaust Temperature 10. Low Oil Pressure 11. Seat Belt Not Fastened 12. Boot Open 13. DoorOpen 14. Coolant Level 15. Air Bag Fault 16. Status / Warning Lamps
17. Hand Brake On (RED) 18. Brake System Fault (RED)
19. Main Beam On (BLUE) 20. Direction Indicator Right (GREEN) 21. Status / Warning Lamps 22. Direction Indicator Left (GREEN) 23. Traction Control Off (GREEN) 24. Transmission Sport Mode (GREEN) 25. Charging Fault (RED) 26. Check Engine (AMBER)
27. Low Fuel Level (AMBER) 28. Anti - Lock Fault (AMBER) 29. Traction Control Fail (AMBER) 30. Bulb Fail (AMBER) 31. Washer Fluid Level (AMBER) 32. Transmission Fault (AMBER)
Fig.
1 Instrument Panel, Front Mew
w: The 'Premium Unleaded Fuel Only' caution is added to the Federal Market vehicles, also 'PARK BRAKE and
'BRAKE' replace international symbols used in all other markets.
m: Six cylinder vehicle version shown; the tachometer red-line on 12 cylinder vehicles starts at 6000 RPM.
The front of the
PECUSprogrammable instrument panel features 6 analog gauges, 22 warning lamps /tell tales and
a Liquid Crystal Display (LCD), the rear of the panel accommodates two PCB mounted connectors, one 24-way
connector, one 48-way connector, one instrument panel identification label and 14 light bulbs arranged in groups of
seven on either side. Three power inputs and two ground inputs are provided for 'POWER UP' and 'POWER DOWN'
sequence, the three power inputs comprising battery, ignition and auxiliary. The instruments are protected by a
housing
/ lens assembly.
15.2.7 Gauges
The two major gauges are tachometer and speedometer, and the four minor gauges indicate battery condition, fuel
level, oil pressure and coolant temperature.
Each gauge is contained
in a sealed non-serviceable can and must be renewed as a complete unit in case of any
damage.
CAUTION: Extreme care should be exercised when renewing instrument pand components to avoid damago to the delicate indicator needles.
X300 VSM 9 Issue 1 August 1994
Page 351 of 521
IT Electrical
15.2.8 Odometer
With the ignition 'OFF' the odometer is permanently dis-
played but not illuminated. With the ignition 'ON' the odo- meter is displayed and also illuminated.
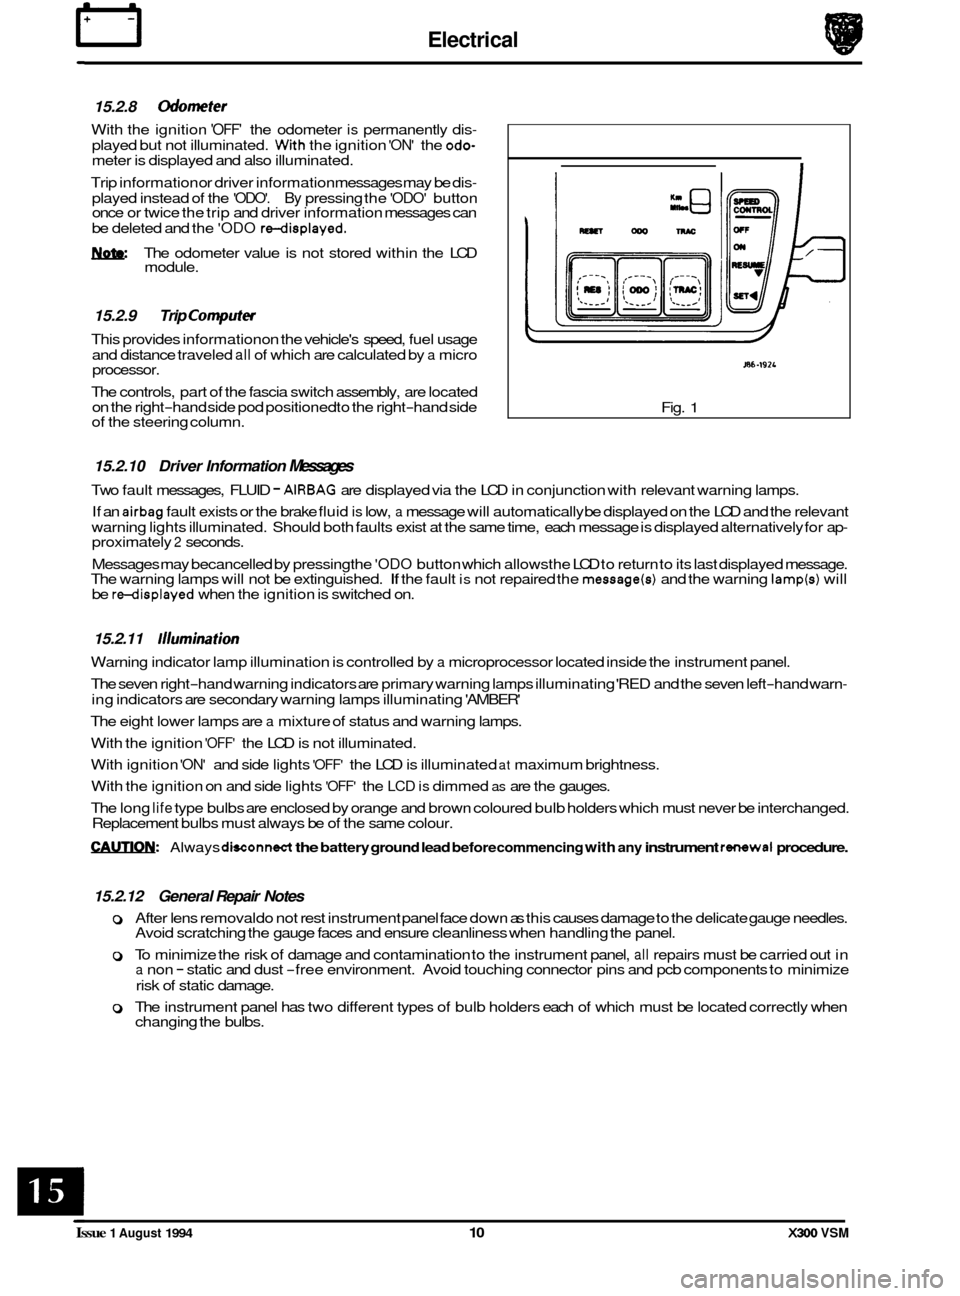
Trip information or driver information messages may be dis
-
played instead of the 'ODO'. By pressing the 'ODO' button
once or twice the trip and driver information messages can
be deleted and the
'ODO rdisplayed.
W. The odometer value is not stored within the LCD
module.
15.2.9 Trip Computev
This provides information on the vehicle's speed, fuel usage
and distance traveled
all of which are calculated by a micro
processor.
The controls, part of the fascia switch assembly, are located
on the right
-hand side pod positioned to the right-hand side
of the steering column.
I
/
J86-192L
Fig. 1
15.2.10 Driver Information Messages
Two fault messages, FLUID - AIRBAG are displayed via the LCD in conjunction with relevant warning lamps.
If an
airbag fault exists or the brake fluid is low, a message will automatically be displayed on the LCD and the relevant
warning lights illuminated. Should both faults exist at the same time, each message is displayed alternatively for ap
- proximately 2 seconds.
Messages may becancelled
by pressing the 'ODO button which allowsthe LCD to return to its last displayed message.
The warning lamps will not be extinguished. If the fault is not repaired the message(s) and the warning lamp(s) will
be redisplayed when the ignition is switched on.
15.2.11 /llumination
Warning indicator lamp illumination is controlled by a microprocessor located inside the instrument panel.
The seven right
-hand warning indicators are primary warning lamps illuminating 'RED and the seven left-hand warn-
ing indicators are secondary warning lamps illuminating 'AMBER'
The eight lower lamps are
a mixture of status and warning lamps.
With the ignition
'OFF' the LCD is not illuminated.
With ignition
'ON' and side lights 'OFF' the LCD is illuminated at maximum brightness.
With the ignition on and side lights
'OFF' the LCD is dimmed as are the gauges.
The long
life type bulbs are enclosed by orange and brown coloured bulb holders which must never be interchanged.
Replacement bulbs must always be of the same colour.
CAUTIQN: Always dwonnect the battery ground lead before commencing with any instrument rsimwal procedure.
15.2.12 General Repair Notes
0 After lens removal do not rest instrument panel face down as this causes damage to the delicate gauge needles.
Avoid scratching the gauge faces and ensure cleanliness when handling the panel.
0 To minimize the risk of damage and contamination to the instrument panel, all repairs must be carried out in a non - static and dust -free environment. Avoid touching connector pins and pcb components to minimize
risk of static damage.
0 The instrument panel has two different types of bulb holders each of which must be located correctly when
changing the bulbs.
Issue 1 August 1994 10 X300 VSM