brake sensor JAGUAR XJ6 1997 2.G Workshop Manual
[x] Cancel search | Manufacturer: JAGUAR, Model Year: 1997, Model line: XJ6, Model: JAGUAR XJ6 1997 2.GPages: 227, PDF Size: 7.2 MB
Page 39 of 227
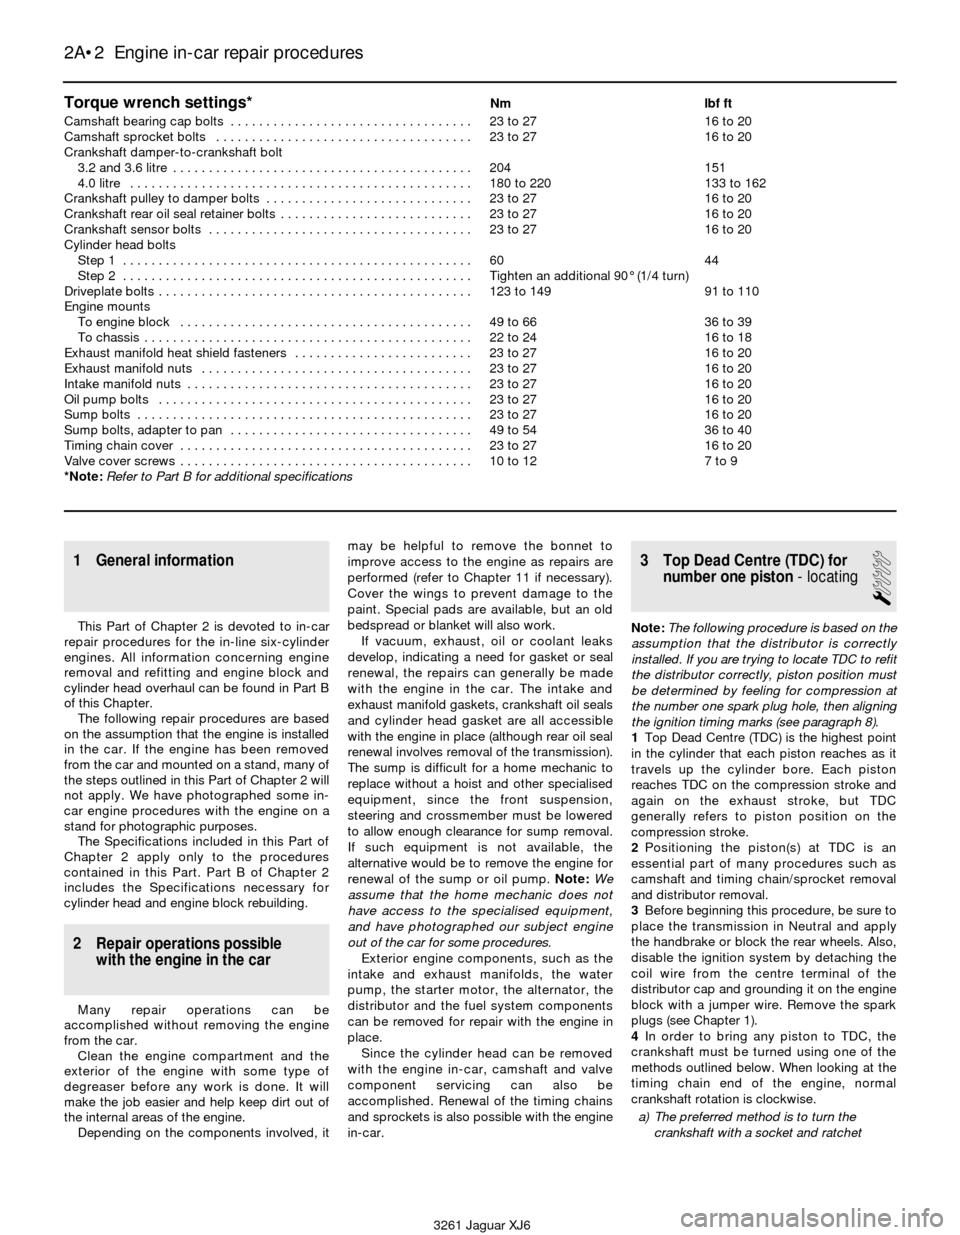
Torque wrench settings*Nm lbf ft
Camshaft bearing cap bolts . . . . . . . . . . . . . . . . . . . . . . . . . . . . . . . . . . 23 to 27 16 to 20
Camshaft sprocket bolts . . . . . . . . . . . . . . . . . . . . . . . . . . . . . . . . . . . . 23 to 27 16 to 20
Crankshaft damper-to-crankshaft bolt
3.2 and 3.6 litre . . . . . . . . . . . . . . . . . . . . . . . . . . . . . . . . . . . . . . . . . . 204 151
4.0 litre . . . . . . . . . . . . . . . . . . . . . . . . . . . . . . . . . . . . . . . . . . . . . . . . 180 to 220 133 to 162
Crankshaft pulley to damper bolts . . . . . . . . . . . . . . . . . . . . . . . . . . . . . 23 to 27 16 to 20
Crankshaft rear oil seal retainer bolts . . . . . . . . . . . . . . . . . . . . . . . . . . . 23 to 27 16 to 20
Crankshaft sensor bolts . . . . . . . . . . . . . . . . . . . . . . . . . . . . . . . . . . . . . 23 to 27 16 to 20
Cylinder head bolts
Step 1 . . . . . . . . . . . . . . . . . . . . . . . . . . . . . . . . . . . . . . . . . . . . . . . . . 60 44
Step 2 . . . . . . . . . . . . . . . . . . . . . . . . . . . . . . . . . . . . . . . . . . . . . . . . . Tighten an additional 90° (1/4 turn)
Driveplate bolts . . . . . . . . . . . . . . . . . . . . . . . . . . . . . . . . . . . . . . . . . . . . 123 to 149 91 to 110
Engine mounts
To engine block . . . . . . . . . . . . . . . . . . . . . . . . . . . . . . . . . . . . . . . . . 49 to 66 36 to 39
To chassis . . . . . . . . . . . . . . . . . . . . . . . . . . . . . . . . . . . . . . . . . . . . . . 22 to 24 16 to 18
Exhaust manifold heat shield fasteners . . . . . . . . . . . . . . . . . . . . . . . . . 23 to 27 16 to 20
Exhaust manifold nuts . . . . . . . . . . . . . . . . . . . . . . . . . . . . . . . . . . . . . . 23 to 27 16 to 20
Intake manifold nuts . . . . . . . . . . . . . . . . . . . . . . . . . . . . . . . . . . . . . . . . 23 to 27 16 to 20
Oil pump bolts . . . . . . . . . . . . . . . . . . . . . . . . . . . . . . . . . . . . . . . . . . . . 23 to 27 16 to 20
Sump bolts . . . . . . . . . . . . . . . . . . . . . . . . . . . . . . . . . . . . . . . . . . . . . . . 23 to 27 16 to 20
Sump bolts, adapter to pan . . . . . . . . . . . . . . . . . . . . . . . . . . . . . . . . . . 49 to 54 36 to 40
Timing chain cover . . . . . . . . . . . . . . . . . . . . . . . . . . . . . . . . . . . . . . . . . 23 to 27 16 to 20
Valve cover screws . . . . . . . . . . . . . . . . . . . . . . . . . . . . . . . . . . . . . . . . . 10 to 12 7 to 9
*Note:Refer to Part B for additional specifications
2A•2 Engine in-car repair procedures
3261 Jaguar XJ6
1 General information
This Part of Chapter 2 is devoted to in-car
repair procedures for the in-line six-cylinder
engines. All information concerning engine
removal and refitting and engine block and
cylinder head overhaul can be found in Part B
of this Chapter.
The following repair procedures are based
on the assumption that the engine is installed
in the car. If the engine has been removed
from the car and mounted on a stand, many of
the steps outlined in this Part of Chapter 2 will
not apply. We have photographed some in-
car engine procedures with the engine on a
stand for photographic purposes.
The Specifications included in this Part of
Chapter 2 apply only to the procedures
contained in this Part. Part B of Chapter 2
includes the Specifications necessary for
cylinder head and engine block rebuilding.
2 Repair operations possible
with the engine in the car
Many repair operations can be
accomplished without removing the engine
from the car.
Clean the engine compartment and the
exterior of the engine with some type of
degreaser before any work is done. It will
make the job easier and help keep dirt out of
the internal areas of the engine.
Depending on the components involved, itmay be helpful to remove the bonnet to
improve access to the engine as repairs are
performed (refer to Chapter 11 if necessary).
Cover the wings to prevent damage to the
paint. Special pads are available, but an old
bedspread or blanket will also work.
If vacuum, exhaust, oil or coolant leaks
develop, indicating a need for gasket or seal
renewal, the repairs can generally be made
with the engine in the car. The intake and
exhaust manifold gaskets, crankshaft oil seals
and cylinder head gasket are all accessible
with the engine in place (although rear oil seal
renewal involves removal of the transmission).
The sump is difficult for a home mechanic to
replace without a hoist and other specialised
equipment, since the front suspension,
steering and crossmember must be lowered
to allow enough clearance for sump removal.
If such equipment is not available, the
alternative would be to remove the engine for
renewal of the sump or oil pump. Note:We
assume that the home mechanic does not
have access to the specialised equipment,
and have photographed our subject engine
out of the car for some procedures.
Exterior engine components, such as the
intake and exhaust manifolds, the water
pump, the starter motor, the alternator, the
distributor and the fuel system components
can be removed for repair with the engine in
place.
Since the cylinder head can be removed
with the engine in-car, camshaft and valve
component servicing can also be
accomplished. Renewal of the timing chains
and sprockets is also possible with the engine
in-car.
3 Top Dead Centre (TDC) for
number one piston- locating
1
Note:The following procedure is based on the
assumption that the distributor is correctly
installed. If you are trying to locate TDC to refit
the distributor correctly, piston position must
be determined by feeling for compression at
the number one spark plug hole, then aligning
the ignition timing marks (see paragraph 8).
1Top Dead Centre (TDC) is the highest point
in the cylinder that each piston reaches as it
travels up the cylinder bore. Each piston
reaches TDC on the compression stroke and
again on the exhaust stroke, but TDC
generally refers to piston position on the
compression stroke.
2Positioning the piston(s) at TDC is an
essential part of many procedures such as
camshaft and timing chain/sprocket removal
and distributor removal.
3Before beginning this procedure, be sure to
place the transmission in Neutral and apply
the handbrake or block the rear wheels. Also,
disable the ignition system by detaching the
coil wire from the centre terminal of the
distributor cap and grounding it on the engine
block with a jumper wire. Remove the spark
plugs (see Chapter 1).
4In order to bring any piston to TDC, the
crankshaft must be turned using one of the
methods outlined below. When looking at the
timing chain end of the engine, normal
crankshaft rotation is clockwise.
a) The preferred method is to turn the
crankshaft with a socket and ratchet
Page 90 of 227
special electrical device that provides circuit
protection by switching off the ignition and
fuel pump upon impact in the event of vehicle
collision. Later Jaguar models are equipped
with an additional specialised inertia switch.
This later device switches OFF all ignition fed
circuits, locks the fuel filler cap, locks the boot
(only if doors are locked) and unlocks the
doors if they are locked during the accident.
All these functions are directed by the inertia
switch. The inertia switch is located behind
the left kick panel. Refer to Chapter 12 for
more information.
Exhaust system
The exhaust system includes an exhaust
manifold equipped with an exhaust oxygen
sensor, a catalytic converter, an exhaust pipe,
and a silencer.
The catalytic converter is an emission
control device added to the exhaust system to
reduce pollutants. A single-bed converter is
used in combination with a three-way
(reduction) catalyst. See Chapter 6 for more
information regarding the catalytic converter.
2 Fuel pressure relief
1
Warning: Petrol is extremely
flammable, so take extra
precautions when you work on
any part of the fuel system.
Don’t smoke or allow open flames or bare
light bulbs near the work area, and don’t
work in a garage where a natural gas-type
appliance (such as a water heater or a
clothes dryer) with a pilot light is present.
Since petrol is carcinogenic, wear latex
gloves when there’s a possibility of being
exposed to fuel, and, if you spill any fuel on
your skin, rinse it off immediately with soap
and water. Mop up any spills immediately
and do not store fuel-soaked rags wherethey could ignite. The fuel system is under
constant pressure, so, if any fuel lines are
to be disconnected, the fuel pressure in
the system must be relieved first. When
you perform any kind of work on the fuel
system, wear safety glasses and have a
Class B type fire extinguisher on hand.
1Before servicing any fuel system
component, you must relieve the fuel pressure
to minimise the risk of fire or personal injury.
2Remove the fuel filler cap - this will relieve
any pressure built up in the tank.
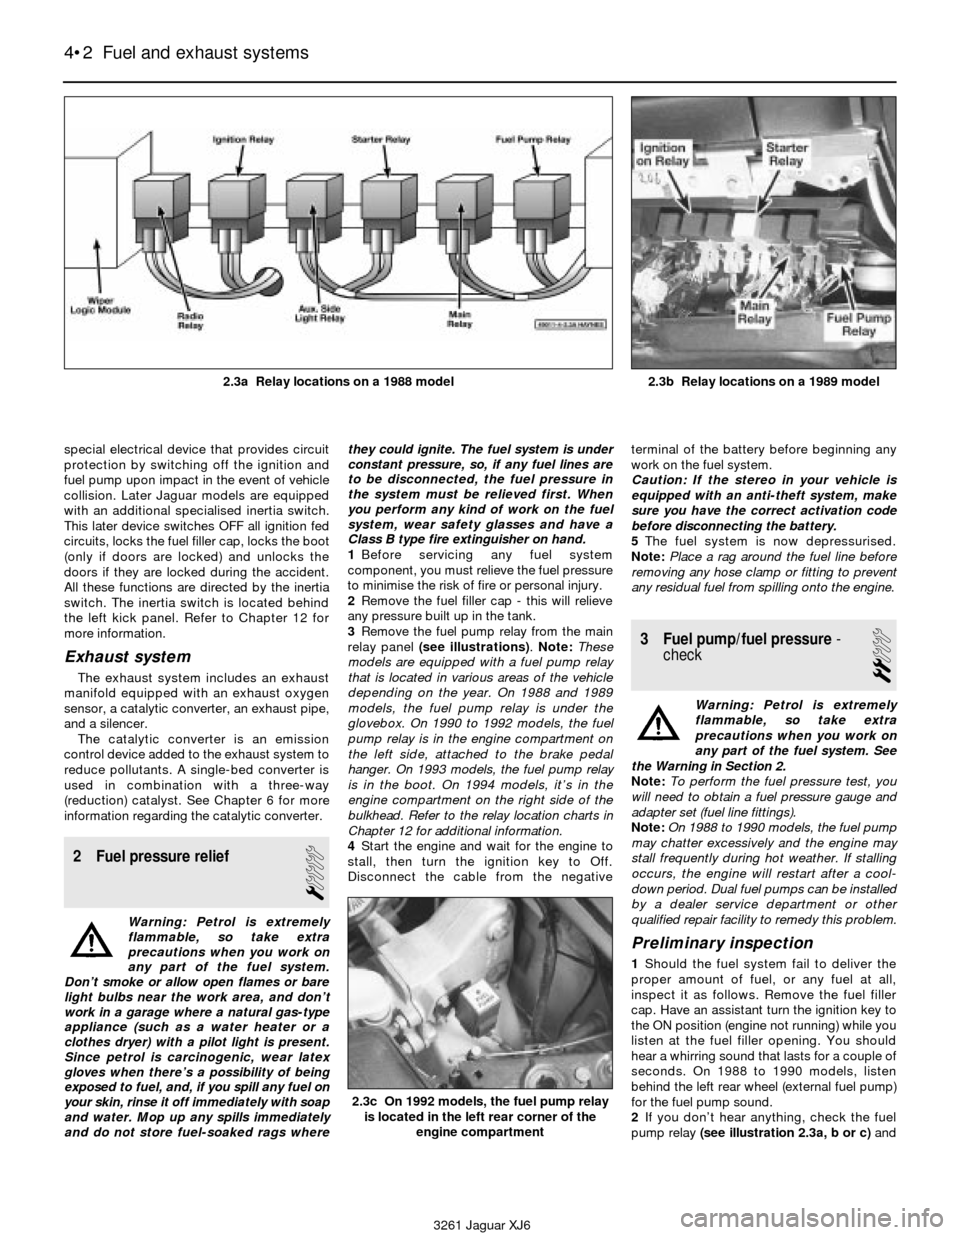
3Remove the fuel pump relay from the main
relay panel (see illustrations). Note:These
models are equipped with a fuel pump relay
that is located in various areas of the vehicle
depending on the year. On 1988 and 1989
models, the fuel pump relay is under the
glovebox. On 1990 to 1992 models, the fuel
pump relay is in the engine compartment on
the left side, attached to the brake pedal
hanger. On 1993 models, the fuel pump relay
is in the boot. On 1994 models, it’s in the
engine compartment on the right side of the
bulkhead. Refer to the relay location charts in
Chapter 12 for additional information.
4Start the engine and wait for the engine to
stall, then turn the ignition key to Off.
Disconnect the cable from the negativeterminal of the battery before beginning any
work on the fuel system.
Caution: If the stereo in your vehicle is
equipped with an anti-theft system, make
sure you have the correct activation code
before disconnecting the battery.
5The fuel system is now depressurised.
Note:Place a rag around the fuel line before
removing any hose clamp or fitting to prevent
any residual fuel from spilling onto the engine.
3 Fuel pump/fuel pressure-
check
2
Warning: Petrol is extremely
flammable, so take extra
precautions when you work on
any part of the fuel system. See
the Warning in Section 2.
Note: To perform the fuel pressure test, you
will need to obtain a fuel pressure gauge and
adapter set (fuel line fittings).
Note: On 1988 to 1990 models, the fuel pump
may chatter excessively and the engine may
stall frequently during hot weather. If stalling
occurs, the engine will restart after a cool-
down period. Dual fuel pumps can be installed
by a dealer service department or other
qualified repair facility to remedy this problem.
Preliminary inspection
1Should the fuel system fail to deliver the
proper amount of fuel, or any fuel at all,
inspect it as follows. Remove the fuel filler
cap. Have an assistant turn the ignition key to
the ON position (engine not running) while you
listen at the fuel filler opening. You should
hear a whirring sound that lasts for a couple of
seconds. On 1988 to 1990 models, listen
behind the left rear wheel (external fuel pump)
for the fuel pump sound.
2If you don’t hear anything, check the fuel
pump relay (see illustration 2.3a, b or c)and
4•2 Fuel and exhaust systems
2.3c On 1992 models, the fuel pump relay
is located in the left rear corner of the
engine compartment
3261 Jaguar XJ6 2.3a Relay locations on a 1988 model
2.3b Relay locations on a 1989 model
Page 123 of 227
3261 Jaguar XJ6
9
Chapter 9
Braking system
General
Brake fluid type . . . . . . . . . . . . . . . . . . . . . . . . . . . . . . . . . . . . . . . . . . . . See Chapter 1
Minimum brake pad thickness . . . . . . . . . . . . . . . . . . . . . . . . . . . . . . . . See Chapter 1
Brake disc minimum permissible thickness . . . . . . . . . . . . . . . . . . . . . . Cast into disc
Parallelism . . . . . . . . . . . . . . . . . . . . . . . . . . . . . . . . . . . . . . . . . . . . . . . 0.013 mm (0.0005 inch) maximum
Runout . . . . . . . . . . . . . . . . . . . . . . . . . . . . . . . . . . . . . . . . . . . . . . . . . 0.102 mm (0.004 inch) maximum
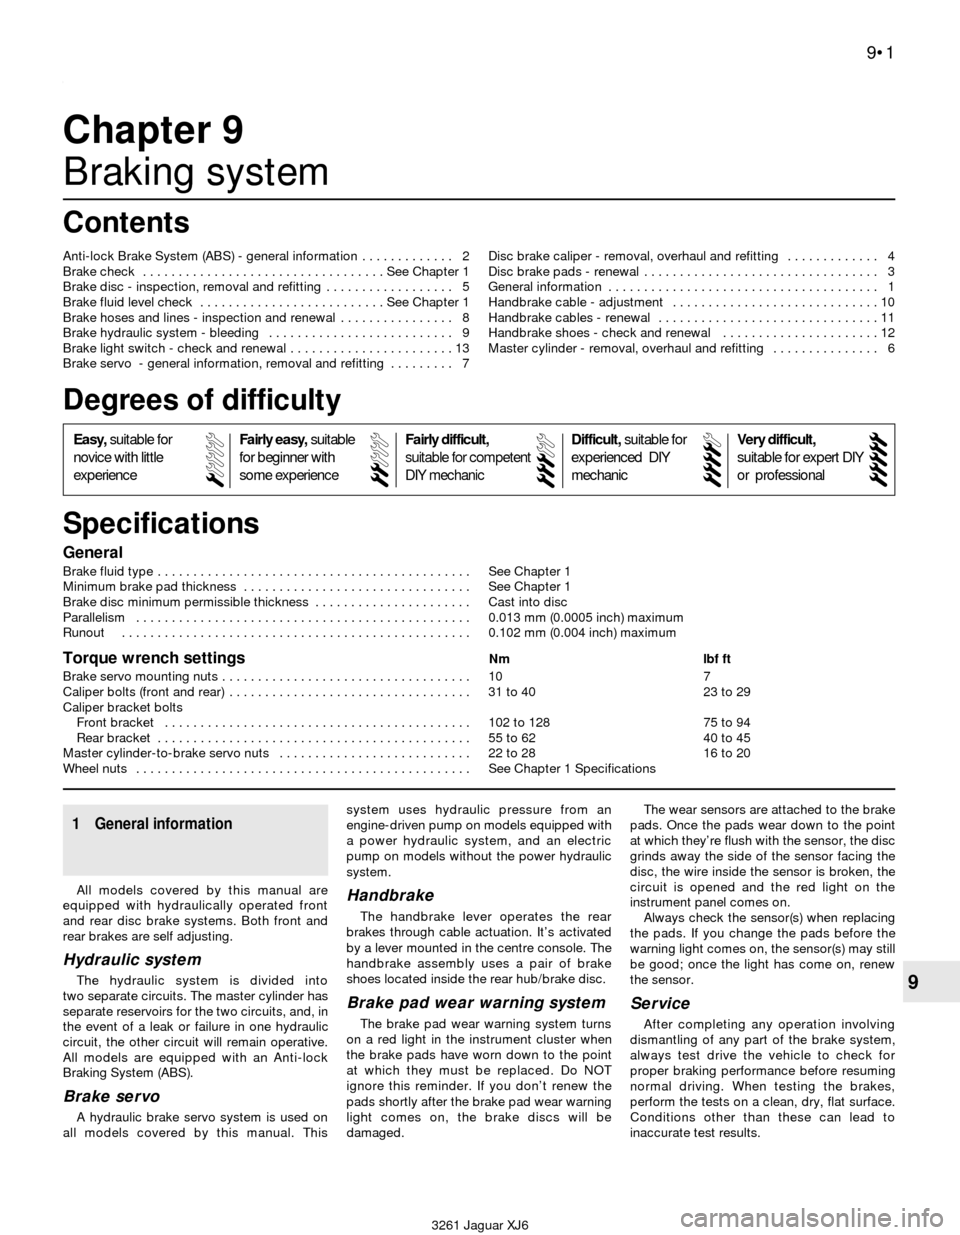
Torque wrench settingsNm lbf ft
Brake servo mounting nuts . . . . . . . . . . . . . . . . . . . . . . . . . . . . . . . . . . . 10 7
Caliper bolts (front and rear) . . . . . . . . . . . . . . . . . . . . . . . . . . . . . . . . . . 31 to 40 23 to 29
Caliper bracket bolts
Front bracket . . . . . . . . . . . . . . . . . . . . . . . . . . . . . . . . . . . . . . . . . . . 102 to 128 75 to 94
Rear bracket . . . . . . . . . . . . . . . . . . . . . . . . . . . . . . . . . . . . . . . . . . . . 55 to 62 40 to 45
Master cylinder-to-brake servo nuts . . . . . . . . . . . . . . . . . . . . . . . . . . . 22 to 28 16 to 20
Wheel nuts . . . . . . . . . . . . . . . . . . . . . . . . . . . . . . . . . . . . . . . . . . . . . . . See Chapter 1 Specifications Anti-lock Brake System (ABS) - general information . . . . . . . . . . . . . 2
Brake check . . . . . . . . . . . . . . . . . . . . . . . . . . . . . . . . . . See Chapter 1
Brake disc - inspection, removal and refitting . . . . . . . . . . . . . . . . . . 5
Brake fluid level check . . . . . . . . . . . . . . . . . . . . . . . . . . See Chapter 1
Brake hoses and lines - inspection and renewal . . . . . . . . . . . . . . . . 8
Brake hydraulic system - bleeding . . . . . . . . . . . . . . . . . . . . . . . . . . 9
Brake light switch - check and renewal . . . . . . . . . . . . . . . . . . . . . . . 13
Brake servo - general information, removal and refitting . . . . . . . . . 7Disc brake caliper - removal, overhaul and refitting . . . . . . . . . . . . . 4
Disc brake pads - renewal . . . . . . . . . . . . . . . . . . . . . . . . . . . . . . . . . 3
General information . . . . . . . . . . . . . . . . . . . . . . . . . . . . . . . . . . . . . . 1
Handbrake cable - adjustment . . . . . . . . . . . . . . . . . . . . . . . . . . . . . 10
Handbrake cables - renewal . . . . . . . . . . . . . . . . . . . . . . . . . . . . . . . 11
Handbrake shoes - check and renewal . . . . . . . . . . . . . . . . . . . . . . 12
Master cylinder - removal, overhaul and refitting . . . . . . . . . . . . . . . 6
9•1
Specifications Contents
Easy,suitable for
novice with little
experienceFairly easy,suitable
for beginner with
some experienceFairly difficult,
suitable for competent
DIY mechanic
Difficult,suitable for
experienced DIY
mechanicVery difficult,
suitable for expert DIY
or professional
Degrees of difficulty
54321
1 General information
All models covered by this manual are
equipped with hydraulically operated front
and rear disc brake systems. Both front and
rear brakes are self adjusting.
Hydraulic system
The hydraulic system is divided into
two separate circuits. The master cylinder has
separate reservoirs for the two circuits, and, in
the event of a leak or failure in one hydraulic
circuit, the other circuit will remain operative.
All models are equipped with an Anti-lock
Braking System (ABS).
Brake servo
A hydraulic brake servo system is used on
all models covered by this manual. Thissystem uses hydraulic pressure from an
engine-driven pump on models equipped with
a power hydraulic system, and an electric
pump on models without the power hydraulic
system.
Handbrake
The handbrake lever operates the rear
brakes through cable actuation. It’s activated
by a lever mounted in the centre console. The
handbrake assembly uses a pair of brake
shoes located inside the rear hub/brake disc.
Brake pad wear warning system
The brake pad wear warning system turns
on a red light in the instrument cluster when
the brake pads have worn down to the point
at which they must be replaced. Do NOT
ignore this reminder. If you don’t renew the
pads shortly after the brake pad wear warning
light comes on, the brake discs will be
damaged.The wear sensors are attached to the brake
pads. Once the pads wear down to the point
at which they’re flush with the sensor, the disc
grinds away the side of the sensor facing the
disc, the wire inside the sensor is broken, the
circuit is opened and the red light on the
instrument panel comes on.
Always check the sensor(s) when replacing
the pads. If you change the pads before the
warning light comes on, the sensor(s) may still
be good; once the light has come on, renew
the sensor.
Service
After completing any operation involving
dismantling of any part of the brake system,
always test drive the vehicle to check for
proper braking performance before resuming
normal driving. When testing the brakes,
perform the tests on a clean, dry, flat surface.
Conditions other than these can lead to
inaccurate test results.
Page 124 of 227
Test the brakes at various speeds with both
light and heavy pedal pressure. The vehicle
should stop evenly without pulling to one side
or the other. Avoid locking the brakes,
because this slides the tyres and diminishes
braking efficiency and control of the vehicle.
Tyres, vehicle load and wheel alignment are
factors which also affect braking performance.
2 Anti-lock Brake system
(ABS)- general information
The Anti-lock Brake System is designed to
maintain vehicle steerability, directional stability
and optimum deceleration under severe
braking conditions on most road surfaces. It
does so by monitoring the rotational speed of
each wheel and controlling the brake line
pressure to each wheel during braking. This
prevents the wheels from locking up.
The ABS system has three main units - the
wheel speed sensors, the electronic control unit
and the modulator (hydraulic control unit). The
sensors - one at each wheel - send a variable
voltage signal to the electronic control unit,
which monitors these signals, compares them
to its program and determines whether a wheel
is about to lock up. When a wheel is about to
lock up, the control unit signals the hydraulic
unit to reduce hydraulic pressure (or not
increase it further) at that wheel’s brake caliper.
Pressure modulation is handled by three
electrically-operated solenoid valves - one for
each front wheel and one for the rear wheels -
inside the modulator.
If a problem develops within the system, an
“ABS” warning light will glow on the dashboard.
Sometimes, a visual inspection of the ABS
system can help you locate the problem.
Carefully inspect the ABS wiring harness. Pay
particularly close attention to the harness and
connections near each wheel. Look for signs of
chafing and other damage caused by
incorrectly routed wires. If a wheel sensor
harness is damaged, the sensor should be
replaced (the harness and sensor are integral).
Warning: Do NOT try to repair an
ABS wiring harness. The ABS
system is sensitive to even thesmallest changes in resistance. Repairing
the harness could alter resistance values
and cause the system to malfunction. If the
ABS wiring harness is damaged in any way,
it must be replaced.
Caution: Make sure the ignition is turned
off before unplugging or reattaching any
electrical connections.
Diagnosis and repair
If a dashboard warning light comes on and
stays on while the vehicle is in operation, the
ABS system requires attention. Although
special electronic ABS diagnostic testing tools
are necessary to properly diagnose the system,
you can perform a few preliminary checks
before taking the vehicle to a dealer service
department or other qualified repair workshop.
a) Check the brake fluid level in the master
cylinder reservoir.
b) Verify that all ABS system electrical
connectors in the engine compartment
are plugged in.
c) Check the fuses.
d) Follow the wiring harness to each front
wheel and to the differential sensor and
verify that all connections are secure and
that the wiring is undamaged.
If the above preliminary checks do not
rectify the problem, the vehicle should be
diagnosed by a dealer service department.
Due to the complex nature of this system, all
actual repair work must be done by a dealer
service department or other qualified repair
workshop.
3 Disc brake pads- renewal
2
Warning: Disc brake pads must
be replaced on both front wheels
or both rear wheels at the same
time - never renew the pads on
only one wheel. Also, the dust created by
the brake system may contain asbestos,
which is harmful to your health. Never blow
it out with compressed air and don’t inhale
any of it. An approved filtering mask should
be worn when working on the brakes. Do
not, under any circumstances, use
petroleum-based solvents to clean brake
parts. Use brake system cleaner only!
Note:The following procedure applies to both
the front and rear brake pads.
1Remove the cap from the brake fluid
reservoir and siphon off about two-thirds of
the fluid from the reservoir. Failing to do this
could result in fluid overflowing when the
caliper pistons are pressed into their bores.
2Loosen the wheel nuts, raise the front of the
vehicle and support it securely on axle stands.
3Remove the front wheels. Work on one
brake assembly at a time, using the
assembled brake for reference if necessary.
4Inspect the brake disc (see Section 5).
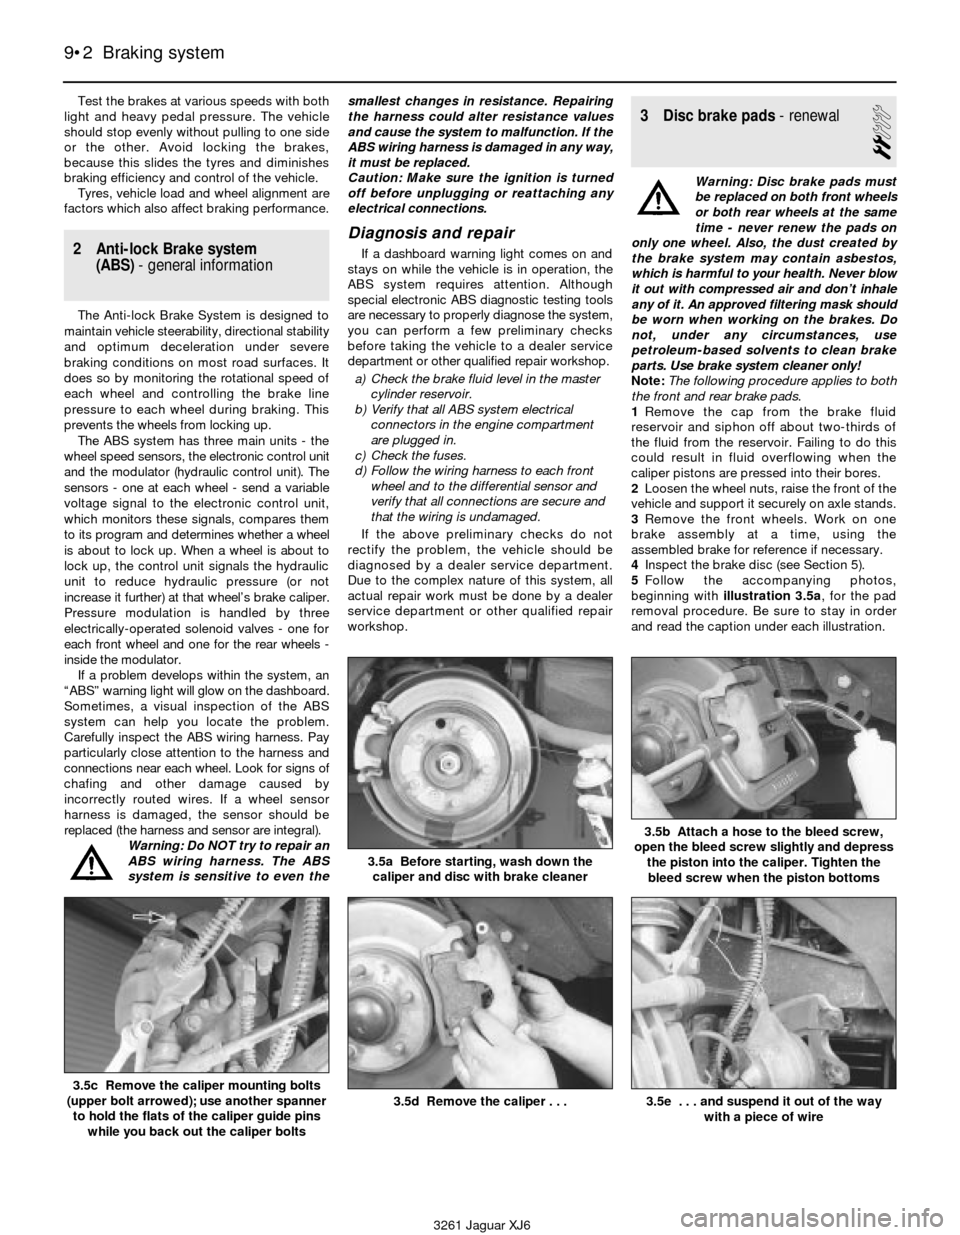
5Follow the accompanying photos,
beginning with illustration 3.5a, for the pad
removal procedure. Be sure to stay in order
and read the caption under each illustration.
9•2 Braking system
3.5a Before starting, wash down the
caliper and disc with brake cleaner
3.5b Attach a hose to the bleed screw,
open the bleed screw slightly and depress
the piston into the caliper. Tighten the
bleed screw when the piston bottoms
3.5c Remove the caliper mounting bolts
(upper bolt arrowed); use another spanner
to hold the flats of the caliper guide pins
while you back out the caliper bolts3.5d Remove the caliper . . .3.5e . . . and suspend it out of the way
with a piece of wire
3261 Jaguar XJ6
Page 125 of 227
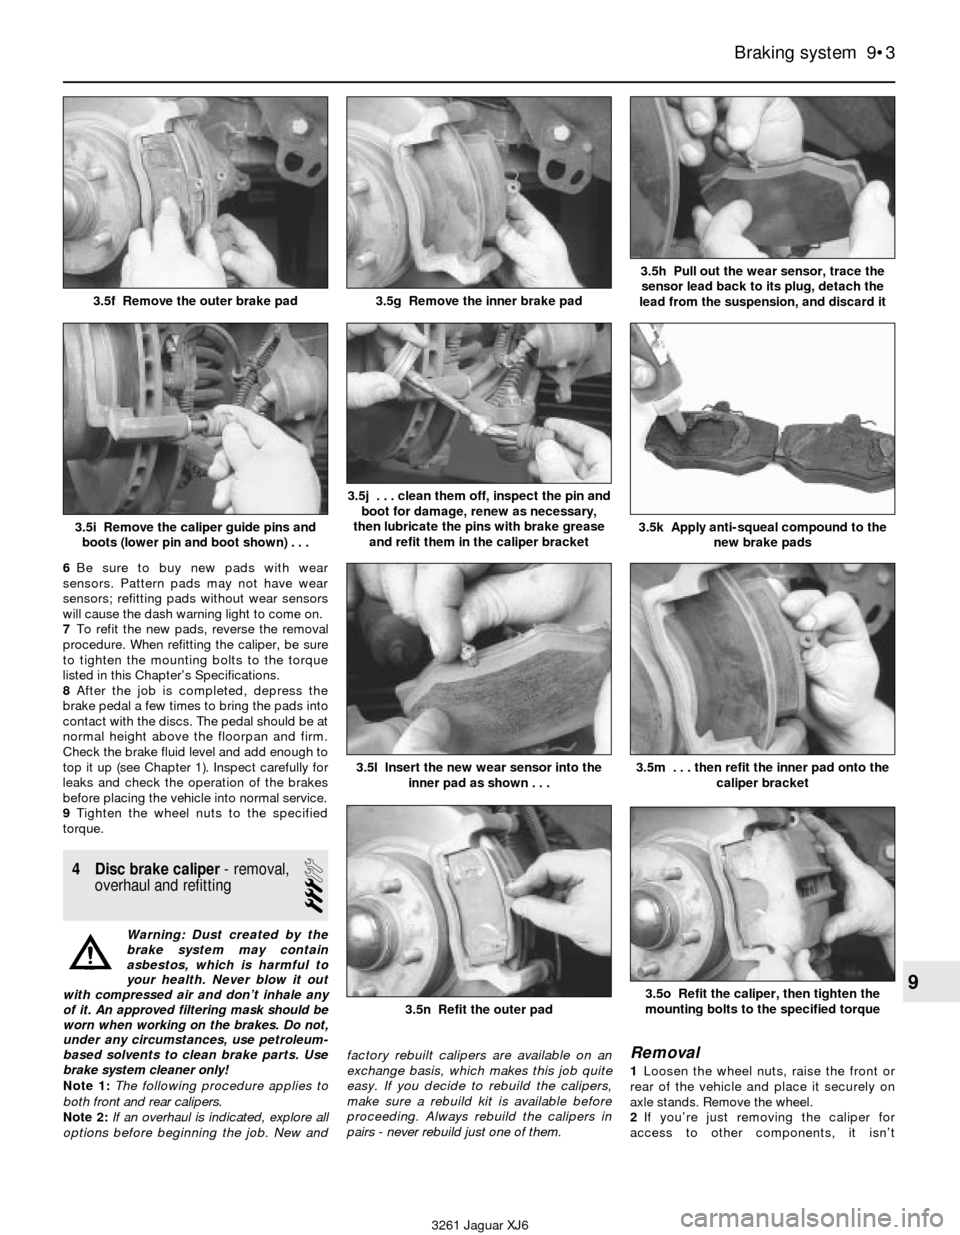
6Be sure to buy new pads with wear
sensors. Pattern pads may not have wear
sensors; refitting pads without wear sensors
will cause the dash warning light to come on.
7To refit the new pads, reverse the removal
procedure. When refitting the caliper, be sure
to tighten the mounting bolts to the torque
listed in this Chapter’s Specifications.
8After the job is completed, depress the
brake pedal a few times to bring the pads into
contact with the discs. The pedal should be at
normal height above the floorpan and firm.
Check the brake fluid level and add enough to
top it up (see Chapter 1). Inspect carefully for
leaks and check the operation of the brakes
before placing the vehicle into normal service.
9Tighten the wheel nuts to the specified
torque.
4 Disc brake caliper- removal,
overhaul and refitting
3
Warning: Dust created by the
brake system may contain
asbestos, which is harmful to
your health. Never blow it out
with compressed air and don’t inhale any
of it. An approved filtering mask should be
worn when working on the brakes. Do not,
under any circumstances, use petroleum-
based solvents to clean brake parts. Use
brake system cleaner only!
Note 1:The following procedure applies to
both front and rear calipers.
Note 2:If an overhaul is indicated, explore all
options before beginning the job. New andfactory rebuilt calipers are available on an
exchange basis, which makes this job quite
easy. If you decide to rebuild the calipers,
make sure a rebuild kit is available before
proceeding. Always rebuild the calipers in
pairs - never rebuild just one of them.
Removal
1Loosen the wheel nuts, raise the front or
rear of the vehicle and place it securely on
axle stands. Remove the wheel.
2If you’re just removing the caliper for
access to other components, it isn’t
Braking system 9•3
9
3.5f Remove the outer brake pad3.5g Remove the inner brake pad
3.5h Pull out the wear sensor, trace the
sensor lead back to its plug, detach the
lead from the suspension, and discard it
3.5i Remove the caliper guide pins and
boots (lower pin and boot shown) . . .
3.5j . . . clean them off, inspect the pin and
boot for damage, renew as necessary,
then lubricate the pins with brake grease
and refit them in the caliper bracket
3.5k Apply anti-squeal compound to the
new brake pads
3261 Jaguar XJ6
3.5l Insert the new wear sensor into the
inner pad as shown . . .
3.5n Refit the outer pad
3.5m . . . then refit the inner pad onto the
caliper bracket
3.5o Refit the caliper, then tighten the
mounting bolts to the specified torque
Page 127 of 227
been noticed during application of the brakes,
suspect disc runout.
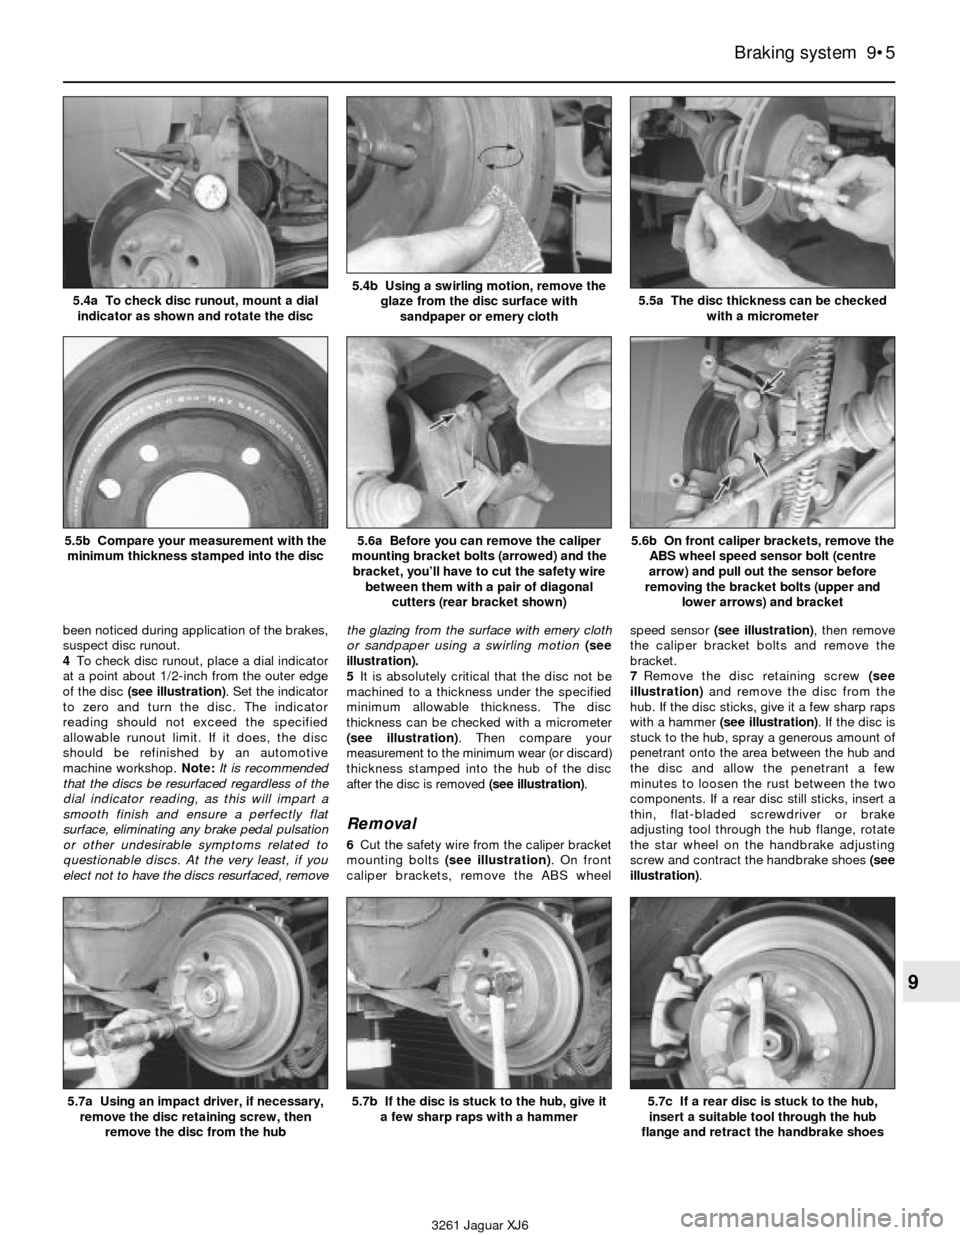
4To check disc runout, place a dial indicator
at a point about 1/2-inch from the outer edge
of the disc (see illustration). Set the indicator
to zero and turn the disc. The indicator
reading should not exceed the specified
allowable runout limit. If it does, the disc
should be refinished by an automotive
machine workshop. Note:It is recommended
that the discs be resurfaced regardless of the
dial indicator reading, as this will impart a
smooth finish and ensure a perfectly flat
surface, eliminating any brake pedal pulsation
or other undesirable symptoms related to
questionable discs. At the very least, if you
elect not to have the discs resurfaced, removethe glazing from the surface with emery cloth
or sandpaper using a swirling motion (see
illustration).
5It is absolutely critical that the disc not be
machined to a thickness under the specified
minimum allowable thickness. The disc
thickness can be checked with a micrometer
(see illustration). Then compare your
measurement to the minimum wear (or discard)
thickness stamped into the hub of the disc
after the disc is removed (see illustration).
Removal
6Cut the safety wire from the caliper bracket
mounting bolts (see illustration). On front
caliper brackets, remove the ABS wheelspeed sensor (see illustration), then remove
the caliper bracket bolts and remove the
bracket.
7Remove the disc retaining screw (see
illustration) and remove the disc from the
hub. If the disc sticks, give it a few sharp raps
with a hammer (see illustration). If the disc is
stuck to the hub, spray a generous amount of
penetrant onto the area between the hub and
the disc and allow the penetrant a few
minutes to loosen the rust between the two
components. If a rear disc still sticks, insert a
thin, flat-bladed screwdriver or brake
adjusting tool through the hub flange, rotate
the star wheel on the handbrake adjusting
screw and contract the handbrake shoes (see
illustration).
Braking system 9•5
9
5.4a To check disc runout, mount a dial
indicator as shown and rotate the disc5.4b Using a swirling motion, remove the
glaze from the disc surface with
sandpaper or emery cloth5.5a The disc thickness can be checked
with a micrometer
5.5b Compare your measurement with the
minimum thickness stamped into the disc5.6a Before you can remove the caliper
mounting bracket bolts (arrowed) and the
bracket, you’ll have to cut the safety wire
between them with a pair of diagonal
cutters (rear bracket shown)5.6b On front caliper brackets, remove the
ABS wheel speed sensor bolt (centre
arrow) and pull out the sensor before
removing the bracket bolts (upper and
lower arrows) and bracket
3261 Jaguar XJ6
5.7a Using an impact driver, if necessary,
remove the disc retaining screw, then
remove the disc from the hub5.7c If a rear disc is stuck to the hub,
insert a suitable tool through the hub
flange and retract the handbrake shoes5.7b If the disc is stuck to the hub, give it
a few sharp raps with a hammer
Page 128 of 227
Refitting
8Place the disc on the hub and refit the disc
retaining screw. Tighten the screw securely.
9Refit the caliper mounting bracket, using a
new safety wire on the mounting bolts.
10Refit the brake pads and caliper (see
Section 3). Tighten all fasteners to the torque
listed in this Chapter’s Specifications.
11Refit the wheel and wheel nuts, then lower
the vehicle to the ground. Tighten the wheel
nuts to the specified torque (see Chapter 1
Specifications). Depress the brake pedal a
few times to bring the brake pads into contact
with the disc.
12Adjust the handbrake shoes, if necessary.
13Check the operation of the brakes
carefully, if possible before driving the vehicle
on public roads.
6 Master cylinder- removal,
overhaul and refitting
3
Note:Although master cylinder parts and
rebuild kits are available for most models, we
recommend replacing the master cylinder with
a new or remanufactured unit, if possible.
Removal
1The master cylinder is connected to the
brake servo, which is attached to the pedal
box, in front of the bulkhead on the driver’s
side of the engine compartment.
2Remove as much fluid as you can from the
reservoir with a syringe.
3Place rags under the line fittings and
prepare caps or plastic bags to cover the
ends of the lines once they are disconnected.
Caution: Brake fluid will damage paint.
Cover all body parts and be careful not to
spill fluid during this procedure.
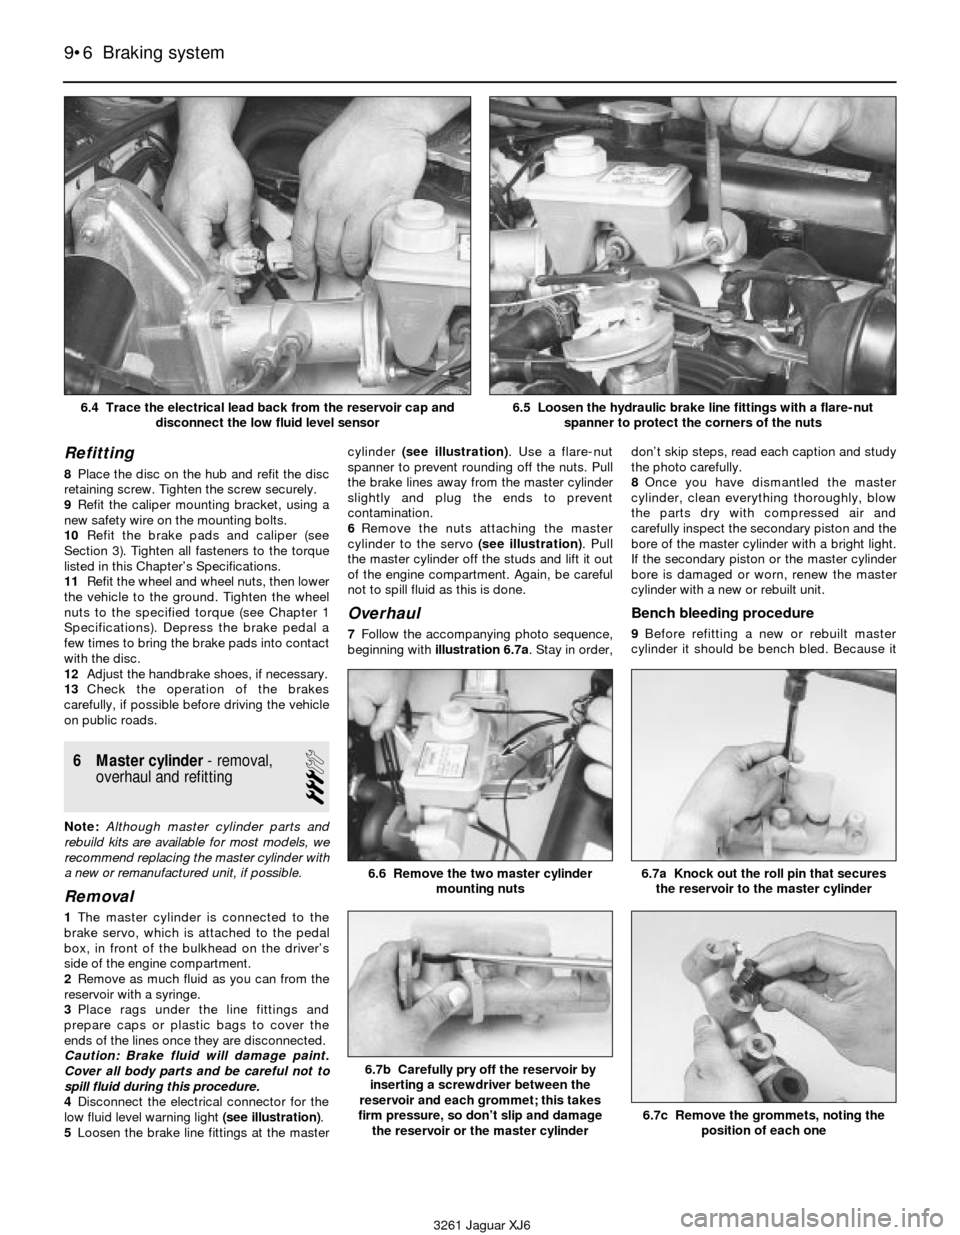
4Disconnect the electrical connector for the
low fluid level warning light (see illustration).
5Loosen the brake line fittings at the mastercylinder (see illustration). Use a flare-nut
spanner to prevent rounding off the nuts. Pull
the brake lines away from the master cylinder
slightly and plug the ends to prevent
contamination.
6Remove the nuts attaching the master
cylinder to the servo (see illustration). Pull
the master cylinder off the studs and lift it out
of the engine compartment. Again, be careful
not to spill fluid as this is done.
Overhaul
7Follow the accompanying photo sequence,
beginning with illustration 6.7a. Stay in order,don’t skip steps, read each caption and study
the photo carefully.
8Once you have dismantled the master
cylinder, clean everything thoroughly, blow
the parts dry with compressed air and
carefully inspect the secondary piston and the
bore of the master cylinder with a bright light.
If the secondary piston or the master cylinder
bore is damaged or worn, renew the master
cylinder with a new or rebuilt unit.
Bench bleeding procedure
9Before refitting a new or rebuilt master
cylinder it should be bench bled. Because it
9•6 Braking system
6.7a Knock out the roll pin that secures
the reservoir to the master cylinder
6.7b Carefully pry off the reservoir by
inserting a screwdriver between the
reservoir and each grommet; this takes
firm pressure, so don’t slip and damage
the reservoir or the master cylinder
6.7c Remove the grommets, noting the
position of each one
6.6 Remove the two master cylinder
mounting nuts
3261 Jaguar XJ6 6.4 Trace the electrical lead back from the reservoir cap and
disconnect the low fluid level sensor
6.5 Loosen the hydraulic brake line fittings with a flare-nut
spanner to protect the corners of the nuts
Page 141 of 227
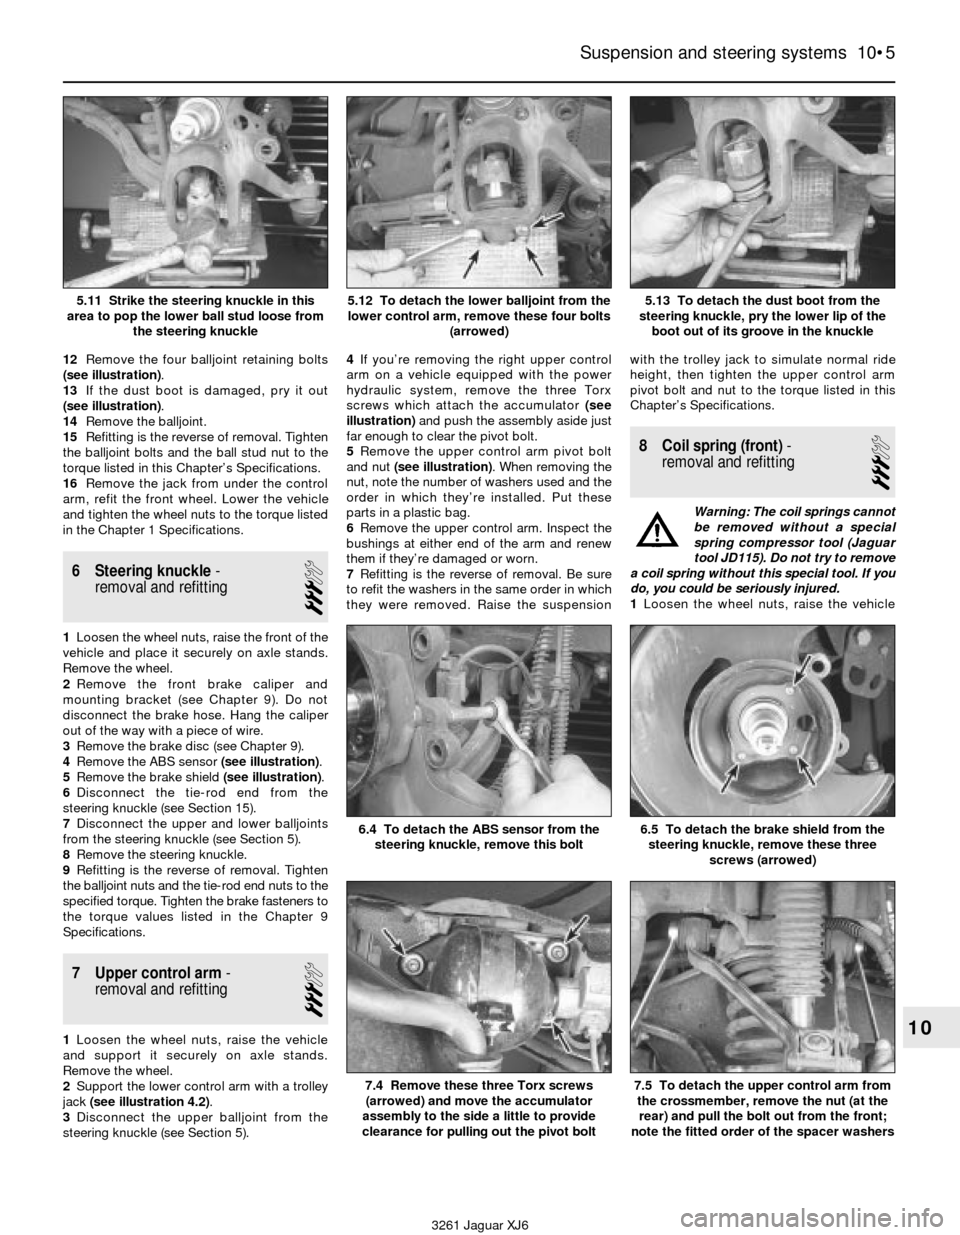
12Remove the four balljoint retaining bolts
(see illustration).
13If the dust boot is damaged, pry it out
(see illustration).
14Remove the balljoint.
15Refitting is the reverse of removal. Tighten
the balljoint bolts and the ball stud nut to the
torque listed in this Chapter’s Specifications.
16Remove the jack from under the control
arm, refit the front wheel. Lower the vehicle
and tighten the wheel nuts to the torque listed
in the Chapter 1 Specifications.
6 Steering knuckle-
removal and refitting
3
1Loosen the wheel nuts, raise the front of the
vehicle and place it securely on axle stands.
Remove the wheel.
2Remove the front brake caliper and
mounting bracket (see Chapter 9). Do not
disconnect the brake hose. Hang the caliper
out of the way with a piece of wire.
3Remove the brake disc (see Chapter 9).
4Remove the ABS sensor (see illustration).
5Remove the brake shield (see illustration).
6Disconnect the tie-rod end from the
steering knuckle (see Section 15).
7Disconnect the upper and lower balljoints
from the steering knuckle (see Section 5).
8Remove the steering knuckle.
9Refitting is the reverse of removal. Tighten
the balljoint nuts and the tie-rod end nuts to the
specified torque. Tighten the brake fasteners to
the torque values listed in the Chapter 9
Specifications.
7 Upper control arm-
removal and refitting
3
1Loosen the wheel nuts, raise the vehicle
and support it securely on axle stands.
Remove the wheel.
2Support the lower control arm with a trolley
jack (see illustration 4.2).
3Disconnect the upper balljoint from the
steering knuckle (see Section 5).4If you’re removing the right upper control
arm on a vehicle equipped with the power
hydraulic system, remove the three Torx
screws which attach the accumulator (see
illustration)and push the assembly aside just
far enough to clear the pivot bolt.
5Remove the upper control arm pivot bolt
and nut (see illustration). When removing the
nut, note the number of washers used and the
order in which they’re installed. Put these
parts in a plastic bag.
6Remove the upper control arm. Inspect the
bushings at either end of the arm and renew
them if they’re damaged or worn.
7Refitting is the reverse of removal. Be sure
to refit the washers in the same order in which
they were removed. Raise the suspensionwith the trolley jack to simulate normal ride
height, then tighten the upper control arm
pivot bolt and nut to the torque listed in this
Chapter’s Specifications.
8 Coil spring (front)-
removal and refitting
3
Warning: The coil springs cannot
be removed without a special
spring compressor tool (Jaguar
tool JD115). Do not try to remove
a coil spring without this special tool. If you
do, you could be seriously injured.
1Loosen the wheel nuts, raise the vehicle
Suspension and steering systems 10•5
10
5.11 Strike the steering knuckle in this
area to pop the lower ball stud loose from
the steering knuckle5.12 To detach the lower balljoint from the
lower control arm, remove these four bolts
(arrowed)5.13 To detach the dust boot from the
steering knuckle, pry the lower lip of the
boot out of its groove in the knuckle
6.5 To detach the brake shield from the
steering knuckle, remove these three
screws (arrowed)6.4 To detach the ABS sensor from the
steering knuckle, remove this bolt
7.4 Remove these three Torx screws
(arrowed) and move the accumulator
assembly to the side a little to provide
clearance for pulling out the pivot bolt7.5 To detach the upper control arm from
the crossmember, remove the nut (at the
rear) and pull the bolt out from the front;
note the fitted order of the spacer washers
3261 Jaguar XJ6
Page 144 of 227
11If you installed another pair of self-
levelling shocks, or removed and installed the
same pair of self-levelling shocks, be sure to
top up the power hydraulic system reservoir
(see Chapter 1).
11 Hub carrier (rear)-
removal and refitting
4
1Loosen the wheel nuts, raise the rear of the
vehicle and support it securely on axle stands.
Remove the wheel.
2Remove the rear caliper and brake pads,
the caliper bracket, the brake disc, the
handbrake cable and the handbrake shoe
assembly (see Chapter 9).
3Disconnect the outer end of the propshaft
from the hub carrier (see Chapter 8).
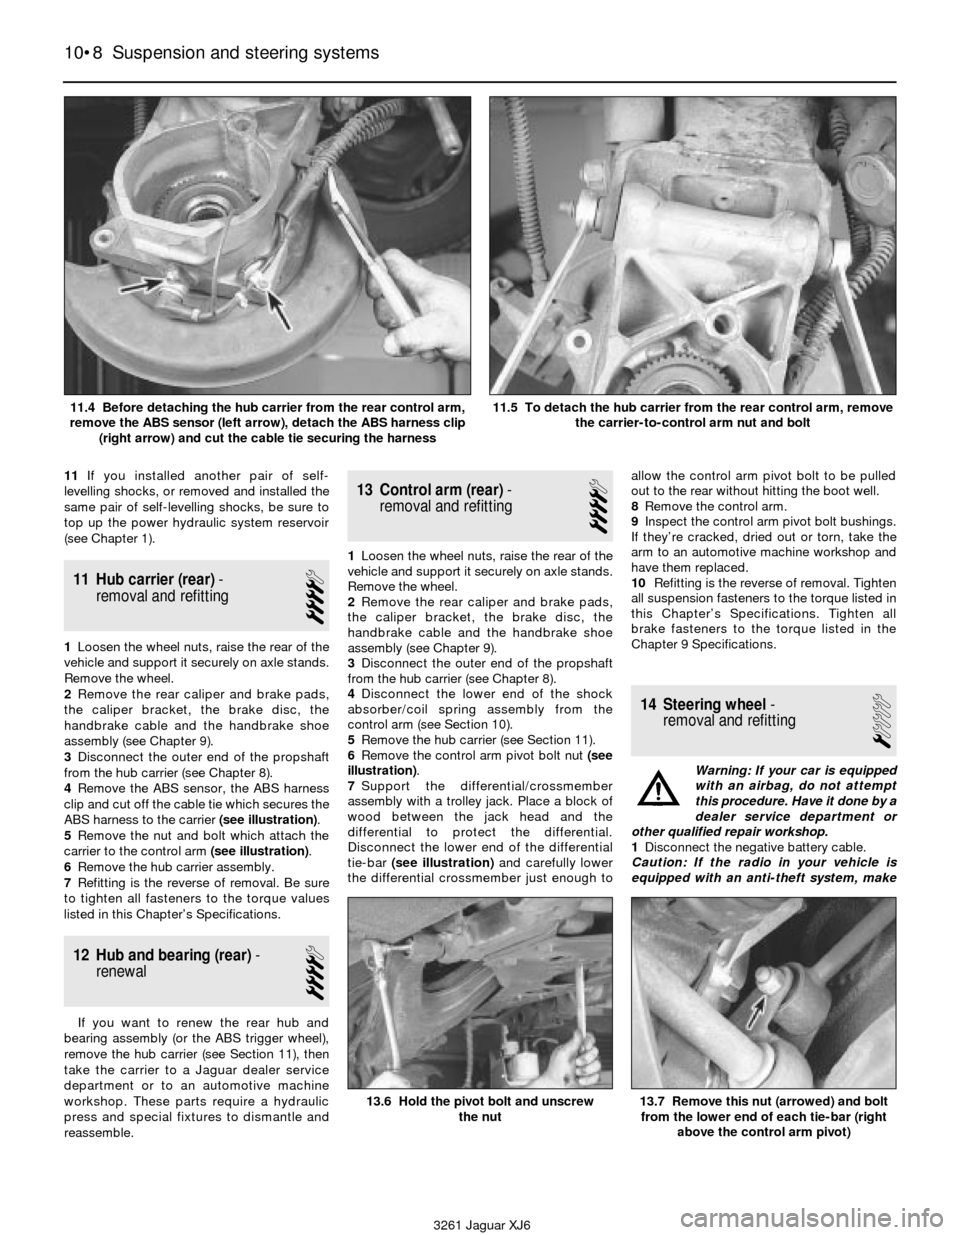
4Remove the ABS sensor, the ABS harness
clip and cut off the cable tie which secures the
ABS harness to the carrier (see illustration).
5Remove the nut and bolt which attach the
carrier to the control arm (see illustration).
6Remove the hub carrier assembly.
7Refitting is the reverse of removal. Be sure
to tighten all fasteners to the torque values
listed in this Chapter’s Specifications.
12 Hub and bearing (rear)-
renewal
4
If you want to renew the rear hub and
bearing assembly (or the ABS trigger wheel),
remove the hub carrier (see Section 11), then
take the carrier to a Jaguar dealer service
department or to an automotive machine
workshop. These parts require a hydraulic
press and special fixtures to dismantle and
reassemble.
13 Control arm (rear)-
removal and refitting
4
1Loosen the wheel nuts, raise the rear of the
vehicle and support it securely on axle stands.
Remove the wheel.
2Remove the rear caliper and brake pads,
the caliper bracket, the brake disc, the
handbrake cable and the handbrake shoe
assembly (see Chapter 9).
3Disconnect the outer end of the propshaft
from the hub carrier (see Chapter 8).
4Disconnect the lower end of the shock
absorber/coil spring assembly from the
control arm (see Section 10).
5Remove the hub carrier (see Section 11).
6Remove the control arm pivot bolt nut (see
illustration).
7Support the differential/crossmember
assembly with a trolley jack. Place a block of
wood between the jack head and the
differential to protect the differential.
Disconnect the lower end of the differential
tie-bar (see illustration)and carefully lower
the differential crossmember just enough toallow the control arm pivot bolt to be pulled
out to the rear without hitting the boot well.
8Remove the control arm.
9Inspect the control arm pivot bolt bushings.
If they’re cracked, dried out or torn, take the
arm to an automotive machine workshop and
have them replaced.
10Refitting is the reverse of removal. Tighten
all suspension fasteners to the torque listed in
this Chapter’s Specifications. Tighten all
brake fasteners to the torque listed in the
Chapter 9 Specifications.
14 Steering wheel-
removal and refitting
1
Warning: If your car is equipped
with an airbag, do not attempt
this procedure. Have it done by a
dealer service department or
other qualified repair workshop.
1Disconnect the negative battery cable.
Caution: If the radio in your vehicle is
equipped with an anti-theft system, make
10•8 Suspension and steering systems
13.6 Hold the pivot bolt and unscrew
the nut13.7 Remove this nut (arrowed) and bolt
from the lower end of each tie-bar (right
above the control arm pivot)
3261 Jaguar XJ6 11.4 Before detaching the hub carrier from the rear control arm,
remove the ABS sensor (left arrow), detach the ABS harness clip
(right arrow) and cut the cable tie securing the harness
11.5 To detach the hub carrier from the rear control arm, remove
the carrier-to-control arm nut and bolt
Page 216 of 227
3261 Jaguar XJ6
Fault findingREF•15
4 Automatic transmission
Note:Due to the complexity of the automatic transmission, it is difficult
for the home mechanic to properly diagnose and service this
component. For problems other than the following, the vehicle should
be taken to a dealer or transmission workshop.
Fluid leakage
m mAutomatic transmission fluid is a deep red colour. Fluid leaks
should not be confused with engine oil, which can easily be blown
by air flow to the transmission.
m mTo pinpoint a leak, first remove all built-up dirt and grime from the
transmission housing with degreasing agents and/or steam
cleaning. Then drive the vehicle at low speeds so air flow will not
blow the leak far from its source. Raise the vehicle and determine
where the leak is coming from. Common areas of leakage are:
a) Sump pan (Chapters 1 and 7)
b) Dipstick/filler tube (see below)
c) Transmission fluid cooler lines (Chapter 7)
d) Speedometer sensor (Chapter 7)
m mMake sure the dipstick is a tight fit inside the filler tube. If the seal
at the top of the dipstick is worn or damaged, replace the seal or
the dipstick. If fluid continues to leak from the top of the dipstick
tube, inspect the breather, which is a plastic cap secured by a clip
to the top of the extension housing. This breather can be plugged
by the noise-deadening foam installed in the transmission tunnel,
causing transmission fluid to leak from the top of the dipstick
tube.
Transmission fluid brown or has a burned smell
m mTransmission fluid burned (Chapter 1).
Shift cable problems
m
mChapter 7 deals with adjusting the shift cable. Common problems
which may be attributed to a poorly adjusted shift cable are:
a) Engine starting in gears other than Park or Neutral.
b) Indicator on shift lever pointing to a gear other than the one
actually being used.
c) Vehicle moves when in Park.
m mRefer to Chapter 7 for the shift cable adjustment procedure.
Transmission will not downshift
with accelerator pedal pressed to the floor
m mKickdown cable out of adjustment (Chapter 7).
Engine will start in gears
other than Park or Neutral
m mNeutral start/reversing light switch malfunctioning (Chapter 7).
m mShift cable out of adjustment (Chapter 7).
Transmission slips, shifts roughly, is noisy,
or has no drive in forward or reverse gears
m mThere are many probable causes for the above problems, but the
home mechanic should be concerned with only one possibility -
fluid level. Before taking the vehicle to a dealer service department
or transmission repair workshop, check the level and condition of
the fluid as described in Chapter 1. Correct the fluid level as
necessary or change the fluid if needed. If the problem persists,
have a professional diagnose the probable cause.
5 Brakes
Note:Before assuming that a brake problem exists, make sure that:
a) The tyres are in good condition and properly inflated (Chapter 1).
b) The front end alignment is correct (Chapter 10).
c) The vehicle is not loaded with weight in an unequal manner.
Vehicle pulls to one side during braking
m mIncorrect tyre pressures (Chapter 1).
m mFront end out of line (have the front end aligned).
m mUnmatched tyres on same axle.
m mRestricted brake lines or hoses (Chapter 9).
m mMalfunctioning caliper assembly (Chapter 9).
m mLoose suspension parts (Chapter 10).
m mLoose calipers (Chapter 9).
m mBrake pads contaminated with oil or grease (Chapter 9).
Noise (high-pitched squeal
when the brakes are applied)
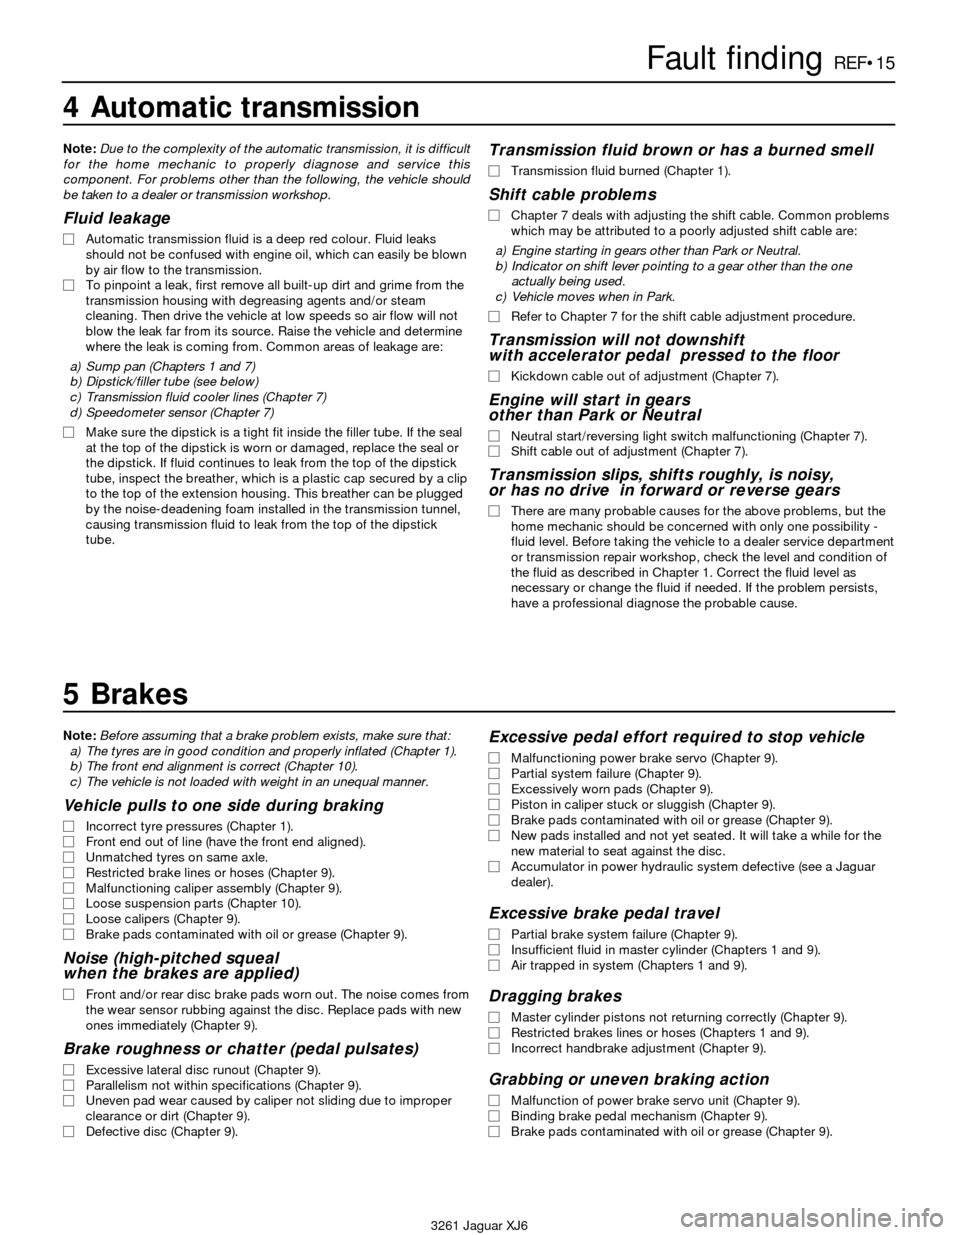
m mFront and/or rear disc brake pads worn out. The noise comes from
the wear sensor rubbing against the disc. Replace pads with new
ones immediately (Chapter 9).
Brake roughness or chatter (pedal pulsates)
m mExcessive lateral disc runout (Chapter 9).
m mParallelism not within specifications (Chapter 9).
m mUneven pad wear caused by caliper not sliding due to improper
clearance or dirt (Chapter 9).
m mDefective disc (Chapter 9).
Excessive pedal effort required to stop vehicle
m
mMalfunctioning power brake servo (Chapter 9).
m mPartial system failure (Chapter 9).
m mExcessively worn pads (Chapter 9).
m mPiston in caliper stuck or sluggish (Chapter 9).
m mBrake pads contaminated with oil or grease (Chapter 9).
m mNew pads installed and not yet seated. It will take a while for the
new material to seat against the disc.
m mAccumulator in power hydraulic system defective (see a Jaguar
dealer).
Excessive brake pedal travel
m mPartial brake system failure (Chapter 9).
m mInsufficient fluid in master cylinder (Chapters 1 and 9).
m mAir trapped in system (Chapters 1 and 9).
Dragging brakes
m
mMaster cylinder pistons not returning correctly (Chapter 9).
m mRestricted brakes lines or hoses (Chapters 1 and 9).
m mIncorrect handbrake adjustment (Chapter 9).
Grabbing or uneven braking action
m
mMalfunction of power brake servo unit (Chapter 9).
m mBinding brake pedal mechanism (Chapter 9).
m mBrake pads contaminated with oil or grease (Chapter 9).