wiper fluid JAGUAR XJ6 1997 2.G Workshop Manual
[x] Cancel search | Manufacturer: JAGUAR, Model Year: 1997, Model line: XJ6, Model: JAGUAR XJ6 1997 2.GPages: 227, PDF Size: 7.2 MB
Page 2 of 227

3261 Jaguar XJ6
LIVING WITH YOUR JAGUAR XJ6
IntroductionPage 0•4
Notes for UK readersPage 0•4
Safety first!Page 0•5
Roadside repairs
IntroductionPage 0•6
If your car won’t startPage 0•6
Jump startingPage 0•7
Wheel changingPage 0•8
Identifying leaksPage 0•9
TowingPage 0•9
Weekly checks
IntroductionPage 0•10
Underbonnet check points Page 0•10
Engine oil levelPage 0•11
Coolant levelPage 0•11
Brake fluid levelPage 0•12
Screen washer fluid level Page 0•12
Power steering fluid level Page 0•13
Wiper bladesPage 0•13
Tyre condition and pressure Page 0•14
BatteryPage 0•15
Bulbs and fusesPage 0•15
Lubricants, fluids and tyre pressuresPage 0•16
MAINTENANCE
Routine maintenance and servicingPage 1•1
Servicing specificationsPage 1•2
Maintenance schedulePage 1•3
Maintenance procedures Page 1•6
Contents
Page 13 of 227

3261 Jaguar XJ6
Weekly checks0•13
Power steering
fluid level
Before you start:
4Park the vehicle on level ground.
4Set the steering wheel straight-ahead.
4The engine should be turned off.
Safety first!
lThe need for frequent topping-up indicates
a leak, which should be investigated
immediately.
For the check to be
accurate, the steering must
not be turned once the
engine has been stopped.
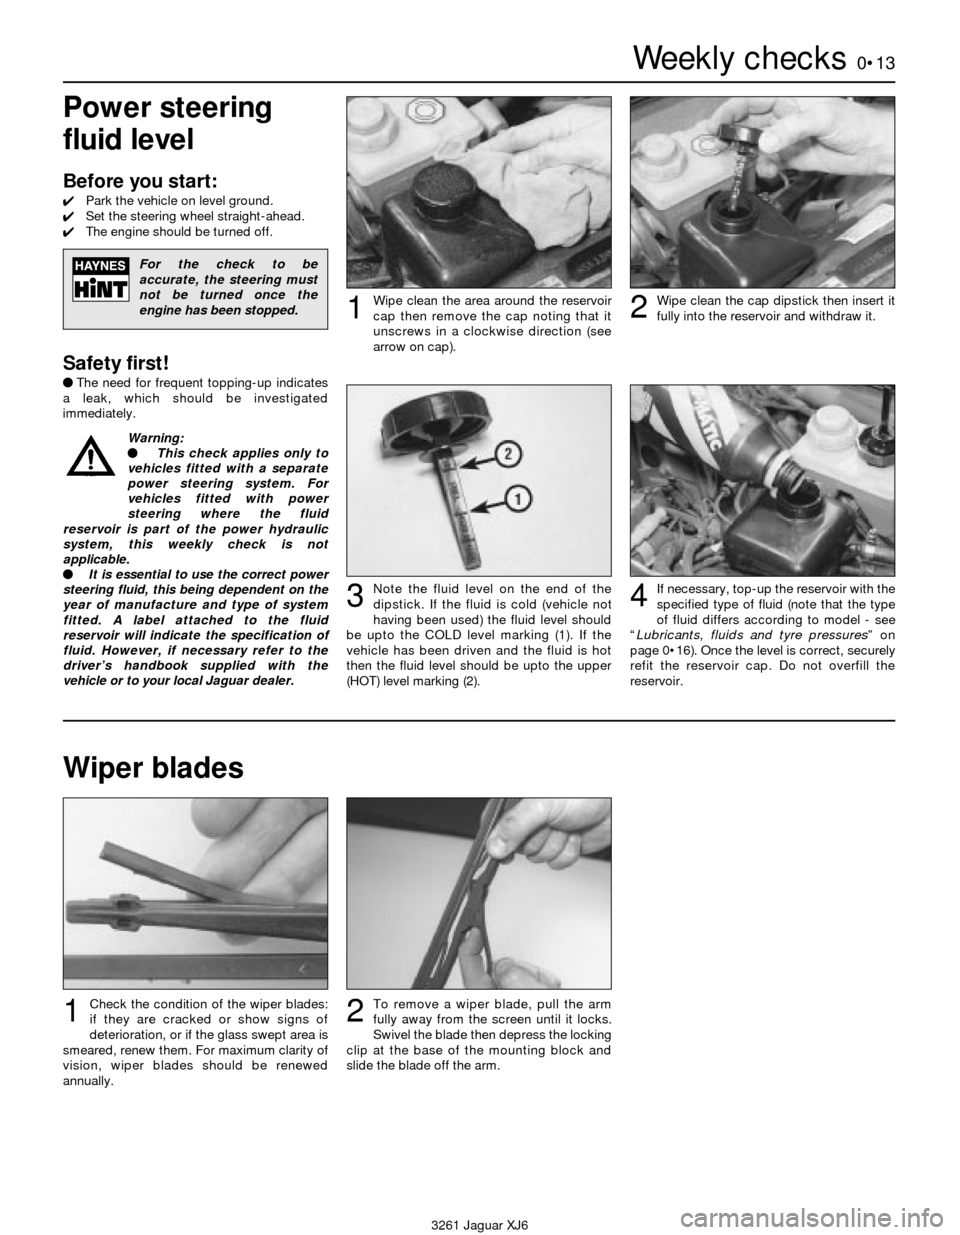
Wipe clean the area around the reservoir
cap then remove the cap noting that it
unscrews in a clockwise direction (see
arrow on cap).1Wipe clean the cap dipstick then insert it
fully into the reservoir and withdraw it.2
Note the fluid level on the end of the
dipstick. If the fluid is cold (vehicle not
having been used) the fluid level should
be upto the COLD level marking (1). If the
vehicle has been driven and the fluid is hot
then the fluid level should be upto the upper
(HOT) level marking (2).3If necessary, top-up the reservoir with the
specified type of fluid (note that the type
of fluid differs according to model - see
“Lubricants, fluids and tyre pressures” on
page 0•16). Once the level is correct, securely
refit the reservoir cap. Do not overfill the
reservoir.4
Wiper blades
Check the condition of the wiper blades:
if they are cracked or show signs of
deterioration, or if the glass swept area is
smeared, renew them. For maximum clarity of
vision, wiper blades should be renewed
annually.1To remove a wiper blade, pull the arm
fully away from the screen until it locks.
Swivel the blade then depress the locking
clip at the base of the mounting block and
slide the blade off the arm.2
Warning:
l This check applies only to
vehicles fitted with a separate
power steering system. For
vehicles fitted with power
steering where the fluid
reservoir is part of the power hydraulic
system, this weekly check is not
applicable.
l It is essential to use the correct power
steering fluid, this being dependent on the
year of manufacture and type of system
fitted. A label attached to the fluid
reservoir will indicate the specification of
fluid. However, if necessary refer to the
driver’s handbook supplied with the
vehicle or to your local Jaguar dealer.
Page 87 of 227

cushions fit on the mounting points and that
any foam insulator strips are still in place or
transferred to the new condenser.
6Reconnect the refrigerant lines, using new
O-rings. If a new condenser has been
installed, add 84 cc (3 fluid ounces) of new
refrigerant oil. Note:The oil and O-rings must
be compatible with the type of refrigerant you
are using.
7Refit the remaining parts in the reverse
order of removal.
8Have the system evacuated, charged and
leak tested by the workshop that discharged
it.
17 Air conditioning evaporator
and expansion valve-
removal and refitting
4
Warning 1: The air conditioning
system is under high pressure.
Do not loosen any hose fittings
or remove any components until
the system has been discharged. Air
conditioning refrigerant should be properly
discharged into an EPA-approved
recovery/recycling unit by a dealer service
department or an automotive airconditioning repair facility. Always wear
eye protection when disconnecting air
conditioning system fittings.
Warning 2: Later model vehicles
are equipped with airbags. To
prevent the accidental
deployment of the airbag, which
could cause personal injury or damage to
the airbag system, DO NOT work in the
vicinity of the steering wheel or instrument
panel. The manufacturer recommends
that, on airbag-equipped models, the
following procedure should be left to a
dealer service department or other repair
workshop because of the special tools and
techniques required to disable the airbag
system.
1Refer to Chapter 11 for removal of the glove
compartment, under-dash panels and
console. Note:The removal of the
heater/evaporator housing is difficult and
time-consuming, much more so than the
removal of the heater core (see Section 11).
For some home mechanics, the job is better
left to a Jaguar dealership or other qualified
repair workshop.
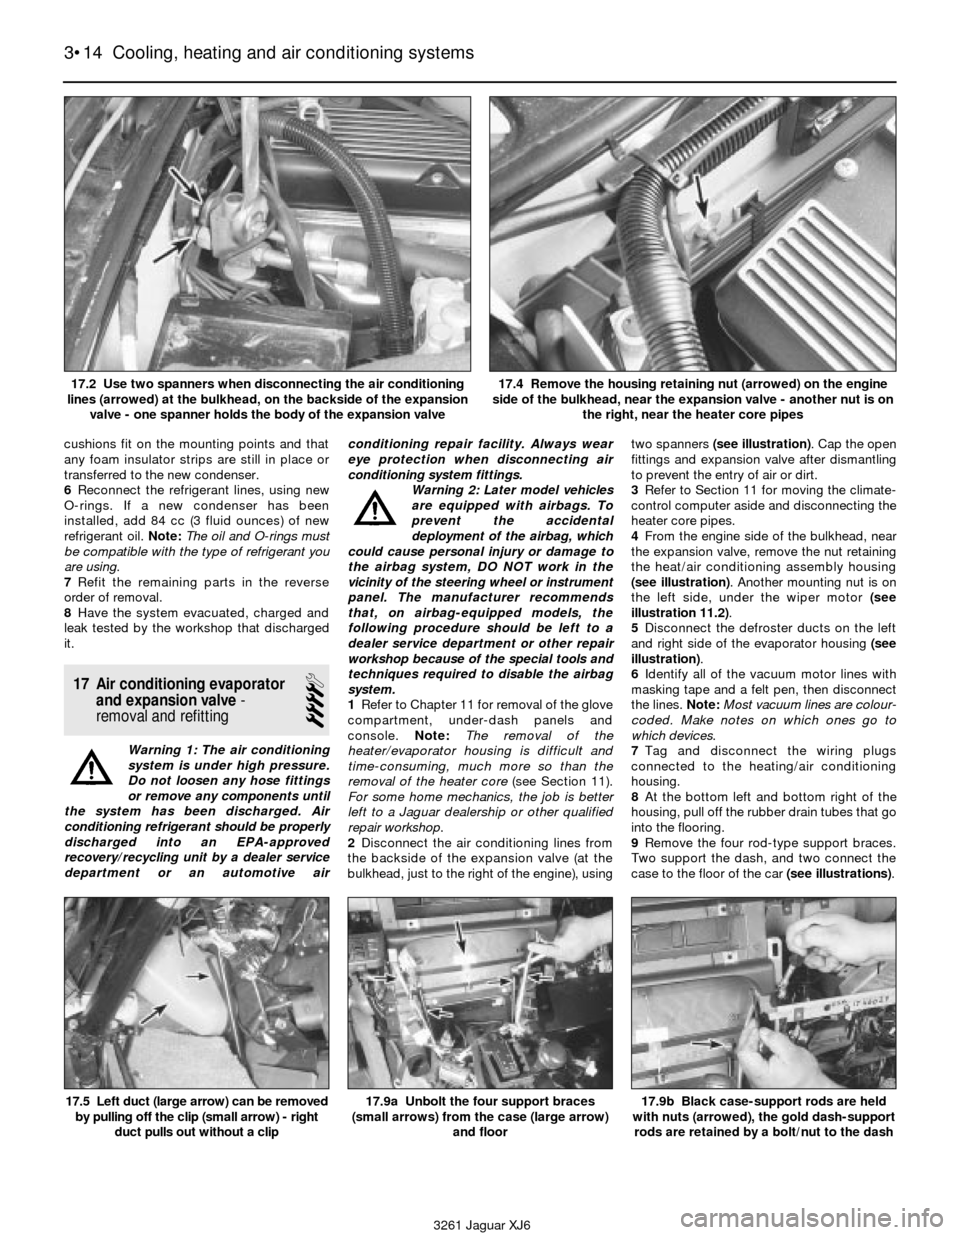
2Disconnect the air conditioning lines from
the backside of the expansion valve (at the
bulkhead, just to the right of the engine), usingtwo spanners (see illustration). Cap the open
fittings and expansion valve after dismantling
to prevent the entry of air or dirt.
3Refer to Section 11 for moving the climate-
control computer aside and disconnecting the
heater core pipes.
4From the engine side of the bulkhead, near
the expansion valve, remove the nut retaining
the heat/air conditioning assembly housing
(see illustration). Another mounting nut is on
the left side, under the wiper motor (see
illustration 11.2).
5Disconnect the defroster ducts on the left
and right side of the evaporator housing (see
illustration).
6Identify all of the vacuum motor lines with
masking tape and a felt pen, then disconnect
the lines. Note:Most vacuum lines are colour-
coded. Make notes on which ones go to
which devices.
7Tag and disconnect the wiring plugs
connected to the heating/air conditioning
housing.
8At the bottom left and bottom right of the
housing, pull off the rubber drain tubes that go
into the flooring.
9Remove the four rod-type support braces.
Two support the dash, and two connect the
case to the floor of the car (see illustrations).
3•14 Cooling, heating and air conditioning systems
17.5 Left duct (large arrow) can be removed
by pulling off the clip (small arrow) - right
duct pulls out without a clip17.9a Unbolt the four support braces
(small arrows) from the case (large arrow)
and floor17.9b Black case-support rods are held
with nuts (arrowed), the gold dash-support
rods are retained by a bolt/nut to the dash
3261 Jaguar XJ6 17.2 Use two spanners when disconnecting the air conditioning
lines (arrowed) at the bulkhead, on the backside of the expansion
valve - one spanner holds the body of the expansion valve
17.4 Remove the housing retaining nut (arrowed) on the engine
side of the bulkhead, near the expansion valve - another nut is on
the right, near the heater core pipes
Page 210 of 227

3261 Jaguar XJ6
MOT test checksREF•9
Seat belts and seats
Note: The following checks are applicable to
all seat belts, front and rear.
MExamine the webbing of all the belts
(including rear belts if fitted) for cuts, serious
fraying or deterioration. Fasten and unfasten
each belt to check the buckles. If applicable,
check the retracting mechanism. Check the
security of all seat belt mountings accessible
from inside the vehicle.
MThe front seats themselves must be
securely attached and the backrests must
lock in the upright position.
Doors
MBoth front doors must be able to be opened
and closed from outside and inside, and must
latch securely when closed.
Vehicle identification
MNumber plates must be in good condition,
secure and legible, with letters and numbers
correctly spaced – spacing at (A) should be
twice that at (B).
MThe VIN plate and/or homologation plate
must be legible.
Electrical equipment
MSwitch on the ignition and check the
operation of the horn.
MCheck the windscreen washers and wipers,
examining the wiper blades; renew damaged
or perished blades. Also check the operation
of the stop-lights.
MCheck the operation of the sidelights and
number plate lights. The lenses and reflectors
must be secure, clean and undamaged.
MCheck the operation and alignment of the
headlights. The headlight reflectors must not
be tarnished and the lenses must be
undamaged.
MSwitch on the ignition and check the
operation of the direction indicators (including
the instrument panel tell-tale) and the hazard
warning lights. Operation of the sidelights and
stop-lights must not affect the indicators - if it
does, the cause is usually a bad earth at the
rear light cluster.
MCheck the operation of the rear foglight(s),
including the warning light on the instrument
panel or in the switch.
Footbrake
MExamine the master cylinder, brake pipes
and servo unit for leaks, loose mountings,
corrosion or other damage.
MThe fluid reservoir must be secure and the
fluid level must be between the upper (A) and
lower (B) markings.MInspect both front brake flexible hoses for
cracks or deterioration of the rubber. Turn the
steering from lock to lock, and ensure that the
hoses do not contact the wheel, tyre, or any
part of the steering or suspension mechanism.
With the brake pedal firmly depressed, check
the hoses for bulges or leaks under pressure.
Steering and suspension
MHave your assistant turn the steering wheel
from side to side slightly, up to the point where
the steering gear just begins to transmit this
movement to the roadwheels. Check for
excessive free play between the steering
wheel and the steering gear, indicating wear or
insecurity of the steering column joints, the
column-to-steering gear coupling, or the
steering gear itself.
MHave your assistant turn the steering wheel
more vigorously in each direction, so that the
roadwheels just begin to turn. As this is done,
examine all the steering joints, linkages,
fittings and attachments. Renew any
component that shows signs of wear or
damage. On vehicles with power steering,
check the security and condition of the
steering pump, drivebelt and hoses.
MCheck that the vehicle is standing level,
and at approximately the correct ride height.
Shock absorbers
MDepress each corner of the vehicle in turn,
then release it. The vehicle should rise and
then settle in its normal position. If the vehicle
continues to rise and fall, the shock absorber
is defective. A shock absorber which has
seized will also cause the vehicle to fail.
2Checks carried out
WITH THE VEHICLE ON THE
GROUND
Page 226 of 227

3261 Jaguar XJ6
WWasher fluid -0•12
Water pump -3•6
Weekly checks-0•10et seq
Weights - REF•1
Wheel alignment -1•18, 10•11
Wheel bearings -1•17, 10•8, REF•10
Wheel changing -0•8Wheels - 10•11, REF•11
Windows - 11•10, 11•11, 12•13
Windscreen - 11•3, REF•8
Wing - 11•6
Wiper blades -0•13
Wiper motor - 12•8
Wiring diagrams- 12•15et seq
Working facilities- REF•7
IndexREF•25