stop start JEEP CHEROKEE 2014 KL / 5.G Owner's Manual
[x] Cancel search | Manufacturer: JEEP, Model Year: 2014, Model line: CHEROKEE, Model: JEEP CHEROKEE 2014 KL / 5.GPages: 204, PDF Size: 3.84 MB
Page 141 of 204
CAUTION!
It is necessary to follow these steps to be certain that the power transfer unit is fully
in NEUTRAL (N) before recreational towing to prevent damage to internal parts.
WARNING!
You or others could be seriously or fatally injured if you leave the vehicle
unattended with the power transfer unit in the NEUTRAL (N) position without first
fully engaging the parking brake. The NEUTRAL (N) position disengages both the
front and rear driveshafts from the powertrain and will allow the vehicle to move,
even if the transmission is in PARK. The parking brake should always be applied
when the driver is not in the vehicle.
Shifting Out of NEUTRAL (N)
Use the following procedure to prepare your vehicle for normal usage.
1. Bring the vehicle to a complete stop, leaving it connected to the tow vehicle.
2. Apply the parking brake.
3. Turn the ignition switch to the ON/RUN position, but do not start the engine.
4. Press and hold the brake pedal.
5. Shift the transmission into NEUTRAL.
6. Using a ballpoint pen or similar object, press and hold the recessed PowerTransfer Unit NEUTRAL (N) button (located by the selector switch) for one
second.
7. When the NEUTRAL (N) indicator light turns off, release the NEUTRAL (N) button.
8. After the NEUTRAL (N) button has been released, the Power Transfer Unit will shift to the position indicated by the selector switch.
9. Shift the transmission into PARK.
10. Release the brake pedal.
UTILITY
139
Page 144 of 204
- Air Bag Warning Light
This light will turn on for four to eight seconds as a bulb check when the ignition
switch is first turned to the ON/RUN position. If the light is either not on during
starting, stays on, or turns on while driving, have the system inspected at an
authorized dealer as soon as possible. Refer to “Occupant Restraints” in “Things To
Know Before Starting Your Vehicle” of your Owner’s Manual for further information.
NOTE:
The Air Bag System is designed to be maintenance free.
- Electronic Throttle Control (ETC) Light
This light informs you of a problem with the Electronic Throttle Control (ETC) system.
If a problem is detected, the light will come on while the engine is running. Cycle the
ignition key when the vehicle has completely stopped and the shift lever/gear selector
is placed in the PARK position; the light should turn off.
If the light remains lit with the engine running, your vehicle will usually be drivable;
however, see an authorized service center immediately. If the light is flashing when
the engine is running, immediate service is required and you may experience reduced
performance, an elevated/rough idle or engine stall and your vehicle may require
towing.
- Tire Pressure Monitoring System (TPMS) Light
Each tire, including the spare (if provided), should be checked monthly, when cold
and inflated to the inflation pressure recommended by the vehicle manufacturer on
the vehicle placard or tire inflation pressure label. (If your vehicle has tires of a
different size than the size indicated on the vehicle placard or tire inflation pressure
label, you should determine the proper tire inflation pressure for those tires.)
As an added safety feature, your vehicle has been equipped with a Tire Pressure
Monitoring System (TPMS) which display in the Electronic Vehicle Information
Center (EVIC) when one or more of your tires is significantly under-inflated.
Accordingly, when the low tire pressure EVIC display illuminates, you should stop and
check your tires as soon as possible, and inflate them to the proper pressure. Driving
on a significantly under-inflated tire causes the tire to overheat and can lead to tire
failure. Under-inflation also reduces fuel efficiency and tire tread life, and may affect
the vehicle’s handling and stopping ability.
IF THE LIGHT STARTS FLASHING INDICATING A LOW TIRE PRESSURE, ADJUST THE AIR
PRESSURE IN THE LOW TIRE TO THE AIR PRESSURE SHOWN ON THE VEHICLE PLACARD OR
TIRE INFLATION PRESSURE LABEL LOCATED ON THE DRIVER'S DOOR.
WHAT TO DO IN EMERGENCIES
142
Page 149 of 204
Oil Life Reset
• Your vehicle is equipped with an engine oil change indicator system. The “OilChange Due” message will flash in the EVIC display for approximately 10 seconds
after a single chime has sounded, to indicate the next scheduled oil change
interval. The engine oil change indicator system is duty cycle based, which means
the engine oil change interval may fluctuate, dependent upon your personal
driving style.
• Unless reset, this message will continue to display each time you turn the ignition switch to the ON/RUN position or cycle the ignition to the ON/RUN position if
equipped with Keyless Enter-N-Go™. To turn off the message temporarily, push
and release the MENU button. To reset the oil change indicator system (after
performing the scheduled maintenance) refer to the following procedure:
Vehicles Equipped With Passive Entry
Without pushing the brake pedal, push the ENGINE START/STOP button and cycle
the ignition to the ON/RUN position (Do not start the engine.)
1. Push the OKbutton to enter the EVIC menu screen.
2. Push and release the DOWN
arrow button to access the ”Oil Life” menu
screen.
3. Push the LEFT
arrow button or RIGHTarrow button to access the “OIL
LIFE” submenu.
4. Push the OKbutton to reset the “OIL LIFE” to 100%
5. Push the UP
arrow button to exit the EVIC menu screen
Vehicles Not Equipped With Passive Entry
Without pushing the brake pedal, cycle the ignition to the ON/RUN position (Do not
start the engine.)
1. Push the OKbutton to enter the EVIC menu screen.
2. Push and release the DOWN
arrow button to access the ”Oil Life” menu
screen.
3. Push the LEFT
arrow button or RIGHTarrow button to access the “OIL
LIFE” submenu.
4. Push the OKbutton to reset the “OIL LIFE” to 100%
5. Push the UP
arrow button to exit the EVIC menu screen
NOTE:
If the indicator message illuminates when you start the vehicle, the oil change
indicator system did not reset. If necessary, repeat this procedure.
WHAT TO DO IN EMERGENCIES
147
Page 164 of 204
WARNING!
• Being under a jacked-up vehicle is dangerous. The vehicle could slip off thejack and fall on you. You could be crushed. Never put any part of your body
under a vehicle that is on a jack. If you need to get under a raised vehicle, take
it to a service center where it can be raised on a lift.
• Never start or run the engine while the vehicle is on a jack.
• The jack is designed to be used as a tool for changing tires only. The jack
should not be used to lift the vehicle for service purposes. The vehicle should
be jacked on a firm level surface only. Avoid ice or slippery areas.
• Do not attempt to change a tire on the side of the vehicle close to moving
traffic, pull far enough off the road to avoid the danger of being hit when
operating the jack or changing the wheel.
• Carefully follow these tire changing warnings to help prevent personal injury or
damage to your vehicle:
• Always park on a firm, level surface as far from the edge of the roadwayas possible before raising the vehicle.
• Turn on the Hazard Warning flasher.
• Chock the wheel diagonally opposite the wheel to be raised.
• Set the parking brake firmly and set an automatic transmission in PARK.
• Do not let anyone sit in the vehicle when it is on a jack.
• Do not get under the vehicle when it is on a jack.
• Only use the jack in the positions indicated and for lifting this vehicle during
a tire change.
• If working on or near a roadway, be extremely careful of motor traffic.
• Assure that spare tires, flat or inflated, are securely stowed, spares must be
stowed in the rear cargo area with the wing nut attached.
• Raising the vehicle higher than necessary can make the vehicle less stable. It
could slip off the jack and hurt someone near it. Raise the vehicle only enough
to remove the tire.
• A loose tire or jack thrown forward in a collision or hard stop could injure the
occupants in the vehicle. Have the deflated (flat) tire repaired or replaced
immediately.
• To avoid the risk of forcing the vehicle off the jack, do not tighten the lug bolts
fully until the vehicle is lowered to the ground. Failure to follow this warning
may result in personal injury.
WHAT TO DO IN EMERGENCIES
162
Page 182 of 204
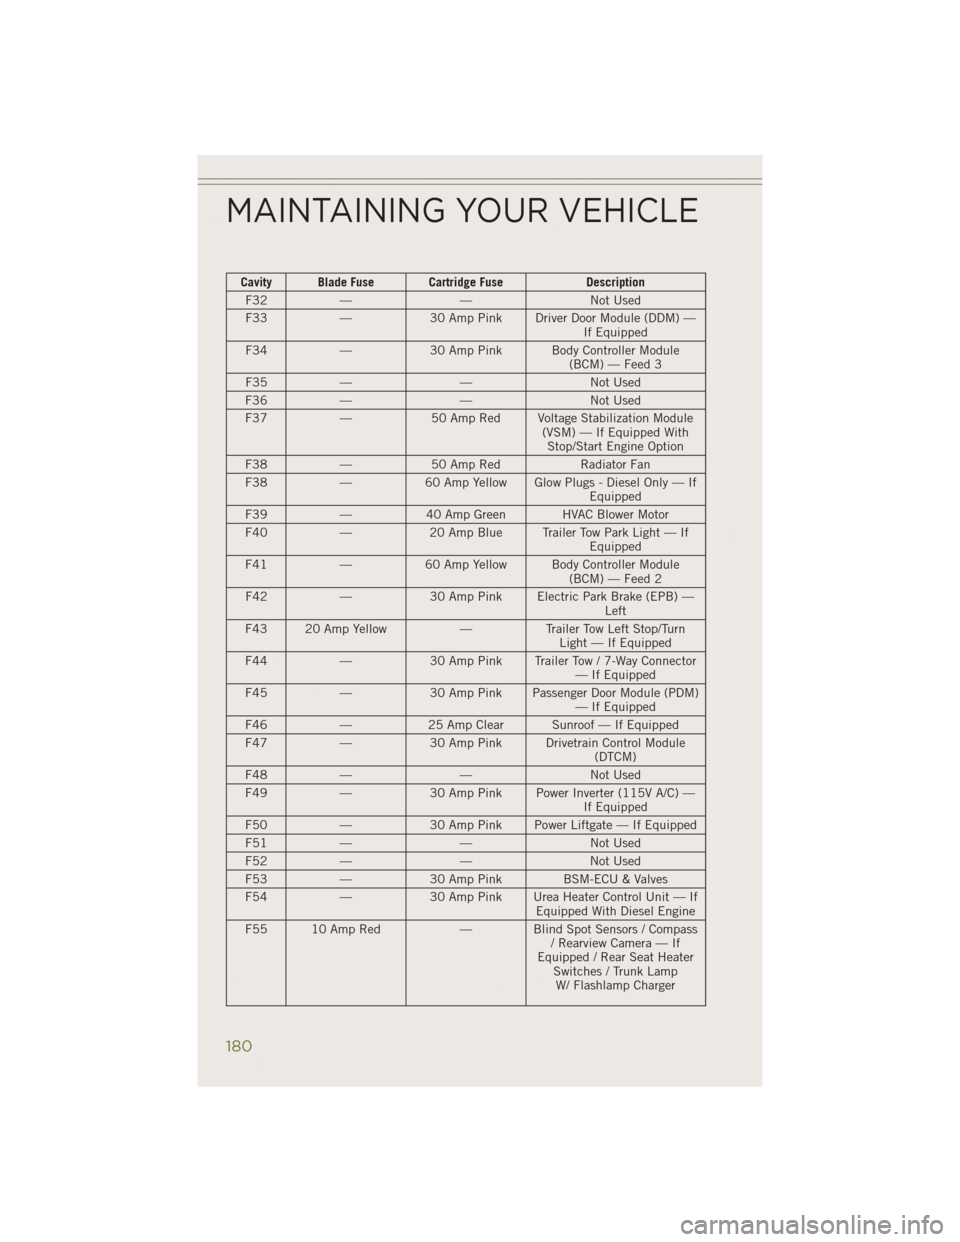
Cavity Blade Fuse Cartridge FuseDescription
F32 — — Not Used
F33 —30 Amp Pink Driver Door Module (DDM) —
If Equipped
F34 —30 Amp Pink Body Controller Module
(BCM) — Feed 3
F35 — — Not Used
F36 — — Not Used
F37 —50 Amp Red Voltage Stabilization Module
(VSM) — If Equipped WithStop/Start Engine Option
F38 —50 Amp Red Radiator Fan
F38 —60 Amp Yellow Glow Plugs - Diesel Only — If
Equipped
F39 —40 Amp Green HVAC Blower Motor
F40 —20 Amp Blue Trailer Tow Park Light — If
Equipped
F41 —60 Amp Yellow Body Controller Module
(BCM) — Feed 2
F42 —30 Amp Pink Electric Park Brake (EPB) —
Left
F43 20 Amp Yellow —Trailer Tow Left Stop/Turn
Light — If Equipped
F44 —30 Amp Pink Trailer Tow / 7-Way Connector
— If Equipped
F45 —30 Amp Pink Passenger Door Module (PDM)
— If Equipped
F46 —25 Amp Clear Sunroof — If Equipped
F47 —30 Amp Pink Drivetrain Control Module
(DTCM)
F48 — — Not Used
F49 —30 Amp Pink Power Inverter (115V A/C) —
If Equipped
F50 —30 Amp Pink Power Liftgate — If Equipped
F51 — — Not Used
F52 — — Not Used
F53 —30 Amp Pink BSM-ECU & Valves
F54 —30 Amp Pink Urea Heater Control Unit — If
Equipped With Diesel Engine
F55 10 Amp Red — Blind Spot Sensors / Compass
/ Rearview Camera — If
Equipped / Rear Seat Heater Switches / Trunk LampW/ Flashlamp Charger
MAINTAINING YOUR VEHICLE
180
Page 183 of 204
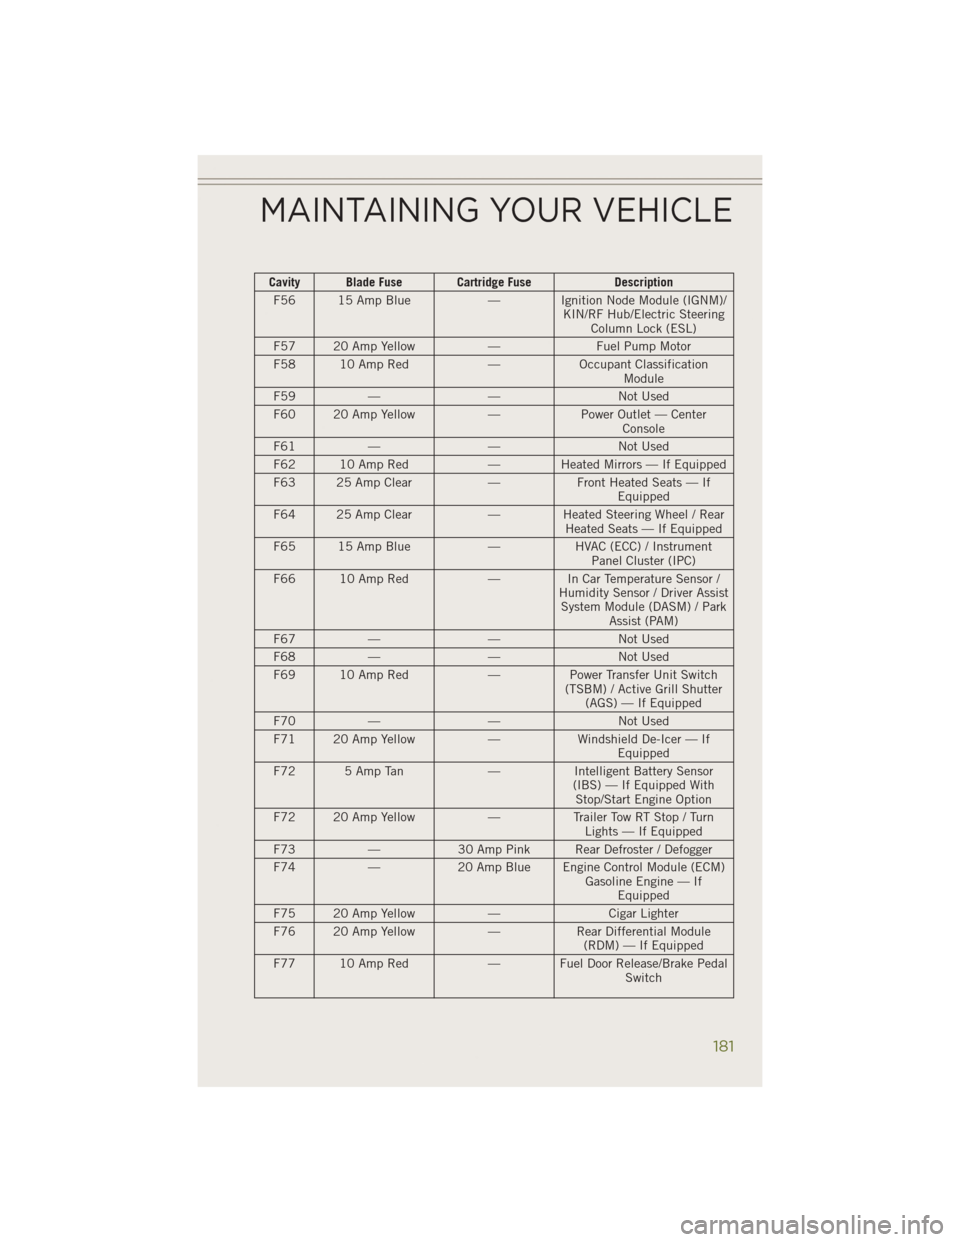
Cavity Blade Fuse Cartridge FuseDescription
F56 15 Amp Blue — Ignition Node Module (IGNM)/
KIN/RF Hub/Electric SteeringColumn Lock (ESL)
F57 20 Amp Yellow —Fuel Pump Motor
F58 10 Amp Red —Occupant Classification
Module
F59 — — Not Used
F60 20 Amp Yellow —Power Outlet — Center
Console
F61 — — Not Used
F62 10 Amp Red — Heated Mirrors — If Equipped
F63 25 Amp Clear —Front Heated Seats — If
Equipped
F64 25 Amp Clear —Heated Steering Wheel / Rear
Heated Seats — If Equipped
F65 15 Amp Blue —HVAC (ECC) / Instrument
Panel Cluster (IPC)
F66 10 Amp Red —In Car Temperature Sensor /
Humidity Sensor / Driver Assist System Module (DASM) / Park Assist (PAM)
F67 — — Not Used
F68 — — Not Used
F69 10 Amp Red —Power Transfer Unit Switch
(TSBM) / Active Grill Shutter (AGS) — If Equipped
F70 — — Not Used
F71 20 Amp Yellow —Windshield De-Icer — If
Equipped
F72 5 Amp Tan —Intelligent Battery Sensor
(IBS) — If Equipped With Stop/Start Engine Option
F72 20 Amp Yellow —Trailer Tow RT Stop / Turn
Lights — If Equipped
F73 —30 Amp Pink Rear Defroster / Defogger
F74 —20 Amp Blue Engine Control Module (ECM)
Gasoline Engine — IfEquipped
F75 20 Amp Yellow —Cigar Lighter
F76 20 Amp Yellow —Rear Differential Module
(RDM) — If Equipped
F77 10 Amp Red — Fuel Door Release/Brake Pedal
Switch
MAINTAINING YOUR VEHICLE
181