ignition JEEP CHEROKEE 2014 KL / 5.G Owner's Manual
[x] Cancel search | Manufacturer: JEEP, Model Year: 2014, Model line: CHEROKEE, Model: JEEP CHEROKEE 2014 KL / 5.GPages: 204, PDF Size: 3.84 MB
Page 147 of 204
- Brake Warning Light
This light monitors various brake functions, including brake fluid level and parking
brake application. If the brake light turns on it may indicate that the parking brake is
applied, that the brake fluid level is low, or that there is a problem with the anti-lock
brake system reservoir.
If the light remains on when the parking brake has been disengaged, and the fluid
level is at the full mark on the master cylinder reservoir, it indicates a possible brake
hydraulic system malfunction or that a problem with the Brake Booster has been
detected by the Anti-Lock Brake System (ABS)/Electronic Stability Control (ESC)
system. In this case, the light will remain on until the condition has been corrected.
If the problem is related to the brake booster, the ABS pump will run when applying
the brake and a brake pedal pulsation may be felt during each stop.
The dual brake system provides a reserve braking capacity in the event of a failure to
a portion of the hydraulic system. A leak in either half of the dual brake system is
indicated by the Brake Warning Light, which will turn on when the brake fluid level
in the master cylinder has dropped below a specified level. The light will remain on
until the cause is corrected.
Vehicles equipped with the Anti-Lock Brake System (ABS), are also equipped with
Electronic Brake Force Distribution (EBD). In the event of an EBD failure, the Brake
Warning Light will turn on along with the ABS Light. Immediate repair to the ABS
system is required.
Operation of the Brake Warning Light can be checked by turning the ignition switch
from the OFF position to the ON/RUN position. The light should illuminate for
approximately two seconds. The light should then turn off unless the parking brake
is applied or a brake fault is detected. If the light does not illuminate, have the light
inspected by an authorized dealer.
The light also will turn on when the parking brake is applied with the ignition switch
in the ON/RUN position.
NOTE:
This light shows only that the parking brake is applied. It does not show the degree
of brake application.
WARNING!
Driving a vehicle with the red brake light on is dangerous. Part of the brake system
may have failed. It will take longer to stop the vehicle. You could have a collision.
Have the vehicle checked immediately.
WHAT TO DO IN EMERGENCIES
145
Page 149 of 204
Oil Life Reset
• Your vehicle is equipped with an engine oil change indicator system. The “OilChange Due” message will flash in the EVIC display for approximately 10 seconds
after a single chime has sounded, to indicate the next scheduled oil change
interval. The engine oil change indicator system is duty cycle based, which means
the engine oil change interval may fluctuate, dependent upon your personal
driving style.
• Unless reset, this message will continue to display each time you turn the ignition switch to the ON/RUN position or cycle the ignition to the ON/RUN position if
equipped with Keyless Enter-N-Go™. To turn off the message temporarily, push
and release the MENU button. To reset the oil change indicator system (after
performing the scheduled maintenance) refer to the following procedure:
Vehicles Equipped With Passive Entry
Without pushing the brake pedal, push the ENGINE START/STOP button and cycle
the ignition to the ON/RUN position (Do not start the engine.)
1. Push the OKbutton to enter the EVIC menu screen.
2. Push and release the DOWN
arrow button to access the ”Oil Life” menu
screen.
3. Push the LEFT
arrow button or RIGHTarrow button to access the “OIL
LIFE” submenu.
4. Push the OKbutton to reset the “OIL LIFE” to 100%
5. Push the UP
arrow button to exit the EVIC menu screen
Vehicles Not Equipped With Passive Entry
Without pushing the brake pedal, cycle the ignition to the ON/RUN position (Do not
start the engine.)
1. Push the OKbutton to enter the EVIC menu screen.
2. Push and release the DOWN
arrow button to access the ”Oil Life” menu
screen.
3. Push the LEFT
arrow button or RIGHTarrow button to access the “OIL
LIFE” submenu.
4. Push the OKbutton to reset the “OIL LIFE” to 100%
5. Push the UP
arrow button to exit the EVIC menu screen
NOTE:
If the indicator message illuminates when you start the vehicle, the oil change
indicator system did not reset. If necessary, repeat this procedure.
WHAT TO DO IN EMERGENCIES
147
Page 150 of 204
INSTRUMENT CLUSTER INDICATOR LIGHTS
- Turn Signal Indicator
The arrows will flash with the exterior turn signals when the turn signal lever is
operated. A tone will chime, and an EVIC message will appear if either turn signal is
left on for more than 1 mile (1.6 km).
NOTE:
If either indicator flashes at a rapid rate, check for a defective outside light bulb.
- High Beam Indicator
Indicates that headlights are on high beam.
- Front Fog Light Indicator
This indicator will illuminate when the front fog lights are on.
- Vehicle Security Light
This light will flash rapidly for approximately 15 seconds when the vehicle theft
alarm is arming. The light will flash at a slower speed continuously after the alarm is
set. The security light will also come on for about three seconds when the ignition is
first turned on.
- Fuel Cap/Loose Gas Cap EVIC Message
• If a “gas cap” message (shown as gASCAP) appears, tighten the gas cap until a“clicking” sound is heard.
• If the message continues to appear for more than three days after tightening the gas cap, see your authorized service center.
- Electronic Speed Control ON Indicator
This indicator will illuminate when the electronic speed control has been activated to
the “ON” position.
- Electronic Speed Control SET Indicator
This indicator will illuminate when the cruising speed has been set.
WHAT TO DO IN EMERGENCIES
148
Page 155 of 204
• You can use the TIREFIT air pump to inflate bicycle tires. The kit also comes withtwo needles, located in the Accessory Storage Compartment (on the bottom of the
air pump) for inflating sport balls, rafts, or similar inflatable items. However, use
only the Air Pump Hose (7) and make sure the Mode Select Knob (5) is in the Air
Mode when inflating such items to avoid injecting sealant into them. The TIREFIT
Sealant is only intended to seal punctures less than 1/4” (6 mm) diameter in the
tread of your vehicle.
• Do not lift or carry the TIREFIT kit by the hoses.
Sealing A Tire With TIREFIT
(A) Whenever You Stop To Use TIREFIT:
1. Pull over to a safe location and turn on the vehicle’s Hazard Warning flashers.
2. Verify that the valve stem (on the wheel with the deflated tire) is in a position that is near to the ground. This will allow the TIREFIT Hoses (6) and (7) to reach the
valve stem and keep the TIREFIT kit flat on the ground. This will provide the best
positioning of the kit when injecting the sealant into the deflated tire and running
the air pump. Move the vehicle as necessary to place the valve stem in this
position before proceeding.
3. Place the transmission in PARK (auto transmission) or in Gear (manual transmis- sion) and cycle the ignition to the OFF position.
4. Set the parking brake.
(B) Setting Up To Use TIREFIT:
1. Turn the Mode Select Knob (5) to the Sealant Mode position.
2. Uncoil the Sealant Hose (6) and then remove the cap from the fitting at the end of the hose.
3. Place the TIREFIT kit flat on the ground next to the deflated tire.
4. Remove the cap from the valve stem and then screw the fitting at the end of the Sealant Hose (6) onto the valve stem.
5. Uncoil the Power Plug (8) and insert the plug into the vehicle’s 12 Volt power outlet.
6. Do not remove foreign objects (e.g., screws or nails) from the tire.
WHAT TO DO IN EMERGENCIES
153
Page 160 of 204
JACKING AND TIRE CHANGING
Jack Location
• The scissor-type jack and tire changing tools are located in the cargo compartmentbehind the rear seat underneath the load floor.
Spare Tire Stowage
• The spare tire is stowed underneath the rear cargo load floor behind the rear seatalong with the jack and wheel chocks.
Preparations For Jacking
1. Park the vehicle on a firm level surface as far from the edge of the roadway as
possible. Avoid icy or slippery areas.
2. Turn on the Hazard Warning flasher.
3. Set the parking brake.
4. Place the shift lever into PARK.
5. Turn the ignition to the OFF position.
Chock both the front and rear of the
wheel diagonally opposite of the jacking
position. For example, if changing the
right front tire, chock the left rear wheel.
NOTE:
Passengers should not remain in the ve-
hicle when the vehicle is being jacked.
Wheel Chocks
WHAT TO DO IN EMERGENCIES
158
Page 165 of 204
JUMP-STARTING
• If your vehicle has a discharged battery it can be jump-started using a set ofjumper cables and a battery in another vehicle or by using a portable battery
booster pack.
• Jump-starting can be dangerous if done improperly so please follow the proce- dures in this section carefully.
NOTE:
When using a portable battery booster pack follow the manufacturer’s operating
instructions and precautions.
CAUTION!
Do not use a portable battery booster pack or any other booster source with a
system voltage greater than 12 Volts or damage to the battery, starter motor,
alternator or electrical system may occur.
WARNING!
Do not attempt jump-starting if the battery is frozen. It could rupture or explode
and cause personal injury.
Preparations For Jump-Start
• The battery in your vehicle is located in the front of the engine compartment, behind the left headlight assembly.
NOTE:
The positive battery post is covered with a protective cap. Lift up on the cap to gain
access to the positive battery post.
• Set the parking brake, shift the automatic transmission into PARK and turn the ignition to OFF.
• Turn off the heater, radio, and all unnecessary electrical accessories.
• If using another vehicle to jump-start the battery, park the vehicle within the jumper cables reach, set the parking brake and make sure the ignition is OFF.
WHAT TO DO IN EMERGENCIES
163
Page 167 of 204
CAUTION!
• Do not use a portable battery booster pack or any other booster source with asystem voltage greater than 12 Volts or damage to the battery, starter motor,
alternator or electrical system may occur.
• Failure to follow these procedures could result in damage to the charging
system of the booster vehicle or the discharged vehicle.
• Accessories that can be plugged into the vehicle power outlets draw power from
the vehicle’s battery, even when not in use (e.g., cellular phones, etc.).
Eventually, if plugged in long enough, the vehicle’s battery discharges suffi-
ciently to degrade battery life and/or prevent the engine from starting.
WARNING!
• When temperatures are below the freezing point, electrolyte in a dischargedbattery may freeze. Do not attempt jump-starting because the battery could
rupture or explode and cause personal injury. Battery temperature must be
brought above the freezing point before attempting a jump-start.
• Take care to avoid the radiator cooling fan whenever the hood is raised. It can
start anytime the ignition switch is on. You can be injured by moving fan
blades.
• Remove any metal jewelry, such as watch bands or bracelets, that might make
an inadvertent electrical contact. You could be severely injured.
• Batteries contain sulfuric acid that can burn your skin or eyes and generate
hydrogen gas which is flammable and explosive. Keep open flames or sparks
away from the battery.
• Do not allow vehicles to touch each other as this could establish a ground
connection and personal injury could result.
• Failure to follow this procedure could result in personal injury or property
damage due to battery explosion.
• Do not connect the cable to the negative post (-) of the discharged battery. The
resulting electrical spark could cause the battery to explode and could result in
personal injury.
WHAT TO DO IN EMERGENCIES
165
Page 183 of 204
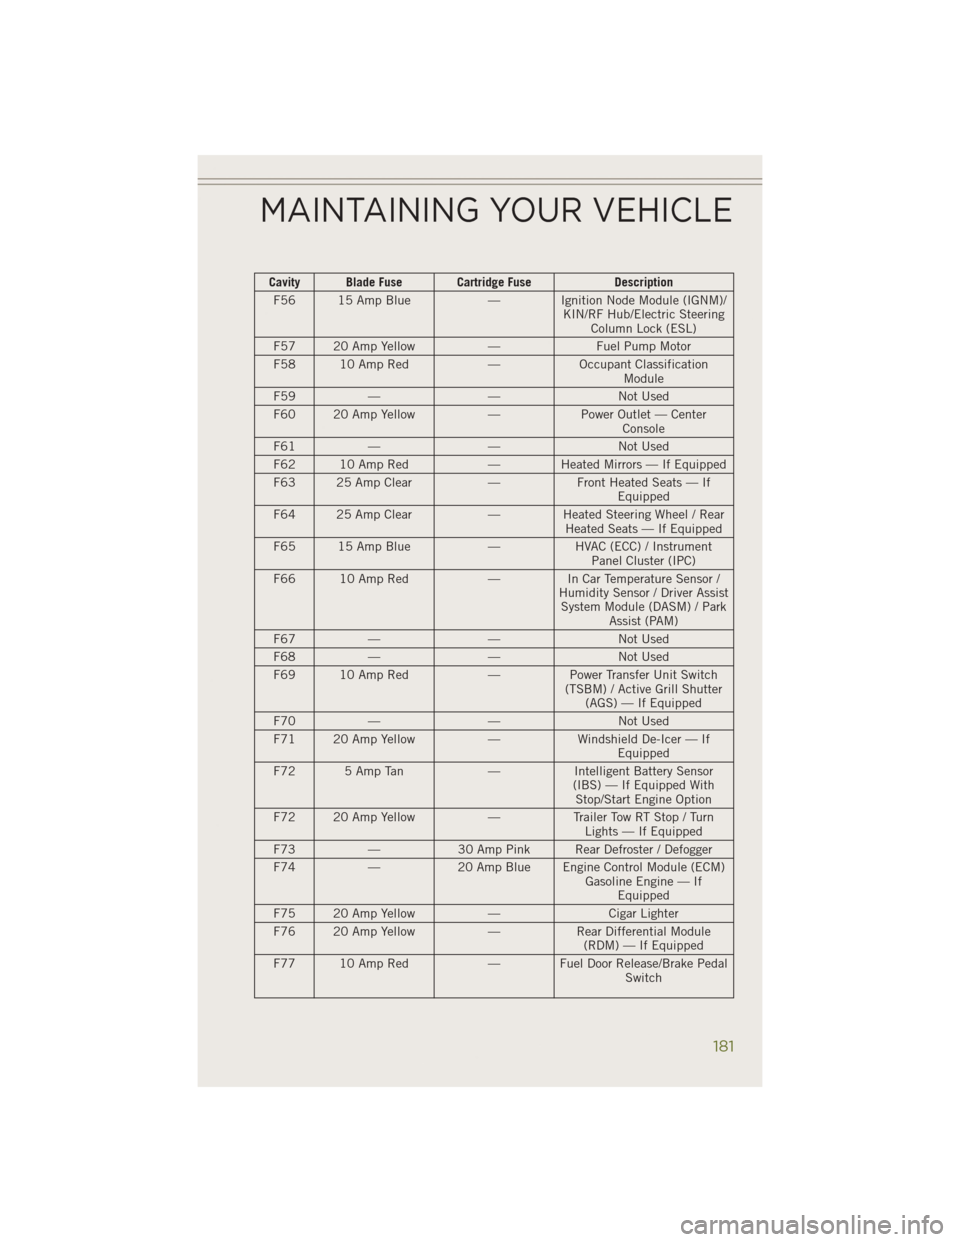
Cavity Blade Fuse Cartridge FuseDescription
F56 15 Amp Blue — Ignition Node Module (IGNM)/
KIN/RF Hub/Electric SteeringColumn Lock (ESL)
F57 20 Amp Yellow —Fuel Pump Motor
F58 10 Amp Red —Occupant Classification
Module
F59 — — Not Used
F60 20 Amp Yellow —Power Outlet — Center
Console
F61 — — Not Used
F62 10 Amp Red — Heated Mirrors — If Equipped
F63 25 Amp Clear —Front Heated Seats — If
Equipped
F64 25 Amp Clear —Heated Steering Wheel / Rear
Heated Seats — If Equipped
F65 15 Amp Blue —HVAC (ECC) / Instrument
Panel Cluster (IPC)
F66 10 Amp Red —In Car Temperature Sensor /
Humidity Sensor / Driver Assist System Module (DASM) / Park Assist (PAM)
F67 — — Not Used
F68 — — Not Used
F69 10 Amp Red —Power Transfer Unit Switch
(TSBM) / Active Grill Shutter (AGS) — If Equipped
F70 — — Not Used
F71 20 Amp Yellow —Windshield De-Icer — If
Equipped
F72 5 Amp Tan —Intelligent Battery Sensor
(IBS) — If Equipped With Stop/Start Engine Option
F72 20 Amp Yellow —Trailer Tow RT Stop / Turn
Lights — If Equipped
F73 —30 Amp Pink Rear Defroster / Defogger
F74 —20 Amp Blue Engine Control Module (ECM)
Gasoline Engine — IfEquipped
F75 20 Amp Yellow —Cigar Lighter
F76 20 Amp Yellow —Rear Differential Module
(RDM) — If Equipped
F77 10 Amp Red — Fuel Door Release/Brake Pedal
Switch
MAINTAINING YOUR VEHICLE
181