brake JEEP CHEROKEE 2014 KL / 5.G Owner's Guide
[x] Cancel search | Manufacturer: JEEP, Model Year: 2014, Model line: CHEROKEE, Model: JEEP CHEROKEE 2014 KL / 5.GPages: 204, PDF Size: 3.84 MB
Page 169 of 204
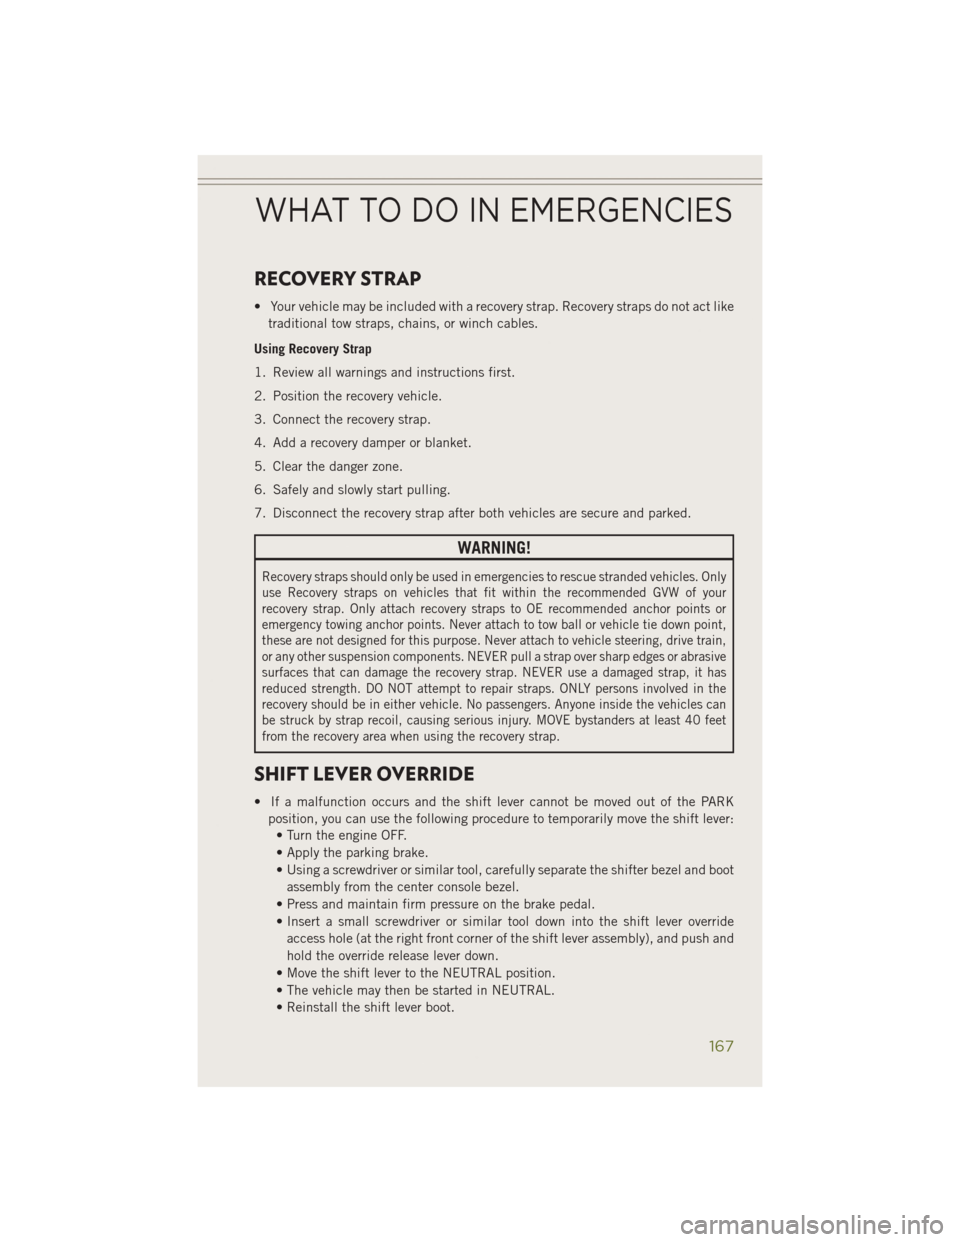
RECOVERY STRAP
• Your vehicle may be included with a recovery strap. Recovery straps do not act liketraditional tow straps, chains, or winch cables.
Using Recovery Strap
1. Review all warnings and instructions first.
2. Position the recovery vehicle.
3. Connect the recovery strap.
4. Add a recovery damper or blanket.
5. Clear the danger zone.
6. Safely and slowly start pulling.
7. Disconnect the recovery strap after both vehicles are secure and parked.
WARNING!
Recovery straps should only be used in emergencies to rescue stranded vehicles. Only
use Recovery straps on vehicles that fit within the recommended GVW of your
recovery strap. Only attach recovery straps to OE recommended anchor points or
emergency towing anchor points. Never attach to tow ball or vehicle tie down point,
these are not designed for this purpose. Never attach to vehicle steering, drive train,
or any other suspension components. NEVER pull a strap over sharp edges or abrasive
surfaces that can damage the recovery strap. NEVER use a damaged strap, it has
reduced strength. DO NOT attempt to repair straps. ONLY persons involved in the
recovery should be in either vehicle. No passengers. Anyone inside the vehicles can
be struck by strap recoil, causing serious injury. MOVE bystanders at least 40 feet
from the recovery area when using the recovery strap.
SHIFT LEVER OVERRIDE
• If a malfunction occurs and the shift lever cannot be moved out of the PARK position, you can use the following procedure to temporarily move the shift lever:• Turn the engine OFF.
• Apply the parking brake.
• Using a screwdriver or similar tool, carefully separate the shifter bezel and boot
assembly from the center console bezel.
• Press and maintain firm pressure on the brake pedal.
• Insert a small screwdriver or similar tool down into the shift lever override access hole (at the right front corner of the shift lever assembly), and push and
hold the override release lever down.
• Move the shift lever to the NEUTRAL position.
• The vehicle may then be started in NEUTRAL.
• Reinstall the shift lever boot.
WHAT TO DO IN EMERGENCIES
167
Page 171 of 204
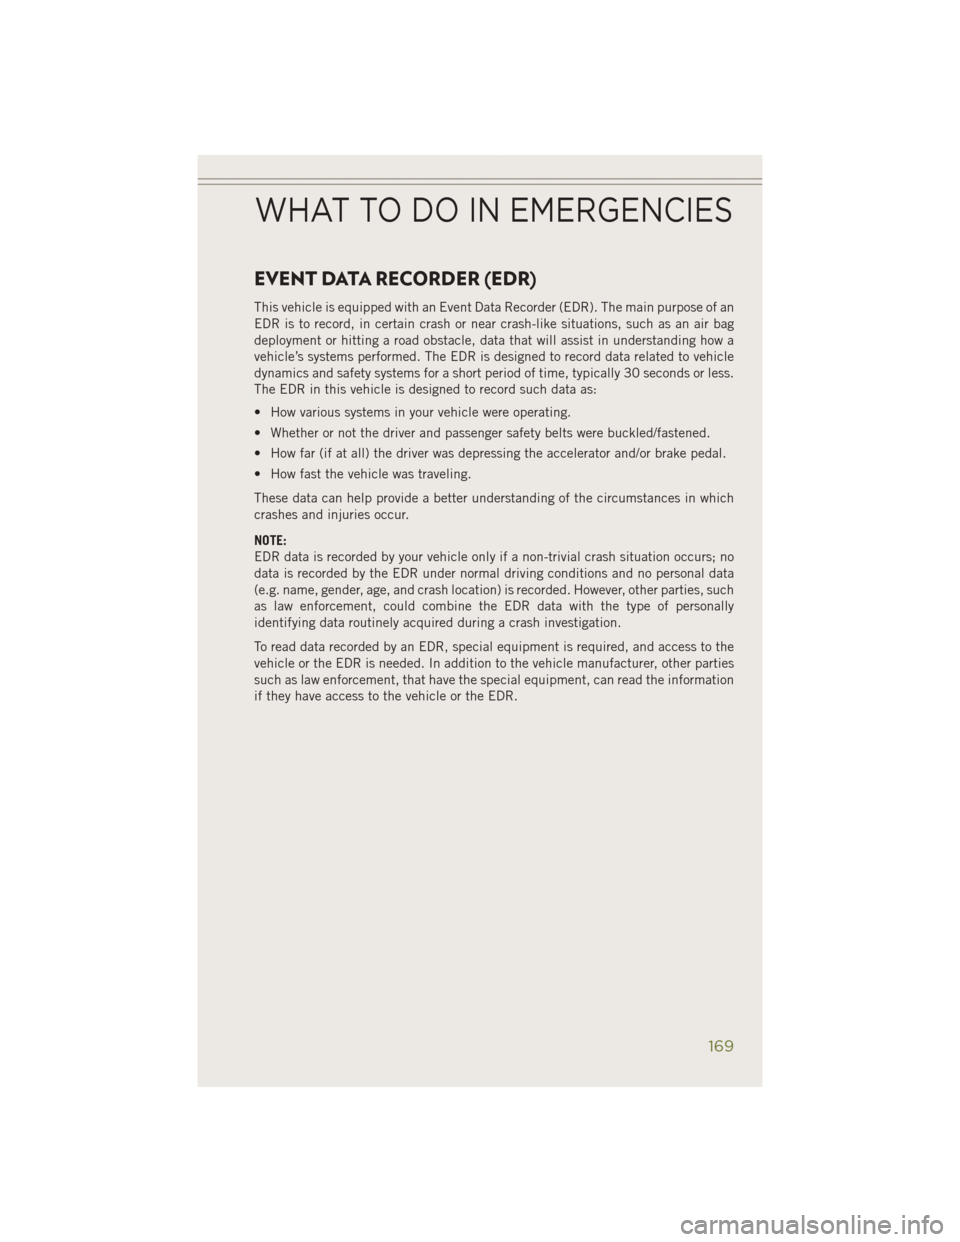
EVENT DATA RECORDER (EDR)
This vehicle is equipped with an Event Data Recorder (EDR). The main purpose of an
EDR is to record, in certain crash or near crash-like situations, such as an air bag
deployment or hitting a road obstacle, data that will assist in understanding how a
vehicle’s systems performed. The EDR is designed to record data related to vehicle
dynamics and safety systems for a short period of time, typically 30 seconds or less.
The EDR in this vehicle is designed to record such data as:
• How various systems in your vehicle were operating.
• Whether or not the driver and passenger safety belts were buckled/fastened.
• How far (if at all) the driver was depressing the accelerator and/or brake pedal.
• How fast the vehicle was traveling.
These data can help provide a better understanding of the circumstances in which
crashes and injuries occur.
NOTE:
EDR data is recorded by your vehicle only if a non-trivial crash situation occurs; no
data is recorded by the EDR under normal driving conditions and no personal data
(e.g. name, gender, age, and crash location) is recorded. However, other parties, such
as law enforcement, could combine the EDR data with the type of personally
identifying data routinely acquired during a crash investigation.
To read data recorded by an EDR, special equipment is required, and access to the
vehicle or the EDR is needed. In addition to the vehicle manufacturer, other parties
such as law enforcement, that have the special equipment, can read the information
if they have access to the vehicle or the EDR.
WHAT TO DO IN EMERGENCIES
169
Page 176 of 204
![JEEP CHEROKEE 2014 KL / 5.G Owners Guide ComponentFluid, Lubricant, or Genuine
Part Capacities
Spark Plugs – 2.4L Engine We recommend you use
MOPAR
®Spark Plugs
(Gap 0.047 in [1.2 mm]) —
Spark Plugs – 3.2L Engine We recommend you use
JEEP CHEROKEE 2014 KL / 5.G Owners Guide ComponentFluid, Lubricant, or Genuine
Part Capacities
Spark Plugs – 2.4L Engine We recommend you use
MOPAR
®Spark Plugs
(Gap 0.047 in [1.2 mm]) —
Spark Plugs – 3.2L Engine We recommend you use](/img/16/7056/w960_7056-175.png)
ComponentFluid, Lubricant, or Genuine
Part Capacities
Spark Plugs – 2.4L Engine We recommend you use
MOPAR
®Spark Plugs
(Gap 0.047 in [1.2 mm]) —
Spark Plugs – 3.2L Engine We recommend you use
MOPAR
®Spark Plugs
(Gap 0.043 in [1.1 mm]) —
Automatic Transmission We recommend you only
use MOPAR
®ZF 8&9
Speed ATF™ Automatic Transmission Fluid, or equivalent. —
Brake Master Cylinder We recommend you use
MOPAR
®DOT 3 Brake
Fluid, SAE J1703 should be used. If DOT 3, SAE
J1703 brake fluid is not available, then DOT 4 is
acceptable. Use only rec- ommended brake fluids. —
CAUTION!
• Mixing of engine coolant (antifreeze) other than specified Organic Additive
Technology (OAT) engine coolant (antifreeze), may result in engine damage and
may decrease corrosion protection. Organic Additive Technology (OAT) engine
coolant is different and should not be mixed with Hybrid Organic Additive
Technology (HOAT) engine coolant (antifreeze) or any “globally compatible”
coolant (antifreeze). If a non-OAT engine coolant (antifreeze) is introduced into
the cooling system in an emergency, the cooling system will need to be drained,
flushed, and refilled with fresh OAT coolant (conforming to MS-12106), by an
authorized dealer as soon as possible.
• Do not use water alone or alcohol-based engine coolant (antifreeze) products.
Do not use additional rust inhibitors or antirust products, as they may not be
compatible with the radiator engine coolant and may plug the radiator.
• This vehicle has not been designed for use with propylene glycol-based engine
coolant (antifreeze). Use of propylene glycol-based engine coolant (antifreeze)
is not recommended.
MAINTAINING YOUR VEHICLE
174
Page 178 of 204
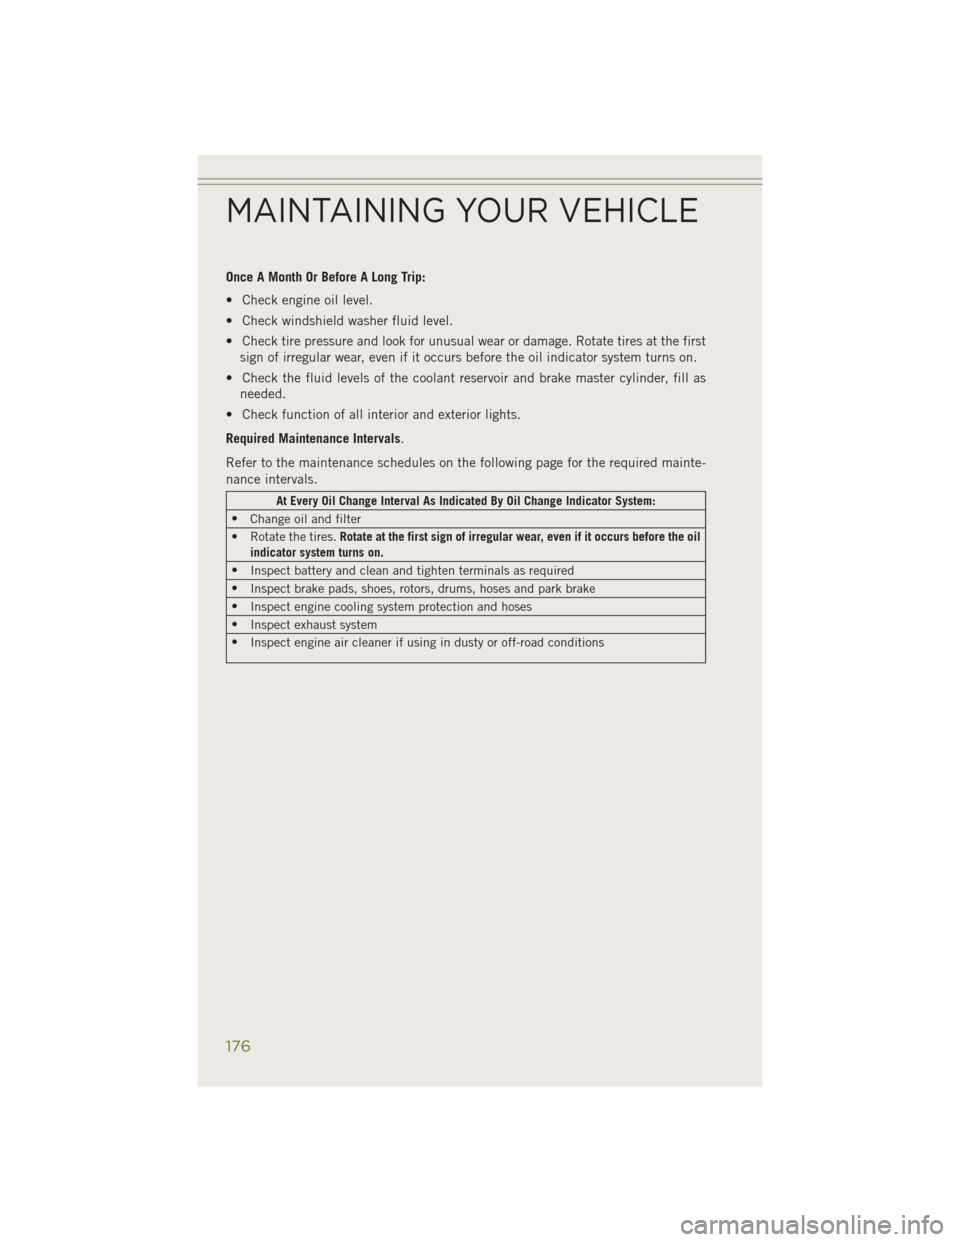
Once A Month Or Before A Long Trip:
• Check engine oil level.
• Check windshield washer fluid level.
• Check tire pressure and look for unusual wear or damage. Rotate tires at the firstsign of irregular wear, even if it occurs before the oil indicator system turns on.
• Check the fluid levels of the coolant reservoir and brake master cylinder, fill as needed.
• Check function of all interior and exterior lights.
Required Maintenance Intervals.
Refer to the maintenance schedules on the following page for the required mainte-
nance intervals.
At Every Oil Change Interval As Indicated By Oil Change Indicator System:
• Change oil and filter
• Rotate the tires. Rotate at the first sign of irregular wear, even if it occurs before the oil
indicator system turns on.
• Inspect battery and clean and tighten terminals as required
• Inspect brake pads, shoes, rotors, drums, hoses and park brake
• Inspect engine cooling system protection and hoses
• Inspect exhaust system
• Inspect engine air cleaner if using in dusty or off-road conditions
MAINTAINING YOUR VEHICLE
176
Page 179 of 204
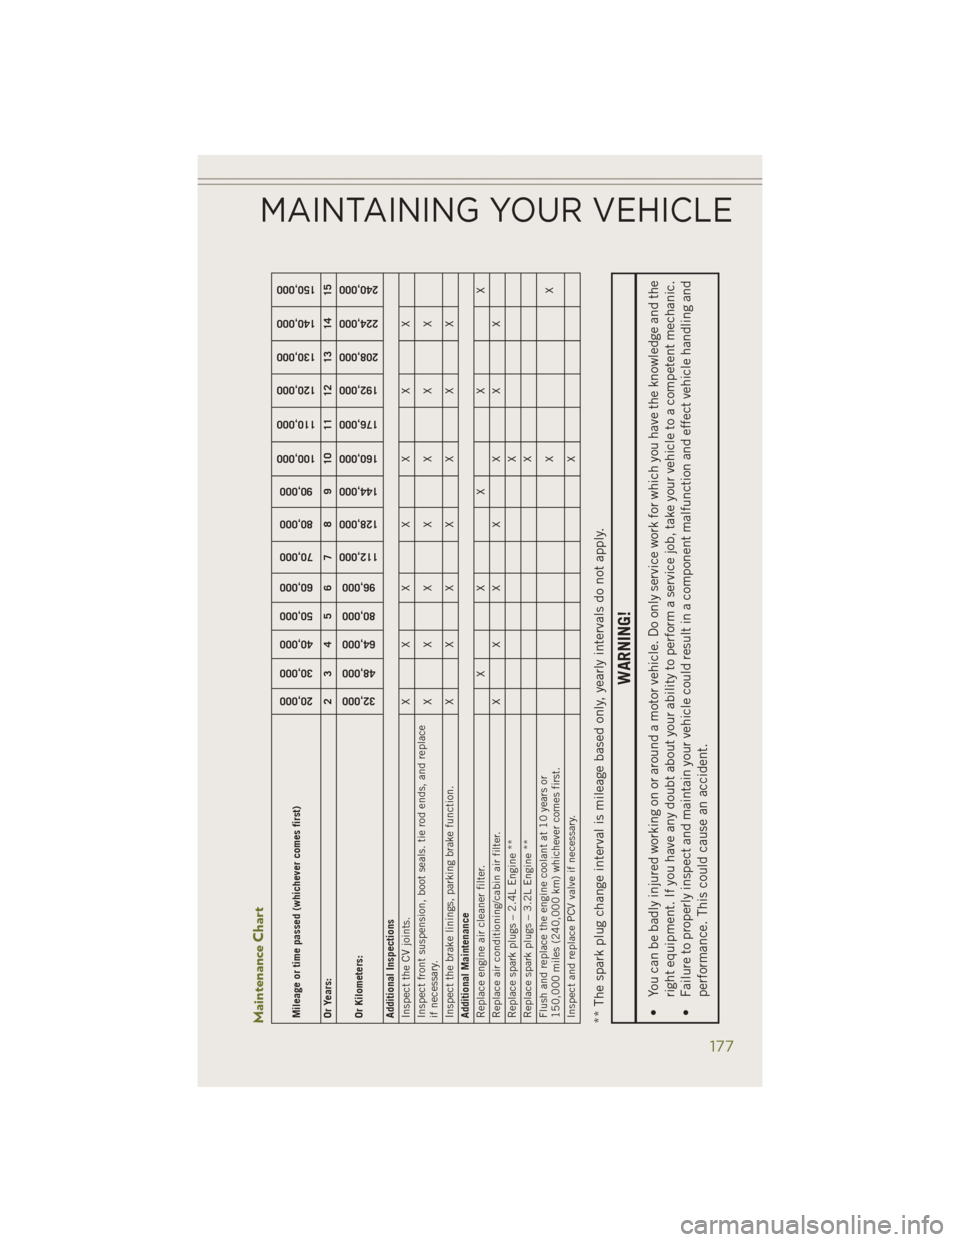
Maintenance ChartMileage or time passed (whichever comes first)
20,000
30,000
40,000
50,000
60,000
70,000
80,000
90,000
100,000
110,000
120,000
130,000
140,000
150,000
Or Years: 2 3 4 5 6 7 8 9 10 11 12 13 14 15
Or Kilometers:
32,000
48,000
64,000
80,000
96,000
112,000
128,000
144,000
160,000
176,000
192,000
208,000
224,000
240,000
Additional Inspections
Inspect the CV joints. X X XXX XX
Inspect front suspension, boot seals. tie rod ends, and replace
if necessary. XXX X X X X
Inspect the brake linings, parking brake function. X X XXX XX
Additional Maintenance
Replace engine air cleaner filter. XX X XX
Replace air conditioning/cabin air filter. X X XXX XX
Replace spark plugs – 2.4L Engine ** X
Replace spark plugs – 3.2L Engine ** X
Flush and replace the engine coolant at 10 years or
150,000 miles (240,000 km) whichever comes first. XX
Inspect and replace PCV valve if necessary. X** The spark plug change interval is mileage based only, yearly intervals do not apply.
WARNING!
• You can be badly injured working on or around a motor vehicle. Do only service work for which you have the knowledge and the
right equipment. If you have any doubt about your ability to perform a service job, take your vehicle to a competent mechanic.
• Failure to properly inspect and maintain your vehicle could result in a component malfunction and effect vehicle handling and
performance. This could cause an accident.
MAINTAINING YOUR VEHICLE
177
Page 181 of 204
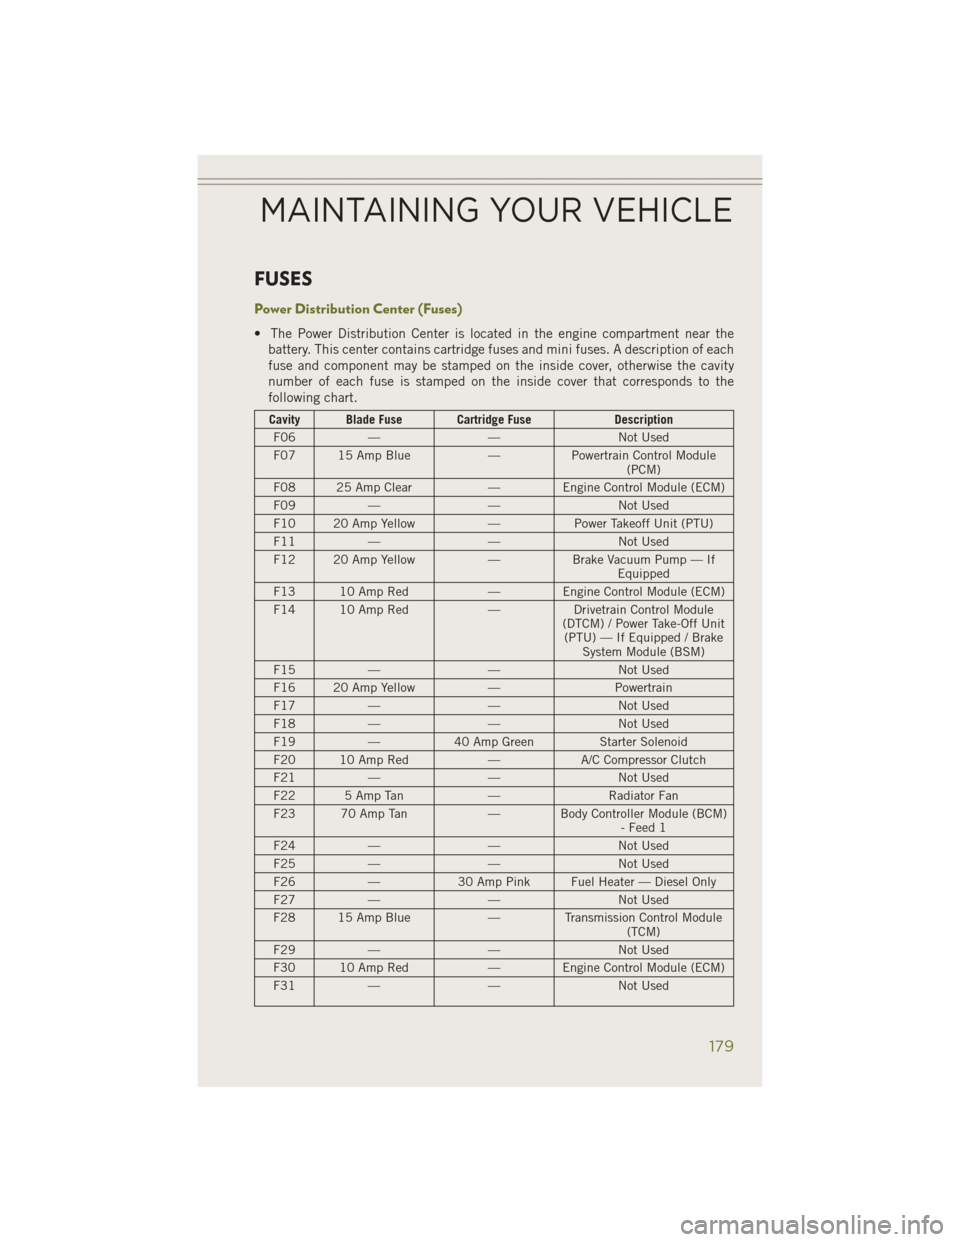
FUSES
Power Distribution Center (Fuses)
• The Power Distribution Center is located in the engine compartment near thebattery. This center contains cartridge fuses and mini fuses. A description of each
fuse and component may be stamped on the inside cover, otherwise the cavity
number of each fuse is stamped on the inside cover that corresponds to the
following chart.
Cavity Blade Fuse Cartridge Fuse Description
F06 — — Not Used
F07 15 Amp Blue —Powertrain Control Module
(PCM)
F08 25 Amp Clear — Engine Control Module (ECM)
F09 — — Not Used
F10 20 Amp Yellow —Power Takeoff Unit (PTU)
F11 — — Not Used
F12 20 Amp Yellow —Brake Vacuum Pump — If
Equipped
F13 10 Amp Red — Engine Control Module (ECM)
F14 10 Amp Red —Drivetrain Control Module
(DTCM) / Power Take-Off Unit (PTU) — If Equipped / Brake System Module (BSM)
F15 — — Not Used
F16 20 Amp Yellow —Powertrain
F17 — — Not Used
F18 — — Not Used
F19 —40 Amp Green Starter Solenoid
F20 10 Amp Red —A/C Compressor Clutch
F21 — — Not Used
F22 5 Amp Tan —Radiator Fan
F23 70 Amp Tan — Body Controller Module (BCM)
- Feed 1
F24 — — Not Used
F25 — — Not Used
F26 —30 Amp Pink Fuel Heater — Diesel Only
F27 — — Not Used
F28 15 Amp Blue —Transmission Control Module
(TCM)
F29 — — Not Used
F30 10 Amp Red — Engine Control Module (ECM)
F31 — — Not Used
MAINTAINING YOUR VEHICLE
179
Page 182 of 204
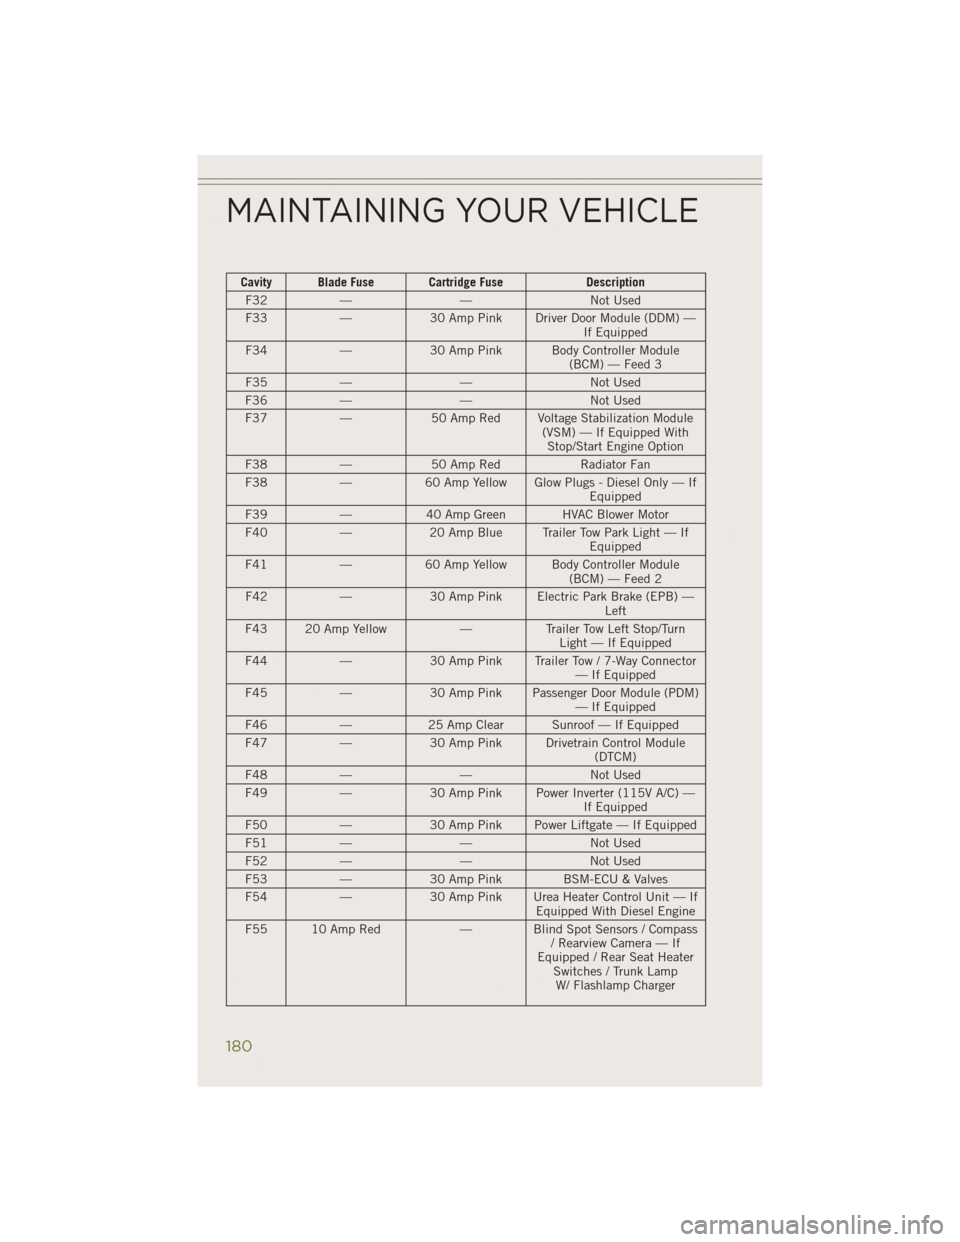
Cavity Blade Fuse Cartridge FuseDescription
F32 — — Not Used
F33 —30 Amp Pink Driver Door Module (DDM) —
If Equipped
F34 —30 Amp Pink Body Controller Module
(BCM) — Feed 3
F35 — — Not Used
F36 — — Not Used
F37 —50 Amp Red Voltage Stabilization Module
(VSM) — If Equipped WithStop/Start Engine Option
F38 —50 Amp Red Radiator Fan
F38 —60 Amp Yellow Glow Plugs - Diesel Only — If
Equipped
F39 —40 Amp Green HVAC Blower Motor
F40 —20 Amp Blue Trailer Tow Park Light — If
Equipped
F41 —60 Amp Yellow Body Controller Module
(BCM) — Feed 2
F42 —30 Amp Pink Electric Park Brake (EPB) —
Left
F43 20 Amp Yellow —Trailer Tow Left Stop/Turn
Light — If Equipped
F44 —30 Amp Pink Trailer Tow / 7-Way Connector
— If Equipped
F45 —30 Amp Pink Passenger Door Module (PDM)
— If Equipped
F46 —25 Amp Clear Sunroof — If Equipped
F47 —30 Amp Pink Drivetrain Control Module
(DTCM)
F48 — — Not Used
F49 —30 Amp Pink Power Inverter (115V A/C) —
If Equipped
F50 —30 Amp Pink Power Liftgate — If Equipped
F51 — — Not Used
F52 — — Not Used
F53 —30 Amp Pink BSM-ECU & Valves
F54 —30 Amp Pink Urea Heater Control Unit — If
Equipped With Diesel Engine
F55 10 Amp Red — Blind Spot Sensors / Compass
/ Rearview Camera — If
Equipped / Rear Seat Heater Switches / Trunk LampW/ Flashlamp Charger
MAINTAINING YOUR VEHICLE
180
Page 183 of 204
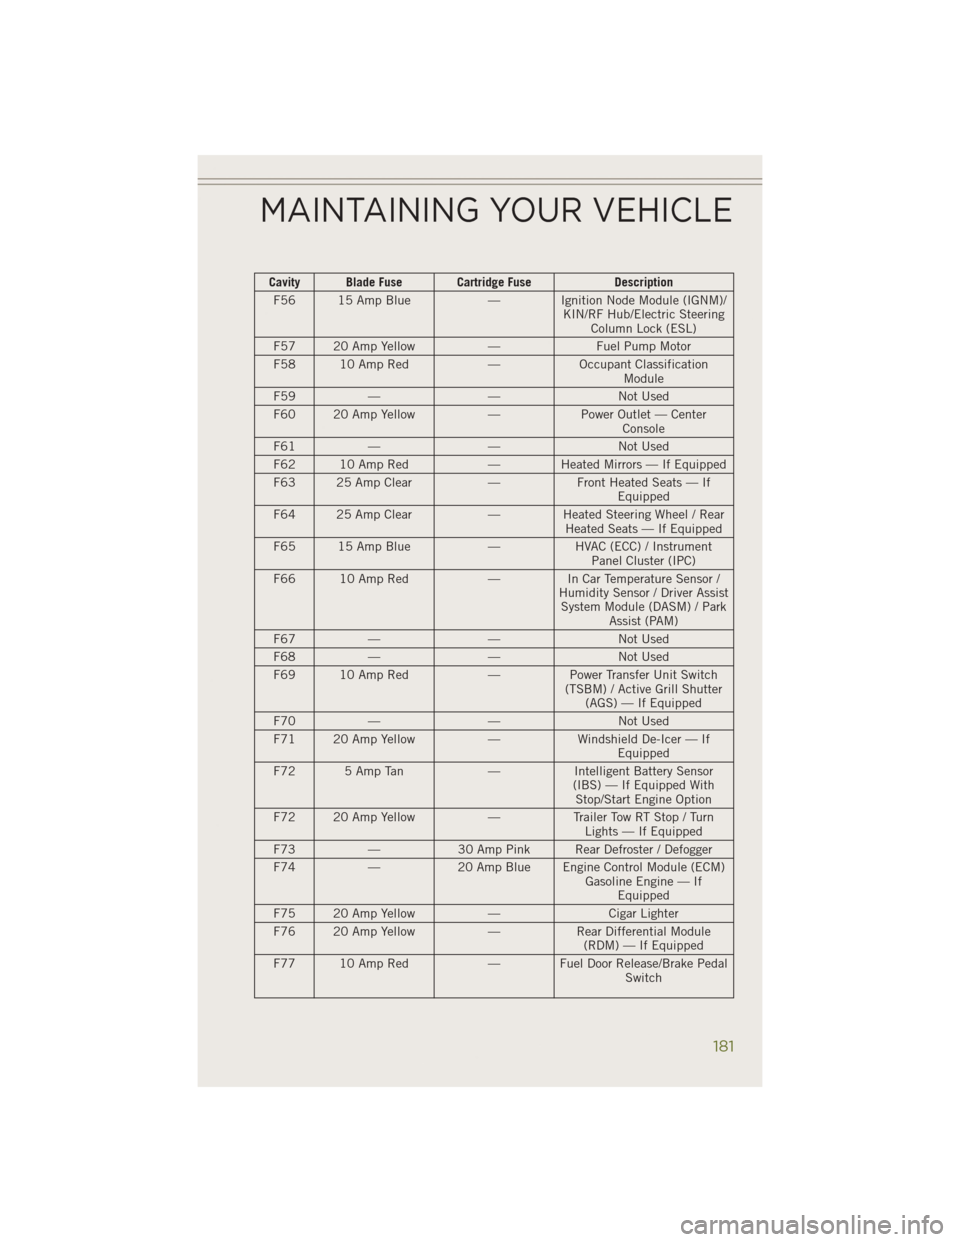
Cavity Blade Fuse Cartridge FuseDescription
F56 15 Amp Blue — Ignition Node Module (IGNM)/
KIN/RF Hub/Electric SteeringColumn Lock (ESL)
F57 20 Amp Yellow —Fuel Pump Motor
F58 10 Amp Red —Occupant Classification
Module
F59 — — Not Used
F60 20 Amp Yellow —Power Outlet — Center
Console
F61 — — Not Used
F62 10 Amp Red — Heated Mirrors — If Equipped
F63 25 Amp Clear —Front Heated Seats — If
Equipped
F64 25 Amp Clear —Heated Steering Wheel / Rear
Heated Seats — If Equipped
F65 15 Amp Blue —HVAC (ECC) / Instrument
Panel Cluster (IPC)
F66 10 Amp Red —In Car Temperature Sensor /
Humidity Sensor / Driver Assist System Module (DASM) / Park Assist (PAM)
F67 — — Not Used
F68 — — Not Used
F69 10 Amp Red —Power Transfer Unit Switch
(TSBM) / Active Grill Shutter (AGS) — If Equipped
F70 — — Not Used
F71 20 Amp Yellow —Windshield De-Icer — If
Equipped
F72 5 Amp Tan —Intelligent Battery Sensor
(IBS) — If Equipped With Stop/Start Engine Option
F72 20 Amp Yellow —Trailer Tow RT Stop / Turn
Lights — If Equipped
F73 —30 Amp Pink Rear Defroster / Defogger
F74 —20 Amp Blue Engine Control Module (ECM)
Gasoline Engine — IfEquipped
F75 20 Amp Yellow —Cigar Lighter
F76 20 Amp Yellow —Rear Differential Module
(RDM) — If Equipped
F77 10 Amp Red — Fuel Door Release/Brake Pedal
Switch
MAINTAINING YOUR VEHICLE
181
Page 184 of 204
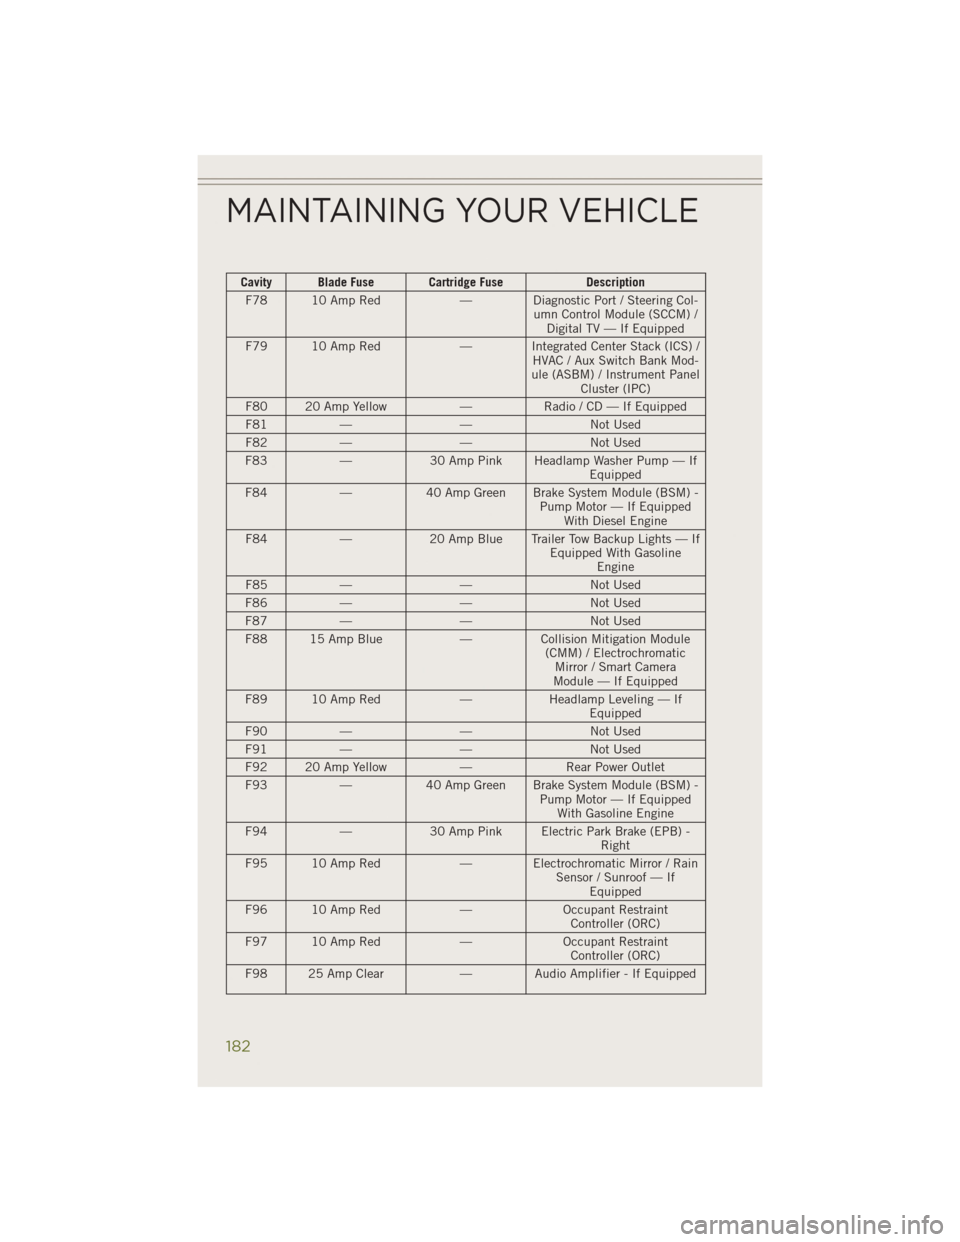
Cavity Blade Fuse Cartridge FuseDescription
F78 10 Amp Red — Diagnostic Port / Steering Col-
umn Control Module (SCCM) /Digital TV — If Equipped
F79 10 Amp Red — Integrated Center Stack (ICS) /
HVAC / Aux Switch Bank Mod-
ule (ASBM) / Instrument Panel Cluster (IPC)
F80 20 Amp Yellow —Radio / CD — If Equipped
F81 — — Not Used
F82 — — Not Used
F83 —30 Amp Pink Headlamp Washer Pump — If
Equipped
F84 —40 Amp Green Brake System Module (BSM) -
Pump Motor — If EquippedWith Diesel Engine
F84 —20 Amp Blue Trailer Tow Backup Lights — If
Equipped With GasolineEngine
F85 — — Not Used
F86 — — Not Used
F87 — — Not Used
F88 15 Amp Blue —Collision Mitigation Module
(CMM) / Electrochromatic Mirror / Smart Camera
Module — If Equipped
F89 10 Amp Red —Headlamp Leveling — If
Equipped
F90 — — Not Used
F91 — — Not Used
F92 20 Amp Yellow —Rear Power Outlet
F93 —40 Amp Green Brake System Module (BSM) -
Pump Motor — If EquippedWith Gasoline Engine
F94 —30 Amp Pink Electric Park Brake (EPB) -
Right
F95 10 Amp Red — Electrochromatic Mirror / Rain
Sensor / Sunroof — IfEquipped
F96 10 Amp Red —Occupant Restraint
Controller (ORC)
F97 10 Amp Red —Occupant Restraint
Controller (ORC)
F98 25 Amp Clear —Audio Amplifier - If Equipped
MAINTAINING YOUR VEHICLE
182
Page 187 of 204
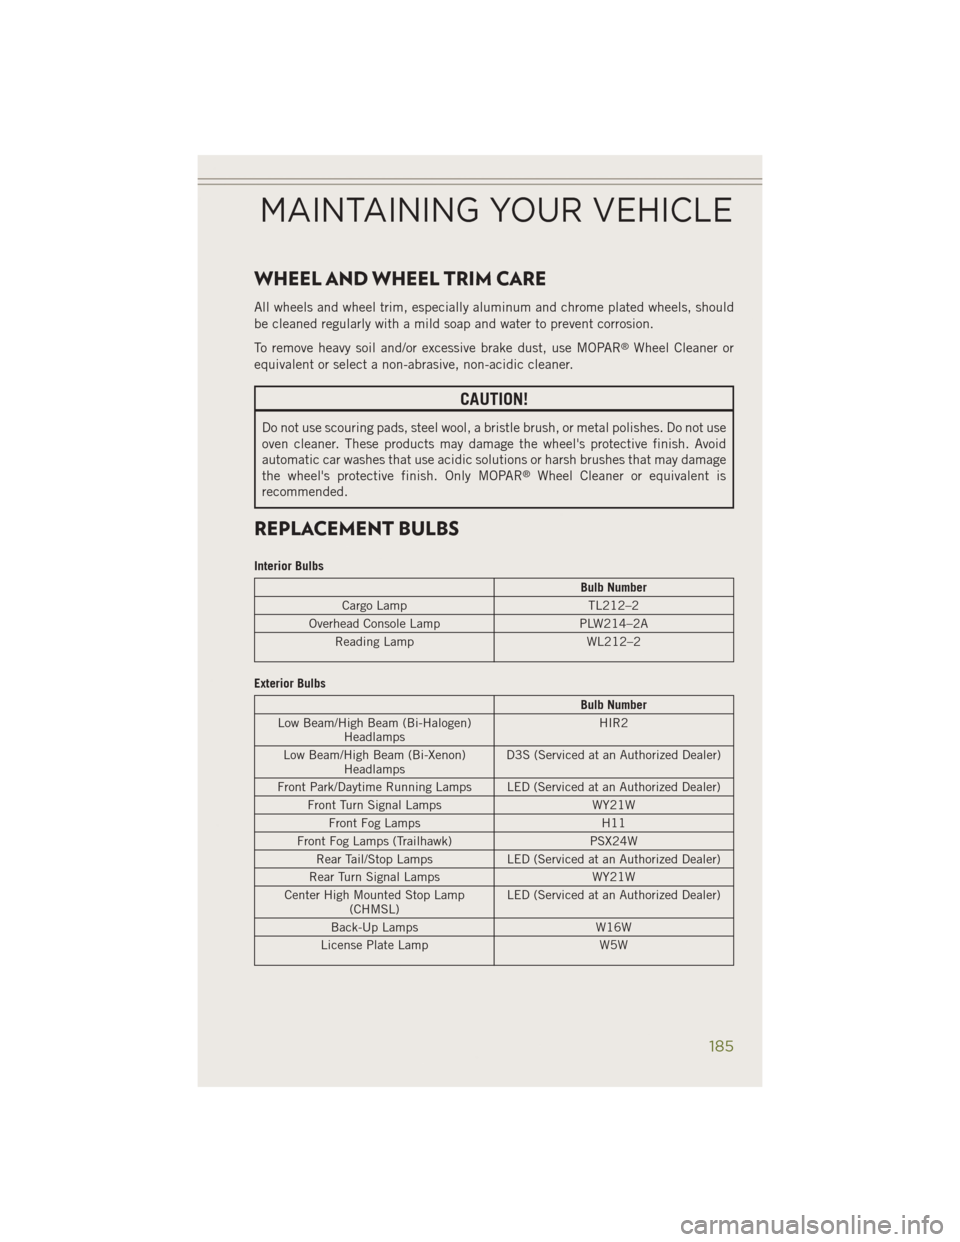
WHEEL AND WHEEL TRIM CARE
All wheels and wheel trim, especially aluminum and chrome plated wheels, should
be cleaned regularly with a mild soap and water to prevent corrosion.
To remove heavy soil and/or excessive brake dust, use MOPAR
®Wheel Cleaner or
equivalent or select a non-abrasive, non-acidic cleaner.
CAUTION!
Do not use scouring pads, steel wool, a bristle brush, or metal polishes. Do not use
oven cleaner. These products may damage the wheel's protective finish. Avoid
automatic car washes that use acidic solutions or harsh brushes that may damage
the wheel's protective finish. Only MOPAR
®Wheel Cleaner or equivalent is
recommended.
REPLACEMENT BULBS
Interior Bulbs
Bulb Number
Cargo Lamp TL212–2
Overhead Console Lamp PLW214–2A
Reading Lamp WL212–2
Exterior Bulbs
Bulb Number
Low Beam/High Beam (Bi-Halogen) Headlamps HIR2
Low Beam/High Beam (Bi-Xenon) Headlamps D3S (Serviced at an Authorized Dealer)
Front Park/Daytime Running Lamps LED (Serviced at an Authorized Dealer) Front Turn Signal Lamps WY21W
Front Fog Lamps H11
Front Fog Lamps (Trailhawk) PSX24W
Rear Tail/Stop Lamps LED (Serviced at an Authorized Dealer)
Rear Turn Signal Lamps WY21W
Center High Mounted Stop Lamp (CHMSL) LED (Serviced at an Authorized Dealer)
Back-Up Lamps W16W
License Plate Lamp W5W
MAINTAINING YOUR VEHICLE
185