rear view mirror JEEP CHEROKEE 2014 KL / 5.G User Guide
[x] Cancel search | Manufacturer: JEEP, Model Year: 2014, Model line: CHEROKEE, Model: JEEP CHEROKEE 2014 KL / 5.GPages: 204, PDF Size: 3.84 MB
Page 34 of 204
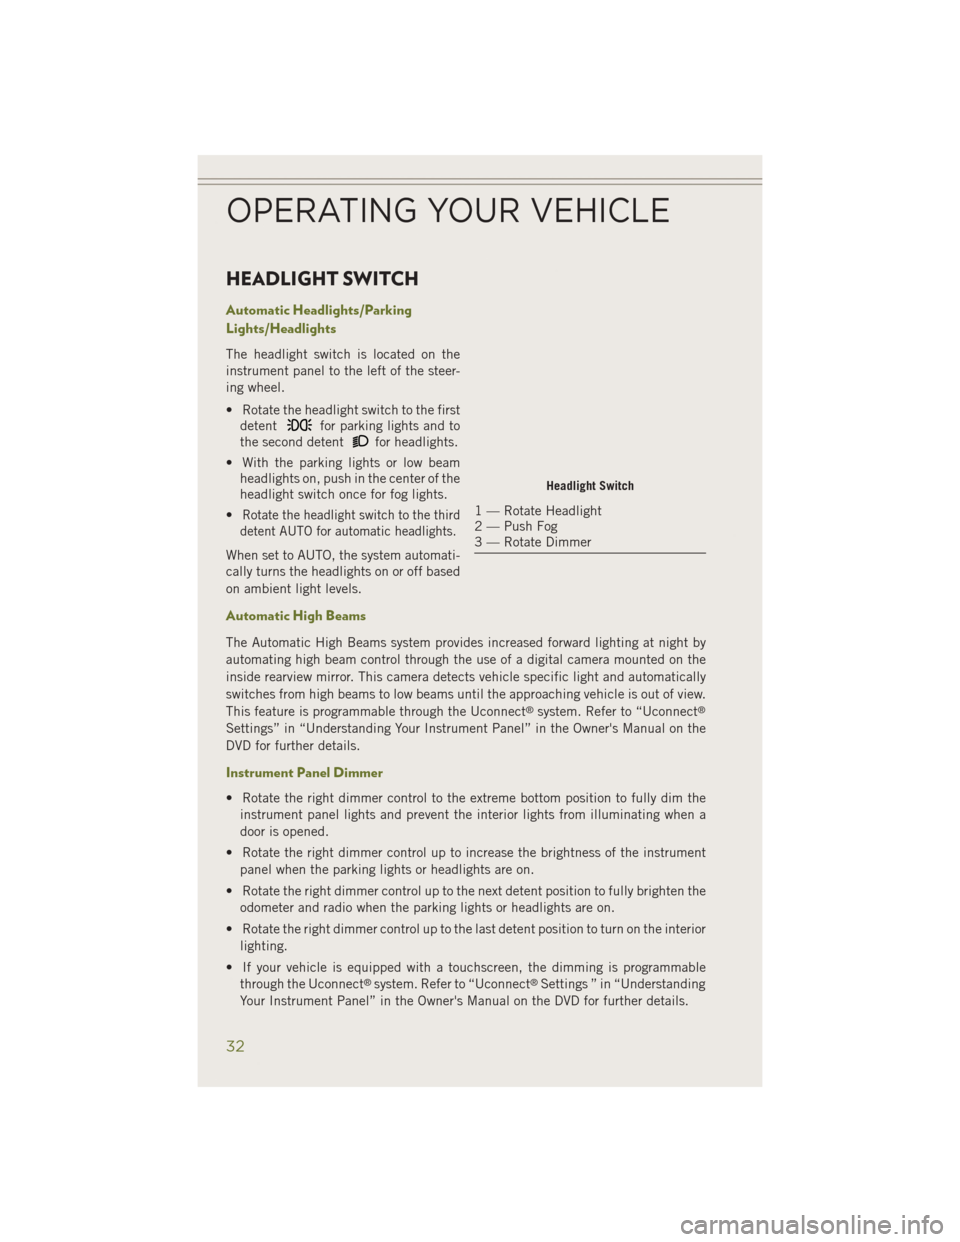
HEADLIGHT SWITCH
Automatic Headlights/Parking
Lights/Headlights
The headlight switch is located on the
instrument panel to the left of the steer-
ing wheel.
• Rotate the headlight switch to the firstdetent
for parking lights and to
the second detent
for headlights.
• With the parking lights or low beam headlights on, push in the center of the
headlight switch once for fog lights.
•
Rotate the headlight switch to the third
detent AUTO for automatic headlights.
When set to AUTO, the system automati-
cally turns the headlights on or off based
on ambient light levels.
Automatic High Beams
The Automatic High Beams system provides increased forward lighting at night by
automating high beam control through the use of a digital camera mounted on the
inside rearview mirror. This camera detects vehicle specific light and automatically
switches from high beams to low beams until the approaching vehicle is out of view.
This feature is programmable through the Uconnect
®system. Refer to “Uconnect®
Settings” in “Understanding Your Instrument Panel” in the Owner's Manual on the
DVD for further details.
Instrument Panel Dimmer
• Rotate the right dimmer control to the extreme bottom position to fully dim the
instrument panel lights and prevent the interior lights from illuminating when a
door is opened.
• Rotate the right dimmer control up to increase the brightness of the instrument panel when the parking lights or headlights are on.
• Rotate the right dimmer control up to the next detent position to fully brighten the odometer and radio when the parking lights or headlights are on.
• Rotate the right dimmer control up to the last detent position to turn on the interior lighting.
• If your vehicle is equipped with a touchscreen, the dimming is programmable through the Uconnect
®system. Refer to “Uconnect®Settings ” in “Understanding
Your Instrument Panel” in the Owner's Manual on the DVD for further details.
Headlight Switch
1 — Rotate Headlight
2 — Push Fog
3 — Rotate Dimmer
OPERATING YOUR VEHICLE
32
Page 60 of 204
• Search for places to eat, shop, relax and play with Yelp, using your voice oron-screen menu. Then navigate to them (navigation standard on Uconnect®
8.4AN, optional on Uconnect®8.4A).
• Get operator assistance using the Assist button on your mirror.
Before you drive, familiarize yourself with the easy-to-use Uconnect
®System.
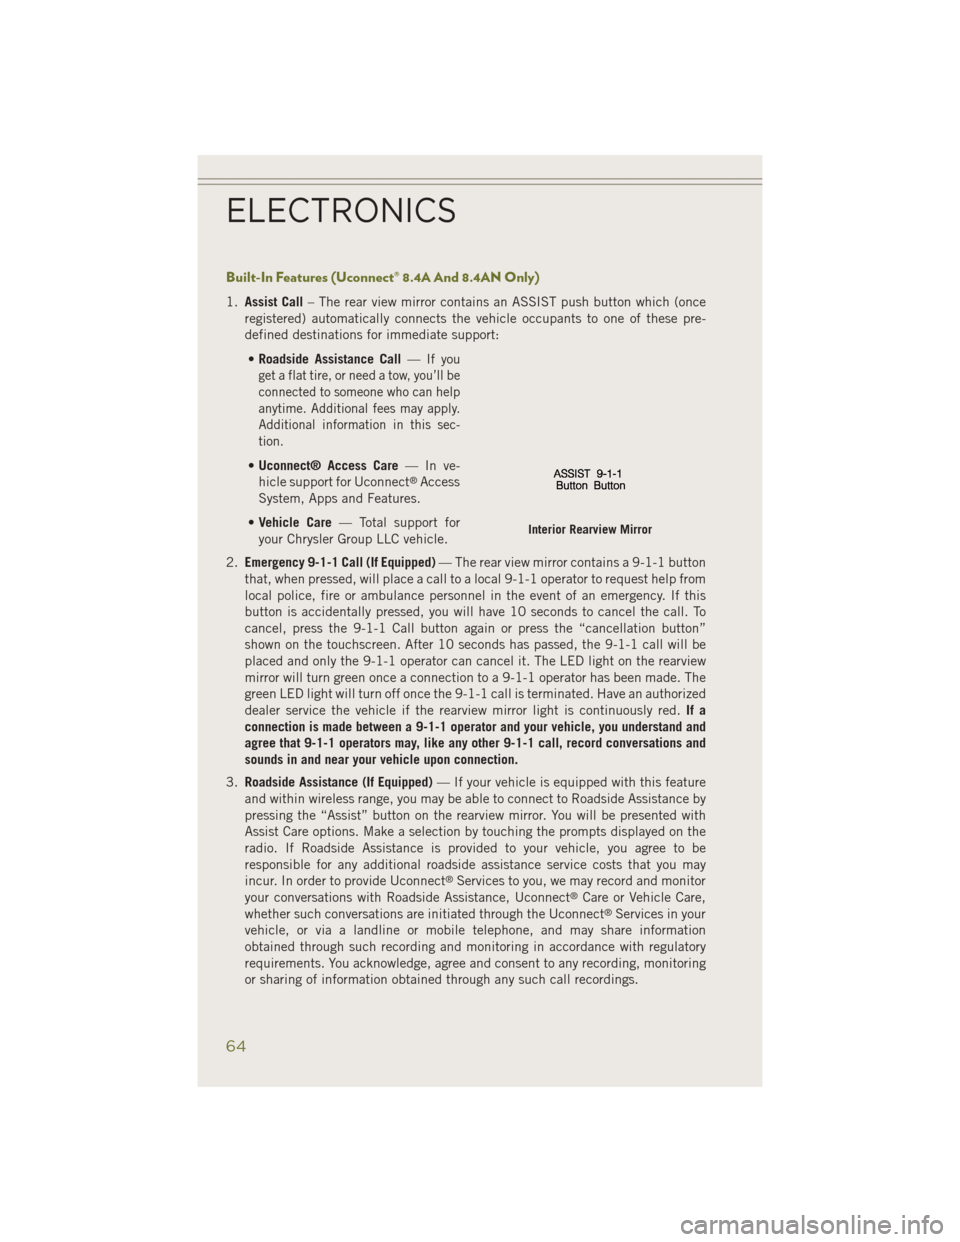
1. The ASSIST and 9-1-1 buttons are located on your rearview mirror. The ASSIST Button is used for contacting Roadside Assistance, Vehicle Care and Uconnect
®
Care. The 9-1-1 Button connects you to emergency services.
NOTE:
Vehicles sold in Canada and Mexico DO NOT have 9-1-1 Call system capabilities. 9-1-1
or other emergency line operators in Canada and Mexico may not answer or respond to
9-1-1 system calls.
2. The Uconnect
®“Apps” button on the menu bar at the bottom right corner of the
radio touchscreen. This is where you can begin your registration process, manage
your Apps and purchase WiFi on demand.
3. The Uconnect
®Voice Command and Uconnect®Phone buttons are located on the
left side of your steering wheel. These buttons let you use your voice to give
commands, make phone calls, send and receive text messages hands-free, enter
navigation destinations, and control your radio and media devices.
Included Trial Period For New Vehicles
Your new vehicle may come with an included trial period for use of the Uconnect
®
Access Services starting at the date of vehicle purchase (date based on vehicle sales
notification from your dealer). To activate the trial, you must first register with
Uconnect® Access. After the trial period, if you wish to continue your Uconnect
®
Access Services you can choose to purchase a subscription.
Features And Packages
• After the trial period, you can subscribe to continue your service by visiting the Uconnect
®Store located within the Mopar Owner Connect website
(moparownerconnect.com). If you need assistance, U.S. residents can call
Uconnect
®Care at 855-792-4241.
• For the latest information on packages and pricing information: U.S. residents visit DriveUconnect.com.
ELECTRONICS
58
Page 62 of 204
Set Up Your Via Mobile Profile — If Equipped
Setting up your Via Mobile profile means entering your login information for each app
so that they can work in your vehicle. Complete your Via Mobile Profile online during
registration of your Uconnect
®Access system. Access this page by logging into your
Mopar Owner Connect account (moparownerconnect.com), going to Edit Profile,
then Via Mobile Profile.
If you already have an account with these apps, click “SetUp” to enter your
information. If you do not have an account, you can create a new one.
Aha™ by HARMAN (www.aharadio.com)
• Enter your email address and password for Aha™, or create a new Aha™ account.
• You can link your Facebook, Twitter or Slacker accounts on the Aha™ website.
iHeartRadio (www.iheart.com)
• Click “Sign Up” if you’re new to iHeartRadio, or “Log In” to enter your iHeartRadio account information.
• Select “Activate” to continue,
• Select “Close” to complete activation.
Pandora® (www.pandora.com)
• Enter your Pandora
®username/email address and password, then click “Save.”
Slacker Radio (www.slacker.com)
• Enter your Slacker username/email address and password, then click “Save.”
Invite family and friends to use the Via Mobile Apps in your vehicle by setting up their
own Via Mobile profile.
Renewing Subscriptions And Purchasing WiFi Hotspot (Uconnect® 8.4AN Only,
U.S. 48 Contiguous States And Alaska)
Subscriptions, and WiFi Hotspot, can be purchased from the Uconnect®Store within
your vehicle, and online at Mopar Owner Connect. If you need help press the ASSIST
button on the rearview mirror, then select Uconnect
®Care (or dial 855-792-4241).
Purchasing Online
You can renew your subscription to a package or purchase WiFi from the Mopar Owner
Connect website. You must first set up a Uconnect
®Access Payment Account online.
Log into moparownerconnect.com, select Edit Profile, then Uconnect®Payment
Account.
1. Log In to the Mopar Owner Connect website (moparownerconnect.com) with your username/email and password.
2. Click on the “Shop” tab, then click on the Uconnect
®Store.
3. From the Uconnect
®Store, select the item you wish to purchase.
ELECTRONICS
60
Page 63 of 204
4. This will launch the selected item into purchase mode along with providingadditional information. The purchase process begins when you press the “Buy”
button on the touchscreen.
5. The Uconnect
®Store will display a “Purchase Overview” message confirming the
financial details of your purchase. Press the “Purchase” key to continue.
6. The Uconnect
®Store will ask you to “Confirm Payment” using your default
payment method on file in your Payment Account. Press the “Complete” key to
continue.
7. The Uconnect
®Payment Account will then ask for your “Payment Account PIN,”
which you established when setting up your Uconnect®payment account. After
entering this four digit PIN, press the “Complete” key to make the purchase.
8. You will receive a confirmation message that your purchase has been submitted. Press the OK button to end the process.
Purchasing WiFi Hotspot While In Your Vehicle
You must set up a Uconnect
®Access Payment Account online (log in to
moparownerconnect.com, go to Edit Profile, then Uconnect®Payment Account,to
set up and manage your Payment Account).
To purchase WiFi while in your vehicle, ensure the vehicle is running and in Park.
Press the Apps button on the touchscreen, then select WiFi within the Tools menu.
Follow the on-screen instructions. When asked for your payment PIN, use the 4-digit
PIN you established when setting up your payment account on Mopar Owner
Connect.
NOTE:
This may be different than the Uconnect
®Security PIN you established for using
features such as Remote Vehicle Start.
After purchasing WiFi, it may take up to 30 minutes (with the vehicle running) before
the WiFi will be active in your vehicle.
Select WiFi again, then note the hotspot name. Select this network when connecting
devices to the hotspot. Also click on View/Edit Passphrase, then note the security
passphrase you will need to connect to the network on each device.
If your devices cannot see the WiFi Hotspot network after 30 minutes, please contact
Uconnect
®Care by pressing the Assist button on the rear view mirror, or by calling
855-792-4241.
ELECTRONICS
61
Page 66 of 204
Built-In Features (Uconnect® 8.4A And 8.4AN Only)
1.Assist Call – The rear view mirror contains an ASSIST push button which (once
registered) automatically connects the vehicle occupants to one of these pre-
defined destinations for immediate support:
• Roadside Assistance Call —
If you
get a flat tire, or need a tow, you’ll be
connected to someone who can help
anytime. Additional fees may apply.
Additional information in this sec-
tion.
• Uconnect® Access Care —Inve-
hicle support for Uconnect®Access
System, Apps and Features.
• Vehicle Care — Total support for
your Chrysler Group LLC vehicle.
2. Emergency 9-1-1 Call (If Equipped) — The rear view mirror contains a 9-1-1 button
that, when pressed, will place a call to a local 9-1-1 operator to request help from
local police, fire or ambulance personnel in the event of an emergency. If this
button is accidentally pressed, you will have 10 seconds to cancel the call. To
cancel, press the 9-1-1 Call button again or press the “cancellation button”
shown on the touchscreen. After 10 seconds has passed, the 9-1-1 call will be
placed and only the 9-1-1 operator can cancel it. The LED light on the rearview
mirror will turn green once a connection to a 9-1-1 operator has been made. The
green LED light will turn off once the 9-1-1 call is terminated. Have an authorized
dealer service the vehicle if the rearview mirror light is continuously red. If a
connection is made between a 9-1-1 operator and your vehicle, you understand and
agree that 9-1-1 operators may, like any other 9-1-1 call, record conversations and
sounds in and near your vehicle upon connection.
3. Roadside Assistance (If Equipped) — If your vehicle is equipped with this feature
and within wireless range, you may be able to connect to Roadside Assistance by
pressing the “Assist” button on the rearview mirror. You will be presented with
Assist Care options. Make a selection by touching the prompts displayed on the
radio. If Roadside Assistance is provided to your vehicle, you agree to be
responsible for any additional roadside assistance service costs that you may
incur. In order to provide Uconnect
®Services to you, we may record and monitor
your conversations with Roadside Assistance, Uconnect®Care or Vehicle Care,
whether such conversations are initiated through the Uconnect®Services in your
vehicle, or via a landline or mobile telephone, and may share information
obtained through such recording and monitoring in accordance with regulatory
requirements. You acknowledge, agree and consent to any recording, monitoring
or sharing of information obtained through any such call recordings.
Interior Rearview Mirror
ELECTRONICS
64
Page 80 of 204
VOICE COMMAND QUICK REFERENCE
Uconnect® 5.0 Voice Command Quick Reference
•If the Uconnect®Voice Commandbutton exists on your steering wheel, you
have the Voice Command feature, which is optimized for the driver. The Voice
Command feature lets you keep your hands on the wheel, and your eyes on the road.
• When you press the Voice Commandbutton located on the steering wheel,
you will hear a beep. After the beep, give your command. If you do not know what
commands to say, you can say “help” and the system will provide options to you.
If you ever wish to interrupt the system while it lists options, press the Voice
Command
button, after the beep, say your command.
NOTE:
All phone oriented voice commands are accessible by first pressing the Phone Pick
Up
button, not the Voice Command button. To end a call, simply press the
Phone Hang Up
button. In some vehicle’s, the Phone Pickupbutton
serves the dual purpose of ending calls as well.
Voice Command (VR) User TIPs
• To hear available commands, press the Uconnect
®Voice Command button and
say “Help.” You will hear available commands for the menu displayed.
• At any time, you can say the words “Cancel” or “Help.” These commands are universal and can be used from virtually any menu. All other specific commands
can be used depending upon the active application.
• You can interrupt the system prompts at any time by pressing the Uconnect
®Voice
Command button while the system is speaking. After the beep, you can say a
command.
• You can chain commands together for faster results. Say “Call Joe Doe mobile”, for example.
• For best performance, adjust the rearview mirror to provide at least ½ in (1 cm) gap between the overhead console (if equipped) and the mirror.
• Always wait for the beep before speaking.
• Speak normally, without pausing, just as you would speak to a person sitting a few feet/meters away from you.
• Make sure that no one other than you is speaking during a Voice Command period.
ELECTRONICS
78
Page 98 of 204
VOICE COMMAND QUICK REFERENCE
Uconnect® 8.4A Voice Command Quick Reference
•If the Uconnect®Voice Commandbutton exists on your steering wheel, you
have the Voice Command feature, which is optimized for the driver. The Voice
Command feature lets you keep your hands on the wheel, and your eyes on the road.
• When you press the Voice Commandbutton located on the steering wheel,
you will hear a beep. After the beep, give your command. If you do not know what
commands to say, you can say “help” and the system will provide options to you.
If you ever wish to interrupt the system while it lists options, press the Voice
Command
button, after the beep, say your command.
NOTE:
All phone oriented voice commands are accessible by first pressing the Phone Pick
Up
button, not the Voice Command button. To end a call, simply press the
Phone Hang Up
button. In some vehicles, the Phone Pickupbutton
serves the dual purpose of ending calls as well.
Voice Command (VR) User TIPs
• To hear available commands, press the Uconnect
®Voice Command button and
say “Help.” You will hear available commands for the menu displayed.
• At any time, you can say the words “Cancel” or “Help”. These commands are universal and can be used from virtually any menu. All other specific commands
can be used depending upon the active application.
• You can interrupt the system prompts at any time by pressing the Uconnect
®Voice
Command button while the system is speaking. After the beep, you can say a
command.
• You can chain commands together for faster results. Say “Call Joe Doe mobile,” for example.
• For best performance, adjust the rearview mirror to provide at least ½ inch (1 cm) gap between the overhead console (if equipped) and the mirror.
• Always wait for the beep before speaking.
• Speak normally, without pausing, just as you would speak to a person sitting a few feet/meters away from you.
• Make sure that no one other than you is speaking during a Voice Command period.
ELECTRONICS
96
Page 118 of 204
VOICE COMMAND QUICK REFERENCE
Uconnect® 8.4AN Voice Command Quick Reference
• If the Uconnect®Voice Commandbutton exists on your steering wheel,
you have the Voice Command feature, which is optimized for the driver. The Voice
Command feature lets you keep your hands on the wheel, and your eyes on the
road.
• When you press the Voice Command
button located on the steering wheel,
you will hear a beep. After the beep, give your command. If you do not know what
commands to say, you can say “help” and the system will provide options to you.
If you ever wish to interrupt the system while it lists options, press the Voice
Command
button, after the beep, say your command.
NOTE:
All phone oriented voice commands are accessible by first pressing the Phone Pick
Up
button, not the Voice Command button. To end a call, simply press the
Phone Hang Up
button. In some vehicles, the Phone Pickupbutton
serves the dual purpose of ending calls as well.
Voice Command (VR) User TIPs
• To hear available commands, press the Uconnect
®Voice Command button and
say “Help”. You will hear available commands for the menu displayed.
• At any time, you can say the words “Cancel” or “Help”. These commands are universal and can be used from virtually any menu. All other specific commands
can be used depending upon the active application.
• You can interrupt the system prompts at any time by pressing the Uconnect
®Voice
Command button while the system is speaking. After the beep, you can say a
command.
• You can chain commands together for faster results. Say “Call Joe Doe mobile”, for example.
• For best performance, adjust the rearview mirror to provide at least ½ inch (1 cm) gap between the overhead console (if equipped) and the mirror.
• Always wait for the beep before speaking.
• Speak normally, without pausing, just as you would speak to a person sitting a few feet/meters away from you.
• Make sure that no one other than you is speaking during a Voice Command period.
ELECTRONICS
116
Page 190 of 204
AUTHENTIC ACCESSORIES BY MOPAR®
• The following highlights just some of the many Authentic Jeep Accessories byMOPAR®featuring a fit, finish, and functionality specifically for your Jeep
Cherokee.
• In choosing Authentic Accessories you gain far more than expressive style, premium protection, or extreme entertainment, you also benefit from enhancing
your vehicle with accessories that have been thoroughly tested and factory-
approved.
• For the full line of Authentic Jeep Accessories by MOPAR
®, visit your local Jeep
dealership or online at mopar.com.
CHROME:
• Mirror Covers • Tubular Side Steps • Body Side Moldings
• Grille • Fuel Door
EXTERIOR:
• Black Tubular Side Steps • Front End Cover • Hood Decal
• Wheels • Splash Guards• Skid Plates
• Wheel Locks • Locking Gas Cap
INTERIOR:
• Premium Floor Mats • Emergency Roadside Kit • Molded Cargo Tray
• Security Cover • Bright Pedal Kit • Ambient Light Kit
• Slush Mats • Door Sill Guards • Katzkin Leather Interiors
• Cargo Area Management
ELECTRONICS:
• MOPAR
®Web (WiFi) • Rear Seat Video • Speaker Upgrades
• Remote Start • Heated Seats• Park Distance Sensors
• Rear View Camera • Electronic Vehicle Tracking System
CARRIERS:
• Hitch-mount Bike Carrier • Sport Utility Bars • Roof-mount Bike Carrier
• Roof Top Cargo Basket • Roof-mount Ski and Snowboard Carrier• Roof Cargo Box Carrier
MOPAR® ACCESSORIES
188